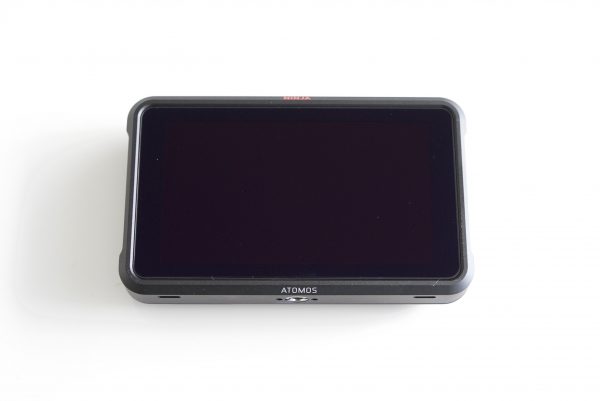
The Atomos Ninja V was announced back in April, just prior to the NAB show. At that time we were unable to see the 5.2″ HDMI monitor/recorders 1000 nit screen and new user interface, as the device was still in the early stages of development. Even though Erik had some hands-on time with a pre-production version of the Ninja V, I thought we should do our due diligence and do a full review of a production model.
So without further ado, let’s get on with it.
WHO IS THE ATOMOS NINJA V AIMED AT?
The Atomos sales pitch is, Eliminate your camera’s internal compression and time limits – record up to 4Kp60 10-bit HDR video direct from your camera’s sensor over HDMI 2.0. Teamed with a 1TB AtomX SSDmini you can now achieve up to 150 minutes of 4K recording on a single drive! And when you’re done, your edit-ready ProRes and DNxHR recordings are stored on affordable SSD drives.
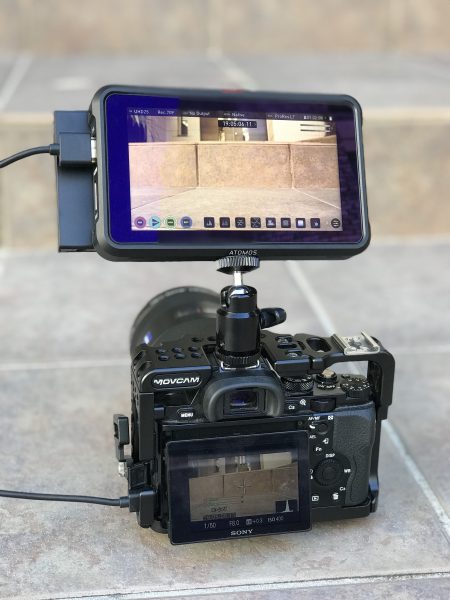
The Ninja V is being squarely aimed at users of cameras such as the Canon EOS R, Nikon Z6/Z7, and Fujifilm X-T3 or owners of any camera that has an HDMI output and limited internal recording capabilities. It could also be used by owners of small digital cinema cameras such as the Canon C100 Mark II and the Sony FS5. Its small size also makes it very suitable as a small monitor to use on a gimbal. Without having an SDI input or the ability to record raw, it is unlikely to be used by a lot of shooters who own other cameras that are capable of internally recording in high bit rate, high color space codecs, unless you are just looking for a monitor.
Speaking of monitors, even if you have no need for using the recording capabilities of the Ninja V, its capabilities as a stand-alone monitor also make it well worth looking at. Not only will you get a good monitor, but you also have the added benefit of getting an external recorder if you end up needing one.
WHAT DO YOU GET?
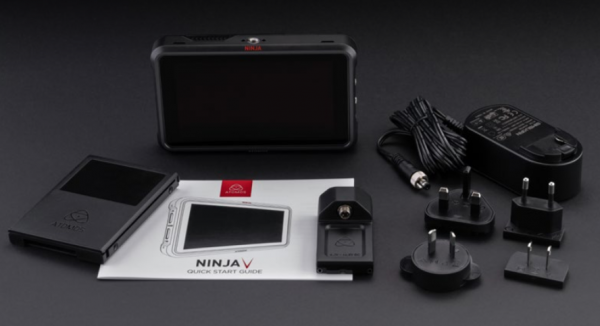
The Ninja V includes base accessories to get you started, such as a mains power supply and a media Master Caddy. Additionally, you will need a 2.5” Solid State Drive (SSD) or AtomX SSDmini, a compatible HDMI cable (Camera out/Ninja in) and compatible batteries. Optional AtomX accessories including combo kits are also available. Not all drives are compatible with the Ninja V. For the most up-to-date information please visit: www.atomos.com/drives
In the box
• Ninja V
• 1 x Master Caddy II + screws
• 12V-3A AC power supply
• DC input module
• Ninja V Quick Start Guide
While you do get the basics I would have liked to have seen Atomos include an HDMI cable and some sort of protective sleeve for the Ninja V.
FINALLY, A MONITOR/RECORDER THAT MAKES SENSE TO USE WITH SMALL CAMERAS
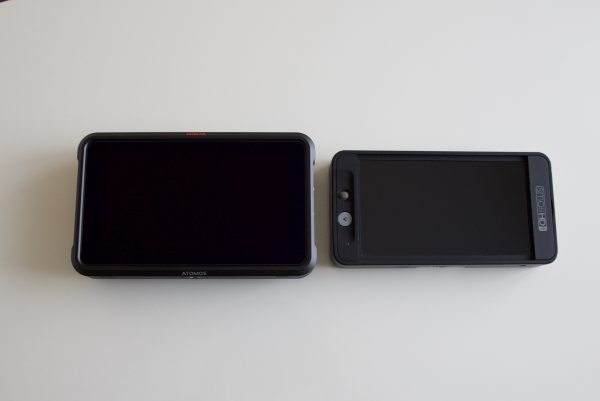
I’m glad Atomos finally returned to making a more compact, monitor/recorder. The larger Ninja Inferno and Shogun Inferno are nice devices, but they are just too big and heavy for use with small mirrorless and DSLR style cameras. Even using one on something as small as a Sony FS5 is walking a fine line.
The Ninja V is a good size and match for the new breed of mirrorless cameras that are on the market. While many shooters are still hoping for a smaller 4K recorder version of the Ninja Star, the Ninja V is certainly a step in the right direction.
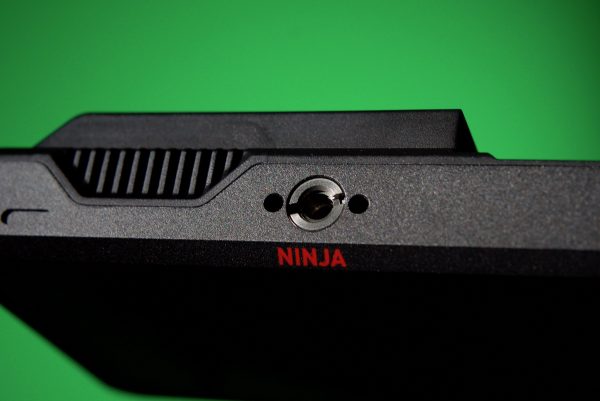
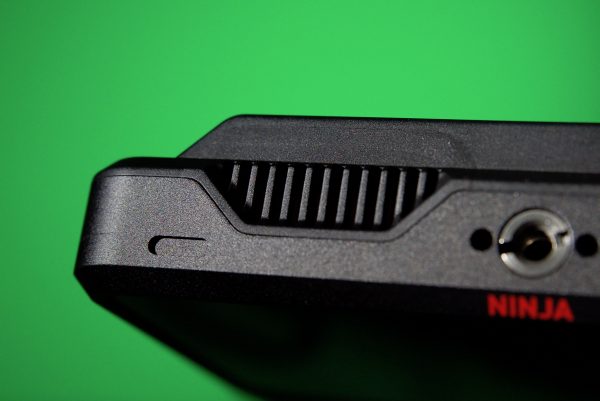
ATOMOS NINJA V BUILD QUALITY
Look I’m not going to lie, I’ve had a problem with the build quality of some Atomos devices in the past, and I have certainly been vocal about this. I’ve always felt that the build quality of a lot of their products has been more centered around catering to the prosumer market than the pro market. Atomos devices have never felt as robust to me as other options on the market. In saying all of this, I think Atomos may have turned the corner with the Ninja V.
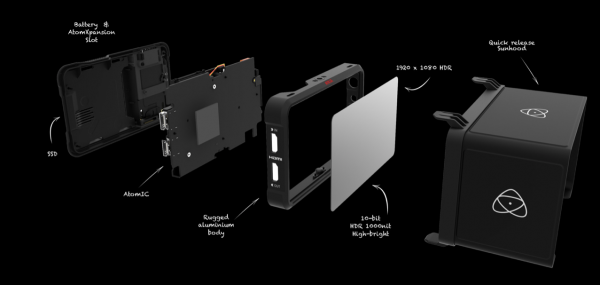
In my opinion, it is the most solidly made product they have ever produced. It doesn’t feel as plasticky as other Atomos products and this is probably because it is being made out of a combination of aluminum and polycarbonate. Previous Atomos products such as the Ninja Inferno and Shogun Inferno were only made out of polycarbonate.
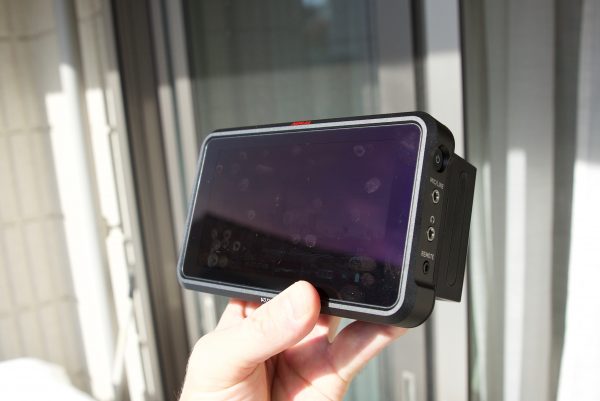
Despite its relatively small size and weight (12.7 oz / 360 g), the Ninja V stills feel solid to the touch. The attention to detail is where I feel Atomos have really improved. The battery release switch feels a lot more solid, the batteries clip in smoothly, and even small things like the power on/off button feel more robust.
I think the overall build quality is a lot better than that of the much more expensive Shogun Inferno. If you register your Ninja V within twelve months of purchasing it you can get an upgraded 3-year warranty.
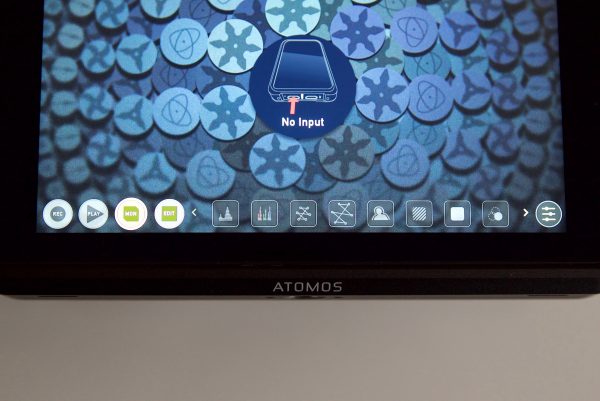
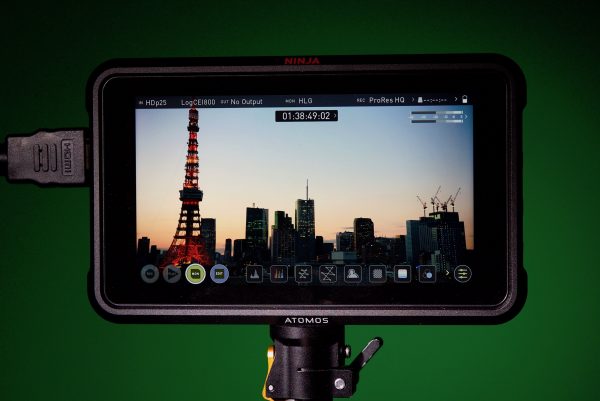
NINJA V IMPROVED INTERFACE
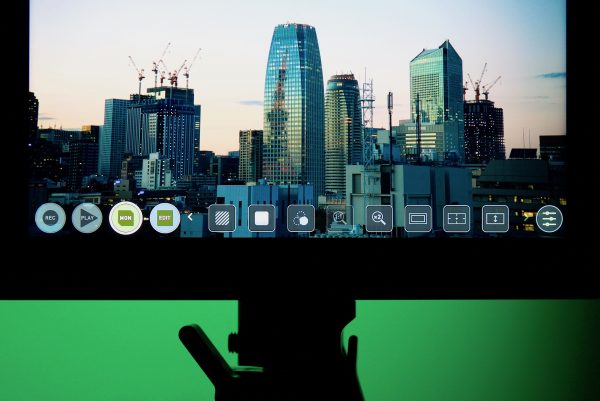
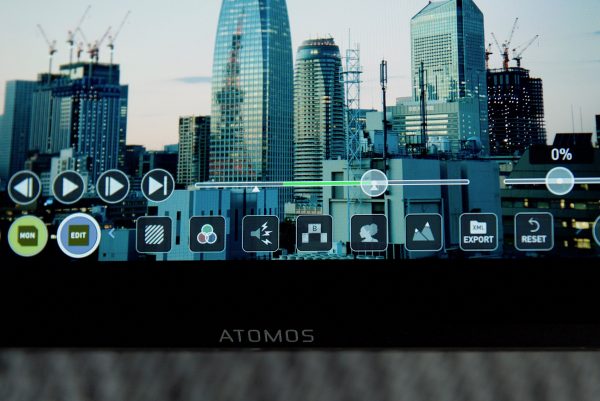
The new AtomOS on the Ninja V is easy to use and although Atomos says that it doesn’t take up a lot of real estate on the screen, it still does. Putting up information on any small sized screen is always tricky because you have limited real estate to work with. The trouble with recorder/monitors is that you need to have so many more menus and information on the screen than what a stand-alone monitor requires. Just how to lay out that information clearly and concisely is a bit of a juggling act. Maybe a layout where all the information is on the outside of the actual image would have made more sense, but on a small 5.2″ display that would be difficult.
AtomOS
In my opinion, the new OS is slightly easier to navigate and make changes than with previous AtomOS iterations. I never quite got comfortable with the AtomOS on devices such as the Shogun Inferno. I always found it clunky to use and operate and you always had to go searching for tools that should be easy to access. I’m still a stickler for physical buttons for key monitor features. I like being able to press a dedicated button that I know will do the one thing I want, quickly and efficiently. While there is nothing wrong with touchscreen technology, I prefer physical buttons so I can use them in any conditions, even when I am wearing gloves. I did also find that on occasion I would be touching the screen and nothing would be happening. Sometimes I had to touch the screen multiple times or try using different fingers for it to work.
The old AtomOS system was starting to feel a little bit long in the tooth and I’m glad Atomos decided to make the change. The new AtomOS uses minimal menu trees to navigate to the monitoring tools. Having the ability to simply scroll through all the options on the bottom of the screen is a lot more convenient than the way you used to make changes. In saying that, the menu system isn’t a dramatic departure away from what they were doing, it’s just a more convenient implementation.
The bootup time is also impressive on the Ninja V. From the time you press the power button to the time the screen comes up is less than 3 seconds.
Above you can watch a video where Atomos CEO Jeromy Young explains all about the new AtomOS as well as describes how to best use the Ninja V for an HDR workflow.
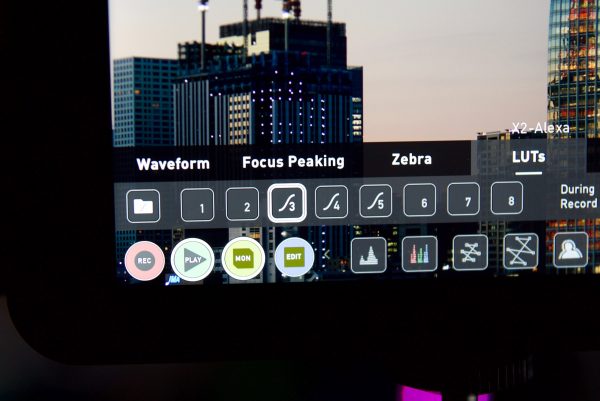
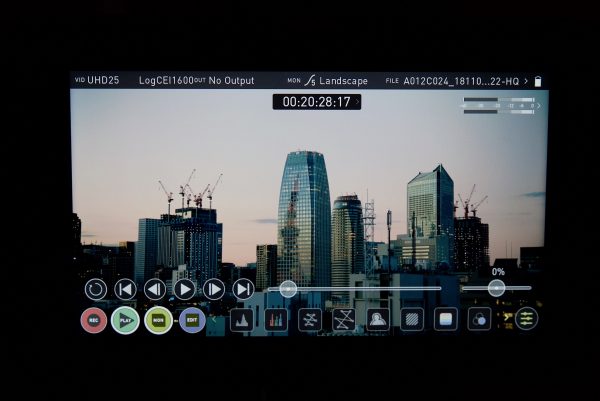
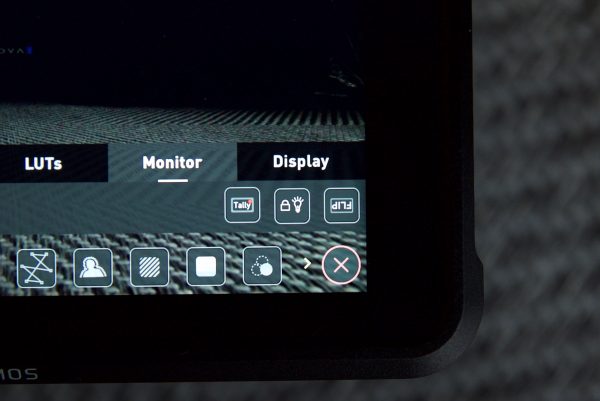
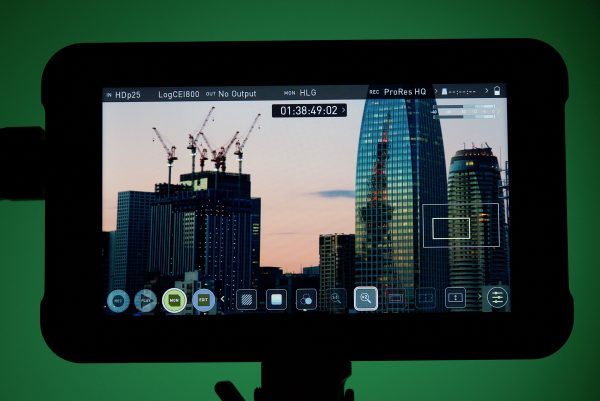
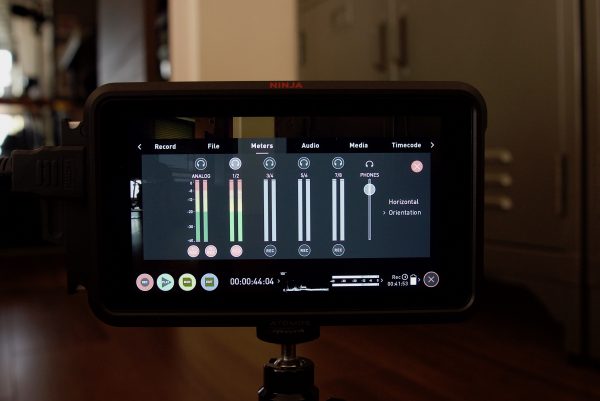
To access all the monitoring tool options you simply tap on the yellow (it’s actually probably closer to mustard) MON icon and this lets you scroll side to side revealing every tool available. To change how a tool works you tap on the sprocket icon on the far right. You can also simply double tap an icon to change its physical size and position. The popular ATOM HDR feature as well as viewing LUTS for log gammas are also available with the Ninja V.

All the usual monitoring tools are present on the Ninja V, such as false color, waveform, vectorscope, focus peaking, 2:1 zoom etc. Atomos has reduced the saturation of all the icons on the screen so they don’t detract from the image you want to look at. In a way, this is a good thing, but on the other hand, if you are a long time Atomos user you may find that you have to go searching a little harder to find the monitoring tools you need.
Above you can see the differences between how the old and the new Atom OS look. The new OS definitely has a more professional feel and appearance to it.
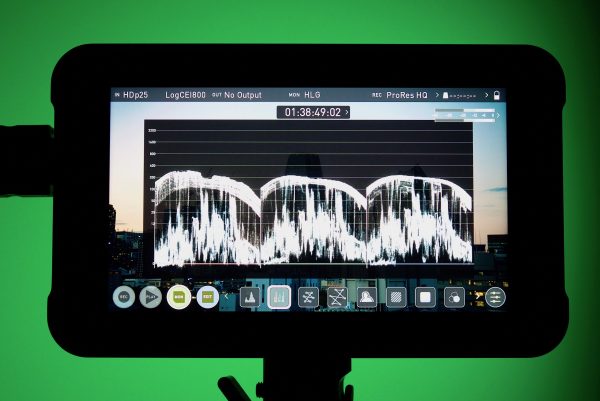
The luminance parade and waveforms have finally been turned white instead of the overwhelming blue color they use to be.
There is also a nice new feature which Atomos likes to call the “shooting page“. By deselecting the monitor icon on the screen you can remove all the monitoring icon tools and just be left with your timecode, audio meters, and waveform.
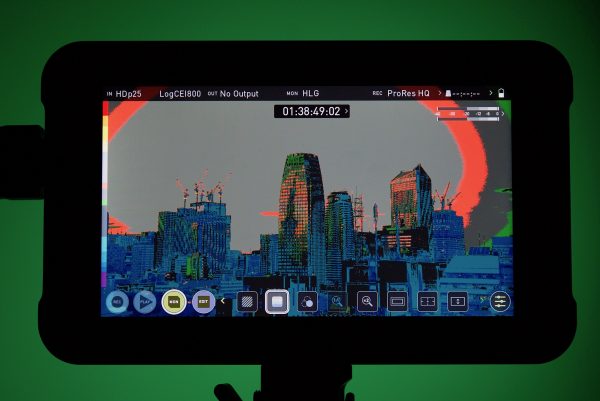
I still can’t quite understand why the false color guide isn’t labeled in any way. I know the values change depending on what camera is being used, but I’d still like to see some rough numbers that correlate to the colors. For new shooters, the way false color is displayed on the Ninja V may be confusing.
Another small bug I found was that if you set the Ninja V up to view HDR and you then turn the unit off and then back again, the Ninja V reverts back to all the standard settings. This was a major pain, as I had to go back into the menus and change everything again. When I asked Atomos about this I was told: “The Ninja V will save settings if ‘HDMI HDR AUTO’ is turned off.”
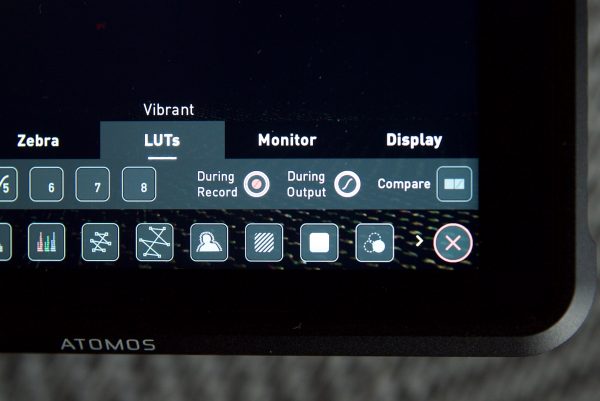
ATOMOS NINJA V LUTS
Just like on previous Atomos products you can load up to 8 LUTs into the Ninja V. To get the LUTs into the Ninja V you need to first save them onto the SSD that you are going to use with the Ninja V.

Once you have saved them you then have to load them up into the Ninja V from the LUT page in the menus.

What I like is the name of the LUT is clearly displayed at the top of the screen so you know exactly which one is being used.
With the previous AtomOS found on the Ninja and Shogun Inferno, the way LUTs were shown wasn’t nearly as intuitive. There was also no way of clearly seeing what LUT was being used unless you went into a menu. Being able to load up your own LUTs on the Ninja V is great, but I would have liked to have seen a range of basic LUTs for various cameras pre-installed in the Ninja V.
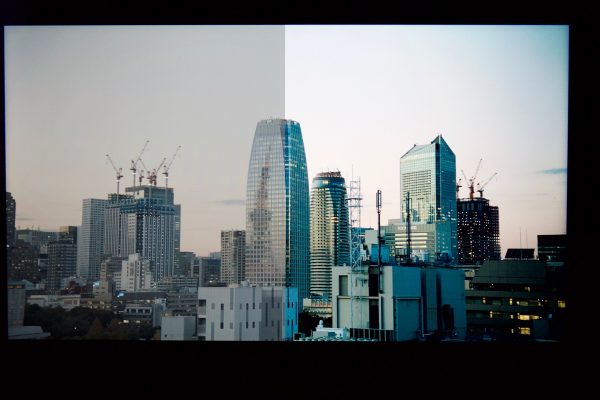
There is also a nice split screen option where on one half of the screen you can display the original Log image and on the other the image with the LUT you have selected.
Baking in a LUT
This is something I didn’t even know existed until I read the manual. Atomos now gives you the option to bake in a LUT when you are recording. If you select this option, the recording will bake the LUT look in, but what you need to know, is if you do this, it is a non-reversible process. It cannot be undone in post, so I would strongly advise that you think very carefully before using this option.
To my knowledge, this is the first time a monitor/recorder has offered the ability to bake in a LUT into a recording.

If you enable this option, a CUSTOM LOOK icon will flash in the top corner of the monitor and the LUT cannot be activated during recording to avoid any potential issues with the recorded content.
HDR ON THE NINJA V
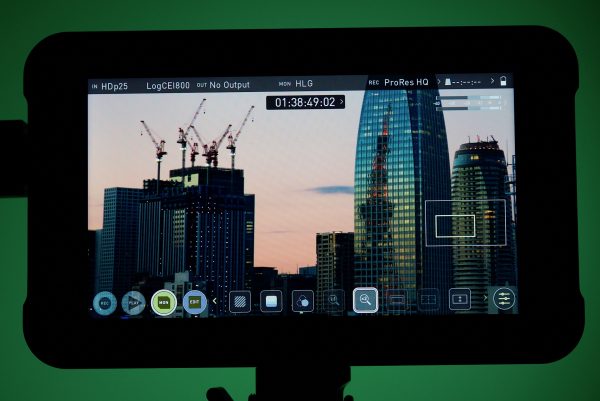
Speaking of HDR, Atomos has changed the way HDR is being displayed with the new AtomOS. Previously it was all a little bit confusing and having HDR sliders where people could make their own adjustments just made it even more confusing. Thankfully Atomos has done away with all of that. If you aren’t familiar with the concept and how HDR works I suggest you read this article that I previously posted on Newsshooter. What you do need to remember is that for the HDR content you’re producing to meet the UHD Premium standard that defines HDR consumer endpoint displays you need to be shooting a minimum of UHD 3840×2160, in a minimum of a 10-bit codec. Capturing the content in 12-bit 4:4:4 RAW provides the ultimate flexibility but for most productions as long as the signal out of the camera is a true 10-bit 4:2:2 being recorded in Apple ProRes or Avid DNx it will provide enough color information and detail to extrapolate the correct information from the log recording.
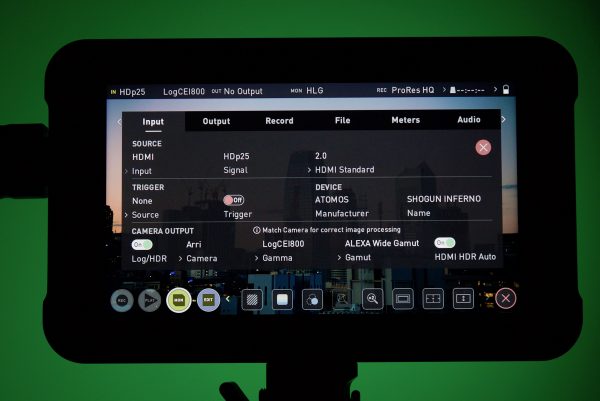
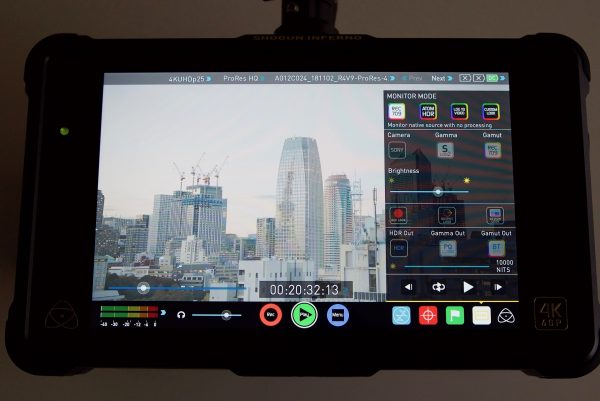
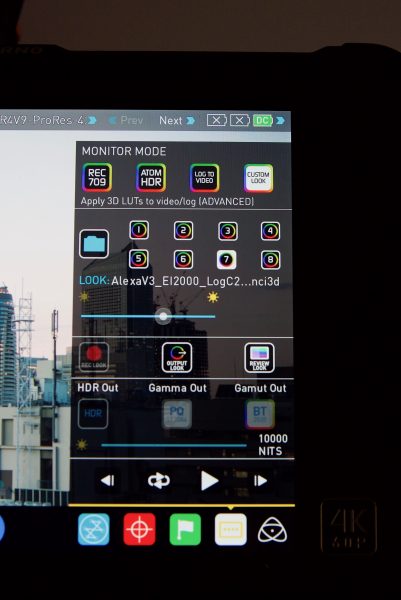
With the new AtomOS, you tell the Ninja V what camera you are using, what Log you are outputting, and what gamut you are using. This allows the Ninja V to know exactly what it should be displaying. Now by doing this alone, the image on your screen isn’t going to magically start showing HDR. All it is doing is setting up the input parameters correctly.
To actually display an HDR image you need to press on another new item called “Native“. This brings up another menu that allows you to change your image.
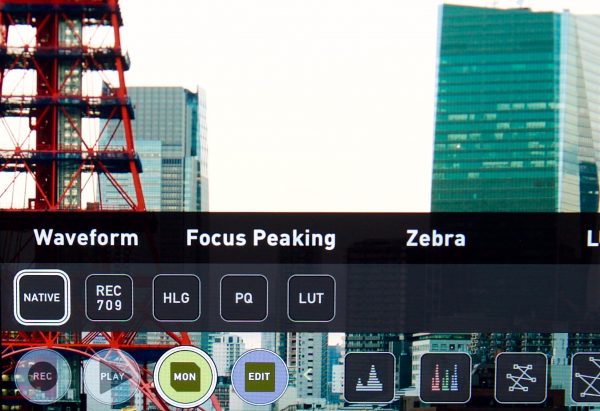
If it is set on Native, then you will be looking at your Log image, if you select REC709, then you see a REC709 adjusted image. If you choose HLG or PG you will get an HDR image. And finally, if you select LUT, you apply a LUT to your Log image.
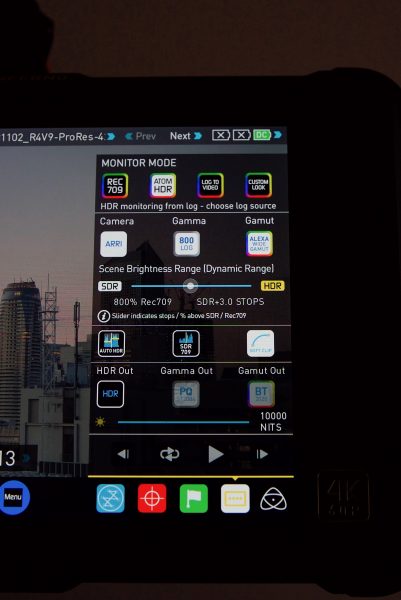
Above you can see the menu options for how HDR was done on the Shogun Inferno and Ninja Inferno. While the new system doesn’t have a slider or as many parameters that you can change I actually prefer how Atomos is now doing it. Back when the Atomos first introduced HDR into their products there really wasn’t any standards and a lot of what they were doing was based on what they thought was right. Now that there are fixed standards for PQ and HLG HDR, in my opinion, it is better to stick to those standards as it takes out all the guesswork.
Now just a word of warning. You don’t necessarily want to be monitoring in HDR or overexposing your image so it looks good on an HDR monitor. If you aren’t delivering in HDR and let’s face it, not a lot of people are, you are just going to make more work for yourself and potentially stuff up material that is intended to fit in a REc709 space. If you start lifting up your exposure because you think its cool to monitor in HDR and then you hand your material off to a client who is going to edit and grade it for a REC709 delivery you won’t be getting any calls back for future work. I’m still very much a firm believer in exposing to get the correct results in camera.
While HDR is great and I hope it gets more widely accepted and implemented, it’s still in its infancy.
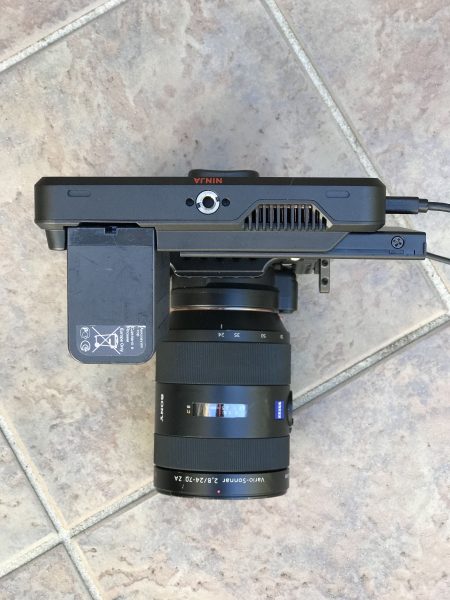
ATOMOS NINJA V INPUTS AND OUTPUTS
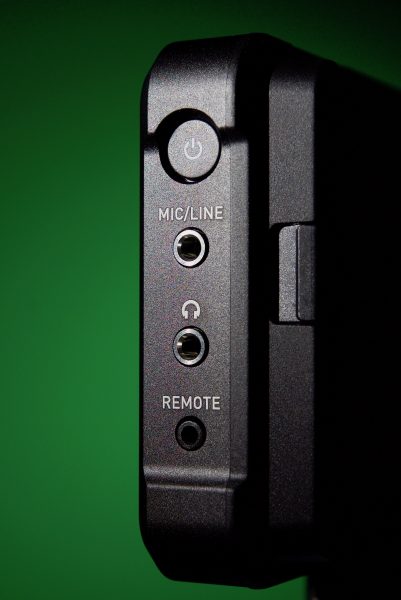
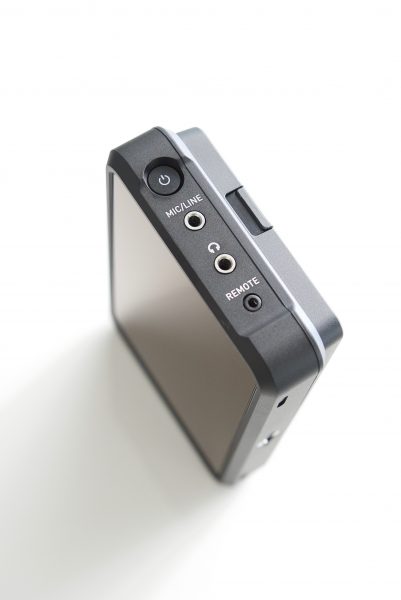
On one side, you have a power button, Mic/Line audio input, a 3.5mm headphone jack, and remote jack. The calibration 2.5mm jack allows for the connection of the X-Rite i1Display Pro calibration device. The calibration unit utilizes the optional USB to serial adaptor cable. For optimal calibration, it is recommended that your Ninja V is powered up for 30 minutes prior to calibration. The latest version of the Atomos Calibration software is available at www.atomos.com/support. For remote operations via this port AtomOS supports both LANC in Sony and Canon format. The Ninja V uses LANC Slave and so a LANC controller must first be attached to a camera and the output taken out via a Y cable to the Ninja V.
On the other side, there is a HDMI In and an HDMI Out. This is the standard Atomos layout that really hasn’t changed much over the years. It’s nice to have a HDMI out. This allows you to connect to an external monitor or other devices with an HDMI input. It carries a loop-through of the incoming HDMI signal in record and standby mode and the playback signal when the Ninja V is in playback mode. This output is 2.0a and can carry either a 4K or HD signal (with the option to down-convert the 4K input to HD). The video out also has the option for a downscale to be applied allowing your 4K input to be converted to a 1080 HD output for use with existing HD equipment.
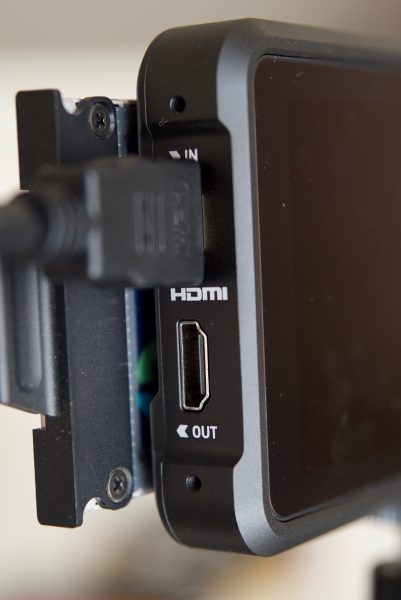
I’m still not a big fan of having HDMI inputs on the side of recorder/monitors. They just end up getting in the way and you are more likely to knock them on something. I would much prefer to have seen HDMI inputs and outputs on the rear of the unit. I do however realize, that would have been impossible with the Ninja V as that real estate is taken up by the SSD space and battery.
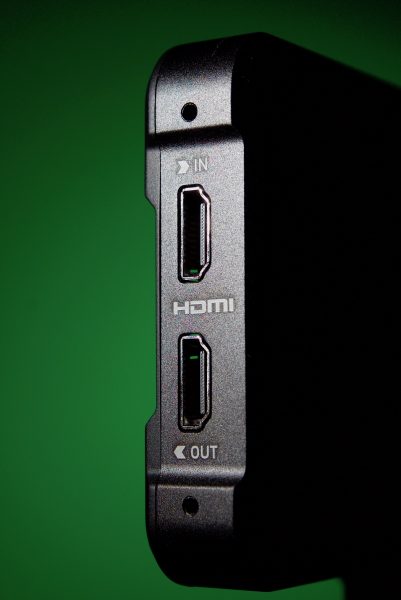
It would have also been nice to have seen Atomos incorporate some sort of built-in locking connector for the HDMI ports. HDMI connectors are always the weakest link in the chain and easily come out and are very prone to breaking. Speaking of HDMI cables you need to use the correct one if you want to record 4K 60p. Not all HDMI cables are created equal and there are a variety of different qualities available. Please make sure you test your cables prior to shooting. This is particularly important when recording 4Kp50/60. Many cables will claim to be high speed but will lack the required shielding on both cable and connector to maintain a high-quality signal. If the signal contains errors that will affect your recording on the Ninja V.
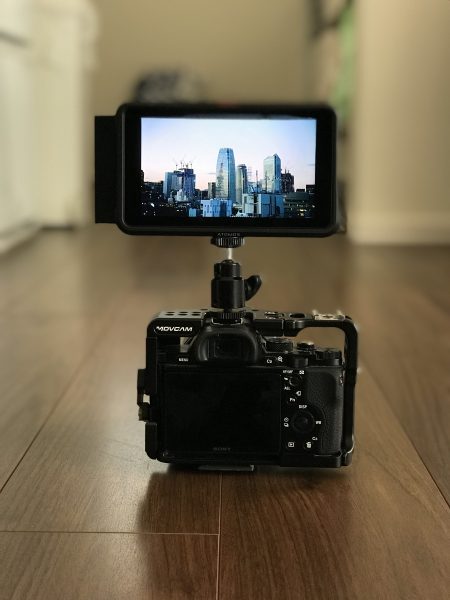
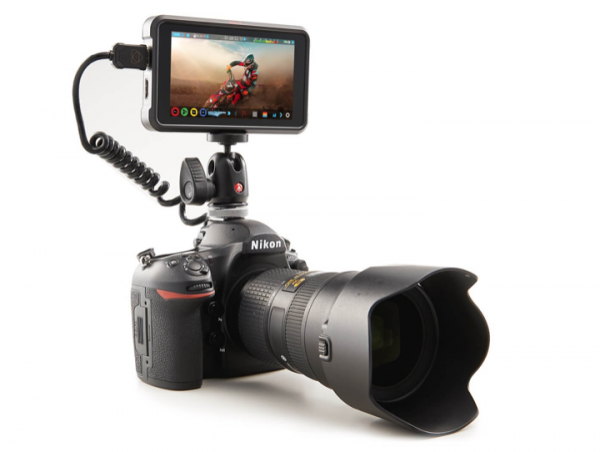
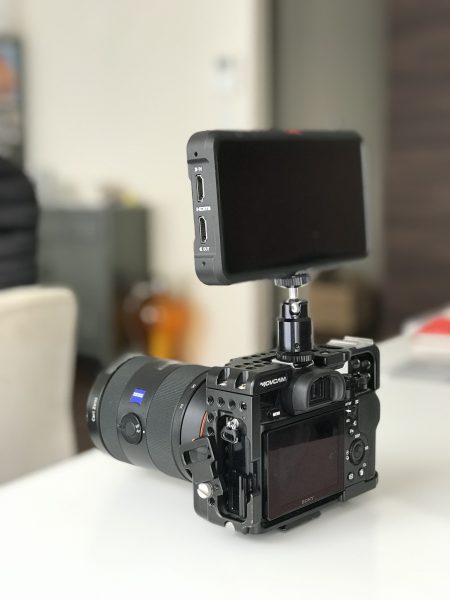
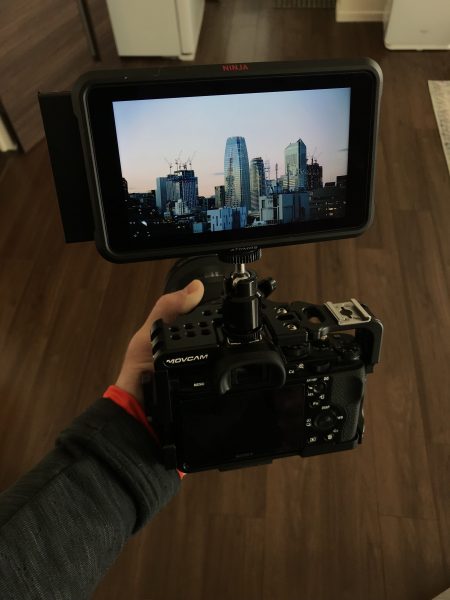
NINJA V MOUNTING OPTIONS
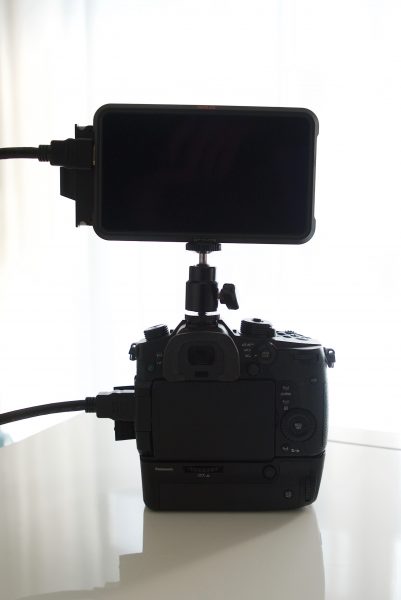
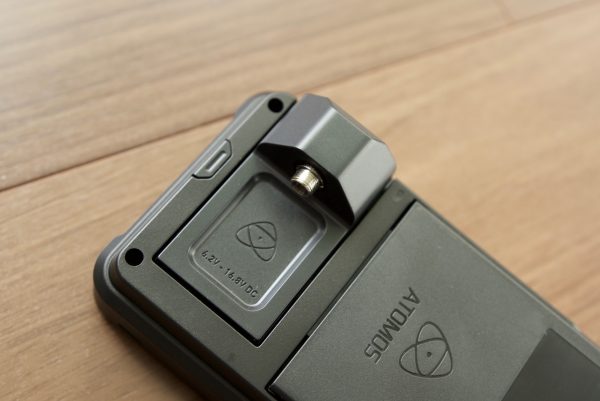
Sometimes it’s the small stuff that makes a product enjoyable to use and it’s attention to detail that often makes one product stand out from another. Atomos have incorporated the use of the ARRI 2-pin 3/8″ accessory mount. You have two options for mounting points, one on top and one on the bottom.
The ARRI accessory mount is a simple but effective design that has a pin on each side of the 3/8″ screw that prevents devices mounted on it from twisting. A common problem with most 1/4-20″ mounts is that your monitor arm or whatever else you have attached will start loosening or spinning around. This is something that won’t happen when you use the Ninja V, as long as you attach a compatible monitor arm or accessory that uses an ARRI 2-pin 3/8″. There are quite a lot of companies now incorporating this type of mount into their products such as Shape, SmallRig, Wooden Camera, and Bright Tangerine.
The Ninja V also has a 1/4″-20 reducer in the 3/8″ thread which gives you further versatility when it comes to mounting.
ATOMOS NINJA V SCREEN
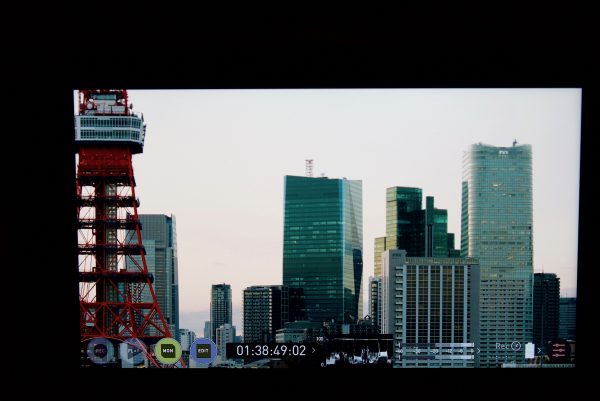
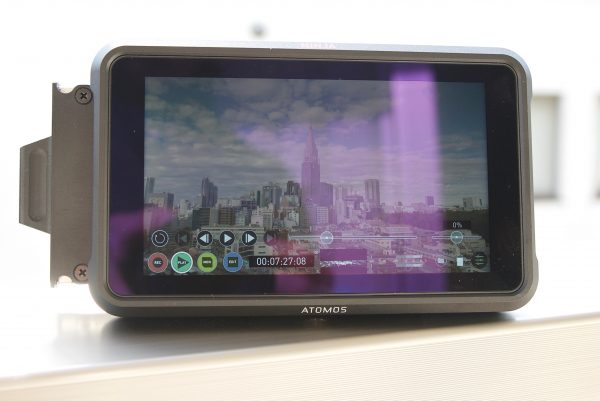
In short, the screen of Ninja V is pretty impressive. The images are very sharp and detailed and it makes getting critical focus a lot easier. I think this is by far the best screen that Atomos have ever made (geez, I sound like Tim Cook at an Apple launch).
While Atomos states in the specifications that the monitor is 10-bit, the screen display on the Ninja V is not a “true” 10-bit display. It is actually 8+2 FRC. 8+2 FRC (Temporal Dithering) is a way of turning the 16.7 million colors from an 8-bit panel into the 1.07 billion colors that a true native 10-bit panel can display. 8+2 FRC uses various algorithms that flash 2 color tones very rapidly, thus giving the perceived impression of a third color that really isn’t there. This may sound like some sort of sneaky parlour trick, but almost all of the major panel manufacturers are now doing this. Atomos, SmallHD, Flanders, and even your 5K iMac display are all 8+2 FRC displays. 8+2 FRC panels are considerably cheaper to manufacturer than a true native 10-bit display.
The good news here is in reality, 8+2 FRC panels are almost impossible to distinguish from true 10-bit native panels. The only small difference is when it comes to viewing material that was shot in low light conditions at higher ISO values. On an 8+2 FRC display, the image will appear to show more noise than what an actual native 10-bit display will.
The IPS 1920x 1080 screen on the Ninja V is very nice. The screen has a maximum brightness of 1000 cd/m2 and a ppi (pixels per square inch) of 427. As a comparison, the Shogun Inferno and Ninja Inferno have a maximum brightness of 1500 cd/m2 and a ppi of 325.
The higher ppi of the Ninja V and the smaller 5″ screen make the images a lot sharper and more detailed when compared to the Shogun Inferno or Ninja Inferno. The Ninja V’s 427 ppi is very impressive, as another comparison, the latest iPhone X has a ppi of 458.
Colors look fairly accurate out of the box, and I did find the images looked a lot closer to what they should than when I use my smallHD 502.
Display options
Atomos has built-in quite a few display function options on the Ninja V. There is finally a Display off function allows for the screen to be turned off without affecting the operation of the unit. I tried this function out but I couldn’t get the screen to turn off. There is also a Screen Lock function and will become active by tapping the power on/off button on the side of the unit. The Tally light on the rear of the unit will still display red for record and the idle (green) status will be displayed on the front screen LED. Finally, there is a Flip screen option allows you to invert the screen if you need to.
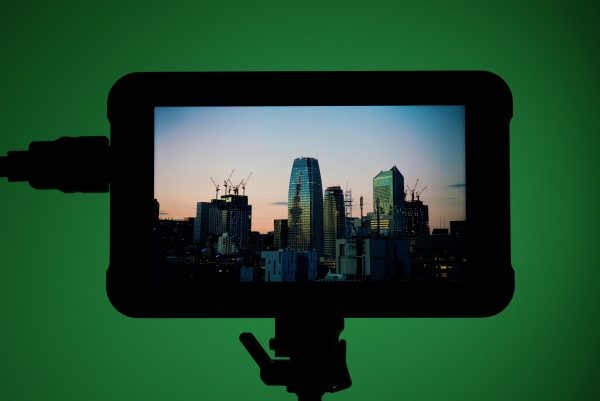
Is the Ninja V daylight viewable?
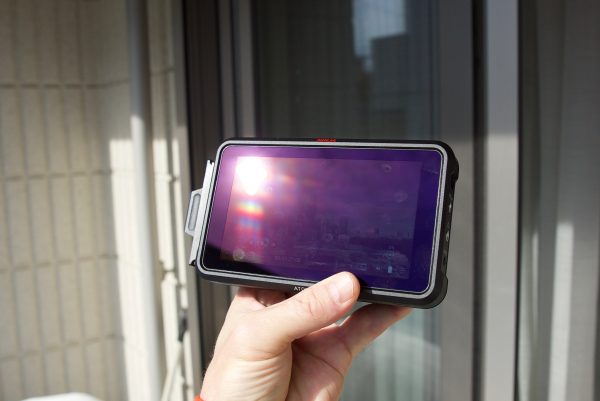
When I was using the Ninja V indoors I found that I could have the backlight set at 100% and it wasn’t too bright. For outdoors use the Ninja V is very viewable in a lot of conditions, although if you have full sun hitting directly on the back of the screen it will be hard to see.
There is a massive difference with using a device like the Atomos Ninja V for monitoring instead of your cameras built-in LCD screen. The majority of LCD screens on cameras are not very bright and almost impossible to view in sunny conditions outdoors.
I wanted to see how the Ninja V compared to the Shogun Inferno for outdoor viewing. The Shogun Inferno is 50% brighter, having 1500 nits as opposed to the Ninja V’s 1000 nits. I was surprised with just how well the Ninja V held up. While the Shogun Inferno was brighter, its screen seemed to be more reflective than that of the Ninja V.
Pixel to pixel
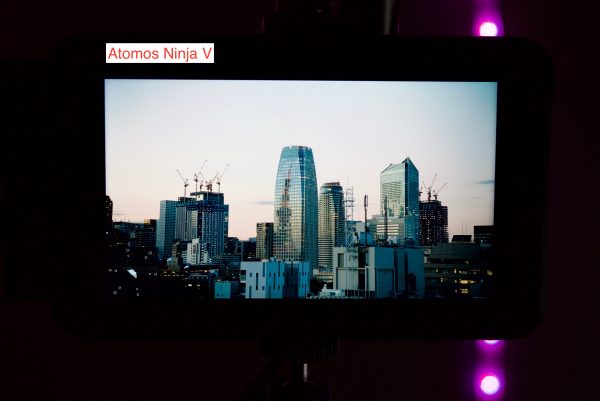
When using the 2X zoom feature the pixels don’t look soft and this makes focusing really easy. Those 427 ppi really come into their own when getting critical focus, especially when shooting in UHD resolutions. I noticed a huge difference in just how much sharper the images looked when zoomed in 2:1 on the Ninja V when compared to the Shogun Inferno.
Fingerprints
The only negative aspect about the screen and this goes to any touchscreen display, is that you end up getting a lot of fingerprint marks.
How does the Ninja V’s screen compare to the smallHD 502?
I wanted to compare the screen quality and color accuracy of the Ninja V against the only 5″ monitor that I own, the smallHD 502. The smallHD 502 has a full 1920×1080 display with a ppi of 441, but it only has 400 nits of brightness. Apart from the increased brightness of the Ninja V, both these monitors have very similar screen specifications.

What surprised me was that despite both screens having a 1920×1080 resolution and a similar ppi, the Ninja V screen looked a lot crisper, sharper, and color accurate than the smallHD 502. In my opinion, the smallHD display tends to have a slight green cast. Above you can see the exact same image being inputted into both devices.
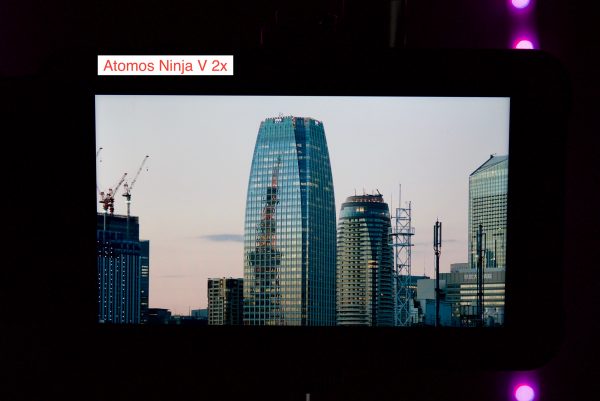
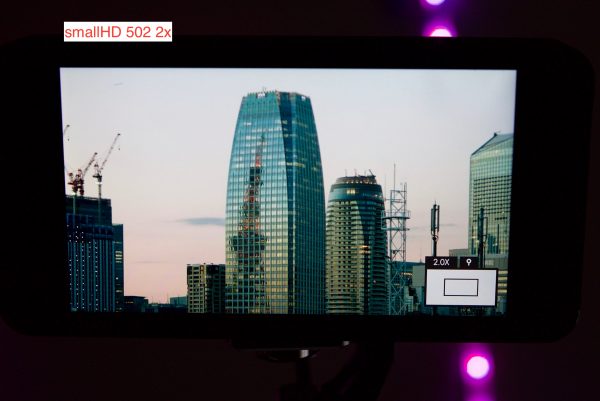
Given that the smallHD has a slightly higher ppi (441) than that of the Ninja V (427) you would think that the smallHD would look cleaner and sharper especially when doing a focus magnification. Again, I was surprised that the Ninja V outperformed the smallHD. The image was far sharper when doing a focus magnification. Above you can see the results from a 2x magnification. Below you can see the results from a 4x magnification.
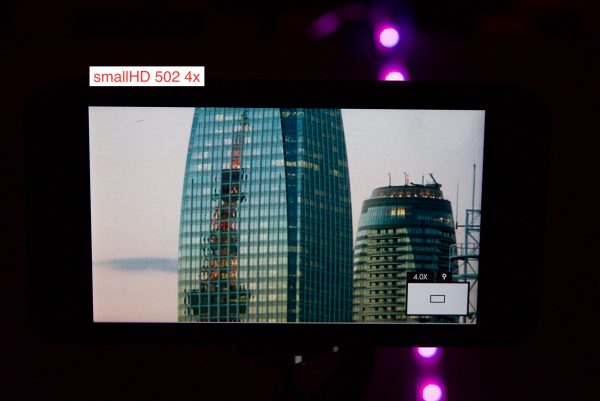
This is why specifications don’t always tell the story. Despite having a slightly smaller ppi than the smallHD the Ninja V outperformed the smallHD.
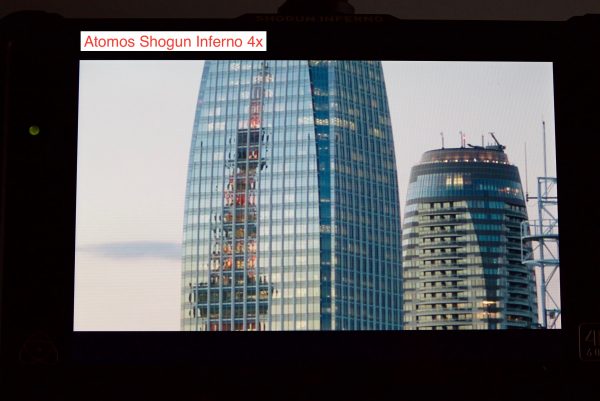
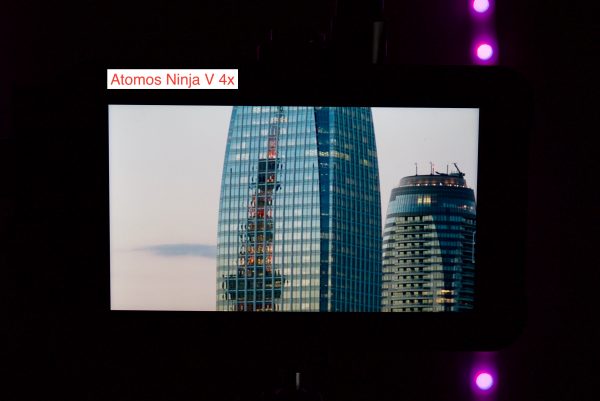
So now that we have seen the differences between the Ninja V and smallHD 502, how does the Ninja V compare against another Atomos product, the Shogun Inferno? The Shogun Inferno has a 1920×1080 resolution 1500 nit display, but it only has a ppi of 325. Above you can the difference at 4x magnification between the Ninja V and the Shogun Inferno. The Ninja V definitely benefits from having more ppi and a smaller screen size.
NINJA V FAN NOISE
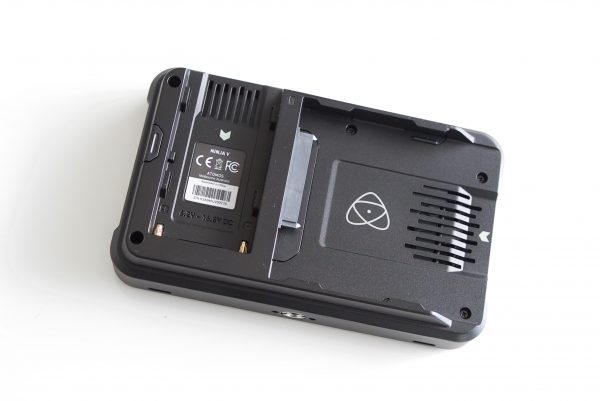
The Ninja V has a fan and two vents on the back of the unit. The main exhaust is located on top of the monitor where you can feel the heat escaping. On the back of the Ninja V there is one vent where the SSD goes, and another at the top of the battery slot area.
When the Ninja V is powered up the fan runs high for around 10 seconds and then winds down. You can definitely hear the fan from several feet away in a quiet room regardless of whether you are using it as a monitor or a recorder. This could be an issue depending on the microphones used and the ambient sound on location. For me personally, I find the fan noise to be too loud in some shooting scenarios. It affects any onboard camera mounted or internal microphone and I can still clearly hear it when recording an interview in a normal room. I actually tested the Ninja V fan noise directly against the Shogun Inferno and I found that the fan noise from the Ninja V wasn’t as loud, but it is still far from being quiet. The Shogun Inferno borders on being unusable in interview situations in quiet rooms.
The frequency of the fan noise is different between the NinjaV and the Shogun Inferno. I found that the Ninja V seems to have a higher pitched fan noise that makes it a little more noticeable than the Shogun Inferno.
To me, the fan noise is the Ninja V’s biggest Achilles heel. Whether this is a design fault or a trade-off in giving shooters a bright HDR display and internal UHD recording who knows. All I know is that if you care about sound then you really do need to think twice before purchasing a Ninja V, or at least be aware that it could be a potential problem for you in some situations.
It’s important to note that the Ninja V does get a lot hotter than say the Shogun Inferno. In saying that, it doesn’t get so hot that you can’t touch it.
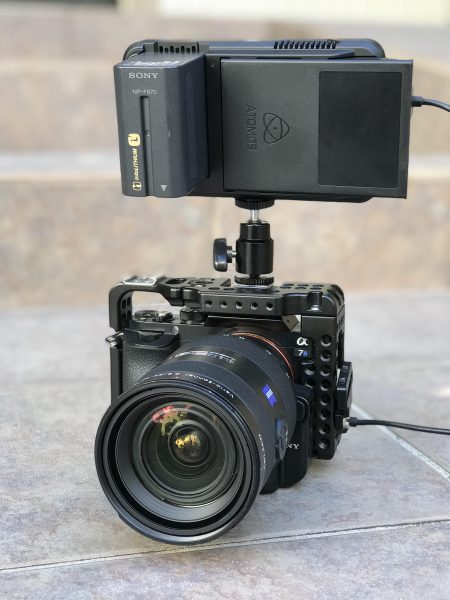
ATOMOS NINJA V POWER
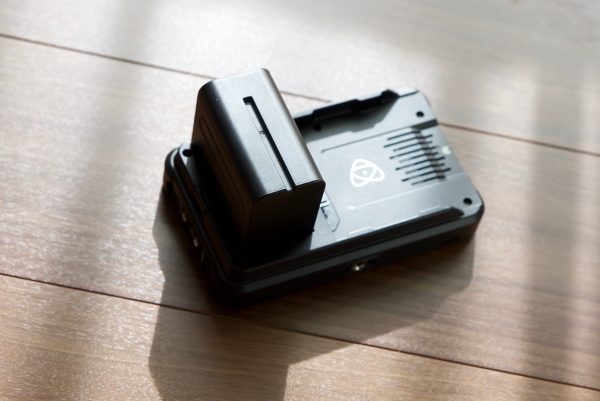
Atomos devices have always been pretty power hungry devices, especially the ones with bright displays, so how does the Ninja V fair? The Ninja V has a 10 W (Typical) and 20 W (Maximum) power draw. For power, the Ninja V uses a single Sony NP type battery that locks into place and is released with a button. Atomos claims that a 5200mAh 4 cell battery will give the Ninja V 2 hours of continuous 4K 60p monitor & recording. If you use a 7800mAh 6 cell battery that increases the time to 3 hours.
I tested the Ninja V with a common Sony NP-F970 47Wh battery and I could get constant record time of around 2 hours with the monitor’s brightness level set at 50%. What you do have to keep in mind is that if you use the monitor with it set at 100% brightness, your battery runtime is going to be significantly reduced. At 100% brightness, I was only getting around 1.5 hours with the same battery. In saying this, the Sony NP-F970 47Wh batteries that I own are quite old, so you would probably get longer run times with newer batteries.
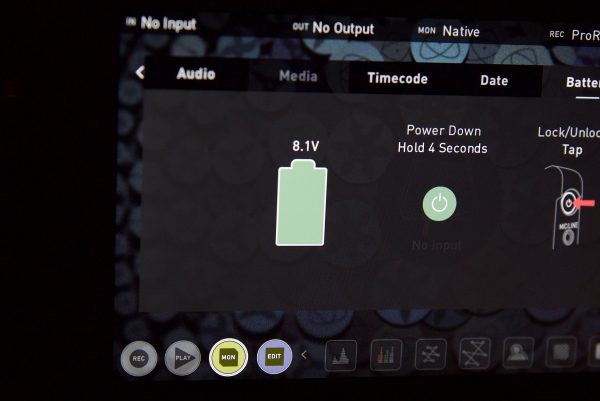
I don’t like that the battery icon only gets displayed as a voltage. I wish it was displayed in either a percentage or time remaining.
If you do want to run the Ninja V off mains power, Atomos includes an AC adapter that has a built-in dummy battery. The connection is nice and solid and it allows you to run the Ninja V continually without fear of losing power. This is particularly useful for scenarios such as recording long interviews or covering an event indoors.
Coiled D-Tap to DC cable
An optional Atomos accessory is a D-Tap/P-Tap connector to 2.1mm DC barrel cable. This is designed to allow you to power your device from an external battery system. You need to ensure that the output of the power source does not exceed 16.8V DC and ideally should be using either 12 or 14V.
NO MANUAL IN THE BOX
The Ninja V doesn’t come with any physical manual, just a quick start guide. While this quick start guide is ok, it doesn’t really explain anything about the functionality. If you haven’t used an Atomos device before or the AtomOS operating system you may find it all a bit confusing. I wish Atomos included a detailed physical manual with the Ninja V as well as basic information about how to set up and use certain cameras. This criticism is not only aimed at Atomos, as there are so many manufacturers who don’t include proper, detailed instruction manuals with their products.
I also couldn’t find any detailed instruction manual on the Atomos website. This is quite strange as Atomos has instruction manuals for all its other products that you can download online. I contacted Atomos to ask them whether they plan to release a full manual and they told me that yes, a full manual should be available in the next week or so. The reason for the delay is because they had to rewrite the manual after they introduced the latest AtomOS.
UPDATE: I have now seen the full manual for the Ninja V that will be available online. It is very detailed and covers just about anything you need to know.
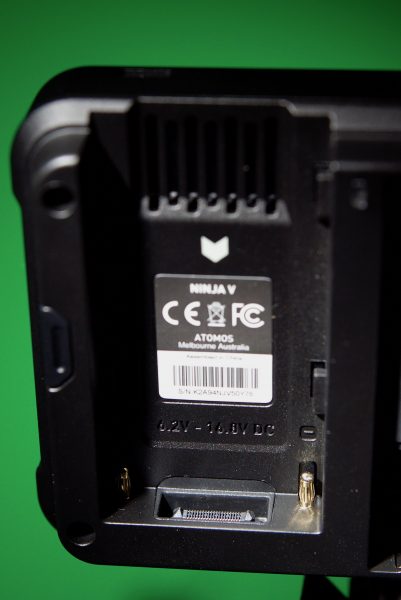
ATOMXPAND PORT
The AtomXpand data port under the battery compartment is capable of interfacing bi-directionally with different devices. The port supports up to 4K 60p and 12-channels digital 24-bit 96KHz audio. The expansion port is something we haven’t really seen on a monitor/recorder before and it is a good way of adding functionality selectively, so you’re not paying for features you don’t want or may not need.
Atomos has already announced the first two AtomX modules, the AtomX Ethernet/NDI, and the AtomX Sync. These dock into the AtomX port and add NDI over ethernet, or wireless sync and Bluetooth control to the Ninja V. Atomos has partnered with Newtek for the AtomX Ethernet and Timecode Systems for the AtomX Sync – this means that the AtomX Ethernet will appear as a node on Newtek NDI networks, and the AtomX Sync will allow you to sync timecode with other Timecode Systems gear.
ATOMX SYNC
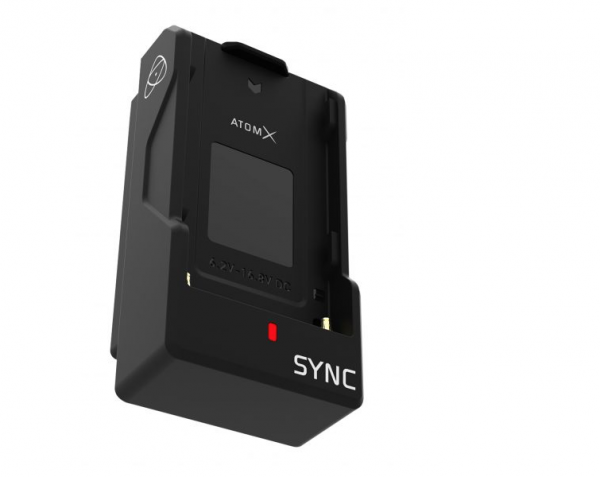
The AtomX Sync records embedded timecode directly into the ProRes or Avid DnXHD file in the Ninja V. That means the timecode metadata can be read by any NLE – there’s no need for an external sync box or genlock.
The Ninja V with the AtomX Sync looks to be a very affordable way of getting timecode sync between multiple Ninja Vs or Ninja Vs and other cameras, as well as when recording sound separately. If you want to sync a non-Ninja V camera with a Ninja V you can do so by attaching a Timecode Systems box to the camera in the way you would normally. The sync is shared between any Timecode Systems product wirelessly (such as an Ultrasync ONE) and Atomos claim the system has a range of 300m (984ft). The AtomX Sync also has a built-in battery extender that allows for continuous power when swapping batteries, ensuring uninterrupted operation of the Ninja V during a shoot.
Timecode Systems make an iOS app that you can use to control and monitor multiple Ultrasync ONE units and apparently a version of this software will find its way into the Ninja V when using the AtomX Sync module. The Atomos Ninja V will have exactly the same Bluetooth LE protocol as the UltraSync Blue and the same long-range RF protocol as the UltraSync Blue and all of Timecode Systems other products such as UltraSync One, pulse, wave, (and older products such as the Denecke TS-TCB slate, mini TRX+, wifi master).
The Ninja V Atom X Sync product can be a master unit or a slave unit for Timecode Systems long-range RF network, meaning it can be part of any workflow large or small. This means that it will work with other Atom X Sync units, pro cameras/pro audio and UltraSync Blue units that are syncing smartphones/mirrorless/DSLR/wearables using BLE.
Actually, the Ninja V (and any other Atomos product that uses the Atom X Sync in the future) will be a powerful combination of an UltraSync Blue and the pulse. This is because the screen of the Ninja V will be able to display all the devices on the RF sync/control network to configure and monitor the status of each, just like the pulse product using the free BLINK Hub apps.
ATOMX ETHERNET/NDI
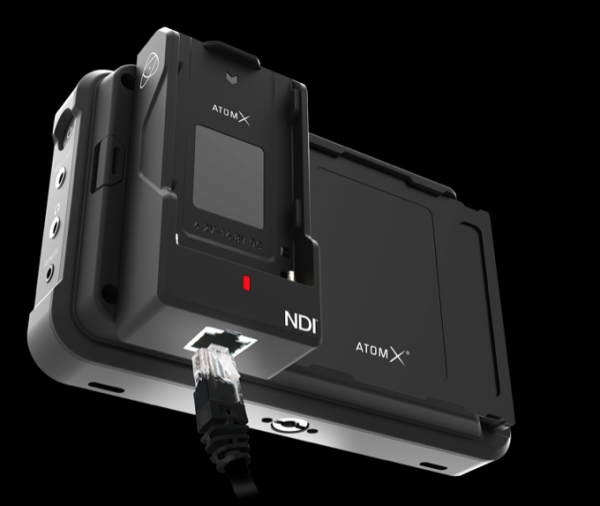
The AtomX Ethernet/NDI module has a wired Gigabit Ethernet connector that delivers live video over IP networks. Newtek’s NDI technology allows for control of multi-camera networks, replacing traditional SDI cabling. The AtomX Ethernet/NDI module has NDI input and output with encode, decode, control and sync, allowing Ninja V users to transmit, distribute or receive and monitor NDI from any NDI source. When you turn on the Ninja V with an AtomX Ethernet/NDI module installed and plug in your network cable, your source will be automatically discovered on the NDI network.
These are the first of many modules we could end up seeing for the Ninja V. It wouldn’t be a big surprise if we were to see an SDI AtomX module, and also wireless video, finding its way into the expansion slot.
ATOMX MODULE PRICES
The AtomX Ethernet/NDI will sell for $199 US and the AtomX Sync for $149 US, but they won’t be available till next year.
HOPEFULLY, OTHER ATOMX MODULES ARE COMING
High on my wishlist for the AtomXpand port is an SDI add-on. With SDI in the Ninja V could be compatible with higher-end cameras and would make for a nice onboard monitor. What about recording ProRes RAW on the Ninja V if there was an SDI module? The Ninja V doesn’t have this now since no camera can send a RAW signal through HDMI 2.0 and I really don’t expect to see this in the near future however with an SDI add-on attached and a possible ProRes RAW license added it could unleash a small ProRes RAW recording beast. Another option for the data port is wireless connectivity. The options are vast and Atomos alongside other companies is looking into many potential devices that could take advantage of this special AtomXpand port.
NINJA V SLINKIER MEDIA
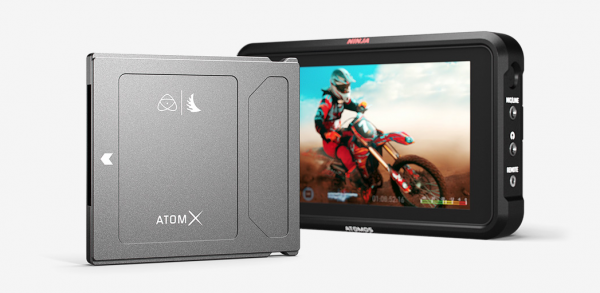
The Ninja V will have a new sleeker media option with the AtomX SSDmini. These drives will be available from Angelbird and Sony. The AtomX SSDmini will fit perfectly in the media slot to keep the smaller Ninja V nice and compact. The drives are only 7mm high and 80mm long and retain the same SATA III connector as traditional SSDs plus they are backwards compatible with the Ninja, Shogun and Sumo devices. In a pinch, the original Atomos caddy works as well but it will extend out from the side of the recorders frame. This is not such a bad thing as they end up offering a bit of protection to the HDMI connectors.
Widely available 2.5” SSDs are the basic storage medium used for all the Atomos 4K Monitor Recorders. SSDs are required for 4K recording where speed and reliability are needed. Here are a few things to bear in mind:
• Disk drive data rates tend to be given in megabytes per second, and codec data rates are normally given in megabits per second. It’s very easy to get confused. But there’s no need to be because all you have to do to convert megabits to megabytes is divide by 8. So if you’re recording at 220 megabits per second, that’s going to result in 220/8 megabytes per second, which is 27.5 megabytes per second.
• With 4K recording your data rate is approximately four times from that of HD recording, so please ensure your drive is capable of keeping up with 4K write speed requirements. Atomos regularly tests hard drives – please check this link before purchasing drives: www.atomos.com/drives
•Mechanical shock and vibration for spinning disk HDDs. Hard disks are precision mechanical devices that need to be handled carefully. The use of mechanical drives or Solid State drives will vary depending on the intended filming application. Atomos can’t give rigid guidelines because there are so many different kinds of drives, each which has different mechanical properties. You may even find variations between drives of the same type. What Stomos have found is that mechanical drives are suitable for most purposes that don’t involve harsh vibration or mechanical shocks. We would not advise using mechanical disks if there is a likelihood that they might be shaken or dropped onto a hard surface.
• Even though spinning drives can withstand substantial shocks when they are not in use, they are more vulnerable when running. Harsh treatment that may not actually damage the drive may interrupt recordings at a much lower level of severity. We recommend that you experiment with your drives by testing them in the conditions that you normally work in.
• Do not bang or jolt the Ninja V while recording.
• Do not use spinning drives (HDD) for recording 4K video. You will find noticeable differences in the ability of drives to withstand shock and to continue recording during vibration and movement.
Which drives should you use?
Below is a list of supported drives that have been tested and recommended by Atomos:
The Ninja V uses the exFAT file system for broadest compatibility. For drives that carry the Atomos Logo such as the G-Technology 4K SSD, Angelbird 4KRAW, AtomX SSDmini by Angelbird and Sony, an option for secure erase is presented. This allows for the entire drive including the drive cache to be formatted. This will erase ALL content on the drive meaning noting can be recovered. The benefit of this is to optimize performance. It will wipe all data off the drive (which may also be useful as an additional security measure) and reset it back as close as possible to factory conditions.
FILE RECOVERY AND FILE DELETION
The Ninja V is able to detect when the drive is under stress and it will recover from any break in a recording by waiting until the drive is ready to continue, and then resuming from that point. If frames have been dropped because of drive performance issues, shock or vibration, a “Skippy” Kangaroo symbol will appear on the home screen on the Ninja V, in the top right-hand corner of the display. If you see a Skippy appear this is a warning and it’s advisable to stop recording to identify the source of the issue. When recording 4K the reason is usually related to drive performance which the drive for a number of reasons cannot keep up with the required write speed. Formatting the drive in the Ninja V can help resolve this issue. In addition, there is a secure erase option on some drives that effectively restores the SDD to factory levels and for drives that support this secure erasing the drive will restore the SSD to factory levels.
To ensure the integrity of data writes and to avoid situations such as fragmentation the AtomOS operating system on the Ninja V does not support the deletion of files. Atomos does not advise removing or deleting files randomly from the disk on your computer. Often files are left in the trash or garbage partition of the drive occupying drive cache and this can effect drive performance. It’s advised that you archive your content and reformat the drive before each shoot.
NINJA V SUPPORTED CODECS & FRAME RATES (RECORD & PLAYBACK)

The Ninja V gives you several options for recording in high-quality codecs such as Apple ProRes and Avid DNxHD. With this year seeing the release of a plethora of new mirrorless cameras like the Canon EOS R, Nikon Z6, and Fujifilm X-T3, which all have the ability to output a 4:2:2 10-bit signal over HDMI, the timing of the arrival of the Ninja V is far from a coincidence. Atomos has always worked very closely with the Japanese camera companies and this gives them a real advantage when designing new products.
You could very well make an argument that there is no big advantage in recording externally to devices such as the Atomos Ninja V. Almost all the new camera offerings are capable of producing high-quality images, regardless of whether you are recording internally or externally. Yes, 10-bit 4:2:2 images are going to give you an advantage (in certain situations) than recording in say 4:2:0 (or 4:2:2) 8-bit, but you shouldn’t always be blinded by specifications. In saying that, I personally wouldn’t want to record internally in any Log format that wasn’t at least 4:2:2 10-bit. I’m constantly amazed at shooters who record everything in Log in low bit rate, low color space internal codecs in situations where the dynamic range they are capturing is no more than 5-6 stops. If you don’t need to shoot in Log, (this is my personal opinion so feel free to agree or disagree) then I don’t actually see a big advantage in recording externally in a lot of scenarios. In my opinion, you are not going to see any perceivable difference in quality recording externally from a camera that can only output 4.2.2 8-bit via HDMI such as the Sony a7R III. If a camera can only output 8-bit it doesn’t magically turn into 10-bit, even though that is what is being recorded on the Ninja V.
If you do work in broadcast where a minimum 4:2:2 10-bit acquisition may be required, then this is where an external recorder such as the Atomos Ninja V does come in very handy.
Video to ProRes / DNxHR (DNx utilizes a .MOV wrapper)
Apple ProRes HQ, 422, LT AVID DNxHR HQX. HQ, SQ, LB
4K DCI; 24/25/30/50/60p
4K UHD; 24/25/30/50/60p
2K
1080p; 24/25/30/50/60/100^/120^ ( ^ From supported HDMI sources such as gaming consoles and graphics cards.)
1080i; 50/60i, 720p; 50/60p
HDR Monitoring/Recording (Gamma)
Sony SLog / SLog2 / SLog3
Canon CLog / CLog2 / Clog3
ARRI Log CEI160 / LogCEI200 / LogCEI250 / LogCEI320 / LogCEI400 / LogCEI500 / LogCEI640 / LogCEI800 / LogCEI1000 / LogCEI1280 / LogCEI1600
Panasonic Vlog
JVC JLog1
RED Log3G10 / RED LogFilm
FujiFilm F-log
Nikon N-Log
PQ10k
HLG
HDR Monitoring/Recording (Gamut)
Sony SGamut / SGamut3 / SGamut3.cine Canon Cinema / DCI P3 / DCI P3+
Nikon Bt2020
Panasonic V Gamut
Arri Alexa Wide Gamut
Rec709 / BT.2020
JVC
RED WideGamut / RED DragonColor / DragonColor2 / RED Color2 / RED Color3 / RED Color4 /
Pre-Roll
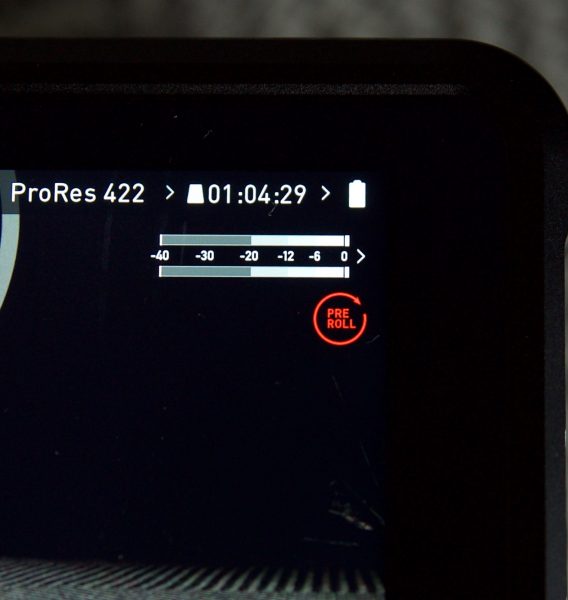
The Ninja V has a built-in pre-roll mode which is very useful. When enabled the input is constantly been recorded with approximately the last 8 seconds in HD and 2-3 seconds in 4K being cached into memory. The frame rate and codec selected will affect the number of seconds being cached for pre-roll. Using a lower bit rate codec setting and shooting at lower frame rate will increase the length of pre-roll. When the record button is pressed or trigger is sent, the buffered pre-roll data in memory will be written out to the start of the recording. This means if you are a few seconds slow hitting the record button when something interesting happens you will still capture the shot. With Pre Roll mode activated the Recorder is constantly caching frames internally to the unit and as such any feature that can not be changed whilst recording is disabled. This includes audio channel select, 3D LUT record, codec, disk options etc.
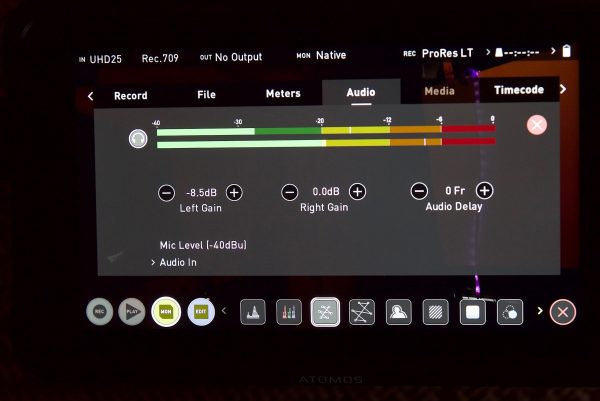
ATOMOS NINJA V AUDIO
The audio functionality on the Ninja V is not as good as what you would find on say the Shogun Inferno. There is no XLR break out cables and the only way you can capture audio is by it either being embedded in the HDMI stream or through a single 3.5mm input jack. Most mirrorless cameras and camcorders send two channels of audio over HDMI but the Ninja V can record up to 8 channels of digital audio embedded in the HDMI signal if supported.
If you are using the onboard built-in microphones from your camera this audio gets transferred over HDMI to the Ninja V. You can also input a microphone such as a RØDE VideoMic Pro into the 3.5mm jack on the Ninja V and that way you can record that audio source as well as the onboard built-in microphones at the same time. If you use an external XLR module such as the Panasonic DMW-XLR1 Microphone Adapter, then the only audio that goes through to the Ninja V will be from that device. If you attempt to plug a microphone or line source into the Ninja V while using an XLR module at the same time, the 3.5mm input will not be present.
Speaking of the 3.5mm input, I tried this out with a RØDE VideoMic Pro and works pretty well. You can adjust the input levels and as the signal gets recorded to both channel 1 and channel 2 you can independently set two different levels for your microphone. I still think it far more likely that users will be plugging external microphones straight into their camera and not directly into the Atomos V.
If you are recording audio over HDMI (at least from the Panasonic GH5) the input on the audio screen is showing that the audio is being recorded on channels 1 and 2. In reality, it actually isn’t. The audio somehow ends up on channels 3 and 4. This is confusing, to say the least.
This particularly weird problem rears its ugly head when it comes to audio playback on the Ninja V. I did some tests with a Panasonic GH5 and the Ninja V and when I went to play back clips I couldn’t see any audio being displayed on the meters on the main screen.
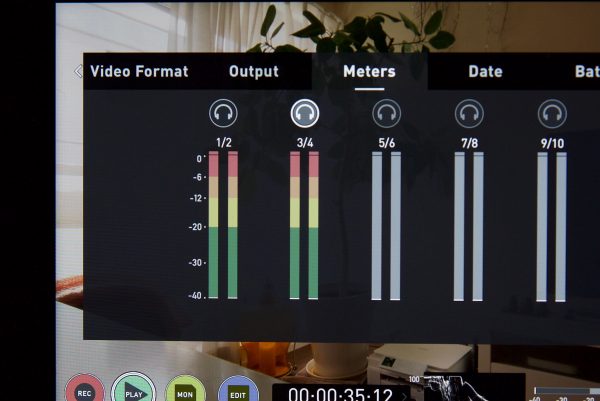
When I then pressed the audio meters icon I found that the audio for some strange reason was being recorded on tracks 3 and 4 and not on 1 and 2. By default, when you playback clips the audio seems to only display what’s being recorded on tracks 1 and 2. What I found I needed to do was to select the headphone button for tracks 3 and 4 and then this would show the audio meters on the screen.
Just to double check, I hooked up the Panasonic DMW-XLR1 Microphone Adapter to the GH5 and put a microphone into channel 1. Again on the Ninja V, this input is being displayed as getting recorded onto channel 1. You can see the audio meters on the main screen of the Ninja V displaying this audio both in standby and when recording. As soon as you go into playback mode on the Ninja V and hit play you don’t see any audio levels being displayed. Again I had to go into the menu and select channels 3 and 4 as that is where the audio was somehow being recorded.
This is a really weird way of doing things. You should be able to see the audio meters for all channels on the screen during playback. The way Atomos is doing it is going to really confuse people and lead to worries that no audio was actually being recorded to the Ninja V.

Now I asked Atomos about these audio problems they told me, “The way audio recording behaves on the Ninja V is the same as our other products. If you have an analog audio input, the audio will be recorded to channels 1/2, with digital audio recorded on channels 3/4. If you don’t have an analog input, but leave the analog audio record icons switched on (red) then digital audio will still be pushed to channels 3/4. So if you want the digital audio to be recorded on channels 1/2 you need to toggle the analog audio record icons to off.”
While I understand how this now works after getting an explanation from Atomos, it’s still confusing and seems very counter-intuitive to me. I’m not sure why you would prioritize the analog input when the majority of users of the Ninja V will be using the digital audio coming over HDMI. If anything the analog audio should be on channels 3 and 4 by default and not on 1 and 2.
Headphone monitoring
It’s nice that the Ninja V has a headphone jack. With some mirrorless and DSLR cameras not having a headphone jack, if you add a Ninja V you can monitor the audio you are recording. Now the only problem with the way headphone monitoring works is that you can’t just listen to a single channel. If for instance, you are using an XLR module with your mirrorless camera and have two microphones going into channels 1 and 2 you can’t just listen to channel 1 or channel 2 from the Ninja V. Through your headphones you will hear channel 1 through one ear and channel 2 through the other. This is far from ideal and I’m not sure why Atomos hasn’t changed this. I raised this problem going all the way back to when the original Shogun was released.
Edit Mode
Like previous Atomos devices, Edit mode gives you the ability to tag your clips during recording and playback. Extended tagging options are a nice way of helping you save time in post-production. By the pressing the Favorite and Reject icons you can assign a “good clip” or “bad clip”. This information can then be imported into a non-linear editing system to speed up the editing process. You can easily see which parts of your recording you have marked to keep or reject.
Using Markers and Tags you can quickly start the editing and review process on your Ninja V, avoiding delays incurred when importing inferior and unwanted footage. You can review and tag immediately on-set with your client or director, or work through your takes without having to dump the recorded files to another workstation/NLE.
NINJA V USABILITY
The Ninja V is the biggest step forward that Atomos have made when it comes to monitor/recorders. I couldn’t really see the point of mounting a large, heavy 7″ monitor/recorder on top of a small mirrorless, DSLR, or compact digital cinema camera. The reason people usually buy a small camera, to begin with, is that they want to shoot and use a small camera. It seems fairly counter-intuitive to take something that is small and make it a lot larger, heavier, and harder to use.
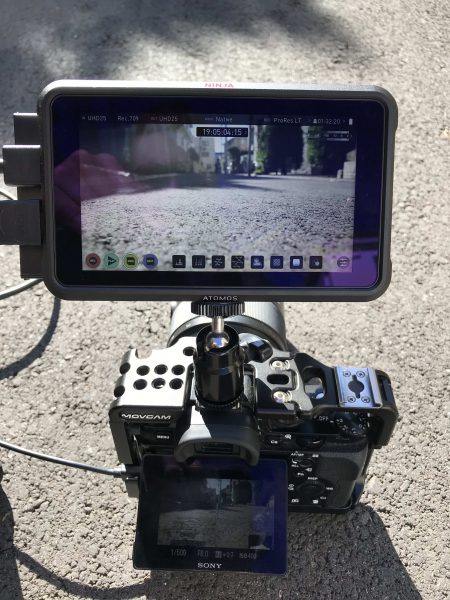
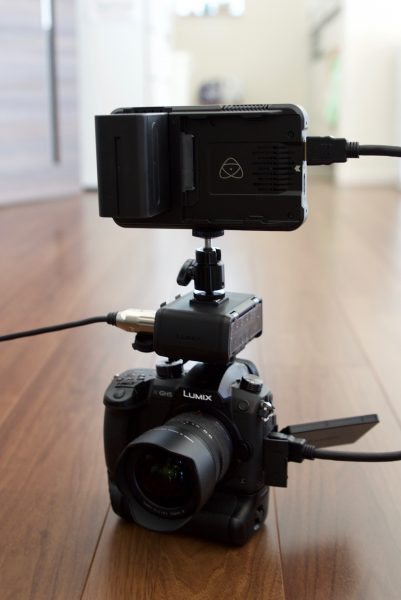
The Ninja V is a much nicer size and weight and makes for a more user-friendly experience if you are shooting with a mirrorless or DSLR camera. With its weight of 11.3 oz (320 g) you can actually attach it directly to a cold shoe on your camera, something I would never do with a larger, and heavier Ninja or Shogun Inferno. This means that for certain shoots you can actually have a manageable set up without needing to add an additional camera cage.
The length of the Ninja V means that it is closer to the same width as a lot of the mirrorless cameras that are on the market. This is important because the Ninja V doesn’t extend out that far from the edges of your camera. This means there is less chance of it getting in your way or get knocked around when you are shooting. In saying that, because the HDMI cable is going to stick out the side of the Ninja V you really need to be careful that it doesn’t get snagged on anything. During my testing, I did exactly this and ended up breaking an HDMI connector.
The new AtomOS is certainly an improvement, but I’m still not 100% convinced about having a full touchscreen interface without any physical buttons. You can’t use it with most gloves and you end up getting fingerprint marks all over the screen. I found that on way too many occasions I would be pressing the screen and nothing would happen.
The screen is great for both indoor and outdoor use, but the fan noise still bothers me. I didn’t have any problems with recording using the Atomos Ninja V. It seemed robust and reliable in that regard. What I do like is that when you are recording a warning screen will come up telling you that the battery is getting low. This is a nice feature as it allows you time to make sure you stop your recording and change over the battery.
What makes the Ninja V special is the addition of the AtomXpand data port. This opens up the Ninja V to a world of possibilities and greatly expands its versatility. I’m glad that Atomos has been thinking outside of the box because, in all honesty, the external recorder isn’t going to be around forever. Internal recording keeps getting better and better and it’s only a matter of when, not if, the need for external recorders disappears. By adding other functionality to your products you not only make that product more appealing to a wider audience, but you also increase its lifespan.
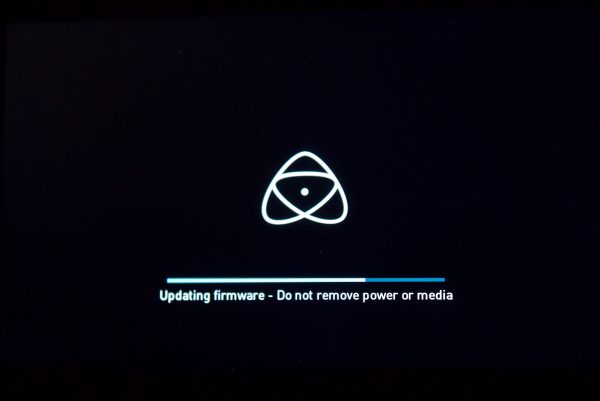
Just like other Atomos products, you won’t get charged for firmware updates. I expect there to be fairly regular firmware updates being made available for the Ninja V, especially once the AtomX modules start appearing.
NINJA V COMPETITION
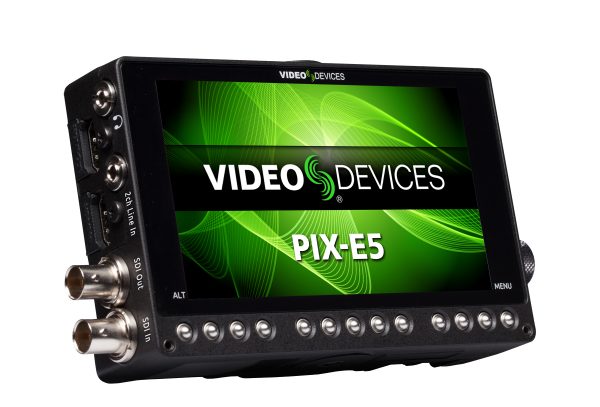
The Atomos Ninja V doesn’t really have any direct competition, as to my knowledge, no other manufacturer makes an HDMI only monitor/recorder. The only other comparative monitor/recorder that has a similar sized screen is the VideoDevices PIX-E5. The PIX-E5 has a 500 nit, 1920×1080, 441 ppi LCD display and it can record in codecs up to Apple ProRes 4444 XQ 12 Bit. It can’t record 4K and UHD 60p like the Ninja V and is limited to 4K up to 30 fps, and UHD up to 30 fps. The PIX-E5 has the advantage of having both HDMI and SDI outputs, but it can’t display any type of HDR pictures.
VideoDevices also has a PIX-LR audio module that can bolt onto the bottom of the PIX-E5 which gives it very substantial sound recording ability.
The PIX-E5 is $995 USD, while the Ninja V is $695 USD.
If you want to compare the Ninja V directly against monitor only products that only have HDMI, then several options from smallHD are probably the closest competition. Those monitors would be:
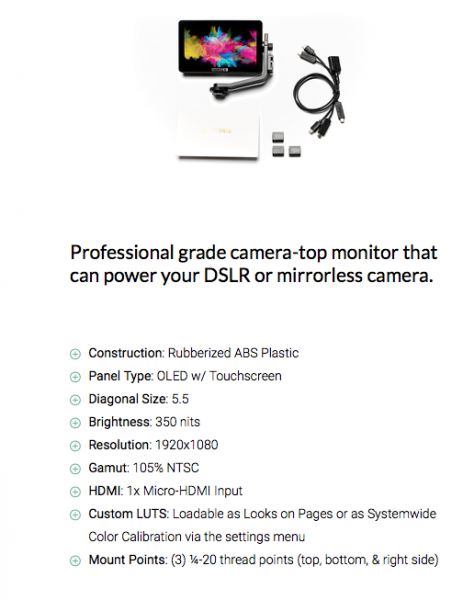
SMALLHD FOCUS HDMI
The smallHD FOCUS HDMI only has a 1280×720 resolution screen with 800 nits of brightness, and a ppi of just 294. It only has a single HDMI In and no HDMI out. The FOCUS HDMI retails for $499 USD.
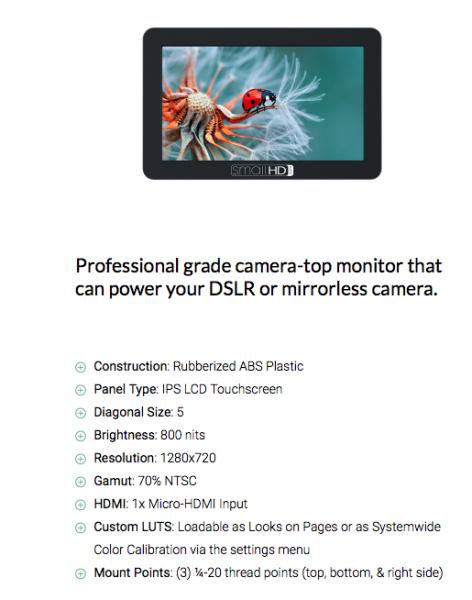
SMALLHD FOCUS OLED
If you want a full 1920×1080 5.5″ display then you need to choose the FOCUS OLED. This extra resolution comes at the expense of brightness, as the FOCUS OLED is only 350 nits. The FOCUS OLED does have a higher 402 ppi, but it still only features a single HDMI in and no HDMI out. The FOCUS OLED is the exact same price as the Ninja V.
As you can see, the Atomos Ninja V more than holds its own, in fact, it actually exceeds the specifications and capabilities of other monitor only products.
CONCLUSION
Is the Ninja V perfect? No, it’s not, but in my opinion its the best product that Atomos has ever produced. The build quality is better than other Atomos products, the new AtomOS is a big improvement, the screen is great, and the addition of the AtomXpand data port gives it a lot of versatility. The only real negative is the fan noise.
Even if the Ninja V didn’t feature any recording capabilities, as a stand-alone HDMI monitor it’s very impressive. I just wish Atomos would hurry up and release an SDI module, or better yet, just make an HDMI/SDI monitor only version of the Ninja V like how they offer the Sumo 19M as a monitor only device..
At $695 USD I think it is competitively priced given its feature set. It’s considerably more affordable than the VideoDevices PIX-E5, and provides better performance and functionality than most other 5″ monitors that are available. Despite the few small gripes I have with the Ninja V, I actually really like it. Atomos has certainly taken steps forward in creating better-built products and not just products that feature catchy specifications. Build quality and attention to detail were the two main things that used to frustrate me with Atomos products, but the Atomos Ninja V has gone some way (although not all the way) to appease my concerns.
If you own a small DSLR or mirrorless camera and want to record in a higher bitrate and color space with the added benefit of getting a very good monitor, then the Ninja V is certainly worth a close look.