DJI announced the Ronin-S back in January at CES 2018. The gimbal was released four months later. It’s a natural progression for DJI to make a single-handed gimbal even with the space for these being crowded with the likes of MOZA, Zhiyun-Tech, Tilta, Feiyu, and Ikan to name a few. I’m sure I left a few out.
One of the first iterations of the single-handed gimbal was from Filmpower with the Nebula 4000 back in 2014. I reviewed the Nebula 4000 back then and it had some issues but the footage you could get was amazing since nothing like it existed.
To get smoother shots and make it easier to operate I stuck it in a Fig Rig. This idea was also used by Freefly with the MOVI and DJI soon added a ring to the Ronin 2. Yes, two hands spread apart is better than one or two stacked.
Shooting with a single-handed gimbal has its challenges. Mainly holding a six pound or more setup in front of your body for an extended period is rough on the arms. Never the less they are popular and capable of getting really nice footage. Let’s get one thing out of the way. Using a gimbal to it’s fullest requires the operator to learn techniques to get smooth footage. If you just grab it and go your footage will bounce.
The DJI Ronin-S Overview
The Ronin-S comes in a stiff foam case similar to the one DJI uses for their drones. It’s a very tight fit, in fact, it might be a little too tight. Once balanced for your camera it won’t fit back in the case with all the axes that were adjusted. It’s great for keeping the gimbal safe while transporting but you won’t be using it outside of that. The Ronin-S comes with 1″ thick Velcro strap to wrap the tilt and pan arms off so it doesn’t get banged up if you stick it in a backpack or camera bag.
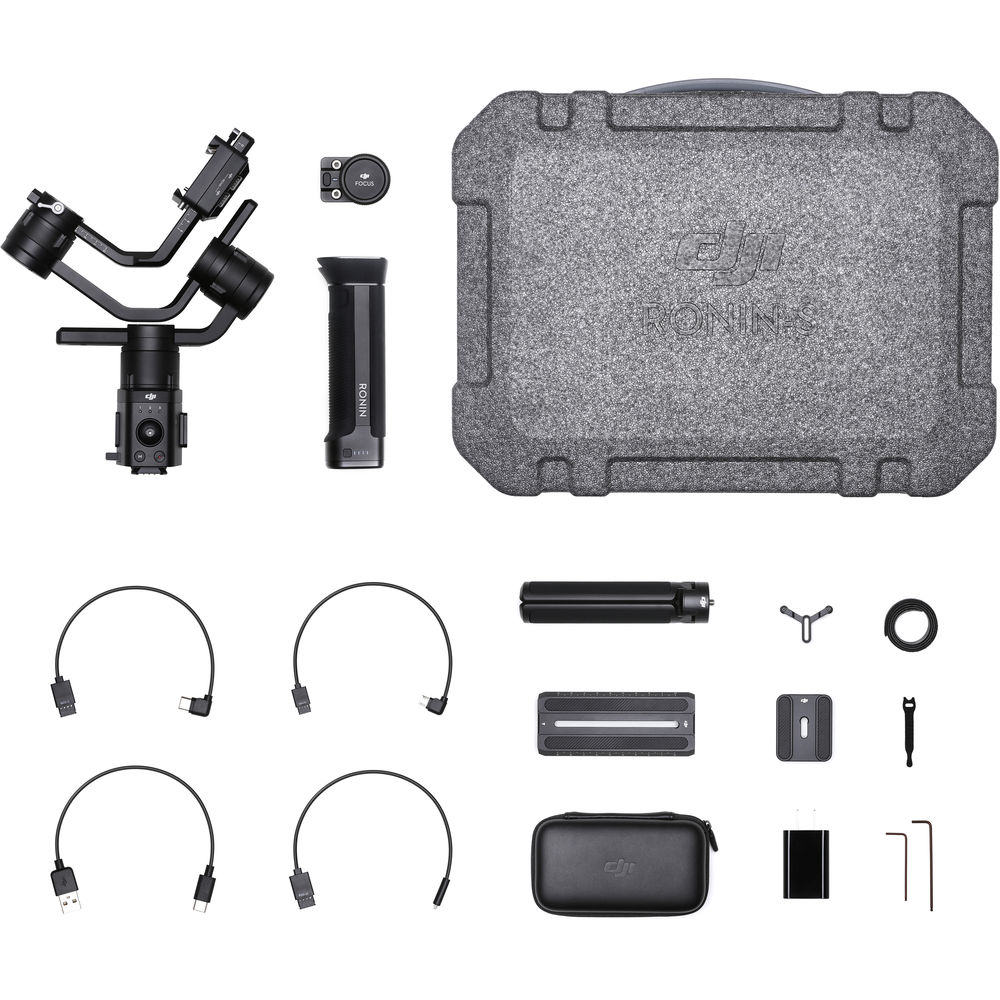
Included in the DJI Ronin-S Kit
- BG37 Grip with Built-In Battery
- Camera Mounting Plate
- Focus Wheel
- RSS IR Control Cable
- USB-C Camera Control Cable
- USB Type-B Camera Control Cable
- USB Type-C Cable
- Lens Support
- Camera Riser
- Extended Grip/Tripod
- 24W USB Power Supply
- Accessory Box
- Hex Key
- Touch Fastener Strap for Cable
- Touch Fastener Strap for Gimbal
- Storage Case
- Ronin-S has a limited 1-year warranty on the gimbal and a limited 6-month warranty on the motors.
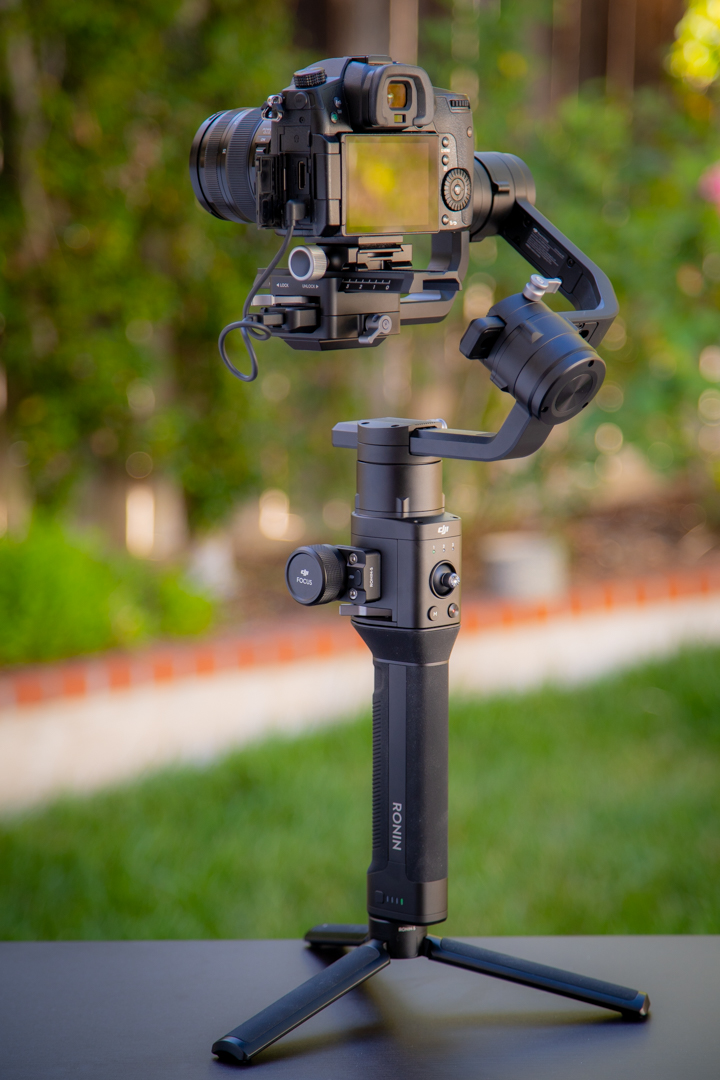
The build quality is very good. All the parts are carefully machined with very clean lines and markings. It has a quality feel to it. I like that. All the knobs lock down easily and adjusting all the axes is nice and smooth.
There are three operation modes for the Ronin-S: Upright mode, Underslung mode, and Flashlight mode.
The grip has the non-removable battery installed. It simply locks into the Ronin-S and powers the gimbal for up to 12 hours.
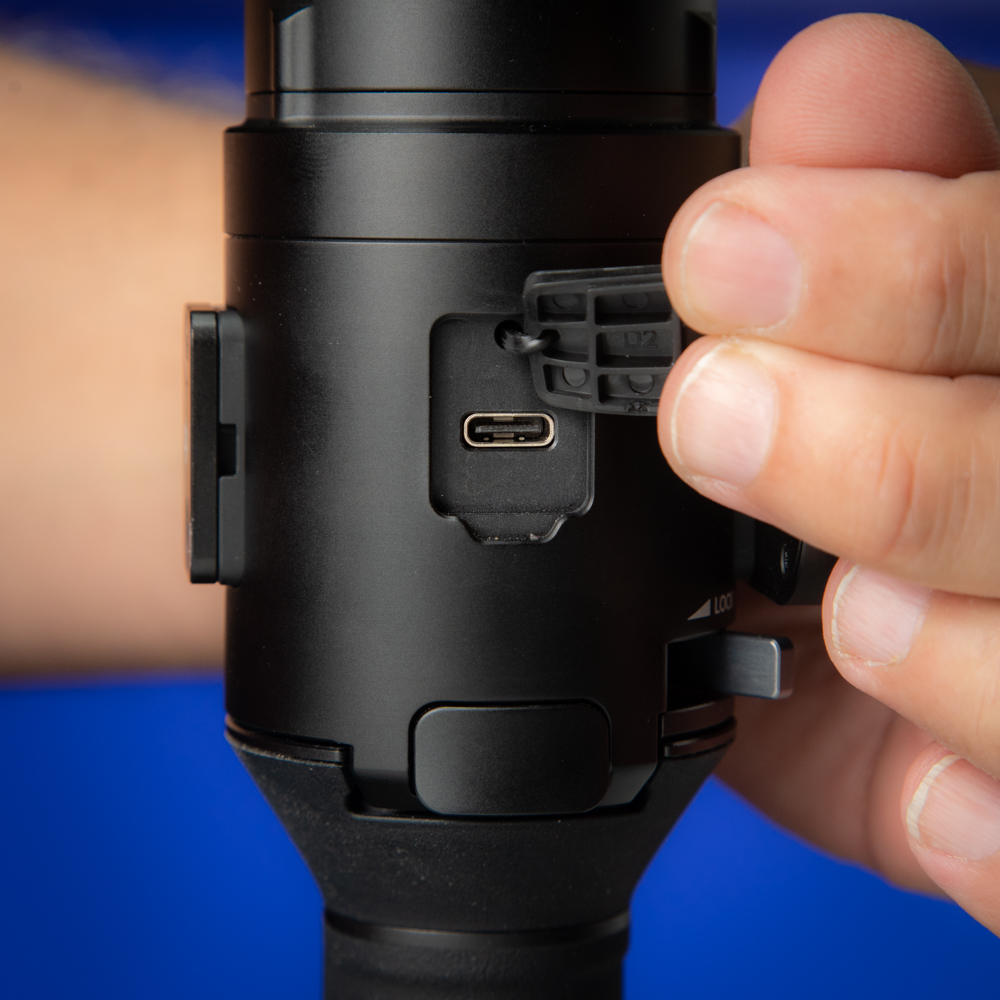
To charge the Ronin-S the battery grip must be attached to the gimbal and plugged in with the supplied 24W USB Power Adapter and USB-C cable. It takes approximately 2 hours to fully charge. At this time a second battery grip is not available for purchase.
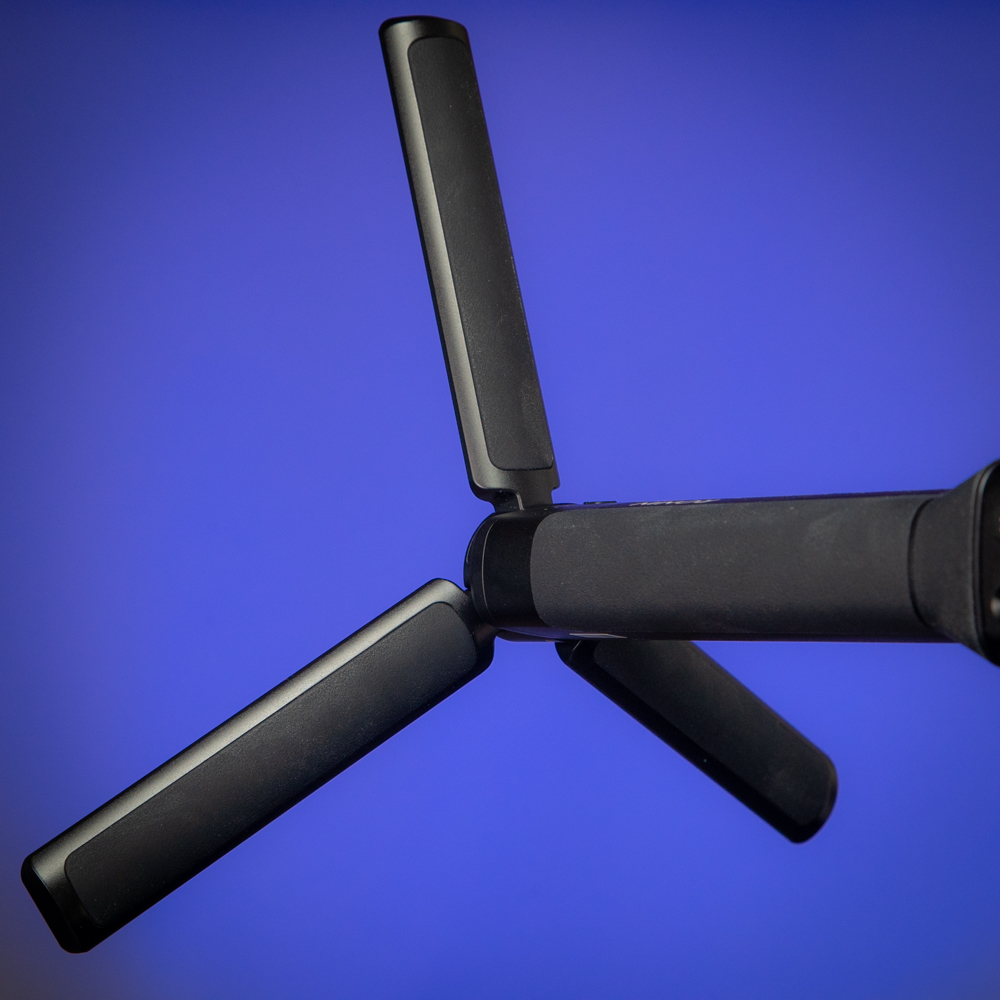
Balancing a gimbal is essential. To do this the gimbal has to be upright on a flat surface. The Ronin-S comes with a mini tripod that attaches to the bottom of the battery grip with a 1/4″ 20 tap. It also doubles as an extended grip when the legs are folded.
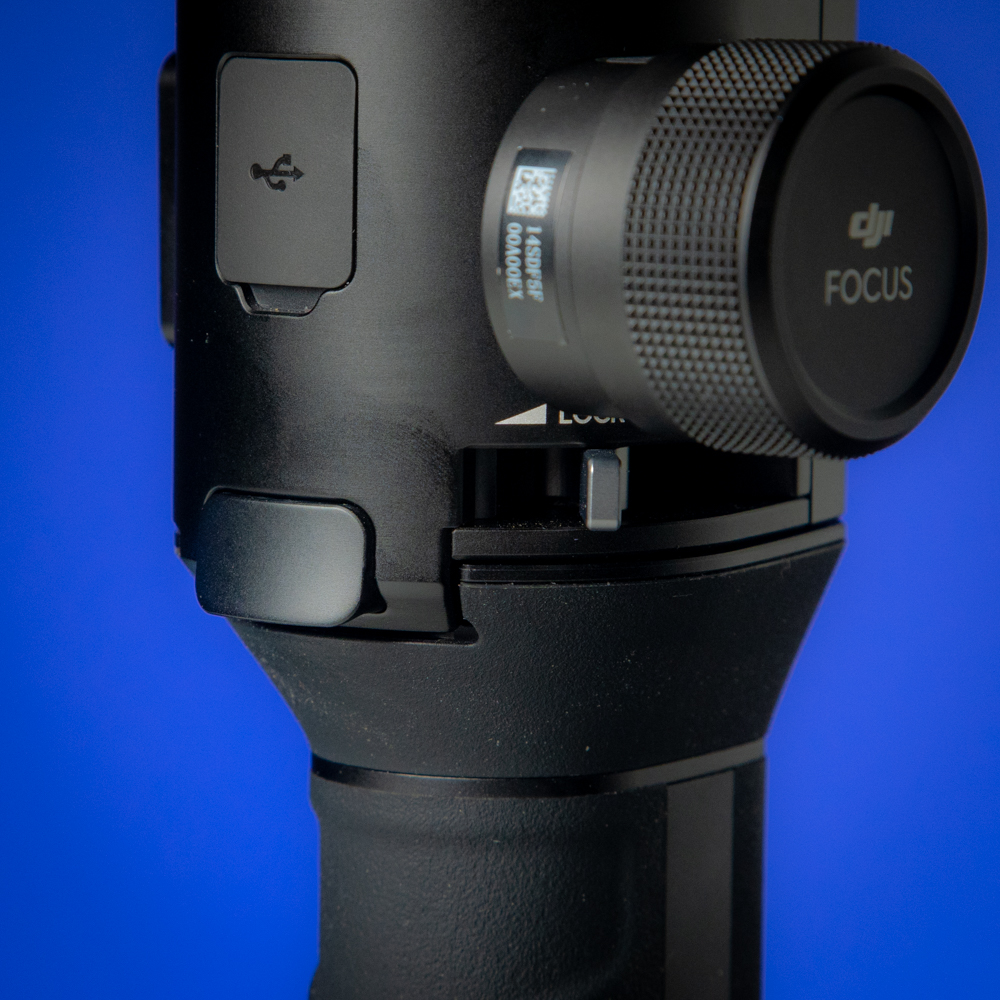
The Focus Wheel
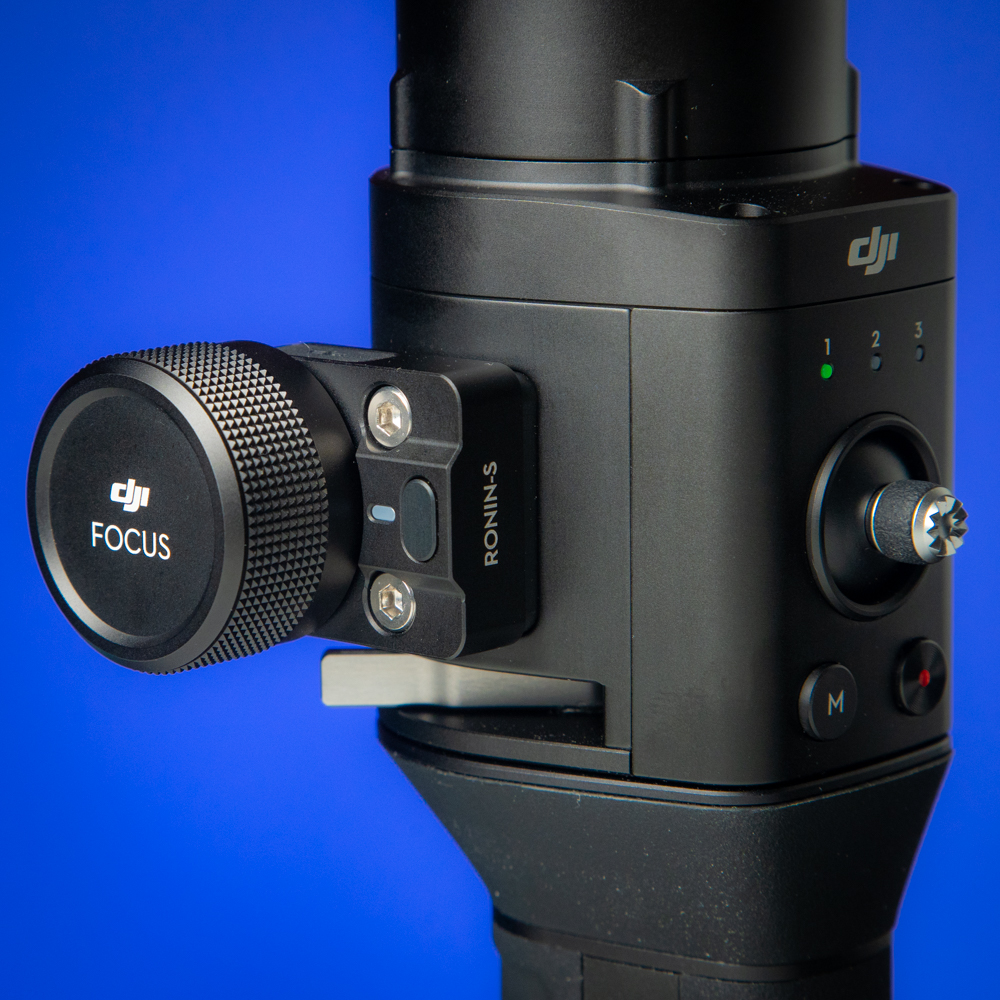
On the side of the handle is a smoothly dampened Focus Wheel for pulling focus with compatible cameras. As of writing this review, the GH5 is the only camera that can take full advantage of this feature. The knob is a little small but works surprisingly well with the GH5. The Focus Wheel has a few more things going on as well such as wireless connectivity.
S-Bus and CAN Switch
This is for switching to a corresponding connected receiver.
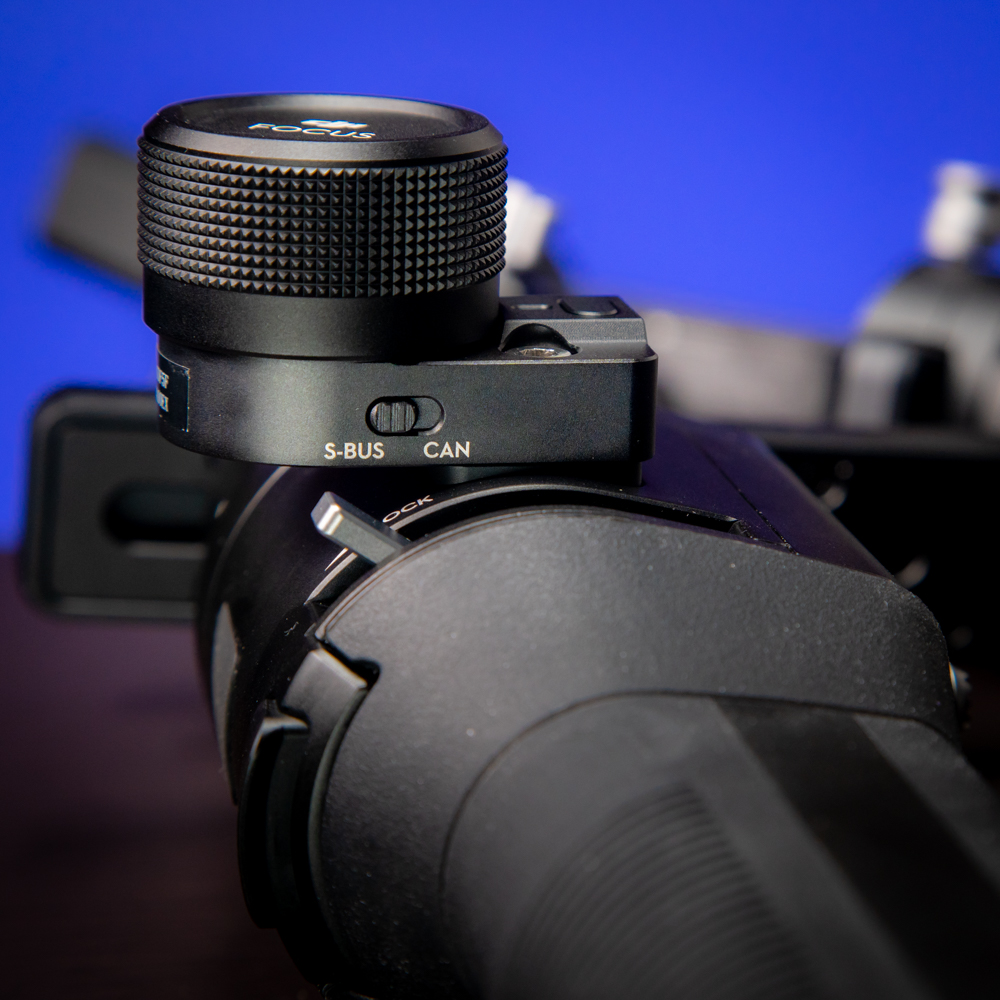
- CAN: Switch to the CAN position when connected to the DJI Pro Wireless Receiver
- S-Bus: switch to the S-Bus position when connected to a third-party remote-control system such as the Futaba remote controller
Multifunction Button
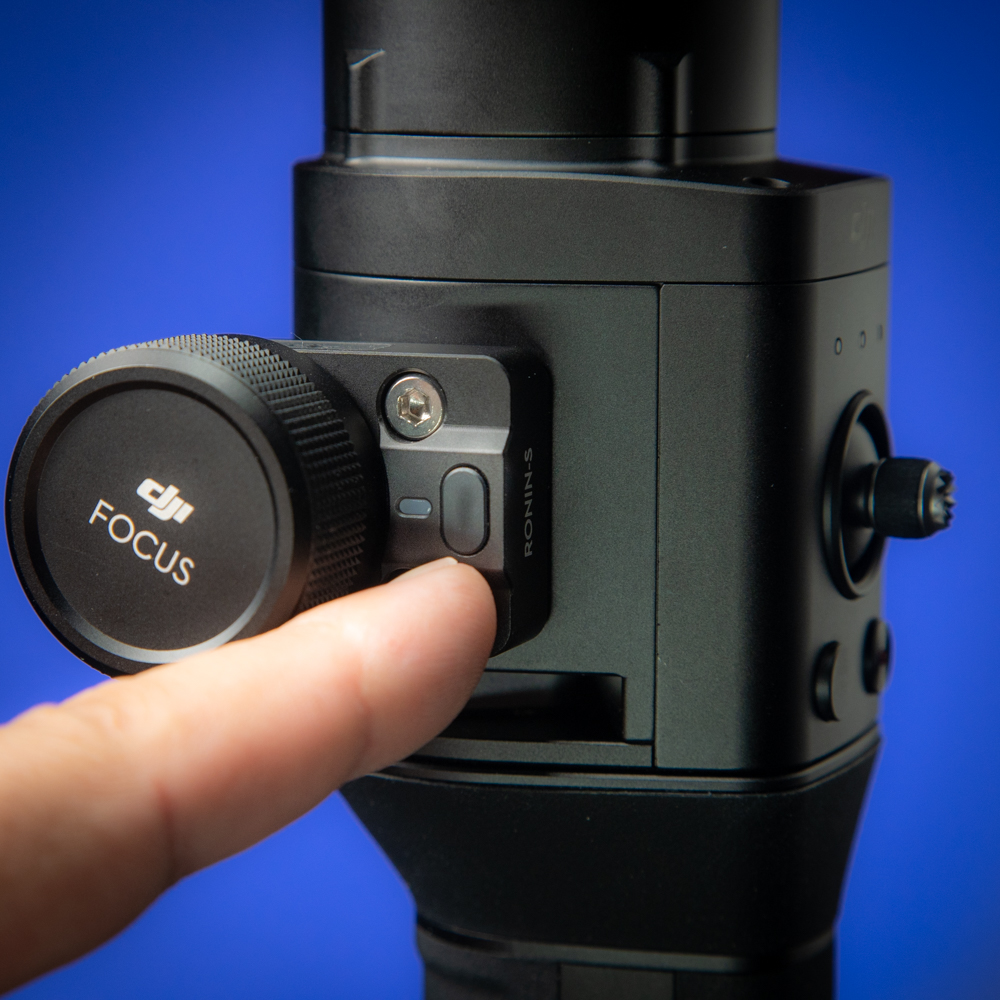
The Ronin-S Multifunction Button has the following functions.
- One click: a-b-point calibration (when connected to an external focus motor).
- Double click: A double-click will perform a travel calibration when connected to an external focus motor.
- Click and hold on: flips the control direction.
CAN Port (5 V)
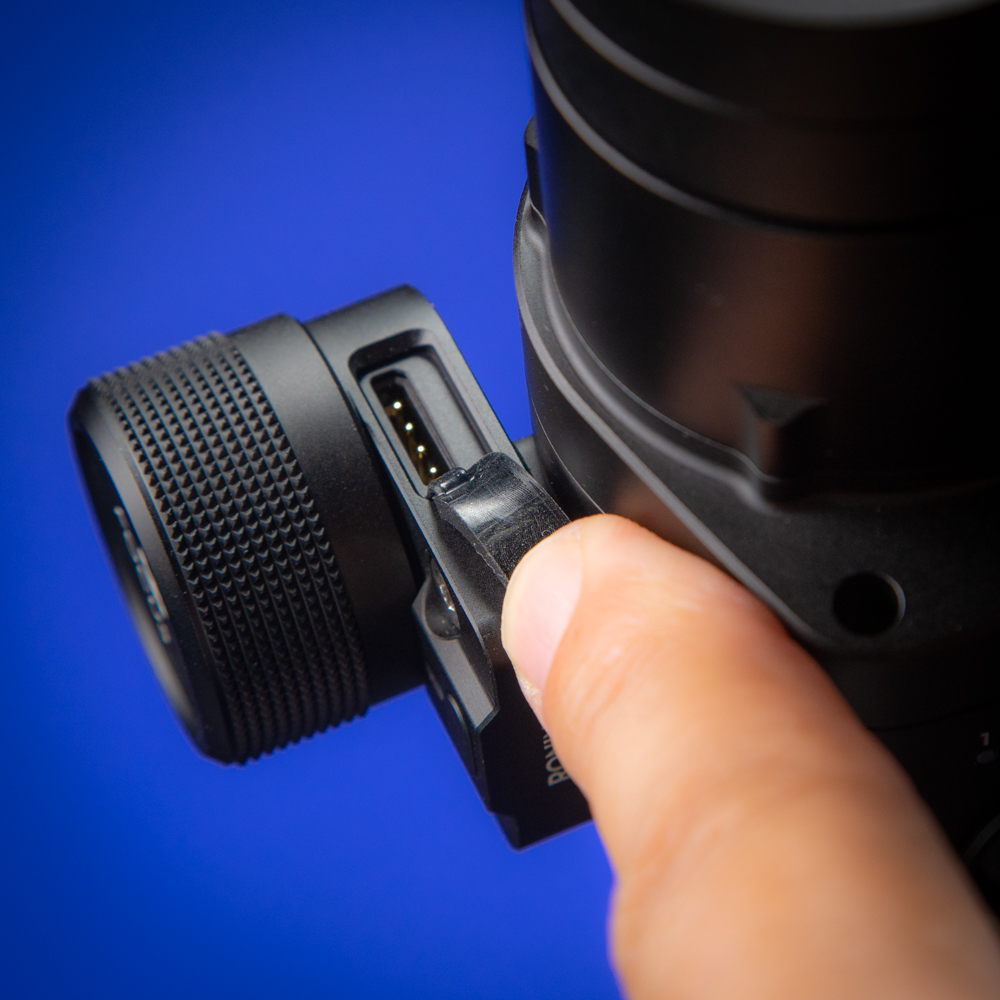
The CAN Port (5 V) port is for connecting a wireless receiver.
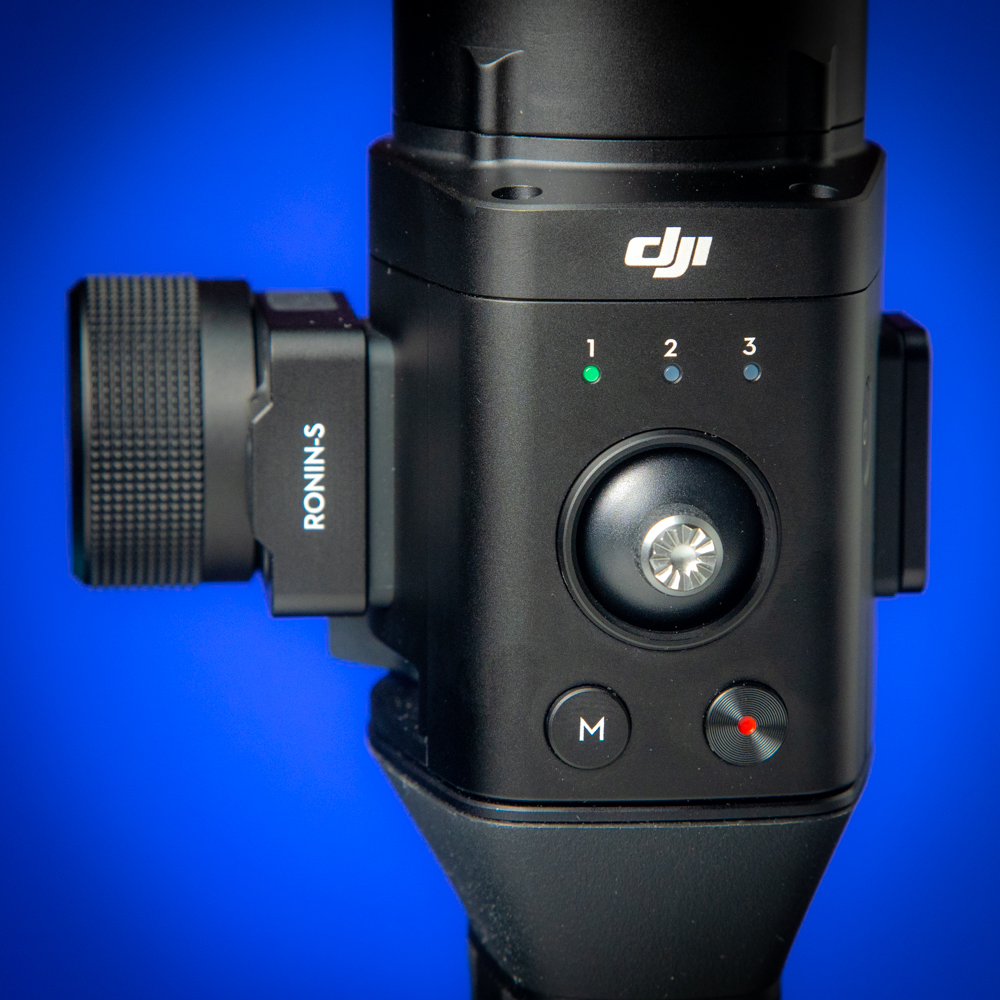
Facing you on the handle are all the main controls. Mini joystick for pan, tilt, and roll. Record trigger and a user Memory button (M) to select up to three customizable USER settings.
On the back of the handle is a trigger for locking off the follow mode. Hold the trigger in and it locks off motion. Double tap and it brings the gimbal back to the forward position. Tripple tap rotates the camera back into selfie mode. Double tap again and it’s now back forward and centered. This is a nice feature and makes operating the gimbal easy.

On the camera mounting platform are two 12 V Accessory Power Ports
One of the best design features is the slanted rear roll arm. By having it lower you can now see the back of the cameras LCD screen making it much easier to frame up shots. I didn’t use an external monitor while shooting for a few reasons. One I didn’t have a good way to mount it on hand and second, it would add more weight to the already heavy setup.
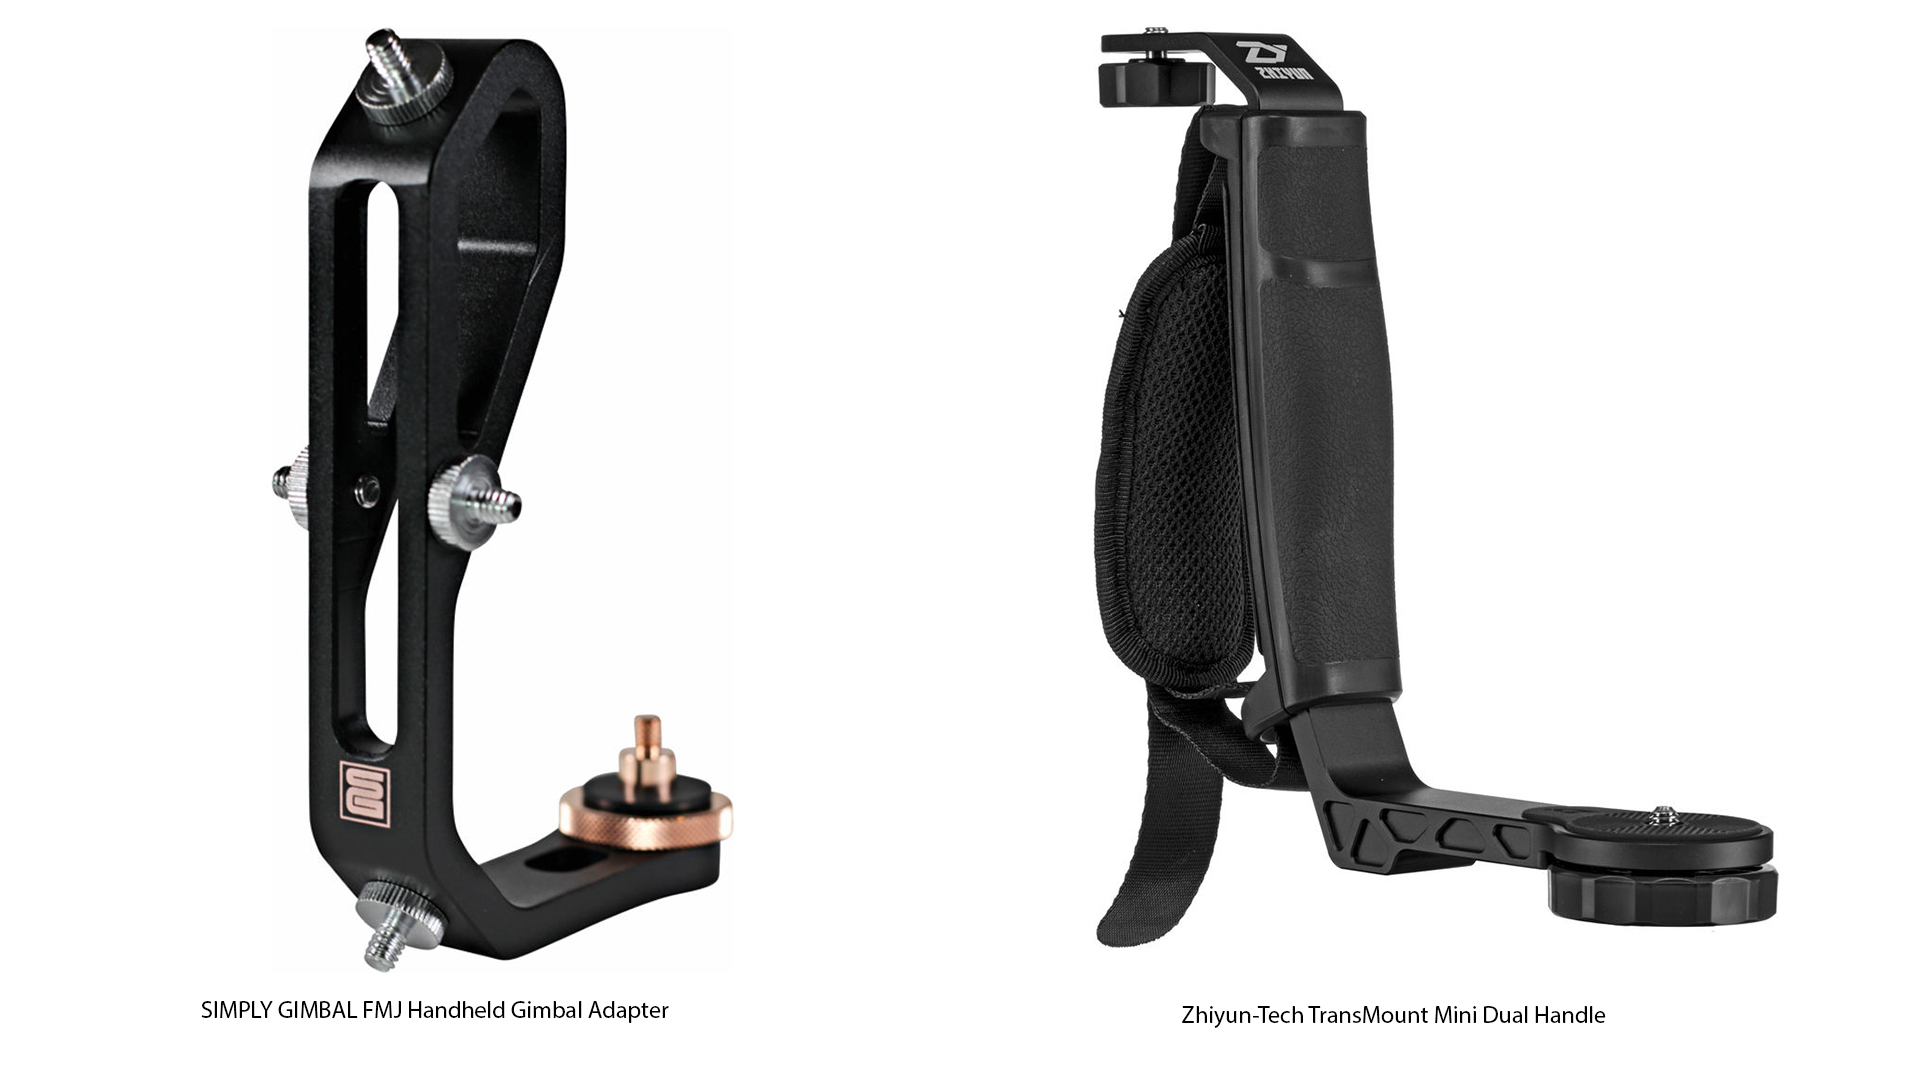
If you want to mount a monitor a couple options are the SIMPLY GIMBAL FMJ Handheld Gimbal Adapter and the Zhiyun-Tech TransMount Mini Dual Handle. I haven’t tested either but from the looks of them they will get the job done plus add another grip to hold the gimbal with two hands. You will need some type of arm to mount the monitor to get it in the right position for viewing.
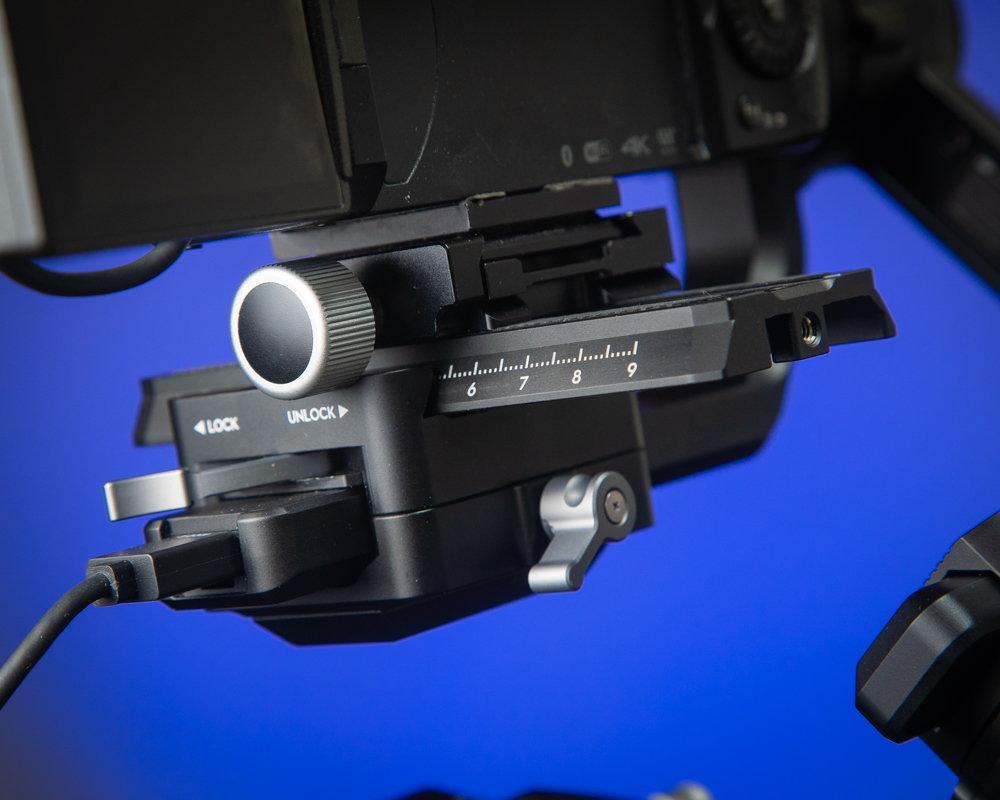
To mount the camera to the Ronin-S, DJI uses the Manfrotto style quick release plate. I don’t use this system, therefore, a better option for me is adding a small Arca/Swiss clamp to the Manfrotto style plate like this one. It’s lightweight and clamps my cameras on fast without having to change the QR plates just for gimbal use. I can go from tripod to gimbal quickly.
DJI includes a riser for Sony cameras to lift them up a little higher from the QR plate. This is due to the lack of space from the bottom of the camera to the bottom of a wider lens that is mounted. The lens will hit the Manfrotto plate, therefore, you would have to mount the camera more to the front of the plate which gives less room for adjusting the position of the roll axis for balancing plus the plate would stick out the back a lot and could possibly hit the back of the roll arm. For example, the Sony 16-35 f4 gets wider from the mount and goes past the bottom of the a7 cameras. Using the riser on the QR plate solves the issue.
 With my Arca/Swiss clamp attached it lifts the camera up about the same height as the riser does and balancing was easy with plenty of room for adjustments.
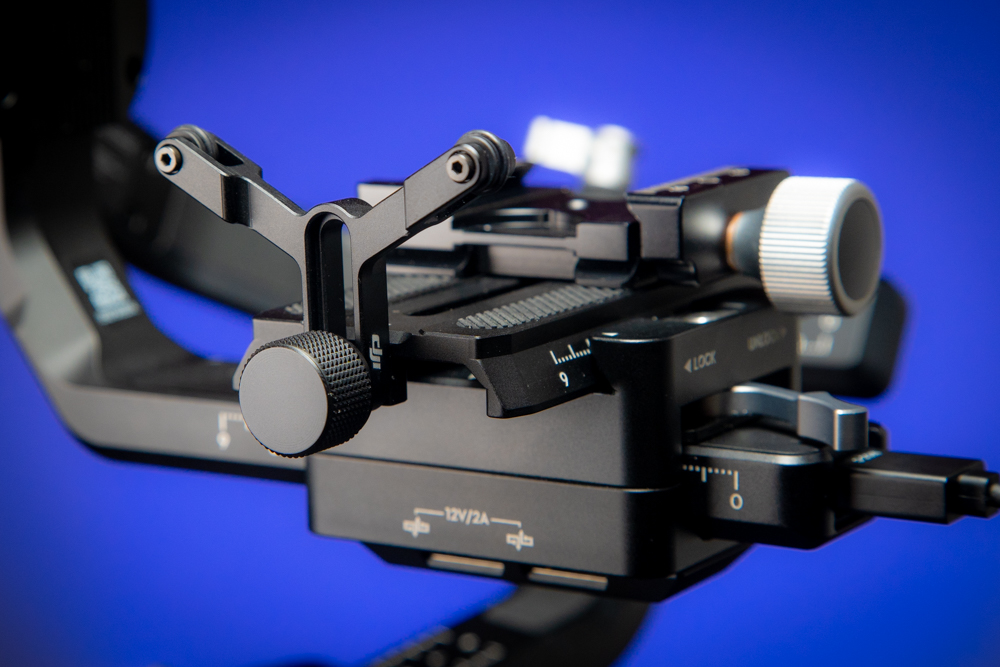
For longer lenses using the included lens support is a good idea. This will prevent vibrating and make performance much better. I would test your setup without the support and see how it works. Less is more if it’s not needed.
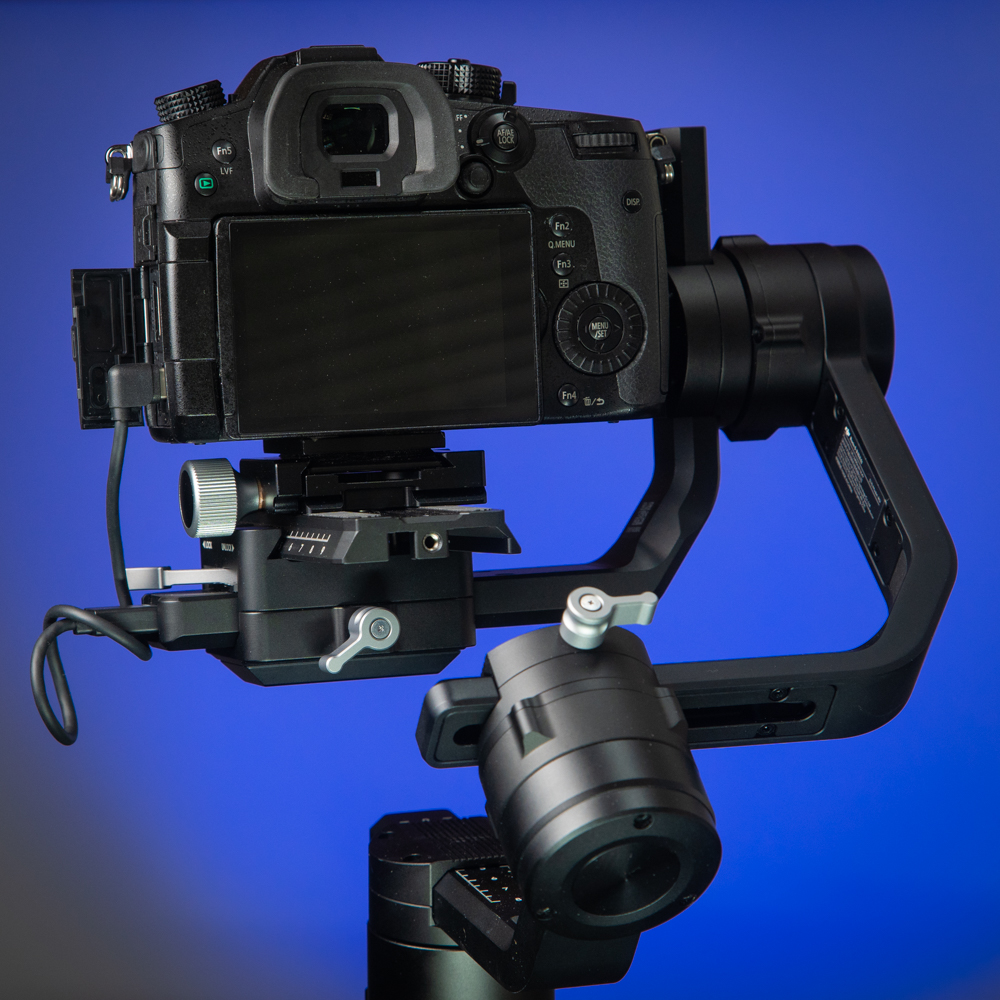
Ronin-S with the GH5
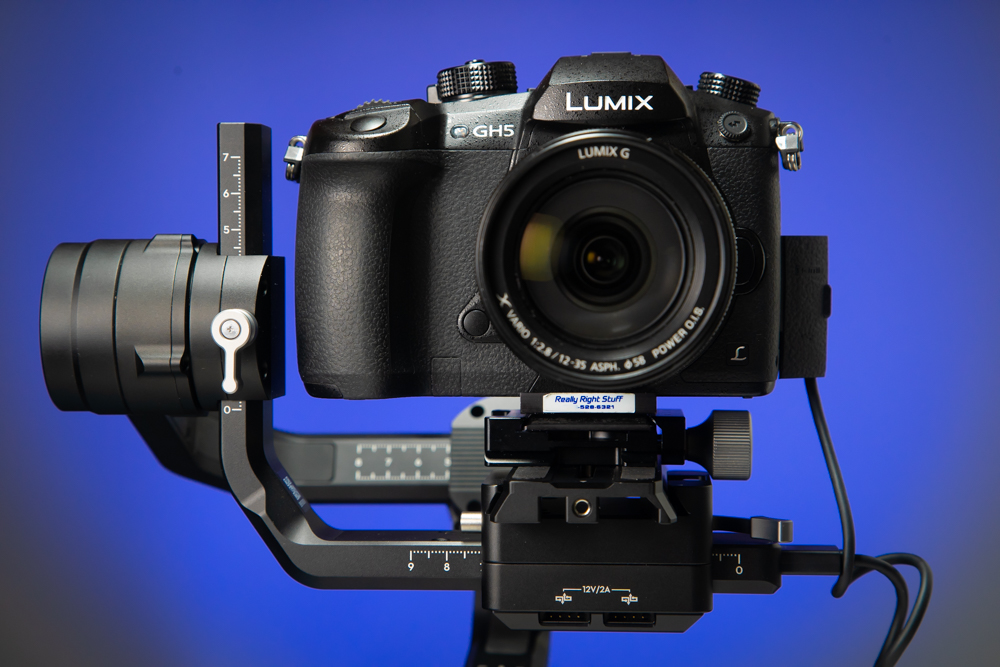
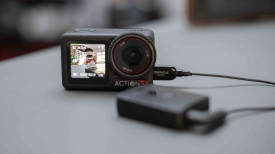
With the included RSS (Remote Start Stop) USB cable attached to the GH5, you can adjust focus with the Focus Wheel and trigger record. On June 27th DJI released a firmware update that added one-shot AF with a half press of the record trigger. I like this method a lot for getting a quick focus since I don’t have to move my hand. Pulling focus with the wheel can be tricky since it’s so close to the top of the gimbal. This makes operating harder when your hands are closer together.
As of July 1st here is the Full Ronin-S Camera Compatibility List for direct control.
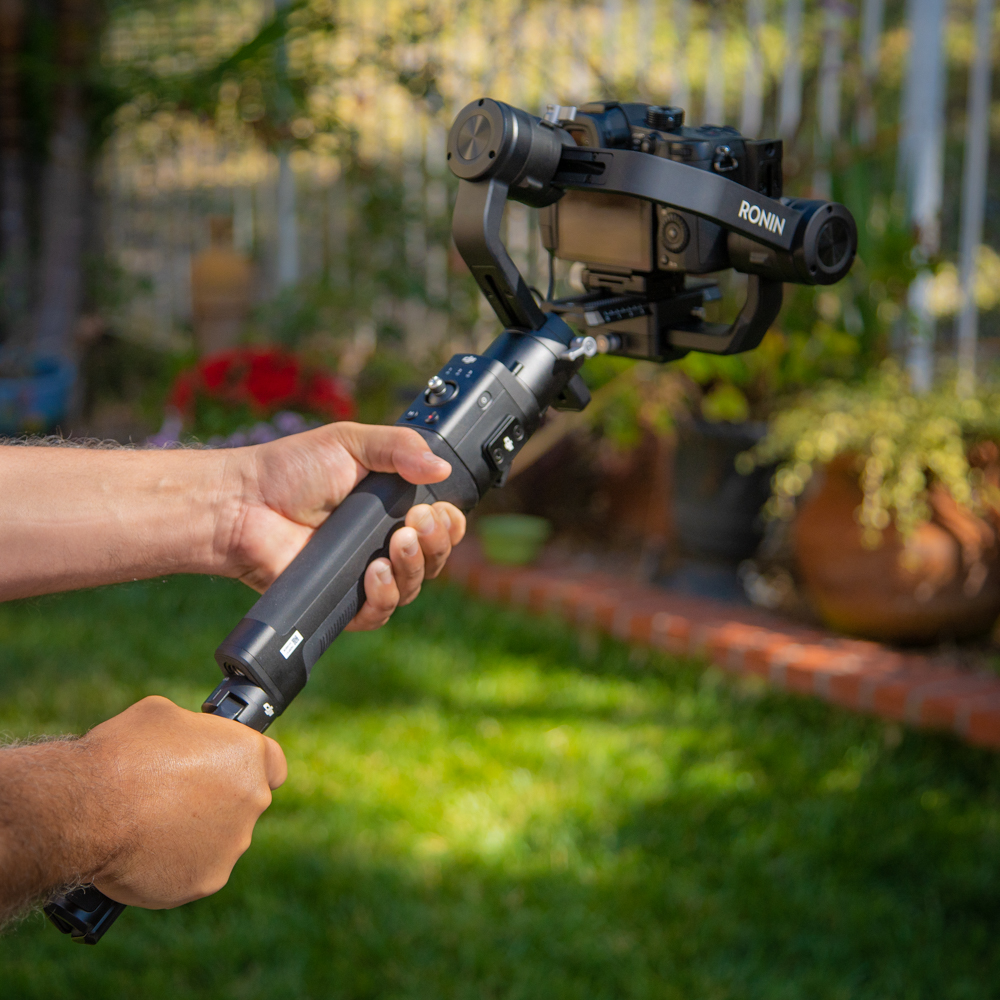
A nice touch is an included tripod that doubles as an extension when folded. The legs and battery grip have a rubberized exterior for a solid grip on the gimbal. I tended to hold the Ronin-S with one hand low on the tripod legs and the other high. I call it the Samurai sword grip. This helps distribute the weight better.
Testing the Ronin-S with Sony a7 III
Sony cameras at this time are not supported by the data port for control like the Lumix GH5 has. DJI states they are working on it and will include the full features of the focus wheel and half-press AF plus record trigger in future firmware updates. The latest V2.0 update improves on the IR performance. DJI suggest the following settings for the Sony cameras.
- Turn on the Remote function in camera.
- When using Create features, turn off Auto Review to enhance camera operating efficiency.

The infrared cable that plugs into the RSS port has wire inside of it to make it hold in place. The bulb on the end of the stiff cable sends an infrared signal that triggers the camera. This doesn’t support one shot AF. Only record. In the picture, you can see I had the IR cable pointing at the illuminator bulb and not at the actual IR Remote Sensor that is under the iris wheel. This explains why I was getting poor performance. After moving the IR cable closer to the sensor I got much better performance. User error on this one. I do feel it’s a little messy having the cable attached in this way. I would need to keep checking it to make sure it’s aligned properly.
One of my favorite locations in San Diego is Balboa Park. Lots of nice architecture and gardens. Perfect place for some test footage. I set the a7 III to 24p so you can see how well the gimbal is performing. No hiding behind 60p slow-mo. Heck, my handheld work looks great at 60p 🙂 I spent a good 2.5 hours shooting with three different lenses.
The 10‑18mm f/4.0 OSS and Sony Sonnar T* FE 55mm F/1.8 ZA plus my Contax/Yashica 35mm lenses were used for my test. The a7 III has S35 mode when using APS-C lenses. I cant tell much of the difference quality wise between full frame and S35. Nice feature. I feel the footage came out pretty well. Not a lot of bounce or jerks in the shots made for more keepers to use in the edit. I learned a lot on the shoot and made some adjustments to the Smoothtrack settings to address them.
The slanted back works well but outside it’s hard to see the LCD screen I ended up sticking the tripod legs into my waist and pulling the camera to my face to use the EVF. It probably looks painful but it worked fine. With the shot looking good I performed a few moves then reviewed them to see how it worked.
This thing is heavy! Could I put a Canon C200. FS5 or EVA1 on it?
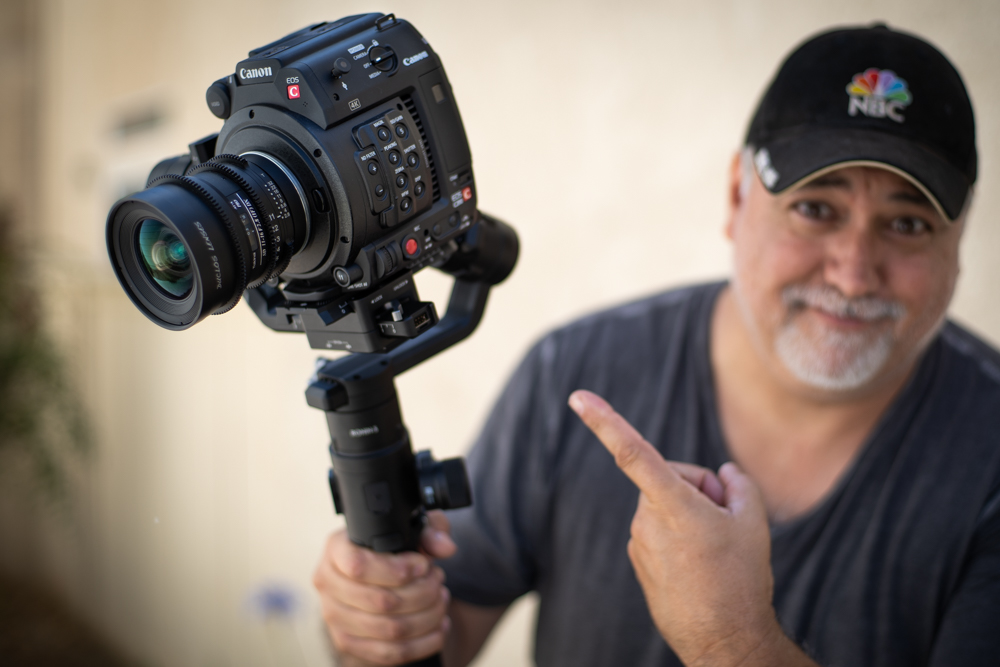
Yes, you can but the Ronin-S is heavy at 4.1 lb / 1.86 kg. compared to the popular Zhiyun-Tech Crane-2 at 2.76 lbs / 1.25 kg. and the MOZA AirCross at 2 lb / 896 g. The Ronin-S wins the heaviest single handed gimbal award! Oh and this doesn’t include a camera. The payload is approximately 8 lbs. DJI doesn’t state that’s the maximum however that’s a lot of weight on the end of a stick. If it fits and can be balanced chances are the motors can handle it and will work, but you better hit the gym if you want to rock an 8 lb. camera on the Ronin-S. I tested it with the Canon C200B and it worked! Surprisingly I was able to balance the body, lens, and battery, however, to see what I was shooting I would need a monitor attached.
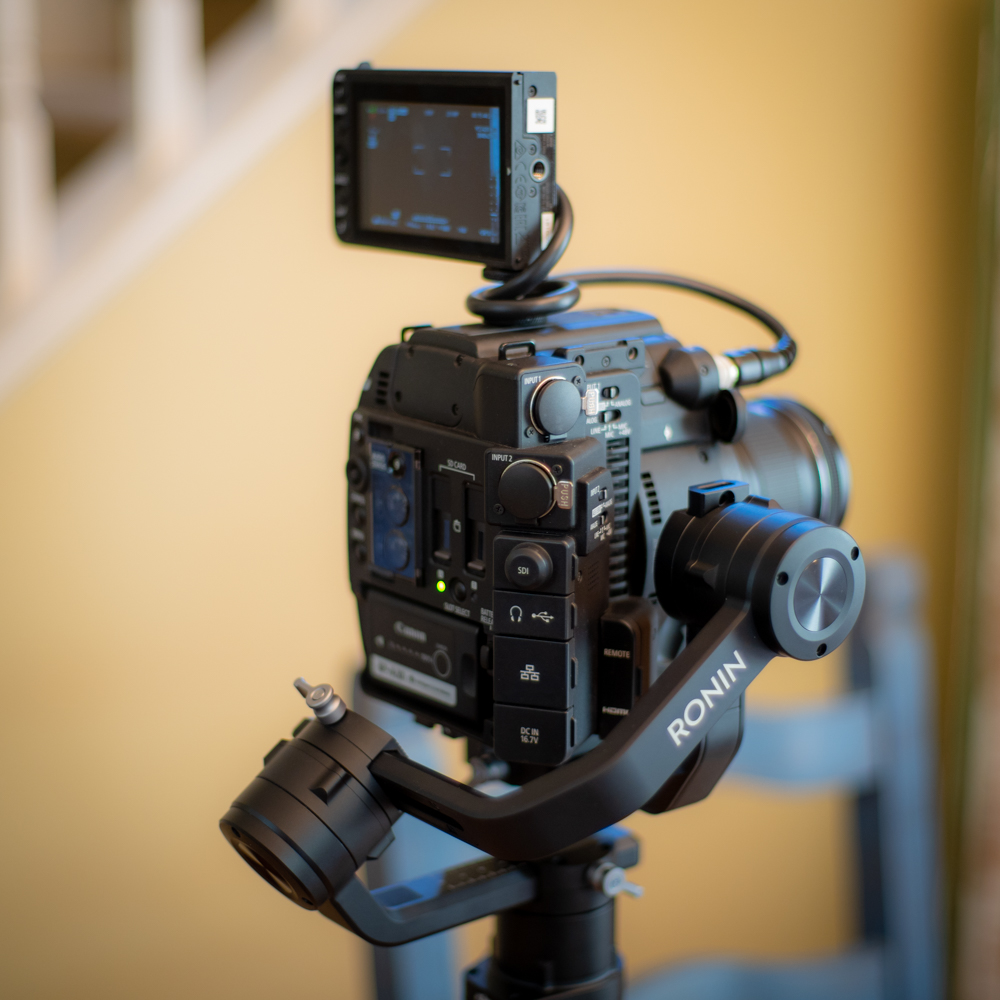
I tried a few different options however most had the monitor too high making it impossible to balance correctly. It’s a tight fit. I didn’t have the right hardware for the time I had the C200. Possibly a small lightweight arm would work for getting the LCD more on the back of the camera and lower. By adding a simple double-sided 1/4″ 20 mount I was able to balance the gimbal. I also add a little counterweight on the bottom of the tilt arm. The motors on the Ronin-S are strong and after a quick calibration, I was ready to go. It worked better than I expected. Did I mention how heavy the Ronin-S is?
Testing the Ronin-S with the C200B
I took the C200B mounted to the Ronin-S out to the Mission San Diego de Alcalá for some test shots. I had a hard time seeing the monitor in the sun plus the angle wasn’t adjustable. If I had an arm on the grip that held the monitor and it was adjustable I think it would be a bit awkward changing the angle with one hand to match the angle of the Ronin-S when going from flashlight to upright modes. Maybe setting it up somewhere in between would work.
Underslung isn’t possible with a monitor attached. The Ronin-S with the C200B worked surprisingly pretty well. I didn’t have any issues other than being heavy and hard to shoot with for the 1.5 hours I spent at the Mission. I also didn’t get any vibration or strange movement. The motors on this gimbal are strong. I shot everything at 24p so you can see the movement and flaws of the motion. I have to say it all looks pretty good with such a load on the gimbal.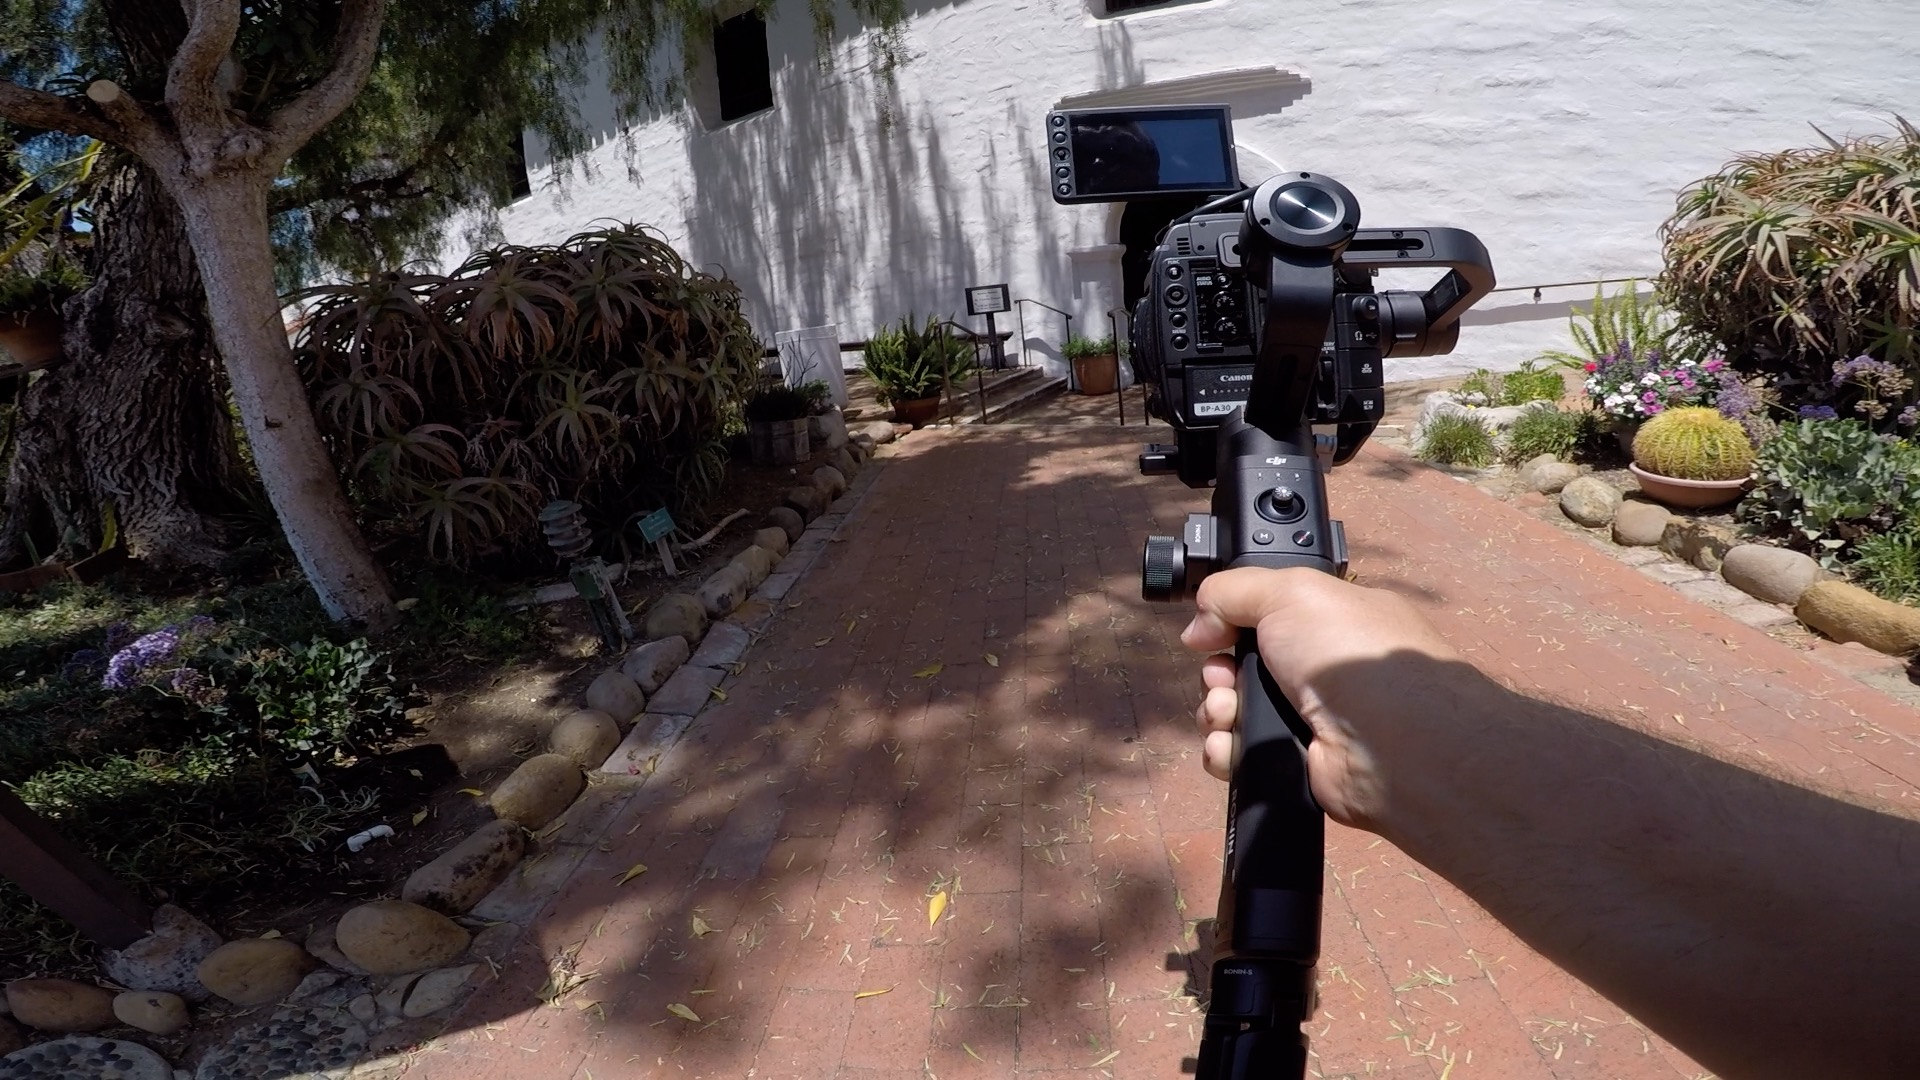
Is this setup something I would use? Probably not but it’s good to know it’s doable and if you only needed a few shots like a jib up or down or a smooth dolly move it’s definitely an option.
Huge thanks to Christopher Francis with Churchfilmmakers.com for lending me his C200B for this test. He should’ve known better 🙂
Operating The Ronin-S
DJI did a great job in making the Ronin-S an easy to use gimbal. You don’t have to memorize a lot of settings. The Ronin-S has three preset USER Settings that you can customize for your style of shooting.
The gimbal when turned on defaults to follow mode. If you want to lock orientation hold the trigger in while performing a move. This is great for the jib up and down motion or when walking and don’t want the camera to tilt or pan. To exit lock off mode simply release the trigger. To recenter the Ronin-S simply double tap. Want to take a selfie or vlog? Tripple tap and the camera spins around and points right at you.
Calibrating can be done with or without the app. To calibrate the Ronin-S hold the M and trigger button in together and the process starts. You don’t have to continue holding the buttons while it’s adjusting. It’s a good idea to calibrate after making any changes to the camera for optimal performance.
One more feature with Sport Mode. This makes the gimbal have a stiffer response when making fast pans to follow moving objects. To enter Sport Mode simply hold the M button while performing the move in any of the three User settings. Releasing the M button deactivates Sport Mode.
As I mentioned DJI makes using the Ronin-S simple and with the three customizable USER settings, you have plenty of control on how the gimbal performs.
It’s all in the software
I mentioned the early days when setting up and tuning a gimbal wasn’t much fun. You used an open source program called SimpleBGC. It wasn’t so simple. Tuning is done with a laptop and USB cable connected to the gimbal. Lots of trial and error and time-consuming.
With the Ronin app, you can make changes to all the parameters as well as change the three custom USER settings. The Ronin app is available for iOS 9.0 or above; Android 4.4 or above. I tested with the iOS version. The app connects to the Ronin-S very quickly. Here is a crash course from DJI on the features of the app.
To set up the Ronin-S to perform ROLL 360 (a 360° continuous rotation) I set USER 3 up for just this purpose. This gets the “Inception” look without having to worry about inducing a tilt in the move. The DJI Ronin-S app is very well laid out and intuitive.
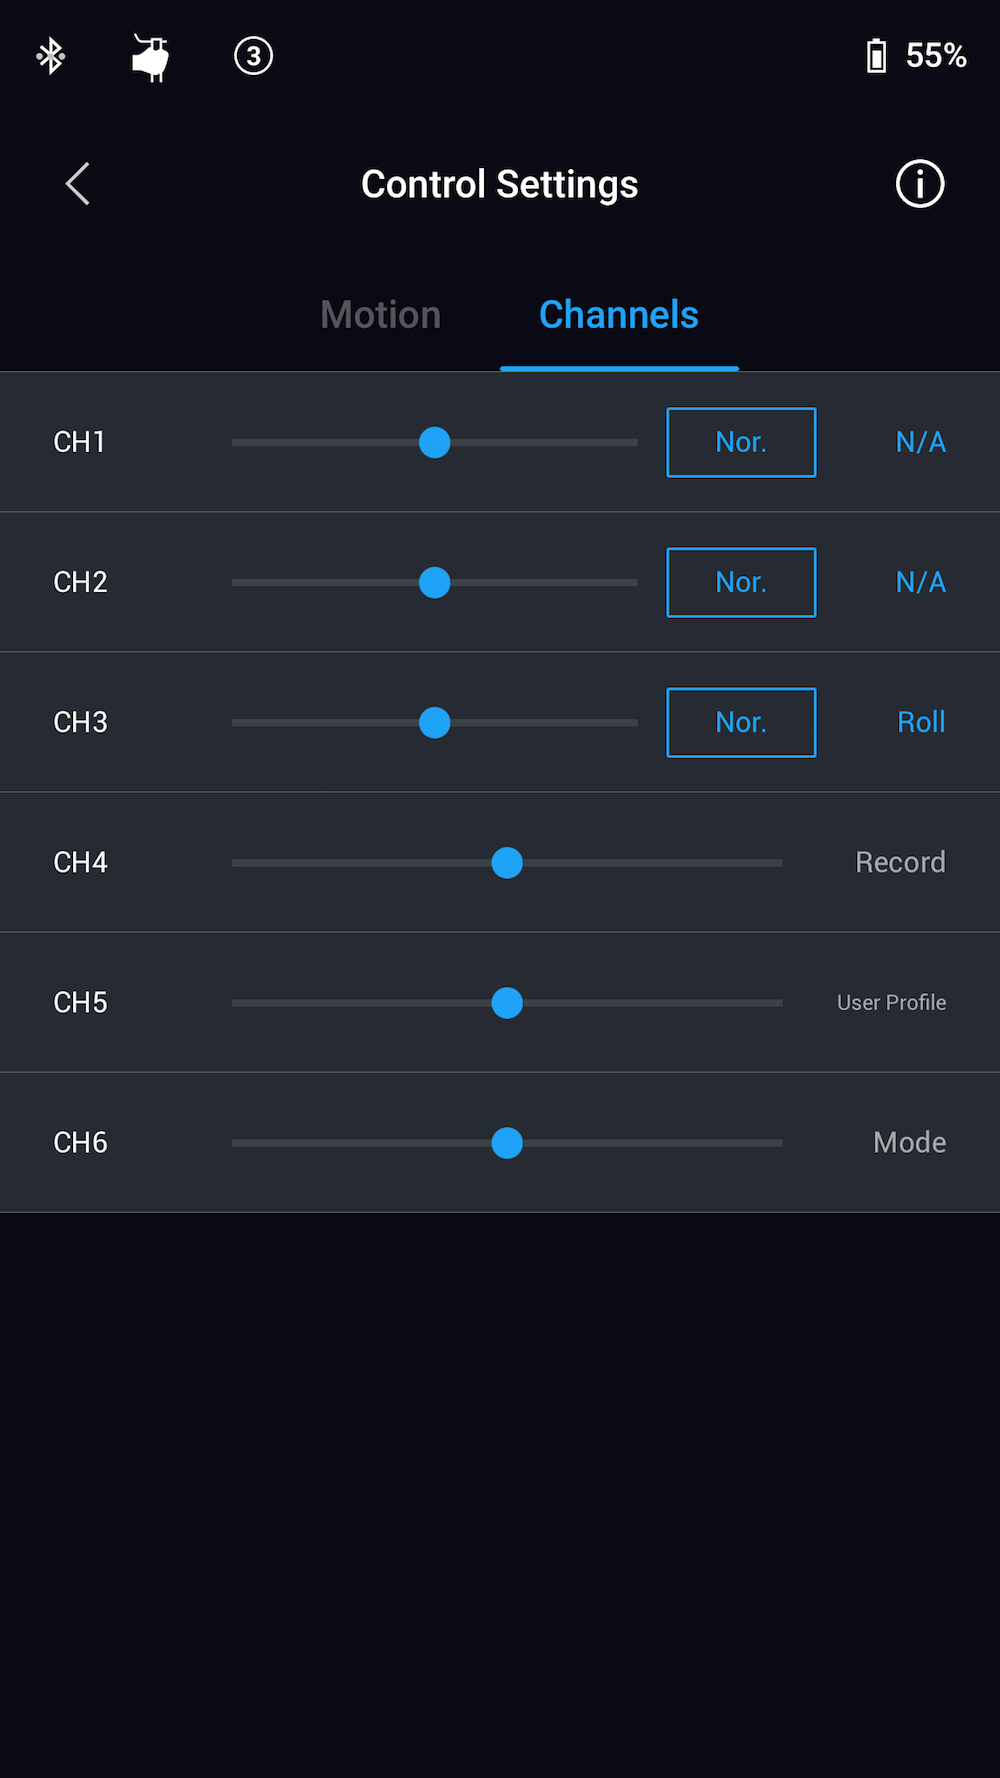
In the app under Control Settings, I disabled Ch.1 and Ch.2 controls on the joystick and set Ch.3 for ROLL (originally mapped as PAN). With USER3 selected and the gimbal in flashlight mode when I push the joystick left or right it spins the camera for the Roll 360 move. This effect can also be performed to give a little tension to the scene with a dutch angle. With the gimbal upright, the range is restricted and the roll will stop about a 1/4 of the way.
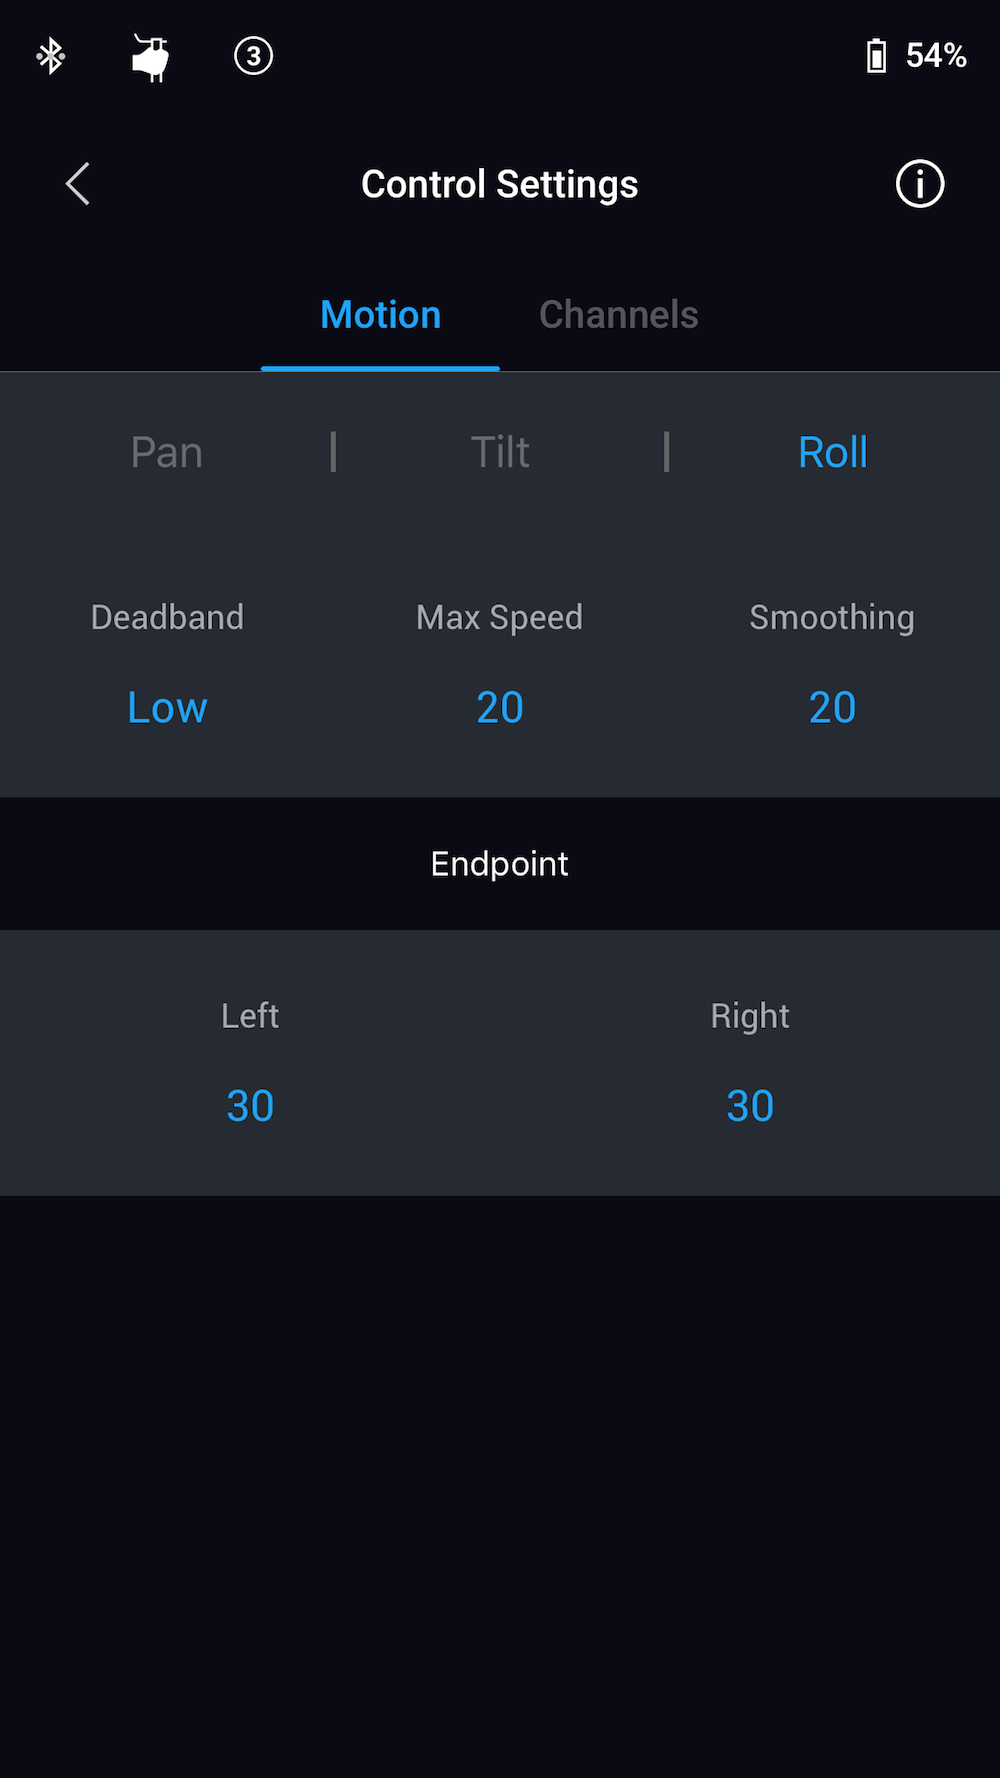
After messing with Motion settings I found the end of a shot was much smoother when changing the Smoothing setting to around 20. When releasing the joystick the roll has a nice slow end. I also wanted a slower roll so changing the Max Speed to down a little makes this adjustment. These type of settings are available for all the axes. We all operate differently and some shots need different settings to pull off so having easy access to the controls and fine tuning is essential.
Creative Functions
The Ronin-S has a few other tricks up its sleeve with Create.
Capture – lets you control the gimbal and camera directly with the app. Trigger record or take a photo.
Panorama – Input your camera info into the app and adjust the span of the shot and the app takes care of the rest.
Timelapse – Camera settings like Shutter, ISO, aperture, Ev and white balance all can be set. Respectively Interval, Content Duration, and Frame Rate.
Motionlapse – Has the same settings available in Timelapse with 2 additional features. As the name implies, this is for motion timelapse. You can set up to five different keyframes to create a motion timelapse.
Track – Is similar to Motionlapse however now you have up to 10-waypoints for real-time video capturing.
But wait there’s more!
DJI has some big plans for the Ronin-S. It’s got an ecosystem waiting to jump into with the DJI Force Pro and Master Wheels integration it can be used to control the gimbal. Also in the works are dual hand grips. Currently, DJI is working on multiple solution options with full control capability of the gimbal. Aside from the trigger, multi-directional joystick and other control buttons will be integrated into the dual handle system. DJI cannot confirm timing yet.
The car mount solution is actually a universal mount system with a power inlet built-in. With this universal mounting system, users of Ronin-S can attach the setup to various platforms including a dolly, a chase car, a cable cam or a jib or any third party RC buggy can work with Ronin-S and the universal mounting system. A universal mounting system for car mounting would be interesting especially since the motors can handle up to 75 kph or 46 mph headwind.
I also asked DJI if a rig would be in the works and they said, it depends on marketing needs, we will collect more feedback and evaluate the possibility. So it looks like the Ronin-S will have a very nice support ecosystem making it more than just a handheld gimbal option.
The dreaded bounce
The one axis that is mostly up to the operator to get smooth shots is the up and down. You have to walk without bouncing to get the smoothest look and it’s not easy to do for longer shots. It takes some practice. Running is where the bounce really shows up. Personally, I feel we make a bigger deal about the look of the bounce. Viewers don’t nitpick this at all. If the shot is compelling they really don’t care about the slight imperfections plus the bounce when slight is most noticeable on the edge of the frame where the eye isn’t looking. I do feel shooting in Flashlight position helps keep the bounce to a minimum as it uses the tilt motor more.
For the most part these days all the new singles are pretty good. The software and ease of balancing and tuning are what makes one potentially better than another. Some gimbals use software called SimpleBGC to tune with. It’s not user-friendly and if used incorrectly can brick the device. Don’t reset the gimbal! The DJI Ronin-S is easy to balance and the app is pretty straightforward and works well.
Conclusion
The DJI Ronin-S is a very well thought out gimbal that is very easy to use. The gimbal controls are laid out in a way that makes operating the gimbal easy. Holding the trigger is a great design for locking off the motors plus the simple double tap to get the camera back to center. The only issue I have is the weight. If it was just 1/4 or 1/2 as much it would make operating the Ronin-S for longer periods of time easier on the body. The machining of the gimbal is top notch. All the parts fit together and lock down with ease. It’s impressive that the motors can handle 8lbs. The motors on the Ronin-S are the best I’ve used on a handheld gimbal. Very quiet and very powerful.
Balancing the Ronin-S is simple. Nothing special to do so if you are familiar with doing so you won’t have any issues. The fact that the gimbal can be a little off and still work is a big deal for heavier loads. I have taken off ND filters and used lenses that protrude when zooming and the Ronin-S performed as if I balanced it. That is a huge time saver. Of course, I recommend getting the balance as close to perfect as you can to get the best performance and battery life. The motors have to work harder when a gimbal isn’t balanced correctly. Speaking of battery life 12 hours is plenty for a full days shooting and the approximate 2-hours it takes to charge is very good. Topping off is a good option while the gimbal isn’t being used. Take a lunch break and charge up for several more hours of use.
The software is a big part of the user experience with these devices. It has to be easy to use, unlike a Sony mirrorless cameras menu system. Simplicity is key to get up and running. DJI did a good job on the Ronin-S app. Easy to figure out, connects fast and plenty of cool other functions available for timelapse and motion capture too.
Last but not least having control of the camera while on the gimbal makes operating a joy. Unfortunately the record trigger and Focus Wheel are not fully compatible yet with cameras other than the GH5, however, DJI is going to get this to work with Sony, Nikon and Canon cameras with future firmware updates. If you think you can handle the weight and I think you can with the right camera setup the Ronin-S will deliver those smooth moves at a very competitive $699 price tag.