After getting announced back in June, Sony has finally released Version 4.0 Firmware for the FX6. FX6 Version 4.0 increases the capabilities of this camera by adding new features including a de-squeeze function for anamorphic lenses and expanded autofocus capabilities in S&Q mode. This update is the direct result of feedback from the filmmaking community.
Version 4.0
- Adds support for Movie file names in the Camera ID + Reel# format
- Adds a function that displays De-squeeze (2.0x, 1.3x) in the viewfinder and HDMI output
- Adds more AF frame rates during Slow & Quick Motion
- Adds support for Flexible ISO and Cine EI Quick in shooting mode:
- Allows you to record S-Log3 content with exposure settings by adjusting the ISO sensitivity
- Allows you to record at a base ISO setting the same as Cine EI, with the base ISO adjusted automatically in conjunction with EI value
- When the shooting mode is set to Flexible ISO, Cine EI, or Cine EI Quick, adds support for recording a 3D LUT file to the same memory card with the base look used during shooting as the shooting data, at the same time
Anamorphic de-squeeze
FX6 Version 4.0 offers a de-squeeze function for anamorphic lenses, but strangely there are only options for 1.3x and 2.0x. This mode enables you to select the de-squeeze ratio for the HDMI output image and the image displayed in the View Finder.
You can set the de-squeeze display using De-Squeeze>Ratio (HDMI/VF) in the Monitoring menu. It is important to note that the HDMI output image display is not de-squeezed during RAW output and SD signal output.
Autofocus support in S&Q mode
FX6 Version 4.0 also adds additional autofocus support in S&Q mode. Autofocus is available for 7 fps or higher in S&Q (Slow & Quick) mode.
Autofocus has the following limitations in Slow & Quick Motion mode:
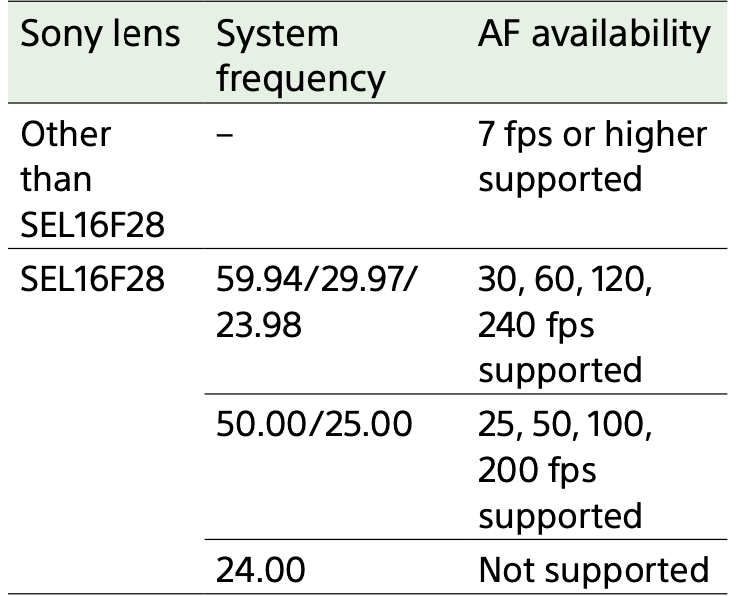
If the iris is set at F18 or higher the AF will be disabled. It is important to note that Audio recording is not supported in Slow & Quick Motion mode, and the auto iris and auto shutter functions are disabled in Slow & Quick Motion mode.
Cine EI Quick support
FX6 Version 4.0 also includes Cine EI Quick support, offering the same production workflow as Cinema Line cameras, including the FX30, and FX3. File naming is now the same as our high-end CineAlta cameras such as the FX9, VENICE and VENICE 2, to ensure an easier workflow, especially in a multi-camera setup.
There are now three Log shooting modes: Flexible ISO, Cine EI, and Cine EI Quick.
Flexible ISO: Records S-Log3 content with exposure settings reflecting the ISO sensitivity matching the scene being shot.
Cine EI/Cine EI Quick: Records S-Log3 content at a selected base sensitivity (fixed), but allows you to change the distribution between light and dark areas using the Exposure Index. In Cine EI Quick shooting mode, a base sensitivity that is suitable for the Exposure Index setting is selected automatically.
When recording in Cine EI Quick or Cine EI, it is recommended that you keep the Exposure Index setting constant. If you change the Exposure Index setting, brightness correction may be very difficult to achieve in post-production, which may make it impossible to reproduce the state when the image was originally shot.
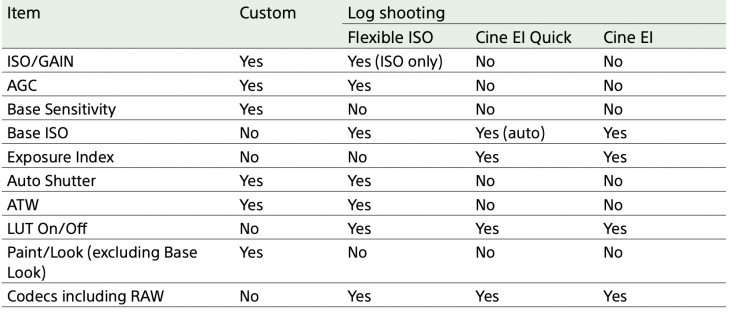
Above you can see what functions are available to use in the various shooting modes.
Recording a 3D LUT file to the same memory card with the base look used during shooting

When a clip that was recorded in a Log shooting mode is played back, the EI value and LUT used when the clip was recorded are applied. The LUT to apply is determined from the information in the 3D LUT file saved as metadata.
If the clip was recorded with Cine EI/Flex.ISO Set >Embed LUT File in the Project menu of the full menu set to On when shooting, that LUT is applied for playback if the 3D LUT file used when shooting is installed on the unit.
If the clip was recorded with Cine EI/Flex.ISO Set >Embed LUT File in the Project menu of the full menu set to Off when shooting, the LUT selected using Base Look >Select in the Paint/Look menu of the full menu is applied for playback. The same LUT is applied if the 3D LUT file used when shooting is not installed on the unit.
Updating your camera
The version update data is first saved to an SDXC type SD card or CFexpress Type A memory card, then is updated using the MENU.
Notes About Upgrading
- Always connect a supplied AC adaptor when updating. If a battery pack is attached at the same time, the update will continue if the AC adaptor is subsequently disconnected.
- Disconnect connected devices (such as USB devices, SDI, HDMI, microphone, and shoe accessories) and eject any media that is not used in updating.
- When using an SD card, make sure it is an SDXC or CFexpress memory card. For details about supported SDXC cards or CFexpress cards, refer to the Operating Instructions.
- Use an SDXC or CFexpress card that has been formatted in the memory card slot using the formatting function of the unit. For details about the formatting function, refer to the Operating Instructions.
Saving Version Update Data to an SDXC card or CFexpress card
- Insert the formatted SDXC or CFexpress card into a computer.
- Download the version update data from the download site, and save the data on your computer.
- Save the data in the root directory of the SDXC card or CFexpress card.
Note: Do not change the file name.
Updating the System Software Version
Note: Do not perform any of the following operations while updating the system software. The version update will not be completed and could cause the unit to malfunction.
- Do not remove the SDXC or CFexpress card
- Do not turn the unit off
For details about the operation of the unit, refer to the Operating Instructions.
- Insert the SDXC or CFexpress card on which the version update data was saved, into slot B of the unit.
Note: Only slot B recognizes the version update data. - Select Version → Version Up in the Maintenance menu, and select Execute.
Note: A Please use the AC Adapter message will appear. If the version update data cannot be determined, Version Up cannot be selected. - Select Execute on the version update confirmation screen.
Note: A Version Update VX.XX → VY.YY message appears (X.XX: existing version number, Y.YY: latest version number). - Select Execute on the version update confirmation screen again. The version update starts. When the version update starts, the access indicator flashes. The process takes approximately 8 minutes (the time will vary depending on the combination of the old and new updated versions). When the version update is completed successfully, the access indicator stops flashing and the unit restarts automatically.
Note: If a black screen is displayed for 15 minutes or longer, set the unit power switch to the OFF position, unplug and then re-insert the power cord, and set the power switch to the ON position. Check the version update procedure, and then perform the update procedure again from step 1. If the version update problem persists and the update is not successful, there may be a problem with the unit. Contact a Sony service representative. - Check that the version has been updated (see Checking the Existing Version). If the system software has not been updated to the latest version, check the version update procedure, and then perform the update procedure again from step 1.