The new Action 2 Camera has taken on a whole new cube form and two-piece design. I’m not getting into the weeds with specifications, as Matt already covered this in his nuts and bolts article. Please have a read as it’s loaded with all the good stuff you will want to know.

I’m focusing on usability and performance. I will state I’m no adventure enthusiast, so no sky diving with an action camera in this review. While the promos always have exciting footage from action sport situations, most users will be a lot tamer. I will test its stability, image quality, and usability. With that, let’s dive in!
New Form Factor
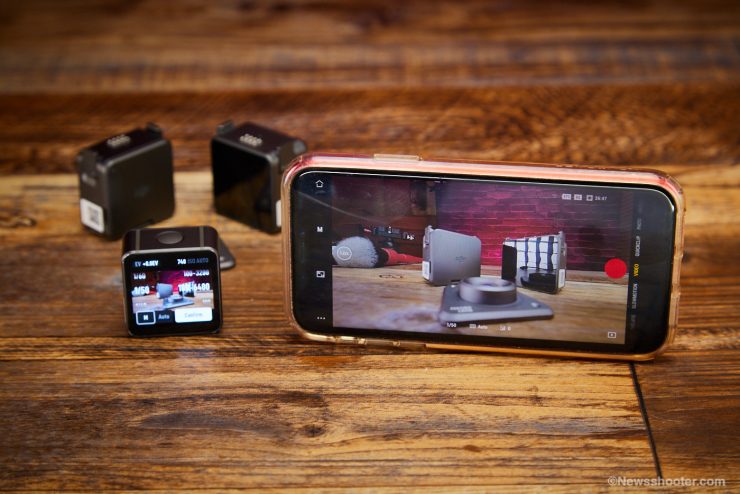
My first impression when I opened the box was, hey! There are two cubes in here? Well, you don’t need to use them together as the primary camera is usable by itself. Plus, it’s waterproof, so if you have the urge to jump into the pool, feel free, but the LCD Touchscreen module isn’t. DJI has a waterproof housing that fits both together.
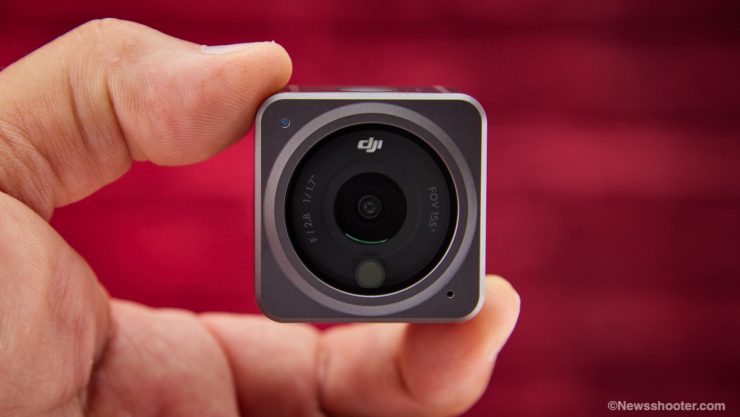
A big new feature is the form factor, and the cube is small with some heft for its size. It’s all-metal with Gorilla Glass covering the lens and LCD on the back. The primary camera comes in at 56g or 1.97 ounces.
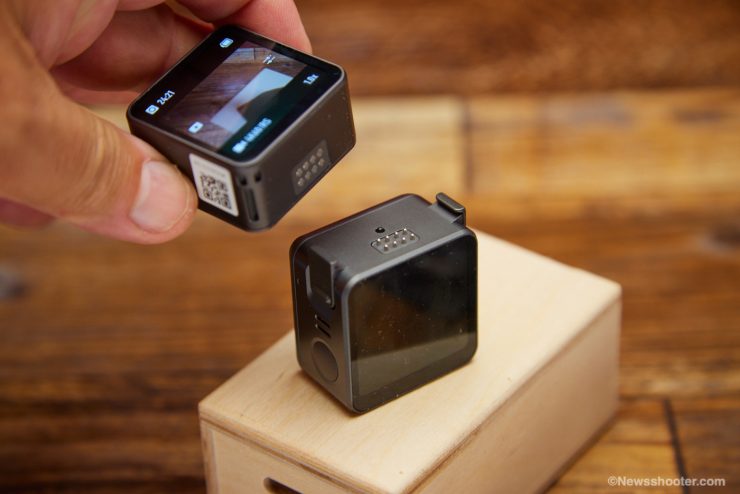
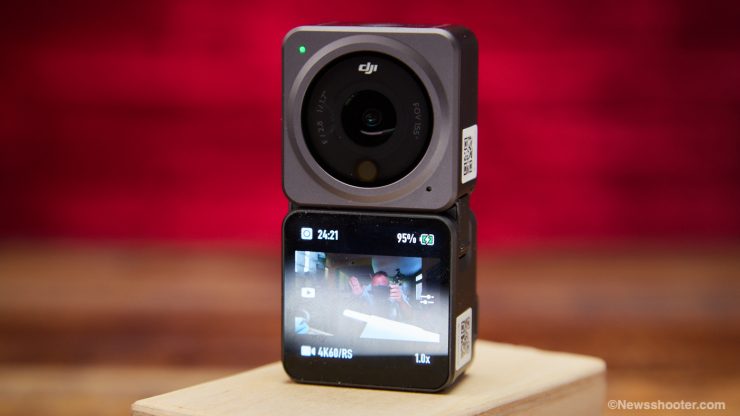
The system is based around a magnetic design with contact pins that allow the use of other modules like the LCD Module and Battery Module. When attached the LCD module can be used as a monitor and record to a Micro SD Card. It’s a new design I haven’t seen used before.
With magnets come issues. DJI states to keep the Action 2 away from magcards, IC cards, hard disks, RAM chips, implantable medical devices such as pacemakers, and other devices to avoid interference.
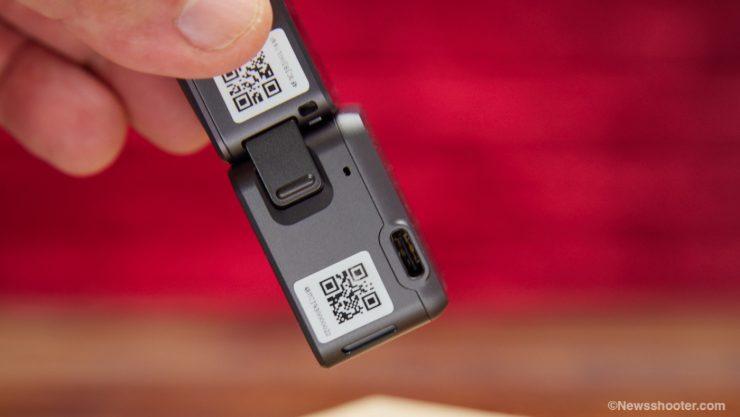
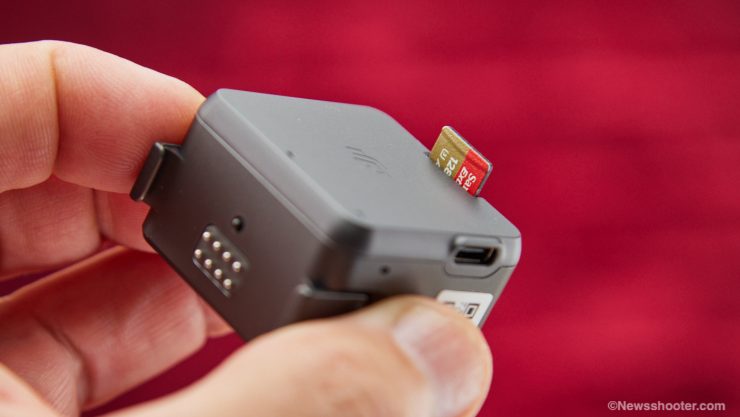
The camera module doesn’t have a media slot or USB-C connection. You charge by attaching either an LCD or Battery module depending on the kit option selected. Without either module, you will only be able to use the internal 32GB of internal storage, and remember you can’t charge the camera without one of the modules attached.
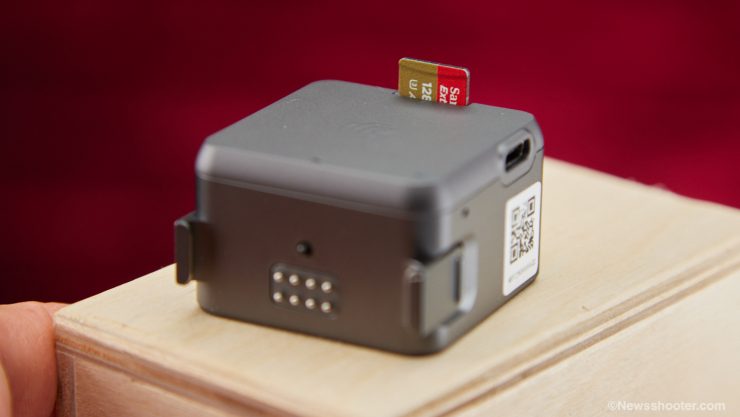
The second module has the Micro SD card slot and USB-C for charging and offloading the media from both the internal storage and card. This might be plenty for the casual user, but I would have some cards handy.
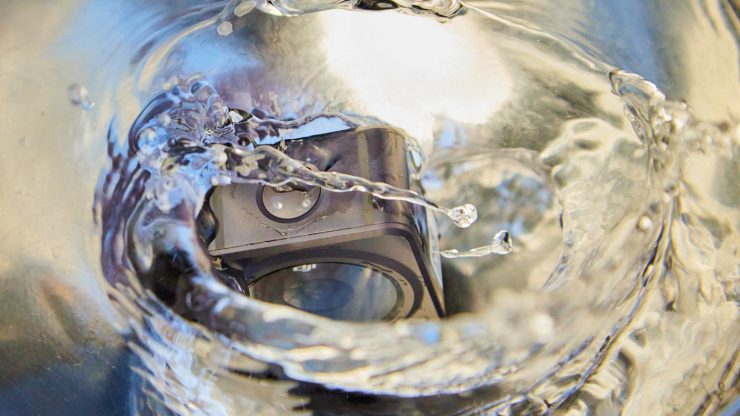
Waterproof
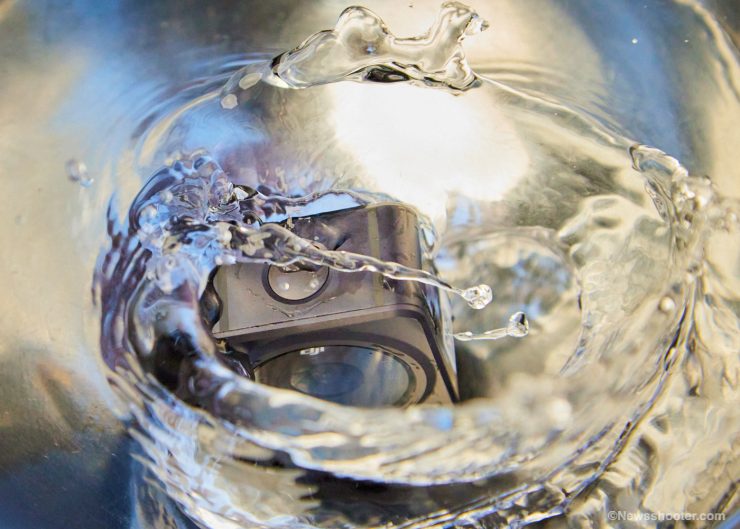
The camera unit and optional waterproof case meet the IPX8 waterproof standards of GB/T 4208-2017 and IEC 60529:2013. The Acton 2 camera module can be used underwater at depths of up to 10 m. The maximum depth underwater is 60 m when using the waterproof case.
Power Module
The DJI Action 2 Power Module increases filming time by up to 180 minutes with a hot-swap option for continuous power and a micro SD card slot. It’s basically the same unit as the LCD touchscreen module only with no screen.
Lens
The camera has a 1/1.7-inch CMOS sensor that records up to 4K/120fps video. The lens on Action 2 has three fields of view options. Standard Dewarp, Wide, and Ultra Wide. Standard Dewarp and Wide look similar but much Dewarp fixes the distortion.
I think Standard Dewarp it’s a good choice if you don’t like that wide-angle look. The 155° FOV is crazy wide a lot of lens distortion. Nowadays, it is easy to fix in post, and the Ultra Wide view is a lot of fun for POV as it captures so much of the scene.
Video Options
As mentioned the Action 2 camera module doesn’t have a Micro SD slot. It uses 32GB of internal storage. It records in two codec options. Efficiency HEVC or Compatibility H.264 compression.
In Compatibility Mode (H.264), you get approximately 48-minutes of HD 24p and 26-minutes of recording in 4K 24p. Not bad, but it could be limiting if you cant offload the footage quickly. This is where using the LCD Touchscreen, or extended battery becomes valuable as it has a Micro SD slot and both extend the run time. Now you can use up to a 256GB Micro SD card plus the internal storage. More on Micro SD card compatibility later in the article.
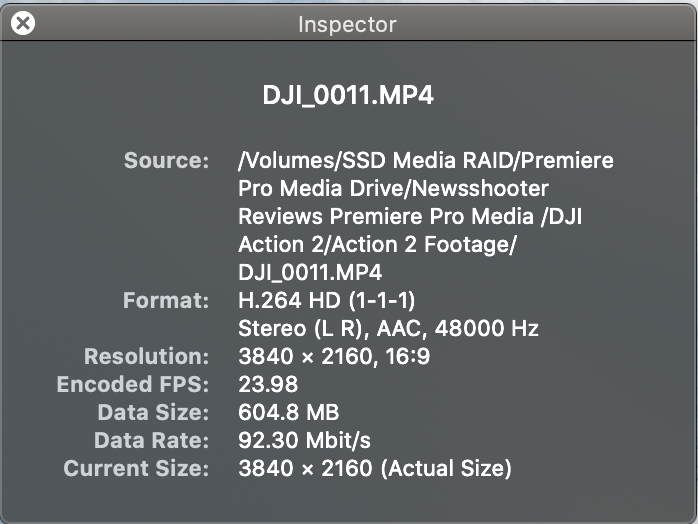
As for what compression is best? I’m not entirely sure as there are no specifications for either Compatibility or Efficiency. From the file size difference, the Efficiency option gets you a little smaller files but not that much. In 4K 24p, you get 29-minutes compared to 26-minutes using Compatibility with the internal 32GB storage.
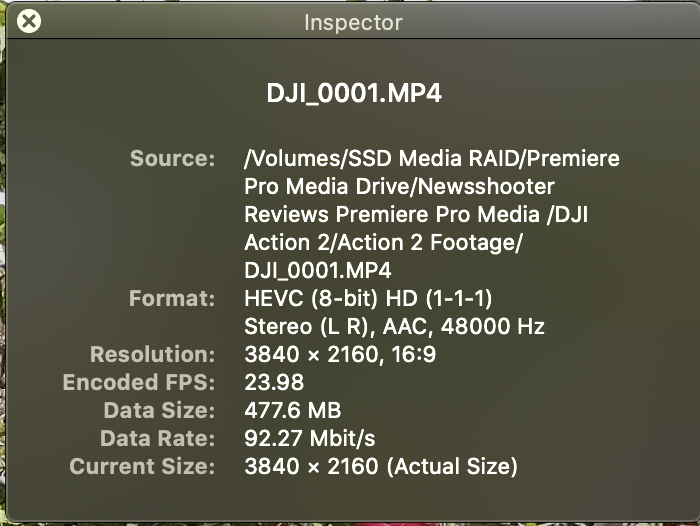
Below is both codecs info from the file. As you can see, both are approximately 92 Mbit/s and 8 bit. I don’t see any advantage of one over the other. It would be nice to have a higher bit rate option, but I’m sure heat would become an issue for such a tiny device. I will say that the image holds up well for a low bit rate, but don’t expect to do heavy grading as it will break pretty quickly.
Resolutions and Frame Rates
Action 2 has impressive resolution and frame rate options. DJI is pushing this little cube to be versatile. Below are all the resolutions available.
- 4K (4:3): 4096×3072 @ 24/25/30/48/50/60 fps
- 4K (16:9): 3840×2160 @ 100/120 fps
- 4K (16:9): 3840×2160 @ 24/25/30/48/50/60 fps
- 2.7K (4:3): 2688×2016 @ 24/25/30/48/50/60 fps
- 2.7K (16:9): 2688×1512 @ 100/120 fps
- 2.7K (16:9): 2688×1512 @ 24/25/30/48/50/60 fps
- 1080p: 1920×1080 @ 100/120/200/240 fps
- 1080p: 1920×1080 @ 24/25/30/48/50/60 fps
GoPro Hero 10 Video Specifications

The Hero 10 states the data rate at 100Mb/s for all the resolutions while this information isn’t available from DJI for the Action 2 I used the Inspector from Quicktime Player to read what the file was and it came in at 92 Mb/s so the data rate is a wash between the two cameras. At this time the GoPro is priced a little less. Direct from GoPro you can get the Hero 10 for $399. It retails for $599. The Action 2 Dual-Screen Combo retails for $519.
GoPro Hero 10 Black Video Specifications
- 5312 x 2988p at 24/25/30/50/60 fps (100 Mb/s MP4 via H.264/AVC, H.265/HEVC)
- 5120 x 3840p at 24/25/30 fps (100 Mb/s MP4 via H.264/AVC, H.265/HEVC)
- 3840 x 2160p at 24/25/30/50/60/100/120 fps (100 Mb/s MP4 via H.264/AVC, H.265/HEVC)
- 4000 x 3000p at 24/25/30/50/60 fps (100 Mb/s MP4 via H.264/AVC, H.265/HEVC)
- 2704 x 2028p at 50/60/100/120 fps (100 Mb/s MP4 via H.264/AVC, H.265/HEVC)
- 2704 x 1520p at 50/60/100/120/200/240 fps (100 Mb/s MP4 via H.264/AVC, H.265/HEVC)
- 1920 x 1080p at 24/25/30/50/60/100/120/200/240 fps (100 Mb/s MP4 via H.264/AVC, H.265/HEVC)
Limitations when using HEVC
Below are a few scenarios where you have some limitations when using HEVC. DJI states more options will be available in future updates.
- Video: 4K (4:3) up to 60fps
- Video: 4K (16:9) 120/100fps or 1080p up to 240fps
- Slow-Mo: 4K 4x or 1080p 8x
To have more control over the Video and Photo settings, set Action 2 to “Pro,” enabling Format, Exposure, and White Balance features.
Exposure Options
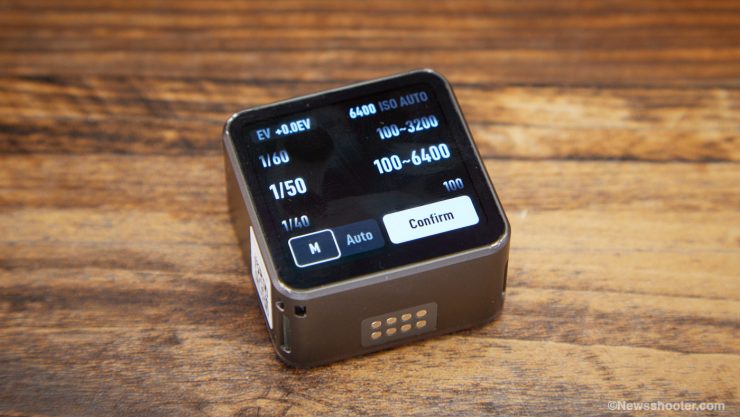
You can go Manual and have more control over the exposure in video mode, but not entirely. In M, you select the shutter and pick a locked ISO value or an ISO range.
The ISO Set Ranges
- 100-6400
- 100-200
- 100-400
- 100-800
- 100-1600
- 100-3200
- 100-6400
In Manual mode, you can switch from shutter to EV settings by tapping the left corner where the set shutter and EV value are shown. By tapping the icon, you can change the value for each. EV from +0.0 to + and – 3.0. Shutter range from 1/25 to 1/8000 of a second.
Having semi-auto options is very cool. If you know the shot might have sudden overexposure moments, this will avoid having the camera make an exposure change that might be over or under compensating.
I like Manual with ISO range selected for when you want to maintain shutter speed to match frame rate. Shooting 60p, then lock it into 1/120 of a second. If you don’t have ND filters, you will ride the shutter higher to drop the exposure. For an action camera, this is probably fine.
When you are in M mode, you can get an exposure reading in the scene for EV + – as it helps a little to set and lock. No exposure tools are available, and I think it would be nice to have them. I would also like to see the settings in the LCD as an option.
The camera will still be in semi-auto mode since it will also add EV. If you are in a more run and gun mode, then Auto is a good choice, and some good news is you can set the exposure compensation and ISO limits.
Monitoring and Touchscreen
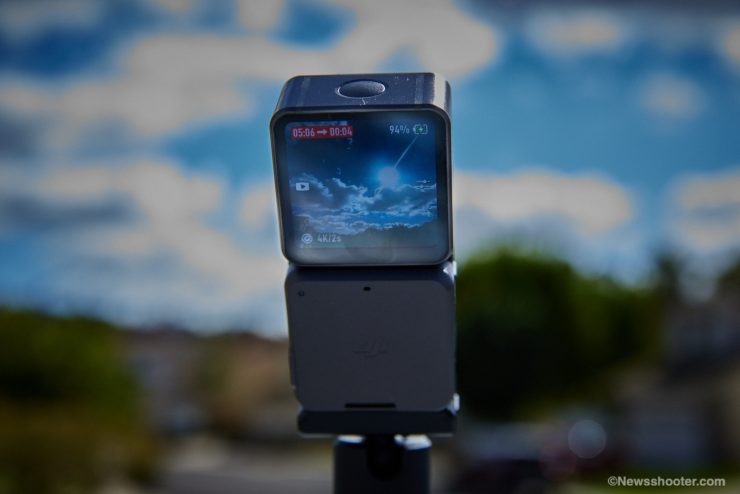
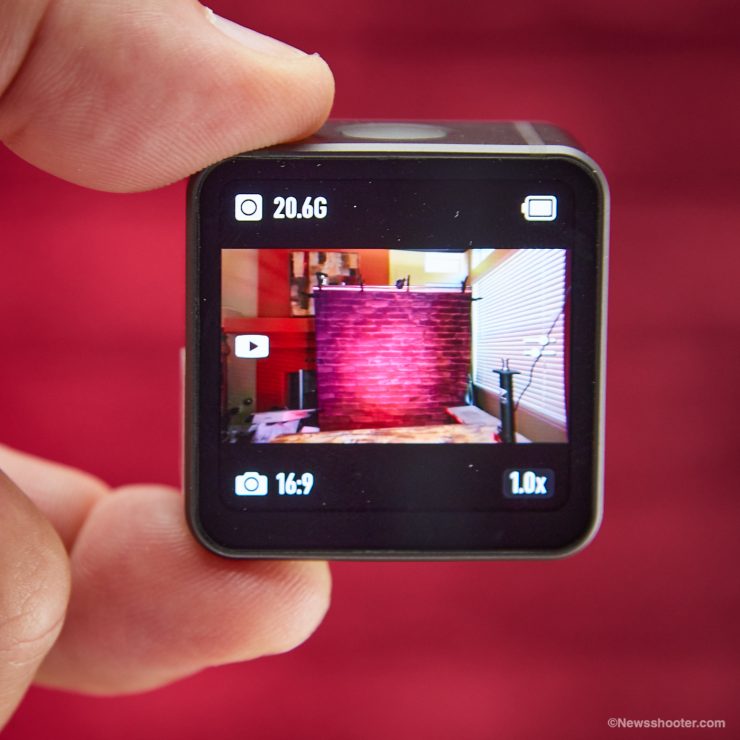
If you use the Action 2 with only the camera module, you have the back LCD to view the image. It’s 1.76 inches with 350 PPI. It’s small but good enough to see and frame the shot.
Knowing if you are too close and out of focus is tricky as the resolution is low and the image is small.
The LCD is bright and works very well outside in the sun.
Some Issues
I had some issues with the LCD Touchscreen. It turned off a few times during use and required powering both off and on to bring it back. The camera still worked when the LCD went black. This is probably an early firmware bug that will be addressed. I did mention it to DJI.
The touchscreen is a little fussy on both. Dragging the settings like the camera lens angle from Ultra wide to Wide jumps past the one I want. Also, the zoom adjustments are very touchy and will jump to a setting I didn’t want. With such a small screen, it’s tough to navigate but workable. I wish the response was more accurate when making setting changes.
Menu System
The settings are accessed with the touchscreen or DJI Mimo App and the touchscreen module has all the same functions for changing settings.
Settings are changed by swiping similar to a GoPro and other devices. Another option is tapping the icon. Tapping works with the battery icon to see the power level, Media playback by tapping the play icon, Settings icon opens Exposure, WB Color, FOV options, and Zoom on the bottom right. It shows 1.0x and resolution and frame rate icon.
Mimo app
The Memo app is excellent. It makes changing settings a breeze compared to using the touch screen. In comparison, it’s a little more time-consuming to pull the iPhone out and launch the app and connect the camera. After that, it’s fast to get to all the settings and double-check to make sure you are good to go for the shooting environment you are in, plus you know have a bigger monitor and you can trigger record. A nice feature is you can playback clips recorded as well.
I like quickly changing the modes from video to stills and special functions like Timelapse and Hyperlapse. Monitoring is also helpful, especially when you are getting to know Action 2. It doesn’t have a close focus. I learned that by using it before I opened the app.
Mounting Options
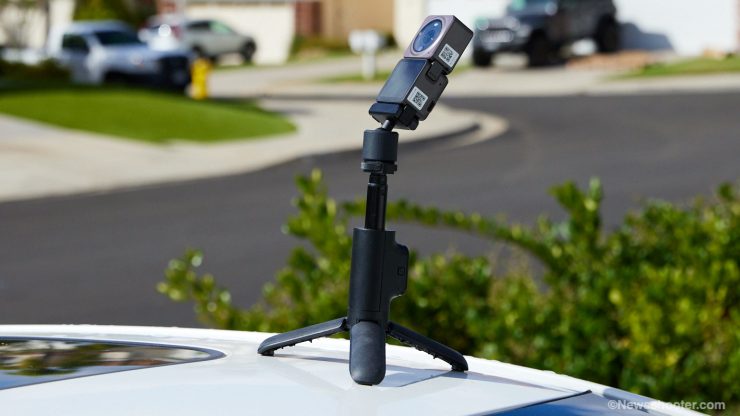
With action cameras, mounting is a big deal as you want to use it in ways conventional cameras are designed for. The Action 2, being a cube with a strong magnet and two clips to hold it in place, is fast to mount on several accessories, including the LCD monitor. At first, I thought the magnets wouldn’t hold the hefty little camera, but it isn’t going anywhere with those added clips. Now would I trust it attached outside of a car? I’m not entirely sure. Heavy vibration can do some crazy stuff. I would like to see a 100% locking solution for situations that could potentially be risky.
DJI does have several options and accessories for Action 2, and it can be mounted to a GoPro style mount for more versatility.
Electronic Image Stabilization
The Action 2 HorizonSteady electronic image stabilization is impressive. This tech has really improved. The camera crops in and uses that extra resolution to stabilize the image. It locks the frame to a level horizon when filming, maintaining stable and horizontal footage. RockSolid is also improved. The combo just works really well in such a tiny camera. There is a lot of tech going on.
Battery Life
Action Cameras generally have poor battery performance due to the physical size of the device. The Action 2 has a built-in battery, and you can purchase a 1300 mAh Action 2 Power Module external battery that mounts with the magnet and clips.
With the camera and power module, you get approximately 180 min of operating time. To fully charge both when connected is 90 min.
Recommended Media
- Max. 256 GB
- SDHC/SDXC UHS-I Speed Grade 1
- UHS-I Speed Grade 3 microSD
- Samsung EVO 32GB SDHC UHS-I Speed Grade 1
- Samsung EVO Plus SDXC 32GB UHS-I Speed Grade 1
- SanDisk Extreme SDXC 64GB V30 A2 UHS-I Speed Grade 3
- SanDisk High Endurance SDXC 32GB UHS-I Speed Grade 3
- SanDisk Extreme Pro SDXC 32GB UHS-I Speed Grade 3
- SanDisk Extreme SDXC 16GBUHS-I Speed Grade 3
- Lexar 633x SDHC 16GB UHS-I Speed Grade 1
Image Quality
The image looks good with the Action 2, especially with the size being so small. By now I shouldn’t be surprised as mobile phones are doing amazing things as well.
It does suffer from noise in bright colors such as red when in “Normal” color mode. This is due to the color depth and compression of the codec, plus the “Normal” picture profile being overly saturated can make it worse. One function I wouldn’t use is the zoom feature as it looks very fuzzy.
The clip above shows how stable the camera is when walking and running. I did notice the audio was weird when I was running. Almost like an echo. I do like how the microphones pick up audio all around the Action 2.
After doing a few tests, I feel that 1080p and 4K look pretty close, with HD a little better with more detail. I wouldn’t hesitate to use either. 4K 120 is surprisingly good. Yes there is some compression and low bitrate noise but it isn’t distracting, so I would use it when the moment calls. HD 240 is also better than I expected but again the low bitrate adds compression artifacts.
Without a neutral density filter on the lens, the shutter will be very high when shooting outdoors on a sunny day to get proper exposure, and this adds a lot of stutter to the image. Action 2 shines in the sun. This is no surprise, and it’s intended for this purpose. It does okay in the shade, but noise is much more present.
Overall, Action 2 image stands up just fine for an action camera.
4K 120 FPS
With a small camera, pulling off 4K 120 fps is impressive, and it also looks good. I wasn’t expecting a detailed, sharp image, but I have to say I’m impressed and would use it freely for high-speed capture.
All the shots in the sample are 120 fps in 4K with the shutter set to 1/240. I used the D-Cine color setting. I found the image to have very little noise or compression issues that distract viewing. Like I said. These cameras are fun to use, and we can’t expect them to look like a cinema camera. Well, we would love it too, but it’s not likely. The last shot in the sample is a 4K timelapse with the camera set for clouds. Very simple to set up.
D-Cine and Normal Color Modes
You can’t fine-tune the image in the settings. You have to choose either D-Cine or Normal.
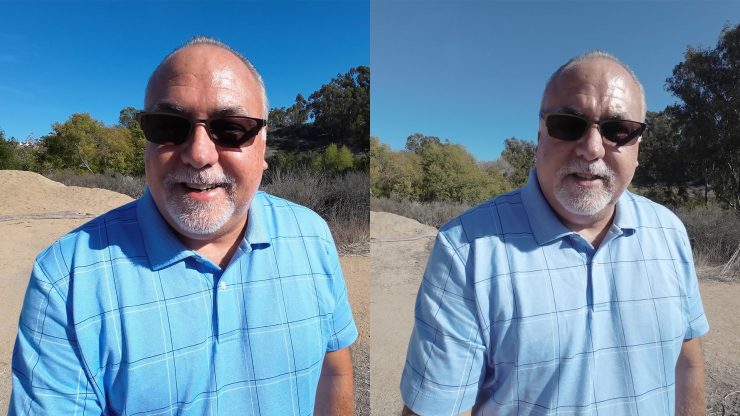
The normal mode is very punchy with a lot of contrast and saturation. D-Cine is looking better to me. Flatter but not super flat with less saturation. I like it. While I look happier in “Normal,” Mr. Grump in the pic likes D-Cine better 😀
With a few simple tweaks in post, the image can look more natural. “Normal” for landscape shots might be fine, but people look overly saturated.
Macro Lens Attachment
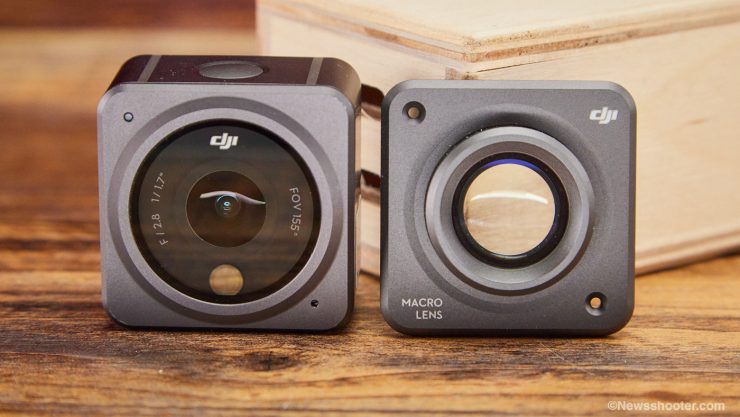
The Macro lens is fun to shoot with. I captured 120 fps footage with it, and I liked the image. One thing that is hard to deal with is knowing if you are in focus. With such a tiny screen, it’s hard to know how close I can get or if I’m not close enough.
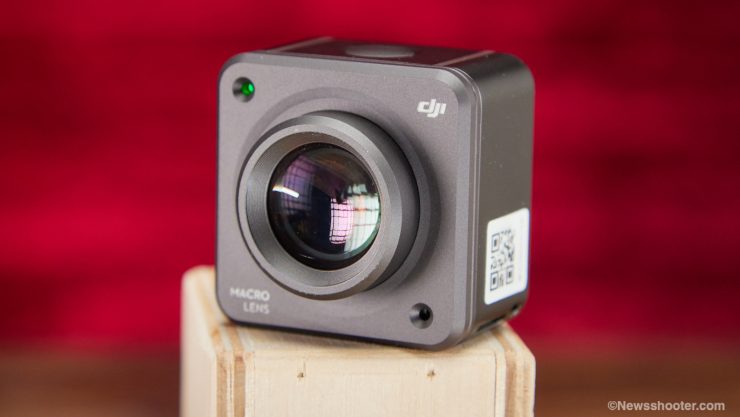
More interestingly is how the lens attaches to Action 2. It uses… You guessed it! a Magnet. I like this a lot. Pop it on and go. If I were a betting man, I would say that ND filters will or already are in the works, which will help a lot in taming the shutter for bright outdoors shooting conditions.
One potential issue is the strength of the magnet. It’s okay with a macro lens, but if an ND filter has the same hold, I think it could fall off if the camera is getting jostled a lot. Say mounted on a mountain bike or helmet.
Final Thoughts
Over the years, I have had a few action cameras, and they seem to get little use in my video kit, but when I need one, it adds a lot to the production. This is probably due to the nature of my work and not being an action sports kind of guy. However, that doesn’t mean these tiny cameras are not helpful as it relies on the user’s imagination and creativity. I’ve always said if you shoot something interesting or compelling, nobody cares about the camera and the quality as the shot sells itself. With the Action 2, you get great image quality and 4K 120 in such a small form factor.
Plain and simple. Action 2 is a lot of fun, and I like the small cube. The image quality is good, especially the 4K 120 FPS. These tiny cameras have come a long way. The question for you is, do I move to the Action 2 from what I already have? That is a tough one as these small cameras are all very capable. If you are heavily invested in accessories and hardware for your camera, it might not make sense, but if you have an older action camera, it is definitely worth a look as it’s a good camera.
Pricing
The Action 2 Dual-Screen Combo retails for $519. and includes the Action 2 Camera Unit, Front Touchscreen Module, Magnetic Lanyard, Magnetic Ball- Joint Adapter Mount, and Magnetic Adapter Mount.
The Action 2 Power Combo retails for $399 USD and includes DJI Action 2 Camera Unit, Power Module, Magnetic Lanyard, and Magnetic Adapter Mount. All other accessories will be sold separately.