Sony’s FX6 is the third camera in its new Cinema Line. The FX3, FX6, FX9, and the VENICE make up Sony’s professional digital cinema line-up.
Yes, this review is quite late because it did take a long time to get hold of a camera. As they say, better late than never.
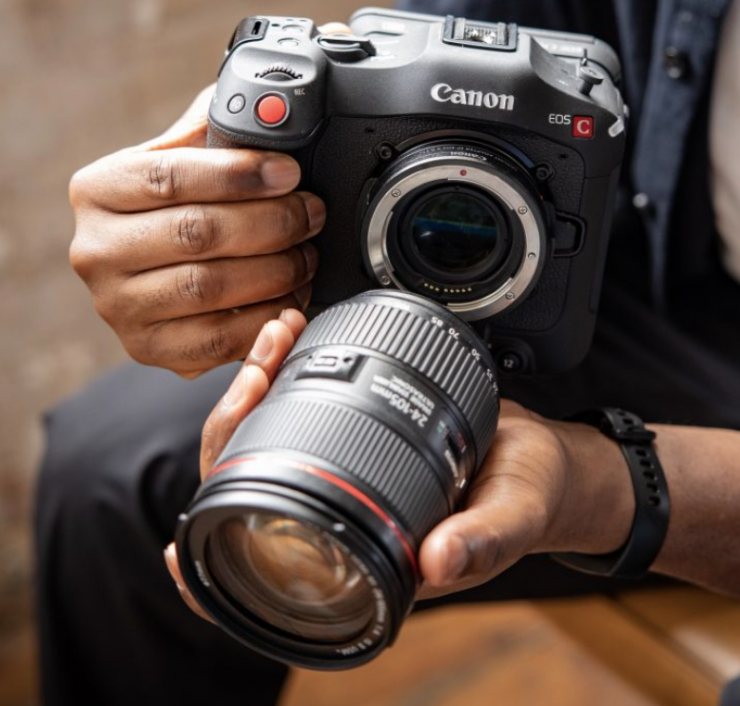
I am going to make a lot of comparisons between the FX6 and the Canon C70 in this review because the Canon is the camera that is most likely to be compared to the Sony.

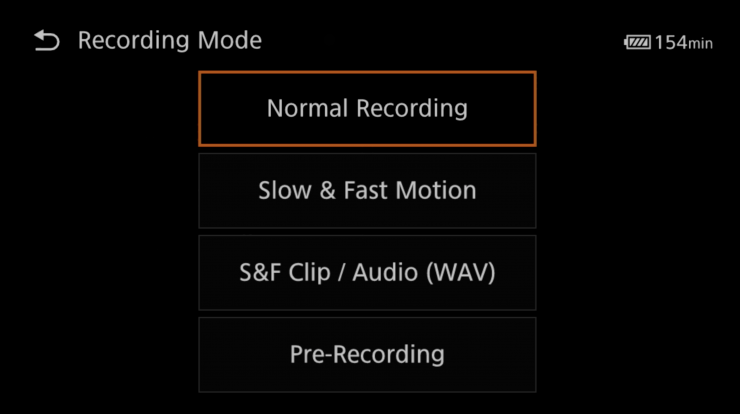
So, let’s have a look at the key features:
- 4K 10.2MP full-frame sensor
- UHD up to 120p
- 4K DCI up to 60p
- Base ISO 800 (Cine EI S-Log3)
- Claimed 15+ stops of DR
- High Sensitivity setting of 12,800 ISO
- AF with face detection and Eye-AF
- 4K 4:2:2 10bit internal recording
- S-Cinetone
- External RAW recording with Atomos Shogun7
- HD up to 180 fps
- Electronic Variable ND
- Four channels of audio recording
- 12G/6G/3G SDI
- TC In/Out
- User uploadable LUTS
If you want to watch the original camera announcement live stream from Sony, you can above.
Concept
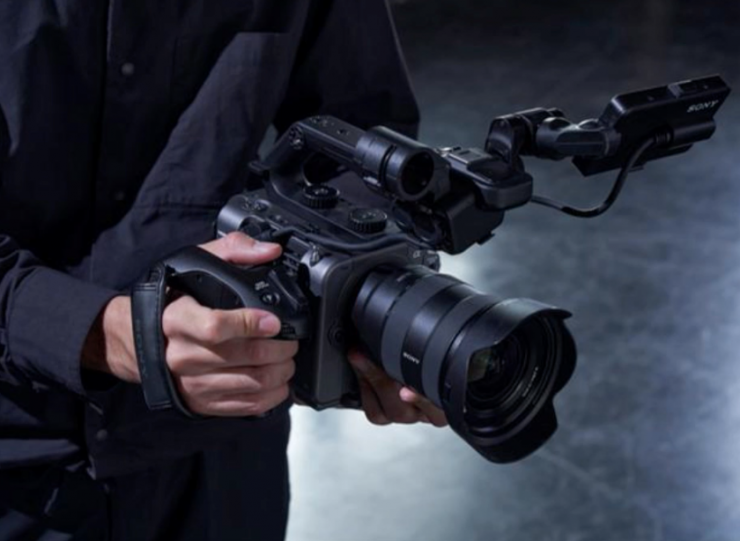
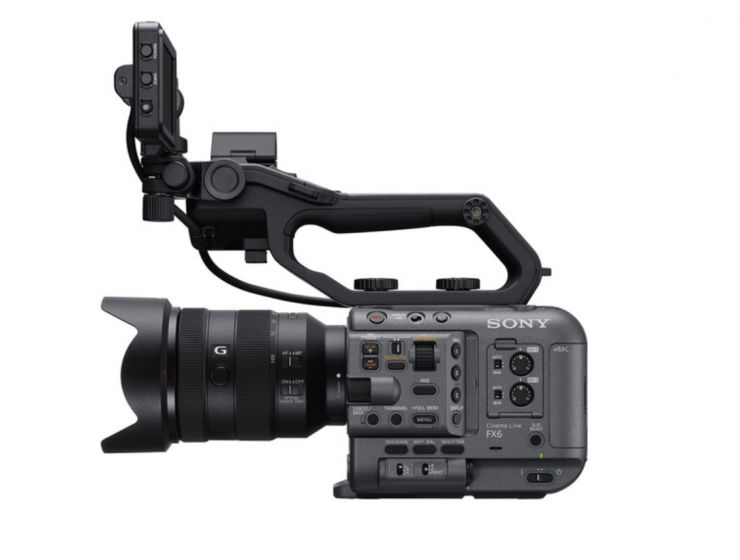
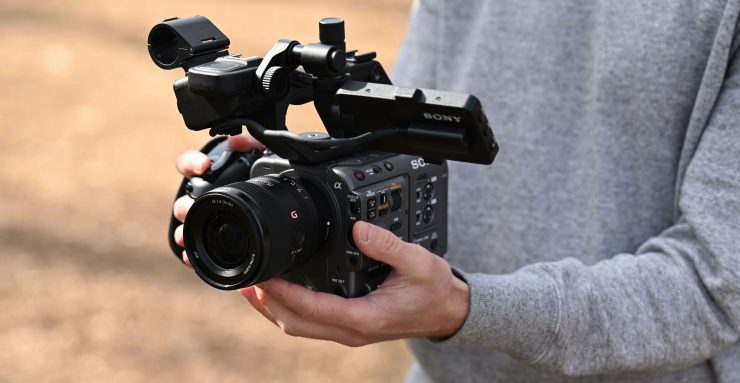
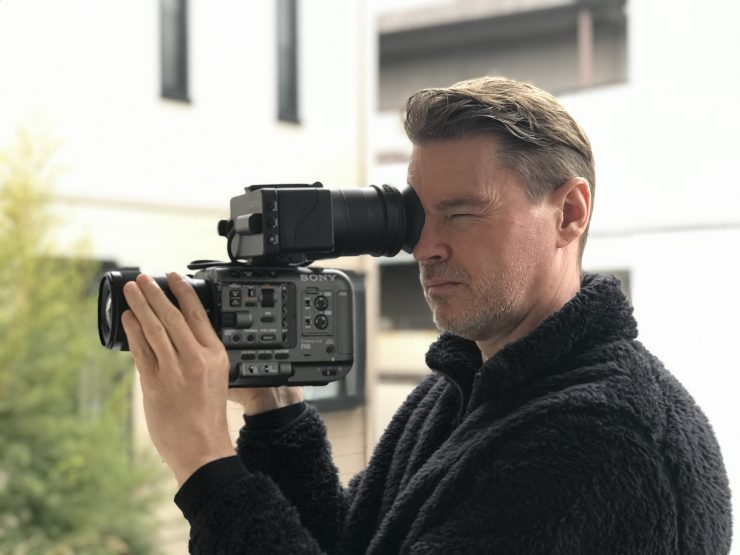
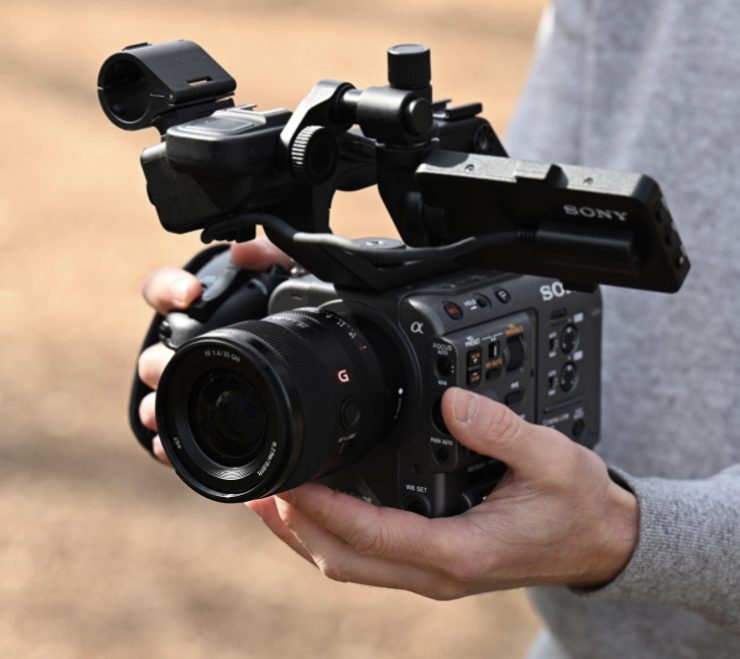
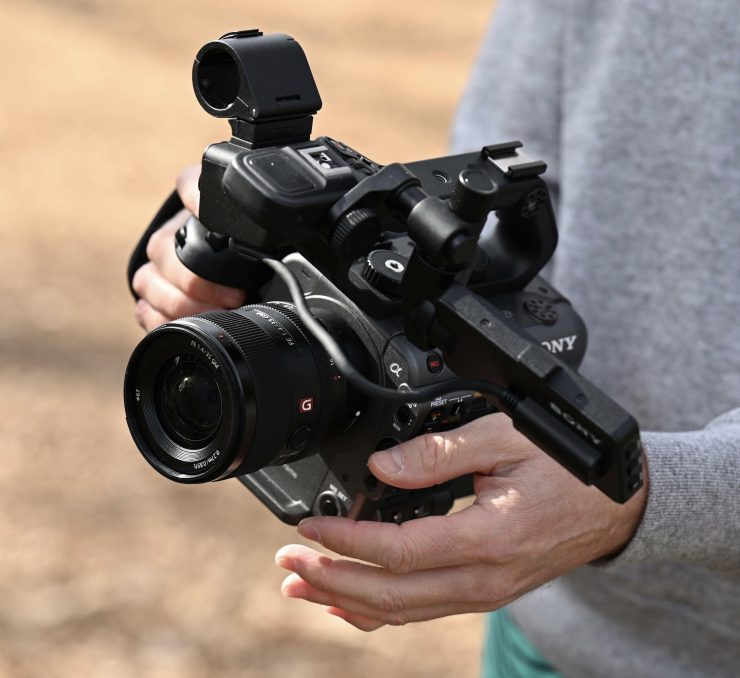
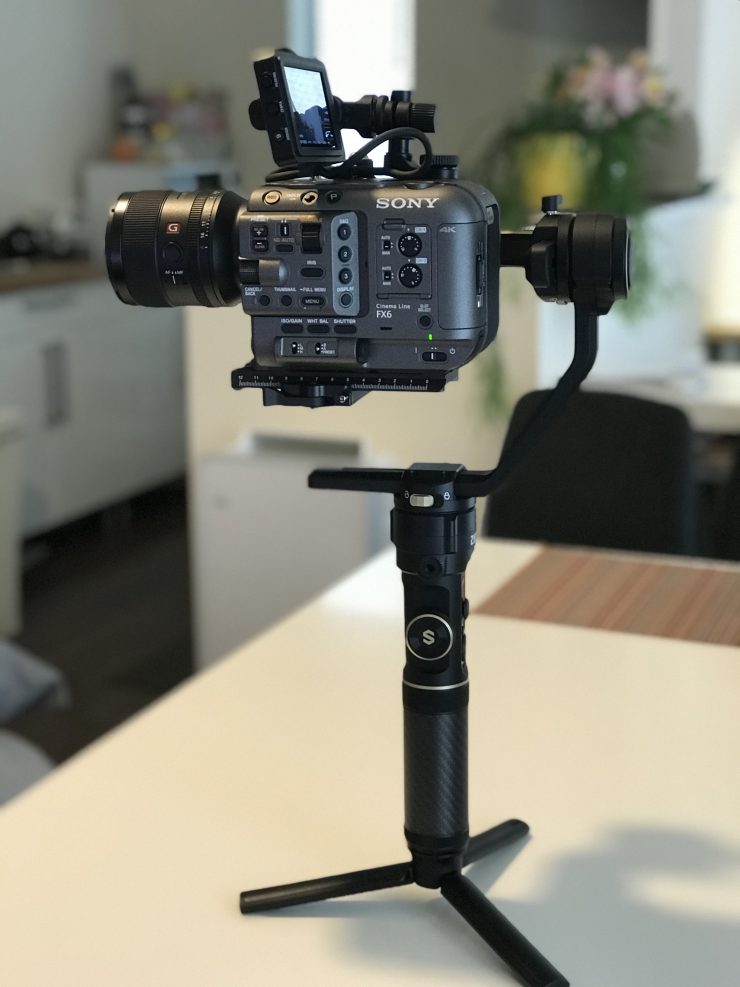
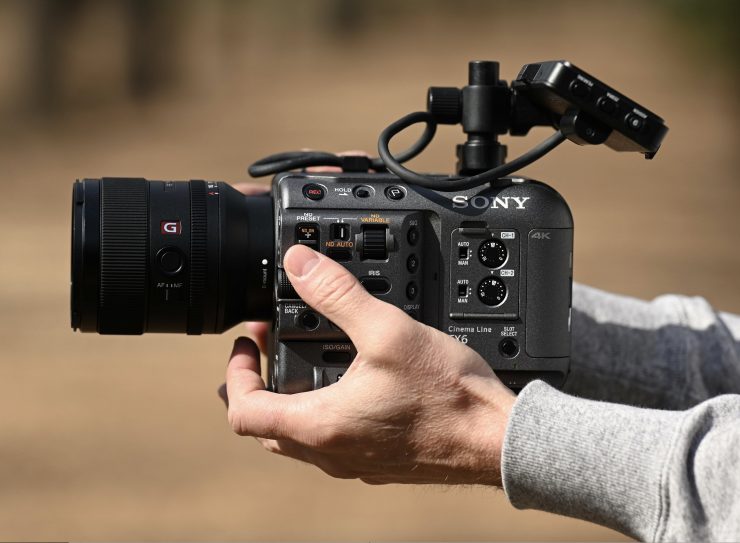
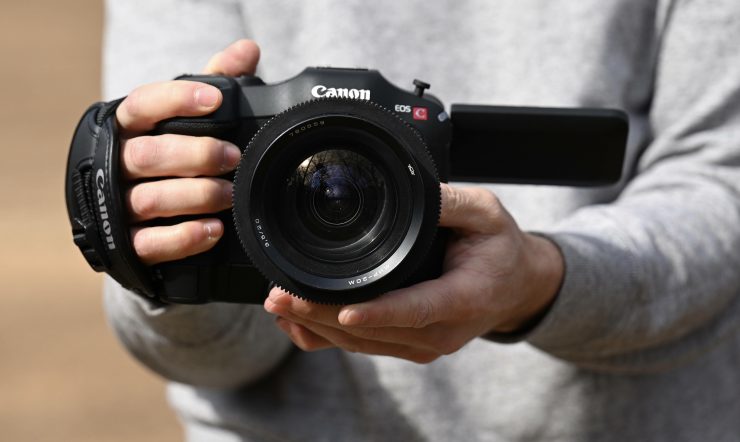
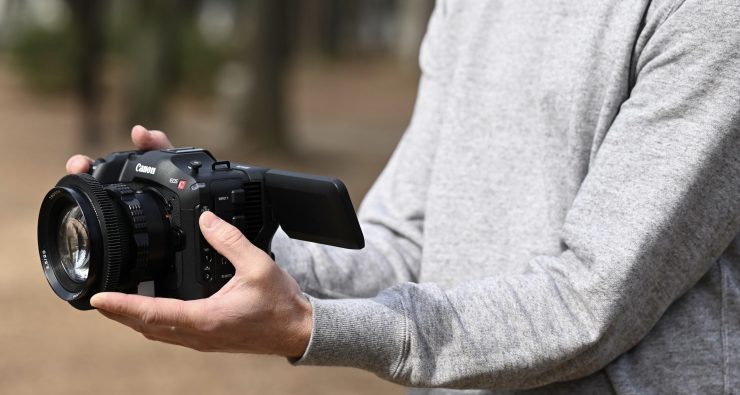
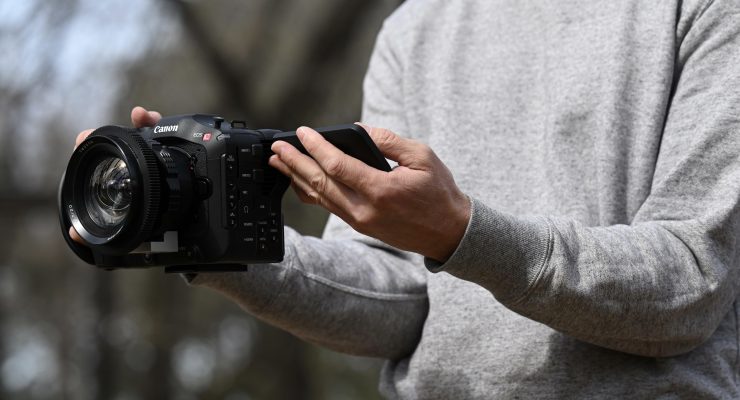
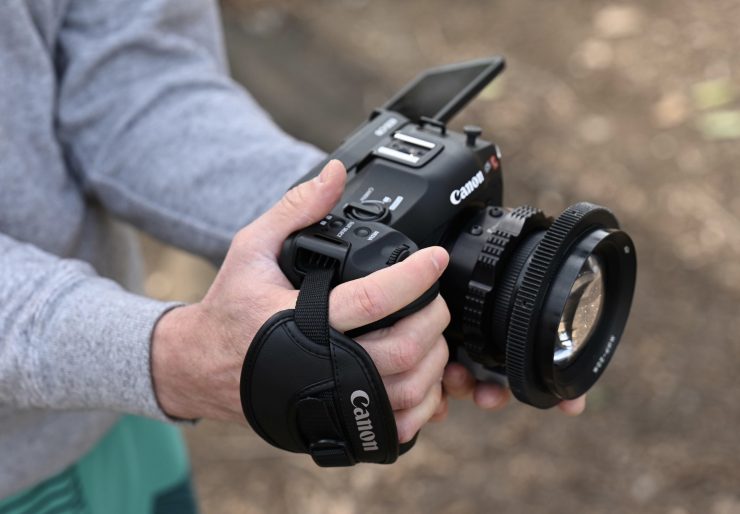
Sony is very much pushing the FX6 as being a lightweight, compact mobile production camera that can be used by solo operators. Its small size and low weight certainly do make the camera suitable for anyone who needs to do a lot of handheld shooting without placing the camera on their shoulder.
The whole design concept of the camera was to make something that you could literally take out of the box and start shooting with.
Even though the FX6 falls under the ‘Cinema Line‘ this camera is very much a blend of the Cinema and alpha cameras. Essentially it is a blend of an FX9 and an a7S III. We recently saw Sony announce the FX3, but that has a lot more in common with the alpha series than Sony’s FX series. Yes, the FX6 is a lot more expensive than an FX3, but in my opinion, it is far better suited to shooting video than an FX3 or an a7S III. The FX6 has SDI, BNC timecode, variable electronic ND, and the ability to load up user LUTs. This is something you won’t find on the FX3 or a7s III.

Sony did what a lot of people were hoping they would do. Take a similar-sized sensor to the a7S III and put it into a larger body with XLRs, SDI, Variable Electronic ND, and TC In/Out. It is hard to complain about the FX6 because Sony essentially gave people what they wanted.
The FX6 has a lot in common with both the FX3 and a7S III, but given its feature set, it certainly does begin to cross over right into FX9 territory.
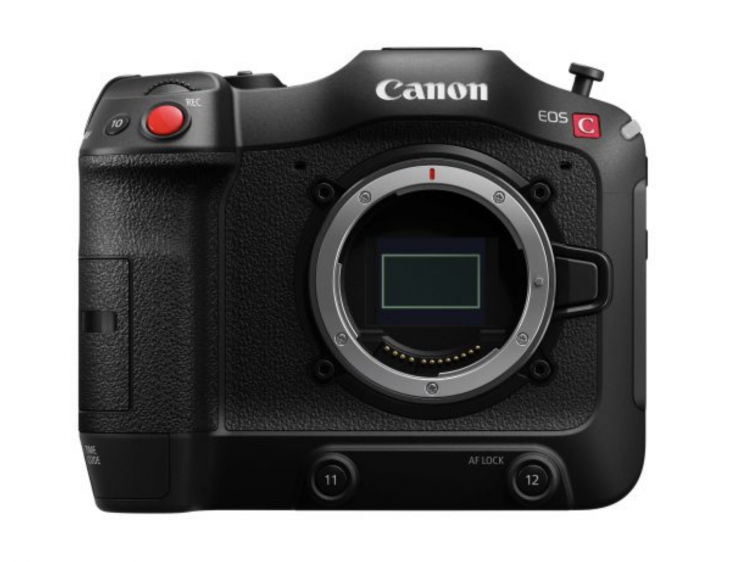
Sensor
The PXW-FX6 uses a full-frame Approx. 12.9 megapixels (total), 10.2 megapixels (effective) back-illuminated CMOS Exmor R 4K sensor. Whether or not this is the same sensor that is in the a7S III and FX3 is fairly likely. When I asked Sony directly if the FX6 was using the same sensor as the a7S III, the response I got was- ‘The sensors in both cameras utilize the same technology.’
As a comparison to the FX6, the FX9 utilizes a 35.7 x 18.8mm full-frame CMOS sensor and the VENICE has a 36.2 x 24.4mm full-frame sensor.
If they had have put the FX9 sensor in the FX6 then they would have had to cripple the camera by reducing frame rates, codec options, etc. Why? Because if they didn’t what would be the difference between the FX6 and the FX9? You can’t have your cake and eat it too. Once you have several camera models below a certain price point in your line-up you put yourself between a rock and a hard place. Complain all you like, but you tell me what else Sony could have done from a business perspective that made more sense. Anybody complaining that they were expecting an FX9 in a smaller body with the same features for less money is living in a dream world.
Above you can see the difference between a standard sensor (on the left), and a back-illuminated sensor on the right. Back-illuminated technology places the metal wiring of the photodiode beneath the diode instead of above it. Back-illuminated sensors offer increased sensitivity and less noise.
The FX6 utilizes the same BIONX XR image processor that is found in the a7S III and FX3. The processor is claimed to be able to read the sensor 3x faster than the a7S II and 2x faster than most traditional mirrorless hybrid sensors. This new processor is claimed to be 4x faster than the one that was used in the FS5.
Because of the low megapixel count, the sensor readout is extremely fast, and this means that the rolling shutter will be almost non-existent. In theory, the rolling shutter performance should be better than that of the FX9 and on par with the a7S III and FX3.
Now, the biggest downside when utilizing a smaller megapixel 4K sensor is that you can only shoot 4K in full-frame. If you switch to the 1.5x S35 shooting mode you are limited to recording in HD. You need to be seriously aware of this because if you are shooting documentaries or events you are going to have serious limitations with focal reach. This alone makes the FX9 a more appealing proposition for certain shooting scenarios.
By utilizing this smaller megapixel sensor in the FX6, Sony can give you UHD at up to 120p with full pixel readout and no pixel binning.
The sensor in the FX6 allows you to comfortably shoot in very low light environments without generating a lot of image noise. Given the target audience for the FX6, this is something a lot of users are going to appreciate.
Sony is claiming 15+ stops of dynamic range from the FX6, but I would take that figure with a grain of salt. Most manufacturers exaggerate their camera’s real dynamic range. Most cameras have good dynamic range these days and if you can’t make a camera with 12 or more stops of dynamic range work then you are doing something wrong.
Sony is also keen to stress that all of the cameras in the Cinema Line have similar color science and that they have all been designed to match. Given the FX6 has Cinetone, in theory, it should match up pretty well with the FX3/ a7S III, and the FX9.
Now, if we compare the sensor used in the FX6 to the C70 we do some differences:
| SONY FX6 | CANON C70 | |
| SENSOR SIZE | 35.7 x 18.8 mm Full-Frame | 26.2 x 13.8 mm (Super35) |
| SENSOR TYPE | CMOS | CMOS |
| SENSOR RESOLUTION | Actual: 12.9 Megapixel Effective: 10.2 Megapixel | Actual: 9.6 Megapixel (4206 x 2280) Effective: 8.85 Megapixel (4096 x 2160) |
| PIXEL PITCH | 8.32 µm | 6.4 µm |
| COLOR FILTER | Bayer | Bayer |
The FX6 has a full-frame sensor, while the Canon C70 utilizes an S35 sized sensor. The sensor in the C70 is the exact same sensor that can be found in the C300 Mark III. It also utilizes the exact same DGO (dual gain output) technology. You shouldn’t confuse Dual Gain Output with Dual Base ISO. Although it’s the same basic idea of having different readout calibrations, Dual Gain Output is much harder to do than Dual Gain ISO because that switches between the two. What ARRI and Canon are doing requires there to be a dual readout on every frame and then processing all of that on every frame.
No Dual Native ISO
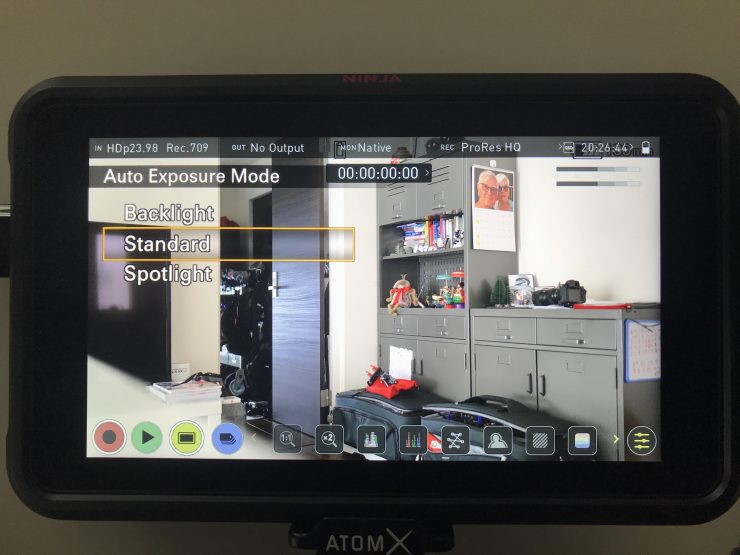
Unlike the FX9 which has a base ISO of 800 as well as a High Base ISO of 4000, the FX6 has a native ISO of 800 (S-Log3) and what Sony is referring to as a High Sensitivity mode of 12,800 ISO.
Sony was quick to point out that even though this High Sensitivity mode works in a similar way to a dual native ISO, they are not calling it a dual native ISO. I asked Sony if the dynamic range is reduced when you are using this High Sensitivity mode and I was told that they feel that it is fairly comparable to the normal base ISO of 800. We will see later on in the review.
But it’s only 4K
In some ways releasing a camera in 2020 that can only record 4K when a lot of your competition is doing 6K and 8K might at first seem like a strange decision. However, how many people actually need greater than 4K at this point in time? The majority of the content you consume is either HD or UHD, and that is unlikely to change anytime soon. Yes, you could very well argue that capturing at a higher resolution allows for more flexibility with reframing in post or downsampling to get a better 4K image, and those are good arguments, however, if you are capturing in 4K and still delivering in HD (which a lot of people are) you don’t need resolutions above 4K.
The Canon C70 is also only capable of shooting in resolutions of up to 4K DCI.
However, unlike the FX9 that is downsampling from a 6K sensor to record 4K, with the FX6 you are getting 4K from a 4K sized sensor. I personally feel that the image you get out of the FX9 is better than that of the FX6. In saying that, both are capable cameras.
The worst argument I always hear in regards to resolution is that I am future-proofing my material. Is historical content not being shown anymore because it was captured in black and white, or 4:3 or SD? Of course not. Future-proofing my footage is a ridiculous argument especially considering the majority of peoples’ work isn’t something that needs to be preserved and shown in 20 years’ time. In my opinion, there is no such thing as future proof. Again there is nothing wrong with wanting to capture something in the highest quality possible, but just don’t use the future proof argument.
Eye-popping specifications and marketing hype sell cameras, and the FX6 certainly has a lot of that going for it on paper, despite the fact that it is only a 4K camera.
Auto Focus
The FX6, just like the FX9, features a next-generation sensor chipset that Sony claims provides much improved AF with face detection and Eye-AF. This is the same technology that has made its way over from Sony’s Alpha series mirrorless cameras.
The enhanced Fast Hybrid AF system has customizable AF transition speeds and sensitivity settings, and also combines phase-detection AF with contrast AF to help with focus accuracy. The dedicated 627-point phase-detection AF sensor covers approximately 95% in width and 94% in height of the imaging area. Sony claims that this provides consistently accurate, responsive AF tracking, even with fast-moving subjects while maintaining a shallow depth of field.
There are seven-level AF transition speeds from fast-switching between subjects as quickly as possible to slower speeds for longer transitions. Above you can see a quick example showing you the fastest and slowest speeds.
Five-level AF subject shift sensitivity ranges from locked-on, ignoring other moving subjects in the frame, to responsive that switches focus from one subject to another.
The AF works in all resolutions and all frame rates, including UHD at 120p and HD up to 240p. The AF system is also claimed to work really well in low light situations. Sony has really improved its AF technology in recent years and it is sure to be a big selling point for people who are looking at the FX6.
As a comparison, the Canon C70 features EOS iTR AF X. iTR stands for Intelligent Tracking and Recognition. This is the exact same system that is found in the Canon 1DX Mark III.
By utilizing deep-learning algorithms, the system can track a subject’s head with good accuracy regardless of whether they are tuned towards the camera on not.
The C70 also has a distance indicator that works in conjunction with RF lenses. Information from the lens will be displayed on the LCD screen as both a numerical display (distance to the subject) and as a bar display.
There are various AF modes including fast One-Shot AF and Continuous AF available within 80% of the frame both horizontally and vertically with touchscreen selection and control. Tracking AF can also automatically track a selected object even as it moves.
Two face detection modes (Face Priority and Face Only) can automatically detect and track a selected face within the frame or prioritize it over a pre-selected focus point. The C70 doesn’t have Eye Detection AF capabilities.
So how does the AF actually perform on the FX6? Well, let’s find out.
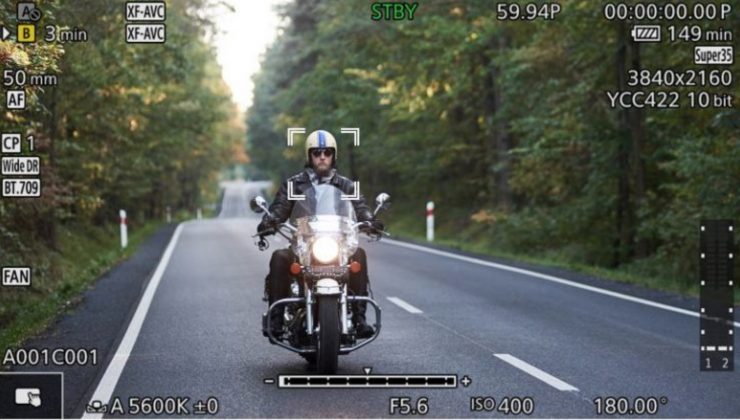
The Face & Eye Detection on the FX6 works really well and most times it is going to do a very good job. It isn’t full proof, but you could reliably use it for locked-off interviews or tracking people if there isn’t too much else going on in the frame. The one thing you will notice is that it won’t detect the back of somebody’s head if they are walking away from camera or you are following them from behind. I shot this test backlit to challenge the AF system. It is pointless to do an AF test like this indoors under good lighting conditions because it won’t challenge the system.
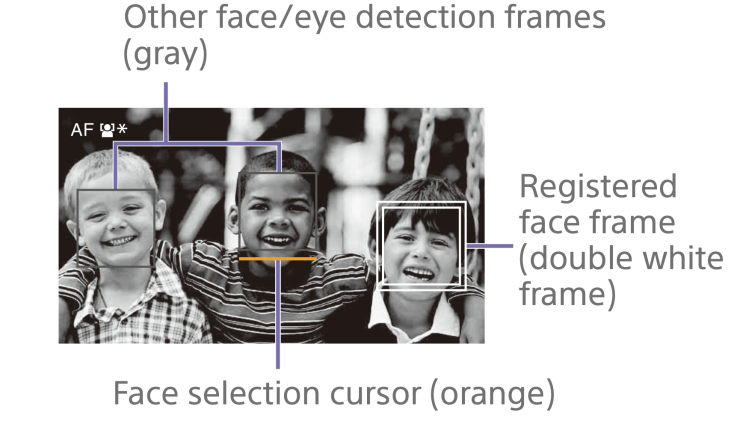
During face/eye detection AF operation, you can only register one face.
When a face is registered, the face/eye detection frame changes to a double frame (registered face frame).
As a comparison above you can see how the FX6 and Canon C70 compare. The C70 doesn’t have any eye detection like the Sony FX6. However, the C70 can track the back of subjects’ heads which is something the FX6 can’t do. From my testing, I found that both cameras performed well and there wasn’t a huge difference between the two. However, I did find that the Sony system tended to pick up faces quicker than the Canon.
The ability for the AF to still work at very low light levels is very impressive. Above you can see a test where I am stopping down the lens to reduce light levels to see where the AF becomes unusable. As you can see from the test, I was still able to use the AF even when the IRE level got down to around 10.
If you set the AF Subject Shift Sensitivity to 1 (Locked On) you can have objects pass through the frame and the AF won’t deviate. While it isn’t perfect it does work really well. If something stays in front of your subject for around 4 seconds the AF system will eventually lock onto that new object.
Above you can see how the touchscreen AF works on the FX6.
One key difference between the Sony FX6 and Canon C70 when it comes to AF is that the Canon has an object tracking mode where you can lock focus on any object and then move the camera around and it will stay locked on that object. With the FX6 it will only track a person.
Sony AF has certainly come a long way in a relatively short amount of time. Canon used to have a big advantage when it came to AF, but not anymore.
AF is great for some applications, but by its very nature, it does not work well for everything. Knowing when to use it and when not to use it is key.
While I don’t mind AF, my biggest problem with it is if you try and use it to do focus pulls with a lot of E-mount lenses you end up getting pretty horrible breathing. For example, the Sony 35mm F1.4 has horrendous focus breathing. AF also can’t predict artistic intent and that is why I personally only choose to use it in controlled situations where I know exactly how it will behave.
Stabilization (well sort of)
The a7S III and the FX3 both feature an enhanced 5.5-stop effective 5-axis SteadyShot image stabilization system, which compensates for five different types of camera shake. The FX6 doesn’t feature any type of IBIS, instead, you need to use post stabilization to improve shake.
According to Sony, by recording image stabilization information and using it on the Catalyst Browse/Prepare option, content creators can capture incredibly stable visuals even in handheld mode. Sony is also working to encourage other third-party non-linear editing tools to adopt this functionality.
The advanced image stabilization information means handheld footage can be transformed with Sony Catalyst Browse/Catalyst Prepare software in post-production to look smoother. Unlike in-camera or lens stabilization, metadata generated by the FX6’s built-in gyro allows you to creatively choose the balance between the level of shake compensation, and the resolution. This feature is also compatible with any E-mount lens and allows for far faster processing than conventional NLE stabilization workflows.
The Canon C70 uses a combination IS that allows for coordinated control between the RF mount, an RF lens, and the electronic IS. If you use EF lenses through one of the adapters you still get Optical IS and Electronic IS in camera, but they are done separately.
With normal IS activated there is a 1.1x crop of the image, with Enhanced IS selected you will get slightly more crop.
With the FX6 I didn’t really find that the lack of in-body image stabilization was a massive problem. As you can just tuck the FX6 up against your body when shooting handheld you can create a reasonably steady shooting platform. Would it have been nice if the FX6 had in-body image stabilization? Of course, but it doesn’t. So let’s move on.
Clear Scan Zoom & Zoom
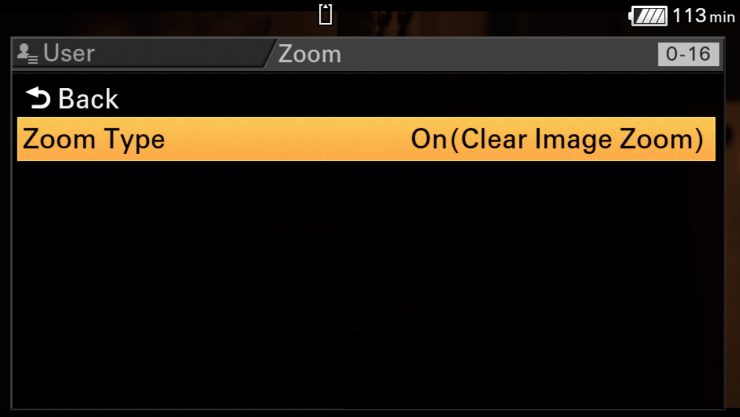
The camera does have a Clear Image Zoom setting. What this allows you to do is to create a small zoom in or zoom out. You can control it using the zoom rocker that is on the top handle, or the zoom rocker that is on the side handle. As the FX6 has no ability to shoot UHD or 4K DCI in its S35 mode, the Clear Image Zoom can come in handy.
Above you can see a quick demonstration showing what it looks like. I couldn’t see any perceived loss of sharpness from using the Clear Image Zoom as opposed to cropping in on the 4K DCI image. If anything, the Clear Image Zoom actually looked a little bit sharper than cropping in on the 4K DCI image.
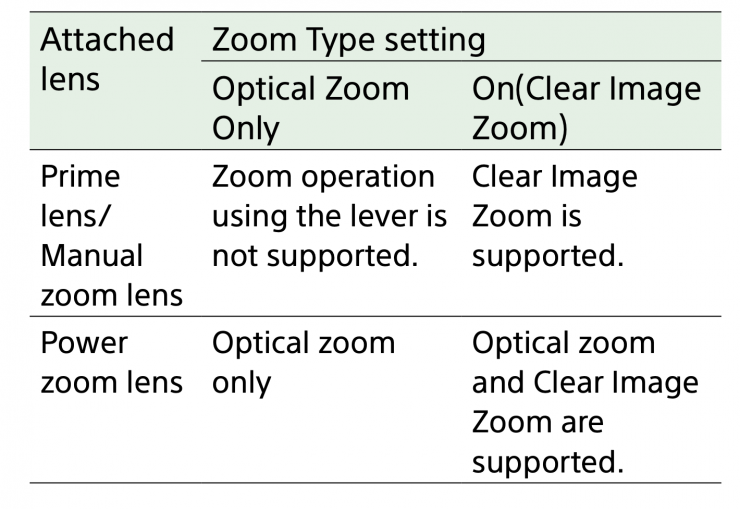
You can also use the zoom rocker to control power zoom lenses.
What you need to be aware of is that you lose certain functionality when the Clear Zoom is turned on. Above you can see that the face/eye detection deactivates as soon as I use the Clear Image Zoom.
Below you can see a list of what is not available when you are using it:
- When S&Q Motion >Frame Rate in the Shooting menu of the full menu is higher than 60fps
- When Rec Format >Codec in the Project menu of the full menu is set to RAW or an option that includes RAW
- Operating the SERVO/MANUAL select switch on a lens resets the magnification of Clear Image Zoom to 1×.
- During Clear Image Zoom operation, the focus area is set to Wide and face/eye detection AF is disabled.
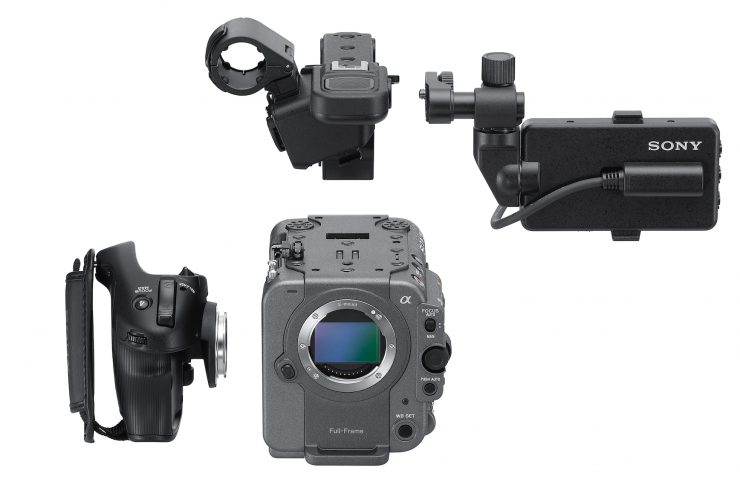
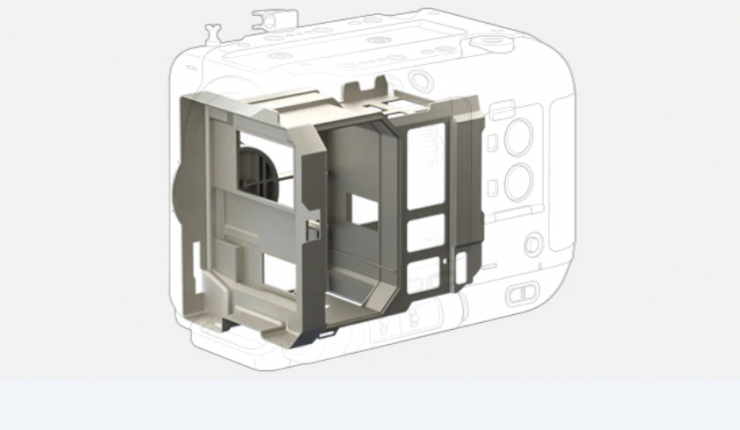
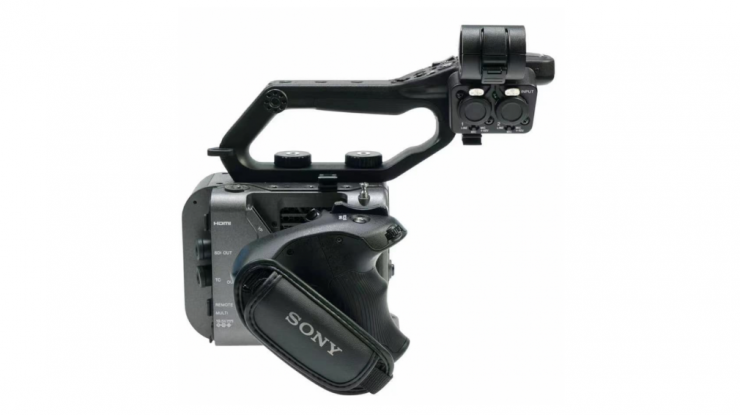
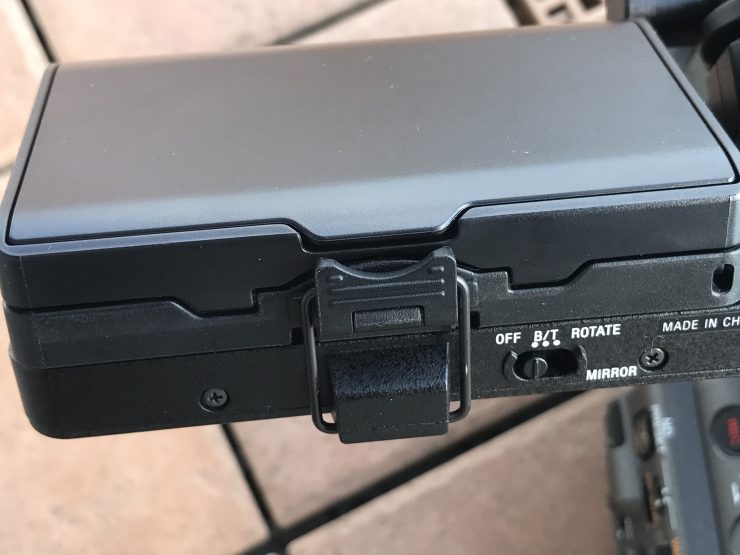
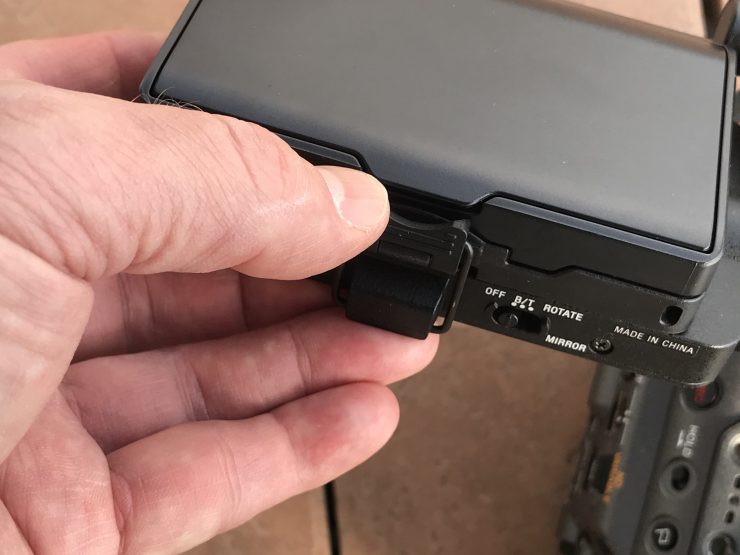
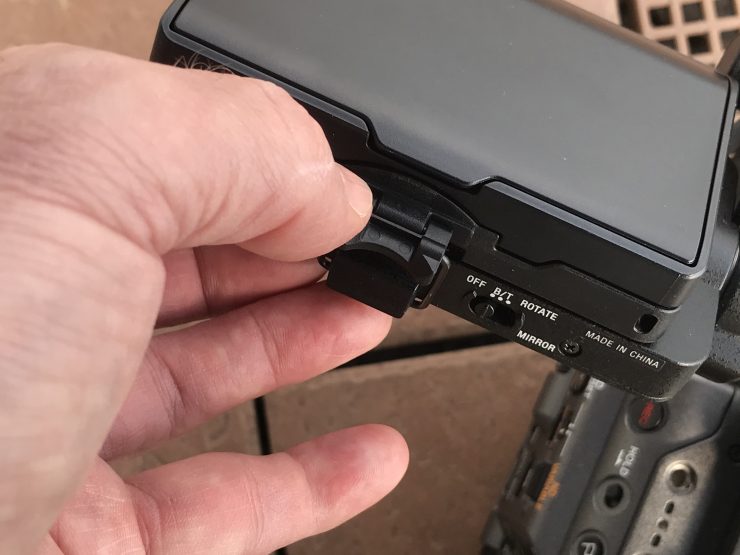
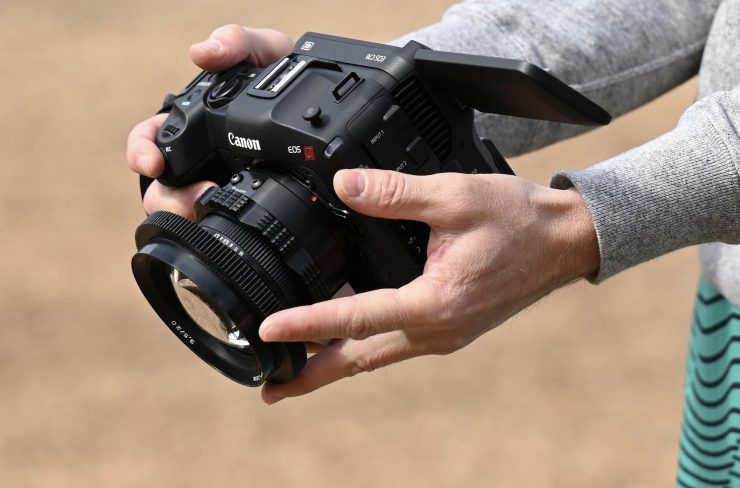
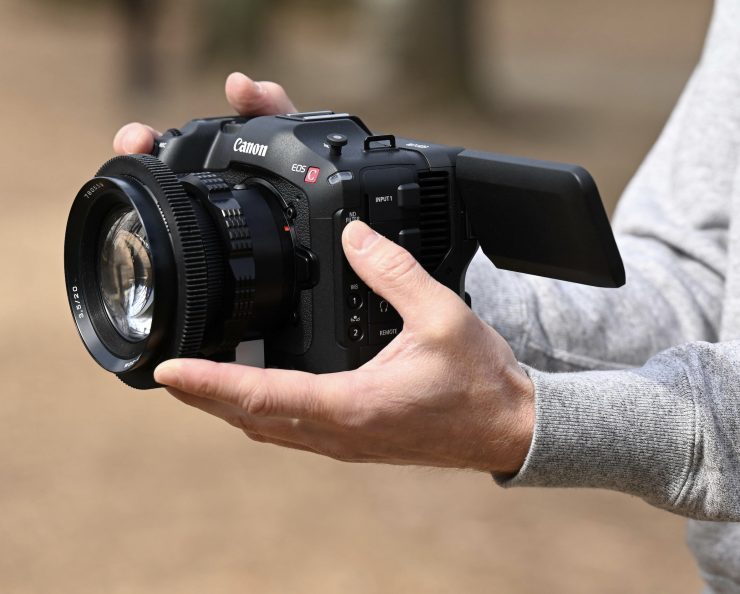
Form factor
Sony FX6 
Sony FS5
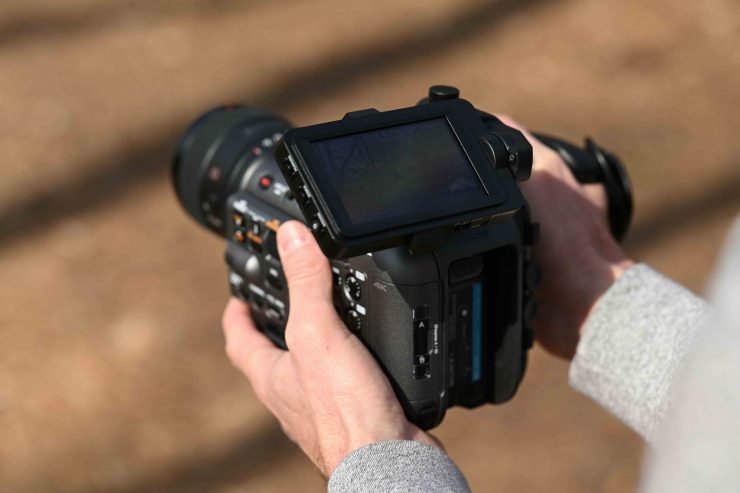
The FX6 isn’t a massive departure away from the form factor of the FS5 and FS5 II. It looks very similar in a lot of ways, however, you will notice that there is no longer an EVF on the back. According to Sony, not many users were actively utilizing the rear EVF so they decided to get rid of it.
I like using an EVF, but often those rear-mounted EVFs are just impractical for a lot of shooting situations.
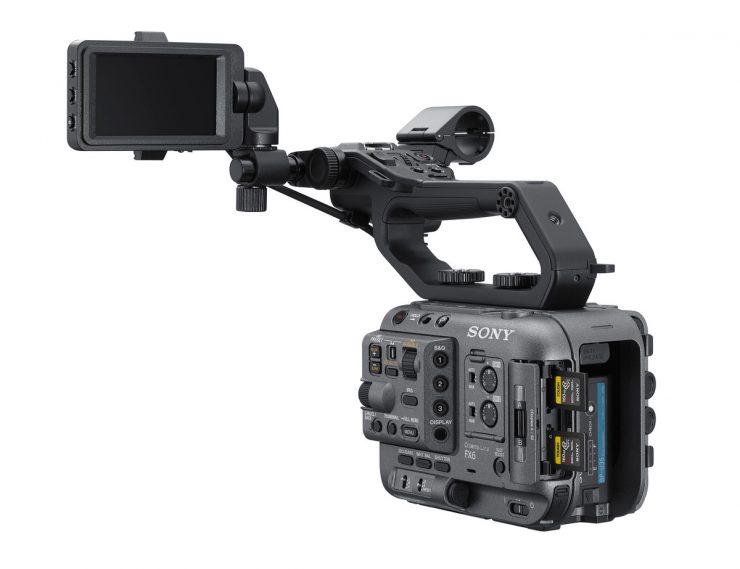
The only monitoring for the camera comes in the form of the 3.5″ 1280×720 LCD touchscreen. While this is ok, it isn’t great. It isn’t overly bright, nor overly large. I personally wouldn’t just want to rely on this for composing, focussing or judging critical exposure.
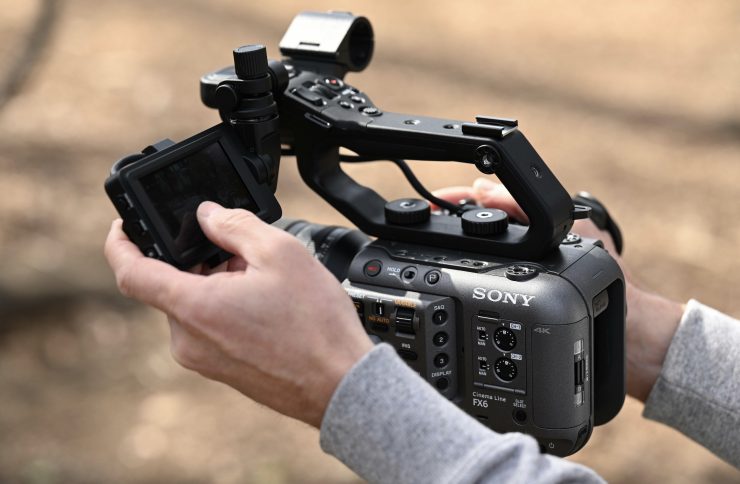
The LCD screen that comes with the FX6 is the exact same LCD that comes with the FX9. This LCD screen can be moved around and positioned in a variety of places on the camera. Any third-party loupe that works with the FX9, or the actual loupe for the FX9, will work with the FX6.
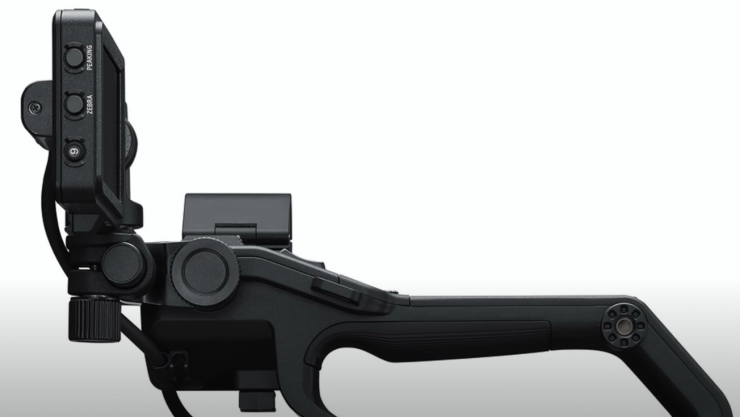
The top handle, microphone holder, and smart grip are both very similar to those used on the FS5. All of the components have been designed to be modular so you can strip the camera right down for certain applications.
This modular design philosophy is what almost every camera company is trending towards at the moment.
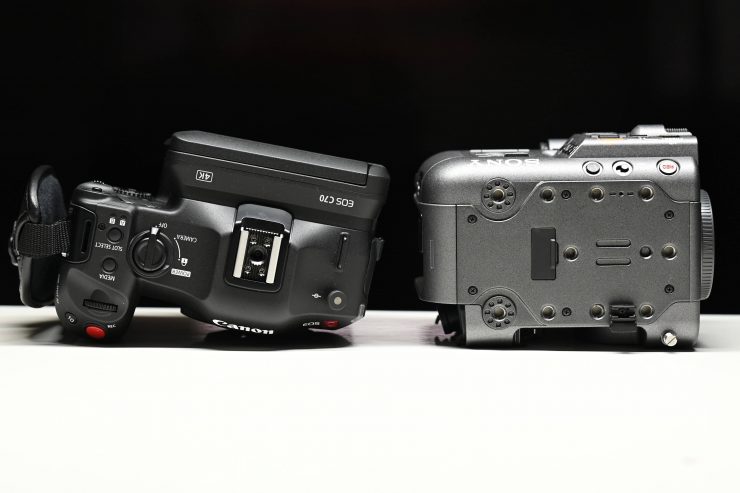
So how does the form factor compare to the Canon C70?
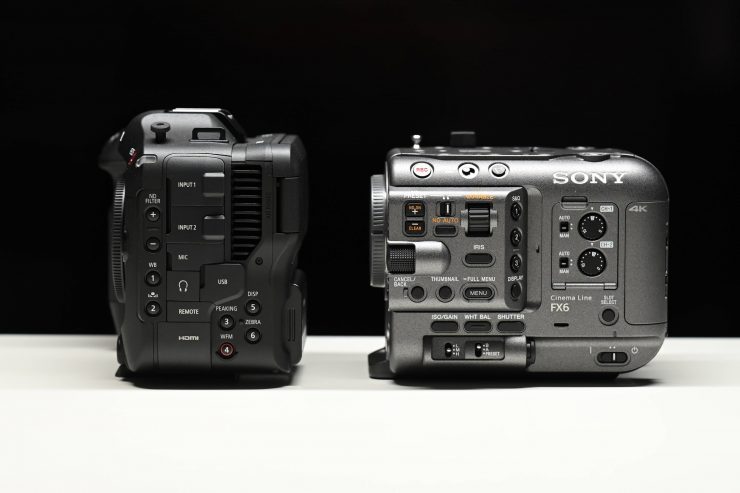
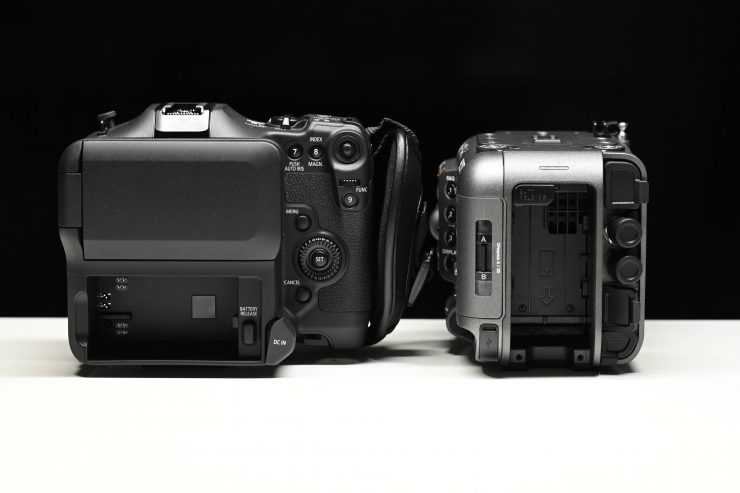

Well, above you can see the difference when we just look solely at the camera bodies themselves. The C70 is wider and a little taller, but the FX6 is deeper.
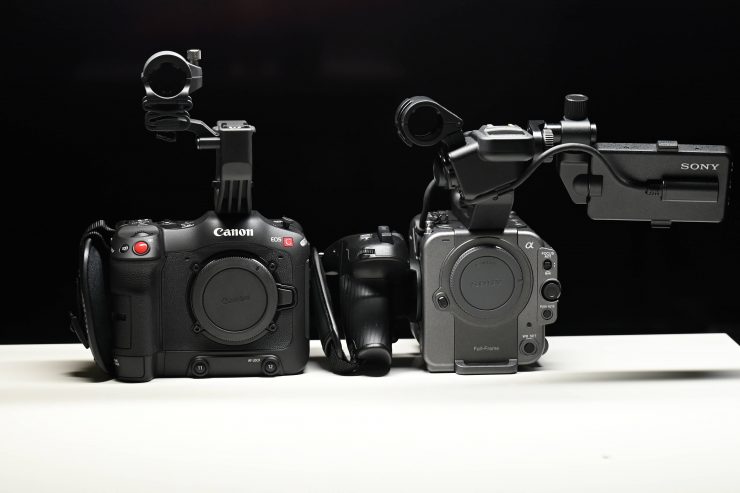
Once you build up the FX6 it starts to look considerably larger than the C70.
FX6 
C70
What you need to factor in is that Canon is not as modular as the FX6. The C70 consists of the camera body and a removable top handle. On the other hand, the FX6 consists of the camera, removable top handle, removable LCD screen, and removable side grip
C70 handle on the left and FX6 handle on the right
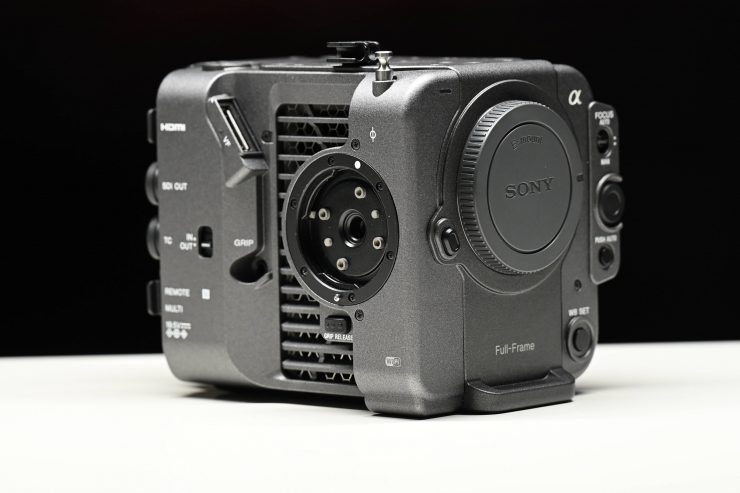
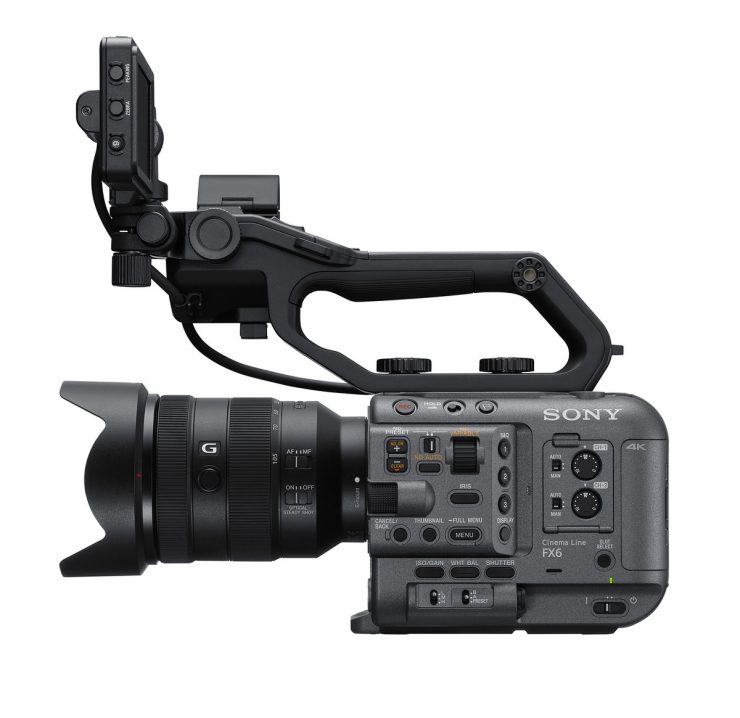
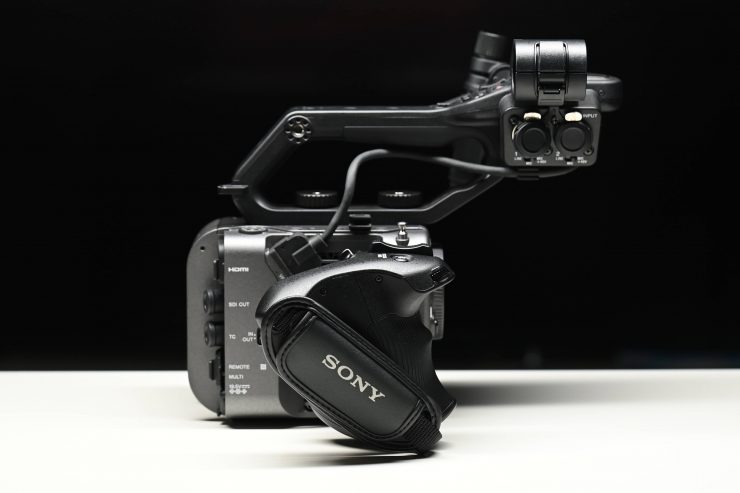
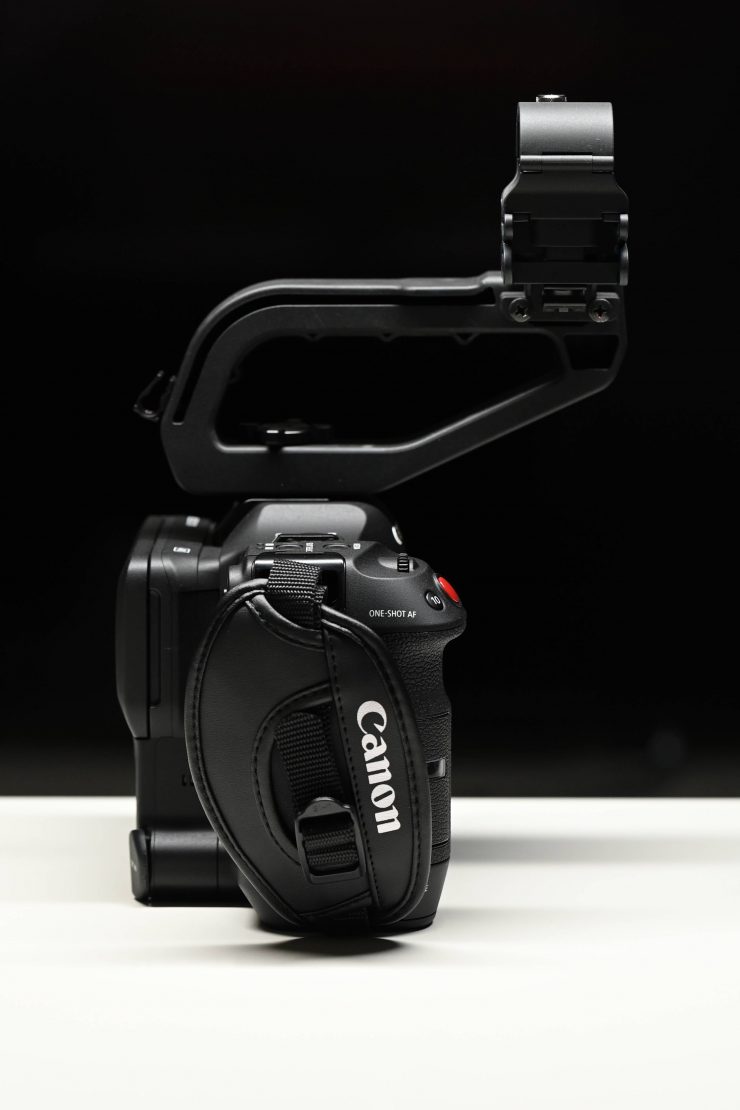
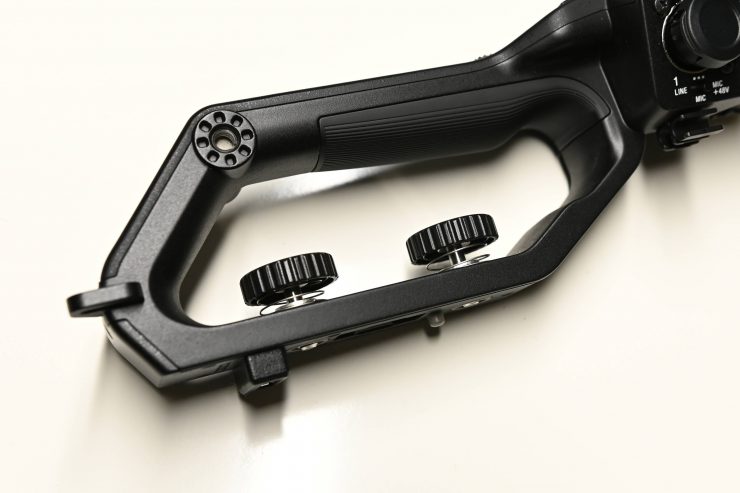
If we look at the removable top handles we will see quite a few differences between the two cameras. The FX6 handle is considerably larger than the one that comes with the C70. This is where you will find the built-in XLR inputs, various controls as well as the rosette attachment for putting on the removable LCD.
FX6 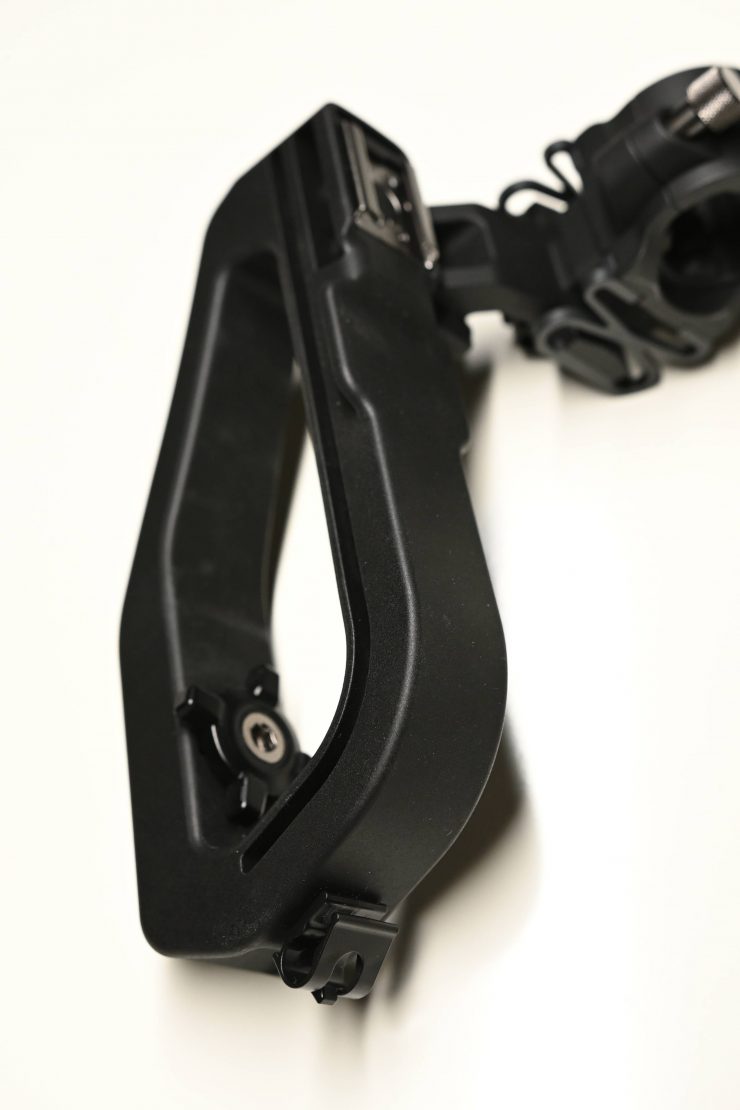
C70
You will also notice that the FX6 handle has quite a few tapped 1/4-20″ threads while the C70’s handle has none. I am not sure what Canon was thinking by not including any mounting points.
FX6 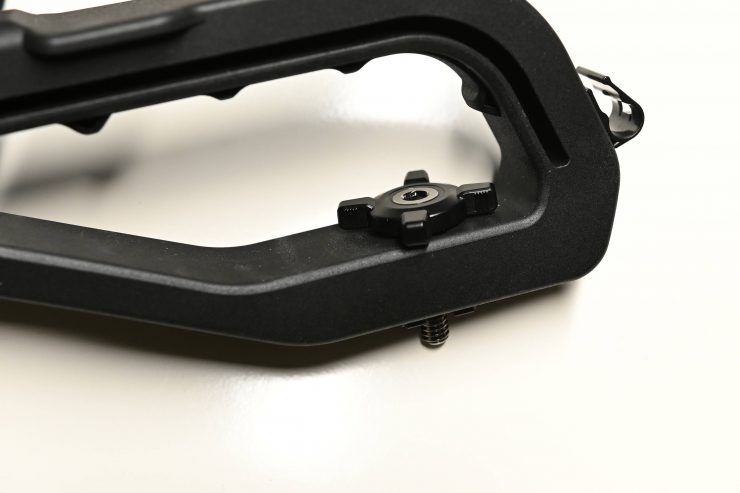
C70
The FX6’s top handle attaches via two screws to the top of the camera. The C70’s just uses one screw point.
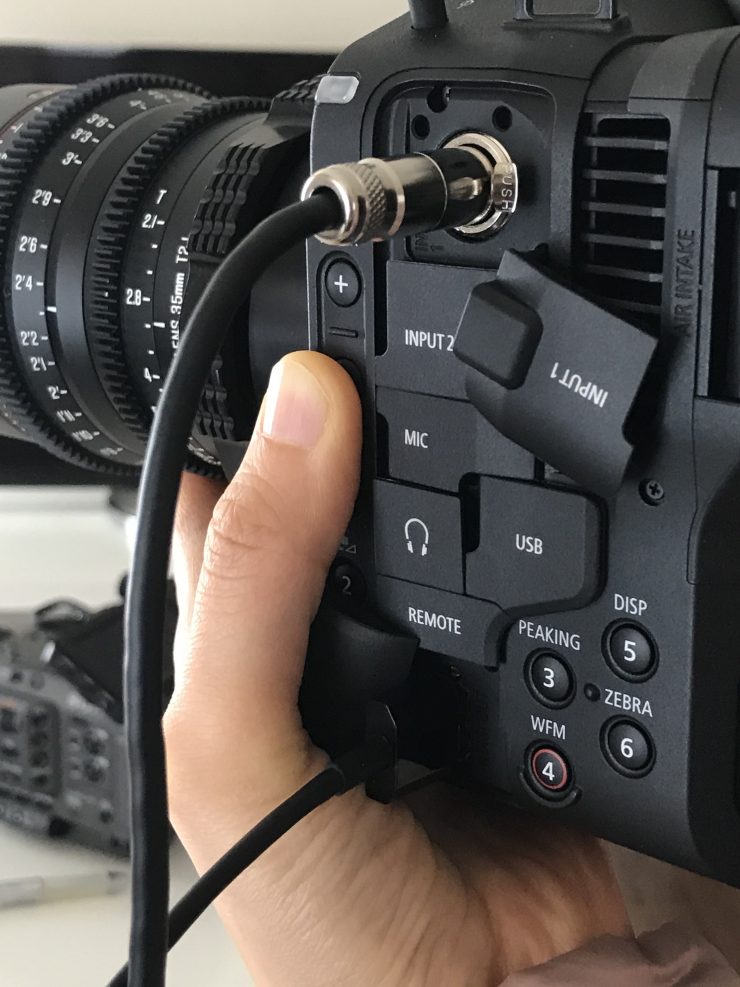
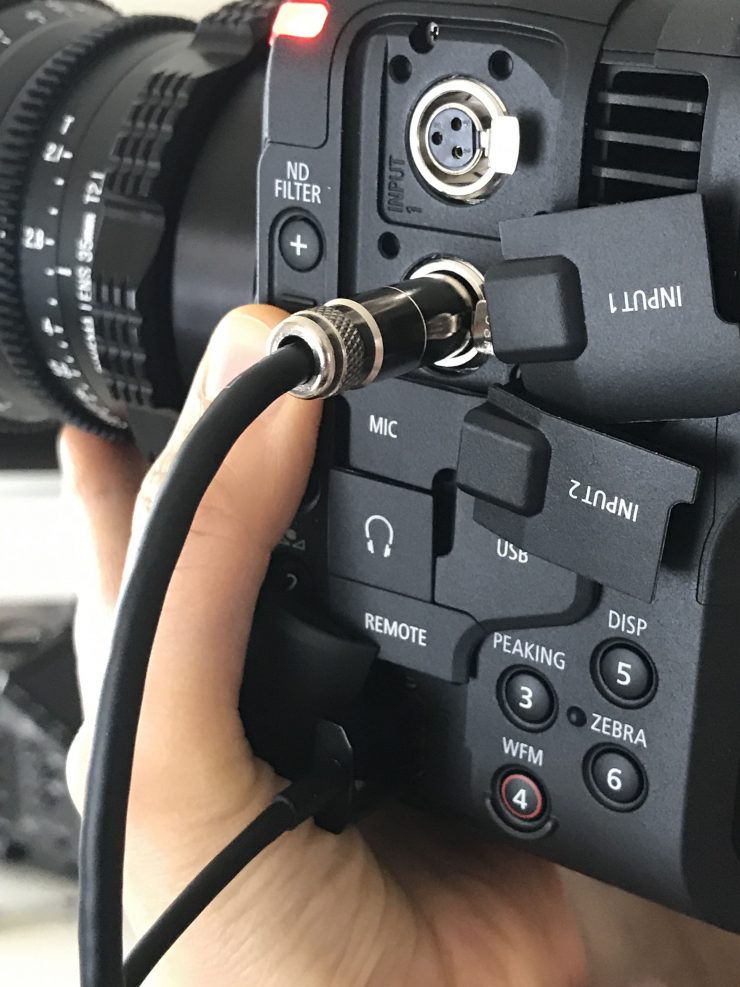
As you can see the XLR inputs are located on the removable handle of the FX6. The biggest problem with this is that Sony failed to put a 3.5mm microphone jack on the camera body, so you need to use the top handle to record any type of good audio. This is a massive design blunder in my opinion. You have a small camera that is no longer small if you need to record good audio because you have to use the large top handle. Yes, there is a tiny internal microphone on the body that you can activate if you do remove the top handle, but it is no better than a scratch mic and you can’t really use it for anything other than that purpose.
The FX6 has a detachable side control handle that you can position in various spots.
The Canon C70 has a built-in side control handle that you cannot move.
FX6 
C70
As far as mounting options go the FX6 has a clear advantage. It features lots of mounting points on the body and better mounting options beneath the camera. It is really strange that Canon only put a single mounting point facing forwards on the bottom of the camera. This means you can’t secure it with two screws onto a tripod plate.
The C70 has no mounting points on the body at all, apart from a single cold shoe.
Size & Weight
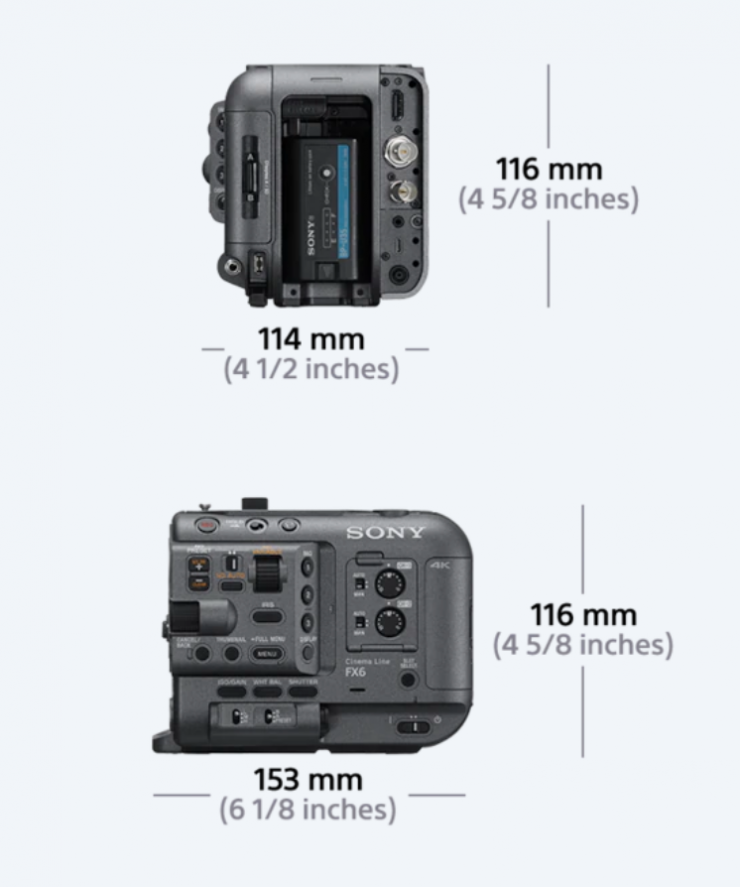
The FX6 weighs in at 890g / 31.39oz (body only) which makes it just 60g heavier than the FS5 M2. It is 153mm (6.02″) long and 116mm (4.56″) high. In fact, the FX6 (body only) weighs just 276g more than the a7S III (body only). If
If we compare it to the FX3, which weighs Approx. 640 g / 1 lb 6.6 oz (body only) there isn’t actually a massive difference.

If we compare it to the Canon C70, the C70 weighs in at 1,170g / 41.27 oz. The C70 has physical dimensions of 6.3 x 5.1 x 4.6″ / 160 x 130 x 116 mm. What you need to factor in is that C70 already has everything attached to it apart from the top handle. Once you had the top handle, LCD screen, and side grip, the weight advantage of the FX6 had disappears.
Below you can see the weight comparison between the FX6, Canon C70, RED Komodo, Kinefinity MAVO 6K S35, Z CAM E2-S6 Super 35, Panasonic EVA1, and the BMPCC 6K Pro.
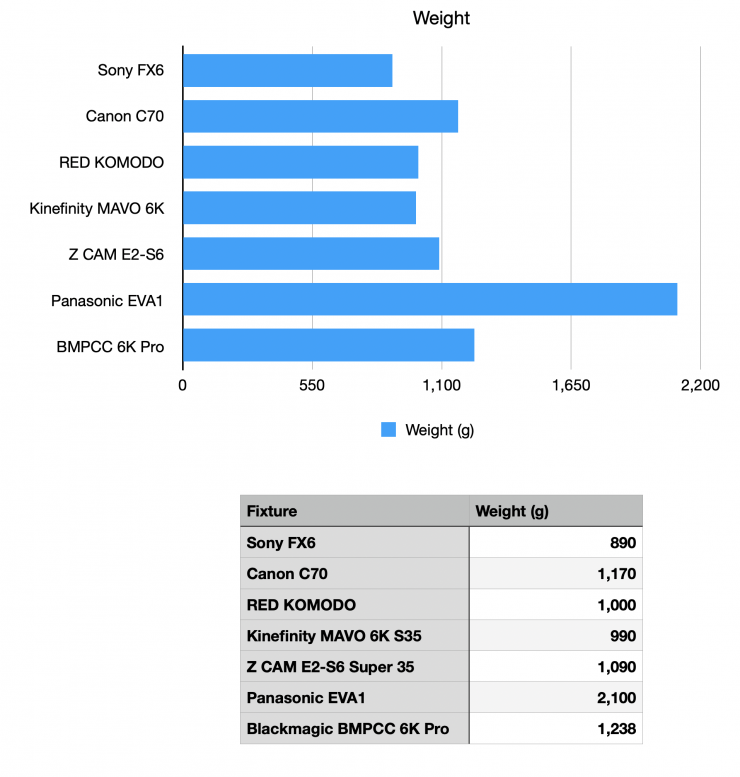
As you can see, the FX6 is lighter than all of these other available options, but not by a lot. This is simply to show you that most of these cameras have a similar weight. However, it is hard to judge the actual weight of these cameras as nobody is going to use one without a screen, battery, lens, etc.
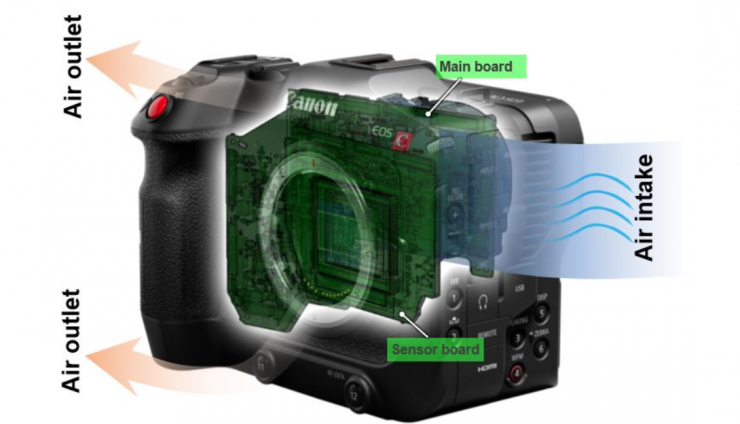
Cooling & Build Quality
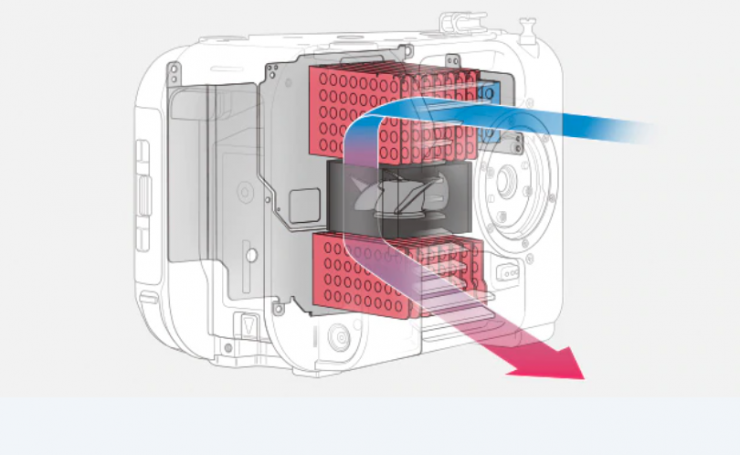
The FX6 has a massive cooling system that takes up a lot of space within the camera. The air intake and exhaust are both on the non-operators side of the camera. Sony states that the camera will not overheat in any recording situation.
The internal structure of the FX6 is made out of magnesium alloy and the camera also features dust and moisture sealing.
While the internal structure is undoubtedly very solid, the outsider casing feels pretty cheap. There may well be nothing wrong with it strength wise, but it just doesn’t feel that way. Again, this is just my personal opinion.


The FX6 is actually made in China and not in Japan. Overall the build quality is not bad, but some of the buttons could be more tactile.
The monitor mount is probably the weakest link on the camera. It feels very plasticky and not very well made.
As soon as you attach the optional loupe to the LCD screen it just wants to move by itself because the LCD mount is so weak. It doesn’t matter how tightly you lock it off, it still wants to move.
The Canon C70 build quality is fairly comparable to the FX6, however, the buttons feel more tactile and the overall attention to detail seems a bit better.
If you look at items such as the audio panel door and media card door they are a little flimsy, especially compared to the C70. That’s not to say they might break, it is simply just an observation.
FX6 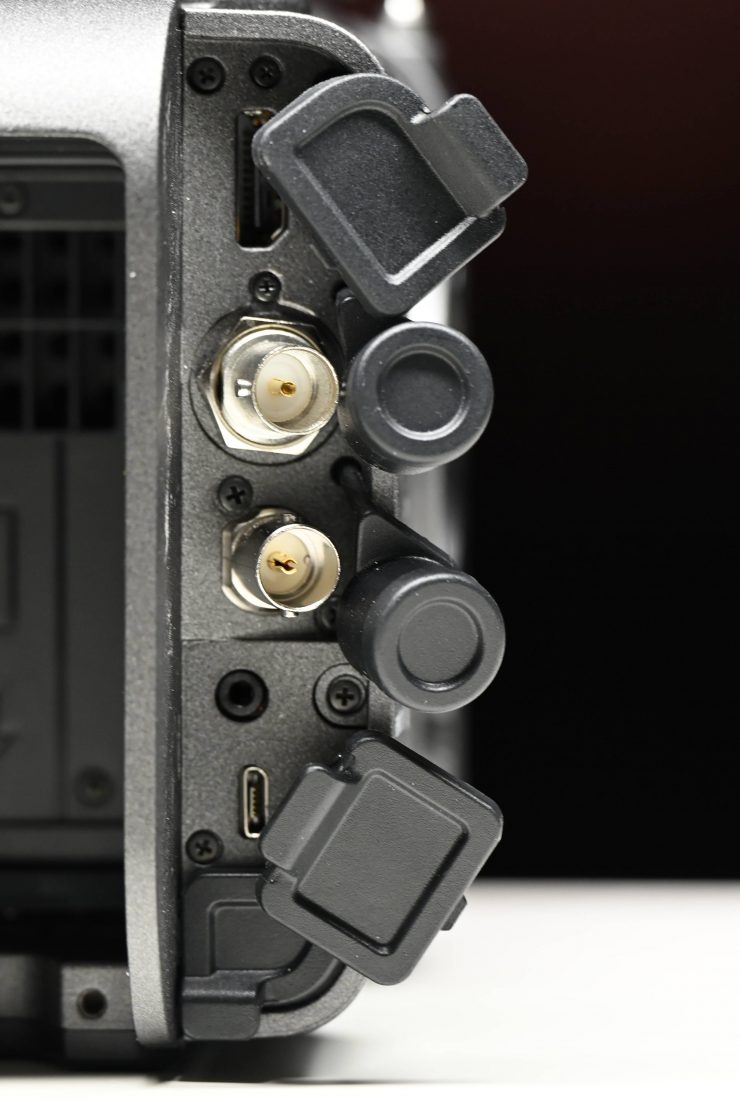
FX6 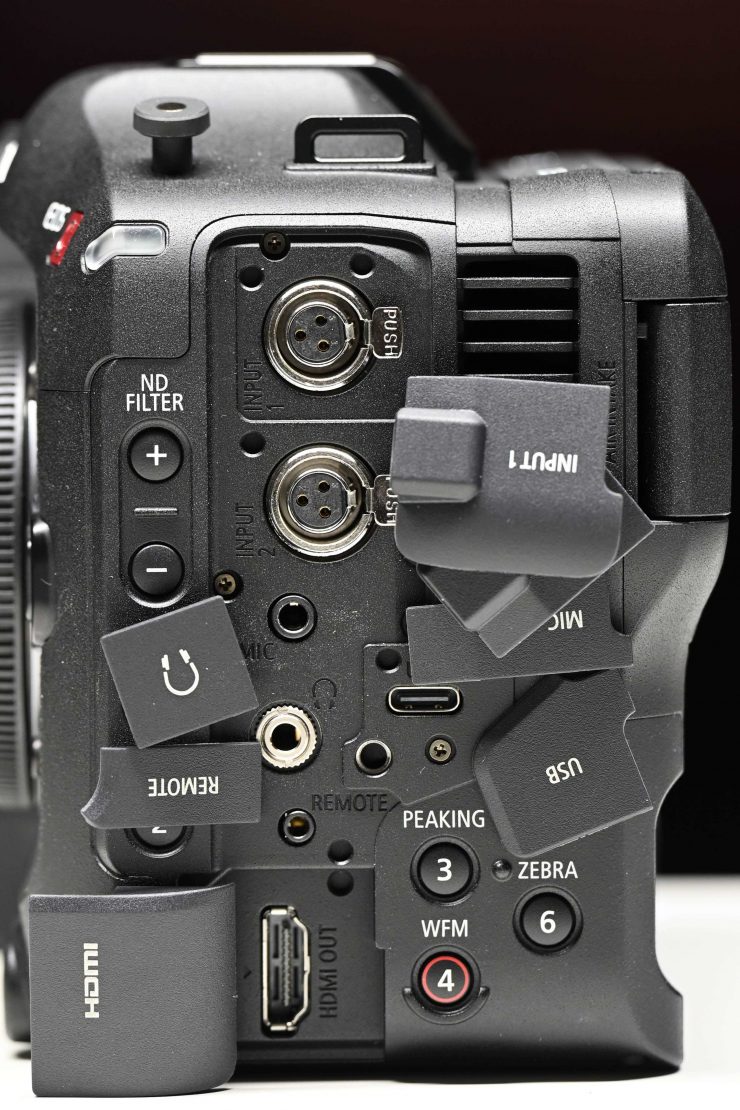
Canon C70 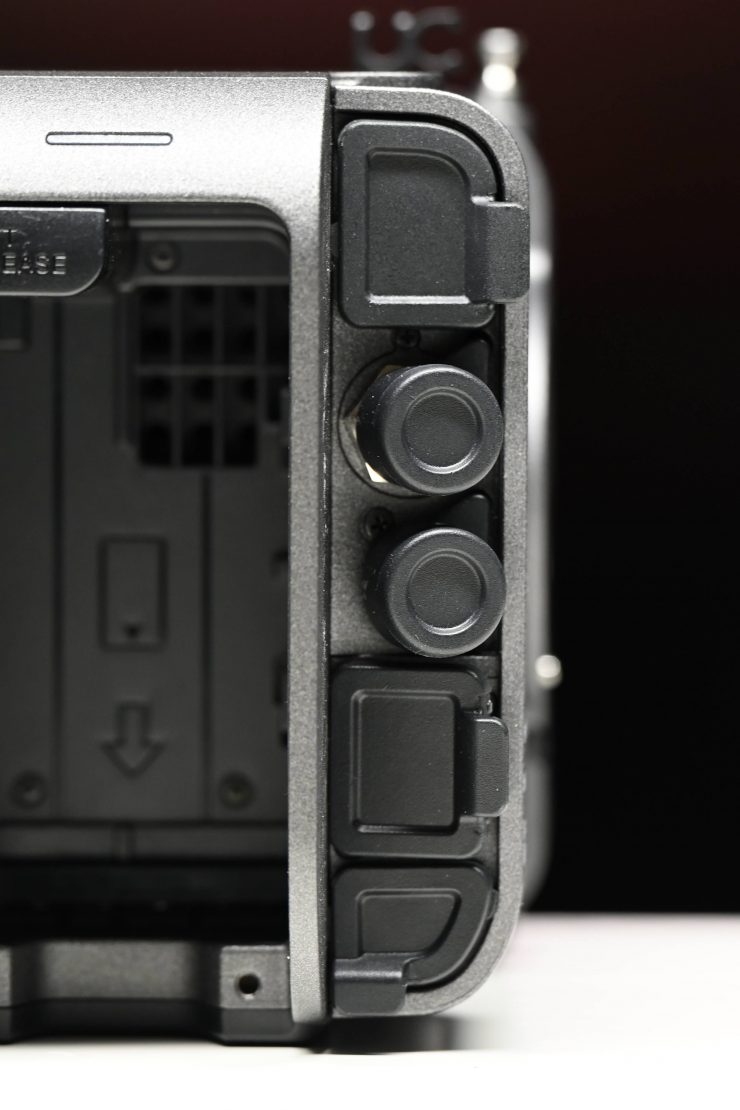
FX6
Small details such as the plastic coverings on the inputs and outputs are better on the canon C70 than they are on the FX6. On the FX6 you really need to remove them entirely because they just end up getting in the way.
These may be really small details, but when you actually considering buying a camera, it is important to look at every little detail. Usability is far more important than camera specifications.
Just like the FX6, the Canon C70 also utilizes a fan and cooling system. The C70 has its ventilation and electrical systems separated to protect the sensor from water, sand, dust, etc.
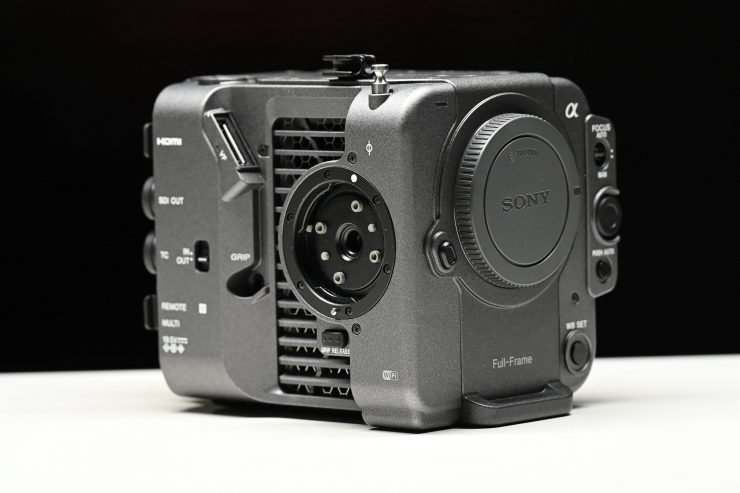
No Locking E-Mount
FX9 
FX6
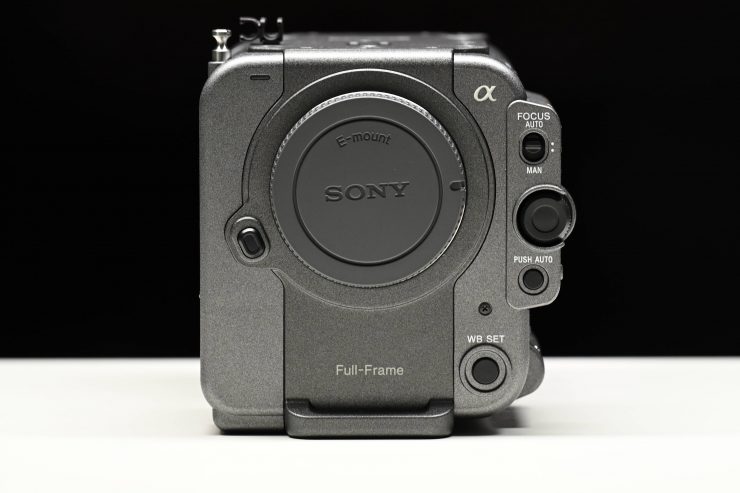
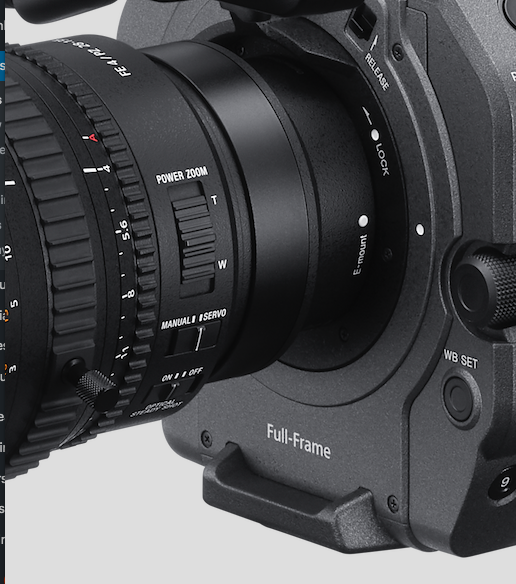
In no real surprise, that the FX6 doesn’t have the same locking E-mount from the FS7 M2 and FX9. It features a regular E-mount. This mount is fully compatible with E-Mount lenses and supports all electronic connections.
Not having a locking E-mount means you really do need to use lens support for certain larger lenses. With a locking mount, it reduces lens play and allows you to use most 35mm lenses including PL, EF, Leica, and Nikon via optional adapters. That stronger E-mount is also handy for using heavier-long cine-zooms without having to add additional lens support.
The Canon C70 utilizes the RF mount. Just like E mount, this allows you to use just about any lens by simply adding an adapter.
With the C70 you can also utilize the optional EF-EOS R 0.71x speedbooster. This allows you to get the most out of Canon EF full-frame lenses. The EF-RF speedbooster creates a 0.71x wide optical conversion. It fully supports CMOS AF and optical correction with Canon EF lenses. It will also pass through and display f-number, focal length, and lens metadata.
Like any normal speedbooster you will also gain a stop of light. So if you, for example, put an F4 lens on the adapter your lens will receive the same amount of light as if it was an F2.8 lens.
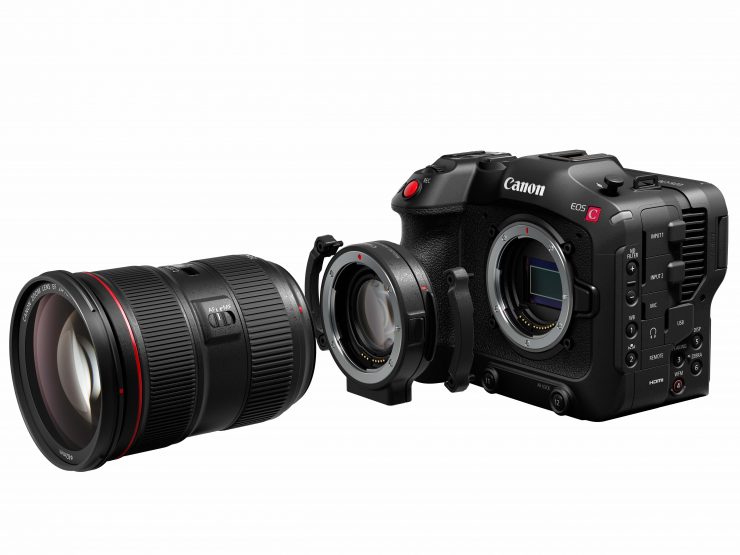
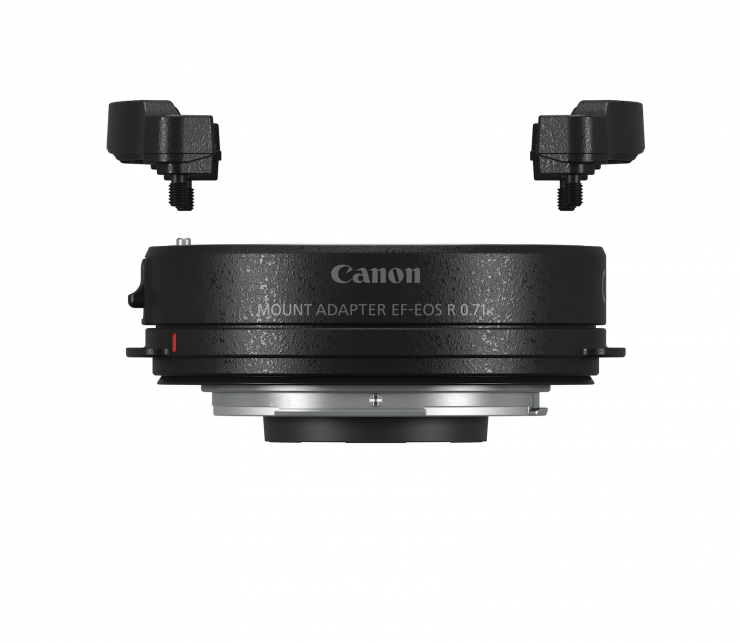
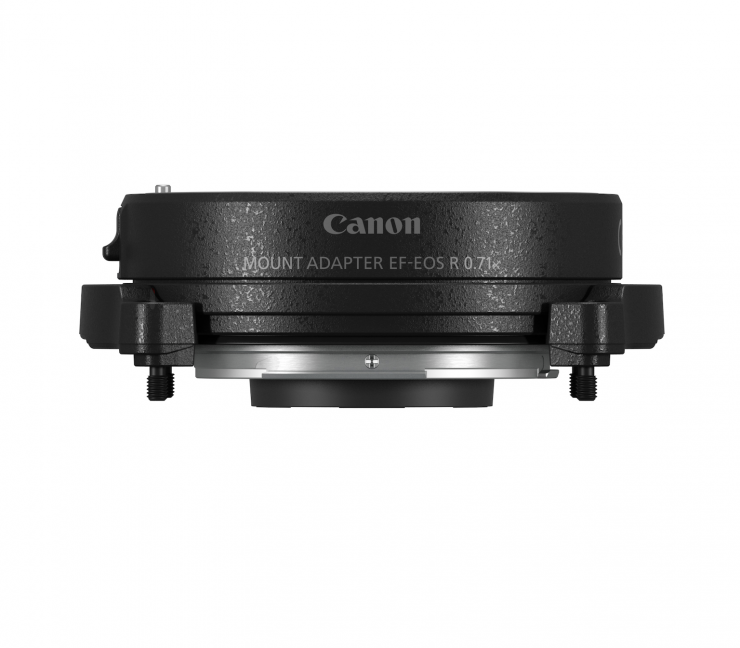
The adapter mounts like any other adapter, however, if you are running heavier lenses it can also be attached via four screws to the body of the C70. If you are going to be swapping between RF and EF lenses frequently you probably wouldn’t want to screw in the EF-EOS R 0.71x mount.
There is currently a catch with the adapter. As of this moment, only the following Canon EF lenses can be used:
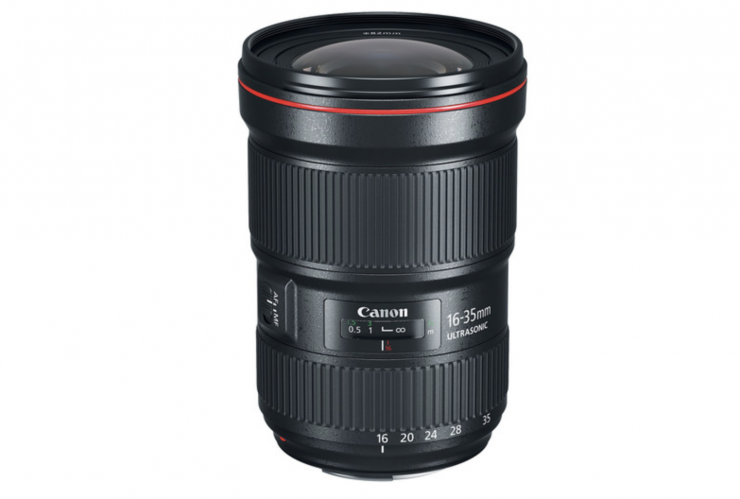
- Canon EF 16-35mm F2.8L III USM
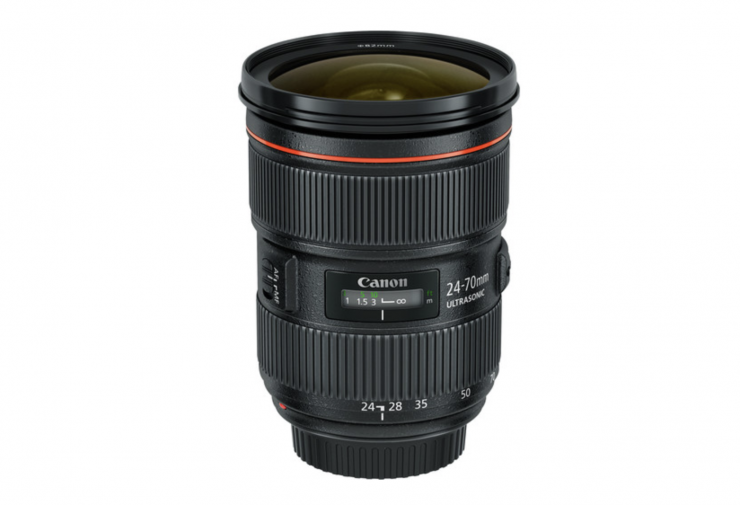
- Canon EF 24-70mm F2.8L II USM
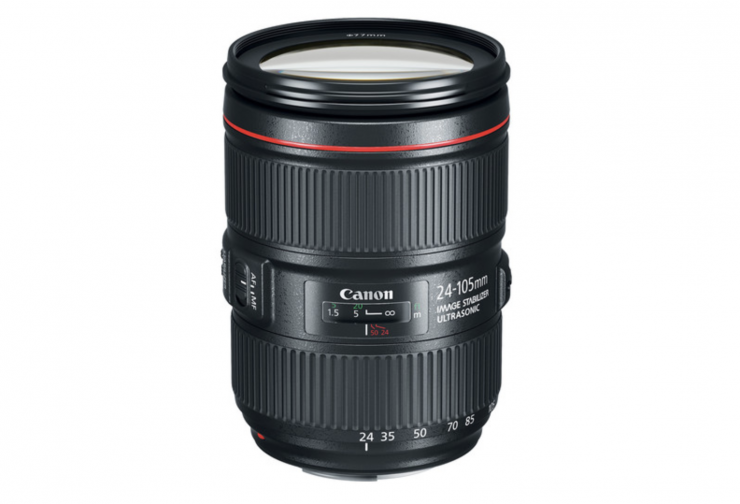
- Canon EF 24-105mm F4L IS II USM
In saying that, this is only Canon’s official list. You can use basically any full-frame-capable EF lens with this adapter.
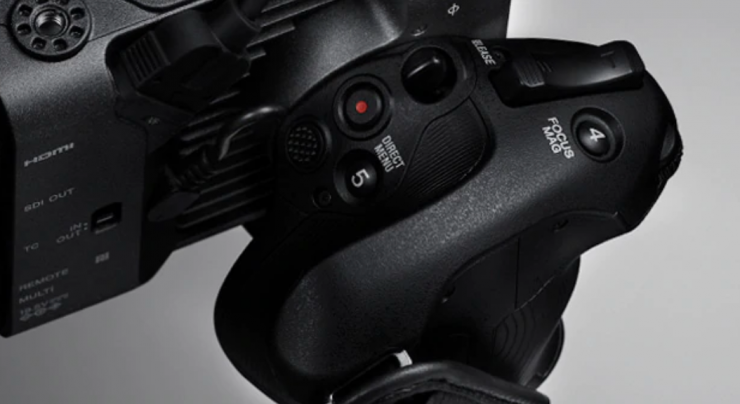
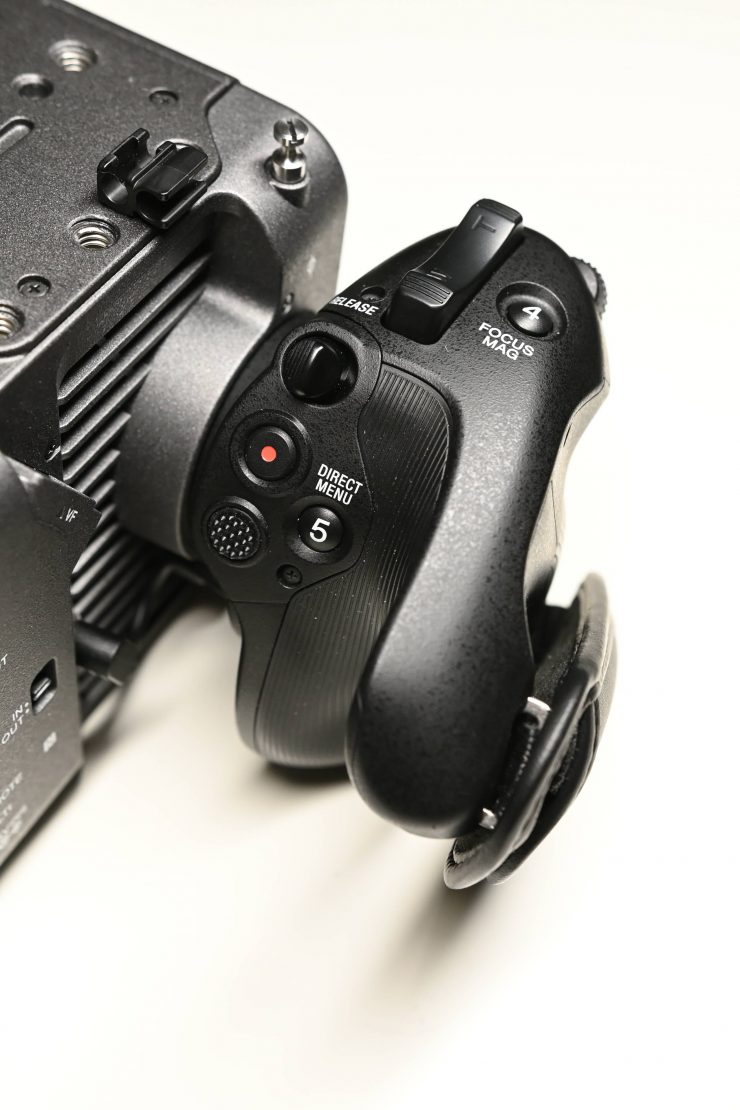
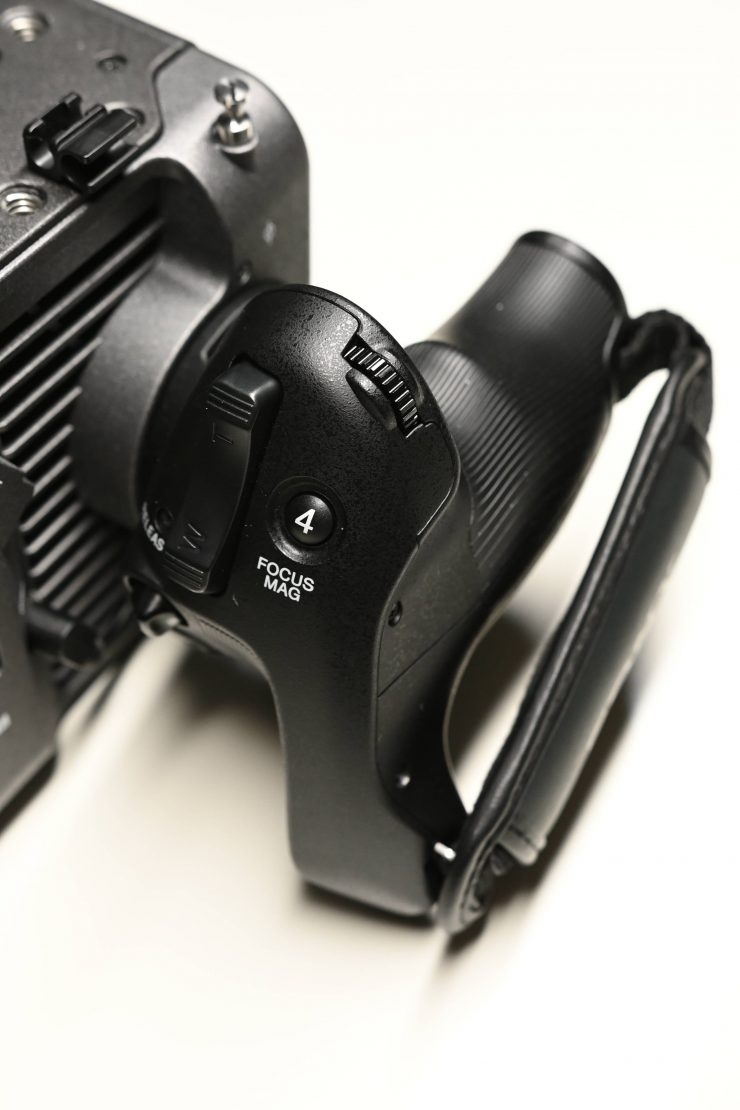
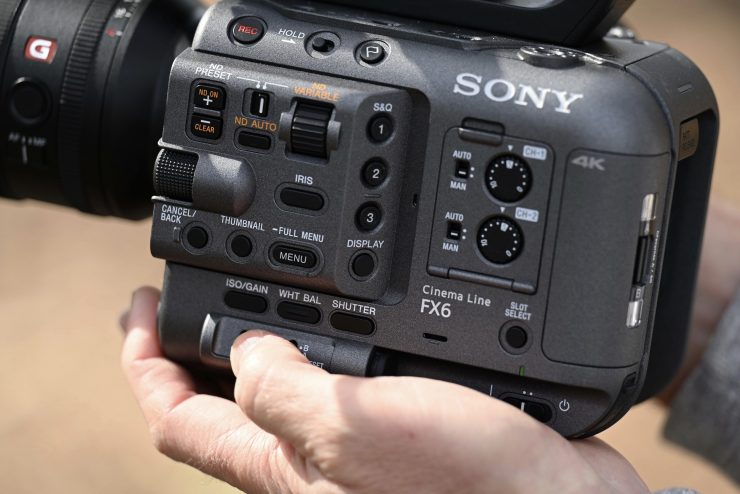
Button Layout
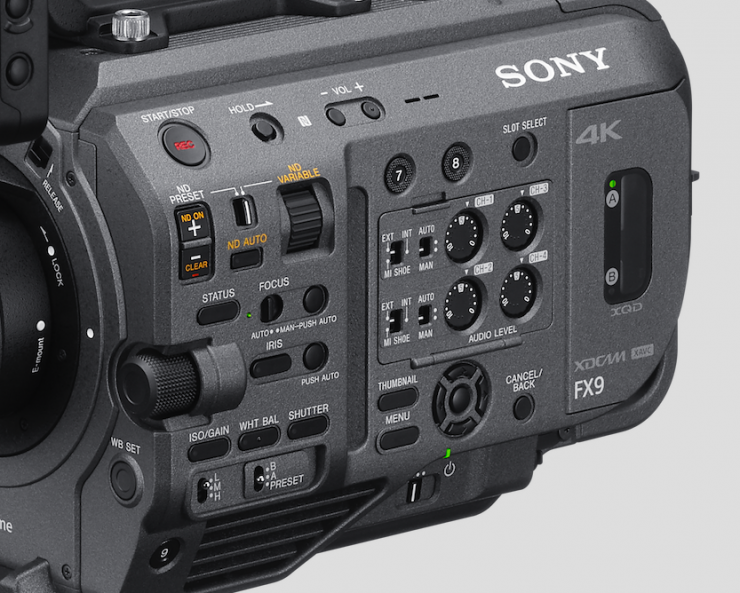
FX9 
FX6 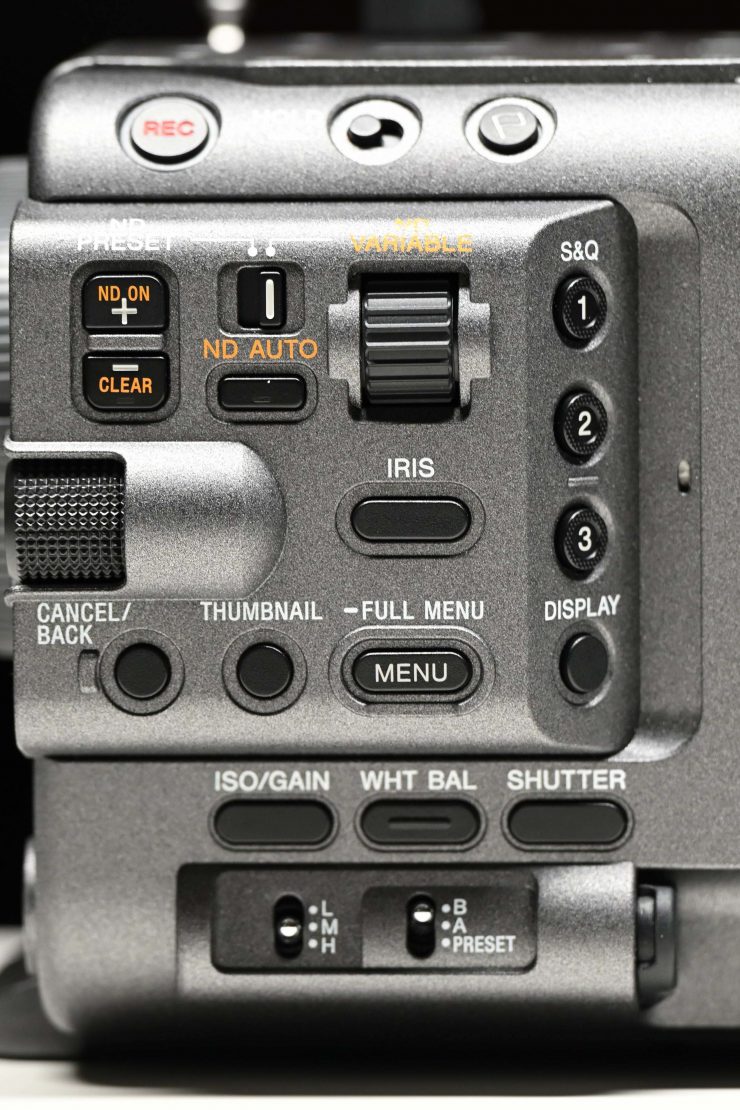
FX6
While the FX6 control and button placement look very similar to its big brother the FX9, if you look closely there are quite a few differences.
FX9 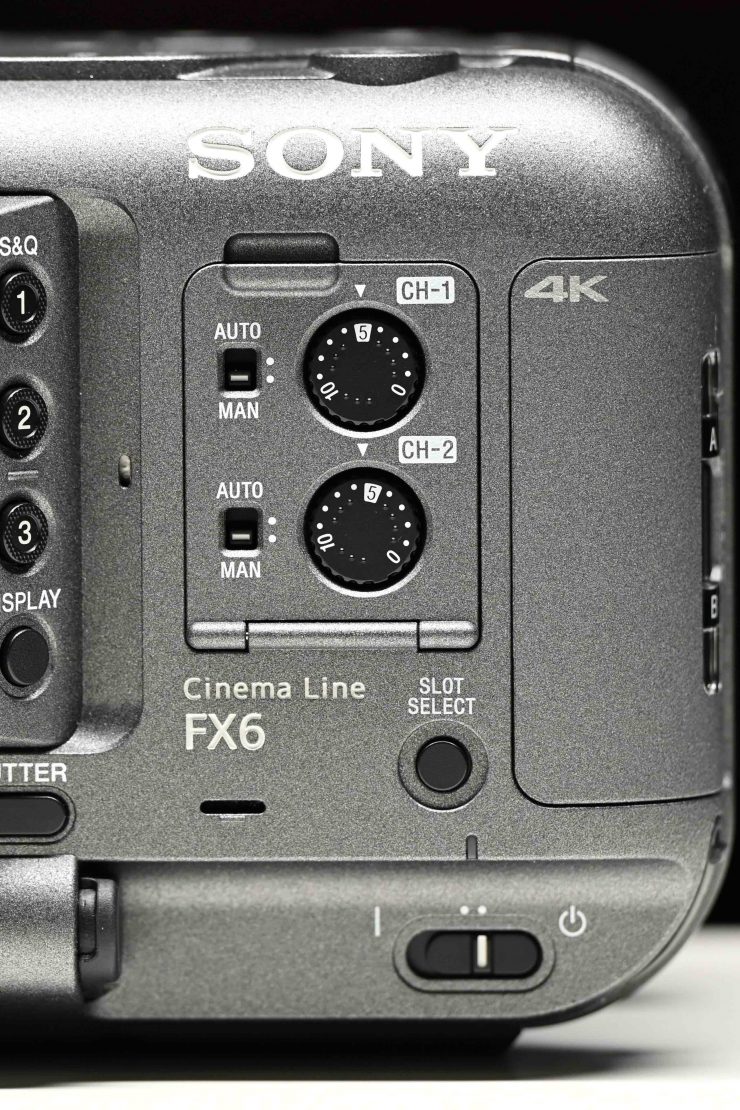
FX6
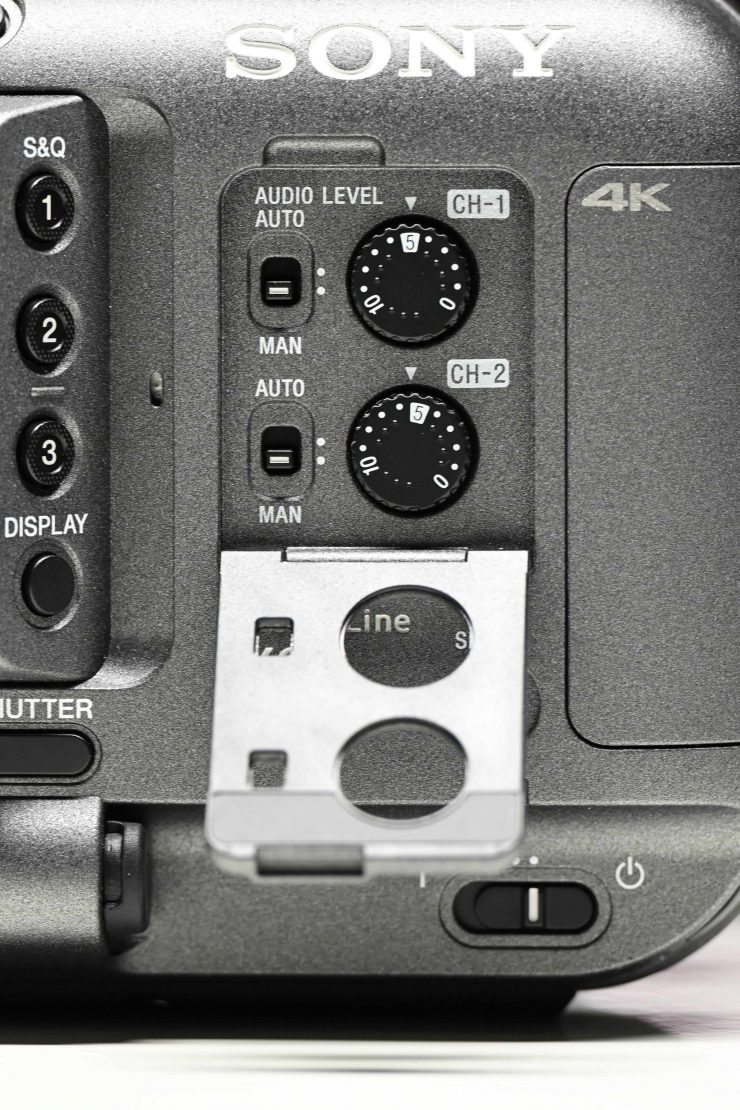
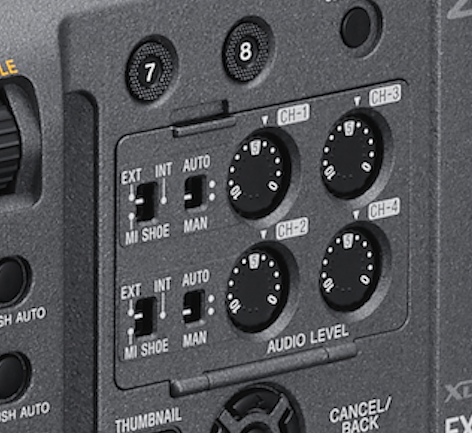
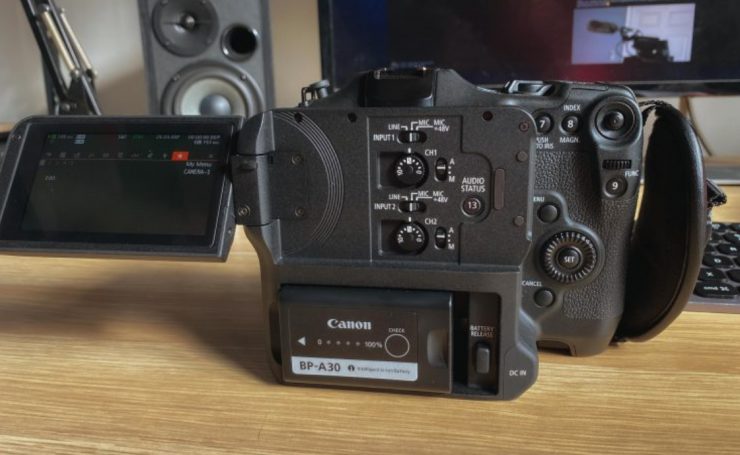
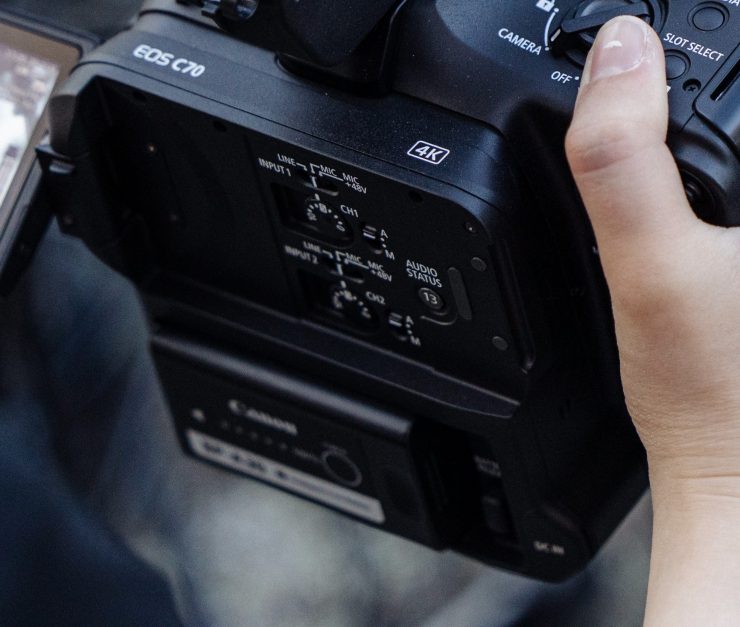
Unlike the FX9 that has controls for four channels of audio, the FX6 only has physical controls for two channels of audio. You will also notice that there aren’t any physical switches on the FX6 for switching between Internal, External, and MI Shoe audio sources. You have to do this in the menu on the FX6.

The C70 has a lot of buttons and while most of them are conveniently located, the audio controls are located behind the LCD screen. To access them you need to have the LCD screen flipped out.
Menus
Menus should be intuitive, well thought out, and easy to use. Most of the Japanese manufacturers haven’t cottoned onto this concept. They continue to make cameras with complex menus and naming parameters that don’t always make sense.
Everyone loves a Sony menu, said no one ever. Sony doesn’t exactly have a stellar reputation for creating easy-to-use and simplified menus. So how does the FX6 fare?

Well, put it this way. They could be a lot better. Intuitive is not a word I would associate with Sony menus. Sony loves to have way too many pages of menus and a lot of the time they place settings for certain features in strange places that make it hard for the user to make changes.
I have a Sony F3 that is now 10 years old and to be honest, the menus don’t look that much different from the FX6.
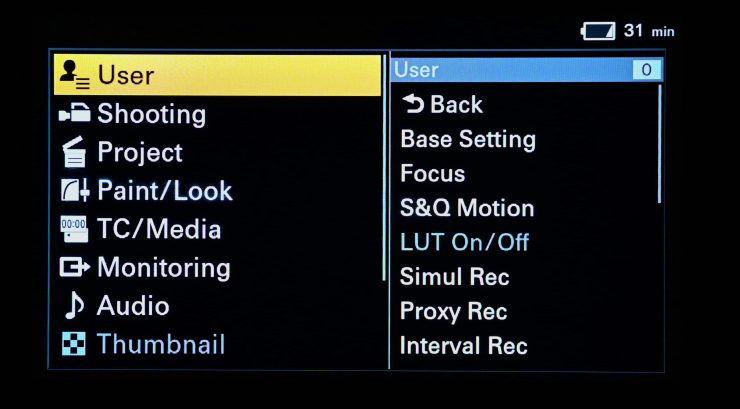
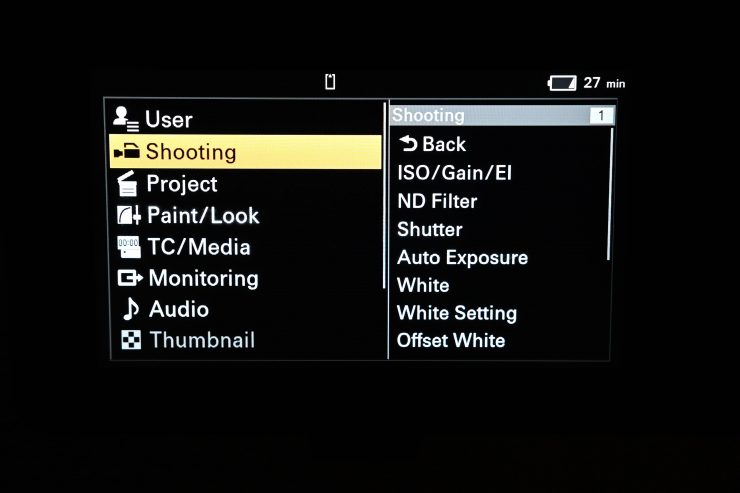
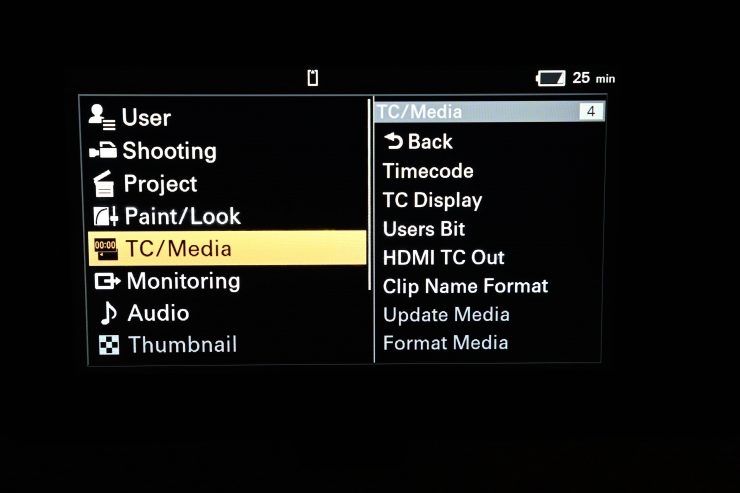
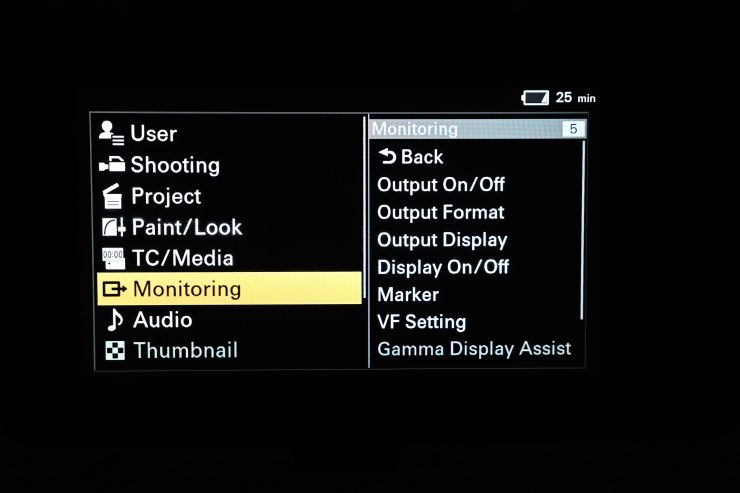
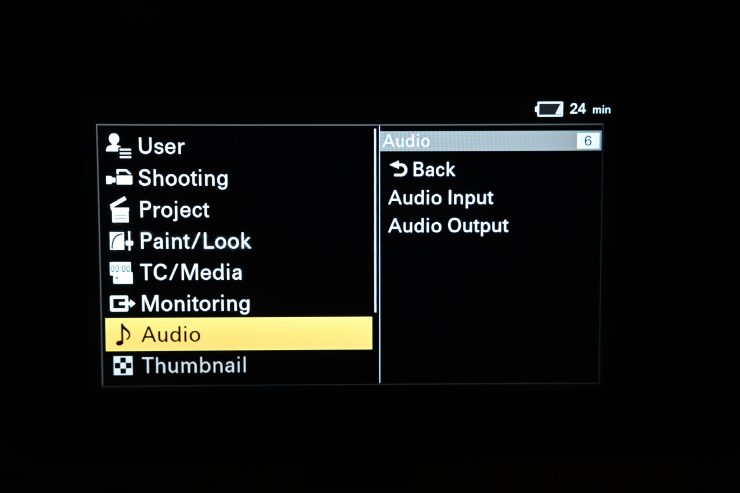
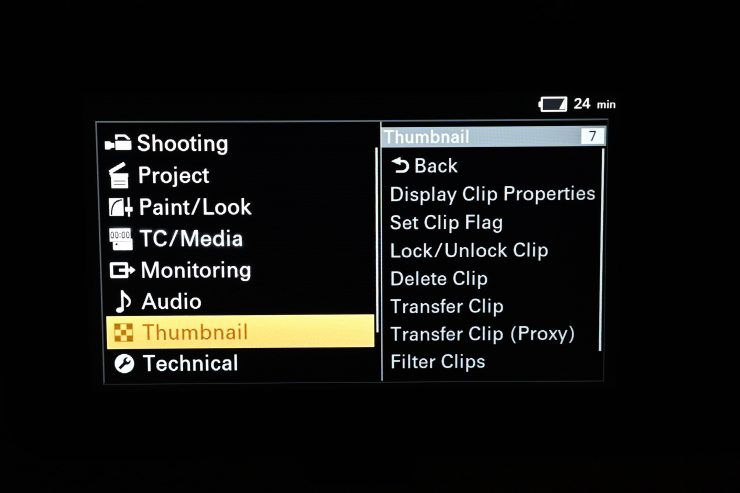
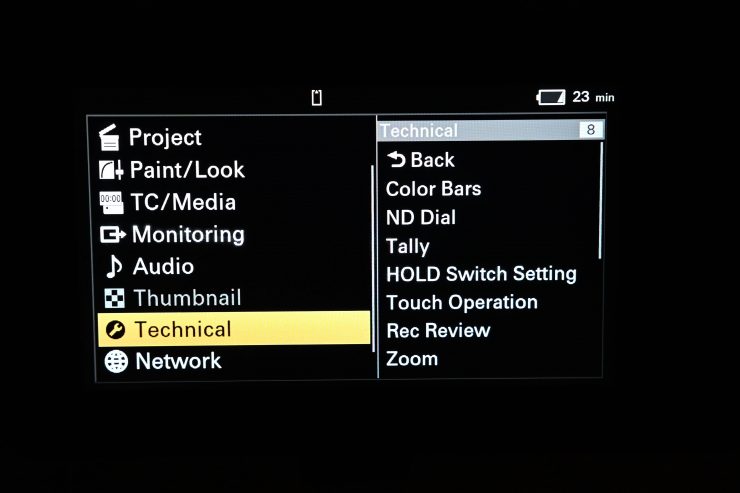
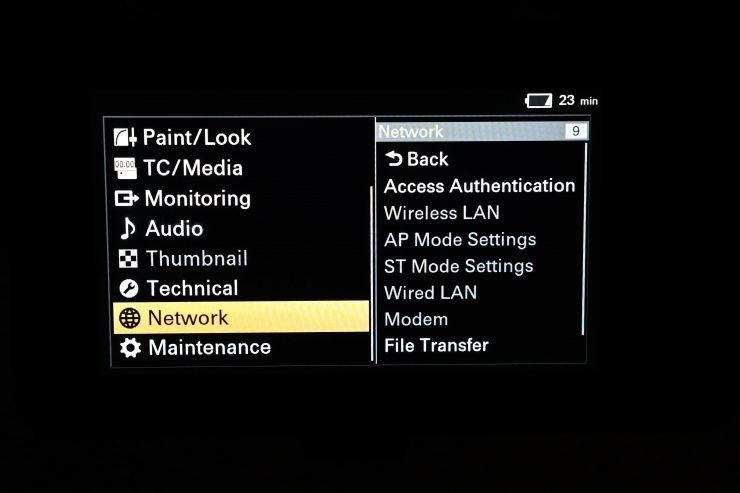
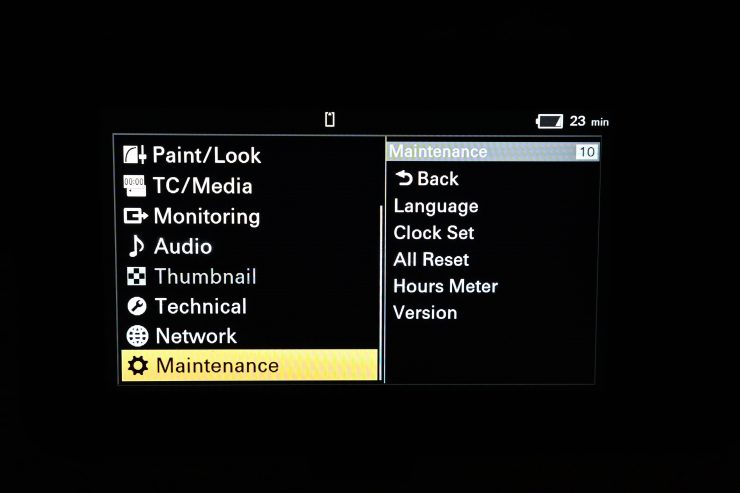
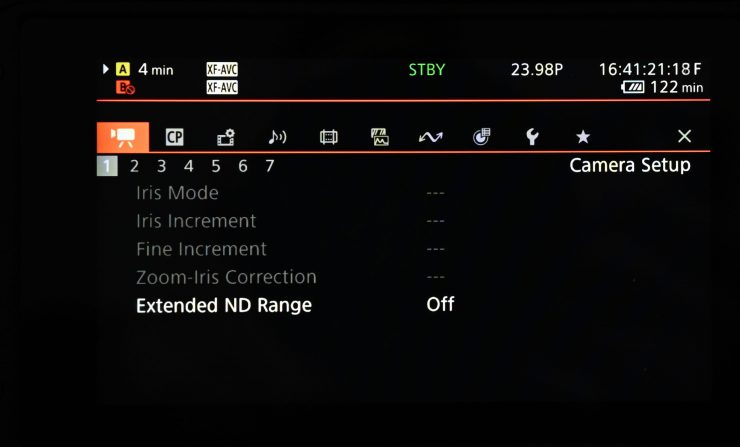
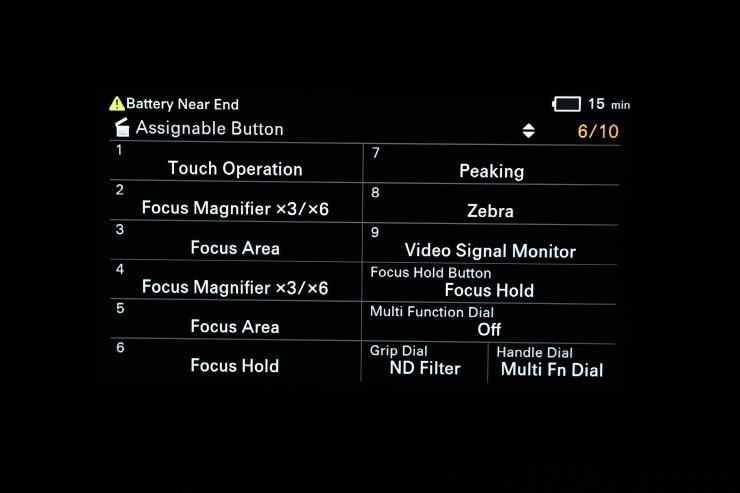
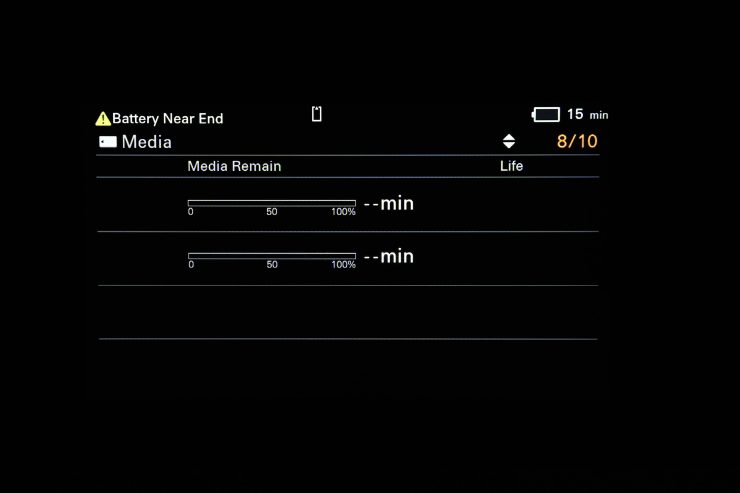
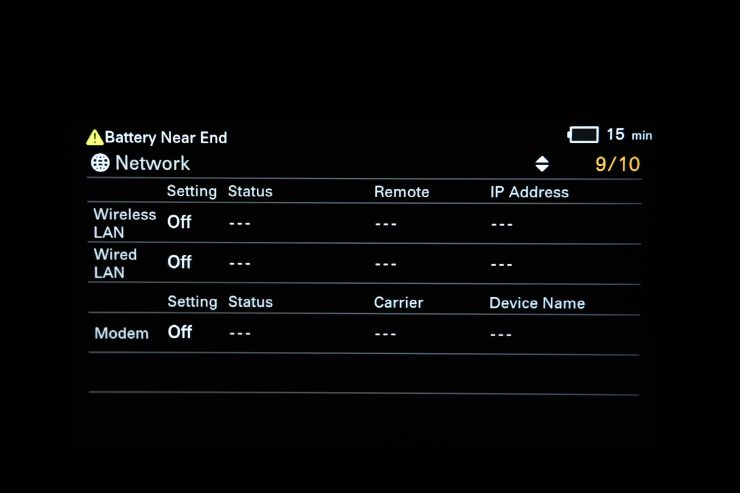
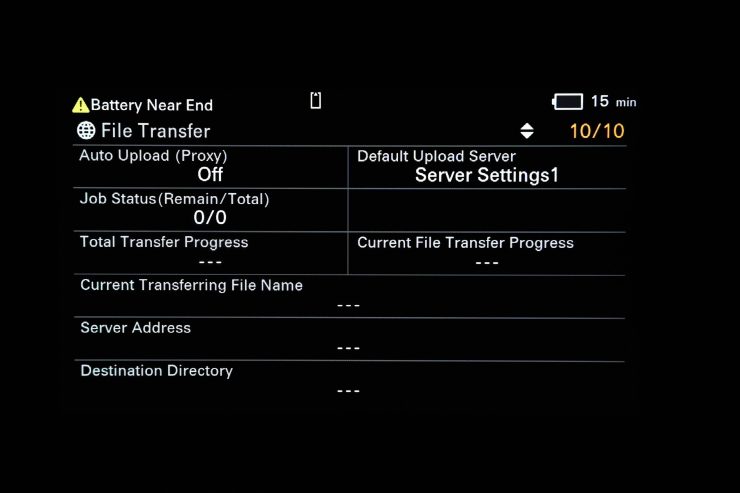
On the FX6 there are 9 pages of menu items. Above you can see a run-through of the menus if you have any interest!
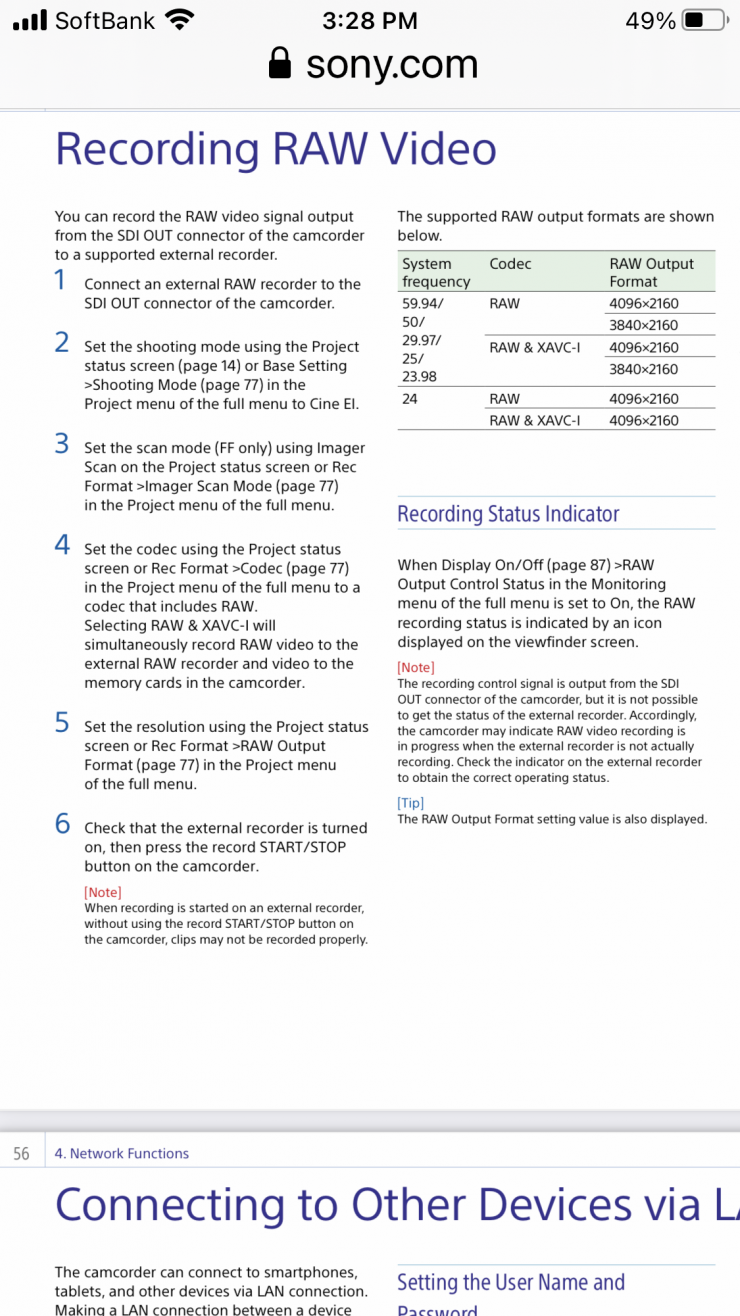
It took me ages to work out how to set up the camera to output a RAW signal. Eventually, I had to consult the manual to work out how to do it.
As a comparison, the Canon C70 has 10 pages on menus. I personally found the Canon C70 menus were even worse to navigate than the Sony. The joystick on the C70 that you can use to toggle through the menu pages often gets stuck or is unresponsive.
On the C70, just like the FX6, there are menu items that are really hard to locate because they are in strange sections. Just trying to work out how to turn on the Face Detection on the C70 required m to do a Google search.
Menus should be intuitive and easy to use. In my personal opinion, neither camera achieves this.
Now, both cameras do have the ability to use more simplified menus, which leads us to the next section.
Touchscreen Operation
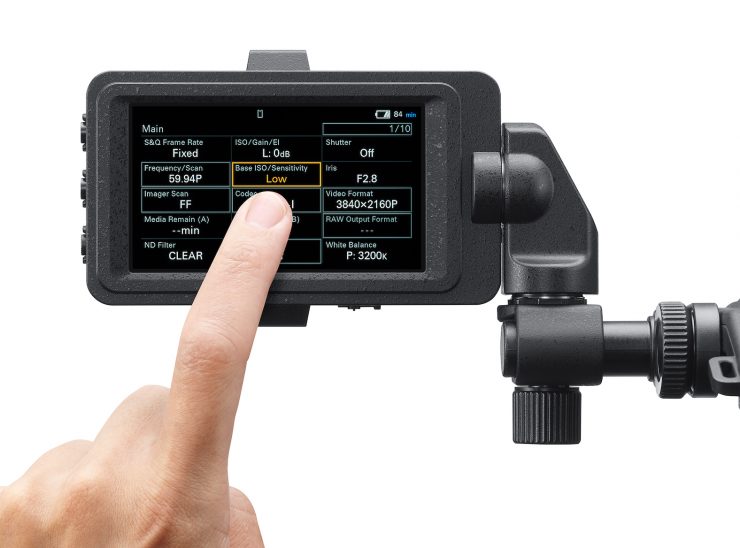
Just like on the FX9, the FX6 has the same touchscreen operation available from its LCD screen. This allows you to access menu features and make changes to certain camera parameters.
It also allows you to use touch AF directly on the screen. Now, this is a little confusing to figure out at first when using the FX6. You can’t just simply touch screen to focus. You need to set an assignable button to Focus Setting and then the focus box goes yellow. When it is yellow you can move the focus point around via the touchscreen.
This really has been made a little more complicated than it needs to be. Look, I get it, Sony didn’t want people to accidentally touch the screen and change the focus, but as there isn’t any other type of touchscreen functionality except for when entering the Quick Menus this doesn’t seem to make a lot of sense. They should have just put a touchscreen function directly on the screen to be able to turn it on or off.
One of my biggest pet hates with Sony cameras is they seem to have a way of making some things more complicated than they need to be. While all of this may be fine if you are familiar with their cameras, if you are buying a camera for the first time, or renting a camera, these little quirks can be very frustrating when you are learning how to use it and set it up.
Above you can see a run through of the Quick MENUS that you can access on the touchscreen.
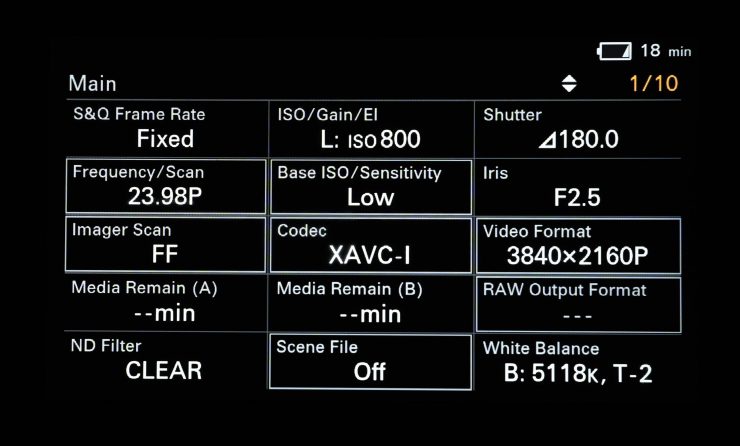
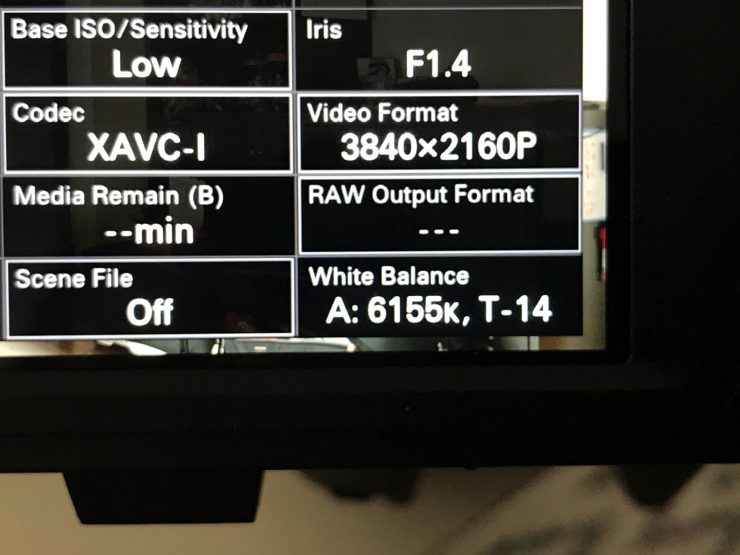
Items that can be changed on the Main Status window are:
- Base ISO/Sensitivity
- Codec
- Video Format
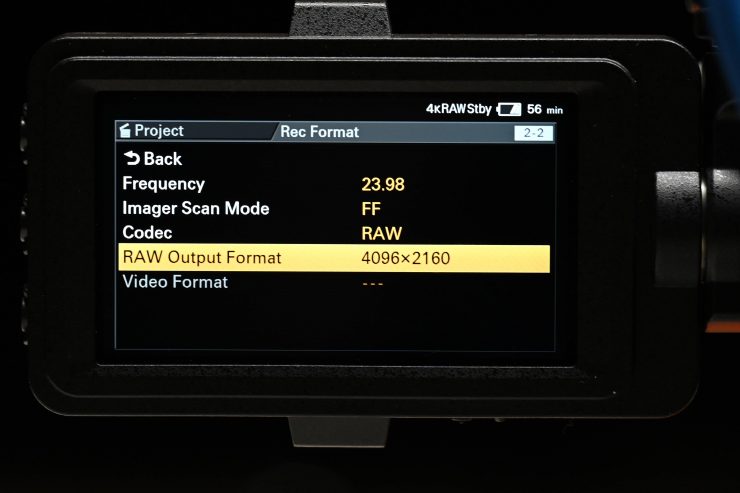
- RAW Output Format
- Imager Scan
- Frequency Scan
- Scene File
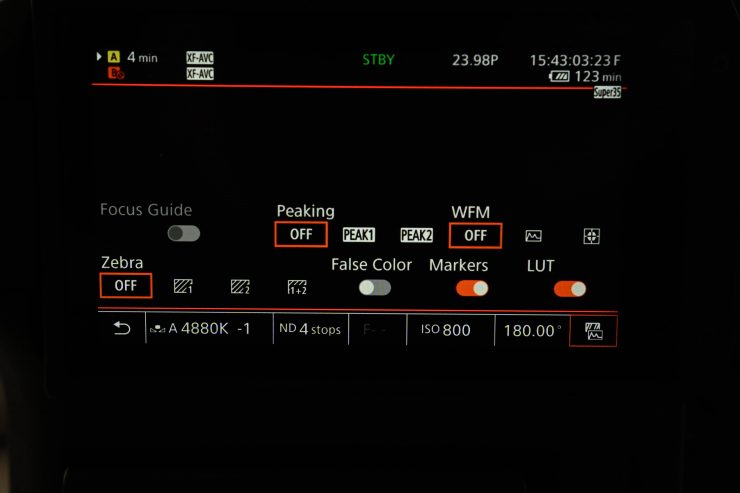
Unfortunately, you cant change the white balance, ISO/Gain, ND, shutter, or Iris using the touch screen while you are on the Main Status menu. The only items you can change have a thicker white box around them.
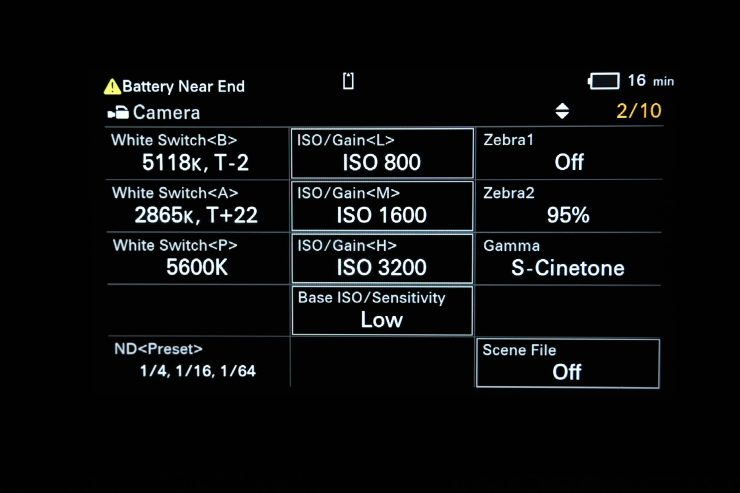
On the Camera Status window, you can change:
- ISO/Gain <L>
- ISO/Gain <H>
- Base ISO/ Sensitivity
- Scene File
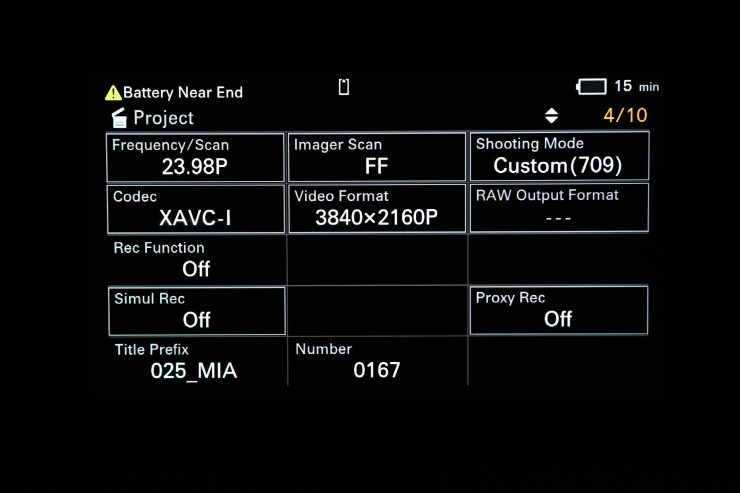
On the Project Status screen you can adjust:
- Frequency/Scan
- Imager Scan
- Codec
- Video Format
- Shooting Mode
- Simultaneous Record
- Proxy Record
- RAW Output Format

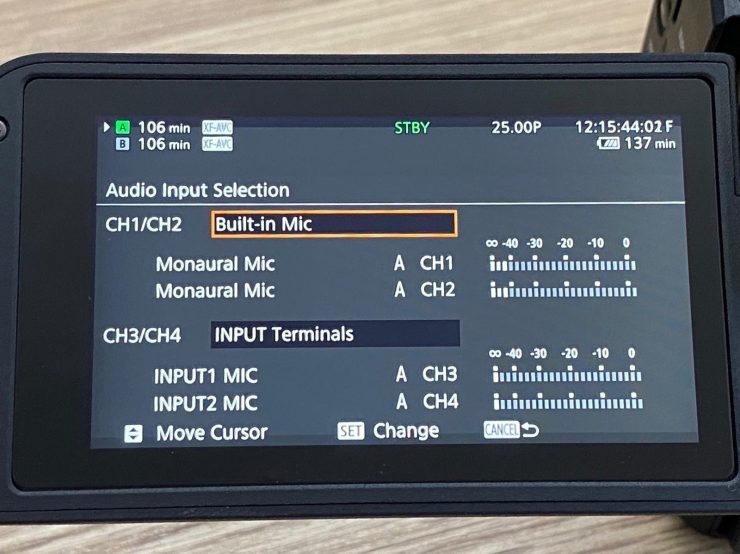
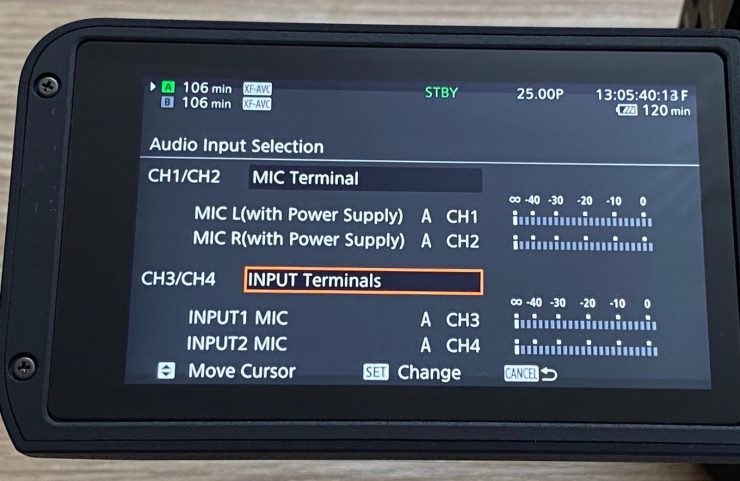
On the Audio Status screen, you can adjust:
- Input 1 Source
- Input 2 Source
- Shoe CH1
- Shoe CH2
- Audio Input Level
- HDMI Output CH
- Volume
- Monitor CH
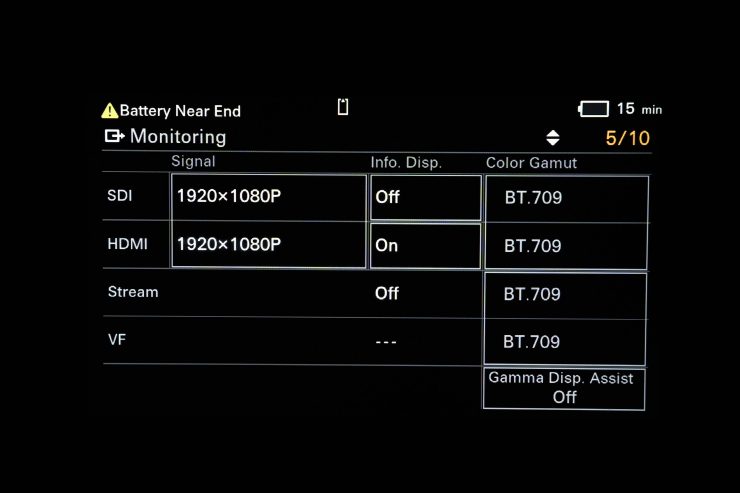
On the Monitoring Status screen you can adjust:
- SDI/HDMI Output Signal
- Info Display On/OFF on all outputs
- Color Gamut on all outputs
- Stream Color Gamut
- VF Color Gamut
- Gamma Display Assist

Above you can also see what information is available using the quick menus.
The only trouble with the touch menu is that you can’t access it from the main screen. You still need to leave your main screen to make any changes using these menus.
While it is nice to see this attempt at simplifying the way you access key menu features, it still could be a lot better.
There is also another way of making changes where you can scroll through certain parameters that are shown on the LCD display. You can access this feature by either doing a long push of the multi-function button or by placing the feature on an assignable button. This allows you to change items such as ISO, WB, focus modes, etc. This is a far better way of making changes than trying to use the Quick Menus.

With the Canon C70, you have the ability to access and change key parameters of the camera’s operation right on the LCD screen without having to go into any menus. This makes it very quick to make changes. I much prefer Canon’s touch screen implementation for this very reason.
What can it record?
The FX6 can internally record in resolutions of up to 4K DCI. Given the small megapixel count, this camera will only ever be capable of recording in resolutions of 4K. This is something you need to keep in mind long term, even though I personally think 4K will be fine for many years to come.
The FX6 can capture 4K DCI at up to 59.94P in 4:2:2 10-bit XAVC Intra (Class 300). In UHD it can capture up to 120P also in 4:2:2 10-bit XAVC Intra (Class 300). Sony doesn’t specifically state what the bitrate is when recording UHD at 100 or 120P. One thing you need to be aware of is that the camera can’t shoot in 4K DCI in frame rates above 59.94p.
There are also XAVC Long GOP recording options as well if you want to minimize card space.
XAVC Intra 422 10-bit (Class 300)
| RESOLUTION | SYSTEM FREQUENCY | BITRATE |
| 4K DCI (4096×2160)* | 59.94P 50P 29.97P 25P 24P/23.98P | 600 Mbps 500 Mbps 300 Mbps 250 Mbps 240 Mbps |
| UHD (3840×2160)** | 59.94P 50P 29.97P 25P 24P/23.98P | 600 Mbps 500 Mbps 300 Mbps 250 Mbps 240 Mbps |
*S&Q from 1-60fps is available in these modes, however, it isn’t available if you are outputting RAW over SDI.
**S&Q 1-60fps and 100/120fps are available in these modes, however, 100/120fps is not available when outputting RAW over SDI.
It is also important to note that there is a slight 10% crop of the image when you record UHD 100/120fps.
XAVC Intra 422 10-bit (Class 100)
| RESOLUTION | SYSTEM FREQUENCY | BITRATE |
| FHD (1920×1080* | 59.94P 50P 29.97P 25P 24P/23.98P | 600 Mbps 500 Mbps 300 Mbps 250 Mbps 240 Mbps |
*S&Q 1-60fps and 100/120/200/240fps are available in these modes.
Please be aware that 100/120/200/240fps are only available in the full-frame shooting mode. They don’t work in the S35 mode.
XAVC Long GOP 420 8-bit
| RESOLUTION | SYSTEM FREQUENCY | BITRATE |
| UHD (3840×2160)* | 59.94P 50P 29.97P 25P 24P/23.98P | 150 Mbps 150 Mbps 100 Mbps 100 Mbps 100 Mbps |
*S&Q 1-60fps and 100/120fps available in these modes.
XAVC Long GOP 422 10-bit
| RESOLUTION | SYSTEM FREQUENCY | BITRATE |
| FHD (1920×1080)* | 59.94P 50P 29.97P 25P 24P/23.98P | 50 Mbps 50 Mbps 50 Mbps 50 Mbps 50 Mbps |
*S&Q 1-60fps and 100/120/200/240fps are available in these modes.
Please be aware that 100/120/200/240fps are only available in the full-frame shooting mode. They don’t work in the S35 mode.
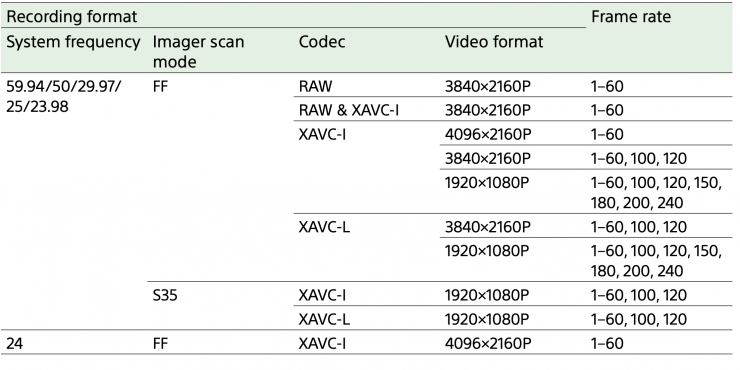
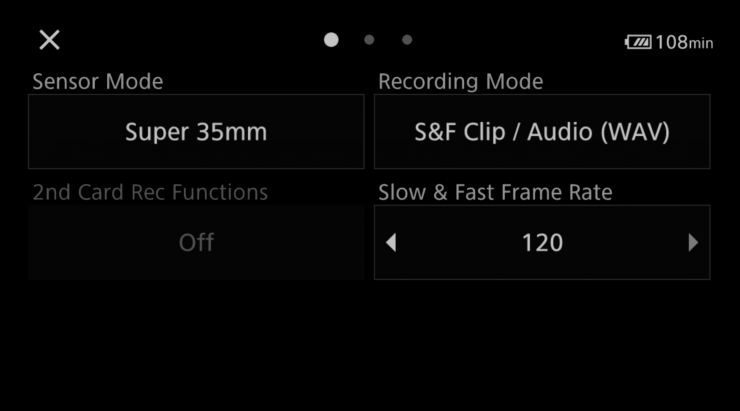
Above you can see what you can do if you are shooting in S&Q. The auto focus function, auto iris function, and auto shutter function are disabled in Slow & Quick Motion mode. However, the auto focus function can be used
the frame rate is set to the following:
System frequency Frame rate
59.94/29.97/23.98 30, 60, 120, 240
50/25 25, 50, 100, 200
On paper, the FX6 offers you higher frame rates in UHD than the more expensive FX9. The only way to get UHD 120P out of the FX9 is via the expensive and cumbersome XDCA-FX9 extension kit and record it externally to an Atomos product.
Both Proxy Video and Audio can be recorded:
- PROXY AUDIO XAVC Proxy: AAC-LC, 128 kbps, 2 channels
- PROXY VIDEO XAVC Proxy: AVC/H.264 High Profile 4:2:0 Long GOP, VBR 1920×1080, 9Mbps
An HLG (Hybrid Log-Gamma) HDR picture profile, complete with the wide-gamut BT.2020 color space, can be used for direct HDR (HLG) playback on compatible TVs.
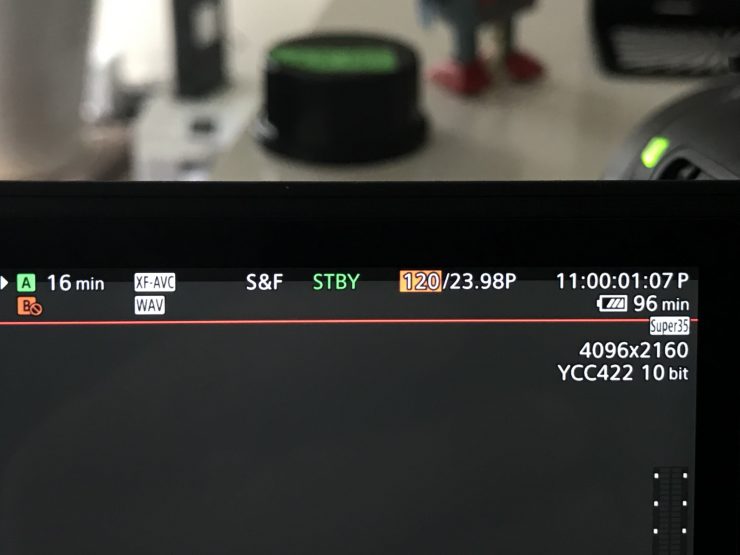
As a comparison, the Canon C70 is capable of recording in resolutions up to 4K DCI (4096 x 2160) and in frame rates of up to 120p. In 2K or HD you can record up to 180p. Unlike the FX&, the C70 can record 120p in 4K DCI.
| FORMAT | SAMPLING | RESOLUTION | MAX. FRAME RATE |
| XF-AVC H.264 Intra | 4:2:2 10bit 410Mbps 4:2:2 10bit 310/160Mbps | 4096 x 2160 3840 x 2160 2048 x 1080 1920 x 1080 | Up to 29.97/25P Up to 59.94/50P |
| XF-AVC H.264 Long GOP | 4:2:2 10bit 260/160Mbps 4:2:2 10bit 50Mbps | 4096 x 2160 3840 x 2160 2048 x 1080 1920 x 1080 | Up to 59.94/50P Up to 59.94/50P |
| XF-AVC HFR (Special Rec) H.264 Long GOP | 4:2:2 10bit 4:2:2 10bit | 4096 x 2160 3840 x 2160 2048 x 1080 1920 x 1080 | Up to 119.88/120P Up to 179.82/180P |
| XF-AVC Proxy H.264 Long GOP | 4:2:0 8bit 35Mbps/24Mbps | 2048 x 1080 1920 x 1080 | Up to 59.94/50P |
| MP4 H.265 Long GOP | 4:2:2 10bit 225Mbps | 4096 x 2160 3840 x 2160 | Up to 59.94/50P |
| MP4 HFR (Special Rec) H.265 Long GOP | 4:2:2 10 bit 4:2:2 10bit | 4096 x 2160 3840 x 2160 2048 x 1080 1920 x 1080 | Up to 119.88/120P Up to 179.82/180P |
| MP4 H.264 Long GOP | 4:2:0 8bit 150Mbps | 4096 x 2160 3840 x 2160 | Up to 59.94/50P |
| MP4 HFR (Special Rec) H.264 Long GOP | 4:2:0 8bit 4:2:0 8bit | 4096 x 2160 3840 x 2160 2048 x 1080 1920 x 1080 | Up to 119.88/120P Up to 179.82/180P |
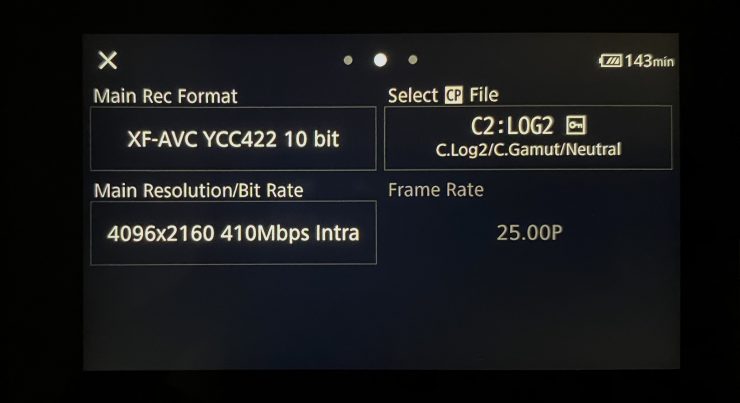
The C70 can record 4K DCI or UHD in 4:2:2 10-bit up to 30p in XF-AVC H.264 Intra, and 4K DCI or UHD in 4:2:2 10-bit in XF-AVC H.264 Long GOP.

Image copyright: Dave May 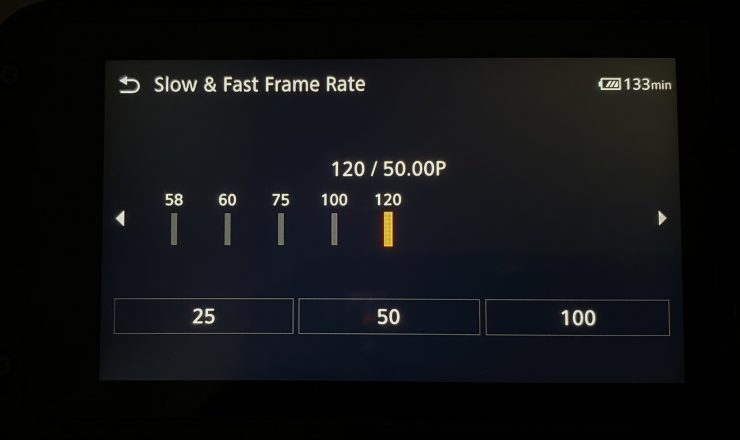
Image copyright: Dave May
It is also capable of recording 4K DCI or UHD at up to 120p in 4:2:2 10-bit XF-AVC HFR (Special Rec) H.264 Long GOP.
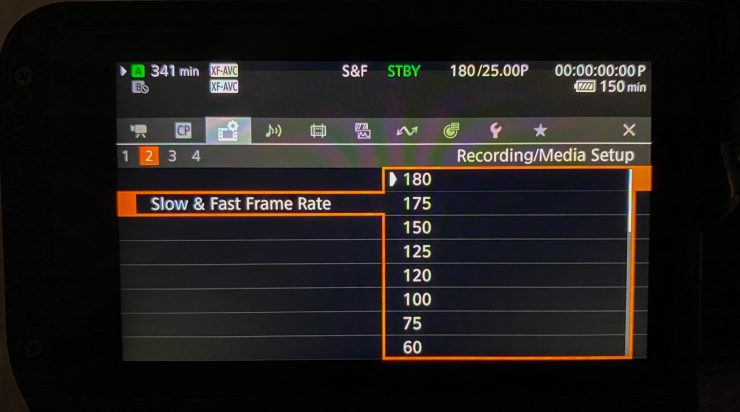
Image copyright: Dave May 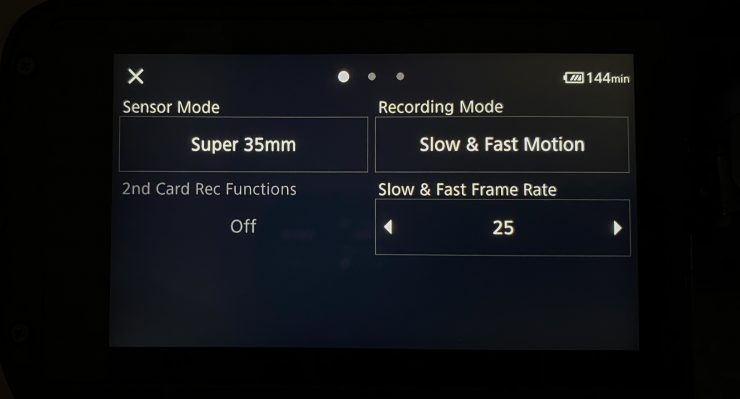
Image copyright: Dave May
In 2K or HD you can record up to 180p in 4:2:2 10-bit XF-AVC HFR (Special Rec) H.264 Long GOP. Please note the camera can shoot in S35 mode in 4K DCI, UHD, 2K and HD.
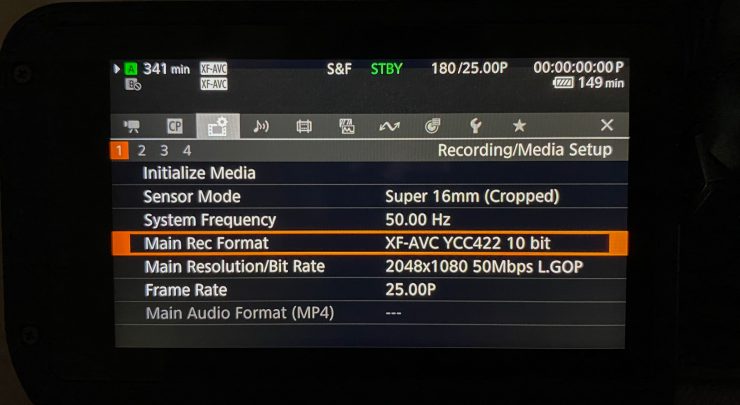
Image copyright: Dave May 
Image copyright: Dave May
As I mentioned earlier, there is also a Super 16mm cropped mode that you can shoot in. This results in a crop of 1.92x when shooting in 2K, or 3.07x when shooting in HD.
What is interesting to see is that Canon has enabled simultaneous audio recording when shooting high frame rates. The audio gets recorded in a separate file from the video. The file format it records in is BWF (.WAV extension). This is a great feature and something that shouldn’t be overlooked.
As far as codec choices are concerned you can choose from XF-AVC Long GOP, XF-AVC Intra, MP4 H.265 Long GOP, or MP4 H.264 Long GOP.
So what is the difference between Intra and Long GOP codecs? I’m glad you asked! An Intra based codec compresses the images frame by frame. This means each frame in decoded and encoded separately. Long GOP is an inter-frame based codec, as its name suggests, it detects the differences in frames by referring to the previous and subsequent frames. It isn’t saving the complete information from every frame like an Intra codec, instead, it is literally just saving the differences it sees between the changing frames. In plain English, it is basically making predictions based on changing frames and not decoding and then encoding every frame. Long GOP codecs are used because they don’t take up much card space and they allow you to record for long periods of time.
External RAW recording
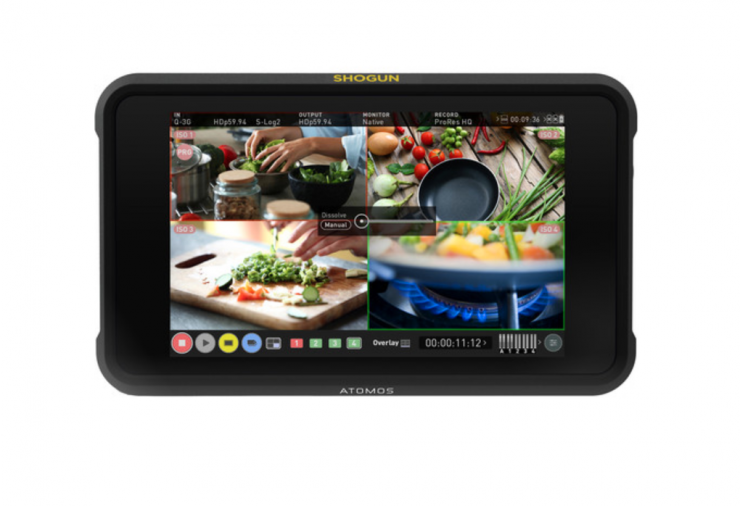
With patent issues prohibiting internal compressed RAW recording, the FX6 will only be capable of recording RAW externally. But unlike with the FX9, you don’t need to use the large, expensive XDCA-FX9 extension kit to do this. With the FX6, all you need to do is connect an SDI cable to an Atomos Shogun 7, or an Atomos Ninja V with the AtomX SDI module and the SDI RAW license and then you can record 12-bit Apple ProRes RAW.
I can still not comprehend why Sony requires FX9 users to use the XDCA-FX9 extension ($2,495 USD) kit to output 16bit RAW so that can be captured to a compatible external recorder.
With the FX6 you can output the exact same 16-bit linear RAW signal from the camera and then record it in the exact same 12-bit ProRes RAW file without needing to pony up $2,500 USD to do it.
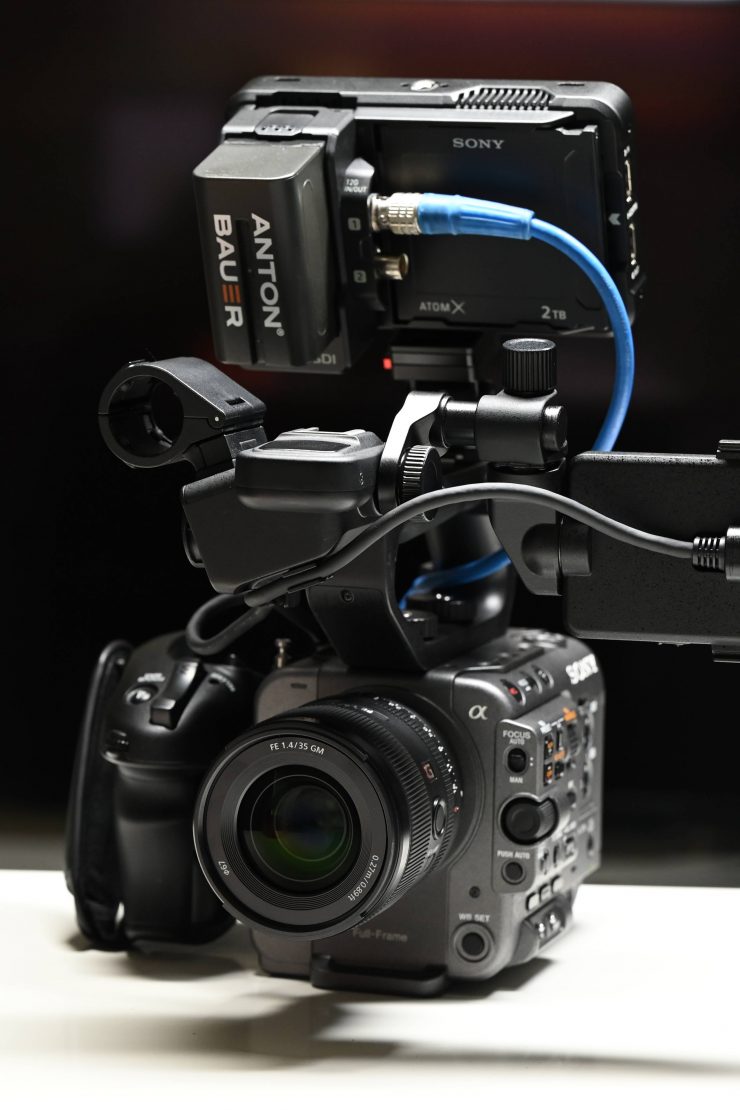
It is great that you can now just use the much smaller Ninja V and AtomX SDI module to record RAW from the FX6. This is a much better size for the camera than trying to use a Shogun 7.
As a comparison, the Canon C70 has no ability to record RAW either internally or externally.
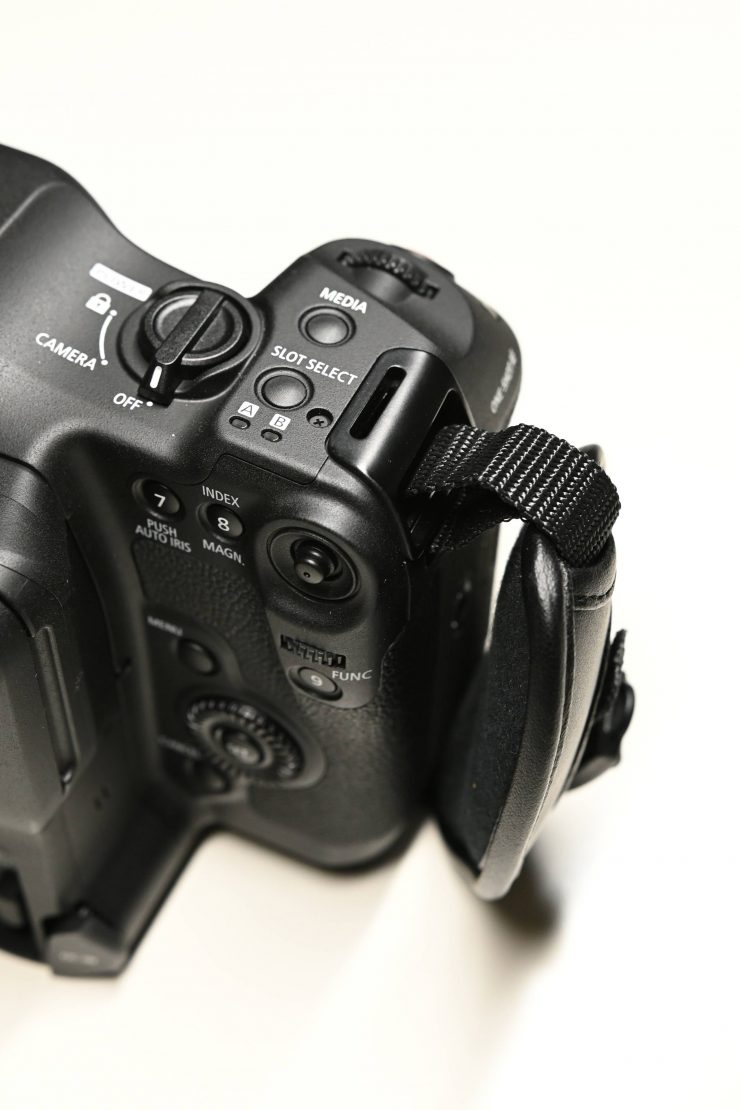
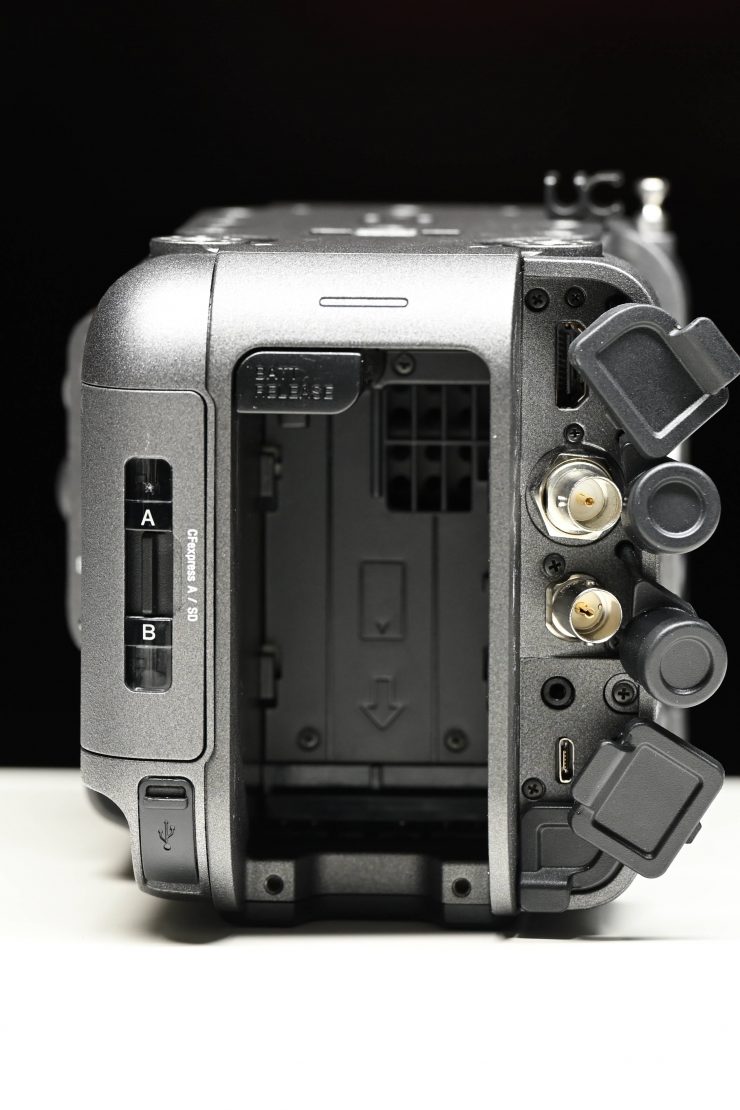
What media does it use?
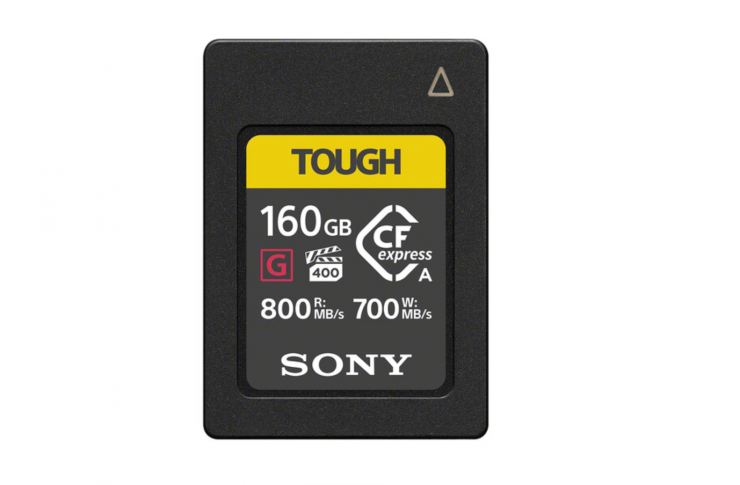
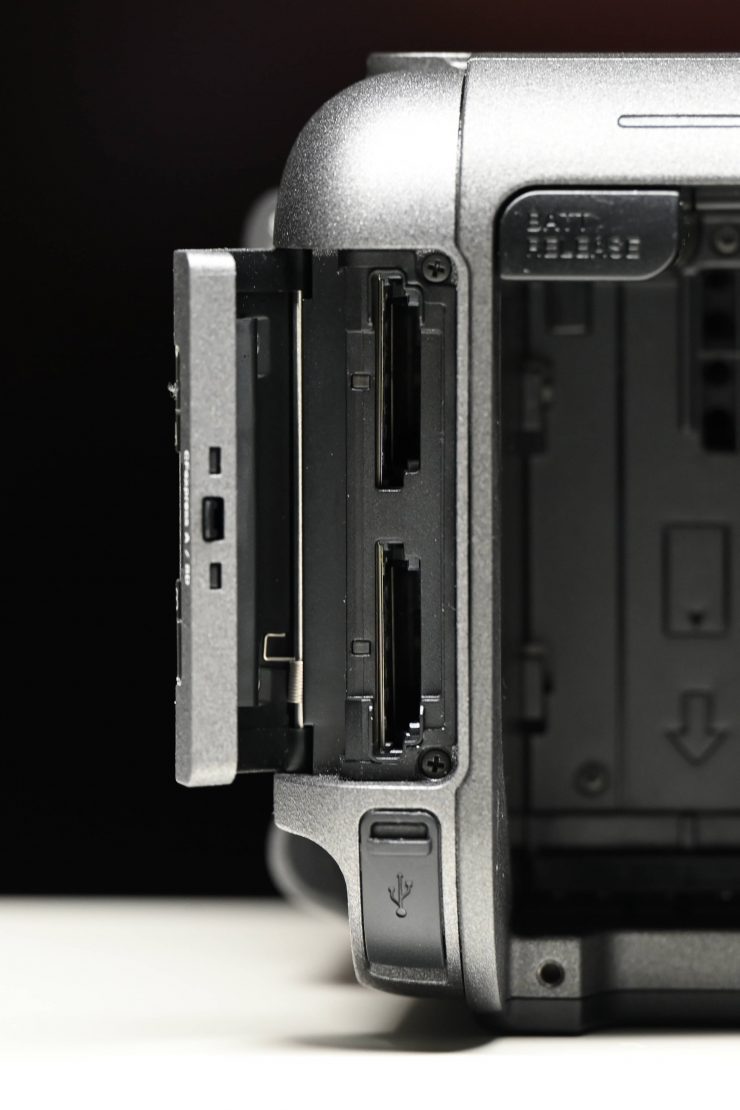
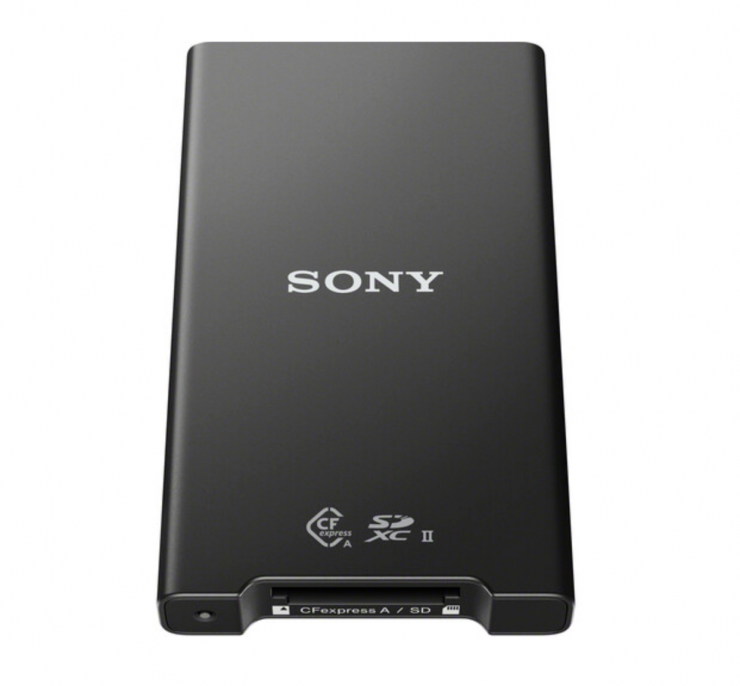
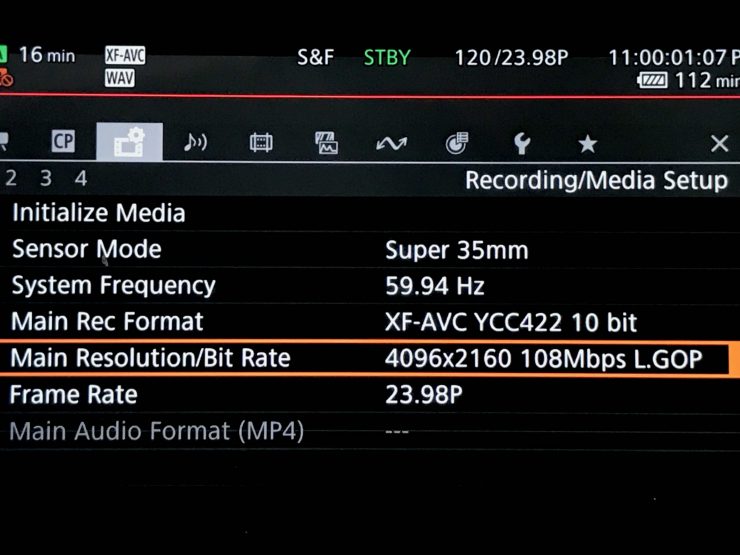
Unlike the FX9 which uses two XQD media slots that support simultaneous or relay recording, the FX6 utilizes new CFexpress type A cards. This doesn’t mean you have to use the new cards, the camera is still backward compatible with SD UHS-II cards as well, however, you do need the faster CFexpress type A cards if you want to record frame rates over 100P.
The FX6 is just the third commercially available camera that I know of that can use CFexpress type A cards. The other two cameras are the a7S III and FX3.

CFexpress was announced back in early 2019, but so far we have only seen CFexpress Type B cards being utilized. There are actually three different standards of CFexpress cards. The Type A card is the slowest of the three standards. But in saying that, it is still capable of theoretical speeds of up to 1000MB/s.
The biggest problem with CFexpress Type A cards is that they are expensive and currently nobody makes one in a capacity that is greater than 160GB.
A single Sony 160GB CFexpress Type A card costs $398.00 USD.
The Sony MRW-G2 CFexpress Type A/SD Memory Card Reader is an additional $118 USD.
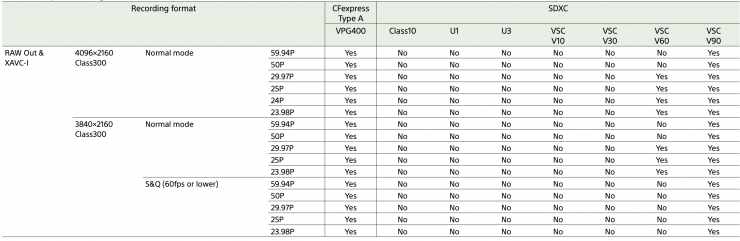
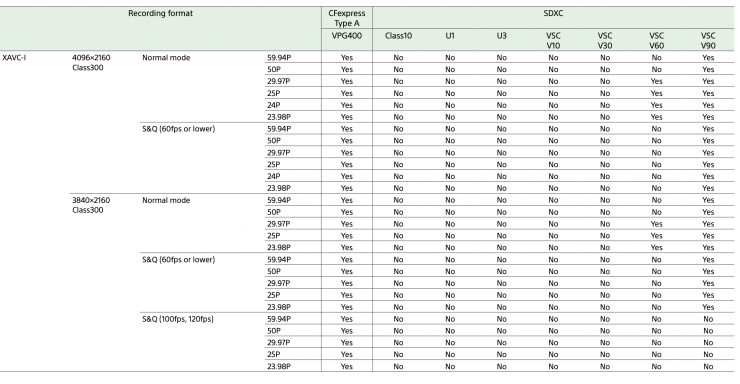
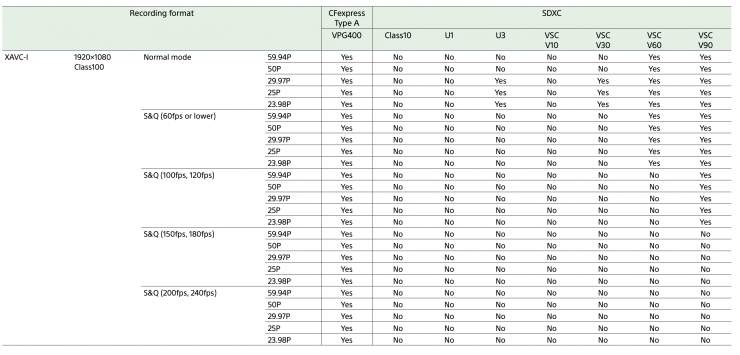
Above you can see what cards required to shoot at various resolutions and frame rates.
As a comparison, the Canon C70 uses SD UHS II cards. You do need to use the more expensive V90 cards to record HFR material such as 4K 120p. V90 cards are still a lot more affordable than CFexpress Type A cards. A 128GB V90 card retails for around $160 USD, that’s around $240 USD cheaper than a 128GB CFexpress Type A card. V90 cards are also available in sizes of up to 256GB.
What is interesting to see is that Canon allows the user to record different resolutions at the same time. For example, you could record 4K DCI to one card and 2K to the other at the same time. You can also record progressive and interlaced at the same time. So you could record UHD 50P to one card and HD 50i to the other. If you wanted to record different codecs at the same time you can also do that. For instance, you could record XF-AVC ALL-I to one card and XF-AVC Long GOP to the other.
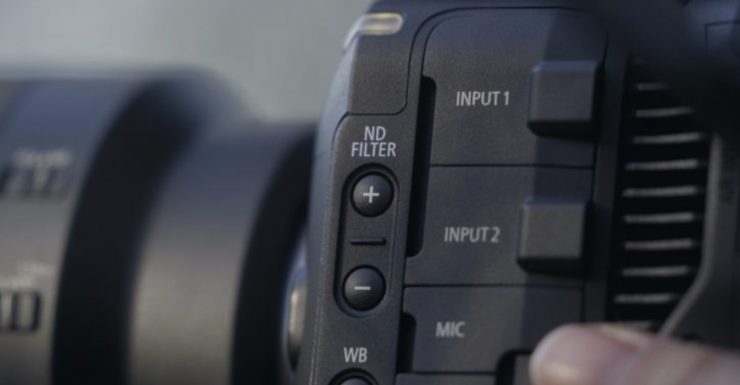
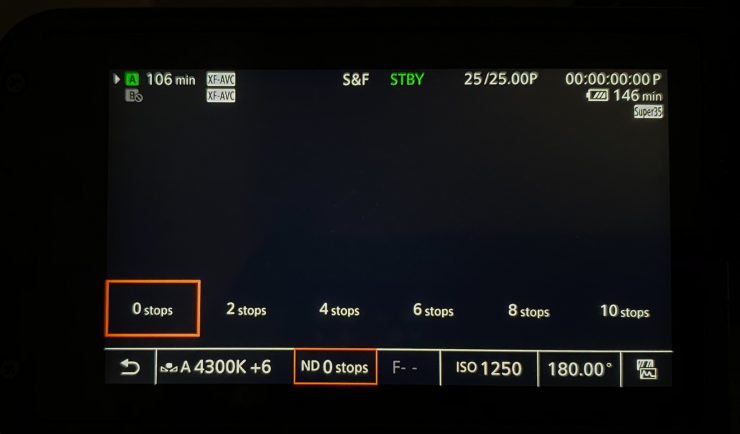
Variable Electronic ND
Just like the FS5, FS5 Mark II, FS7 M2, and FX9, the FX6 utilizes an electronic variable ND system that provides a clear filter and 3 user-definable presets. The variable ND can be adjusted to provide between 2 and 7 stops of ND.
There is also a ND auto button just like on the FX9. ND auto lets you keep your ISO, shutter speed and f-stop locked and then the electronic ND will automatically make adjustments to keep your exposure correct. With this system, you can also do things like adjusting the depth of field in real-time as the variable ND will compensate automatically when you make changes to the f-stop.
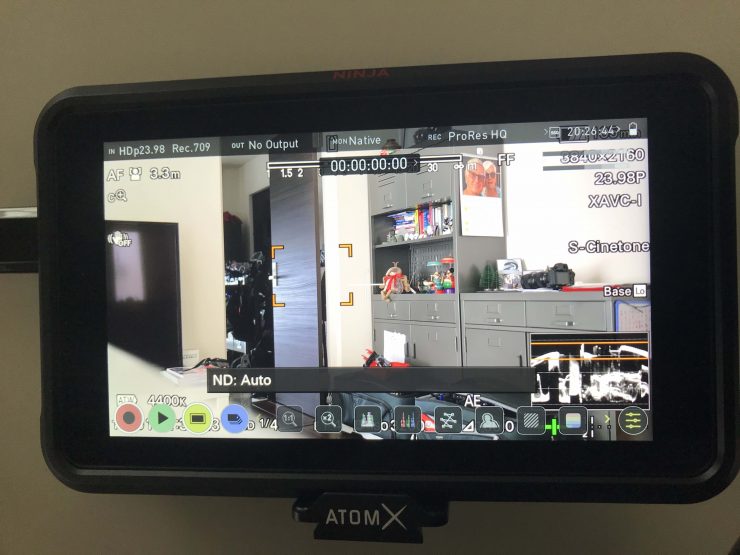
I found one thing that found with the electronic variable ND is that if you have it turned on and you use the ND Variable scroll wheel on the camera body to adjust the ND, if you scroll the wheel too much it actually turns the Variable ND off and you will see the clear filter roll back in. You do get a sort of warning that pops up on the screen that says ND: Variable 1/4. If you are still turning the ND wheel it will quickly go to no ND. This is something you just need to be aware of, especially if you are recording and making adjustments to the ND at the same time.
The Electronic Variable ND system on the Sony cameras is really impressive. It is simple and easy to use and one of the FX6’s stand-out features.
As a comparison, the Canon C70 features a traditional ND system that offers up to 10 stops in its expanded mode.
You can activate the ND through the touchscreen or via the ND buttons on the side of the camera.
Power Draw
The power consumption of the FX6 is approx. 18.0 W (while recording XAVC-I QFHD 59.94p, SEL24105G Lens, Viewfinder ON (not using external device).
The included battery takes around 120 minutes to recharge.
User LUTS
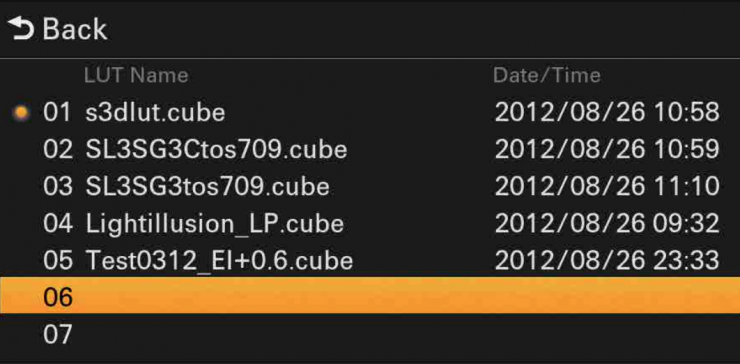
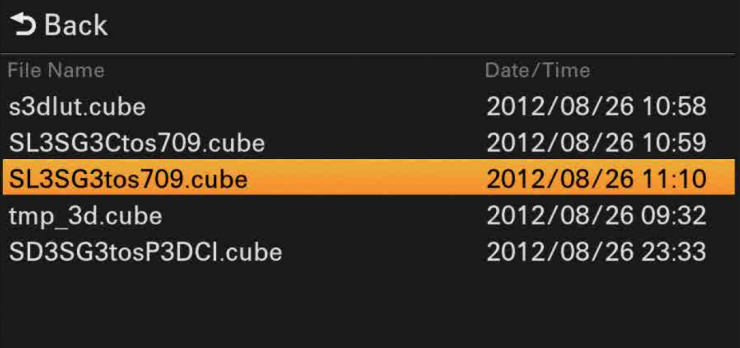
Just like on the FX9 you can load up user LUTS as well as scene files. A CUBE file (*.cube) for a 17-point or 33-point 3D LUT created using RAW Viewer or DaVinci Resolve can be used.
On the Canon C70, you cannot load up any LUTs. There is a “Look File” for creating custom picture profiles. This allows you to import a .Cube format 3D LUT into the camera and apply the captured 3D LUT for recording. This makes it possible to record with the intended look even in workflows that do not do color grading.
No anamorphic
Just like the FX9, the FX6 isn’t capable of recording in any anamorphic modes. That is reserved for the VENICE.
With the Canon C70, you do have the ability to view de-squeezed anamorphic images, but there are no anamorphic modes on the camera. You can also output a de-squeezed image over HDMI.
Again, would it have been nice to have had some sort of anamorphic shooting mode (albeit at a lower resolution) on the FX6? Sure, but it doesn’t. So, let’s move on.
Timecode/SDI/HDMI


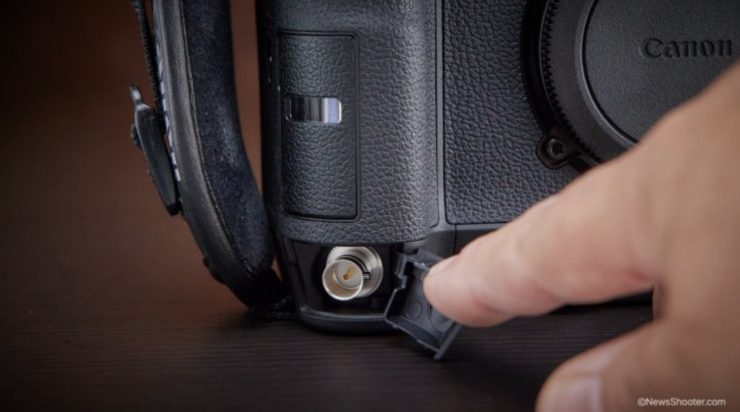
It is nice that Sony gave the FX6 timecode In/Out capability through a dedicated BNC connector. This is something that we are now slowly starting to see appear on lower-priced digital cinema cameras. This is a big deal if you are using cameras in multi-cam situations and you need to everything synched up. It is also crucial when working with a sound recordist if you are recording sound separately.
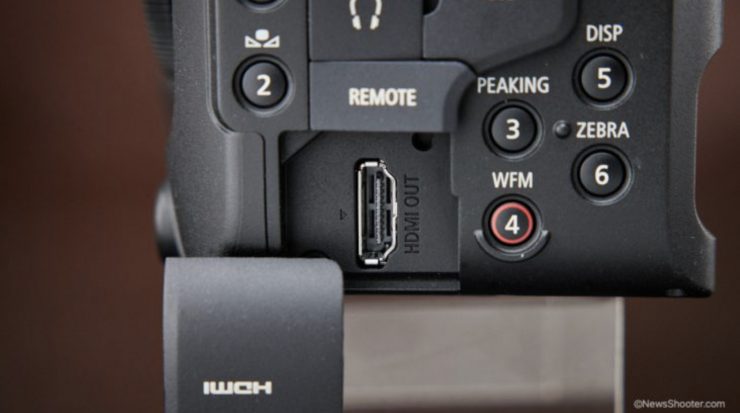
Along with timecode you also get a 12G/6G/3G SDI output and a full-sized HDMI output. The nice thing with the FX6 is you can simultaneously use both outputs at the same time.
All of these features, at least in my opinion, make the FX6 a viable solution for use of proper productions where these are basic requirements.
As a comparison the Canon C70 only has a full-sized HDMI port, however, it does have a BNC timecode In.
The only trouble is that the Timecode In port is located in a rather unusual place on the bottom of the front handgrip just below the media card slots.
Audio
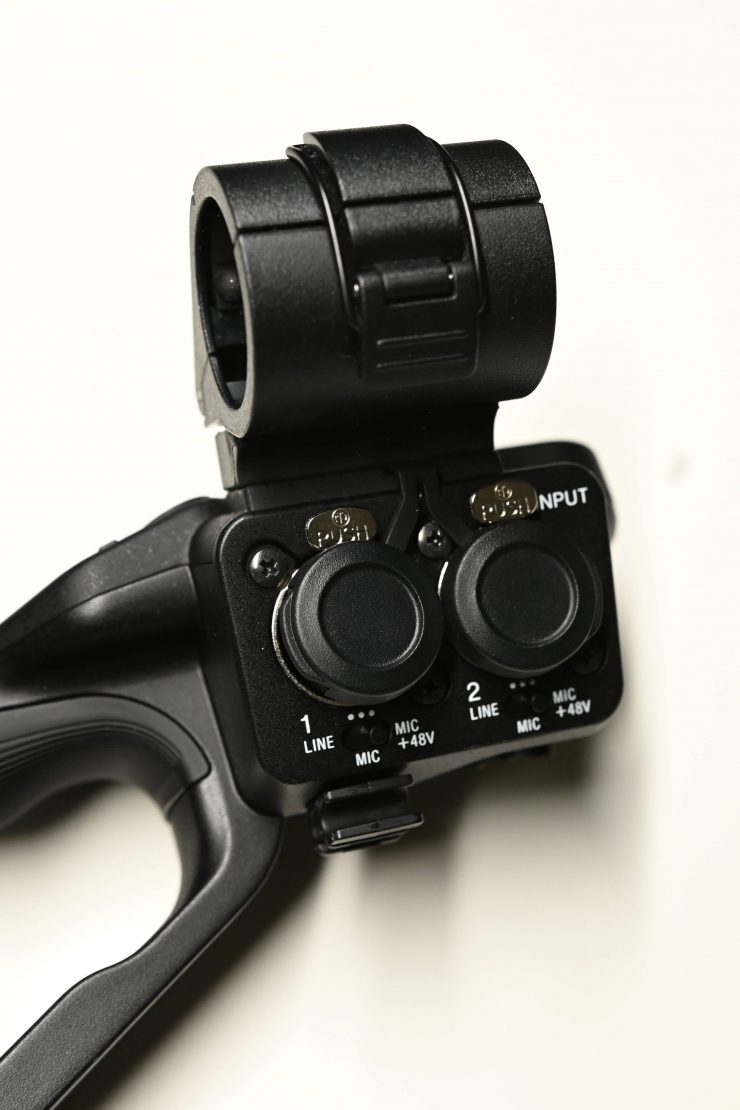
Audio functionality is very important, especially with cameras that are being aimed at solo operators. Even though the FX6 only has two physical audio control dials on the body, it is still capable of recording up to four channels of audio. The XLR inputs are located on the handle, so if you remove the handle you will lose those inputs.
In my opinion, not including a 3.5mm stereo input on the body was a big oversight. If you are going to harp on about modularity then you should be able to use the camera without the top handle and still be able to input a mic source. As I mentioned earlier in the review there is an internal microphone on the camera body, but it isn’t usable for anything more than a scratch mic.
Sure you could argue that because it has a timecode input that you could just record sound externally and then sync it up later, but small mid-tier cameras like the FX6 are going to be used by a lot of people who are doing their own sound.
This is a major problem if you want to run the camera on a gimbal and need to remove the top handle. As I just mentioned, considering this is a camera aimed at solo operators, not having any XLR audio inputs on the body itself seems to be a major design flaw. In saying that, I just don’t see where Sony could have put two full-sized XLR inputs given the camera’s design.
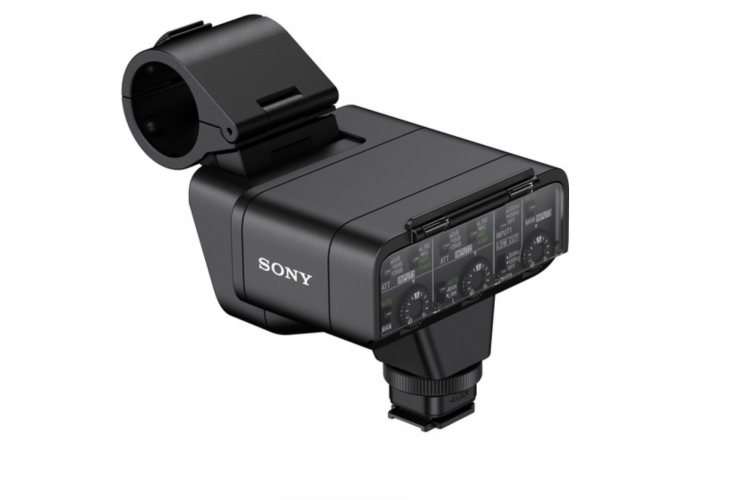
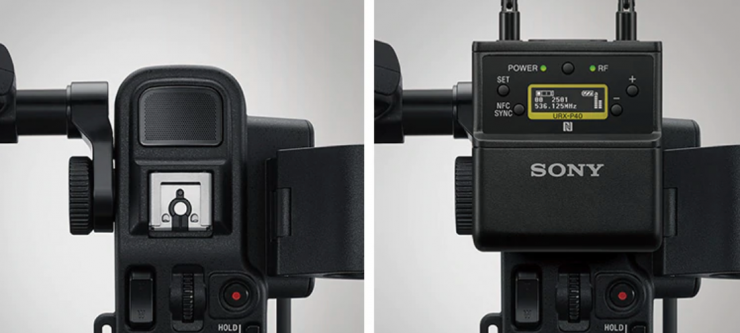
Along with the two XLR inputs on the camera handle, the camera also has a MI shoe that allows you to attach the Sony XLR-K3M Dual-Channel Digital XLR Audio Adapter. This way you can also add two additional XLR inputs to the camera as the audio signals are passed through the MI shoe. The adapter also gives you the additional controls for those two channels of audio.
Here are the ways of getting four channels of audio:
- XLR Input 2-channels + MI shoe compatible wireless receiver (2 channels)
- XLR Input 2-channels + MI shoe compatible XLR input adapter (2 channels)
- XLR Input 2-channels + Internal microphone (2 channels)
The FX6 also features a stereo onboard microphone in the body of the camera itself. If you go into the Quick Audio menu you can control and adjust all four channels of audio.
You need to be aware that the FX6 does not come with an external microphone.
As a comparison, the Canon C70 has two Mini XLR terminals that can provide +48-volt phantom power for attaching professional microphones. Canon doesn’t include any Mini XLR cables with the camera. There is also a 3.5mm microphone input allowing the connection of a variety of different microphones.
Canon has also included two built-in scratch mics on the camera.
You can record two tracks from the internal in-built microphones and two tracks via the Mini XLR inputs.
You can also utilize the 3.5mm microphone input and the Mini XLRs at the same time.
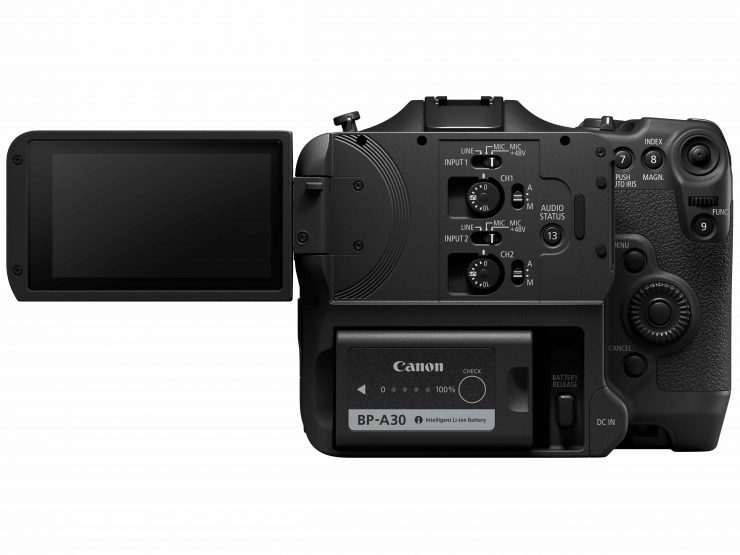
On the back of the camera, you will find audio control dials. These allow you to independently change the levels for channels 1 and 2 as well as switch between Mic/Mic +48/Line. You can either choose to set either channel to auto or manual.
Usability
Usability. In my opinion, this is something that not enough shooters pay attention to. Usability is the number 1 item I look for when choosing a camera. All digital cinema cameras being released today have good recording options, good sensors, a similar amount of dynamic range, and in a lot of cases, similar feature sets.
Arguing over dynamic range figures from cameras that are so close is a pointless exercise in futility. Almost every camera out there can now record 4:2:2 10-bit in a decent onboard codec. Gone are the days where there were huge differences between the sensors and recording capabilities in cameras.
Usability is where cameras still differ greatly. More so now, than ever before, usability can be the defining factor with a camera purchase decision.
Now, usability means different things to different people. The usability of camera XYZ could work really well for me, but not well for you. There is no way of making a blanket statement when it comes to usability. Only you will know what camera works best for you when it comes to usability.
I am going to compare the usability of the FX6 to the usability of the Canon C70. Now, I can only do this from a personal standpoint. I can’t tell you which one of these cameras has better usability for your particular needs. Please bear this in mind when you are reading this.
The usability of both cameras will also be different if you are comparing them based on being a primary ‘A‘ camera or a ‘B‘ camera.
Now, both cameras have their usability pros and cons. I am not going to sugarcoat anything, but again please remember this is my personal opinion from using both cameras. It is just an opinion, feel free to agree or disagree.
SONY FX6
The first thing I check with any camera is how easy is it to make operating changes without having to go into complex menus. Sony menus, for the most part, have tended to be overly complicated and not intuitive to use. Sony tried to alleviate user pain by adding a series of what they refer to as ‘Quick Touchscreen’ menu options. The trouble I personally found is you have to leave the main screen to go into these menus. Then you have some options you can change and others you can’t. From my personal perspective, what is the point of having items in a quick menu that you can’t change?
The actual full menu is too long, confusing, and not well thought out.
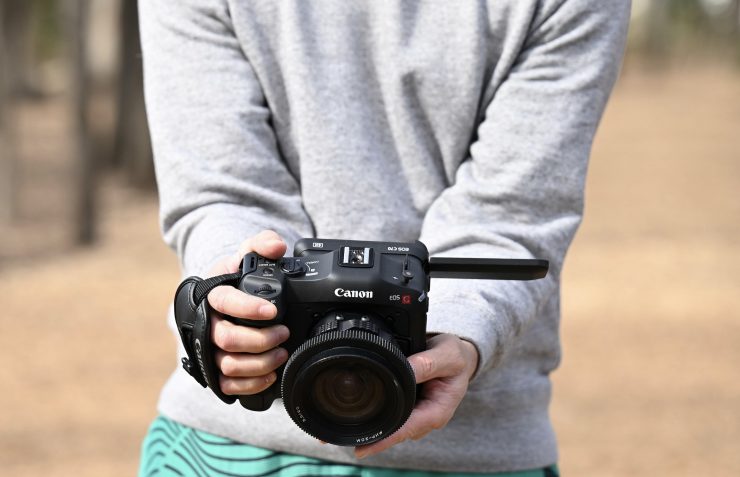
HOLDING THE CAMERA
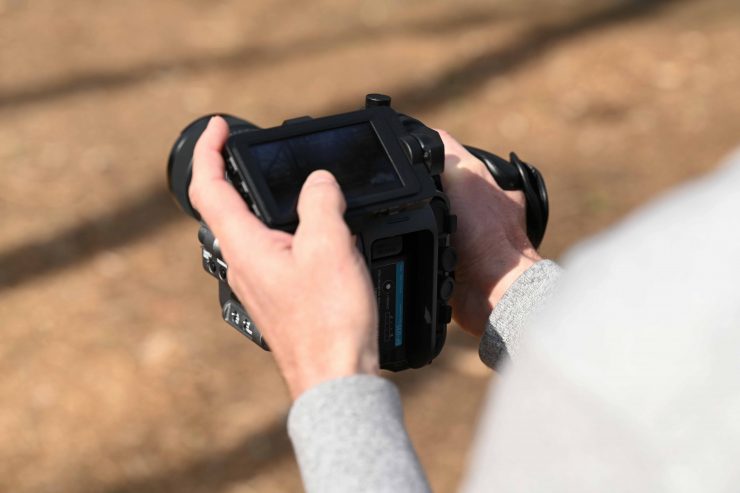
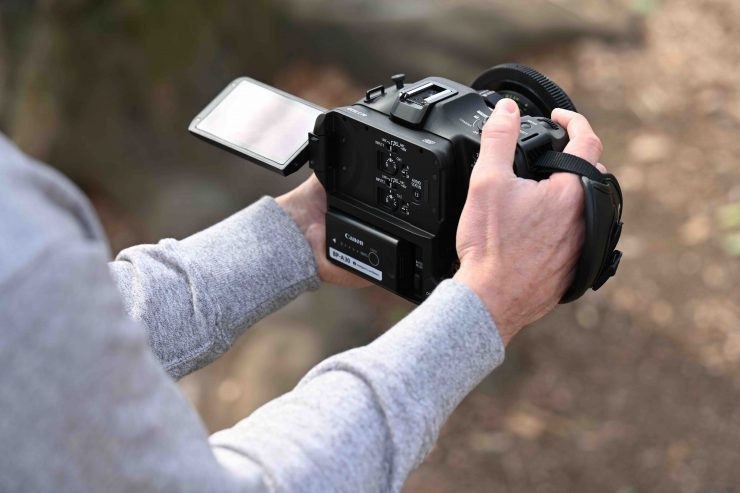
Now, because of the physical design of the FX6, you really need to hold with one hand on the smart grip and the other underneath the camera and towards the front if you need to adjust a lens.
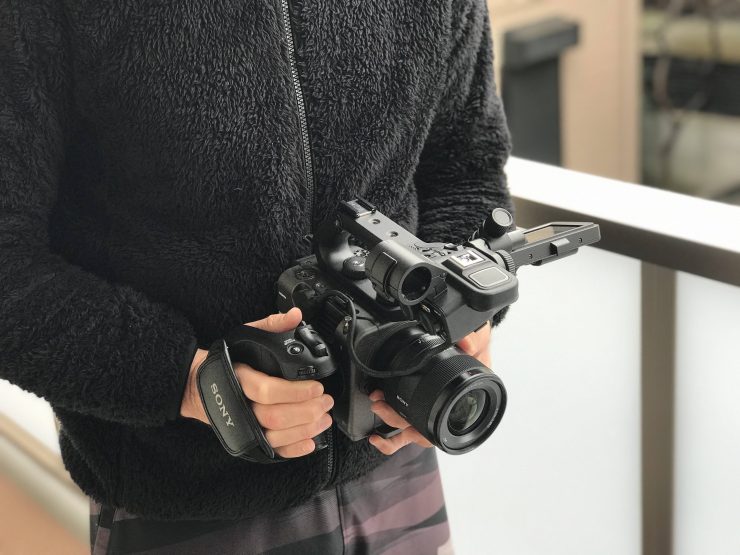
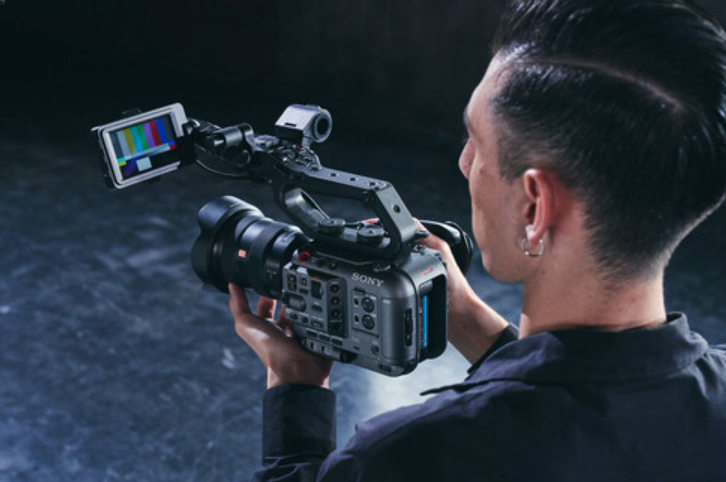
As the camera has some depth to it you can place the back of the camera against your chest to create a third point of contact. Having the LCD screen out towards the front of the camera helps when doing this.

You can also tuck both elbows back into your chest to gain four points of contact. This is a better option if you want to have the camera further away from your body.
With all of these smaller-sized cameras, if you are hand-holding them and you aren’t tall you are ultimately going to end up shooting everything from a lower perspective. This is also something you need to be aware of.
The only trouble with operating a camera like this is that you really need to utilize the smart grip. Not only for accessing some features, but also so you can hold onto it properly.
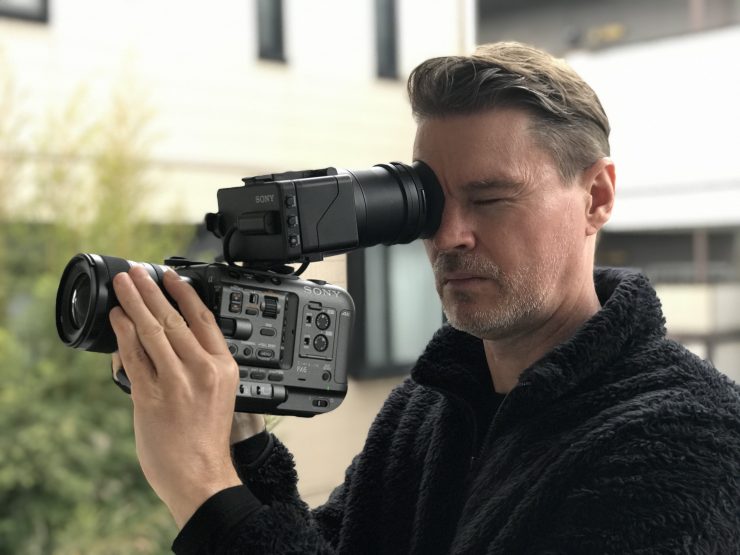
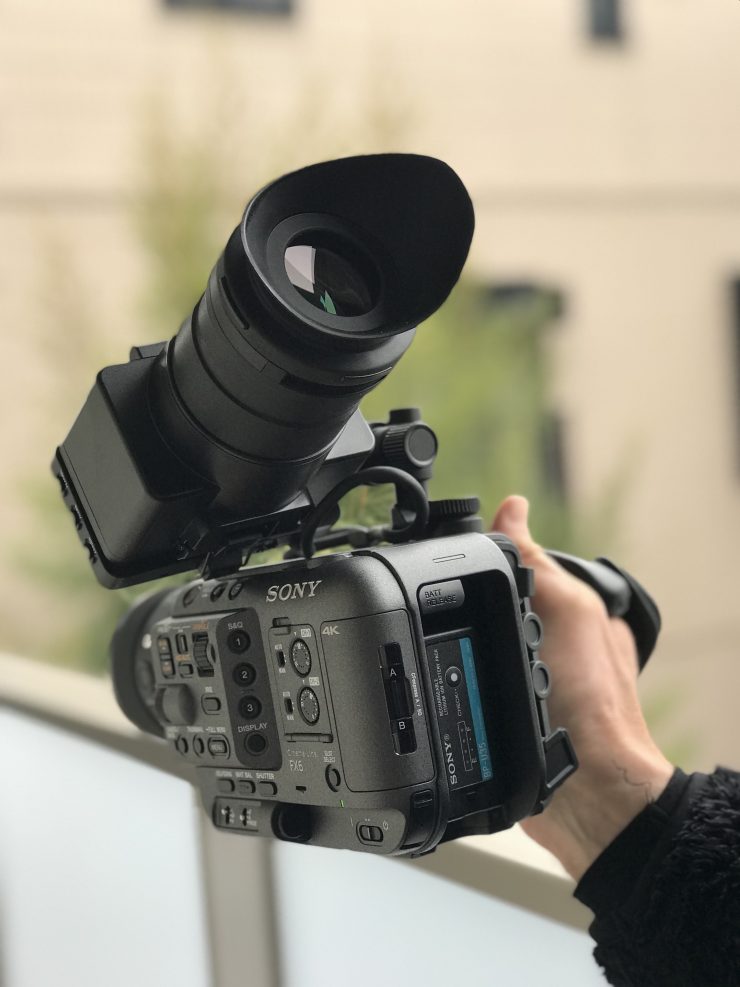
If you use the optional loupe with the camera it is best to take the LCD screen off the top handle and attach it to the back of the camera body. This way you actually handhold the camera and put it up to your eye. You can also tuck your elbows into your sides to create a more stable shooting platform.
The biggest problem with using the loupe is that the monitor mount is so weak that the loupe just keeps falling down. I also found that the diopter adjustment didn’t go far enough for it to work with my eyes. The other problem is that obviously, you have no way of accessing any of the touchscreen features when you have the loupe on.
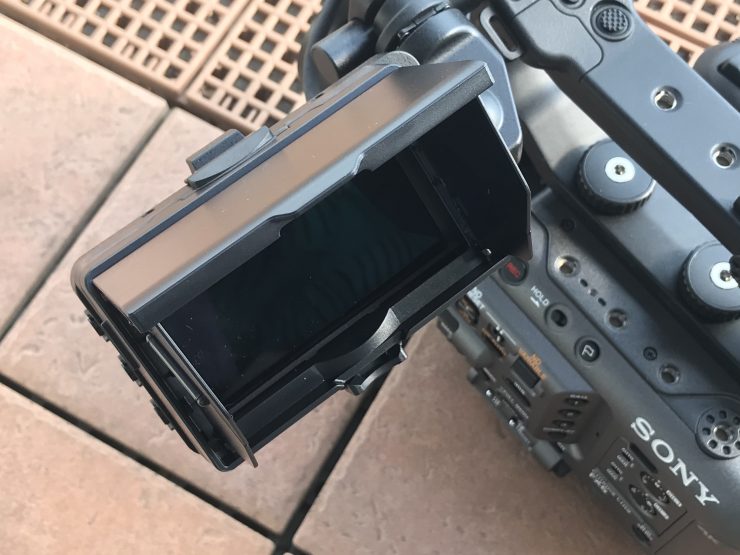
The LCD Hood is also pretty cheaply made and the design hasn’t been well thought out.
When you collapse the hood down to protect the screen and then try to open it up again, the locking mechanism that keeps the hood on the screen is too close to the place where you open up the hood. half the time when I went to open the hood I ended up releasing the locking mechanism.
Yes, there is plenty of buttons on the side of the camera, but you can’t physically see where a lot of them are when you are hand-holding the FX6.

The saving grace is that at least there are physical switches for the WB and the gain settings. This makes them easy to access and identify just by touch. The electronic variable ND scroll wheel is also easy to locate.
The issue with having touchscreen functionality is that if you take your bottom hand away from supporting the camera to touch the screen the camera will want to roll to the left. If you are in the middle of recording a shot this is something you need to be aware of.
Making changes on the touchscreen is a little difficult because I mentioned the camera want’s to roll to the left if you are just holding it by the grip. Even if you try to support the back of the LCD screen with some of your fingers, the balance just doesn’t feel right. This is mainly because one of your hands is at the front and higher, while the other is towards the back and lower. The LCD mount is also pretty badly made and the whole screen tends to move around unless you have it completely locked off.
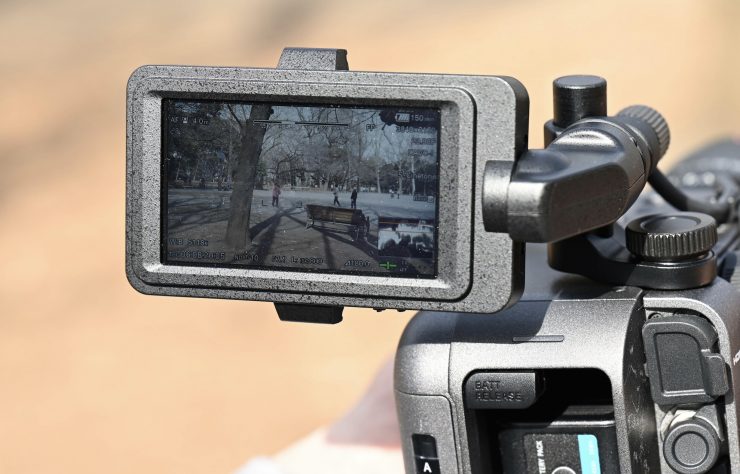
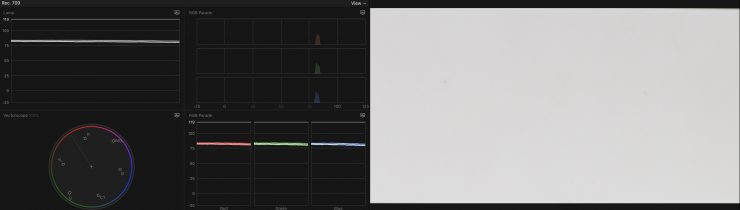
Speaking of the screen I wanted to see how bright it is. In the FX6’s menu, I turned the brightness up to +15, and then I shot a white card and exposed it so it was right on 100 on a waveform. I then played that file back and measured the brightness of the screen using a Sekonic C-800. I found that the brightness of the screen was 570 nits. I found the screen was reasonably good to use even in bright, sunny conditions.
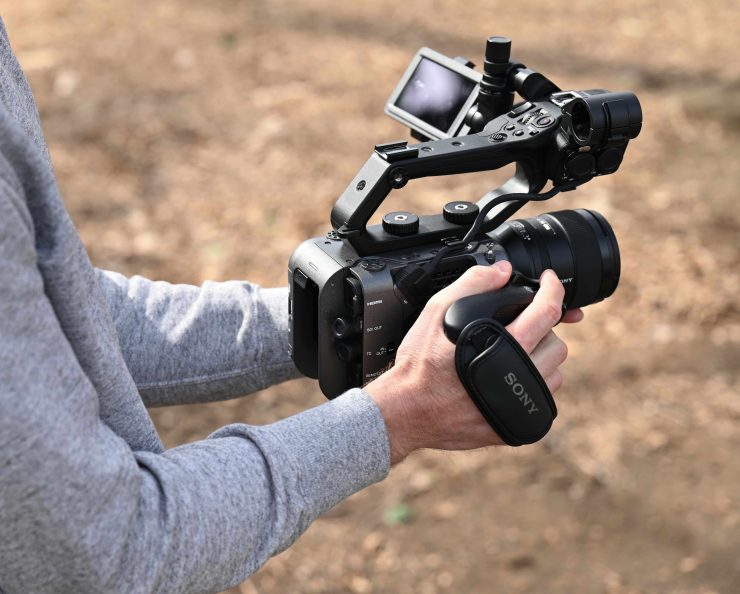
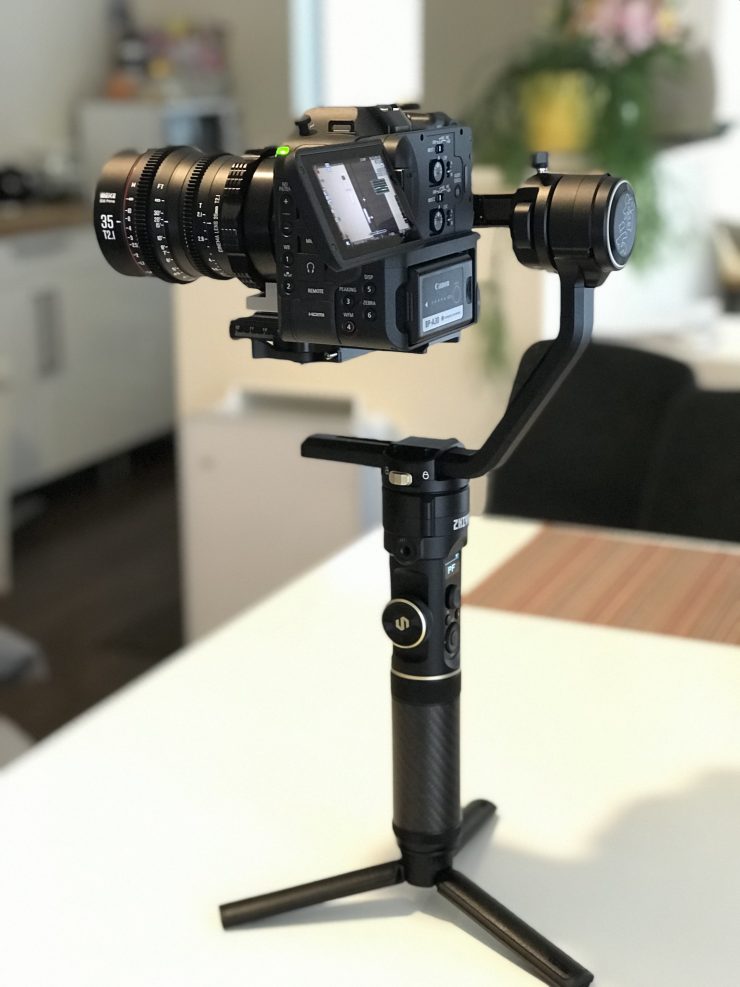
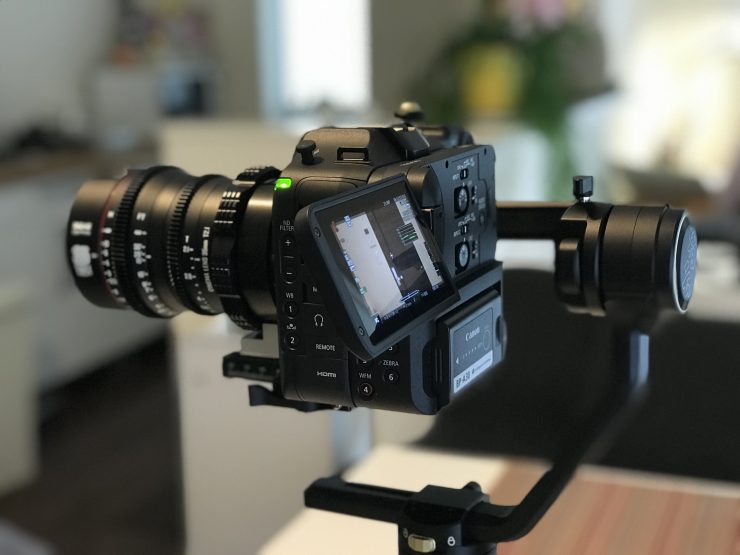
CAN YOU USE IT ON COMPACT GIMBAL?
Yes, you can. By removing the side handle and top handle and repositioning the LCD screen you can run the FX6 on a compact gimbal quite comfortably.
By utilizing the AF system and a compatible lens you don’t need to rig up focus monitors and other items that will make the set up heavier. Of course, you still can, but it is nice that you don’t have to.
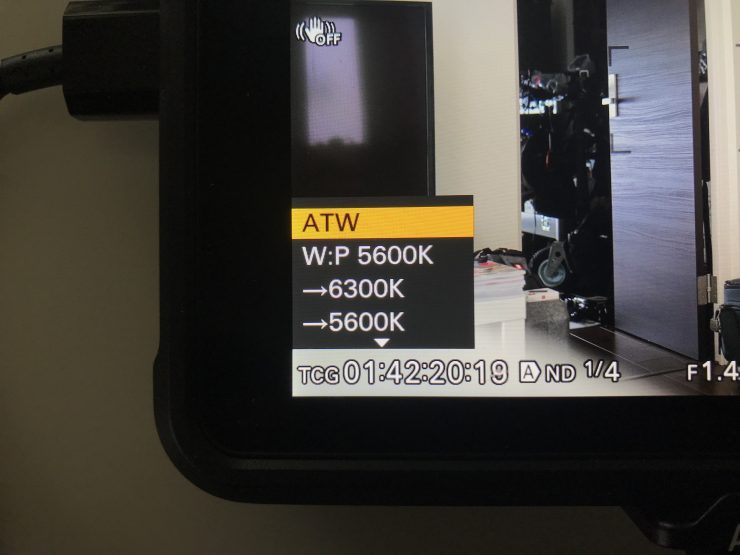
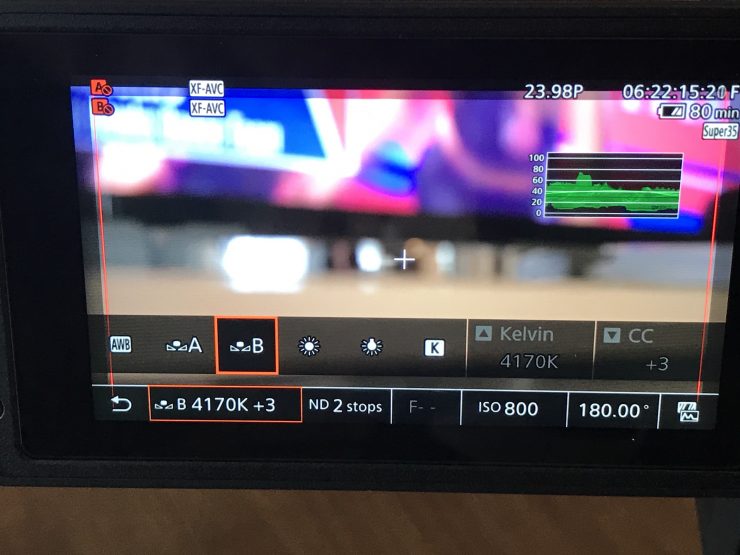
WHITE BALANCE
So how easy is it to do a white balance? This is something we often do many times a day. Doing a white balance shoot be quick and easy to do. It should also be reliable.
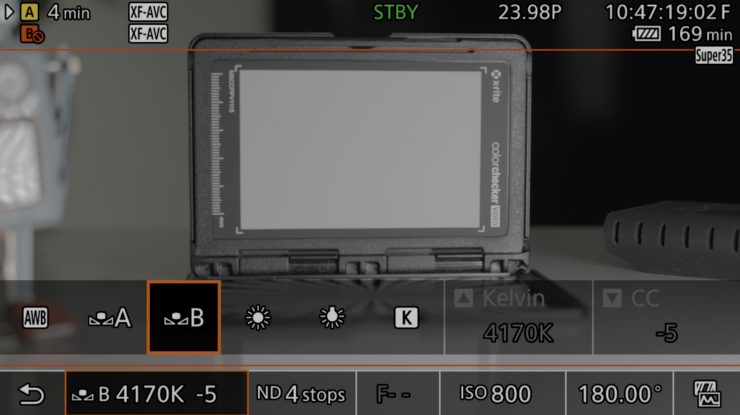
On the FX6 it is nice that you have physical switches that let you go between three WB settings. There are A/B and PRESET defined positions. With A/B you can store user WB settings.
When the WB switch is at A or B you can do a manual white balance by simply pressing the WB SET button that is located on the front of the camera.
Now, it looks as if you need to have the white center markings directly fully inside whatever you are using to white balance for it to work correctly. Above you can see a quick demonstration.
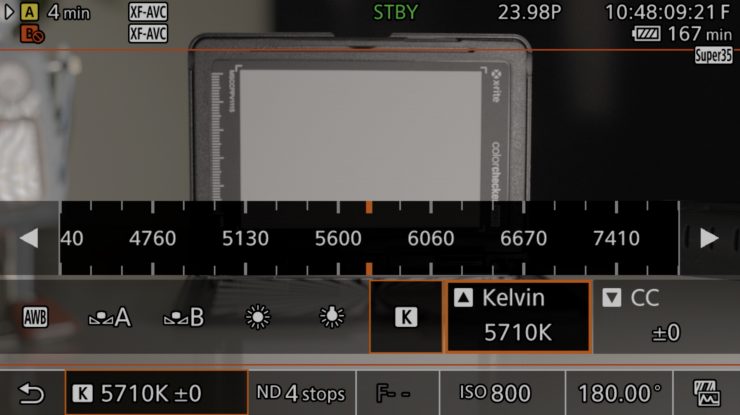
If the switch is in the PRESET position you can press the WHT BAL button that is located just above the white balance switches to turn that Kelvin color temperature orange. When it is orange you can use the menu dial to change that Kelvin color temperature value.
In the PRESET position, you can change an existing preset value directly.
You do this by pressing and holding the WHT BAL function button. This brings up a small window on the bottom left-hand side of the LCD screen where you can toggle through the following options:
Custom mode: 3200K, 4300K,
5600K, 6300K
Cine EI mode: 3200K, 4300K, 5500K
You can also assign the PRESET White Select to an assignable
button to do the exact same thing.
There is also an ATW (Auto Tracing White) setting you can select. This will let the camera continually adjust the white balance in changing lighting conditions. You need to be aware that this doesn’t work if you are in the CINE EI shooting mode.
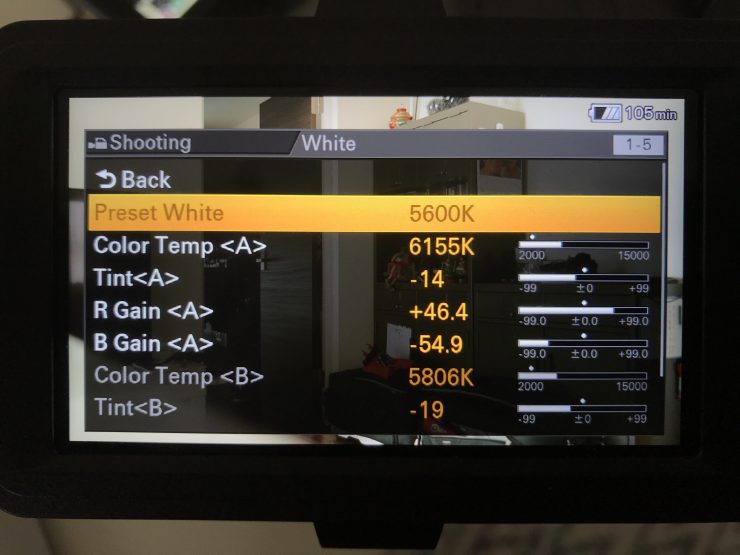
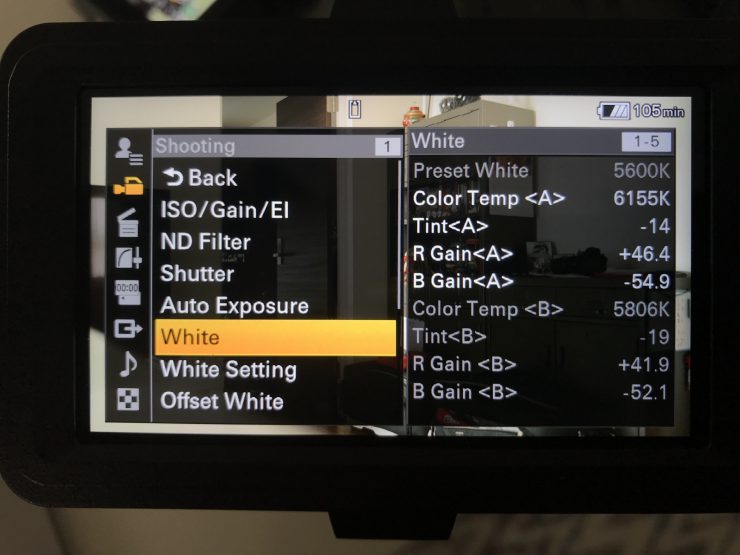
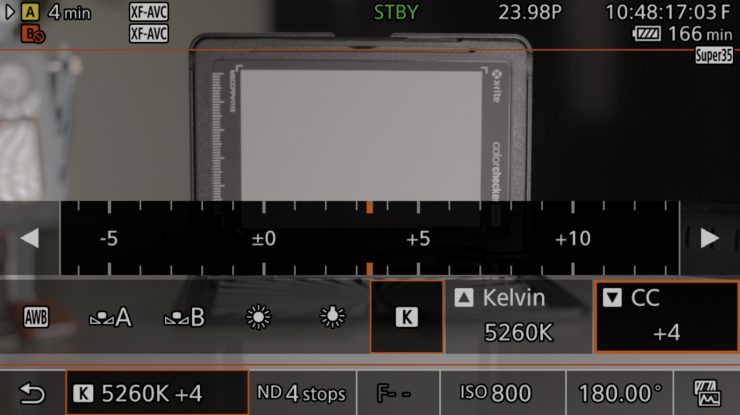
Now, if you want to make finite adjustments to the white balance on the FX6 you need to go into the main menus. Here you can adjust Tint, R Gain and B Gain. This is fiddly and there should be a way you can make these adjustments without needing to go into deep menus.
You can see the Tint value next to the white balance on the Quick Menu page, but this doesn’t mean much to anyone. Why Sony insists on using Tint, R Gain, and B Gain and not including proper CC (+/- G/M) adjustment like most digital cinema cameras is a headscratcher.
Overall, making white balance changes on the FX6 is pretty straightforward and efficient.
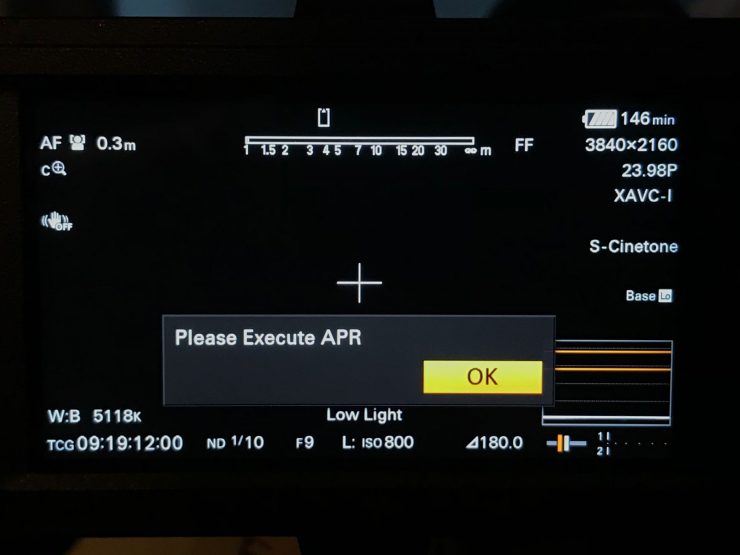
The camera seems to always ask you to do execute an APR every time you turn it on.
The APR function minimizes the appearance of bright or dark sensor pixels, as well as sensor noise, so you should do this regularly. It is only supposed to appear if the camera hasn’t been turned on in a few days. Sony recommends that you do it when changing locations due to lighting, and ambient temperature changes.
FULL AUTO
If you want to let the camera do all the heavy lifting for you by utilizing all of its auto functionality you can. If you are doing run & gun you could put the camera in ATW (Auto Tracing White), ND AUTO, AF, and AUTO EXPOSURE (turning the AGC-auto gain control on). Then set the camera to S-Cinetone and off you go.
Essentially by doing all of this you are creating a point-and-shoot mode. Surprisingly this does a pretty good job. If you are working in heavily backlit or contrasty environments it will struggle because it is having to make decisions based on algorithms and it doesn’t magically know your creative intent.
S&Q
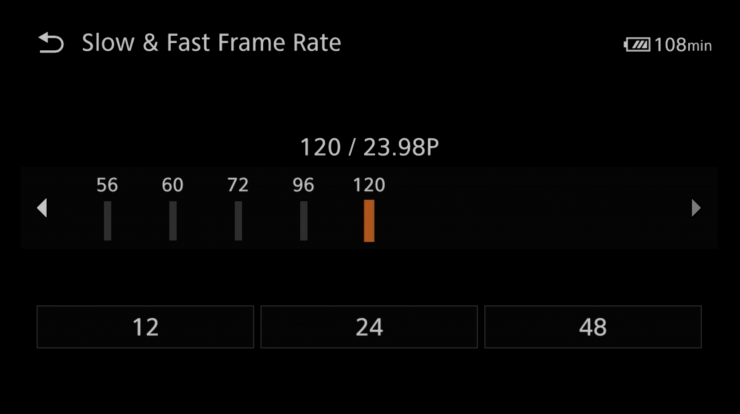
I wanted to see how easy it is to change frame rates on the FX6. I set the camera to record 4K DCI in XAVC-I with a project frame rate of 23.98P. To change it quickly to 60fps from 23.98 fps all I had to do was to assign S&Q to an assignable button and the press it. As long as I have the S&Q preset to 60fps it can be done with the push of a button.
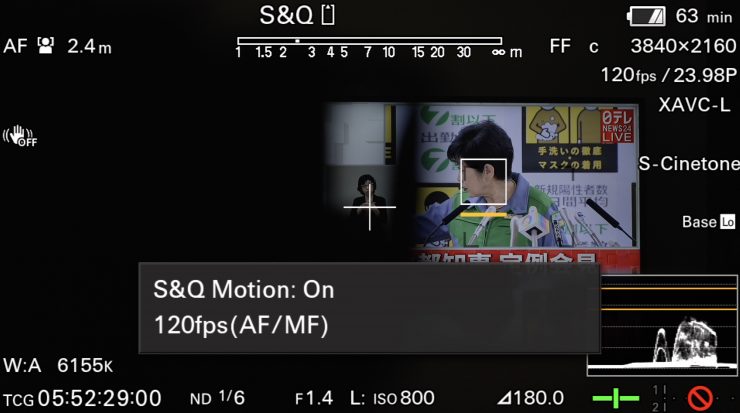
Now, you need to be aware that you can’t shoot 120fps in 4K DCI, you can only do that in UHD and only if you choose XAVC-L as your codec. You also can also only shoot 4K DCI in XAVC-I. If you select XAVC-L you are limited to a maximum resolution of UHD.

Now, what I found strange is that when I selected 100fps with a base project setting of 23.98P AF wasn’t available. I got a screen message saying 100fps MF Only. The same thing happens if I choose 50fps or even 48fps.
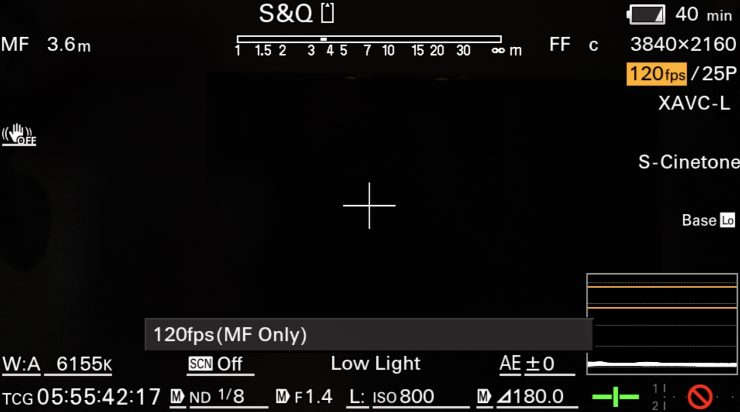
You can only choose fps that are multiples of your base project frame rate and have the AF work. For example, if I set my base project to 25P and I select 100fps in the S&Q both AF and manual focus are available. If I choose 120fps, guess what, no AF.
Above you can see how fast it is to change from 23.98 fps to 120fps, 100fps, or 60fps if you have the S&Q setting placed on an assignable button. Once you press your assignable button it automatically goes to whatever you last set the fps too. If you press the front function scroll wheel the fps will turn orange. If you then press the middle of the joystick button on the smart grip you can cycle through a few predefined fps. You can also see the image crop that occurs when shooting at fps above 60.
LUTS
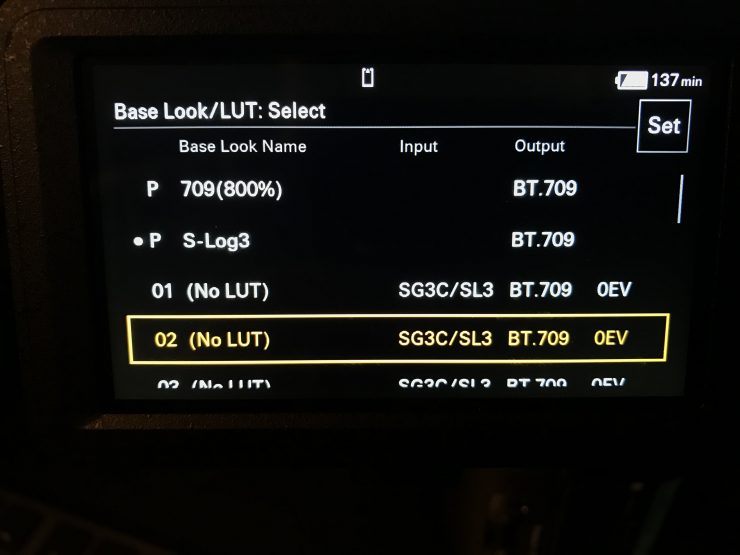
It is nice on the FX6 that you can import user LUTs. This is very helpful. Now, you need to be aware that you can only activate LUTs when you are in the CINE EI Mode.
MODULARITY
As I have already mentioned, the FX6 features a modular design, but in reality, for a lot of shooting situations, you are going to need to attach all of the included accessories to make it work. Hold on you may be saying, why can’t I just not use the top handle. Well, unless you have no need for recording audio in camera that is not a good idea. It may be fine if you are running the camera on a gimbal and recording sound separately, or recording everything in slow motion with no audio, but unless you want to do that you have no other real choice but to use the handle.
Yes, you can make the footprint of the camera smaller by just repositioning the LCD screen on the body and not using the top handle, but I actually found it harder to access the screen when hand-holding the camera this way.
Cameras like the FX6 aren’t designed to be put on your shoulder, and at least in my opinion, it is counterintuitive making something larger just to be able to do this. If you want to shoulder mount this camera you are better off buying an FX9.
OUT OF THE BOX IMAGES
Some users of cameras such as the FX6 are going to want to turn around material quickly or not have to shoot Log or RAW. So does the FX6 fill that need. Quite simply, yes.
The S-Cinetone picture profile is a really nice option to use if you have to turn material around quickly, have to give material to a client that isn’t shot in Log, or if you are working in live environments or broadcast.
The fascination with Log and RAW sometimes gets overblown. Sometimes a good baked-in ‘look’ is a better option. Sony Log images have never been historically super easy to deal with and get great results without having to spend a little bit of time tweaking the image.
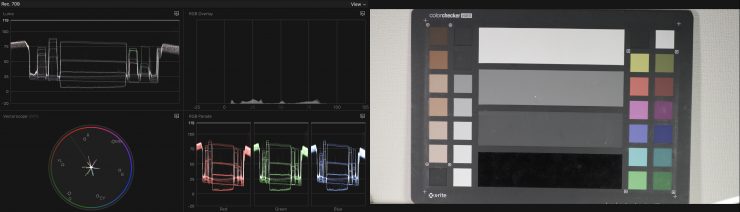
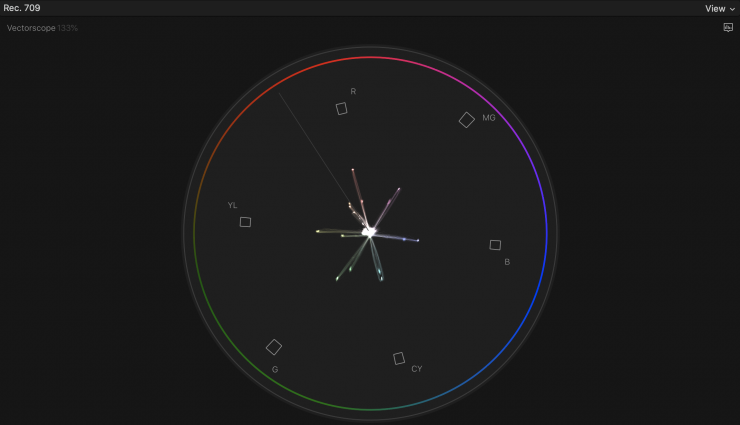
Above you can see what S-Cinetone looks like if you just white balance and expose correctly.
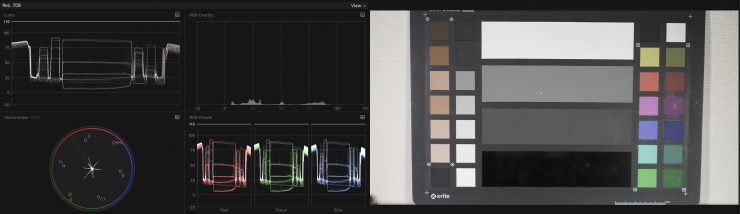
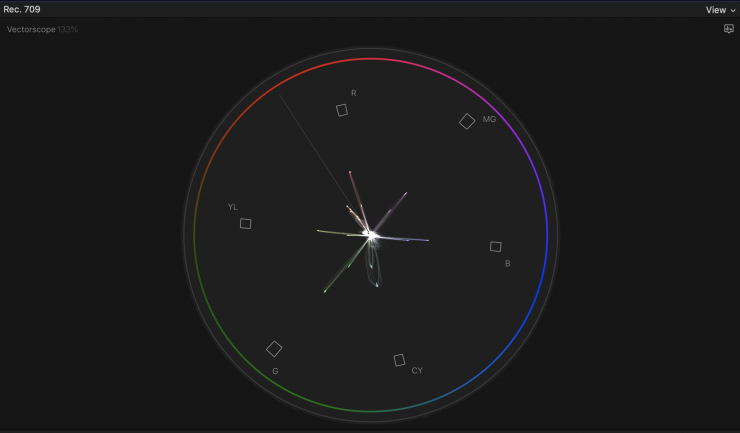
Above you can see that the S-Cinetone color reproduction is very neutral and accurate.
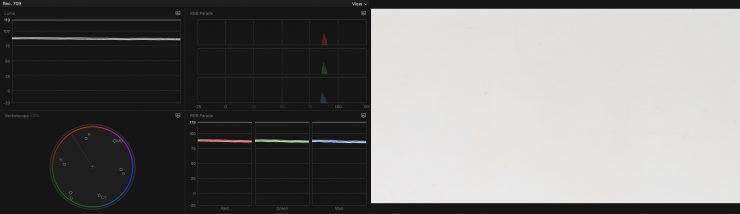
If we zoom way in onto the white chip you can see it doesn’t have any color casts.
I have done the exact same tests with the Canon C70 and you can see those down further in this review. Both cameras were using the eaxct same lens to take out any optical bias. The tests were done under the exact same lighting conditions. None of the images have been touched or altered in anyway.
If you would rather just see a head-to-head comparison between the FX6’s S-Cinetone and the C70’s Wide DR BT.709 pictre profiles I have put that above.
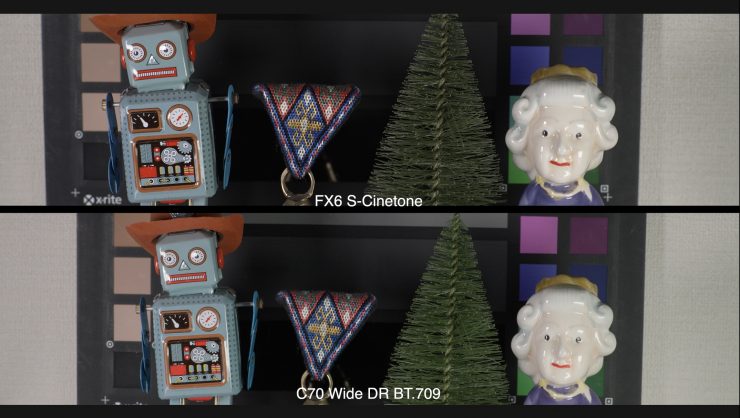
It is very difficult to tell both of these camera’s apart if you use these picture profiles. The biggest noticeable difference is that on the C70 with the Wide DR BT.709 picture profile, the greens are more saturated. On the Sony using S-Cinetone, the reds are slightly more saturated.
ADDING A MONITOR/RECORDER
The whole idea behind buying a small camera like the FX6 is to keep it small. If you have to start adding lots of things to it it becomes problematic and counterintuitive. Even adding something like the Ninja V makes it a lot heavier and unbalanced if you try and place it on the front part of the handle. All the weight then is at the front of the camera and you are continually struggling to keep it upright and level.
I found it made more sense if you needed to attach a Ninja V (you will if you want to record RAW) to the back part of the handle. This helps with weight distribution. Still, you end up with a short camera that is suddenly very tall.
Canon C70
The form factor of the C70 is more in line with a larger-sized DSLR than a digital cinema camera. The Sony FX6 has a more camcorder-esque form factor.
HOLDING THE CAMERA
The way you need to operate handheld with the C70 is in principle, similar to how you need to operate the FX6.
The camera isn’t deep like the FX6, but it is wide. I found the best way to hold it was to use one hand on the grip and the other underneath the left-hand side.
As the camera is wide you can actually brace both your elbows against your body to create four points of contact.
Now, because the LCD screen is towards the back you do need to hold the camera further away from your body to be able to see the screen.
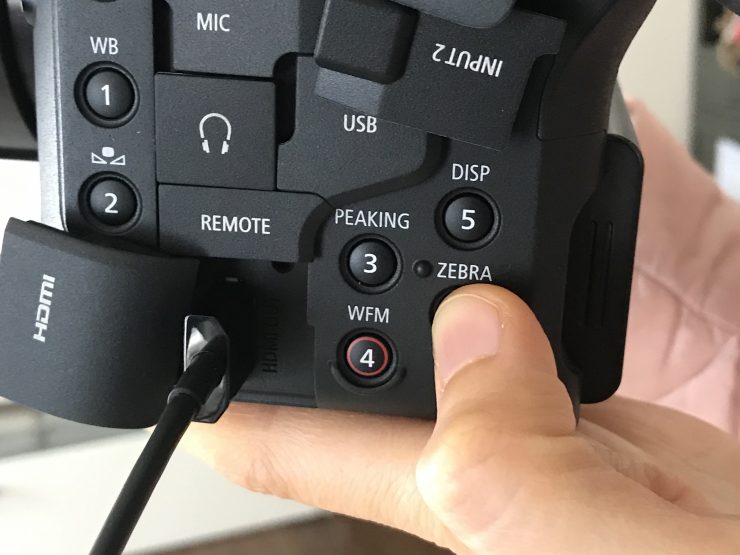
A lot of the physical buttons on the left-hand-side of the camera are difficult to reach and see, especially the Peaking, Waveform, Display, and Zebra buttons.
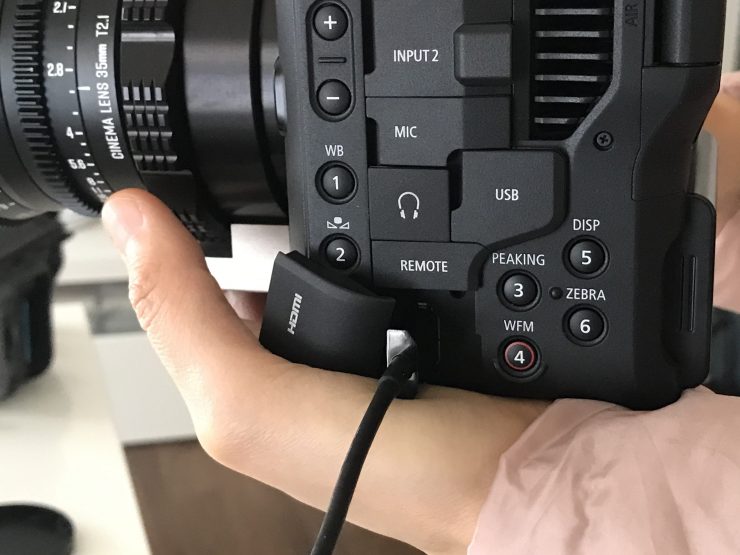
The HDMI port is also in a bad position if you are hand-holding the camera. With an HDMI cable inserted you are forced to place your hand further underneath the camera body. You can still access the ND and WB buttons with the mini XLR cables inserted.
I personally found the screen on the C70 easier to access and touch than the FX6 when I was hand-holding the camera. You can still maintain stability while touching the screen. I could still tuck my elbows into my chest and use my left hand to support the LCD screen while making changes on the front of the screen. This works because essentially both your hands are at the same height on the camera. On the Sony FX6, you have to reach up to access the screen and that throws the balance off.
SCREEN
Speaking of the screen I wanted to see how bright it is. In the C70’s menu, I turned the brightness up to +50 and then I shot a white card and exposed it so it was right on 100 on a waveform. I then played that file back and measured the brightness of the screen using a Sekonic C-800. I found that the brightness of the screen was 296 nits. Now, here lays the problem. Turning the brightness up on the C70’s LCD screen makes everything look washed out and it isn’t actually usable.
Turning op the brightness is a bad idea. What you need to do is to turn up the luminance. You can only change the luminance from Normal to +1 or +2. At +2 the reading I got was 299 nits. The screen on the FX6 is almost twice as bright as that of the C70. I personally think that the C70’s screen is not usable outdoors in bright, sunny conditions.
The other issue with the C70 is that you have all of this information covering large parts of the screen. Yes, you can get rid of it, but it would have been nice to have seen an option where you could have the information displayed on the outside of the picture.
MAKING QUICK CHANGES
Having the ability to quickly access and change key functionality of the camera right from the touchscreen is really nice. Being able to change white balance, ND, shutter speed and ISO very quickly make a world of difference when you need to operate quickly.
The main menu system is a bit of a mess and it isn’t intuitive nor easy to make changes. The joystick button that you use to help navigate the menus often gets stuck or is unresponsive.
I do find that some of the controls are a little difficult to reach on the side grip when you are using it.
CAN YOU USE IT ON COMPACT GIMBAL?
Just like the FX6, you can use the C70 on a compact-sized gimbal. It is a wider camera than the FX6 so you do need to keep that in mind.
If you utilize Canon’s AF and a compatible lens you can keep the size of your set up to a minimum.
WHITE BALANCE
So how easy is it to do a white balance? This is something we often do many times a day. Doing a white balance shoot be quick and easy to do.
On the C70, doing a white balance isn’t as intuitive as it is on the FX6. There are two physical buttons on the left-hand-side of the C70 for white balance.
If you press the button labeled WB a small orange box comes up and you can use the FUNC scroll dial on the control grip to move between the Kelvin color temperature and the CC value.
If you press the WB button you can also use the main scroll wheel that surrounds the SET button on the back of the C70 to toggle through the various WB options. These are:
- Daylight
- Tungsten
- AWB
- A WB
- B WB
Whatever is selected orange you can then adjust with the joystick that is located just above the FUNC scroll dial. Once you make an adjustment you have to press the middle of the joystick. If you don’t no changes get made. Now, you need to be very aware that once you press the WB button the orange box that comes up only stays active for 5 seconds. If you don’t make a change or touch any of the controls within 5 seconds it will turn off.
You can also press the button located below the WB button and that will also bring up the orange box.
To do an actual white balance you need to point the camera at a gray card or white object so that it fills the center of screen. You then press the button below the WB button. The A or B setting (whichever one you have selected) will then flash quickly. Once the flashing stops the white balance has been done.
Now, you can also make white balance changes by accessing the quick menus on the touchscreen. Here you can cycle between all of the settings and make changes to the Kelvin color temperature and CC value. Strangely you can’t actually do a white balance from this screen. You still need to select A WB or B WB and then press the physical button on the camera.
The white balance system on the C70 is ok, but it is far easier and quicker to do a white balance and make changes on the Sony FX6.
S&F
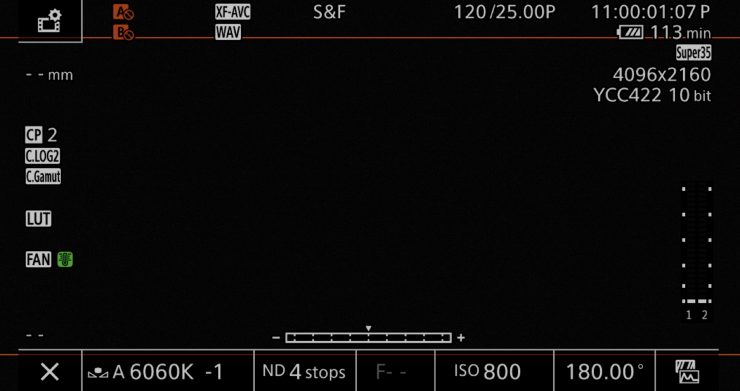
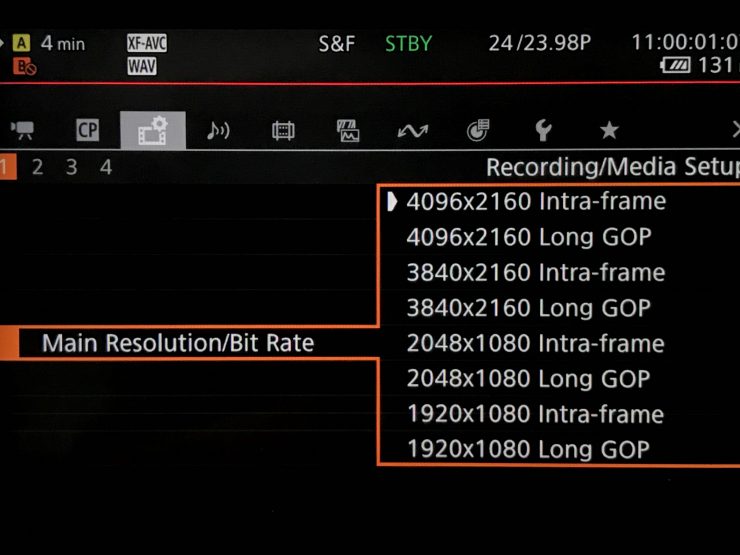
I wanted to see how easy it is to change frame rates on the C70. I set the camera to record 4K DCI in 108Mbps LGOP with a project frame rate of 23.98P.
To change it quickly to 120fps from 23.98 fps all I had to do was to use the touchscreen and change the Recording Mode from Normal Recording to either Slow & Fast Motion or S&F Clip / Audio (WAV). If I already had the Slow & Fast Frame Rate set to 120 this happens automatically. What is nice is that the camera doesn’t need to reboot after you make this change.
On the touchscreen, you can also long-press on the Slow & Fast Frame Rate and it brings up a very nice interactive screen where you can make changes. You need to be aware that you can only choose S&F frame rates that are multiples of your project rate. So for example, I can’t shoot 100fps if my base frame rate is 23.98P. I actually like how Canon has implemented this.
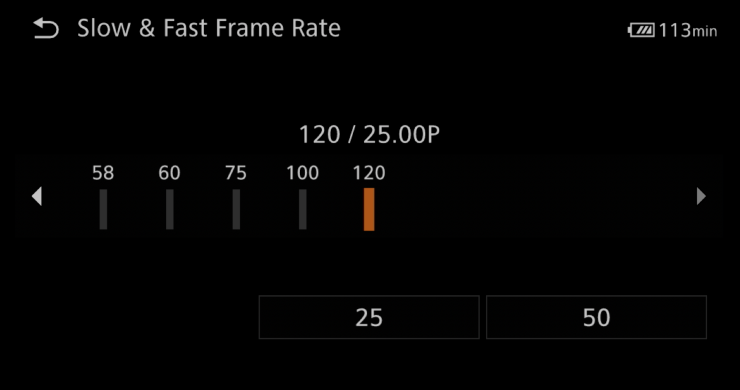
Just something to bear in mind, if you are shooting 25P you can still shoot at 120fps in the S&F mode when shooting in 4K DCI or UHD. This is something you can’t do on the FX6.
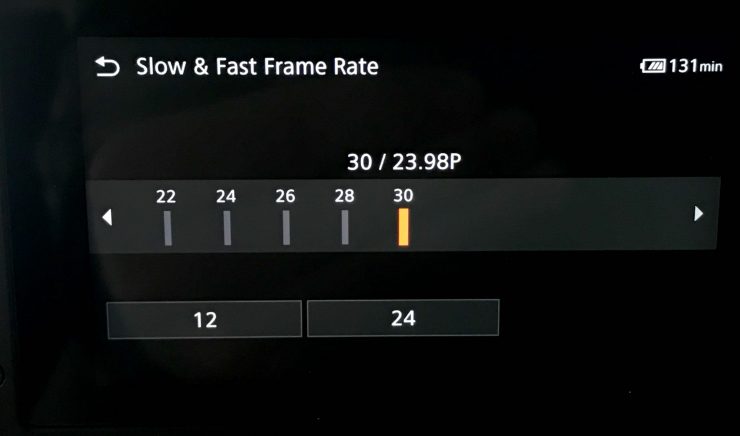
Now, you do need to remember with the C70 that to be able to record 120fps in 4K DCI or UHD you need to have Long GOP selected as your codec. If you have Intra-frame selected you are limited to 30fps. So if you are shooting 4K DCI or UHD at 23.98p in the Inter-frame codec and you suddenly want to shoot 120fps, you need to first go into the menu and change the codec option to Long GOP.
You can also place Slow & Fast Frame Rate on an assignable button. That way you can press that button and an orange overlay will come up next to your frame rate. Here you can use scroll wheel surrounding the SET button to make your frame rate changes.
FULL AUTO
On the C70 you can select AWB, Auto ISO, and AF. This way you can get a setup where the camera does a lot of the hard work for you.
Now, it doesn’t do nearly as good of a job as the FX6 because you don’t have an Auto ND setting. Also, I found that the AWB feature on the C70 is pretty horrible. On the Sony FX6, it is way better.
If you want to go full auto, the FX6 is a better option than the C70.
LUTS
Not being able to import user LUTs or even use LUTs is problematic. Surely this is something that could easily be implemented via a firmware update.
Just to clarify, you can load up LUTS, but they only work as picture profiles. Whatever you choose gets burned into your footage. Canon gives you 20 places to store picture profiles.
OUT OF THE BOX IMAGES
Some users of cameras such as the C70 are going to want to turn around material quickly or not have to shoot Log. So does the C70 fill that need? Quite simply, yes. Canob cameras have generally had a good reputation for producing nice images straight out of the box, and the C70 follows that trend.
The Wide DR BT.709 picture profile is a really nice option to use if you have to turn material around quickly, have to give material to a client that isn’t shot in Log, or if you are working in live environments or broadcast.
The fascination with Log and RAW sometimes gets overblown. Sometimes a good baked-in ‘look’ is a better option.
Above you can see what Wide DR BT.709 looks like if you just white balance and expose correctly.
Above you can see that the Wide DR Bt.709 color reproduction is very neutral and accurate.
If we zoom way in onto the white chip you can see it doesn’t have any color casts.
TOP HANDLE
The top handle on the C70 is badly designed and I don’t really see too much point in using it. Not only does it not feature any mounting points, but the cold shoe at the top is useless if you want to mount a monitor and use the microphone mount. The microphone mount is too close to the cold shoe so a monitor won’t fit! Doesn’t anyone check these things when they are designing parts? The only way to mount the monitor to the cold shoe would be if you removed the microphone mount.
The top handle for the C70 very much feels like an afterthought. Having zero tapped holes on the handle makes absolutely no sense.
AUDIO
What I also like about the C70 is that you can still record audio without needing to use the top handle. This keeps the size of the camera to a minimum. I found that just utilizing a RØDE Wireless GO II was a nice way of keeping everything small and easy to use. This is something you can’t do with the FX6.
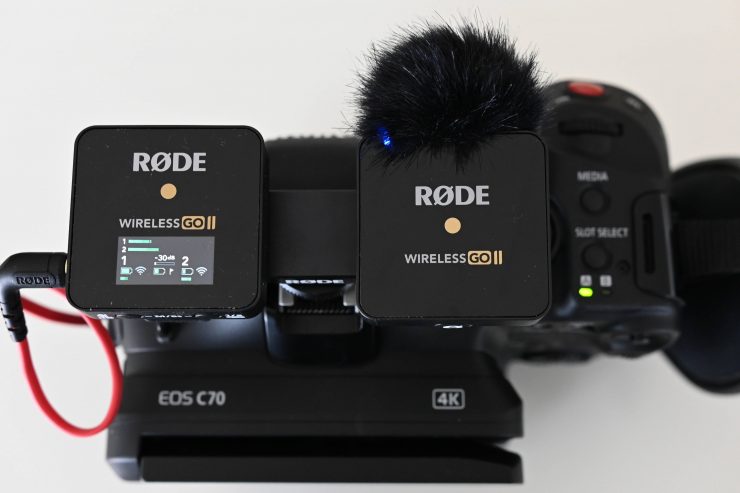
For me, the whole reason to use a small camera is that I can keep it small. I don’t want to have to add anything to it to make it work out of the box. For the most part, the C70 ticks these boxes. If anything, I think the C70 would benefit from a small top plate. Although in saying that, I found that by just adding a dual cols shoe plate I could run a top mic and a dual-radio mic receiver without increasing the camera’s footprint.
Thoughts
Both cameras definitely have their pros and cons when it comes to usability. I hope that at least I have made you aware of some of the potential issues you could run into.
Image Quality
The FX6, like most of today’s modern cameras, is capable of producing nice imagery in the right hands. S-Cinetone is a really nice option if you need to turn material around quickly or the client isn’t requesting footage to be shot in Log or RAW.
Low light performance is good on the FX6, but that shouldn’t surprise anyone given the fact it uses the same sensor as the a7S III.
The Canon C70 is also capable of producing nice quality images. Again, just like with the FX6 or any other camera it is up to the user to get the most out of it. Both cameras can record in good onboard codecs and both will be perfectly adequate for delivering 4K DCI, UHD or HD material.
There are tons of examples of footage from both cameras out there for you to see so I am not going to waste your time by showing you anything else. There is nothing I can show you in the confines of testing out a camera that someone hasn’t already done.
Content Browser Mobile
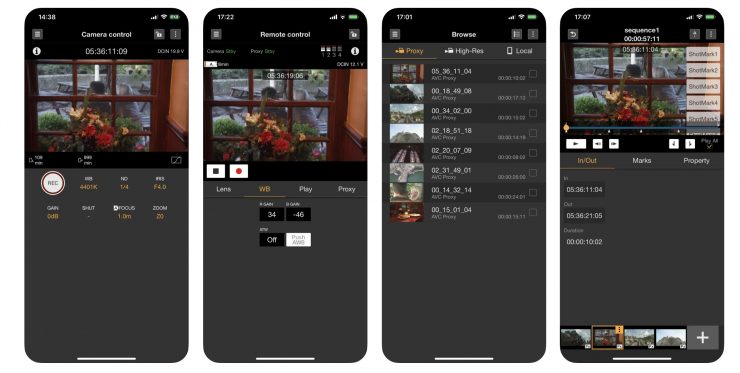
The FX6 works with Sony’s Content Browser Mobile. This allows you to control your camera and also control focus, iris, and zoom with a lens such as the new Sony FE C 16-35mm T/3.1 G E-Mount Lens.
It is unclear whether you need the CBK-WA100/101 Wireless Adapter to be able to do this.
You can also view images from the camera in real-time on a smartphone running Content Browser Mobile. Below you can see what is possible to do.
LIVE OPERATION
– Monitoring live video from camcorders/recorders
– Displaying the status of connected devices
– Remotely controlling focus, zoom, rec start/stop, and etc.
– Live logging (Essence Mark)
BROWSE
– Displaying the clip list
– Playing clips
– Editing metadata of clips
TRANSFER
– Uploading clips to FTP, FTPS, or other servers
– Uploading clips partially by marking in and out points
– Downloading clips to mobile devices
– Managing transfer jobs via job lists
STORYBOARD
– Rough cut editing
– Uploading clips partially and an EDL based on storyboards
PLANNING METADATA
– Naming clips
– Assigning Essence Mark lists to buttons
– Browsing and uploading related clips
TC LINK
– Synchronizing the timecode of multiple camcorders
DEVICE SETTINGS
– Making setting of network functions for connected devices
Compatible Accessories
The FX6 can utilize a range of compatible accessories.
These include compatibility with the new UWP-D series of wireless microphones via Multi-Interface Shoe (MI Shoe) with digital audio interface, as well as compatibility with Sony BP-GL and BP-FL series batteries.
It’s not an FS5 M2 replacement
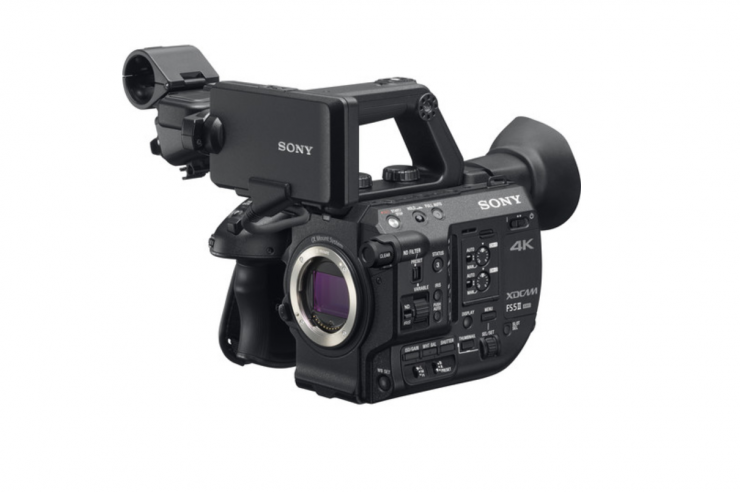
Even though you might think that the FX6 is an FS5 M2 replacement, Sony will tell you that it is not. Sony isn’t discontinuing the FS5 M2 anytime soon. Both the FX6 and the FS5 M2 will be part of Sony’s line up going forward.
I am sure we will eventually see the price of the FS5 M2 being reduced once the FX6 becomes available.
Price & Availability
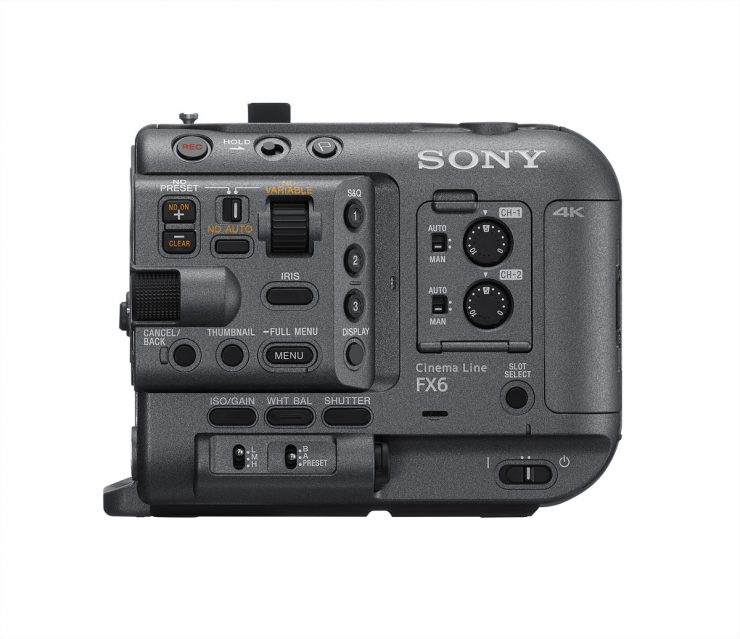
At $5,999.99 USD the FX6 is competitively priced when you look at its main competition. Its main competition arguably comes in the form of the Canon C70, RED KOMODO, Z Cam E6-S6, Kinefinity MAVO 6K S35, Panasonic EVA1, and BMPCC 6K.
The camera is available in two versions:
-Sony FX6 (Body Only): $5,999.99 USD
-Sony FX6 with the Sony FE 24-105mm f/4 G OSS Lens: $7,199.99 USD
This price makes it around $5000 USD less than the FX9 and around $2500 USD more than an a7S III.
This seems to be a reasonable price given its feature set. People who thought that the FX6 would be an FX9 in a smaller form factor for half the cost were dreaming.
So how does the price compare to some of the competition? Below you can see:
| PRICE | |
| Sony FX6 | $5,999.99 USD |
| Canon C70 | $5,499 USD |
| RED KOMODO | $5,995 USD |
| Z CAM E2-F6 | $3,995 USD |
| Panasonic EVA-1 | $6,495 USD |
| BMPCC 6K Pro | $2,495 USD |
| Kinefinity MAVO 6K S35 | $4,999 USD |
At $5999.99 USD it is basically the same amount as a RED KOMODO and around $500 USD more than a Canon C70. Options from Kinefinity, Z CAM, and Blackmagic are more affordable.
Real Cost of Entry– Sony FX6 vs Canon C70
As I have been comparing the Sony FX6 against the Canon C70 throughout this review let’s have a look at what the real cost of entry is if you were to buy either of these cameras with 3 batteries, a dual charger, an onboard microphone, XKR cables, 4 memory cards, and a card reader. For media, I will compare the best available cards for both cameras. Now, unfortunately, the CFexpress Type A cards used by the FX6 only come in capacities of 80GB and 160GB. I will reference 160GB against 128GB as that is the closest comparison that can be made. Yes, both cameras can use cheaper media, but I am listing cards that are required to record any type of resolution and frame rate.
For batteries, I will base it on the standard sizes and models that come with the cameras.
The costs you see listed are for multiples of the product being listed.
| SONY FX6 | CANON C70 | |
| Camera | $5,998.00 | $5,499.00 |
| 3x batteries | Sony BP-U35 Lithium-Ion Battery Pack $479.97 USD | Canon BP-A30 Battery Pack $749.85 USD |
| 1x Dual Charger | Sony BC-U2A Dual-Bay Battery Charger $319.95 USD | Canon Battery Charger for EOS C300 Mark II, C200, and C200B Batteries $495 USD |
| 4x media cards | Sony 160GB CFexpress Type A TOUGH Memory Card $1592 USD | Sony 128GB SF-G Tough Series UHS-II SDXC Memory Card $1049.95 USD* *Just to be fair I have made this the cost of 5 cards |
| 1x card reader | Sony MRW-G2 CFexpress Type A/SD Memory Card Reader $118 USD | Sony UHS-II SD Memory Card Reader $26.65 USD |
| 1x Onboard microphone | Rode NTG2 Shotgun Microphone and Auray Windshield Kit $353.95 USD | Rode NTG2 Shotgun Microphone and Auray Windshield Kit $353.95 USD |
| XLR cables | 2 x Rycote Mic Tail Short XLR Cable $64 USD | Blackmagic Design Set of 2 Mini XLR to XLR Audio Cables for Video Assist 4K (19.5″) $78 USD |
| TOTAL | $8,925.87 USD | $8,252.40 USD |
Before you start complaining that you could use off-brand chargers, media, batteries, etc. this is just one comparison to see how much a kit that could get you through a reasonable day of shooting would cost.
FX6 vs C70 Recap
As I have compared the FX6 and C70 quite closely I am going to give you the pros and cons of both cameras.
| PROS | CONS | |
| FX6 | – Electronic variable ND – Timecode IN/OUT – SDI OUT – Full Frame – 4K at 120p – Lots of mounting points | – No 3.5mm mic input on the body – Flimsy monitor mount – No ability to shoot 4K or UHD in S35 -No EVF – Expensive media |
| C70 | – All-in-one construction – Same sensor as C300 Mark III – 3.5mm mic input on the body – Good touchscreen menu shortcuts – Ability to use a EF-EOS R 0.71x speedbooster – 4K at 120p | – No SDI OUT – Only one output – No mounting points – No user LUTs – No EVF – No loupe for the LCD screen |
Which one would I buy?
There is no right or wrong answer here. Both cameras are very capable and which one works best for you is something only you can answer.
We have got to a point where image quality, recording capabilities, and dynamic range are all very, very close with most sub $10K cameras. Just about all of the cameras out there are capable of getting the job done.
In my opinion, if you are in the market for a new camera then you should be primarily looking at usability. How do you like to work? Does camera XYZ have the inputs, outputs, usability that you are looking for. From being in this industry for over 30 years I can tell you that often the better camera, is not the camera that has the best specifications on paper.
If I had to sum up both the FX6 and the C70 from a personal standpoint this what my thoughts would be:
Sony FX6
- Probably a better option than the C70 if you are looking for an ‘affordable’ A camera.
- Fantastic electronic variable ND system
- SDI OUT and Timecode IN/OUT make a big difference in real world productions where more than one camera is being used
- Badly thought out audio from a usability perspective
- Camera becomes very unbalanced if you put an external monitor on the top handle as all of the weight is at the front
- Menu system could be better
- Touch screen menus can’t be accessed without leaving the main screen
- Flimsy monitor mount- this feels cheaply made
- LCD Hood is badly designed
- No ability to shoot 4K or UHD in S35. This is a big deal for me. Not being able to get extra reach out of the lenses you have when shooting in UHD or 4K because you are stuck using FF limits the FX6’s usability
- Good mounting options on both the handle and the body
- More modular than the C70- but for a lot of applications you need to have all of the components attached to use the FX6.
C70
- Same sensor as the C300 Mark III- the DGO sensor is very impressive and it is nice to see that you get the sensor from a lot more expensive camera in the C70. The FX6 uses a sensor from a hybrid mirrorless.
- Easy out of the box usability- apart from the top handle there are no other parts. You can put a lens on this camera and start shooting straight away. With the FX6 you need to attach the additional components to use the camera.
- Bad main menu and sticky and unresponsive joystick
- Great on screen touch menus for making changes to key parameters
- The ability to shoot UHD or 4K in S35
- The ability to add a speed booster if you want the ‘full frame‘ look
- Timecode IN/OUT- this is a big deal to me when looking for a ‘B‘ camera
- 3.5mm stereo mic input- great inclusion if you need to keep the camera very small but still capture good audio.
- XLR inputs on the camera body. With the FX6 you have to use the top handle if you want decent audio.
- No SDI- not the end of the world, but I would much prefer SDI over HDMI
- Bad HDMI placement when hand-holding the camera
- Only one output- with the C70 you are stuck with a single HDMI output. This limits what you can do with the camera unless you want to add an additional monitor.
- No mounting points- why Canon didn’t put any mounting points on the C70’s handle is mind-boggling. I don’t know what they were thinking.
As you can, I personally think both cameras have their strengths and weaknesses. Both cameras are far from perfect. If you combined the best bits from both of them and made one camera you would probably end up with a pretty good solution.
Now, I actually bought one of these cameras and I would be interested to hear which one readers thought I purchased. Let me know in the comments section at the bottom of the article.
Where does this camera sit?
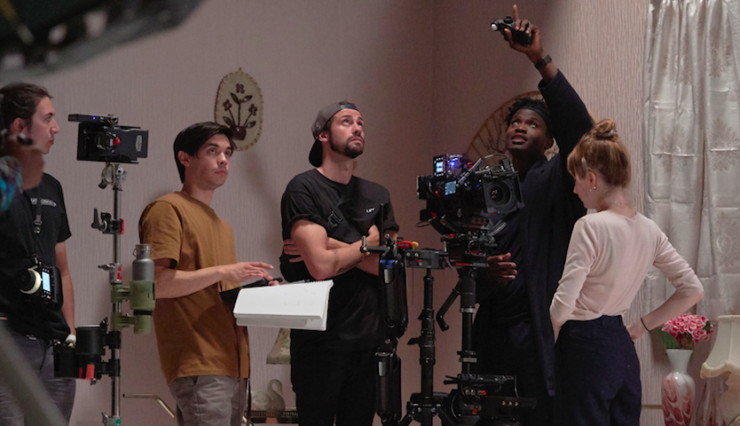
Whether you love Sony cameras or loathe them, the Japanese company has always priced its mid to lower-end cameras fairly aggressively. As I have mentioned in recent articles, the camera market has started to divide into two key sectors; the under $10K category and the high end. There really isn’t much in between. The FX6 falls clearly into that under $10K category.
Sony almost always seems to get its camera timings just right (at least when it comes to digital cinema cameras). Half the battle is being first to market and providing something your competitors don’t. Just look at the F5, F55, FS5, and FS7. All of these cameras were released at a time when they didn’t have any direct competition.
The FX6 started shipping around the same time as the Canon C70 which it is undoubtedly going to be compared to. Despite a large range of full-frame mirrorless hybrids being available, the FX6 could arguably be considered the first truly affordable full-frame digital cinema camera from one of the large Japanese manufacturers. Yes, Sony did release the full-frame E-mount NEX-VG900 way back in 2012, but that was a different kettle of fish.
Sony needed to reinvent the wheel with the FX6 because the competition has become more aggressive and they couldn’t just make a dumbed-down version of an FX9.
People may be asking why it doesn’t use a larger megapixel sensor or why it doesn’t shoot in resolutions over 4K, but in my personal opinion, it doesn’t need to. A large proportion of working professionals buying and using cameras in this price range are not being requested to shoot in resolutions above 4K. 4K is still perfectly acceptable and will still be for quite some time.
The FX6 certainly does tread on FX9’s shoes. Sony didn’t have a tendency to cannibalize their line up, but I think now because of competition from competitors, they kind of have to. While they have tried to differentiate the FX6 and the FX9 by using different sensors, the lines have been blurred and this may well-upset owners of the FX9. However, there is still very much a place for both of these cameras as the FX9 is more suited to being shoulder-mounted than the FX6 and it has the ability to shoot 4K in an S35 crop mode.
To appease FX9 owners, Sony could possibly enable a 6K output and let you output RAW directly over SDI instead of using the XDCA-FX9. I personally have my doubts about whether they will do either of those things. A good proportion of people who were interested in the FX9 have already bought that camera, but it is heavily back-ordered in some places around the world. It will be interesting to see how many potential FX9 buyers will now be rethinking their decision.
Who is it aimed at?
The FX6 is being aimed primarily at the same target audience that owned cameras like the FS5 and FS7. It is also aimed at these same users who may be considering a Canon C70, RED KOMODO, BMPCC 6K Pro, Z CAM, or a Kinefinity.
The FX6 is certainly an affordable workhorse camera for professional users who are shooting news, events, documentaries, and corporate productions. Its small size makes it suitable for solo operators, although, it is a difficult camera to shoulder mount.
The camera won’t be suitable for everyone and there is nothing wrong with that. Everyone has different needs and requirements and luckily we have a wide array of cameras to choose from.
Whether or not people shooting news, events, documentaries, and corporate productions actually want full-frame is debatable. The fact that you can only shoot HD in a Super 35 mode may be a deal-breaker for some potential users. That is why Sony will continue to sell the FS7 M2 and FS5 M2. Although in saying that, with a lot of people using speedboosters on S35 Sony E-mount cameras there is clearly a demand for the full-frame esthetic.
The FX6 can be used as your main camera, a B camera to the FX9, the A camera to a Sony a7S III or FX3, and so on. Given its feature set and capabilities, there really isn’t any reason why it couldn’t be used by anyone for anything.
How does it compare to the FX9
Let’s compare the two (at least on paper).
| FX6 | FX9 | |
| Sensor | Full-Frame 10.2MP back-illuminated CMOS Exmor R | Full-Frame 20.5MP back-illuminated CMOS Exmor R |
| Dual Native ISO | No (High Sensitivity mode) | Yes |
| Dynamic Range (Claimed) | 15+ stops | 15+ Stops |
| IBIS | No | No |
| Electronic Variable ND | Yes | Yes |
| Picture Profiles | S-Log3, CineTone, S-Gamut3.cine, S-Gamut3 | S-Log3, CineTone, S-Gamut3.cine, S-Gamut3 |
| Internal Recording | 4K DCI up to 59.94p XAVC Intra 422 10-bit (Class 300) UHD up to 120p XAVC Intra 422 10-bit (Class 300) HD up to 240p XAVC Intra 422 10-bit (Class 100) | 4K DCI up to 59.94p XAVC Intra 422 10-bit (Class 300) UHD up to 59.94p XAVC Intra 422 10-bit (Class 300) HD up to 180P XAVC Intra 422 10-bit (Class 100) |
| External Recording | 4K DCI up to 59.94p 4:2:2 10-bit | 4K DCI up to 59.94p 4:2:2 10-bit |
| HDMI Out | Yes | Yes |
| SDI Out | Yes, 1x SDI | Yes, 2x SDI |
| Timecode In/Out | Yes (BNC) | Yes (BNC) |
| Genlock | No | Yes (BNC) |
| Recording Media | 2x CFexpress type A | 2x XQD |
| LCD Screen | Yes | Yes |
| EVF | No | No |
| Audio | 2x XLR Support for 4 channels of audio | 2x XLR Support for 4 channels of audio |
| Headphone Jack | Yes | Yes |
| Included Battery | Yes | Yes |
| Weight | 890g (Body Only) | 2 kg / 4.4 lb (body only) |
Despite offering a lot of similarities, the FX9 does offer quite a lot of functionality and features that you won’t find on a FX6. These include:
- 6K Sensor (same as VENICE)
- 4K Super 35 Recording
- FFcrop 5K (4K DCI at up to 60p recording)
- Super 16 Mode (coming in a firmware update)
- Locking E-mount
- Two SDI outputs
- Genlock
- Better ergonomics for shoulder mounting
- Compatability with the XDCA-FX9 Extension unit
How does it compare to the a7S III?
| FX6 | a7S III | |
| Sensor | Full-Frame 10.2MP back-illuminated CMOS Exmor R | Full-Frame 12.1 MP back-illuminated CMOS Exmor R |
| Dual Native ISO | No (High Sensitivity mode) | No |
| Dynamic Range (Claimed) | 15+ stops | 15+ Stops |
| IBIS | No | Yes |
| Electronic Variable ND | Yes | No |
| Picture Profiles | S-Log3, CineTone, S-Gamut3.cine, S-Gamut3 | S-Gamut, S-Gamut3, S-Gamut3.Cine |
| Internal Recording | 4K DCI up to 59.94p XAVC Intra 422 10-bit (Class 300) UHD up to 120p XAVC Intra 422 10-bit (Class 300) HD up to 240p XAVC Intra 422 10-bit (Class 100) | UHD up to 59.94p XAVC Intra 422 10-bit (Class 300) UHD up to 120p XAVC Intra 422 10-bit (Class 300) HD up to 180P XAVC Intra 422 10-bit (Class 100) |
| External Recording | 4K DCI up to 59.94p 4:2:2 10-bit RAW 4K DCI up to 59.94p | 4K DCI up to 59.94p 4:2:2 10-bit RAW 4K DCI up to 59.94p |
| HDMI Out | Yes | Yes |
| SDI Out | Yes | No |
| Timecode In/Out | Yes (BNC) | No |
| Genlock | No | No |
| LUTS | Yes | No |
| Recording Media | 2x CFexpress type A | 2x CFexpress type A |
| LCD Screen | Yes | Yes |
| EVF | No | Yes |
| Audio | 2x XLR Support for 4 channels of audio | 3.5mm Mic Input |
| Headphone Jack | Yes | Yes |
| Included Battery | Yes | Yes |
| Weight | 890g (Body Only) | 614 g (Body Only) |
Essentially, the only real advantages the a7S III has is that it can take photographs and it has a built-in EVF.
What is it similar to?
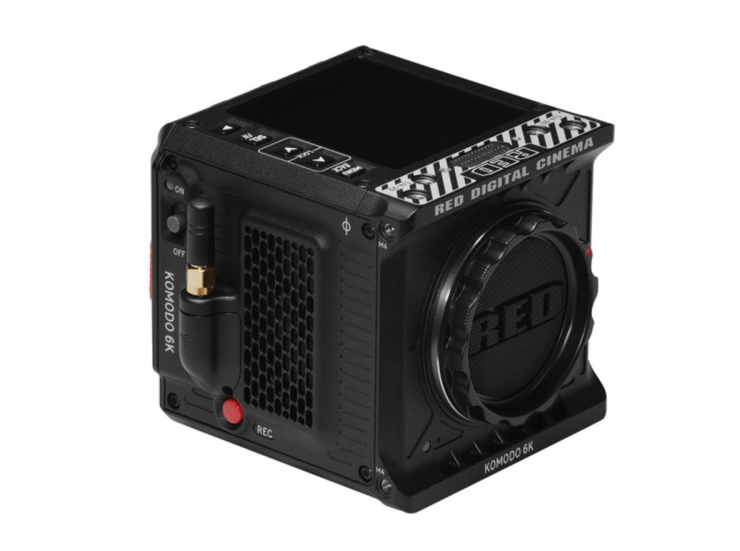
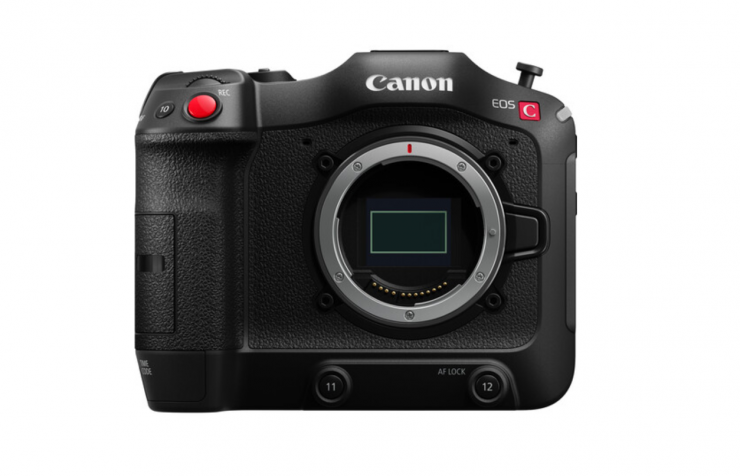
As far as form factor and price are concerned, the closest cameras are arguably the Canon C70, RED KOMODO, and Z CAM E2-F6 Full-Frame 6K Cinema Camera. You could also compare it to older cameras like the Panasonic EVA1 as well. The Kinefinty MAVO LF and MAVO 6K S35 could also potentially join this conversation.
So how do they compare on paper?
| Sony FX6 | Z CAM E2-F6 | Canon C70 | RED KOMODO | |
| Sensor | Full-Frame 10.2MP back-illuminated CMOS Exmor R | 37.09 x 24.75 mm (Full-Frame) | 26.2 x 13.8 mm (Super35) | 27.03 x 14.26 mm (Super35) |
| Weight | 890g / 31.39oz | 1.09kg / 2.4 lb | 1.17 kg / 2.58 lb | 1 kg / 2.1 lb |
| Rec Media | 2x CFexpress type A cards | 1x CFast 2.0 | 2 x SDXC / SDHC Card Slots | 1x CFast 2.0 |
| Inputs & Outputs | 1x 12G/6G/3G-SDI (Out) 1x HDMI (Out) 1x Timecode In/Out (BNC) 1x USB-C 1 x 1/8″ / 3.5 mm Stereo Mic Level Input 1 x 1 x 2.5 mm LANC Control | 1 x HDMI (HDMI 2.0) Output 1 x 1/8″ / 3.5 mm Stereo Input 1 x 5-Pin LEMO Input 1 x 1/8″ / 3.5 mm Stereo Output 1 x USB Type-C 1 x 2.5 mm LANC Control Input 1 x RJ45 GIG-E 1000BASE-T 2 x 4-Pin LEMO | 1 x HDMI Output 2 x Mini XLR Mic/Line Level (+48 V Phantom Power) 1 x 1/8″ / 3.5 mm Stereo Input 1 x 1/8″ / 3.5 mm Stereo Headphone 1 x USB Type-C 1 x BNC Timecode Input/Output 1 x 2.5 mm LANC Control | 1 x BNC (12G-SDI) Monitor Output 1 x 1/8″ / 3.5 mm Stereo Mic Level Input 1 x 9-Pin GPI, Genlock, RS-232, Timecode |
| Display | Fixed LCD | Fixed LCD | Fixed LCD | Fixed LCD |
| ND FILTERS | Yes | No | Yes | No |
| Battery | Sony BP-U | Sony L-series | Canon BP-A Series | Canon BP-9 Series |
| Power | 1x 19.5V DC In | 1 x 4-Pin LEMO | 1 x Barrel (11.5 to 20 VDC) Input | 1 x 2-Pin LEMO (7 to 17 VDC) Input |
| WiFi | Yes | 2.4 GHz, 5 GHz Wi-Fi Control | Optional | 2.4 GHz, 5 GHz Wi-Fi Video Output, Control |
| Price | $5,999.99 USD | $3,995 USD | $5,499 USD | $5,995 USD |
All of these competing options have their own strengths and weaknesses. You could make arguments that any of these cameras are a better choice.
What about recording differences? Let’s have a look at how the Sony FX6 compares to these other options.
FX6 v E2-F6
| SONY FX6 | Z CAM E2-F6 | |
| Internal Recording | ALL-Intra 4:2:2 10-bit: 4096 x 2160p up to 59.94p 3840 x 2160p up to 120p 1920 x 1080 up to 240p LongGOP 4:2:2 8-bit 4096 x 2160p up to 59.94p 3840 x 2160p up to 120p LongGOP 4:2:2 10-bit: HD up to 240p | Raw 12-Bit: 4096 x 2160 at 30 fps (300 Mb/s) H.265/MOV/MP4 4:2:0 10-Bit: 6244 x 4168p up to 30 fps (300 Mb/s) 6144 x 3240p up to 48 fps (300 Mb/s) 6144 x 2592p up to 60 fps (300 Mb/s) 5760 x 3240p up to 48 fps (300 Mb/s) 5552 x 4164p up to 30 fps (300 Mb/s) 4992 x 4160p up to 30 fps (300 Mb/s) 4096 x 2160p up to 72 fps (300 Mb/s) 4096 x 1728p up to 120 fps (300 Mb/s) 3840 x 2160p up to 72 fps (300 Mb/s) 3840 x 1620p up to 90 fps (300 Mb/s) 1920 x 1080p up to 120 fps (300 Mb/s) H.264/MOV/MP4 4:2:0 8-Bit: 6244 x 4168p up to 30 fps (300 Mb/s) 6144 x 3240p up to 48 fps (300 Mb/s) 6144 x 2592p up to 60 fps (300 Mb/s) 5760 x 3240p up to 48 fps (300 Mb/s) 5552 x 4164p up to 30 fps (300 Mb/s) 4992 x 4160p up to 30 fps (300 Mb/s) 4096 x 2160p up to 72 fps (300 Mb/s) 4096 x 1728p up to 120 fps (300 Mb/s) 3840 x 2160p up to 72 fps (300 Mb/s) 3840 x 1620p up to 90 fps (300 Mb/s) 1920 x 1080p up to 120 fps (300 Mb/s) |
| External Recording | OVER HDMI & SDI 4096 x 2160p up to 59.94p 4:2:2 10-bit RAW OVER SDI: 4096 x 2160p up to 59.94p | 12-Bit ProRes RAW recording over HDMI to the Ninja V 5” HDR monitor-recorder 4:2:2 10-Bit via HDMI: 3840 x 2160p at 60 fps |
FX6 v C70
| SONY FX6 | CANON C70 | |
| Internal Recording | ALL-Intra 4:2:2 10-bit: 4096 x 2160p up to 59.94p 3840 x 2160p up to 120p 1920 x 1080 up to 240p LongGOP 4:2:2 8-bit 4096 x 2160p up to 59.94p 3840 x 2160p up to 120p LongGOP 4:2:2 10-bit: HD up to 240p | H.264/H.265/MP4/XF-AVC/XF-AVC Proxy 4:2:2 10-Bit: 4096 x 2160p up to 23.98/24/25/29.97/50/60 fps (160 to 260 Mb/s) 3840 x 2160p up to 23.98/24/25/29.97/50/60 fps (160 to 260 Mb/s) 2048 x 1080p up to 23.98/24/25/29.97/50/60 fps (50 Mb/s) 1920 x 1080p up to 23.98/24/25/29.97/50/60 fps (50 Mb/s) H.264/H.265/MP4/XF-AVC/XF-AVC Proxy 4:2:2 10-Bit: 4096 x 2160p up to 119.88/120 fps 3840 x 2160p up to 119.88/120 fps H.264/H.265/MP4/XF-AVC/XF-AVC Proxy 4:2:2 8-Bit: 2048 x 1080p up to 179.82/180 fps 1920 x 1080p up to 179.82/180 fps H.264/H.265/MP4/XF-AVC/XF-AVC Proxy 4:2:0 8-Bit: 2048 x 1080p up to 23.98/24/25/29.97/50/59.94 fps (24 to 35 Mb/s) 1920 x 1080p up to 23.98/24/25/29.97/50/59.94 fps (24 to 35 Mb/s) H.264/H.265/MP4/XF-AVC/XF-AVC Proxy 4:2:2 10-Bit: 4096 x 2160p up to 23.98/24/25/29.97/50/59.94 fps (135 to 225 Mb/s) 3840 x 2160p up to 50/59.94 fps (135 to 225 Mb/s) 2840 x 1080p up to 23.98/24/25/29.97/50/59.94 fps (50 Mb/s) 1920 x 1080p up to 23.98/24/25/29.97/50/59.94 fps (50 Mb/s) 1280 x 720p up to 50/59.94 fps (12 Mb/s) H.264/H.265/MP4/XF-AVC/XF-AVC Proxy 4:2:0 10-Bit: 4096 x 2160p up to 23.98/24/25/29.97/50/59.94 fps (100 to 170 Mb/s) 3840 x 2160p up to 23.98/24/25/29.97/50/59.94 fps (100 to 170 Mb/s) 2048 x 1080p up to 23.98/24/25/29.97/50/59.94 fps (35 Mb/s) 1920 x 1080p up to 23.98/24/25/29.97/50/59.94 fps (35 Mb/s) 1280 x 720p up to 50/59.94 fps (9 Mb/s) H.264/H.265/MP4/XF-AVC/XF-AVC Proxy 4:2:2 10-Bit: 4096 x 2160p up to 119.88/120 fps 3840 x 2160p up to 119.88/120 fps 2048 x 1080p up to 179.82/180 fps 1920 x 1080p up to 179.82/180 fps H.264/H.265/MP4/XF-AVC/XF-AVC Proxy 4:2:0 8-Bit: 4096 x 2160p up to 23.98/24/25/29.97/50/59.94 fps (150 Mb/s) 3840 x 2160p up to 23.98/24/25/29.97/50/59.94 fps (150 Mb/s) 2048 x 1080p up to 23.98/24/25/29.97/50/59.94 fps (35 Mb/s) 1920 x 1080p up to 23.98/24/25/29.97/50/59.94 fps (35 Mb/s) 1280 x 720p up to 50/59.94 fps (8 Mb/s) H.264/H.265/MP4/XF-AVC/XF-AVC Proxy 4:2:2 8-Bit: 4096 x 2160p up to 119.88/120 fps 3840 x 2160p up to 119.88/120 fps 2048 x 1080p up to 179.82/180 fps 1920 x 1080p up to 179.82/180 fps |
| External Recording | OVER HDMI & SDI 4096 x 2160p up to 59.94p 4:2:2 10-bit RAW OVER SDI: 4096 x 2160p up to 59.94p | 4:2:2 10-Bit via HDMI: 4096 x 2160p at 23.98/24/25/29.97/50/59.94 fps 3840 x 2160p at 23.98/24/25/29.97/50/59.94 fps 1920 x 1080p at 23.98/24/25/29.97/50/59.94 fps 2048 x 1080p at 23.98/24/25/29.97/50/59.94 fps 1280 x 720p at 23.98/24/25/29.97/50/59.94 fps |
FX6 v KOMODO
| SONY FX6 | RED KOMODO | |
| Internal Recording | ALL-Intra 4:2:2 10-bit: 4096 x 2160p up to 59.94p 3840 x 2160p up to 120p 1920 x 1080 up to 240p LongGOP 4:2:2 8-bit 4096 x 2160p up to 59.94p 3840 x 2160p up to 120p LongGOP 4:2:2 10-bit: HD up to 240p | REDCODE RAW: 6144 x 3240 at 40 fps 5120 x 2700 at 48 fps 4096 x 2160 at 60 fps 2048 x 1080 at 120 fps Recording Modes ProRes 422/ProRes 422HQ: 4096 x 2160p up to 60 fps ProRes 422: 2048 x 1080p up to 120 fps |
| External Recording | OVER HDMI & SDI 4096 x 2160p up to 59.94p 4:2:2 10-bit RAW OVER SDI: 4096 x 2160p up to 59.94p | 4:2:2 10-Bit via SDI/BNC: 4096 x 2160p at 23.98/24/25/29.97/30/50/59.94/60 fps 3840 x 2160p at 23.98/24/25/29.97/30/50/59.94/60 fps 2048 x 1080p at 23.98/24/25/29.97/30/50/59.94/60 fps 1920 x 1080p at 23.98/24/25/29.97/30/50/59.94/60 fps |
The Sony FX6 is very similar in some respects to the competition but different in others. All of these cameras offer different features and functionality. Any of the cameras I have listed will get the job done in the right hands.
Why buy one of these over an a7S III or FX3?
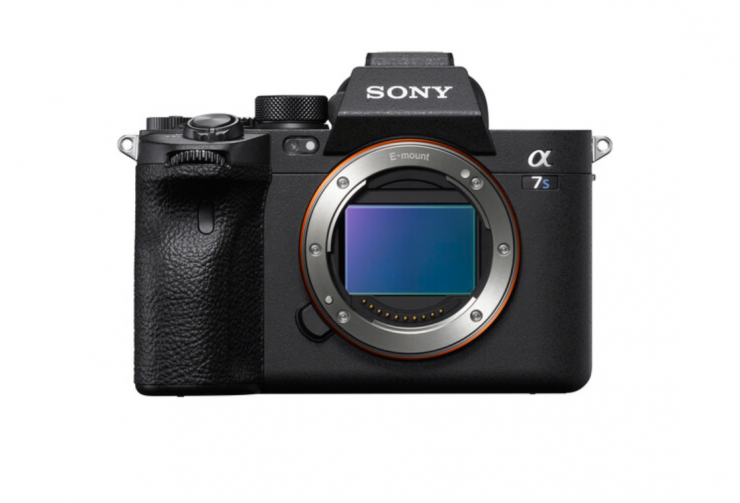
Despite offering similar sensors and a lot of similarities when it comes to frame rates and recording options, the FX6 is a video camera and not a hybrid mirrorless.
If you are primarily shooting video, then items such as built-in electronic variable ND, XLR inputs, SDI In, Timecode In/Out, better cooling, LUTS, and form factor make a big difference. Look, not everyone will agree, and some users will prefer the form factor of a mirrorless hybrid for shooting video, and there is nothing wrong with that.
If you do prefer or value the addition of all of those fore-mentioned features I listed, then the FX6 does make a lot more sense if you are just doing video. However, those added inclusions and functionality will cost you around $2500 USD more than if you buy an a7S III nor FX3.
Sony PXW-FX6
Image Sensor
| Image Sensor Size | Full-frame 10.2MP |
| Sensor Type | Back-illuminated CMOS Exmor R 4K sensor |
| Sensor Resolution | Effective: 4096 x 2160 |
Camera
| Lens Mount | Sony E-Mount |
| Built-In ND Filter | 4 to 128 Stop Electronic ND Filter |
| Recording Media | 2 x XQD Card Slots 1 x SDHC Card Slot |
Internal Recording
| Recording Modes | MPEG HD422/XAVC-I/4:2:2 10-Bit: 4096 x 2160p up to 60 fps 3840 x 2160p up to 120 fps 1920 x 1080p up to 240 fps |
| Gamma Curve | Sony S-Log 3, S-Gamut, S-Gamut3.cine |
| Audio Recording | Up to 4-Channels |
Interfaces
| Video Connectors | 1 x BNC (12G/6H/3G-SDI) Output 1 x HDMI (HDMI 2.0) Output |
| Audio Connectors | 2 x 3-Pin XLR Mic/Line Level (+48 V Phantom Power) Input 1 x 1/8″ / 3.5 mm Stereo Headphone Output |
| Other I/O | 1 x BNC Timecode Data Input/Output |
EVF
| EVF | Not Included |
Power
| Battery Type | Sony BP-U Series |
| Power Connectors | 1 x Barrel Input |
Environmental
| Operating Temperature | 32 to 104°F / 0 to 40°C |
| Storage Temperature | -4 to 140°F / -20 to 60°C |
General
| Accessory Mount | 1 x Multi-Interface Shoe 1 x 1/4″-20 Female |
| Weight | 890g (Body Only) |
Conclusion
There is no doubt that the FX6 is a very capable camera. It offers a good compromise between features, size, weight, usability, and price.
While it is far from perfect (no camera is), it will suit a lot of shooters’ needs. As I have mentioned numerous times throughout this review, almost every camera being released has very similar dynamic range and recording options. What you should be spending more time looking at is usability, total cost of entry, inputs/outputs, menu ease of use, and if that camera will work for you.
Specifications are just specifications and they never tell you the true story about any camera. Usability is the number one thing I look for when deciding on a camera. I don’t care if a camera can shoot a certain number of frames per second at a certain resolution in RAW if that camera isn’t easy to use or doesn’t meet the requirements of how I like to work. I will always choose cameras that are easy to use and don’t get in the way of what I want to accomplish.
Don’t get blinded by marketing hype or specifications or high frame rates or high resolution. Pick the camera that works best for you. At the end of the day, the only person you have to justify a camera purchase to is yourself (or your wife or husband if you have a joint bank account!). If the camera you already own or use or the camera you want to buy pays the bills and meets the requirements of the clients you work for then that is the right camera for you.
The FX6 clearly does step on the toes of the FX9, and I think it had to given the feature set of the recently announced a7S III and FX3. In a lot of ways, the FX6 is a blend of both the FX9 and the a7S III/FX3.
We tend to expect a lot with camera releases, and sometimes that involves having unrealistic expectations. The FX6, at least in my opinion, pretty much offers everything that most users of a camera like this will need. If you need some of the advantages that an FX9 offers, buy an FX9.
People are still likely to still complain that there’s no internal RAW recording, there are no anamorphic modes and that it can’t record in 6K, but as I mentioned earlier, most of the potential buyers of this camera don’t require those things. They may want them, but do they really need them?
I’ll say it again just in case you missed it. Anybody complaining that they were expecting an FX9 in a smaller body with the same features for less money is living in a dream world.
The only concern here that I see is that there is now a lot more competition in the sub $10K category. When the FS5 originally came out 5 years ago it didn’t really have any competition. At the time this certainly helped with sales and early adoption. Just because a new camera comes along, it doesn’t make the camera you already have obsolete. If the camera you currently own is perfectly satisfactory for the type of work you do and is acceptable for the clients you have, then there is no need to purchase a new camera. Sure it is always nice to have the latest and greatest, but often it makes no financial sense to buy a new camera if your existing camera is already working well for you.
On paper, it is hard to find fault with the FX6. If you want an a7S III/FX3 with electronic variable ND, SDI, Timecode, XLR inputs, and a more video-centric form factor, then that’s exactly what Sony has given you. If you want an FX9 sensor with FX9 features, buy an FX9.
Like what we do and want to support Newsshooter? Consider becoming a Patreon supporter and help us to continue being the best source of news and reviews for professional tools for the independent filmmaker.