I have read through all 919 pages of the Canon EOS R5 user manual so I could collate important information you may or may not know about the camera. If you are thinking about buying the camera with video as the primary purpose, then it may well help to have a read below.
Now, this is just information from the user manual and the reality is that real-world shooting conditions hardly ever mimic ideal shooting conditions that are listed in manuals. I haven’t shot with or even touched an EOS R5. This is not my thoughts or opinions on the camera, its just information listed officially by Canon that you may need to know.
If you have bought or are thinking about buying an R5 it is best to do your own testing and find out how the camera works in the conditions and environments that you will be using it in. Don’t rely on someone else’s advice because they may be testing the camera in situations or conditions that are different from how you will use it. You would have probably already seen a multitude of overheating tests where the results have been quite varied. This is why it is important to do your own tests. Ultimately only you can decide if a camera is right for you.
Video recording: Some things you need to know
- By default, [AF : Movie Servo AF] is set to [Enable] so that the camera always keeps focusing
- ISO speed cannot be expanded to L (equivalent to ISO 50) in movie recording.
- Still photo shooting is not supported in movie recording mode. To shoot still photos, stop recording and change the [Shooting mode] setting to still photos first.
- The remaining time displayed for movie recording is only a guideline.
- Other devices may not play movies such as 8K, 4K, /FHD 59.94P/50P, or High Frame Rate movies normally, because playback is processing-intensive.
- Apparent resolution and noise vary slightly depending on movie recording quality, cropped shooting settings, and the lens used.
- From an 8K or 4K movie, you can select any frame to save to the card as a JPEG still image
- Commercially available software may not be able to display RAW movies recorded by this camera. For compatibility information, contact the software manufacturer.
- To prioritize gradation in highlights, set Canon Log to [On]. This is recommended for Cinema EOS and RAW movies.
- Time-lapse movies cannot be recorded when the camera is connected to a computer with the interface cable, or when an HDMI cable is connected.
- If you record something that has fine detail, moire or false colors may result.
- If you perform AF with a USM lens during movie recording in low light, horizontal banding noise may be recorded in the movie. The same type of noise may occur if you focus manually with certain lenses equipped with an electronic focusing ring. Recording a few test movies is recommended if you intend to perform zooming during movie recording. Zooming as you record movies may cause exposure changes or lens sounds to be recorded, an uneven audio level, inaccurate lens aberration correction, or loss of focus.
- Large aperture values may delay or prevent accurate focusing.
- Performing AF during movie recording may cause the following kinds of issues: significant temporary loss of focus, recording of changes in movie brightness, temporary stopping of movie recording, or recording of mechanical lens sounds.
- Any external microphones such as Directional Stereo Microphone DM-E1 (sold separately) connected to the camera’s external microphone IN terminal are used instead of the built-in microphones
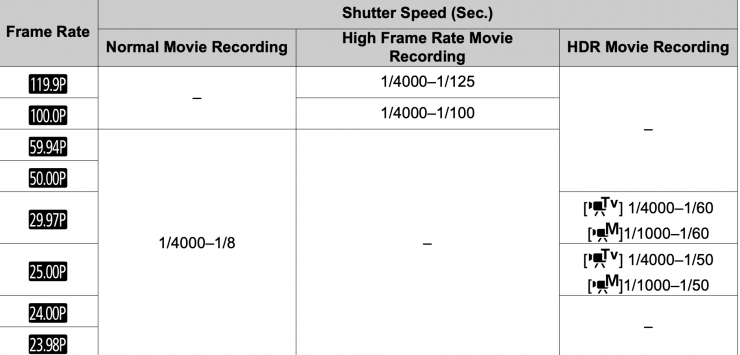
Available shutter speeds in Manual mode vary depending on the frame rate of your specified movie recording quality:
HDMI
- When outputting HDMI video 8K will be outputted at 4K.
- The frame rate of HDMI video output when you are in 4K 119.98P or 100P mode is 59.94 fps or 50.00 fps respectively.
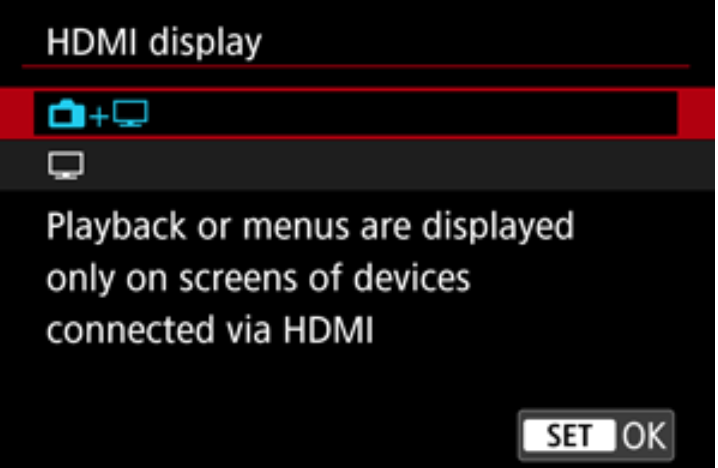
You can specify how movies are displayed as they are recorded via HDMI to an external device. The Movie output itself corresponds to the [Movie rec. size] setting.
The default setting enables movie display both on the camera screen and on the other device, via the HDMI output.
The second option allows for camera operations such as image playback or menu display to be shown on the other device via HDMI, and not on the camera screen.
The third mode deactivates the camera screen during output via HDMI, so that the screen is blank. Shooting information, AF points, and other information are shown on the external device via HDMI, but you can stop output of this information by pressing the <INFO> button.
Audio is also output via HDMI, except when [Sound rec.] is set to [Disable].
Time codes can be added to external device recording via HDMI. Time codes are added to HDMI video output. When [On] is set, [Rec Command] is displayed.
Notes about timecode over HDMI:
- Time codes are not added to HDMI video output when you record High Frame Rate movies with [Count up] in [Time code] set to [Free run].
- To determine compatibility of external recording devices with [Time code] and [Rec Command] functions, check with the device manufacturer.
- Even with [Time code] set to [Off], external recording devices may add time codes to movies, depending on their specifications. For details on device specifications relevant to adding time code to HDMI input, check with the device manufacturer.
Image Crop
The movie image area varies depending on factors such as movie recording quality and cropped shooting settings and the lens used.
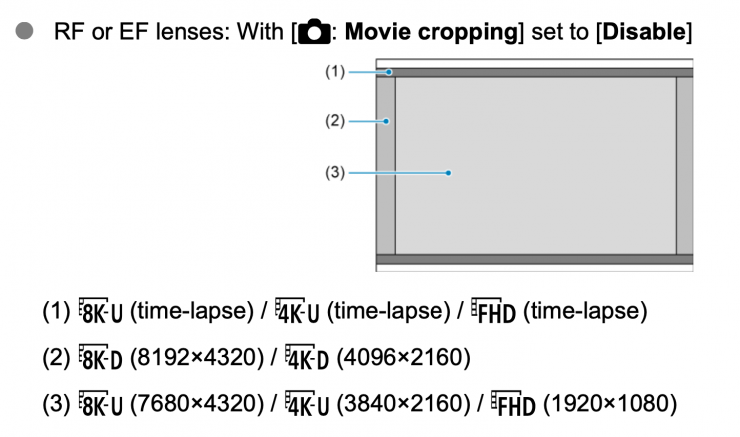
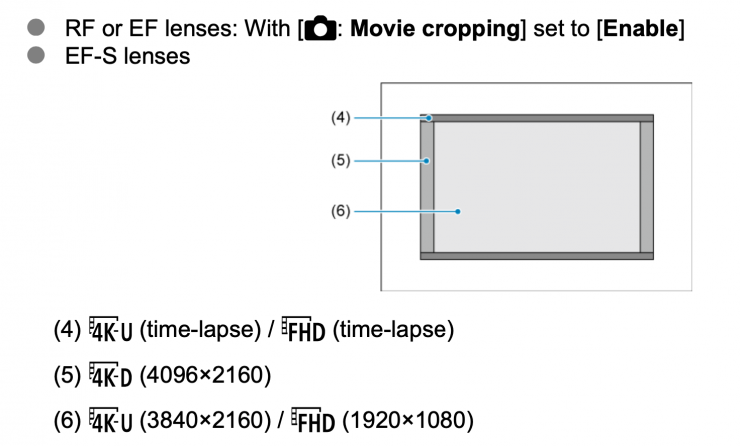
Recording of 8K, 4K, and High Frame Rate movies is not supported with EF-S lenses, or with [Movie cropping] set to [Enable].
Recording with Movie digital IS activated further crops the image around the center of the screen.
8K, High Frame Rate, and 4K HQ movies cannot be recorded with movie cropping enabled.
What cannot be recorded to SD cards?
The following files cannot be recorded to SD cards:
• RAW movies
• 8K ALL-I
• 4K 119.9/100.0 fps (High Frame Rate movies)
• 4K ALL-I HEVC (YUV422, 10-bit)
• 4K 59.94/50.00 fps ALL-I H.264 (YUV420, 8-bit)
If you try and press the movie record button in any of these modes with just an SD card in the camera it will not start recording.
Card Recording Options
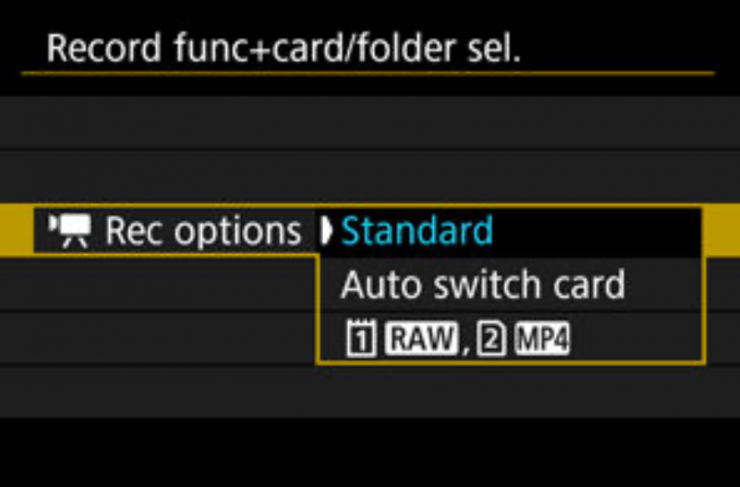
On the EOS R5 you have several options available as far as how recordings are done when you are shooting video:
Standard
Records movies to the card selected in [ Record/play]
Auto Switch Card
Same as [Standard], but recording ends when the card becomes full. When you resume recording, the camera switches to the other card for recording. A new folder is created after switching cards. Auto Switch card will only work when you are recording in certain resolutions and framerates. Please be aware that if you are recording in any of the following modes and your CFexpress card fills up, it is not possible to keep recording to the SD card slot:
• RAW movies
• 8K ALL-I
• 4K 119.9/100.0 fps (High Frame Rate movies)
• 4K ALL-I HEVC (YUV422, 10-bit)
• 4K 59.94/50.00 fps ALL-I H.264 (YUV420, 8-bit)
1 RAW, 2 MP4
For each recording, a RAW movie is recorded to one card and an
MP4 movie to the other card, both with the same file number. When one card becomes full, recording no longer becomes possible.
Just a note: If you set the power switch to <OFF > while an image is being recorded to the card, [Saving…] will be displayed and the power will turn off after the recording finishes. This is a safety feature to make sure that a recording isn’t lost if you accidentally power the camera off.
What cards are supported?
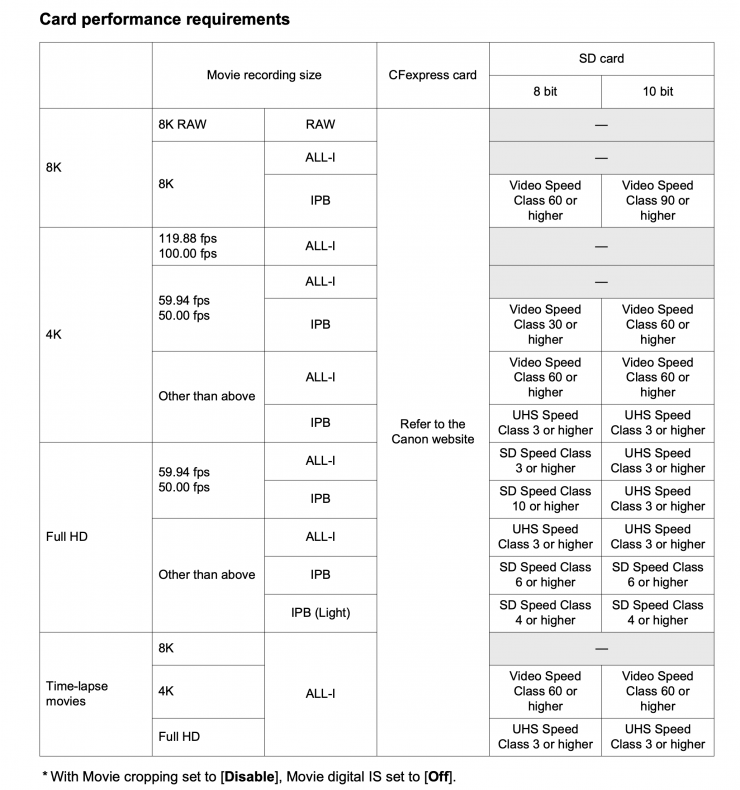
Above you can see what type of SD cards can be used and what resolutions and framerates they can record.
High Frame Rate Recording
You can record 4K movies at a high frame rate of 119.9 fps or 100.0 fps. The maximum recording time per movie is 7 min. 29 sec.
Here are some things to note about high frame rate recording:
- Sound is not recorded in High Frame Rate movies.
- Time code display during movie recording advances 4 sec. per second.
- Because High Frame Rate movies are recorded as 29.97 fps/25.00 fps movie files, they are played in slow motion at 1/4 speed.
- ISO speed can be set within ISO 100–12800. Note that ISO expansion is not available.
SO speed can be set within ISO 100–12800. Note that ISO expansion is not available.
The frame rate of HDMI video output is 59.94 fps or 50.00 fps.
The third one may seem very odd. You can only record high frame rate movies at 29.97 fps/25.00 fps movie files.
Canon Log & Picture Profiles
You can only record in Canon Log on the EOS R5, Canon Log 2, and Canon Log 3 are not supported (this may change in the future).
Canon Log offers a dynamic range of approx. 800% at ISO 400 or higher. Manually setting the ISO speed to 100–320 will reduce the dynamic range.
Here is what Canon says about Canon Log image quality:
- With Canon Log, movies may be affected by horizontal banding, depending on the subject or shooting conditions. Record a few test movies and check the results in advance. In particular, noise may become more noticeable if you enhance the contrast when color-grading your movies.
- With Canon Log, skies, white walls, and similar subjects may be affected by noise or uneven gradation, exposure, or colors.
- Horizontal banding is more likely to occur when recording somewhat dark, flat subjects. This image noise may even occur at relatively low ISO speeds around ISO 400.
- If noise is noticeable, try recording under brighter conditions and adjusting brightness in color grading. Noise can also be reduced by recording at ISO speeds lower than ISO 400, although dynamic range is narrower.
- With Canon Log, autofocusing may be more difficult for subjects under low light, or for low-contrast subjects.
- Noise may appear at image edges if [Peripheral illum corr] in [ : Lens aberration correction] is set to [Enable] when Canon Log is set.
- ISO 100–320 is not available when recording RAW movies with Canon Log set.
With Canon Log, autofocusing may be more difficult for subjects under low light, or for low-contrast subjects.
Noise may appear at image edges if [Peripheral illum corr] in [ : Lens aberration correction] is set to [Enable] when Canon Log is set.
Canon Log 2 and Canon Log 3 are not supported.
Histograms of images captured with [Canon Log] set to [On] are not based on images as converted for View Assist display. Image areas shown in gray in the histogram roughly indicate signal values that are not used.
ISO 100–320 is not available when recording RAW movies with Canon Log set.
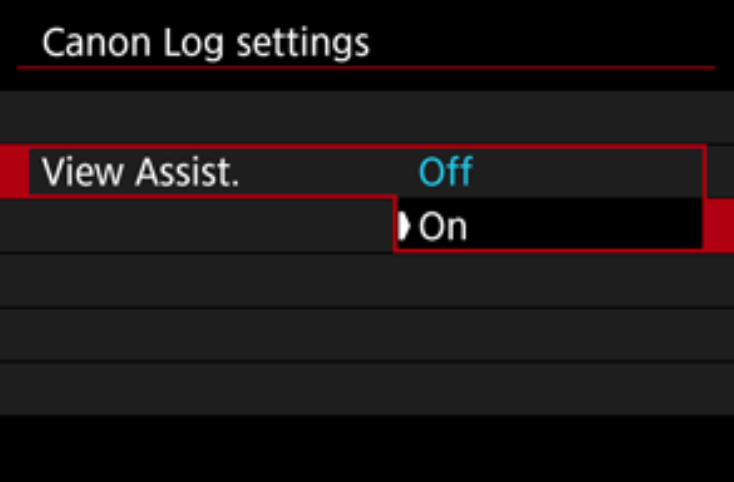
You can use a View Assist feature when shooting in Canon Log. View Assist is basically just a LUT. Setting this feature to [On] does not affect movies recorded to the card, they are still recorded as Canon Log. Similarly, the HDMI video output will also be Canon Log and it isn’t outputted with View Assist characteristics.
Histograms of images captured with [Canon Log] set to [On] are not based on images as converted for View Assist display. Image areas shown in gray in the histogram roughly indicate signal values that are not used.
View Assist is not available during movie playback.
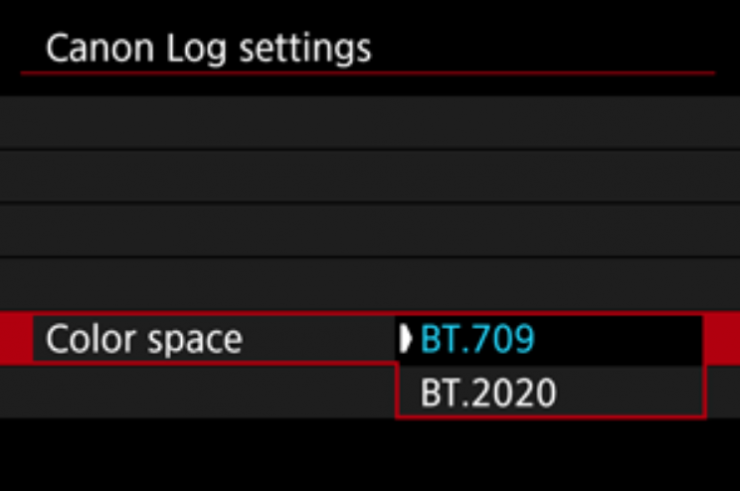
[Color space] can be set when [Canon Log] is set to [On] and [Color Matrix] to [Neutral]. Choose [BT.709] or [BT.2020] as the color space for HDMI output.

You can also select what Color Matrix you want to use, this allows you to specify how colors are reproduced.
You have two choices in the Color Matrix menu:
Cinema EOS Original
Reproduces colors equivalent to those of the EOS-1D C.
Neutral
Reproduces colors similar to actual subject colors.
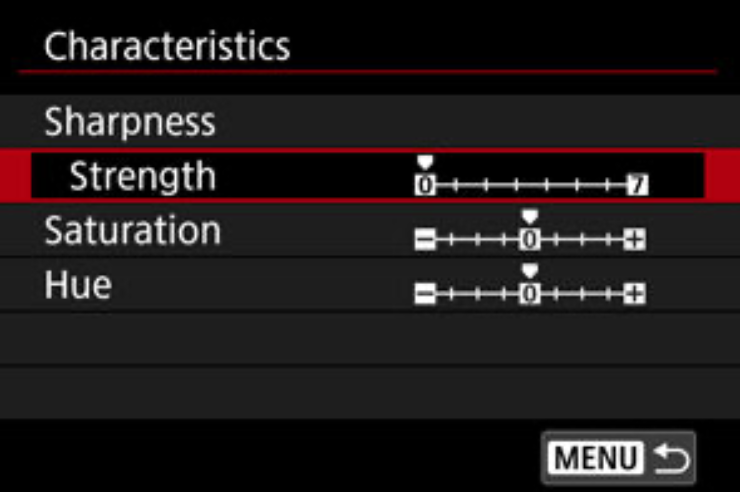
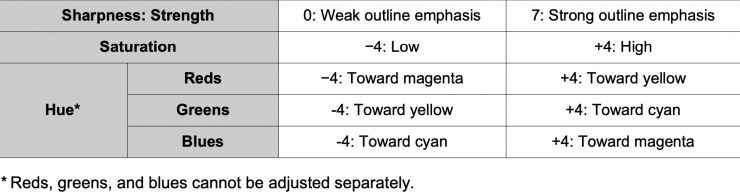
You can also make changes to a setting called Characteristics. This allows you to make changes to sharpness, saturation, and hue.
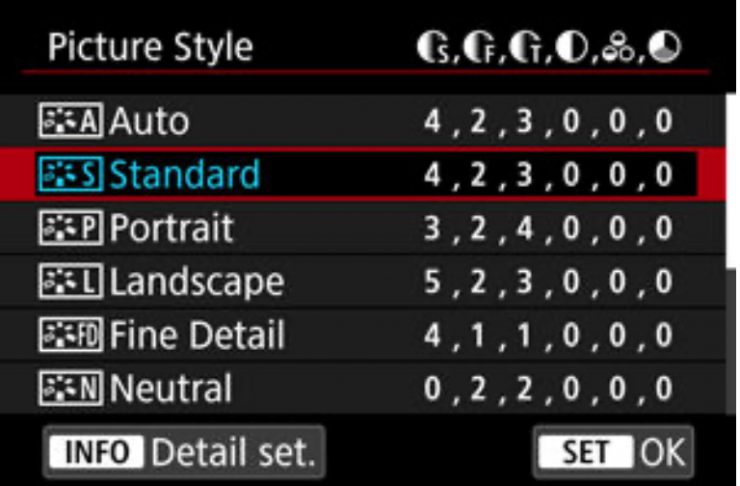
As far as Picture Profiles are concerned you can customize a wide array of profiles if you don’t want to shoot in Canon Log.
Auto
The color tone will be adjusted automatically to suit the scene. The colors will look vivid for blue skies, greenery, and sunsets, particularly in nature, outdoor, and sunset scenes.
Standard
The image looks vivid, sharp, and crisp. Suitable for most scenes.
Portrait
For smooth skin tones, with slightly less sharpness. Suited for close-up portraits. Skin tone can be adjusted by changing [Color tone] as described in Settings and Effects.
Landscape
For vivid blues and greens, and very sharp and crisp images. Effective for impressive landscapes.
Fine Detail
For detailed rendering of fine subject contours and subtle textures. The colors will be slightly vivid.
Neutral
For retouching later on a computer. Makes images subdued, with lower contrast and natural color tones.
Faithful
For retouching later on a computer. Faithfully reproduces the actual colors of subjects as measured in daylight with a color temperature of 5200K. Makes images subdued, with lower contrast.
Monochrome
Creates black-and-white images.
User Def. 1–3
You can add a new style based on presets such as [Portrait] or [Landscape] or a Picture Style file, then adjust it as needed ( ). With any User Defined Picture Style that has not yet been registered, pictures will be taken with the same characteristics settings as with the default settings of [Standard].
HDR
When recording in any of the HDR modes please note the following:
- HDR movie recording is not available with [ : IS (Image Stabilizer) mode] set to [Digital IS], or when set to [ : Time-lapse movie], [ : Highlight tone priority], [ : Canon Log settings], or [ : HDR PQ settings].
- Since multiple frames are merged to create an HDR movie, certain parts of the movie may look distorted. This is more noticeable in handheld recording affected by camera shake, so consider using a tripod. Note that even if a tripod is used for recording, afterimages or noise may become more noticeable, compared to normal playback, when the HDR movie is played back frame-by-frame or in slow motion.
- Image color and brightness may change significantly for a moment if you change settings for HDR movie recording. Also, the movie will not be updated for a moment, and the frame stops momentarily. Be aware of this when recording movies to external devices via HDMI.
Vertical Video Metadata
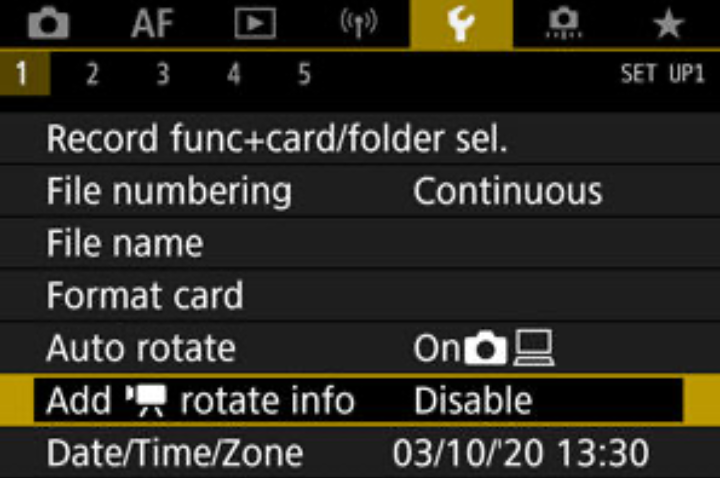
If you are shooting vertical video on the EOS R5 you can go into the menu and Enable rotate info. This will burn in metadata into the file so that the files will be played back correctly on the device you are viewing it on.
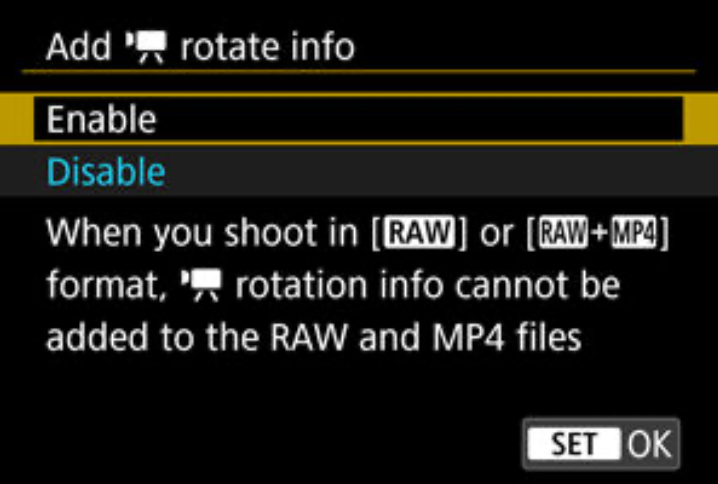
Enable
Play movies on smartphones or other devices in the orientation in which they were recorded.
Disable
Play movies horizontally on smartphones or other devices, regardless of the recording orientation.
Now, just a couple of notes:
[Add rotate info] is not available for RAW or MP4 files when the movie recording format is RAW or RAW + MP4.
Movies are played horizontally on the camera and via HDMI video output, regardless of whether you have rotate info enabled or disabled.
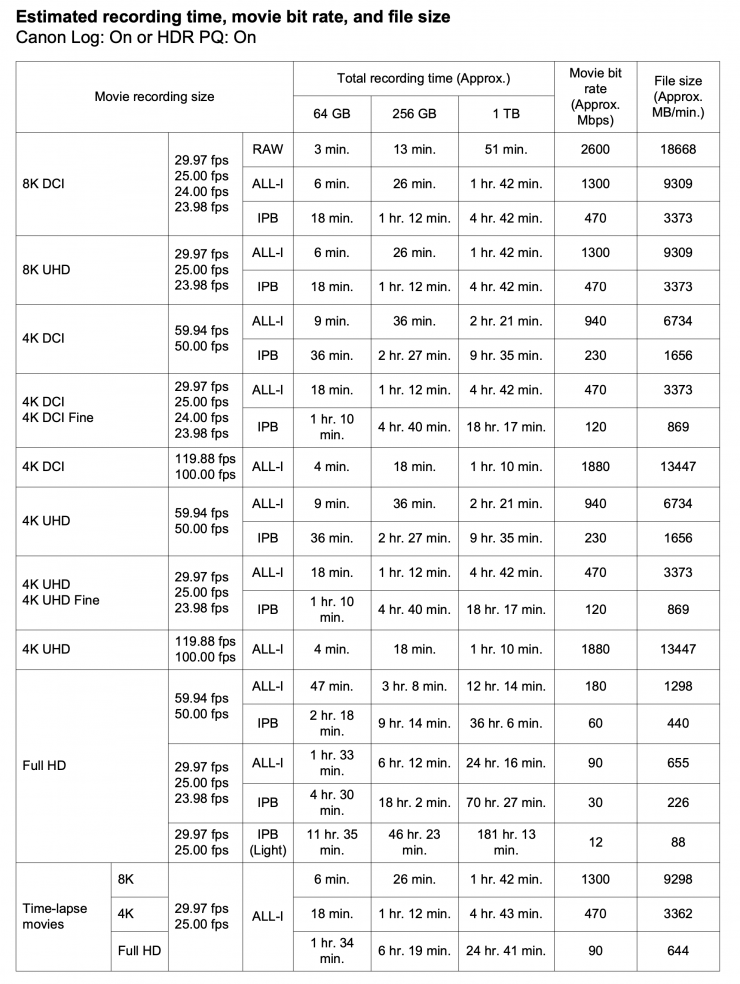
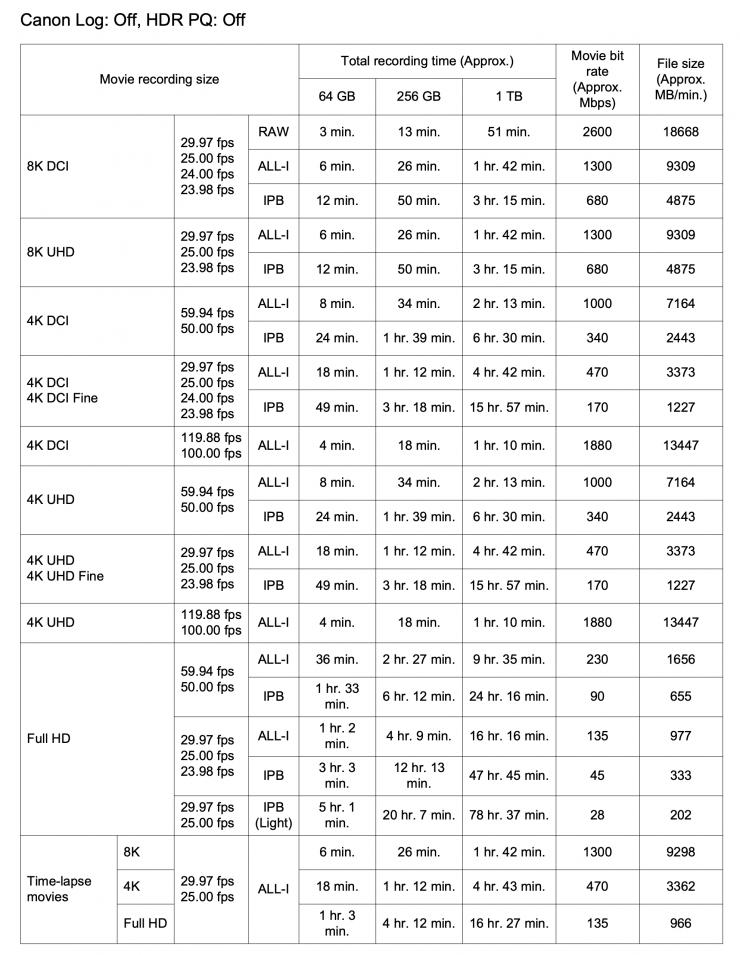
Estimated recording time, movie bit rate, and file size
Movie Self-Timer
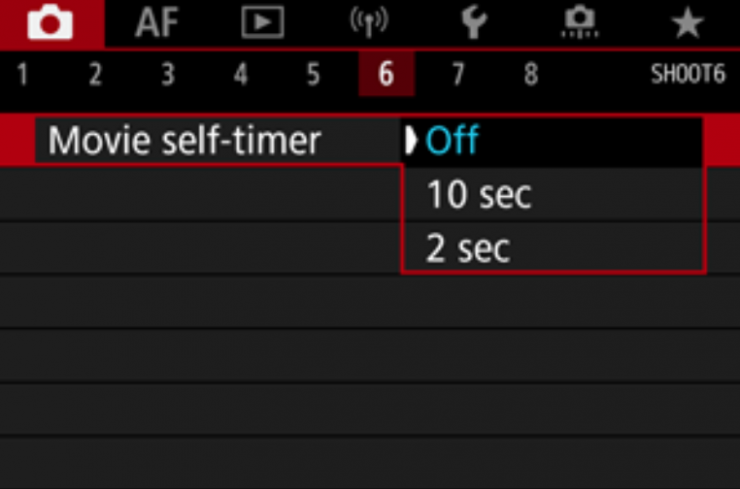
On the EOS R5 there is a Movie Self-Timer function where you can set a recording to start 2 seconds or 10 seconds after you hit the record button. This is useful for people who are shooting themselves.
IS
[IS mode] is not displayed when an IS-equipped lens is attached. If you attach an IS equipped lens then the [IS mode] is always activated and can’t be turned off.
Other things to note:
- Movie digital IS will not function when the lens’s optical Image Stabilizer switch is set to < >.
- With non-IS lenses, setting [ Digital IS] to [On] or [Enhanced] also sets [IS mode] to [On].
- Although movies can also be recorded with Movie digital IS when using EF-S lenses or movie cropping, the image area is further reduced.
- With a lens whose focal length is longer than 1000 mm, Movie digital IS will not function.
- Stabilization by Movie digital IS may be less effective at some movie recording sizes.
- The wider the angle of view (wide angle), the more effective the image stabilization will be. The narrower the angle of view (telephoto), the less effective the image stabilization will be.
- When using a tripod, setting Movie digital IS to [Off] is recommended.
- Depending on the subject and shooting conditions, the subject may blur noticeably (the subject momentarily looks out of focus) due to the effects of the Movie digital IS.
- Consider setting to [Off] when using a TS-E lens or fish-eye lens.
- Since Movie digital IS magnifies the image, the image looks more grainy. Noise, dots of light, etc. may also become noticeable.
Magnified View When Focussing
To check the focus when the AF method is other than [ +Tracking], you can magnify the display by approx. 6× or 15× by pressing the <Magnify > button (or tapping the Magnify button).
The magnification is centered on the AF point for [Spot AF], [1-point AF], [Expand AF area: ], and [Expand AF area: Around] and on the Zone AF frame for [Zone AF], [Large Zone AF: Vertical], and [Large Zone AF: Horizontal].
Autofocusing is performed with a magnified display if you press the shutter button halfway when set to [Spot AF], and [1-point AF]. When set to AF methods other than [Spot AF] and [1-point AF], autofocusing is performed after restoring normal display.
With Servo AF, if you press the shutter button halfway in the magnified view, the camera will return to the normal view for focusing.
In magnified view, peaking display is not shown.
Recording Voice Memos
On the EOS R5, you can record voice memos that get captured as WAV audio files, but unfortunately, this function isn’t supported when capturing video.
4K/8K Movie Frame Grab
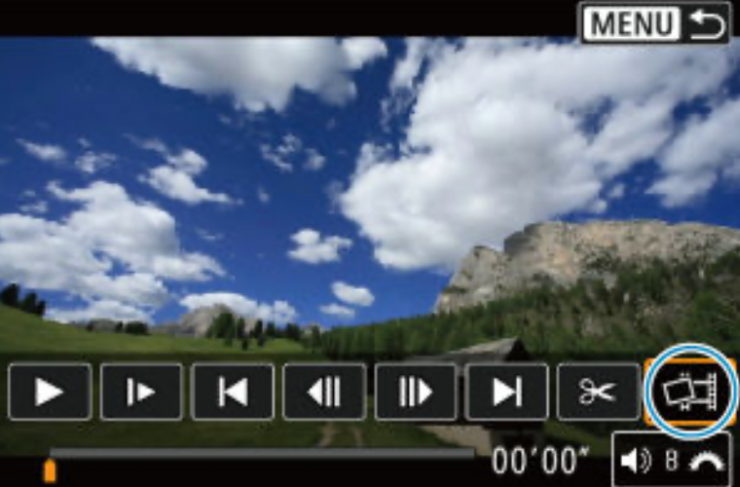
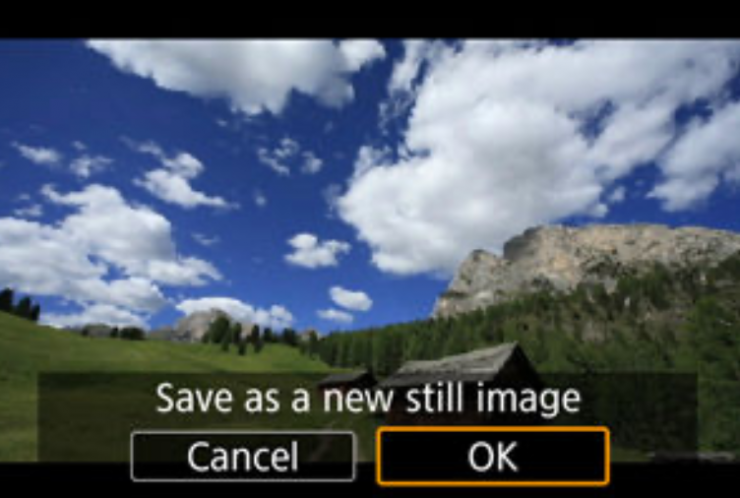
You can save individual 8K or 4K movie frames as JPEG or HEIF still images. You can only do this during movie playback.

Now, there is a catch. You can’t do frame grabs in the following cases:
• RAW movies
• Movies recorded with [ : Canon Log settings] set to [On]
• Movies recorded with other cameras
Frame grabbing is also not possible while the camera is connected to a computer.
Timecode
According to Canon, time codes may not be displayed correctly if movies are played back on devices other than the camera.
You can set the timecode on the R5 to:
Rec run
The time code advances only during movie recording. Time codes in each movie file recorded continue from the last time code in the previous file.
Free run
The time code keeps advancing, even when you are not recording.
You can also set the time to:
Manual input setting
Enables you to set any starting hour, minute, second, and frame.
Reset
Resets the time set with [Manual input setting] or [Set to camera time] to “00:00:00.” or “00:00:00:”
Set to camera time
Matches the hour, minute, and second set as the time on the camera. Sets the frame value to “00.”
Sensor Cleaning
Whenever the power switch is set to <OFF>, the sensor is cleaned automatically (which may make a faint sound).
Battery & Charging
Using a genuine Canon Battery Pack LP-E6NH/LP-E6N is recommended. If you use batteries that are not genuine Canon products, the camera’s full performance may not be attained or malfunction may result.

Doing any of the following will exhaust the battery faster:
- Pressing the shutter button halfway for a prolonged period.
- Activating the AF frequently without taking a picture.
- Using Image Stabilizer.
- Using the Wi-Fi function or Bluetooth function.
- The number of available shots may decrease depending on the actual shooting conditions.
- Lens operations are powered by the camera’s battery. Certain lenses may exhaust the battery faster than others.
- In low ambient temperatures, shooting may not be possible even with a sufficient battery level.
According to Canon, charging a depleted battery takes approx. 2 hr. and 30 min. at room temperature (23°C/73°F). The time required to charge the battery will vary greatly depending on the ambient temperature and the battery’s remaining capacity.
For safety, charging in low temperatures (5–10°C/41–50°F) takes longer (up to approx. 4 hr.).
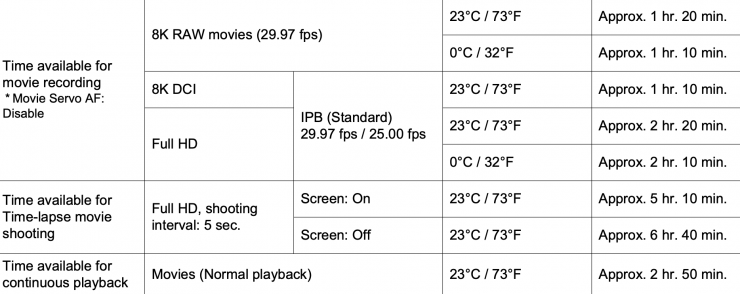
Below you can see how long you can record for and at what temperature when using a fully charged LP-E6NH battery.
Heat Warnings
It was curious to see just how much information about overheating is mentioned in the user manual. It didn’t come as too much of a surprise that overheating is mentioned more than 25 times throughout various sections.
The thing that is not mentioned anywhere in the manual is the recovery times for when the camera overheats. I’m very surprised this information was not placed in the user manual. Knowing the recovery time after overheating has occurred before you can start recording again is something that should never have been left out.
In Canon’s defense, they did issue a statement with estimated recovery times for overheating, but not every potential buyer of this camera may see that.
Given the heat issues surrounding the EOS R5 here are all of the heat associated warnings that can be found in the EOS R5 camera manual.
- Do not leave the camera in excessive heat, such as in a car in direct sunlight. High temperatures can cause the camera to malfunction.
- The camera may become hot after repeated continuous shooting or still photo/movie shooting over an extended period. This is not a malfunction.
- The screen display may seem slightly slow in low temperatures or may look black in high temperatures. It will return to normal at room temperature.
- Movie recording may stop before the initially displayed recording time elapses if the red [Temperature] icon appears due to high internal camera temperature during recording.
- 8K/4K or High Frame Rate movie recording greatly increases the processing load, which may increase the internal camera temperature faster or higher than for regular movies. If any of the red temperature icons appear during movie recording, the card may be hot, so stop recording the movie and let the camera cool down before removing the card. (Do not remove the card immediately.)
- Do not remove cards immediately after a red temperature icon is displayed as you are shooting. Cards may be hot, due to high internal camera temperature. Set the power switch to <OFF>and stop shooting for a while before removing cards. Removing hot cards immediately after shooting may cause you to drop and damage them. Be careful when removing cards.
- 8K movie recording (RAW, DCI, UHD) has restrictions on possible recording time due to the camera’s internal temperature rise. Max possible recording time is approx. 20 min. (at room temperature).
- 4K 60 p movie copped recording has restrictions on possible recording time due to the camera’s internal temperature rise. Max possible recording time is approx. 25 min. (at room temperature).
- The camera’s internal temperature may rise and less recording time may be available after extended movie playback or Live View display.
- Image quality may be lower if you start time-lapse movie recording while the white temperature warning icon is displayed. It is recommended that you start a time-lapse movie recording after the white icon disappears (camera’s internal temperature decreases).
- The camera may become hot in movie recording while connected via Wi-Fi. Use a tripod or take other measures to avoid handheld recording.
- If the camera’s internal temperature increases due to prolonged movie recording or under a high ambient temperature, a red icon will appear.
- The red icon indicates that movie recording will soon be terminated automatically. If this happens, you will not be able to record again until the camera’s internal temperature decreases, so turn off the power and let the camera cool down a while. Note that the time until movie recording stops automatically when the red [ ] icon is displayed varies depending on shooting conditions.
- Recording a movie at a high temperature for a prolonged period will cause the red icon to appear earlier.
- When you are not recording, always turn off the camera.
- The temperature icon may be displayed if repeated movie recording or extended use of Live View display increases the camera’s internal temperature.
- Turn off the camera or take other measures when the temperature icon is displayed, and wait until the camera cools down.
- The camera will turn off automatically if you continue recording while the temperature is displayed.
- The camera may also turn off automatically if you continue using Live View display while the temperature is displayed.
- If there is a very bright light source in the image, the bright area may appear black on the screen. Movies are recorded almost exactly as they appear on the screen. Image noise or irregular colors may occur when shooting at high ISO speeds, high temperatures, slow shutter speeds, or under low light.
- Movie recording is not possible as long as Temperatureicon is displayed. Display of the Temperature icon during movie recording also indicates that the camera will turn off automatically in approx. 3 min
- It may not be possible to record movies during still photo shooting if operations such as extended Live View display increase the camera’s internal temperature. Turn off the camera or take other measures, and wait until the camera cools down.
- Lowering the movie recording quality may enable movie recording.
- Extended movie playback or movie playback under high ambient temperature may cause the camera’s internal temperature to rise, and movie playback may stop automatically. If this happens, playback is disabled until the camera’s internal temperature decreases, so turn off the power and let the camera cool down a while.
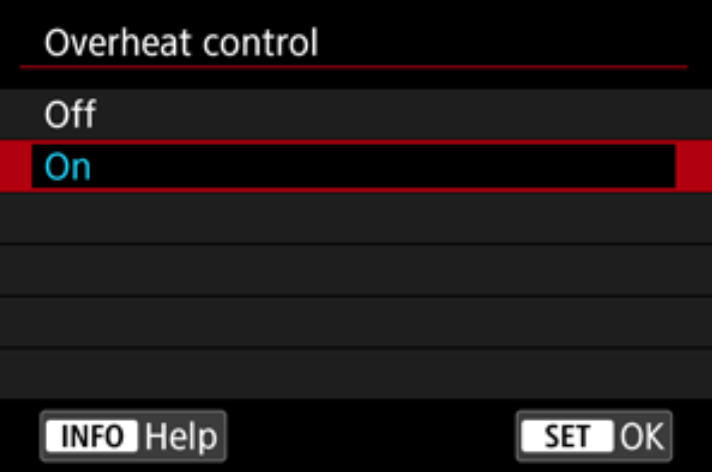
Overheat control
Set to [On] to conserve battery power and help prevent the camera from overheating while waiting to shoot. As a result, it may enable you to record movies over a longer period.
Image quality on the standby screen may differ from image quality on the screen during movie recording. Briefly when you start recording movies, image display may remain on the current frame instead of being updated.
Attaching/Detaching RF Lenses
This is important. According to Canon, when attaching or detaching RF lenses you should always set the camera’s power switch to <OFF>.
Although Canon doesn’t specifically state that you do this for EF lenses when using any of the EF-EOS R adapters, they do still state, ‘For lens precautions, see Attaching/Detaching RF Lenses.’
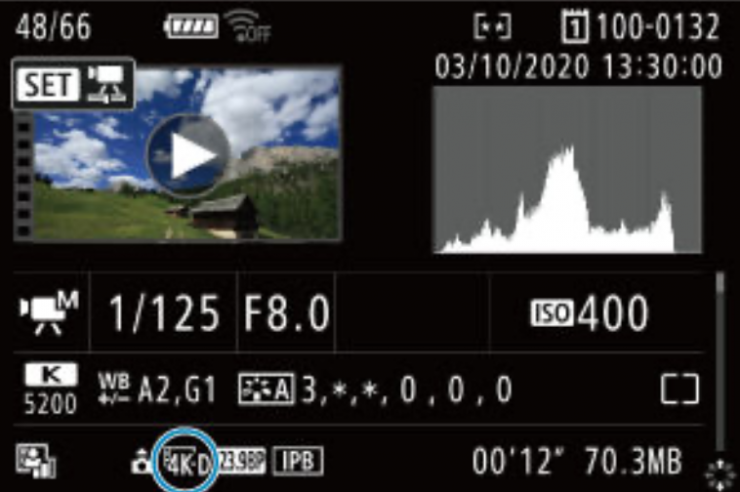
Movie Recording Display Information
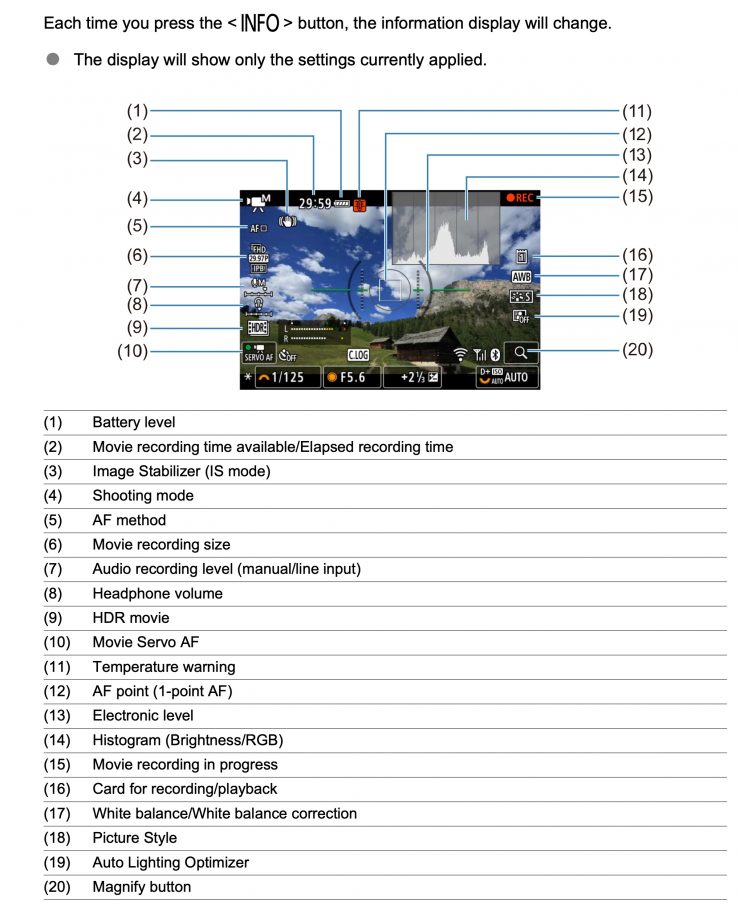
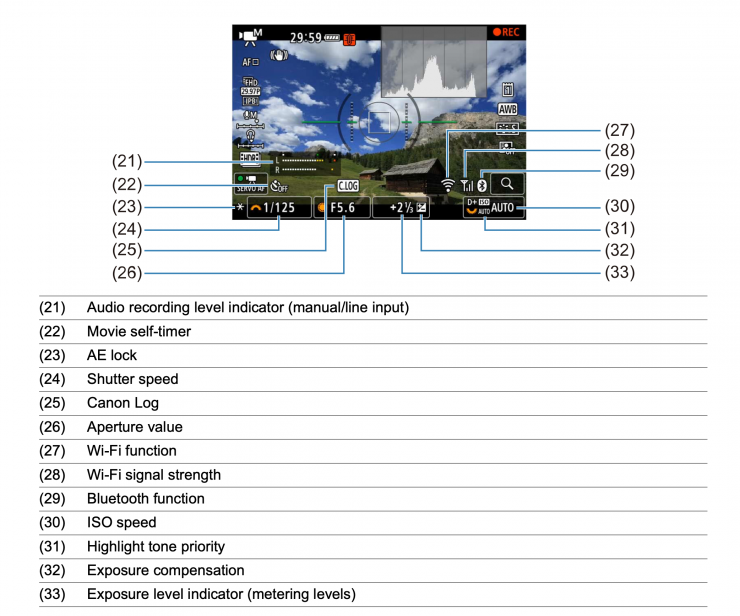
Just to note, the electronic level, grid lines, and histogram cannot be displayed during movie recording (and if they are currently displayed, recording a movie will clear the display).
Still & Video settings remain the same
On the EOS R5 the camera doesn’t remember settings for individual video and stills modes.
When switching from still photo shooting to movie recording, check the camera settings again before recording movies.
Other interesting bits of information you may want to know
- The viewfinder and screen cannot be activated at the same time.
- Even during menu display or image playback, you can return to shooting standby by pressing the shutter button halfway.
- To switch between shooting still photos and recording movies, press the <MODE> button and then the <INFO> button.
- You can record movies by pressing the movie shooting button during still photo shooting.
- It’s ironic that Canon mentions this in the manual, but they say: Avoid adjusting the aperture value while recording movies, which will record changes in exposure caused by aperture adjustment. They also say: During movie recording, avoid changing the shutter speed, aperture value, or ISO speed, which may record changes in the exposure or create more noise at high ISO speeds.
Is there anything that you read that surprised you? Have you bought an R5 or are you thinking of purchasing one? Let us know in the comments section below.
Like what we do and want to support Newsshooter? Consider becoming a Patreon supporter and help us to continue being the best source of news and reviews for professional tools for the independent filmmaker.