RGBW is all the rage at the moment and countless lighting companies have adopted the technology in their line up. The latest entrant in the RGBW arms race is the Luxli Timpani 1×1 RGBAW. Luxli now joins Lupo as the most recent companies to offer a compact 1×1 RGBW panel light. At under $1,000 USD it certainly bucks the trend when it comes to price, especially considering the light is made in Norway.
Luxli has earned a strong reputation with some of their smaller lights such as the Cello and Viola. The Timpani is their latest creation and just like the Cello and Viola, it is named after a musical instrument. A Timpani is a type of drum, that consists of a membrane called a head, stretched over a large bowl traditionally made of copper.
We first saw a yet to be named prototype of this light earlier this year at NAB. At the time I was told it would be coming out around June/July and that they were hoping to get the price under $1,000 USD. It seems they managed to tick both of those boxes.
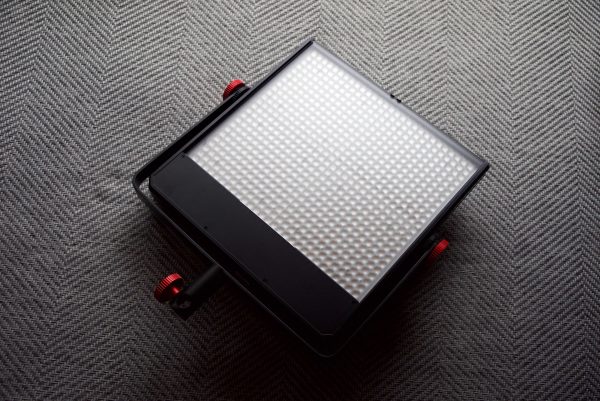
The Luxli Timpani 1×1 RGBAW uses a 672 RGBAW LED array, and offers countless creative lighting options for professionals that require standard color temperature adjustability and color tuning across the RGB spectrum. So what exactly is RGBAW? The “A” and “W” in RGBAW stand for amber and white, 2800K and 5600K color temperature LED’s, respectively. The Timpani mixes the output of these two LEDs to ensure what the company claims create an exact color temperature in CCT mode and accurate color reproduction in Gel mode.
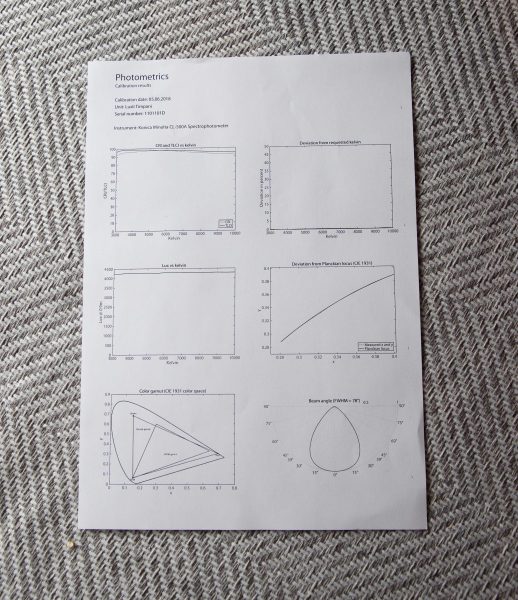
In a nice touch, every Timpani fixture ships with its own photometrics calibration results. These tests are done by the manufacturer but don’t worry, I have done my own independent test which you can see further down in the article.
Operating Modes
RGB Color Mode
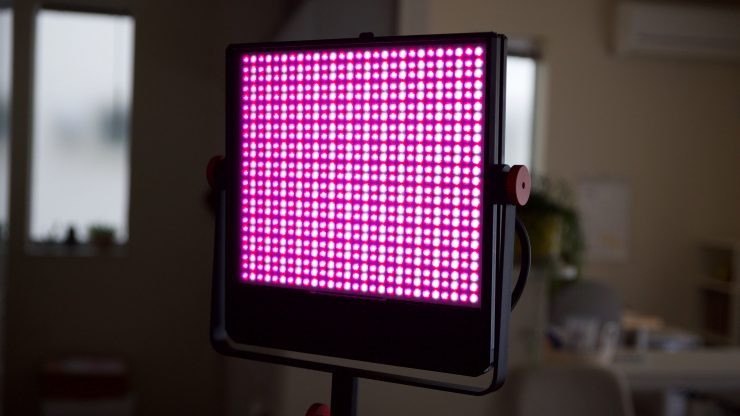
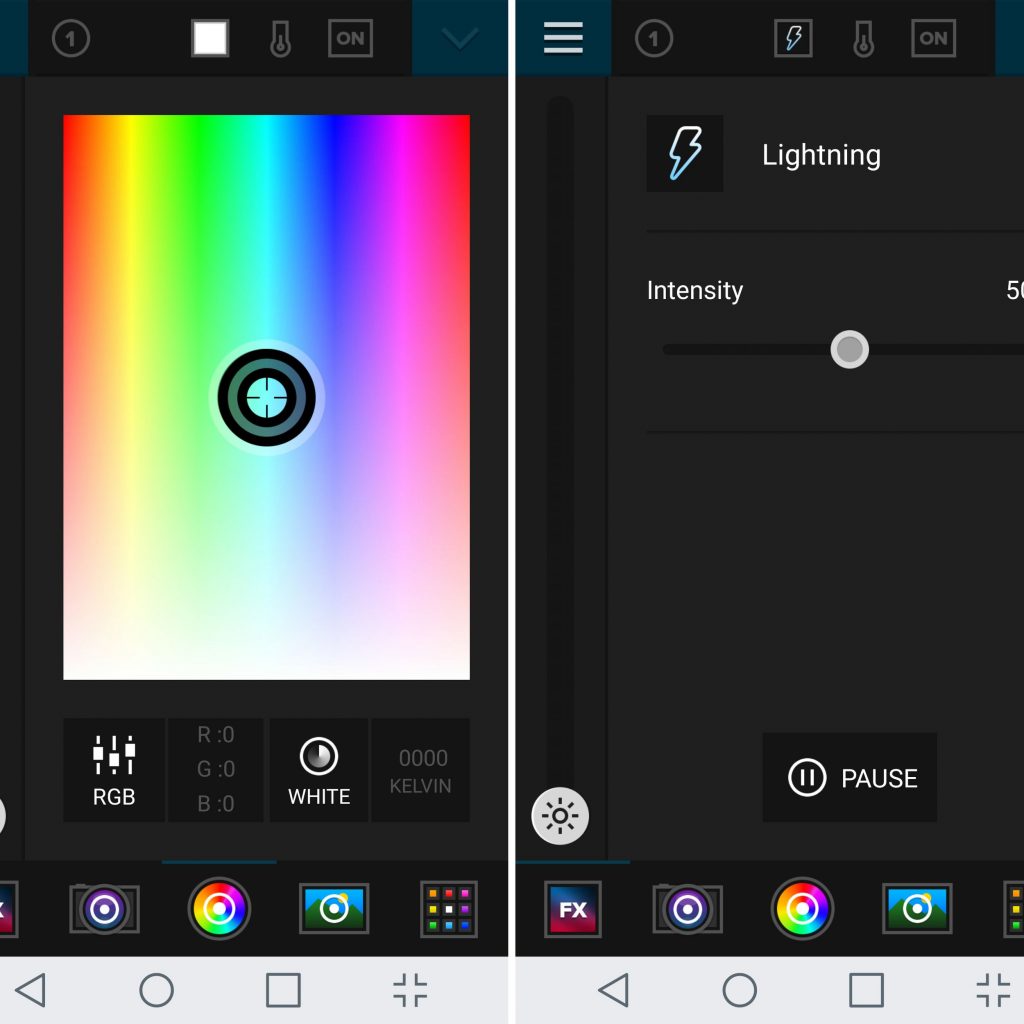
In the RGB Color Mode, you can scroll through the RGB color wheel in 1° increments. This allows you to dial in nearly any color in the visible spectrum.
CCT Mode
The traditional correlated color temperature (CCT) mode allows you to adjust your color temperature from 2800 to 10,000K in 50K increments. This lets you emulate any lighting condition, from the cool hues of bright sunlight to the warmth of a tungsten bulb.
Even if you don’t need the RGB color modes, the white light output by the Timpani can be adjusted from 2800K to 10,000K in CCT mode and it has a claimed CRI of 95 and TLCI of 97 at most color temperature settings. The Dimming and color temperature can be adjusted in fine increments, 50K for color temperature, and 1% for dimming.
It’s important to note that when the white-balance temperature is changed in this mode, the temperature in CCT mode is also changed to this temperature setting. If the temperature setting is changed in CCT mode, the Timpani will set the same white-balance temperature here.
Pick your color and Conduct an orchestra
In the RGB Color Mode, any color on the color wheel can be selected with 1° increments. Saturation can also be controlled to mix the desired color with white light. By using the free Luxli Conductor app on iOS or Android, colors can be sampled with an eye-dropper and sent to the Timpani via Bluetooth at a distance of up to 30′ (9.14 m) away.
The eyedropper feature can be used to match any color within an image or a video. This is very similar to what Aputure was showing us at NAB with their RGBW prototype light that was also using a color picker.
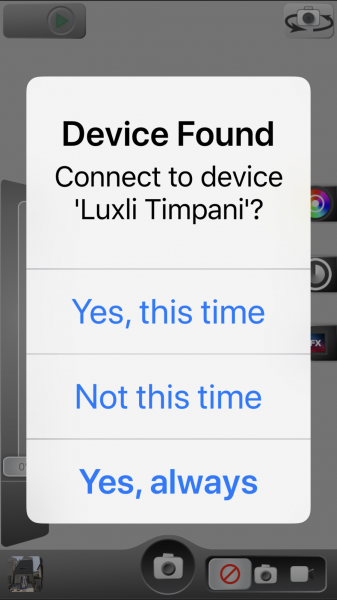
The app is nice because it uses Bluetooth and not Wi-fi, so you don’t need to join any networks. All you do is launch the app once the light is turned on and it automatically finds your light and gives you connection options.
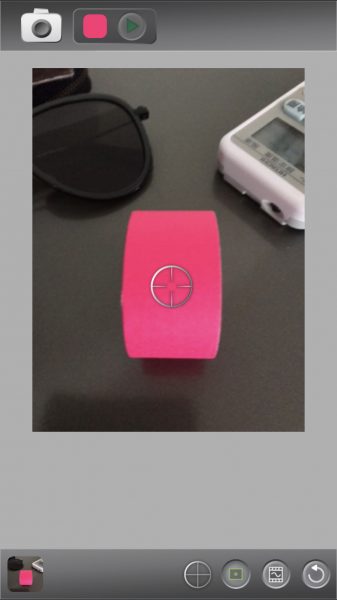
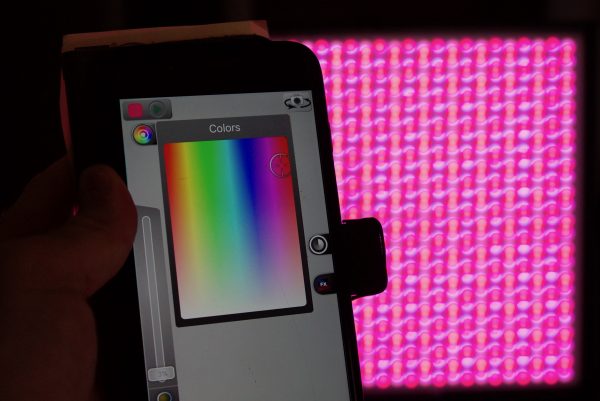
The colour sampler in the app works really well. I tried it out by taking a photo of a bit of pink tape and then using the eye-dropper to select that color within the picture. The Timpani was then able to replicate that color fairly accurately.
The ability to sample and replicate colors is quite groundbreaking and the fact it is a light that costs just under a $1,000 USD is fairly remarkable. No other lighting manufacturer that I know of has this capability in a shipping production version.
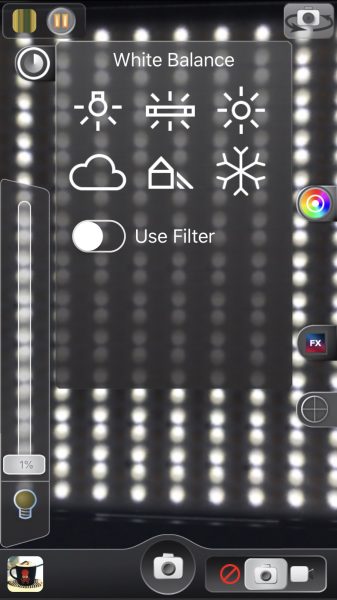
The Conductor app also gives you a range of preset white balance reproductions that you can quickly access.
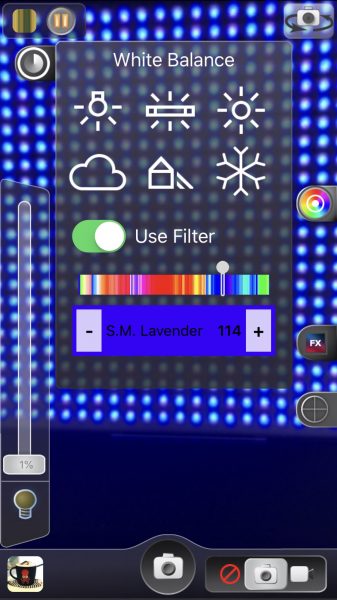
On this same screen, you can also choose to activate any one of the 150 filters that are available.
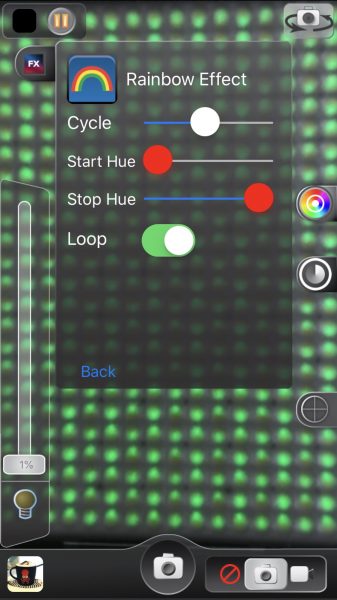
As well as controlling basic functionality such as intensity, you can access the special effects modes. The only problem I did encounter is there is no way of manually changing the Kelvin color temperature or adjusting +/- green from the app. This is somewhat puzzling.
The Conductor app uses Bluetooth 4.2 and lets you create just about any hue of light you can imagine. There is also the ability to create customized lighting animation effects. If that wasn’t enough, you can combine multiple Luxli Orchestra units and synchronize them to operate all at once. The Timpani can also be controlled via DMX.
For me personally, the ability to be able to control all of these aspects of the light from a smartphone or a tablet is a big deal. It lets me make adjustments to the light while I’m still standing behind the camera so I don’t need to go over to the light, adjust it, and then walk back to the camera to see how it looks.
It also makes controlling RGB modes so much easier as it displays your color palette in a simple, clear interface. Some other RGB lights only show values for red, green, and blue and you have no idea what sort of color you are really creating without making an adjustment and then seeing how it looks. Luxli have taken the sometimes complicated and made it simple.
Special effects

The Timpani also features a range of special effects, from strobing that imitates lightning strikes and explosions to orchestrated timed color shifts and warning lights. Each effect is adjustable in timing and color temperature. These special effects are nice to have, but realistically they are not something most shooters will use that often. If you are interested, you can read what they all do below:
Description of the Special Effects
CCT Chase
A continuous loop that changes between two preset color temperatures. Good for simulating a sunrise, sunset, or a change from cloudy to sunny weather in real time. Since the sequence loops, you can shoot multiple takes without reprogramming the light.
CCT Start: Selects the color temperature at the beginning of the sequence (2400 to 10,000 K). CCT Stop: Selects the final color temperature of the sequence (2400 to 10,000 K).
+/- Green: Sets the green/magenta (tint) saturation level in 1% increments from +100% (green) to -100% (magenta).
Time Unit: Select between seconds and minutes for the time loop. Time/Loop: Select how many seconds or minutes the loop will last (1 to 160).
Color Chase
A continuous loop that moves through the color wheel between two selected colors. Since the sequence loops, you can shoot multiple takes without reprogramming the light.
Hue Start: Selects the color at the beginning of the sequence (0° to 360°).
Hue Stop: Selects the final color of the sequence (0° to 360°).
Saturation: Determines the color intensity from 100% (full color) to 0% (white light). Time Unit: Select between seconds and minutes for the time loop.
Time/Loop: Select the duration in seconds or minutes for each loop (1 to 160).
Explosion
Simulates the light from explosions. The Timpani generates random-length pulses and strobes within a range of the red to amber section of the color wheel.
Explosions/Minute: Sets how many separate explosions occur each minute (1 to 360). Duration (%): Set the percentage of time the light is illuminated for each pulse or strobe
(5% to 95%).
Fire
Simulates the light of a candle, campfire, or bonfire in various wind conditions. Fire Type: Select candle, campfire, or bonfire.
Wind Type: Select between no wind, breeze, windy, or storm.
Fireworks
Simulates the light from fireworks. Colors and timing of each flash are random. Explosions/Minute: Sets how many flashes will occur per minute (1 to 50).
Duration (%): Determines the percentage of time the light is illuminated in each cycle. Select from a range of 5% (shortest duration) to 95% (longest duration).
Lightning
Simulates lightning by creating random short and long bursts.
CCT: Selects the color temperature of the lightning flashes (3000 to 10,000 K) in 50 K increments. Interval(s): Sets the interval of seconds between lightning flashes (1 to 60).
Paparazzi
Simulates the random firing of multiple camera flashes.
Intensity: Higher intensity increases the number of random flashes per second (0 to 100).
Bulb Type: Determines the length of each flash. Slow is the longest duration. Modern is the shortest duration. Choose from Slow, Medium, Fast, and Modern.
CCT: Sets the color temperature of the flashes from 2800 to 10,000 K+/- Green: Sets the green/magenta (tint) saturation level in 1% increments from +100% (green)
to -100% (magenta).
Pulse
Offers a steady pulse at a programmable rate. Similar to the Strobe special effect (below), but the light fades on and off.
Hue: Selects the light color (0 to 360).
Saturation: Determines the color intensity from 100% (full color) to 0% (white light). Pulses/Minute: Sets how many times the light will pulse each minute (1 to 200).
Siren
Simulates the flashing lights of an emergency vehicle, like a police car or ambulance.
Colors: Select the color combination of flashing lights. Choose red, blue, and white; red and blue; red and white; blue and white; blue; red; or SAE Amber.
Flash/Cycle: Set the number of times each individual color will flash within the cycle. Choose from 1 to 4 times per cycle.
Cycles/Minute: Determines how many repetitions of the cycle will occur each minute. Choose from 10 to 360.
Duration (%): Determines the percentage of time the light is illuminated in each cycle. Select from a range of 10% (shortest duration) to 90% (longest duration).
Strobe
Offers a steady flashing light at a programmable rate.
Hue: Selects the light color (0 to 360).
Saturation: Determines the color intensity from 100% (full color) to 0% (white light).
Frequency: Changes the number of flashes per second (1 to 25).
Duration (%): Determines the percentage of time the light is illuminated in each cycle. Select from range of 10% (shortest duration) to 90% (longest duration).
Control green and magenta color shifts
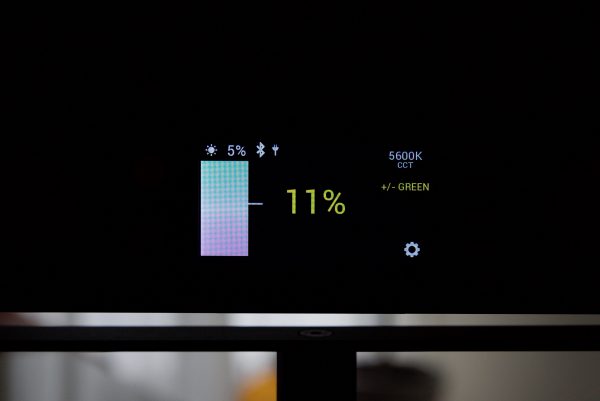
The Timpani lets you adjust +/-green values from 0-100%. This is an incredibly useful feature that lets you get rid of color casts and makes it easier to match other lights that you may be using. If you are using lights from different manufacturers they are all going to behave differently. By being able to offset green or magenta you can get the Timpani to closely match another source. For instance, if you happen to be shooting in an office building with overhead fluorescent lights, they may well have a color cast, if you can’t turn them off, you may want to replicate that same look with the Timpani. By playing with the +/-green values you can.
Unlike some other lights that have +/- green adjustment, on the Timpani you aren’t limited to a certain amount of adjustment. The Timpani lets you go fully magenta or fully green if you need to.
The only negative aspect about the way Luxli has set up the +/-green values is that they have chosen to use values in a percentage form and not in the normal CC values you find in a lot of cameras and some other lights.
Gel Filter Mode
If you select the Gel Filter Mode you can select from up to 150 filters to customize the white light output. Any color temperature available in the CCT mode can be modified by the filter samplings. Included in the filters are useful items such as Chromakey Green and Blue. This filter mode was originally introduced by Luxli in their Cello, but it didn’t have anywhere near the number of filter options that are found in the Timpani.
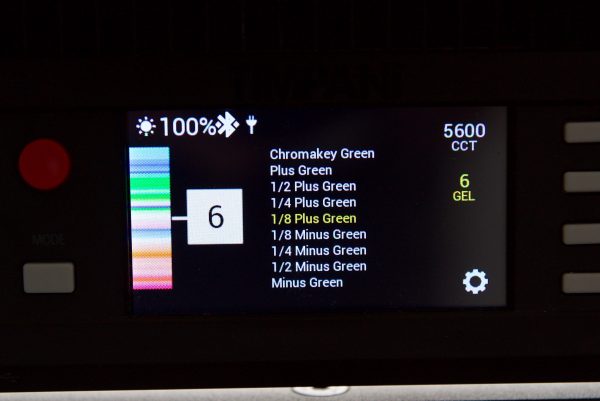
It is very impressive to see so many filters available in the Timpani. There is literally a filter for just about any need you may encounter.
Saving Presets
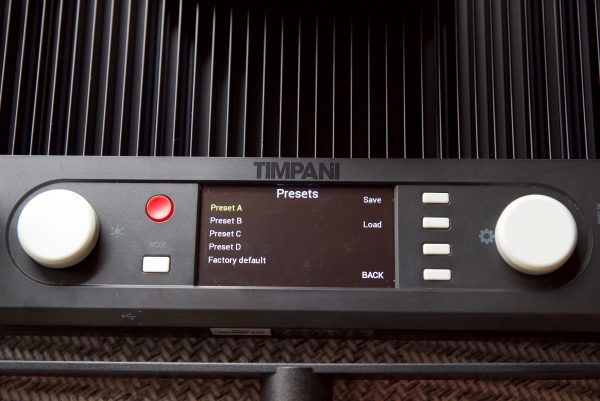
You can save your CCT, RGB, Filter, and Special Effects mode settings as presets, and these settings can be recalled from the presets menu. The Timpani allows you to save four presets per mode.
DMX
The Timpani offers 8-bit and 16-bit modes. The 8-bit modes should be used with basic DMX controllers such as dimming consoles. 16-bit modes are best for use with virtual DMX control from a computer or advanced 16-bit DMX controllers.
DMX Modes for the Timpani include:
CCT mode: ( 8 bit and 16 bit) Corresponds to the CCT mode described above. The DMX controller can adjust the color temperature from 2800 to 10,000 K and set the green/magenta saturation level.
HSL mode: ( 8 bit and 16 bit) Corresponds to the RGB mode described above. This mode controls the hue and saturation levels. The DMX controller can scroll through the entire color wheel in 1% increments.
GEL mode: ( 8 bit and 16 bit) Corresponds to the Filter mode described above. GEL mode allows the DMX controller to apply any of the 150 preset colored gels to any CCT setting.
Power draw
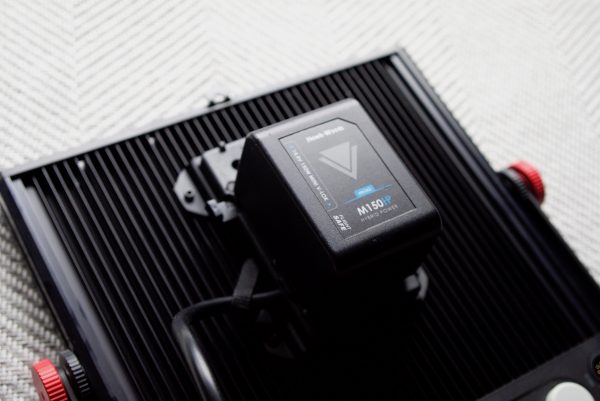
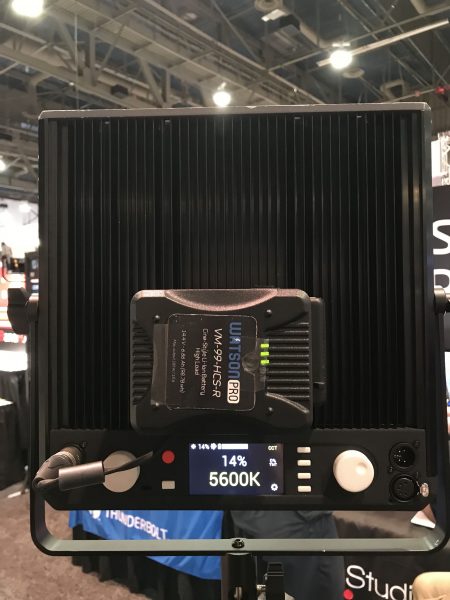
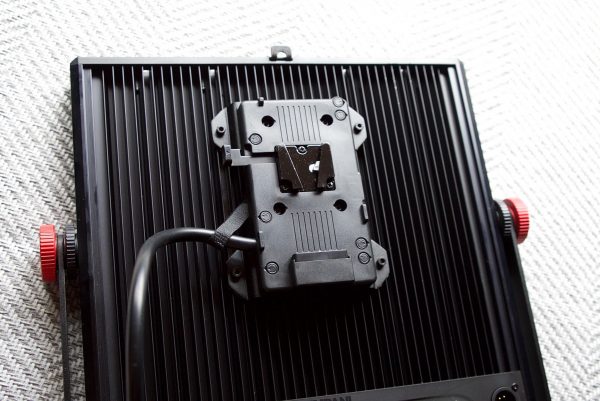
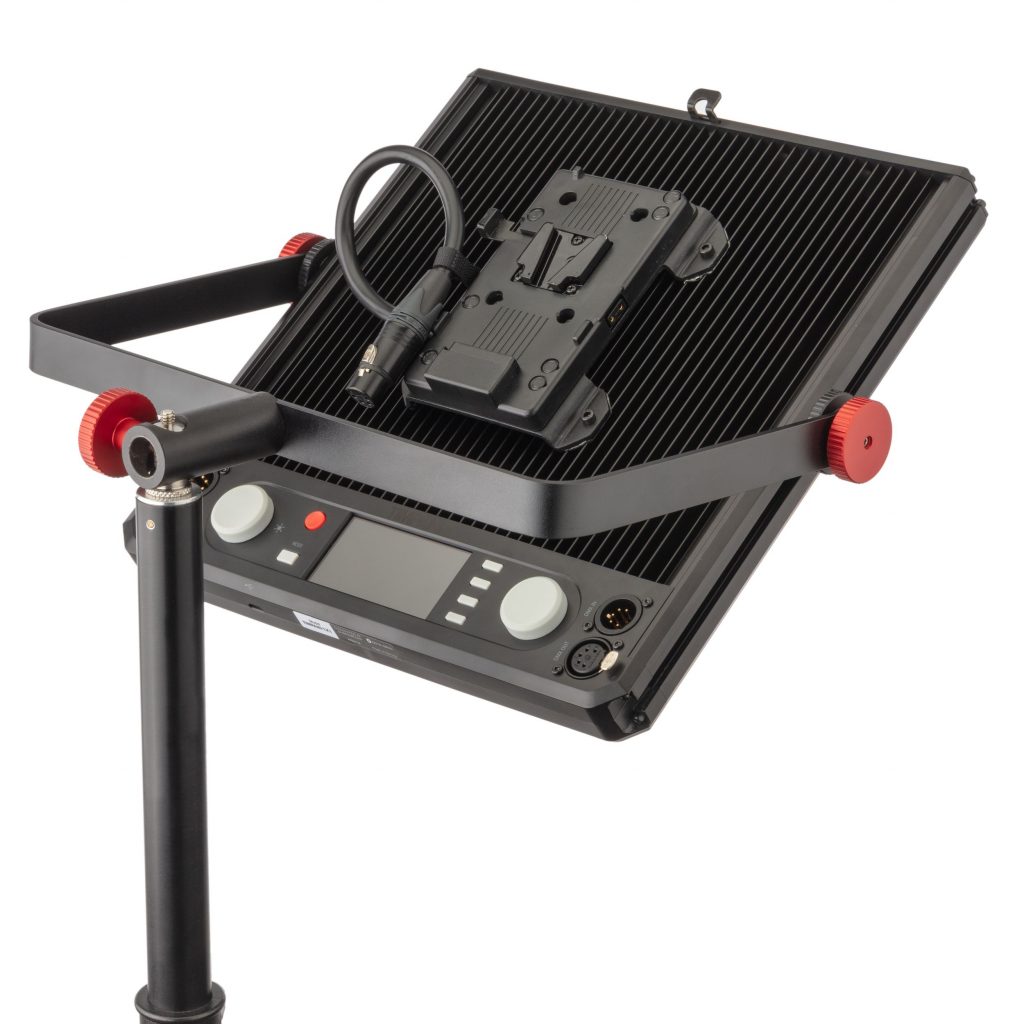
Traditionally RGBW lights have required a lot of power, but the Timpani only draws 120W. In comparison, the Lupo Superpanel Full Color 30 draws 200W. With a 120W power draw the Timpani can easily be powered off camera batteries that are below the 160Wh limit that airlines will allow you to travel with. This is a big deal if you are a travelling cameraman and are looking for an RGBW panel light. The fixture has a 4-pin XLR input, and a power supply is included. A V-mount battery plate comes attached to the rear of the fixture (this is included and not an optional extra).
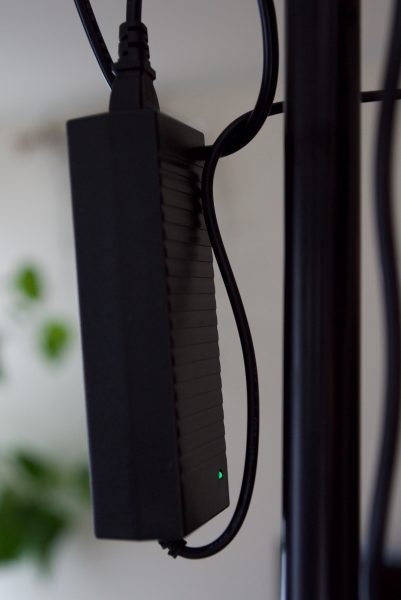
The power supply can’t be attached anywhere to the light and because the power cable is so short, if you have to place the light up above about 4 feet it is going to dangle in the air. I really do wish manufacturers would include a longer connection between the light and the power supply. It should at least be long enough to sit on the ground comfortably when the light is at a height of 6′.
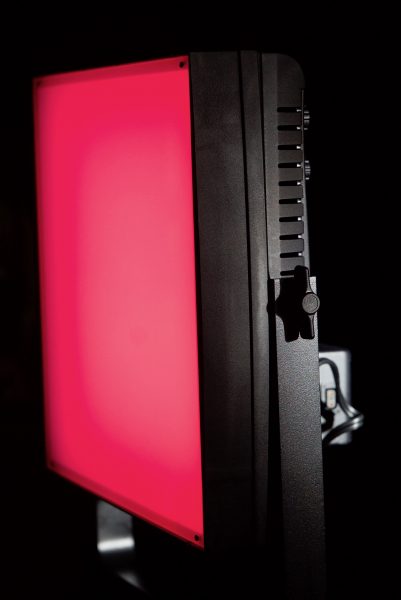
Size and weight
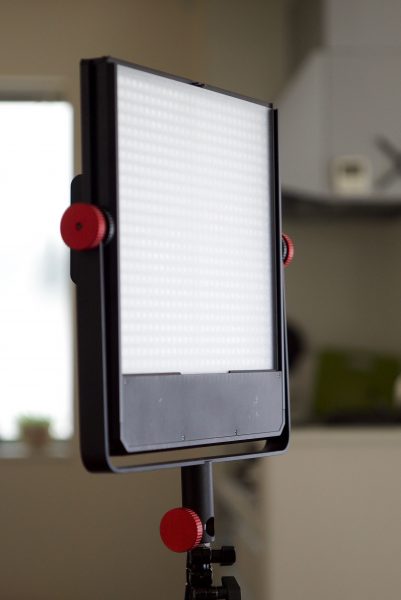
The Timpani looks lighter than it actually is. I think you get fooled into thinking it will be feather light because of its extremely thin profile. At 3.15 kg (6.96lb) the Timpani is fairly lightweight for an RGBW fixture, it’s also incredibly thin (35mm / 1.4″). Most RGBW fixtures are large and heavy because they require a lot more cooling than a traditional LED light.
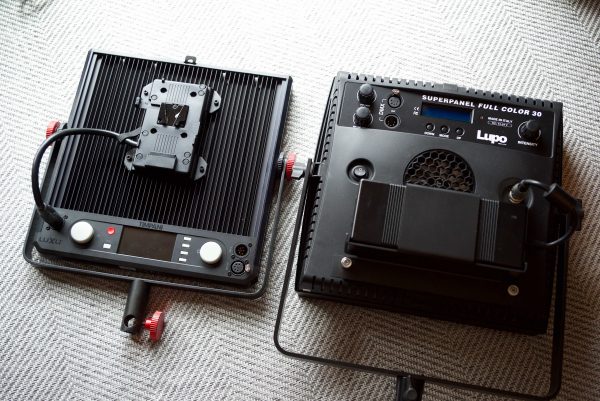
In comparison, the Lupo Superpanal Full Color weighs in at 3.7kg (8.15lb). With the power supply attached, it tops the scales at 4.3kg (9.47lb). The Lupo is also a lot thicker at 100mm (3.93″).
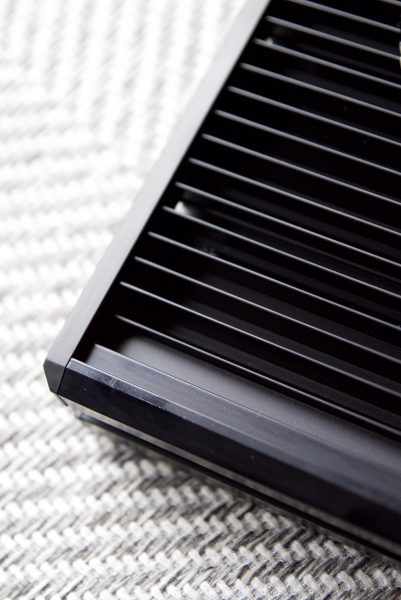
Build Quality
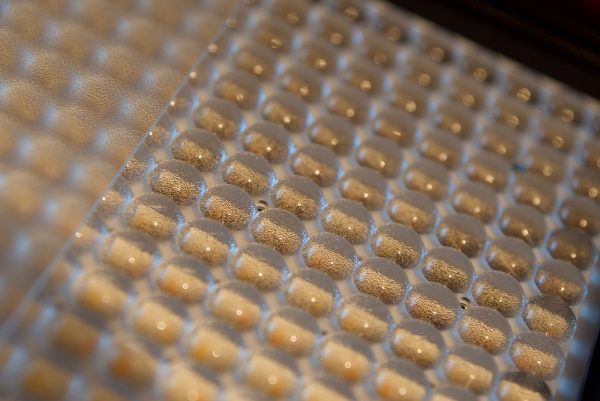
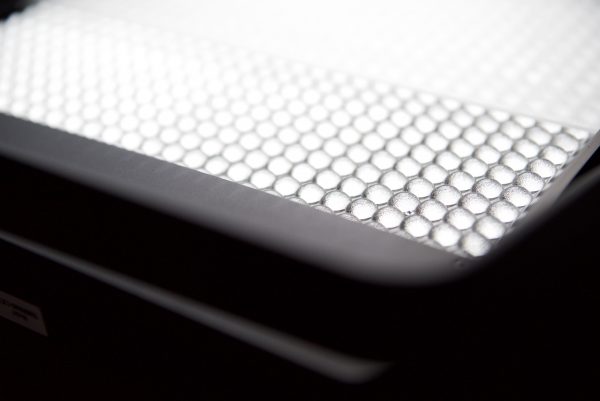
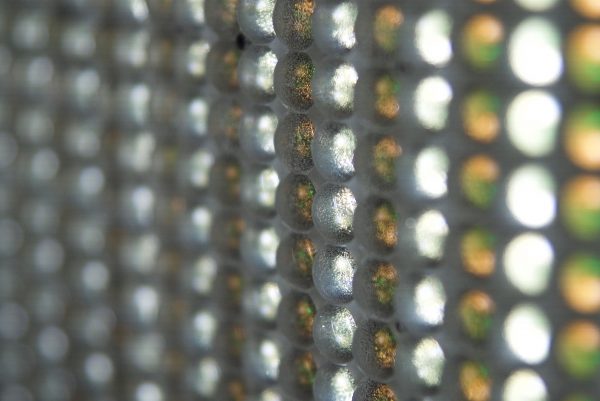
The Timpani is certainly solidly made. The back of the fixture is basically one big giant heatsink. The front of the light is a little less robust than the back as more plastic is used. Over the top of the LEDs is a removable perspex style cover that slips into one of the two grooves. The closest groove is for the diffusion cover and the second is for optional barn doors.
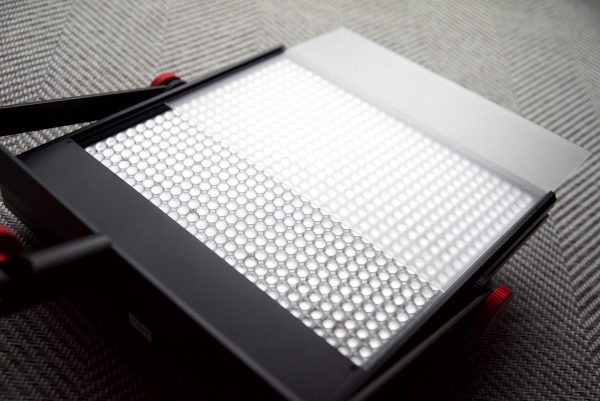
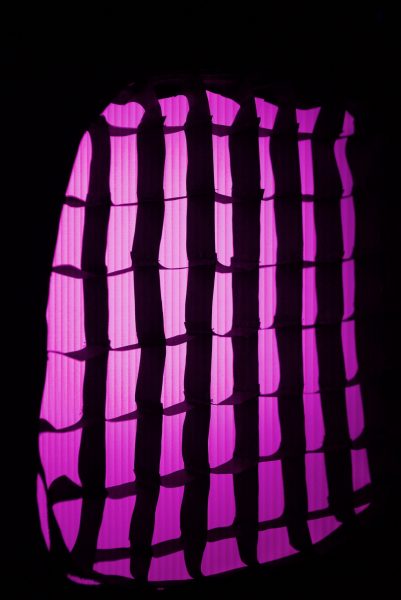
The perspex style cover does act as a type of diffusion, but its main purpose is to reduce the multiple shadows you get from the LEDs. There is around a 5% light loss when using the diffuser.

While the diffusion panel is supposed to reduce multiple shadows, above you can see that there is still cross hatch shadows appearing.
All the buttons and switches have a nice solid and tactile feel.
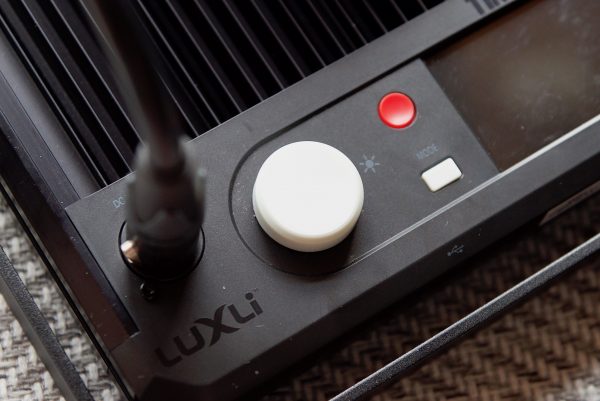
Display and controls
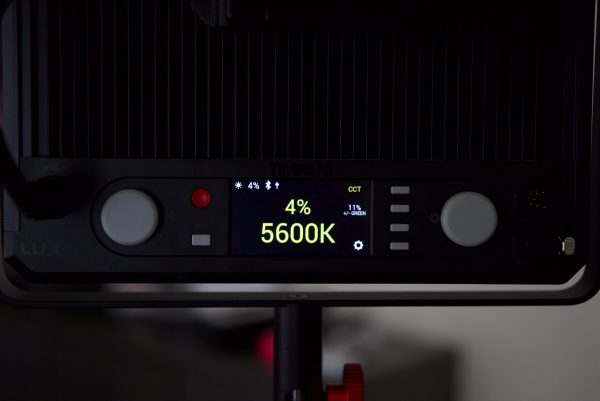
The built-in LCD display lets you adjust brightness and color with the dedicated knobs, and switch between the RGB, filter, CCT, and special effects modes with the touch of a button. The display is the best I have ever seen on any light. It’s clear, concise and it makes it very easy to see what you are doing.
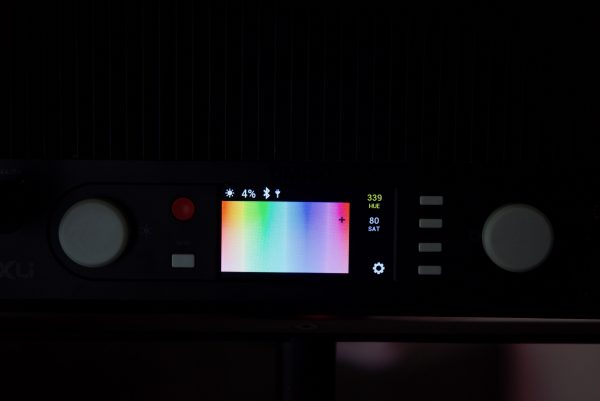
Being able to see all the relevant information about your light without having to walk up really close to it is a nice change. All the operating modes can be accessed through the pushing of a single button, and each mode is clearly and concisely shown on the LCD screen.
No fan
The Timpani doesn’t have a fan but uses a passive cooling system. RGBW lights generate a lot more heat than conventional LED fixtures and therefore they need to be cooled. The Timpani doesn’t have a fan like most other RGBW fixtures I have seen and tested. Because it doesn’t have a fan it certainly does get a lot hotter to touch than those fixtures that do. I had the Lupo Superpanel Full Color 30 on for the same amount of time as the Timpani and it didn’t get nearly as hot.
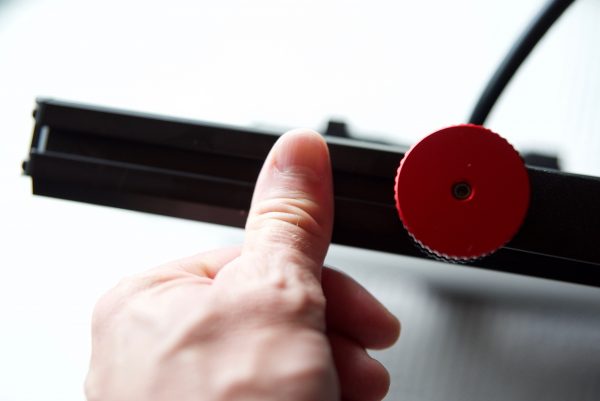
Yolk frame
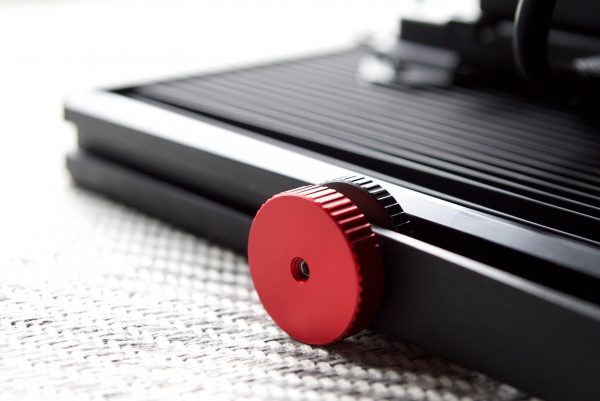
The Timpani uses a yoke that terminates in a 5/8″ receiver for stand-mounting the fixture. The yolk frame itself uses a very clever design that allows you to move the light up and down the length of the frame. It does this by using two separate locking mechanisms, one allows you to move the fixture up and down the frame, and the other adjusts the angle of the light. The nice thing about the way this works is you can easily take the whole yolk frame off if you don’t need to use it.
Competition
The direct competition comes from the Lupo Superpanel Full Color 30 and yet to be released Dracast 728 Led RGB White Panel. You could argue that the ARRI SkyPanel S30-C is also a competitor. but at $4,113 USD it’s not even close to these other options when it comes to price.
Most RGBW lights on the market are large, heavy and expensive. I’m actually surprised that Litepanels hasn’t made a 1×1 sized RGBW version of the popular Astra.
With the direct competition being the Lupo Superpanel Full Color 30 & the Dracast 728 Led RGB White Panel, let’s see how they compare to the Luxli Timpani. As I haven’t seen the Dracast I can only compare the Lupo. If you are interested to see how the Lupo compares head-to-head against the Luxli when it comes to performance, those results are further down in the article.
Luxli Timpani 1×1 RGBAW LED Light
Weight: 6.95 lb. (3.15 kg) Without Yoke
Kelvin color adjustability: 2800 to 10,000 K
Output: Over 4,100 lux at three feet (claimed)
Power draw: 120w
App control: Yes
DMX: Yes
Inbuilt filters: Yes
Special effects: Yes
Price: $999.99 USD
Lupo Superpanel Full Color 30
Weight: 8.15lb (3.7kg)
Kelvin color adjustability: 2800 to 10,000 K
Output:
Power draw: 200w
App control: No
DMX: Yes
Inbuilt filters: No
Special effects: Yes
Price: $1,598 USD
PHOTOMETRICS
So now let’s get to the photometric results. I always test lights in this way so that I get a reference to how they compare to other fixtures. Results only tell part of the story and should never be used alone to judge a light. I have found from extensive testing over the years that certain lights that have good photometric results don’t always look good, and lights that have worse photometric scores can sometimes look better than their results indicate.
OUTPUT AND KELVIN COLOUR TEMPERATURE ACCURACY
I tested the Luxli Timpani 1×1 RGBAW at a variety of Kelvin color temperatures with a Sekonic C-700 Spectrometer to find out how much output the light had and how accurate the Kelvin color temperature reproduction was. All readings are taken at a distance of 1m (3.28ft) in a controlled environment.
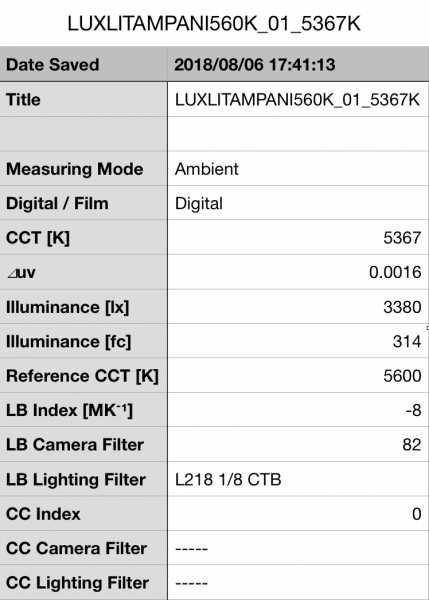
Above you can see the light recorded an output of 3380lx (407fc) when set at 5600K and run off mains power. The light produced a Kelvin color temperature of 53863K. The Timpani had a perfect CC Index score of 0. This output was reasonably impressive for any Soft Panel 1×1 fixture, let alone an RGBW one. The 5367K reading was a little lower than what I would have liked to have seen when using this light at 5600K.
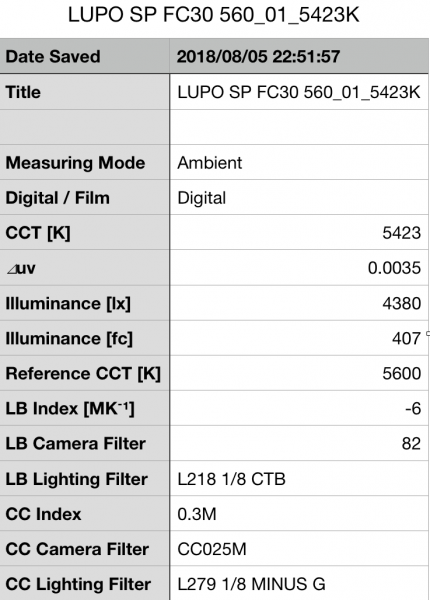
So how does that compare to its direct competition, the Lupo Superpanel Full Color 30? Above you can see the results from the Full Color 30. The Lupo had 1000lx more output (25.77%) than the Luxli. The Kelvin color temperature of the Lupo was 5423K, which was higher than the 5367K recorded by the Luxl. The Lupo, however, did have a CC Index score of 0.3M.
Here is how the 3380lx output and 5367K Kelvin color temperature I measured from the Luxli compares to some other Bi-Colour Soft Panel 1×1 fixtures. I did these comparisons because I was interested to see if the use of RGBW technology in the Full Color 30 came at the sacrifice of output or Kelvin color accuracy.
Litepanels 1×1 Astra Soft Bi-Color 90 degree beam angle (set at 5600K)
3000lx
5504K
0 CC Index
F&V Z400S Soft 130 degree beam angle (set at 5600K)
2250lx
5293K
0.2G CC Index
LUPO Superpanel Dual-Color Soft 120 degree beam angle (set at 5600K)
3880lx
5869K
0.1G CC Index
As you can see both the Litepanels and the F&V have less output than the Luxli, but the LUPO Superpanel Dual-Color Soft has more output. The Timpani’s output was 12.66% higher than the Litepanels and 50.22% higher than the F&V. The Litepanels was more Kelvin color accurate when set at 5600K.
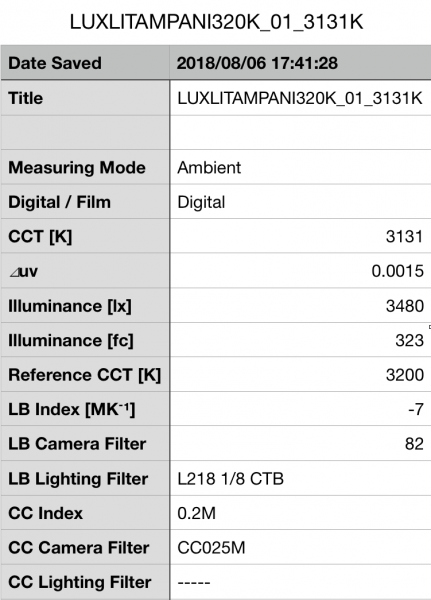
Above you can see the light recorded an output of 3480lx (323fc) when set at 3200K and run off mains power. The Luxli produced a Kelvin color temperature of 3131K. The Timpani had a 0.2M CC Index score. The output was only -7.36% less than when using the light at 5600K.
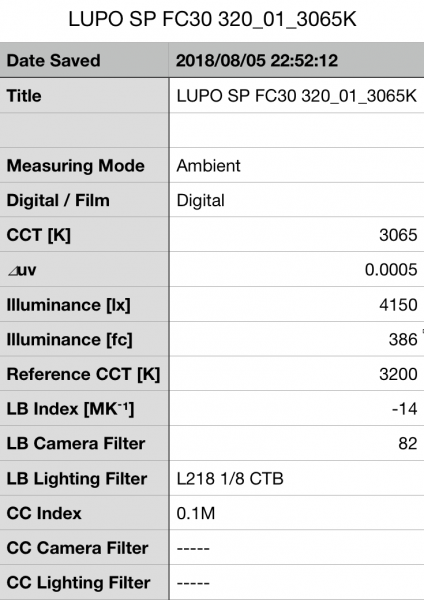
So how does that compare to its direct competition, the Lupo Superpanel Full Color 30? Above you can see the results from the Lupo. The Lupo had 670lx more output (19.25%) than the Luxli. The Kelvin color temperature of the Lupo at 3200K waso 3065K, which was slightly worse than the 3131K recorded by the Luxli. The Lupo had CC Index score of 0.1M which was slightly better than the 0.2M of the Luxli.
Here is how the 3480lx output and 3131K Kelvin color temperature I measured from the Luxli compares to some other Bi-Colour Soft Panel 1×1 fixtures when used at 3200K.
Litepanels 1×1 Astra Soft Bi-Color (set at 3200K)
2200K
3015K
0.2M CC Index
F&V Z400S Soft (set at 320K)
2020lx
3191K
0 CC Index
Lupo Supernal Dual-Color Soft (set at 3200K)
3620lx
4280k
0.3G CC Index
In comparison to these other lights, the Luxli Timpani has more output when set at 3200K than the Litepanels or the F&V. The Lupo, however, is more powerful. The Luxli’s output was 42.3% higher than the Litepanels and 55% higher than the F&V.
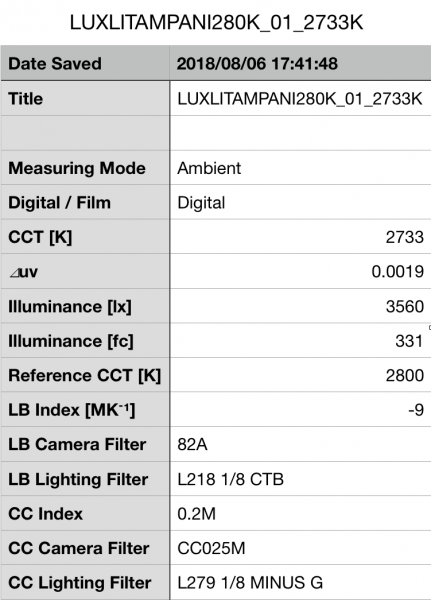

As the Luxli Timpani 1×1 RGBAW can produce Kelvin color temperatures from 2800K up to 10,000K, I thought I’d also test the light at its extremes. Above you can see the results for the light at both 2800K and 10,000K.
Summary of output and Kelvin color temperature results
2800K – 3560lx (331fc) and a Kelvin color temperature reading of 2733K
3200K – 3480lx (323fc) and a Kelvin color temperature reading of 3131K
5600K – 3380lx (314fc) and a Kelvin color temperature reading of 5367K
10,000K– 3590lx (333fc) and a Kelvin color temperature reading of 9743K
These results show me that the lights output stays fairly consistent when you start moving the Kelvin temperature dial up or down. While the output figures don’t quite match that of the Lupo Superpanel Full Color 30, they are none the less impressive. The Kelvin color temperate accuracy of the light was fairly good, but at 5600K the Kelvin color temperature was more than 240K off.
Color rendering
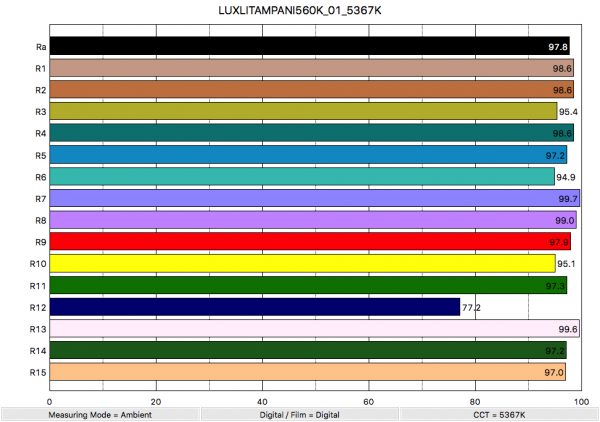
So now that we have seen how much output the Luxli Timpani 1×1 RGBAW produces, how does it perform when it comes to replicating accurate colors. Above you can see that when the light was set at 5600K it recorded an average CRI (R1-R8) of 97.8 and an extended CRI (R1-R15) of 96.2. For replicating accurate skin tones it recorded 97.9 for R9 (red), 99.6 for R13 (closest to caucasian skin tones), and 97.0 for R15 (closest to Asian skin tones). These are exceptionally good scores and the best I have ever seen from a 1×1 style light.
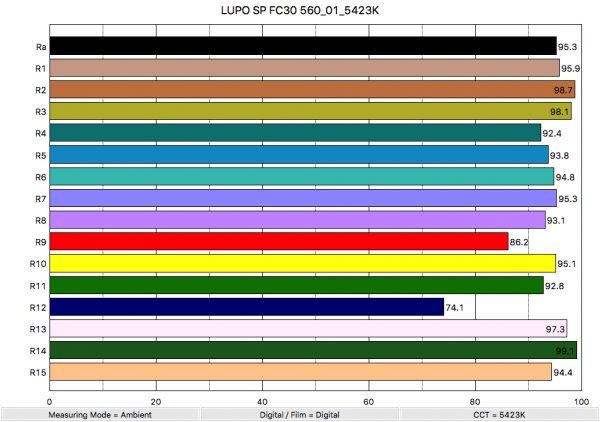
How does this compare to the LUPO Superpanels Full Color 30? The Lupo recorded an average CRI (R1-R8) of 95.3 and an extended CRI (R1-R15) of 93.40. For replicating accurate skin tones it recorded 86.2 for R9 (red), 97.3 for R13 (closest to caucasian skin tones), and 94.4 for R15 (closest to Asian skin tones).
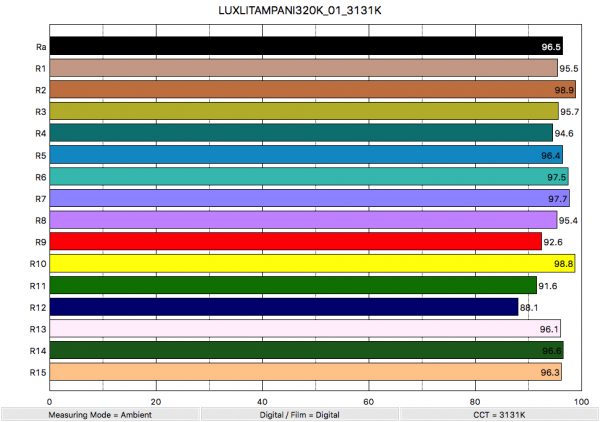
Above you can see the results from the Timpani at 3200K. The Luxli recorded an average CRI (R1-R8) of 96.5 and an extended CRI (R1-R15) of 95.45. For replicating accurate skin tones it recorded 92.6 for R9 (red), 96.1 for R13 (closest to caucasian skin tones), and 96.3 for R15 (closest to Asian skin tones). These are exceptionally good scores and are right up there with some of the best scores I have ever seen from a 1×1 style light.
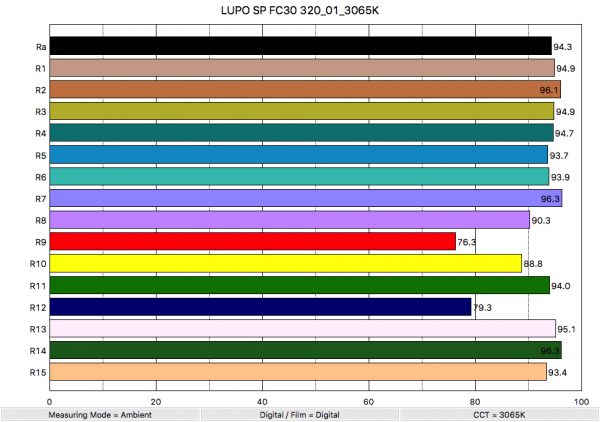
So how does that compare to its direct competition, the LUPO Superpanels Full Color 30? Above you can see the scores for when the light was used at 3200K. It recorded an average CRI (R1-R8) of 94.3 and an extended CRI (R1-R15) of 91.86. For replicating accurate skin tones it recorded 76.3 for R9 (red), 95.1 for R13 (closest to caucasian skin tones), and 93.4 for R15 (closest to Asian skin tones).
How do all of the Luxli’s color rendering results compare to the LUPO Superpanel Full Color 30, Litepanels 1×1 Astra Soft Bi-Color , LUPO Superpanels Dual-Color Soft, and F&V Z400S Soft? Below you can see a comparison:
Luxli Timpani 1×1 RGBAW 5600K
Extended CRI (R1-R15)- 96.2
Litepanels 1×1 Astra Soft Bi-Color 5600K
Extended CRI (R1-R15)- 92.51
F&V Z400S Soft 5600K
Extended CRI (R1-R15)- 93.6
LUPO Superpanels Dual-Color Soft 5600K
Extended CRI (R1-R15)- 93.24
LUPO Superpanels Full Color 30 5600K
Extended CRI (R1-R15)- 93.40
Luxli Timpani 1×1 RGBAW 3200K
Extended CRI (R1-R15)- 95.45
Litepanels 1×1 Astra Soft Bi-Color 3200K
Extended CRI (R1-R15)- 97.32
F&V Z400S Soft 3200K
Extended CRI (R1-R15)- 95.5
LUPO Superpanels Dual-Color Soft 3200K
Extended CRI (R1-R15)- 93.31
LUPO Superpanels Full Color 30 3200K
Extended CRI (R1-R15)- 91.86
As you can see all the lights have fairly similar Extended CRI scores at 5600K, but the Litepanels and F&V are slightly better at 3200K. Now we have seen the color rendering scores, what’s their spectral distribution like? Well, let’s find out.
SPECTRAL DISTRIBUTION
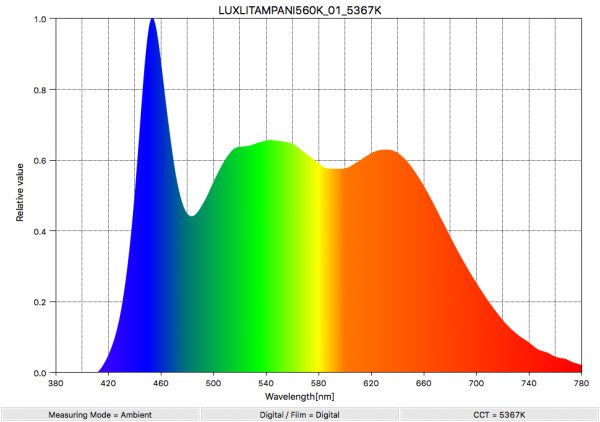
Above you can see the spectral distribution of the Luxli Timpani 1×1 RGBAW when set at 5600K. The spectral distribution is fairly good at 5600K and the light only has a marginal green spike. This spectral distribution is fairly common for a lot of LED lights at 5600K.
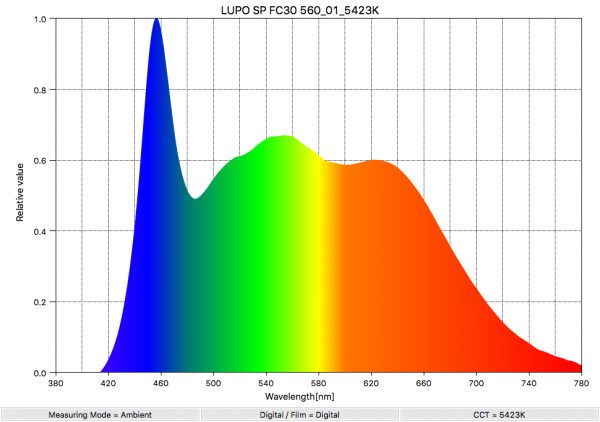
Above you can see the spectral distribution of the LUPO Superpanel Full Color 30 when it is set at 5600K.
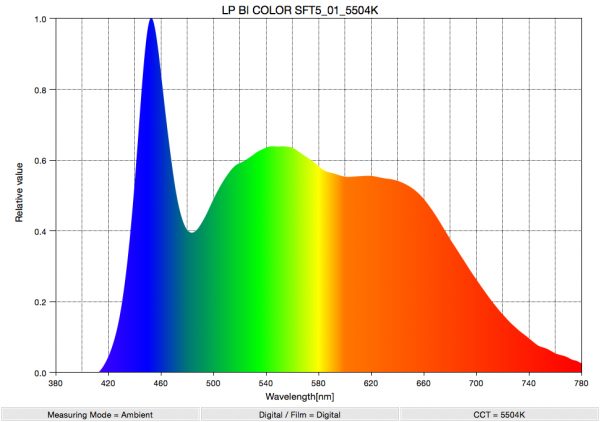
Above you can see the spectral distribution of the Litepanels 1×1 Astra Soft Bi-Color when it is set at 5600K.
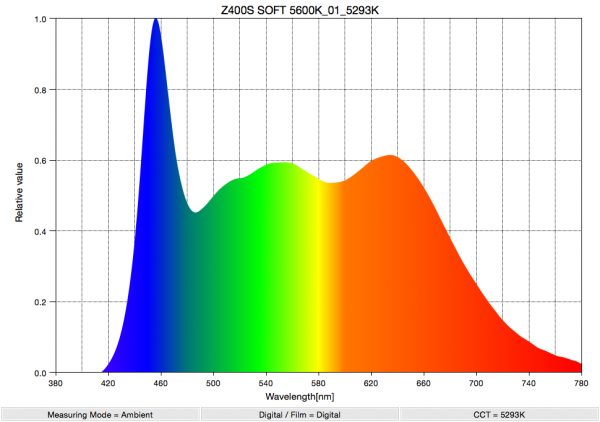
Above you can see the spectral distribution of the F&V Z400S Soft when it is set at 5600K.
The overall spectral distribution of the Luxli, Litepanels and the Lupo Superpanel Full Color 30 are very similar, but the LUPO has a slightly fuller color spectrum.
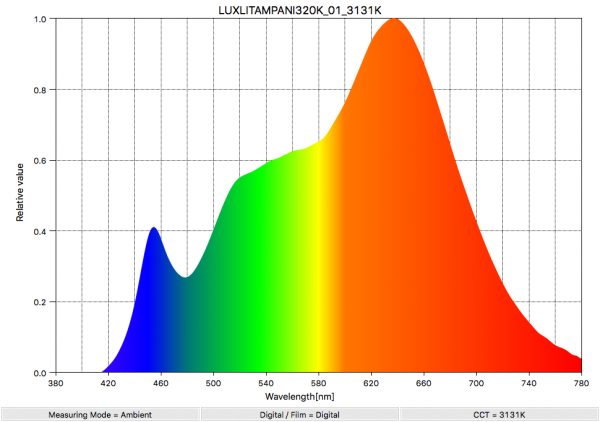
Above you can see the spectral distribution of the Luxli Timpani 1×1 RGBAW when set at 3200K. As you can see it has a definite green spike.
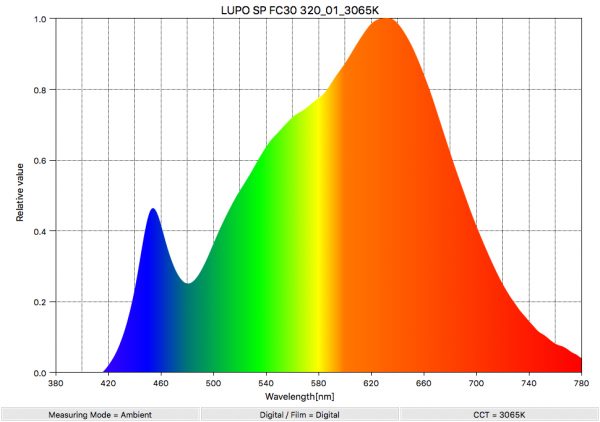
Above you can see the spectral distribution of the LUPO when it is set at 3200K. The spectral distribution is excellent at 3200K and the light doesn’t have any large green spikes. This spectral distribution is very good for a LED light at 3200K.
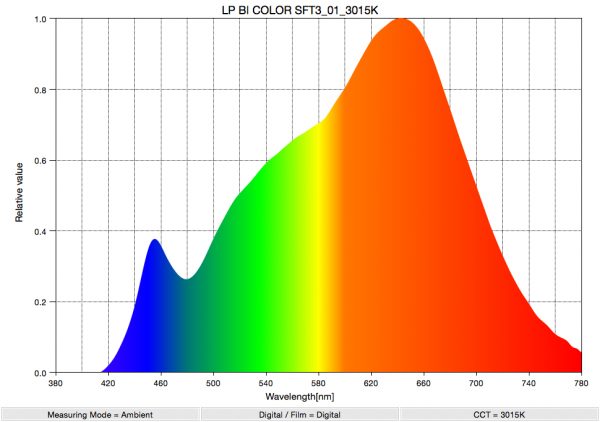
Above you can see the spectral distribution of the Litepanels 1×1 Astra Soft Bi-Color when it is set at 3200K.
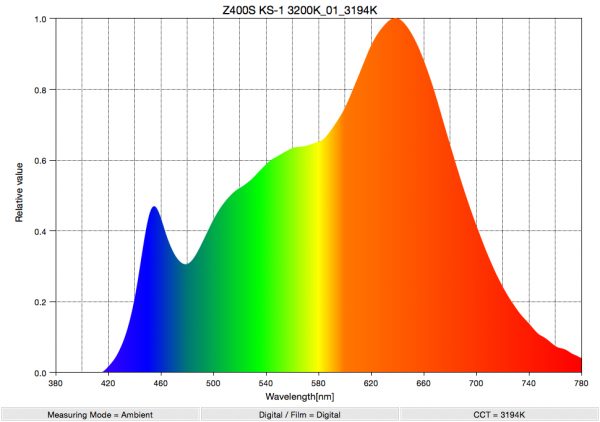
Above you can see the spectral distribution of the F&V Z400S Soft when it is set at 3200K.
The spectral distribution of all four lights is fairly close, with the LUPO having a slightly more linear and fuller color spectrum than the Litepanels. The Luxli certainly has a bit of a green spike at 3200K.
REAL WORLD PERFORMANCE AND QUALITY OF LIGHT
As I always say, photometric scores only tell you part of the story. So do the scores from the Luxli Timpani 1×1 RGBAW translate into real-world performance? Above you can see a few examples using the light. All I have done is white balance the camera and I haven’t altered the image in any way in post.
In this quick example, I simulated an interview set up. The Luxli RGBAW panel was used as the key light with the Lupo Superpanel Full Color 30 being used as the backlight. A white poly board was also used on the right-hand side to add some fill. I have also done some comparisons directly against the Lupo Superpanel Full Color 30. There are also some examples of the light being used in its RGB and Effects modes.
The Timpani does produce a really nice quality of light, but to make it soft you really do need to use a softbox. Unlike the Lupo Superpanel Full Color 30 that has a built-in diffusion panel, the Timpani only has a very light diffusion screen which is there for getting rid of the individual shadows caused by using multiple LEDs. I tried out the Angler LCSB-1212 collapsable soft box and LCSB-GRID Grid for Collapsible LED Softboxes with the light and it works really well.
If you don’t have a high enough output to begin with, and then attempt to heavily diffuse that lighting source, often the brightness of that light is reduced to a point where it’s only usable when placed very close to a subject. If you do use the Timpani for this exact scenario then you will have to have it closer to your subject than say you would if you were using the Lupo Full Color 30. In saying that, the output of the Timpani is still pretty impressive for a 1×1 style panel, especially one that only has a power draw of 120W.
This makes the light ideal for solo operators or travelling cameramen or women who need a light that is quick to set up and can be powered remotely in the field from a camera battery. The lights 72-degree beam angle does make it suitable to use for interviews without the light source spilling everywhere. From my experience using the light, I would still recommend going with a softbox if you are using the fixture for interviews. The beam spread of 72-degrees isn’t nearly as wide as the 115-degrees of the Lupo Superpanel Full Color 30. While it can still be used to illuminate up larger spaces it won’t be nearly as effective at the Lupo for this purpose.
The Timpani also looks also an ideal light for news crews doing live crosses as the fixture can be run off a camera battery and it’s powerful enough (as long as you aren’t trying to match a bright background) to provide a nice amount of fill.
Having the ability to control green and magenta is huge, and this is perhaps the feature I like the most about this light. Being able to match other fixtures as well as getting rid of any green or magenta that you may see when using the light is something you shouldn’t take for granted.
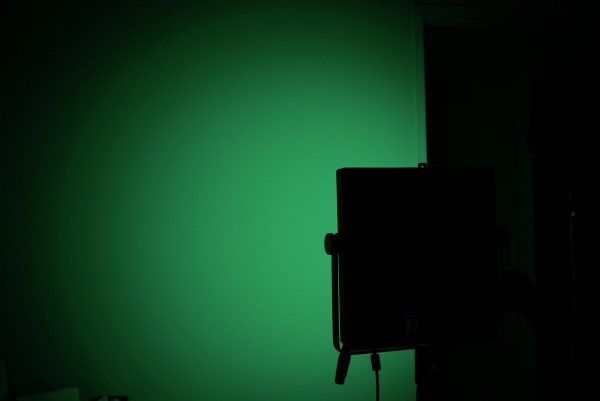
As far as the RGB Color Mode, and effects modes go, while they are great to have available, I don’t tend to use those features that much in my line of work. In saying that, being able to generate different colors is handy for lighting up backdrops or creating color separation during interviews. It’s also nice to be able to use the light to help illuminate green screens very easily.
Do you actually need an RGBW light?
Just because we want something, doesn’t necessarily mean that we need it. Whether you actually need an RGBW light really depends on the type of things that you shoot. If you are primarily shooting interviews, than having an RGBW light may not make a lot of sense. However, in saying that, the price point of the Luxli Timpani 1×1 RGBAW makes it a lot cheaper than other good traditional 1×1 LED panel lights. In that regard, considering it outperforms a lot of other standard 1×1 panel lights, it’s definitely worth buying if you are in the market for a fixture with this type of form factor. Even if you aren’t going to use the additional RGB features and effects they are nice to have on hand if the situation arises.
Even if you have no need for creating colors or using effects with your lighting, RGBW lights do give you access to creating a far wider range of Kelvin color temperatures than their regular LED counterparts. Having the ability to dial in a Kelvin color temperature between 2,800 – 10,000 K can be extremely handy, and you shouldn’t overlook how important being able to change the +/- green bias is.
CONCLUSION
The Luxli Timpani 1×1 RGBAW light is a feature-rich fixture with very good color accuracy and color rendering. Too often I have seen lights where the added features have compromised the most important aspect, the quality of the light. With the Luxli you can have your cake and eat it too. For a light to have this many features at this price point I thought there must be some sort of catch, but there really isn’t. I really tried hard to find faults with the Timpani, but there isn’t many.
From the design to the LCD screen, to the eye-dropper color picker, Luxli has done things that no other manufacturer is doing, especially in a sub $1,000 USD light.
Its nearest competitor, the Lupo Superpanel Full Color 30, which is a great light in its own right, is heavier, larger, and costs almost $600 USD more. While the Timpani may not have the output of the Lupo, it certainly makes up for it in other areas.
I honestly don’t think I have come across a better bang for your buck lighting fixture than the Luxli Timpani 1×1 RGBAW. It certainly ticks so many boxes and it has redefined what you should expect in a light for under $1,000 USD.


