The incredible value of low-budget films as a means to experiment is at least as powerful in post-production as it is on set. As I discussed in a past article about the shoot for The Holy Scoundrel, the capacity to test, experiment, and implement innovative strategies in the relatively low-risk environment of a small film enables these ideas to be road-tested, and in many cases stress-tested, before being implemented on bigger and more complex projects.
Many of the techniques and technologies that I have developed and refined on low-budget films have made their way onto much bigger projects, thanks to the confidence gained from having been used in real-world scenarios of actual projects.
Post-production on The Holy Scoundrel again delivered this in abundance.
The film is a quirky comedy about what happens when a private detective discovers that his daughter’s wedding is about to be conducted by a corrupt priest who runs a brothel.
The contained scale of the project, combined with a flexible approach and recent advances in the technology, tempted me to ask the question that (aside from the original music and some VFX shots)… “can one person, working alone in DaVinci Resolve, do the entire post-production on a feature film?” Most people in the industry would say that asking this question alone is complete madness, but not only was it possible, but it was also reasonably fast and generally a fairly pleasant experience.
Collaborating is one of the great joys of the filmmaking process. But there’s also something very satisfying about having total control over every part of the process.
FROM SHOOT TO EDIT
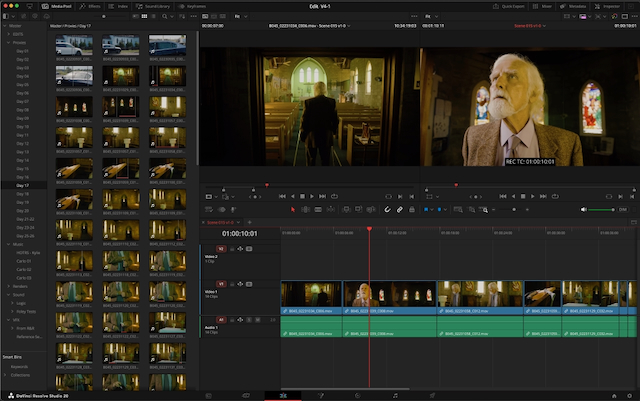
Back in 2002, I first worked with Writer-Director Gerald Lawson on his first feature film, Little Lies. I was recommended to him by a Producer I was working with regularly at the time, and one of the main reasons was that I could confidently shoot and edit, and that on a very low-budget feature, this would be an advantage with limited editing time. It certainly turned out to be the case that being familiar with every frame before even entering the edit suite sped up the process.
That film was edited in a suite set up with the then state-of-the-art G5 Mac tower running Final Cut 4. This combination allowed me to not only edit, but also do the picture finishing on the same machine.
Two decades later, on our fifth long-form film collaboration, Lawson’s film again provided opportunities to push post-production tech to its limits.
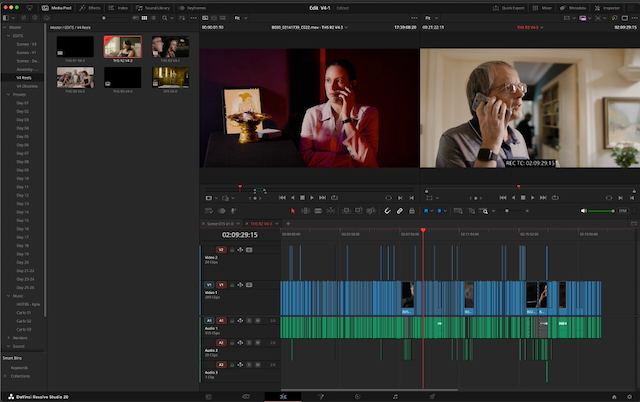
During the prep, I decided to use HEVC (H.265) proxies for editing, and this proved to be a very effective choice as the project progressed through post. The 2K proxies for the entire film amounted to a little over 100 GB of data, roughly a tenth of the size of the ProRes Proxy equivalent.
This created a lot of flexibility for the editing process because I could have the proxies loaded onto multiple machines simultaneously and move the project back and forth by simply copying the project file. By the time I got to editing the trailer for the film, I was confident enough with Blackmagic Cloud to be able to use it to automate this process. Both approaches were very successful and allowed me to continue editing regardless of my travel, family, and other work commitments.
Moving between desktop and laptop computers was a seamless process, and for editing, the main advantage of the desktop was in the monitoring, and much of the edit actually ended up happening on the laptop for convenience. I kept the project on the same MacBook Pro through the process, which was a 16-inch M2 Max with 96 GB of RAM, a 12-core CPU, and a 38-core GPU. This combination handled the 2K HEVC proxies and all the requirements of the editing process seamlessly.
The proxies were produced manually in Resolve so that I could have fine control over colorspace and data rate. While this was very effective, the capacity of the newer Blackmagic cameras, such as the URSA Cine LF and the Cinema Camera 6K, to record HEVC proxies alongside the RAW files while shooting will probably replace that process on future projects. Eliminating the proxy processing entirely has too many advantages to be ignored.
Because of the decision to work with an ARRI C4 color pipeline, these proxies were encoded directly into the C4 colorspace. A version of the custom LUT that I had created for the shoot was set to apply the show-look along with a transform from C4 to Rec.709, and this was applied in the edit project at the clip level so that the footage would always be seen with the LUT applied, whether it was in the viewer or the timeline.
I would have been inclined to do this at the project level as an output LUT, except for the fact that we also had car mount footage from the iPhone, which was in Apple LOG, and doing it at the clip level allowed me to apply the correct version of the LUT for that footage. Either of the two methods is also good because they don’t apply the LUT to the timeline or clip-grade level, and therefore, it doesn’t travel with the DRT to the finishing project. This was helpful because the finishing pipeline was designed to separate the show-LUT from the output transform, which enables outputting different versions, such as HDR and SDR, as well as easily generating archival masters, both with and without the grade.
HARDWARE CONTROLLERS
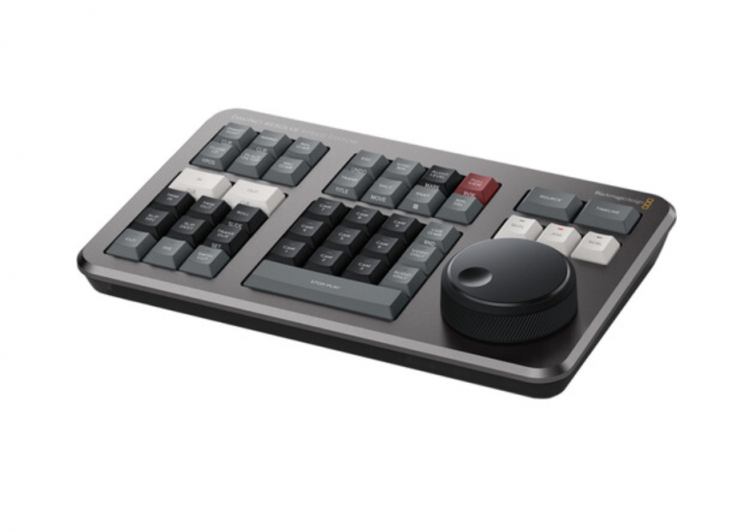
I’m generally a fan of hardware controls for many aspects of post-production. This is probably influenced by my early career, working with linear tape-to-tape editing systems, which relied on jog/shuttle controls and a lot of muscle memory to be able to hit the dedicated keys rapidly. I do believe that it is also a faster and more precise way to edit, and so I love the Blackmagic Resolve Speed Editor. For short edits, including my podcast, I’ve found it to be a fantastic tool to be able to edit intuitively, looking more at the images than the interface, and to be able to cut much faster than I can with a mouse or trackpad.
I expected that this would be the perfect combination with the MacBook Pro for editing the film. What had not become apparent when using it for short bursts was that the need to reach around or over the controller to use the MacBook Pro’s keyboard or trackpad was an uncomfortable movement, and after a few long days of editing in a row, I found that I was getting pain up and down my arms.
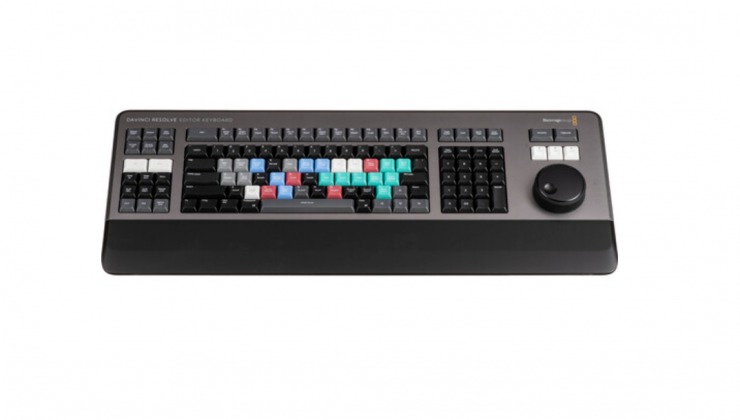
The solution I found was to use the full-sized Resolve Editor Keyboard in combination with the Bluetooth Magic Mouse. The Editor Keyboard thoroughly exceeded my expectations, and while some people have criticized it as expensive, that’s not the case if you look at it as more “Editor” than “Keyboard”.
The Editor Keyboard has a jog/shuttle control that looks similar to the Speed Editor’s one, and both of them function in jog, shuttle, and scroll mode,s but the Editor Keyboard has a clutch that engages in shuttle mode, just like I remember from my tape-to-tape days. This makes the shuttle mode dramatically more efficient and precise, but adds a physical “bump” at the still position and hard stops at the extreme forward and reverse positions. This means that turning it all the way and then turning the wheel by the same amount will bring it back to the first position. Without the clutch, this doesn’t happen. The result is that the shuttle mode becomes dramatically more useful in most parts of the editing process.
Navigating the timeline, finding in and out points in the source footage, and especially trimming edits became faster than I have ever experienced in over thirty years of professional editing. What this equated to was more time to experiment and finesse the scenes and the moments. Because it was so fast to make changes, it became easy to try a lot of ideas that might have been hard to justify if they had taken longer.
I found the learning curve to be very quick with the Editor Keyboard, and after the first day of editing was very comfortable with it. This is probably influenced by my experience with linear controllers in the 1990’s, but I’ve experimented with a lot of different solutions to get better control of NLE edits, and nothing has come close to the Editor Keyboard, except, of course, the Speed Editor.
The Speed Editor is obviously a lot more suited to travel than the Editor Keyboard, which is more at home in a desktop configuration, but I still found it quick enough to set up with a single USB-C cable, that I used it for most of the editing, even when working with the laptop and only used the Speed Editor when traveling, such as when we were shooting pickups for the film.
The biggest thing about the switch was that even after several weeks of long days of intense editing, I wasn’t experiencing any arm or shoulder pain. After experiencing it, I would now be very hesitant about starting a long-form edit without the Editor Keyboard.
VOICE ISOLATION
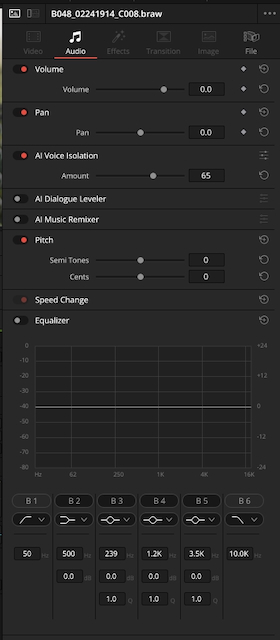
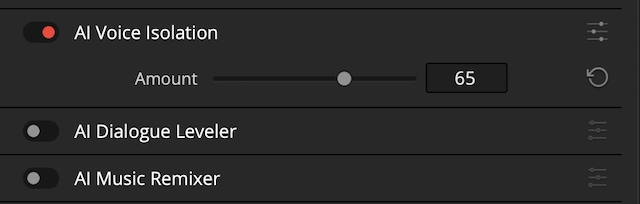
The other huge leap forward on Scoundrel from the other films I’ve done was the power of the Voice Isolation tool in DaVinci Resolve. This is a great example of using AI to empower creatives to do things better, while leaving the creative work to the humans.
Because the tool is so fast and effective and can be applied in the Edit page as well as in the Fairlight page, I found myself using it routinely, just to be able to have clearer dialogue for me to listen to while I was editing. A single mouse click to turn it on in the clip’s settings, and the slider to change the amount of isolation, and the dialogue was instantly clearer, and this also makes the edit points less jarring without the background noise changing across each cut.
The other great thing about the Voice Isolation is that it doesn’t tend to damage the clarity of the voice the way that old-school noise reduction tools usually do if used quickly.
CUTTING WITHOUT MUSIC
A lot of editors and directors love to cut to music, and it can be an incredibly powerful way to work, with the music providing a rhythm and pace to anchor the editing.
For The Holy Scoundrel, I decided to do the entire cut of the film without even temp music. This was partly because I knew that the original score by Carlo Giacco would inevitably add a lot to the feel of this film, and I didn’t want to impose any other music on that preemptively. But equally, I felt that it was important for this script to find its own pace before connecting that to music.
In the past, I’ve mostly used music to cut to, but found the process of deliberately not doing that was really effective for this particular film.
WORK IN PROGRESS
Because Lawson is not a director who wants to sit in the edit and watch every cut happening, we built a workflow around full work-in-progress screenings.
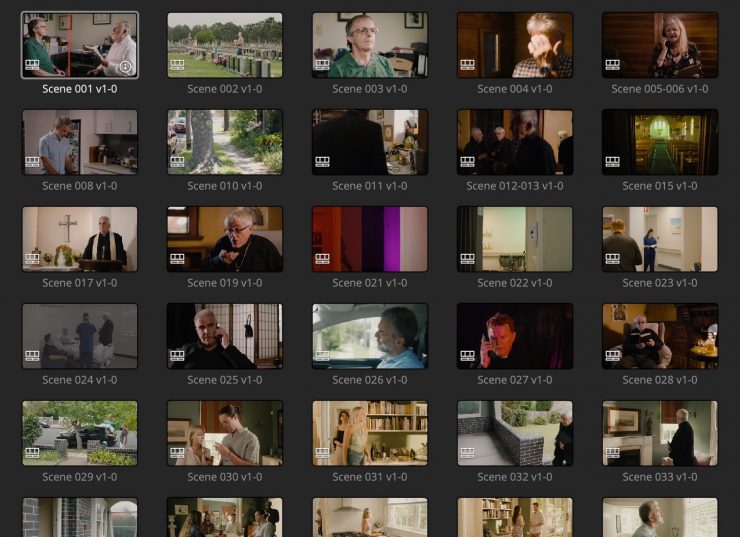
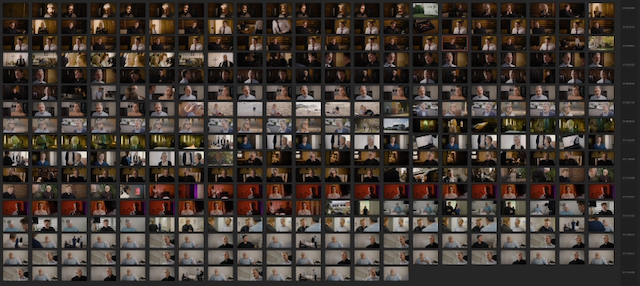
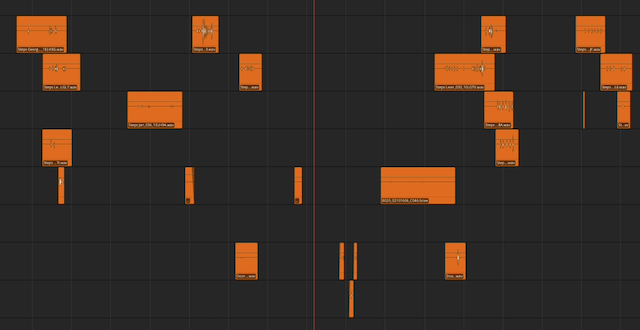
Because of the number of subplots combined with a lot of practical script changes that happened during the fast paced shoot, I anticipated that there would be a fair bit of juggling scenes around, so for the first assembly edit, I decided to cut each scene as a separate timeline to make it quick and easy to experiment with different scene orders and which scenes to delete. The assembly edit ran nearly 2 hours, and although we knew that was a bit too long for this style of comedy, it gave us a solid starting point to then trim it down and focus the story and flow through the editing.
Version 2 of the edit was largely devoted to this process of working out the flow of the scenes and what would be the best overall structure, without changing much in the scenes themselves.
After this, version 3 of the edit was more focused on changes within the scenes to get their internal pacing and flow working. Using this process allowed us to work iteratively, and while it wouldn’t be ideal for every film, the combination of style and circumstances meant that it worked very well to get the big picture flow worked out first and then start refining the individual scenes.
Dropping all of the included scenes into a timeline in the current order allowed us to quickly produce full work-in-progress renders, which allowed Lawson and me to screen the film all the way through to judge how it was working.
As well as the Voice Isolation tool on the individual dialogue lines at the clip level, I also used the AI Dialogue Leveler at the track level for the WIP renders, which gave us a much more presentable version of the sound with very minimal time or effort. This tool tries to mimic the effects of a sound mixer riding the levels to maintain consistent volume across dialogue. While different from creative mixing, it was quite effective at making the work-in-progress screenings much more comfortable than they otherwise would have been.
22 MINUTE REELS
After version 3 of the edit, we made the call that it was the right time to switch to working in film-style reels of 22 minutes or less. This enabled us to start looking at the flow between the scenes as well as prepare for the finishing process and adding in the original music, which would often need to be able to flow between scenes.
Some people argue that working in reels is an archaic holdover from the film days, when edits simply had to fit on 2,000 ft reels of film. I think they remain popular with films both big and small for very good reasons. Although the specific length is no longer tied to anything physical, it is a good length where there’s a relatively small number of timelines to deal with, but it is also a good workable length for a lot of different reasons throughout the finishing process.
PICTURE LOCK
As we began to lock the edit on the five reels, we were able to send them to Giacco so that he could commence work on the music. The music brief was a very open one, but with the understanding that the music would need to do a bit of heavy lifting to make sure the audience took the occasionally dark or ironic humour in the intended way.
INSTANT CONFORM
One of the best things about cutting and finishing in Resolve is that the conform process becomes virtually a non-event.
I set up a Mastering Project in Resolve Studio on our main finishing machine, which was a Mac Studio M2 Ultra. This project was pre-populated with all of the camera source material in BRAW and set to the intended master settings of 4K DCI (3996 x 2160).
Each of the five reels was exported as a DRT (DaVinci Resolve Timeline), and this was AirDropped from the MacBook Pro to the finishing machine.
When these DRTs were imported into the mastering Resolve project, Resolve instantly recognised the BRAW originals as the same footage as the proxies had been on the other machine, and every shot in the film conformed precisely, without a single error on the entire 96-minute film.
Anyone who has done much conforming would recognise that it is an extraordinary result, and it meant that instead of spending time dealing with conform errors, we could jump straight into the finishing work. Again, using Blackmagic Cloud would have made this even easier, and that was the exact process we used on the Trailer for the film. It also meant that I was cutting the Trailer on the edit MacBook Pro with access to all of the source footage as well as the edited film in the five-reel timelines, and that this Trailer edit was then instantly accessible on the finishing machine.
This seamless process felt very much like stepping into the future.
COLOR FINISHING PIPELINE
The mastering project was also pre-set with the BRAW decoding directly to ARRI C4, and the clips were set without the LUT applied, so each DRT came in with all of the shots sitting in the timeline in ARRI C4 log space. This was basically the only moment in the whole production when the footage was seen in LOG and without the Show LUT applied.
I applied a basic node tree to every clip, which included the Show LUT, with nodes before and after it, and then an output transform at the timeline level using ARRI’s C4 to Rec.709 LUT. After this, everything matched how it looked in the edit, except in 4K and from the camera originals.
The decision to work in Rec.709 was a relatively easy one. The first priority was the cinema version and previews for film festivals. From a monitoring point of view, 709 was a lot easier and meant that we were in the right space for mastering work in progress previews, while Resolve’s conversion to DCP space is so effective and reliable, it didn’t make much sense not to take advantage of that. If an HDR version is required at some point, this will be an easy update by simply replacing the output LUT at the timeline level.
Within this, the color approach to the film was reasonably simple. Much of what I wanted to do with the images, I was able to do on set with the lights, lenses, etc., so a lot of what needed to be done was pretty straightforward using lift, gamma, gain, and printer lights, along with very soft vignettes and targeted Power Windows to add shading or highlights. One of the great luxuries of shooting and grading is that it makes it very easy to decide what should be done on set and what should be done in the grade.
Despite the fact that we were shooting at such a fast pace, I was surprised at how much was actually possible in camera. A lot of that comes down to how much the newer cameras, shooting RAW and using really flexible LED lights adds up to being able to do things quickly and efficiently while still being able to decide the exact elements of the look. With scenes switching between the Bayer Pattern and RGBW of the URSA Mini Pro G2 and the URSA Mini Pro 12K OLPF caused no issues. With both cameras recording BRAW, the only noticeable difference was a bit of extra silkiness and subtlety in the skin tones with the 12K and a bit nicer handling of mixed color temperatures, which made it a little faster to work with.
There were a few challenging scenes, as there is on any film, and these primarily revolved around days when we had to shoot in less-than-ideal light because of the weather and the pressures of the schedule.
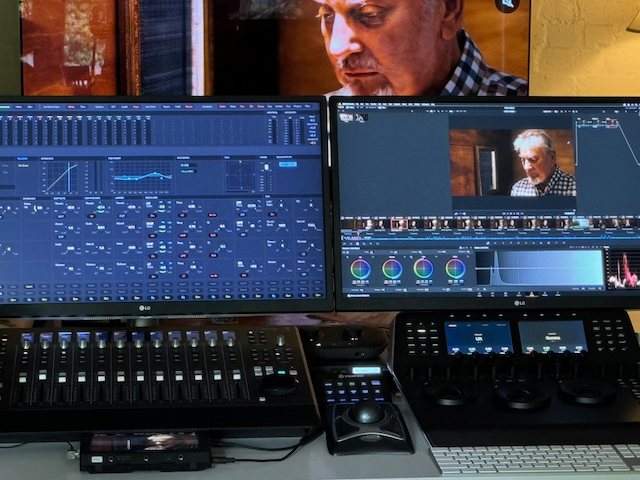
Color grading is something that relies so much on subtle, intuitive adjustments to multiple parameters, and so it’s another area where physical controls make a huge difference. I’ve been a fan of the Resolve Mini Panel since it was released, and the unit I bought back then was still going strong all the way through the post on Scoundrel. The build quality and reliability of it are as impressive as its functionality and tight integration with the Resolve toolset.
FAIRLIGHT SOUND DESIGN


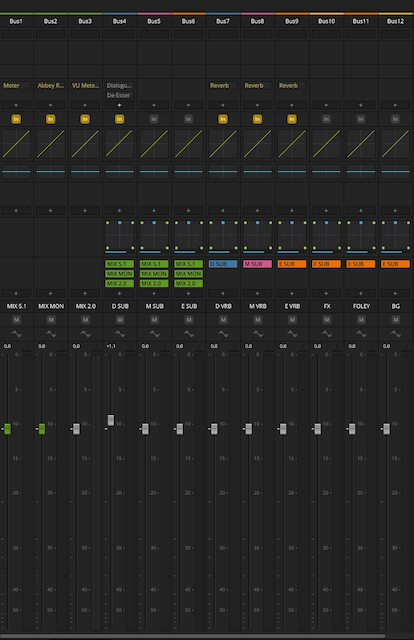


Mixing in Fairlight is a sort of homecoming, with Lawson’s first film, Little Lies, mixed on a Fairlight system in 2003. Having switched our sound production at Main Course Films fully to Fairlight around 5 years ago, it was an obvious choice to use Fairlight in Resolve for The Holy Scoundrel, and it also kept the entire post-production in the Resolve ecosystem.
Because we run an integrated finishing system (more on that in a bit), the reels conform to the picture finish and include all of the sound from the edit as well. Not only that, but all of the Voice Isolation which I had done for the editing travelled perfectly across to the mastering project, creating a big head start on the dialogue editing.
I created a full template for the 5.1 sound on The Holy Scoundrel, based on and then copied the picture and sound from each of the conformed reels, into a copy of the template. This template had groups of tracks for Dialogue, Music, Effects, Foley, and Backgrounds, and used Fairlight’s Flexbus architecture to route each of these groups to its own 5.1 submix bus, then to D, M & E buses before being routed to the mastering project buses for 5.1 and Stereo. Fairlight does such a great job of converting between different channel formats, so for a lot of work, it was easy to switch to the stereo mix and work with my near-field monitors on the desk. Things like dialogue editing and effects editing worked absolutely fine this way, and everything was still sitting in the 5.1 space, ready to be mixed and panned.
As a contemporary comedy, where a lot of the film consists of conversations in quiet rooms, the task of building the soundscape was an achievable one for a solo operator. Because the Voice Isolation is so effective at getting very clean dialogue tracks, it creates a lot of flexibility with room tone. There’s less need to have room tone that matches the ambient noise in the dialogue, so it can really be chosen almost entirely to match the feel of the room on screen. In practice, this means that a lot of these quiet rooms could use fairly standard library tracks, and this sped up the BG track laying enormously.
The Voice Isolation also made the dialogue editing many times faster and easier than it would otherwise be. Compared to traditional noise reduction tools for dialogue, it produces such a clean result, while maintaining so much depth and clarity in the voices that the dialogue editing became a very simple tidy-up for almost every line in the film. Things like passing cars on an edit point, which would traditionally require a fair bit of care, become a complete non-issue.
In the template, I gave each character in the film their own dialogue track, or several where needed, and kept these consistent across the reels, even when they didn’t appear in that reel. This consistency made it very fast as I got deeper and deeper into the mixing process, because I could go straight to the character I needed.
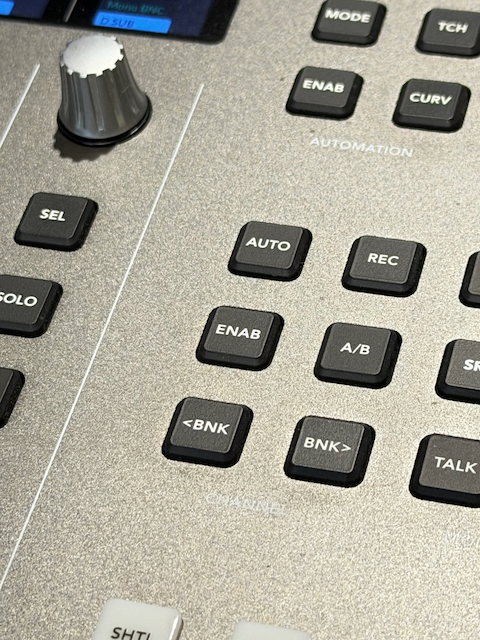
One of my favorite things about Fairlight is the Desktop Console, and for this sort of work, its expansive toolset and small footprint are a huge part of being able to make the solo operator concept not just possible, but actually very workable.
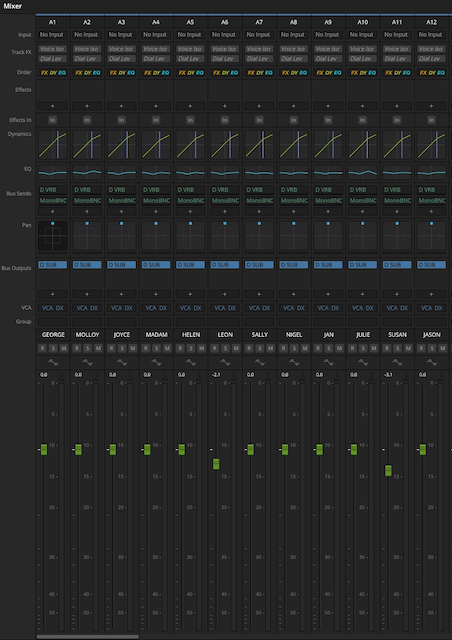
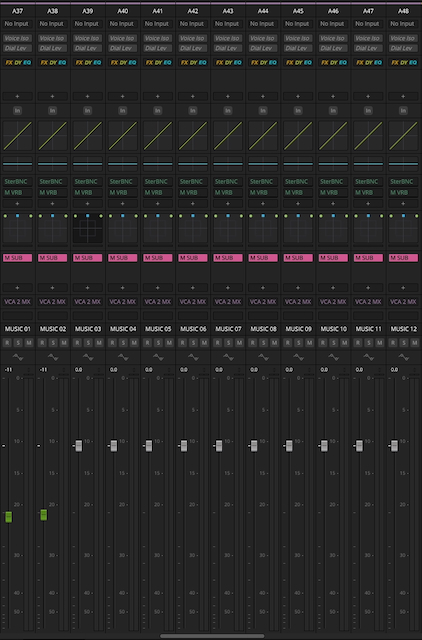

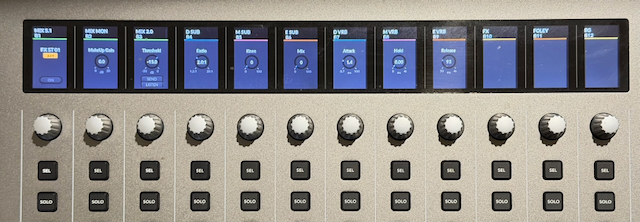
The Desktop Console has 12 faders, and so I like to work in banks of 12 when laying out my mix. This makes it very easy to jump around the mix and get to the tracks I want without too much thought or reaching for the mouse. On Scoundrel, I had 36 dialogue tracks followed by 24 music tracks, so getting from the main characters on the first bank of dialogue to the first bank of music simply required pressing the Bank-Right button 3 times, while getting to the first bank of Foley meant pressing it 5 times. Having the identical basic track layout across the reels made this consistent and allowed me to quickly develop the muscle memory for where everything was in the mix, and in some ways could actually be quicker than physically moving around a large console.
Foley is something that traditionally is very hard to achieve outside of a dedicated Foley studio, and I have a huge appreciation for the work of the artists who specialize in that field, so much so that the main character in the feature Dark Noise is a Foley artist. Ironically, in that film, the COVID restrictions in place at the time led us to do all of the footsteps foley in-house using a mixture of recordings and library effects laboriously edited into place. That was not a process I would want to repeat!
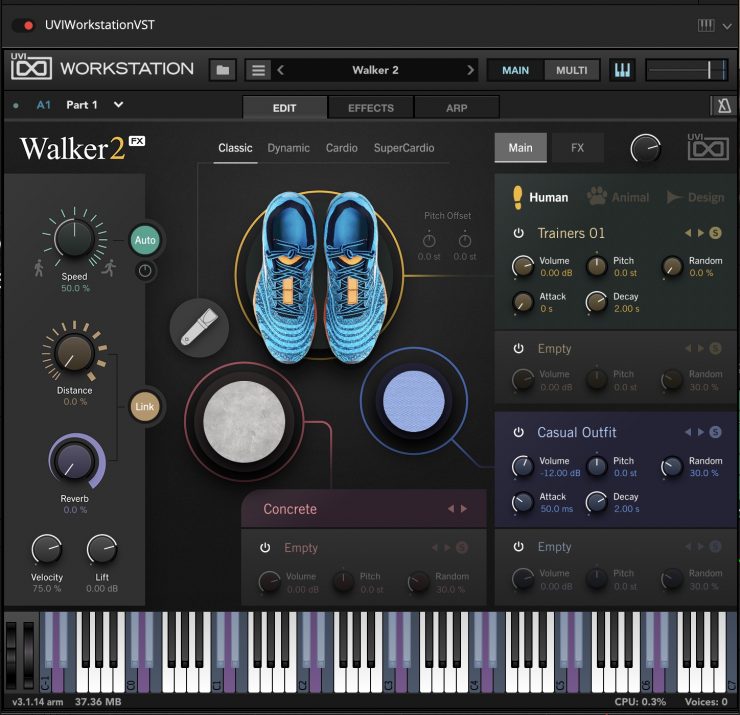
UVI, which mainly makes instrument plugins have an amazing tool called Walker-2, which sits in a DAW application as a virtual instrument but allows the user to set parameters like shoe type, surface, distance, etc., and then “perform” the foley on any midi keyboard. Different keys give left foot, fight foot, stop, and scuff, and it is surprisingly fast and, with a little practice, fairly easy to get realistic-sounding footsteps. The force and pace of the steps are controlled by how you hit the keys, and it is quite intuitive to get the mood of the character coming through in the nature of their footsteps.
Because Fairlight is designed for audio post rather than music production, it only has the capacity to record the sound from a virtual instrument rather than the midi notes. For Scoundrel, the plugin was inserted on a track, and the footsteps were recorded directly to that track like any other audio. While this worked well, I have since done another project where the footsteps were recorded in Logic Pro, and that allows full control over every midi note after they have been recorded. As well as being able to move the steps around in the timeline, they can be converted from a step to a scuff or a stop.
Once correct, the tracks can be rendered out and dropped into Fairlight, just as they would be if they were recorded in a studio.
The effects design also delivered some opportunities for a bit of subtle fun. To reinforce the humor, I occasionally added sound effects that were stylized and even cartoon-style. In one scene, this was taken to a literal extent when one of the bad guys’ henchmen gets hit in the head with a shovel. As well as the realistic layers of metal and body impact, along with some heightened cinematic layers to add “oomph,” I tried adding in tweeting birds as he falls down – a classic cartoon effect. To my surprise, it not only did the job of reinforcing the comedic effect, but did so in a way that no one found objectionable. Sound has so much capacity to influence audience expectations and interpretations in ways that they are often not conscious of.
The mixing process was a rushed, but enjoyable one. The original music from Carlo Giacco exceeded all of our expectations and absolutely delivered on the need to help guide the audience as to the intended tone of each scene. The music tracks were mostly delivered as mastered stereo cues, sometimes with room for a little more compression in the mixdown and occasionally with stems where we needed them.
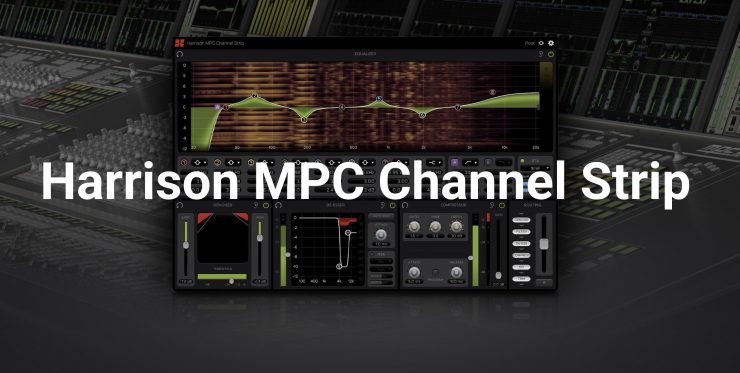
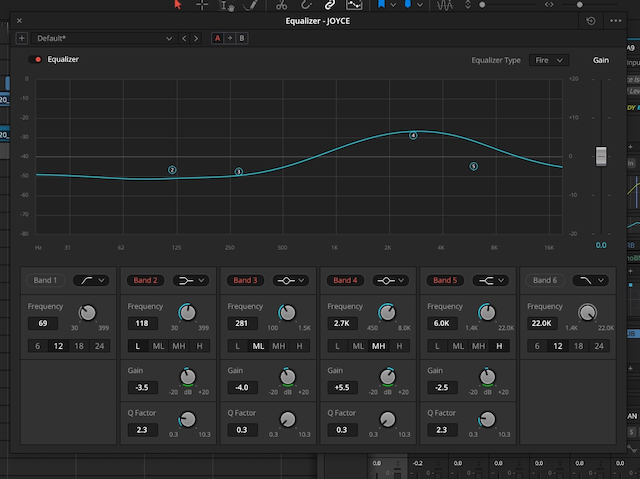
For this, I made use of the lovely Harrison 32C channel strip plugin from Harrison/SSL, which adds a very nice analogue style of warmth. For most of the rest of the mix, I relied on Fairlight’s built-in EQ and Compressor, which are built into the processing for every clip, every track, and bus. These are also very nicely built into the design of the Desktop Console with dedicated buttons that turn the row of 12 knobs and displays above the faders to control the EQ or Compressor for the current track with detailed, touch-sensitive control.
There is also a Channel Strip mode where the key adjustments, such as the 4 main band gain controls for EQ, the Compression threshold, and Surround Panning for the selected track, are all available. After the basic EQ and compression have been set up in their respective modes, this focus mode makes it very quick and easy to precisely write automation for these essential parameters simultaneously. These moment-by-moment adjustments to EQ and Compression as well as volume, are such a big part of film mixing; having them so accessible and controllable significantly speeds up the mixing process.
As with both the edit and color hardware controllers, the Fairlight Console allows creative precision at a fast pace of work.
INTEGRATED FINISHING
On my previous feature film, Dark Noise, we took the opportunity of COVID lockdowns to explore the idea of what we call “Integrated Finishing,” where picture and sound are taken through finishing simultaneously in the same suite. What we discovered was that on the right-sized film, the technology had advanced to the point where it was possible to make this work. Not only that, but the creative process of being able to adjust the pictures and sound together was a revelation.
For The Holy Scoundrel, I decided to follow this process again and see how it had progressed. While Dark Noise was finished on an Intel Mac Pro, the M2 Ultra Mac Studio performed even better for The Holy Scoundrel. The 4K grade was happily playing in real-time for almost all of the film at the same time as it was processing hundreds of channels of surround sound, with playback automation and processing.
At this point, I’m sure that many experienced post professionals will be fully convinced of my madness! Why would you even want to do that? The funny thing is that I remember having those conversations about things that have become standard industry practice… like shooting digital images in LOG or doing desktop color grading or using memory cards instead of tape.
Because of how much better it is creatively, I’m confident that as people start to discover what’s now possible, they will start to embrace versions of this approach. While bigger productions will not have the luxury of one person being able to hand-craft every aspect of the finishing, the rise of hybrid finishing suites, where the color and sound controls sit in the same room with their respective operators, and the creative team can make the final passes of adjusting them to be fully in tune with each other.
It is only really possible because of the combination of powerful integrated software and hardware controllers that Blackmagic has created alongside the insane amount of processing that the Apple Silicon Macs can do without generating too much heat.
DELIVERY
The primary deliverables for the film were a DCP (digital cinema package) for cinema screenings and standard QuickTime files for preview uploads.
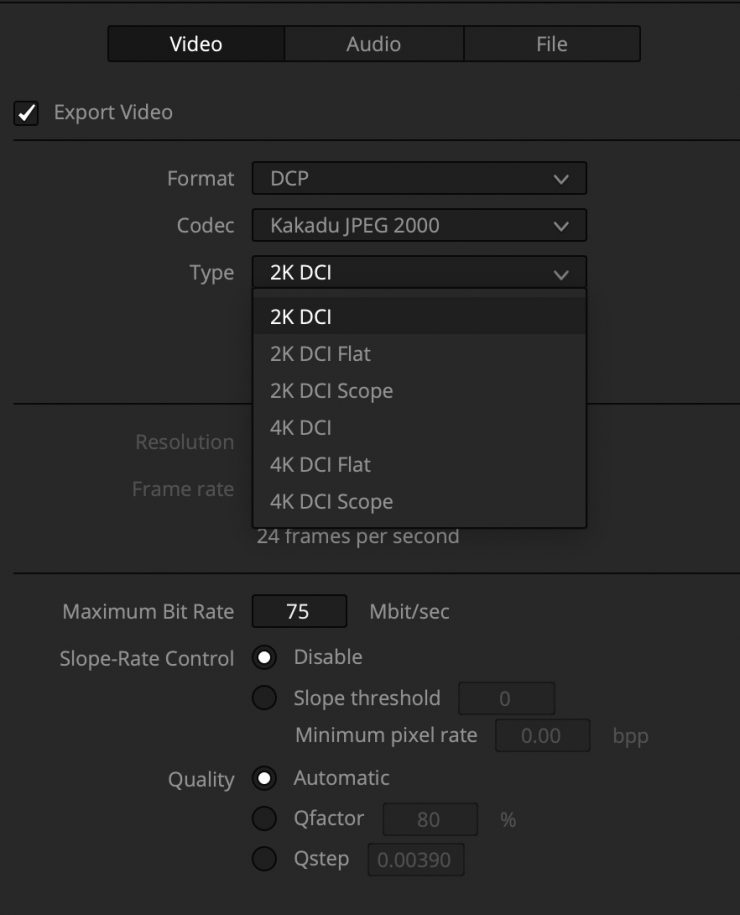
The DCP process was very simple and effective by rendering out directly from the Resolve timelines using the built-in Kakadu encoder. I used this to output an unencrypted DCP of each reel, and because this applies the colourspace transform to XYZ and the JPEG 2000 compression encoding without security encryption, they serve the purposes of a modern DCDM (digital cinema distribution master) even though they are functional DCP’s themselves.
These unencrypted reels were then brought into DCP-O-Matic for packaging into the final delivery DCP with full encryption for secure delivery. DCP-O-Matic is an incredible bit of free software that does a great job of processing DCP files. Although it can encode and do the colorspace transform from a video file, bringing in the pre-encoded reels means that this has all been done already in Resolve. As a result, there was no processing of the images or sound in DCP-O-Matic, and the process of doing the final DCP output is extremely fast.
What it does do is string the reels together into a single, seamless presentation and provide all of the additional metadata, such as name, credits, cues, format, etc. It also applies industry-standard encryption to the picture and sound files, so that they can only be played using a KDM (key decryption message), which can be generated by the main DCP-O-Matic app or the accompanying DCP-O-Matic KDM Creator. This makes it very quick and easy to create the individual KDM decryption keys that the cinemas need in order to be able to play the DCP. DCP-O-Matic also has a player app, which can be used to check that the encryption and decryption key system is working correctly.
Although the player is great for that job, it is not a good way to check the quality of the picture and sound output. The right way to do this is to take the file into a well-calibrated cinema and play the film. While this is an essential step in the process and should not be skipped with the finished file, it is also good to be able to check the file for any issues before going to this effort and expense.
To do this, I have developed a roundabout but effective process. The unencrypted reels are first brought back into Resolve. This can’t be done with the final DCP because Resolve will not be able to play or process the encrypted files, but because DCP-O-Matic is not doing any processing of the picture or sound themselves, the unencrypted reels have identical image and audio data, just in separate files and unencrypted form.
In a new Resolve project, I string the reels together in a single timeline and render out as a 2K HEVC (H.265) file at full resolution and with 5.1 sound. This could then be transferred to my iPad Pro, where I could check the picture and sound on the iPad screen and with AirPods Pro. This allows me to check that the color has converted to XYZ successfully enough to convert back to Rec.709 and that there are no glitches or Wavelet compression problems, which would be visible in the converted file. It also allows me to check that there are no render problems or errors in the timelines, which would also carry across. It also lets me confirm that the joins between the reels function correctly and smoothly.
Because the iPad Pro is playing the images directly on its own screen, the playback pipeline is also completely different from my mastering setup, which relies on video output using Blackmagic UltraStudio 4K Mini and so isn’t affected by the Apple color management system. If there was a problem with either my monitoring or rendering, either with settings or calibration, then there would be a visible difference between the finishing system and the iPad playback. Seeing a very precise match between the two gave me confidence that what was in the DCP matched my grading and mastering decisions.
By listening through the AirPod Pros, I could similarly confirm that the sound was clear and free of distortion and that the channel alignments were correct. The spatial audio capability of the AirPod Pros also made it easy to check the balance of the channels and the quality of the mix. As with the pictures, the fact that this was completely independent of the monitoring system for the mix gave a separate validation that everything was sitting where it was intended to.
The first screening was a cast & crew preview to a full house and was extremely well received. Since then, it has begun the indie film’s long and winding road of festivals and Q&A screenings, with consistently strong responses, including 2nd place Finalist for Best International Feature at the Bournemouth International Film Festival.
For anyone with the right combination of skills, the technology is indisputably at the point where it is possible and surprisingly practical for one person to hand-make every part of the post-production process for a feature film using DaVinci Resolve and an Apple Mac …or two. While I don’t expect this to become a trend, I do expect that it will make it possible for many people to do amazing things with short films and other creative projects, elevating them with the combination of quality and creative freedom that this process provides.
For The Holy Scoundrel, all of this meant being able to keep a tight hold on the delicate balance between comedy and drama, realism and stylisation, while working quickly and on a very tight budget. The result has been overwhelmingly positive reactions from audiences and film festivals. For me, it has also been another glimpse of what the future of film post-production may soon look like for many productions, both small and big, with the final stages of picture and sound finishing… happening together at last.