RØDE introduced the RØDE Go in 2019, becoming a popular lower-priced 2.4 GHz wireless audio option. A lot of companies have copied the design over the years.
RØDE has taken what they started and built on it with the Wireless Pro.
It is packed with a lot of new features, including a longer-range and 32-bit float internal recording while transmitting even in the US.
This is a huge plus! Another great feature is LTC timecode that can be synced with your camera for easier editing in post. The third big feature is the price. It retails for $399. I feel you get a lot for this price. Let’s dive in!
The RØDE Wireless Pro also includes RØDE intelligent GainAssist technology. RØDE states you can get over 260 meters or 850 feet of range. I’ll be testing this for the review.
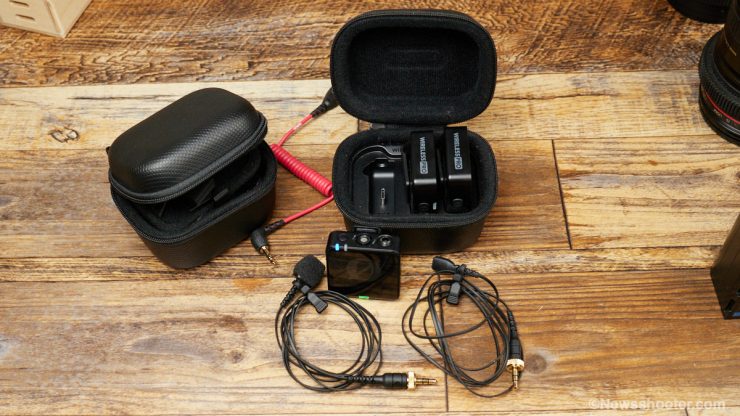
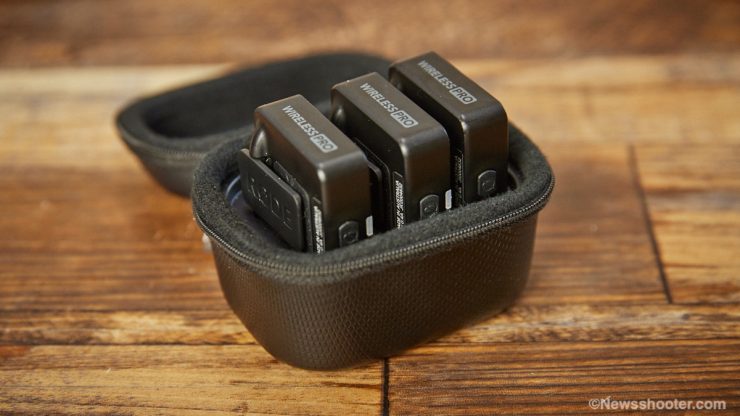
It comes with a complete accessory kit that includes a charging case, two lavs, and mounting clips, plus cables. It is a very complete kit.
Wireless PRO Key features
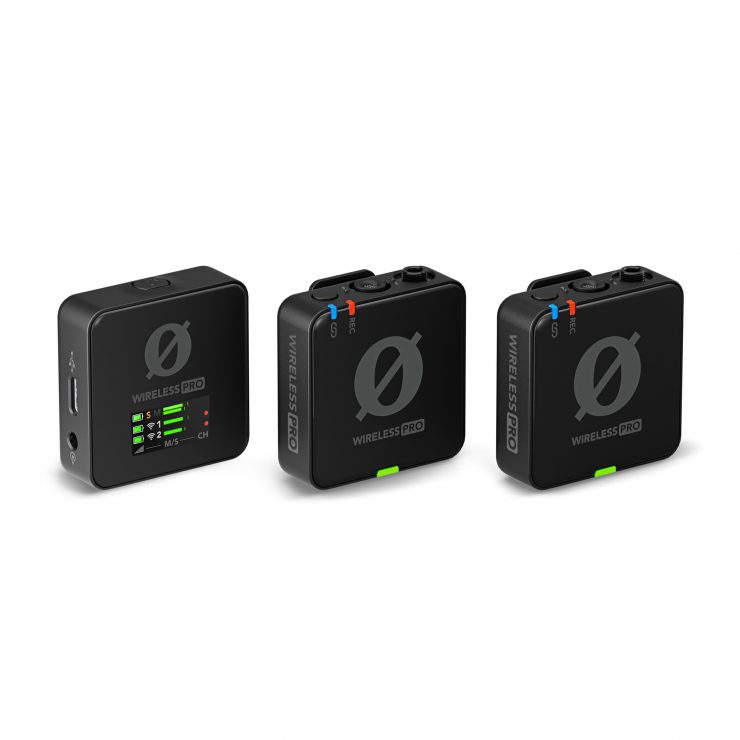
- Dual-channel compact wireless microphone system
- RØDE’s state-of-the-art Series IV 2.4 GHz digital transmission with 128-bit encryption for crystal-clear, incredibly stable audio with up to 260m range
- Universal compatibility with cameras, smartphones, and computers
- 32-bit float on-board recording allows for the recovery of clipped or quiet audio files
- Advanced timecode capability for quick-and-easy audio sync in post-production
- intelligent GainAssist technology, flexible output gain control and safety channel for ensuring pristine audio when recording direct to camera
- 32GB of storage on each transmitter for over 40 hours of backup recordings
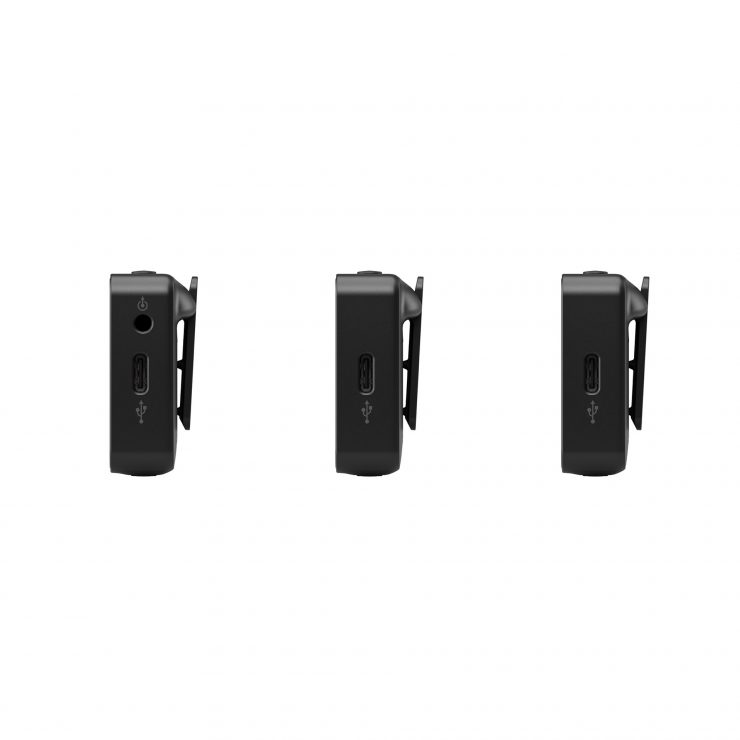
- Locking 3.5mm TRS connectors for complete security
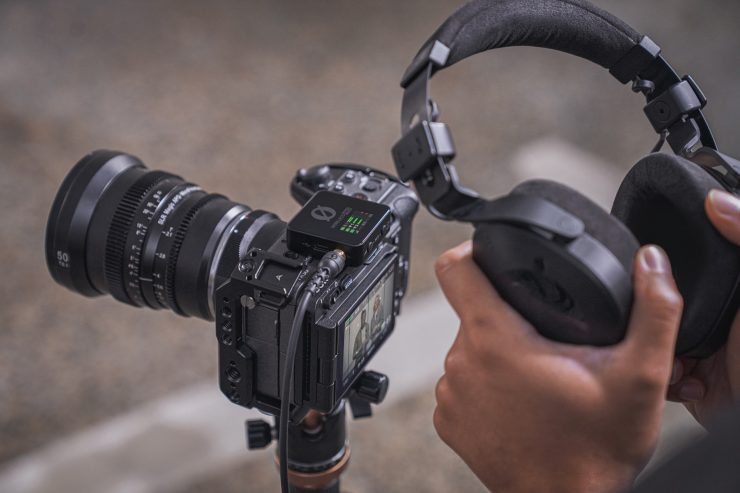
- Headphone monitoring with on-board level control
- Plug-in power detect for extended battery life
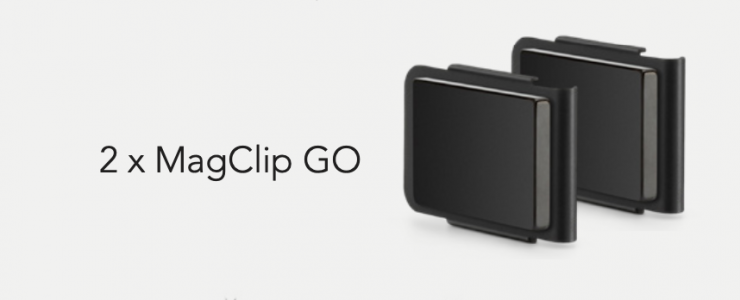
- Complete accessory kit, including smart charging case, two Lavalier II microphones, cables, MagClip GO magnetic mounting clips and accessory case
- Easy configuration on a computer or smartphone via RØDE Central
- Designed and made in RØDE’s precision facilities in Sydney, Australia
What’s Included
The Wireless PRO comes with a complete set of accessories, giving you everything you need to get recording right away.
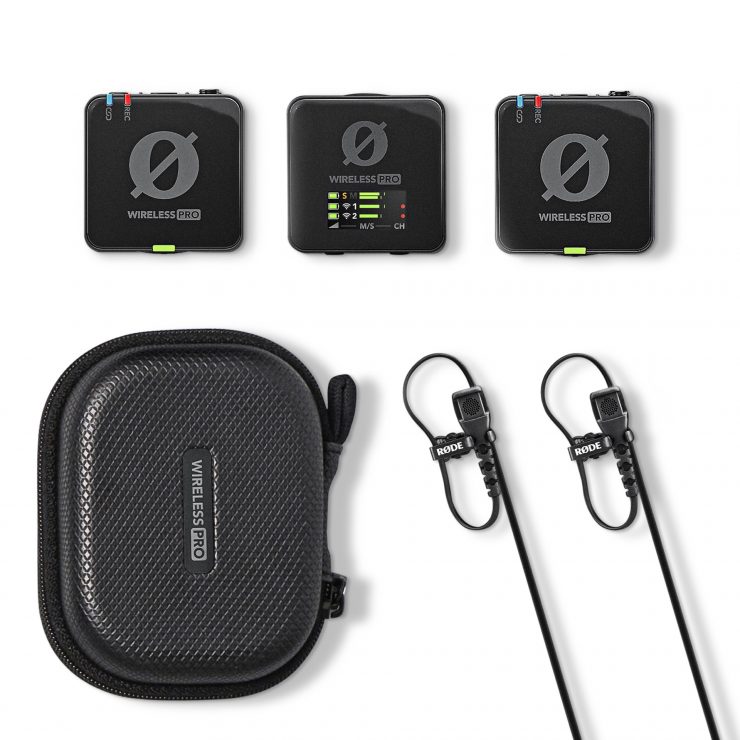
Smart Charging Case
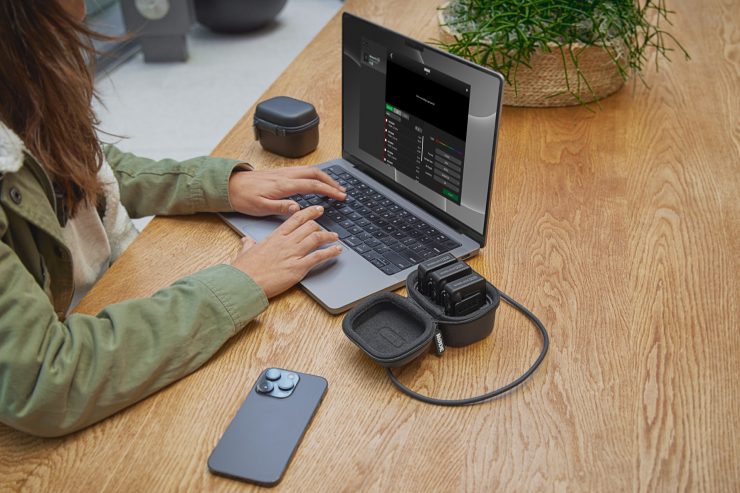
I really like this charging case. It’s “Smart” because it does more than just charge all three devices at the same time. It uses a USB-C port so you can directly attach it to your computer and the Rode Central app for charging, updating, and making settings changes.
The Smart Charging Case also protects the transmitters and receiver when in transit, ensures they are always fully charged, and facilitates ultra-fast data transfer for quickly exporting on-board recordings to a computer in the studio or in the field. The case provides approximately 14 hours of charging, and the Wireless Pro has seven hours of battery life.
The units automatically turn on when you pull the transmitters and receiver out of the charging case. This is a nice feature as it gets you going quickly. You can even set the TX to record when powered on automatically.
Mounting and Included Accessories
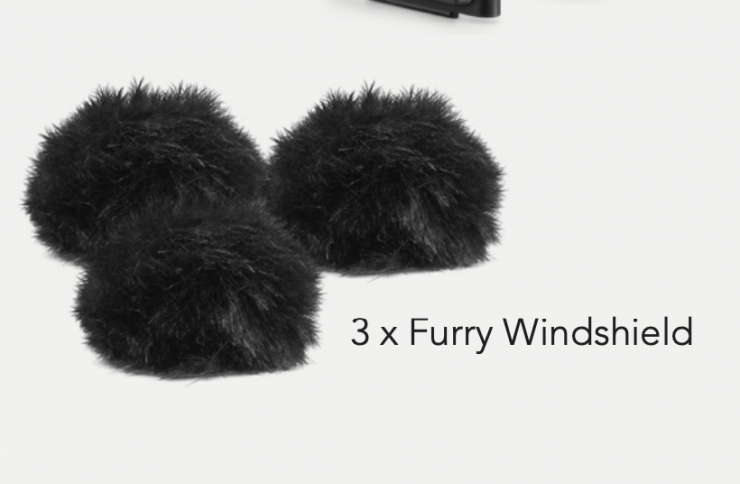
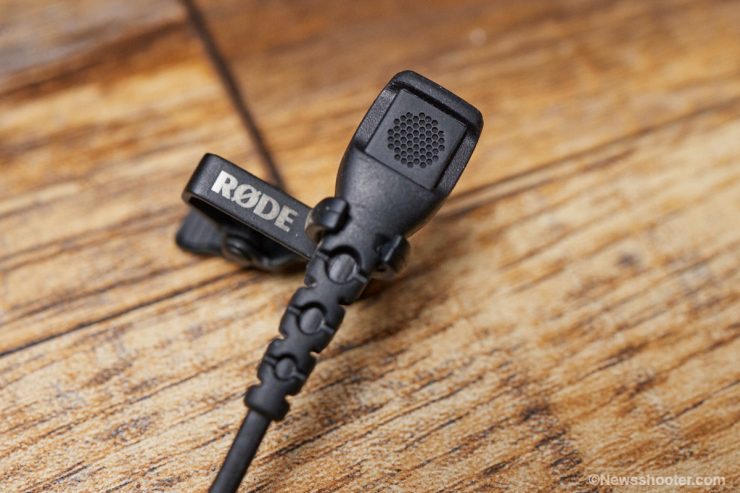
The two Lavalier II microphones have locking connectors and include a windscreen and lapel clips. The windscreens slide on but don’t lock or click into place. Also included are three mini dead cat windshields. I really appreciate how many accessories the system includes.
Something to keep in mind the Wireless Pro includes two RØDE Lavalier II microphones that retail for $99 each. The system retails for $399. Very competitively priced.
It also includes colored tags that can be used to identify each mic and transmitter combo. Rode uses the same color coding on their Rodecaster products as well.
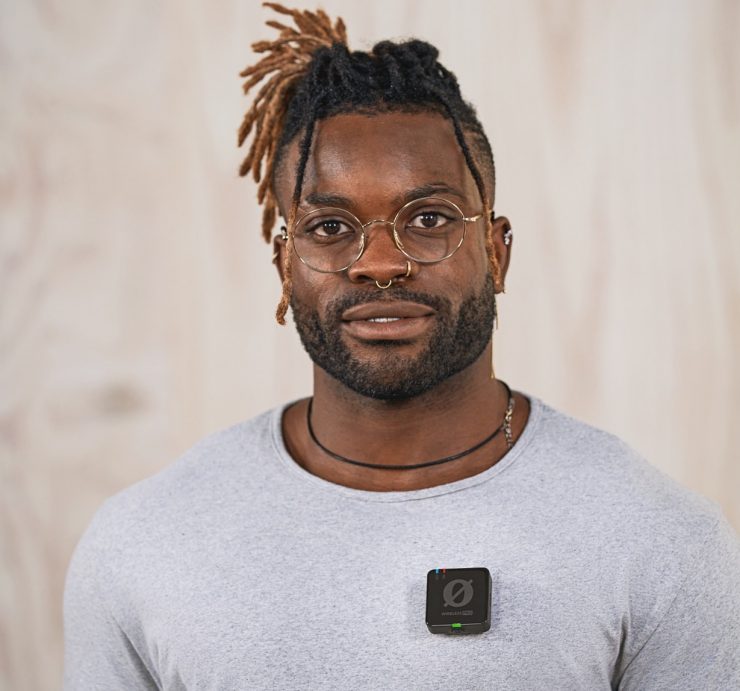
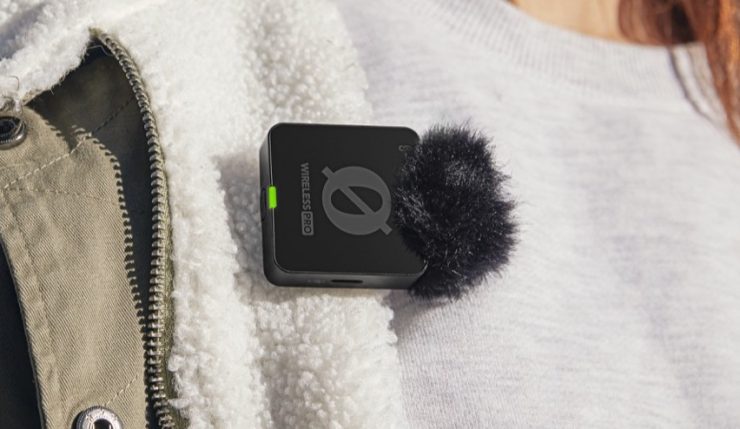
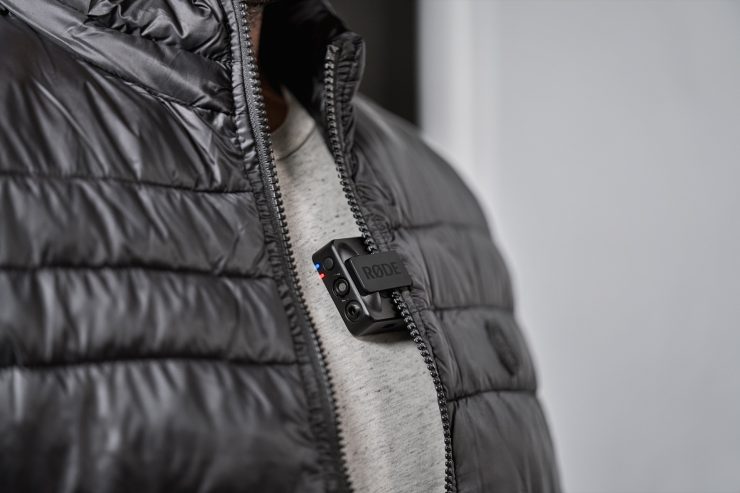
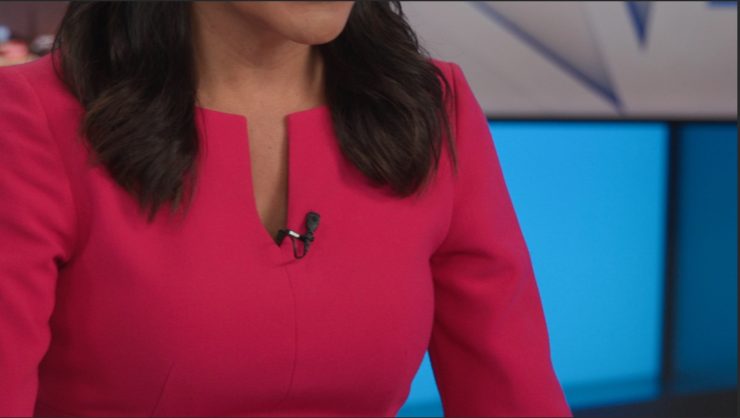
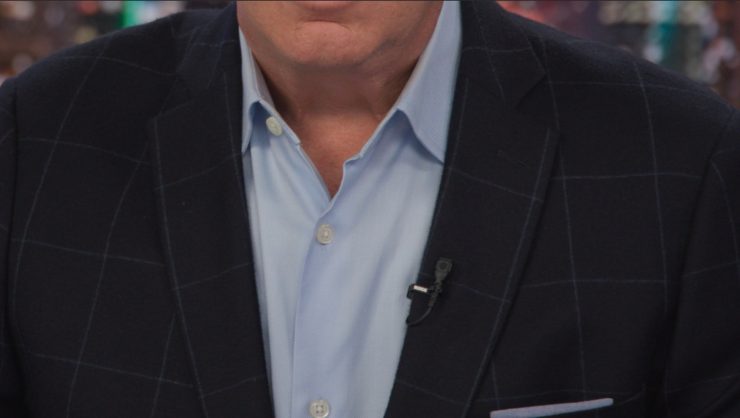
The MagClip GO magnetic clips hold very well. It’s surprising it doesn’t fall off easily. While this is a simple way to use the transmitter with the built-in microphone, it does stick out a lot. Finding a way to hide it will make it much less distracting; however, these smaller mountable TX systems have been available for some time now, and while I don’t like to see them on clothes, it’s becoming more common and accepted.
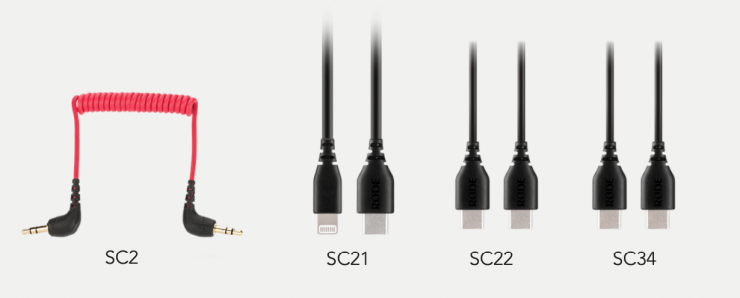
It also comes with three furry windshields that twist into the TX for recording in windy conditions. These hold in place pretty well. Also included are all the necessary cables for connecting to cameras, phones, and other devices, and a handy case for keeping all the accessories together. The system is well thought out, and the charging case is fantastic.
The Wireless PRO features the same pocket-sized form factor as the rest of RØDE’s compact wireless range, with a new black-on-black aesthetic. The case is a bit shiny and will reflect light if mounted on clothing.
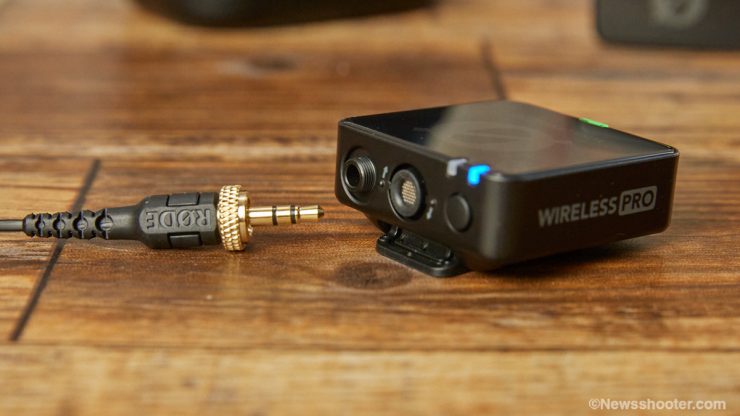
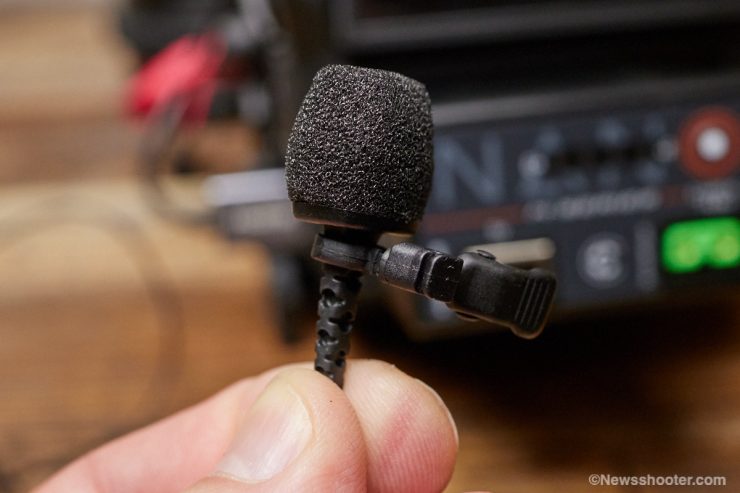
The lav microphone has a 3.5mm locking connector to secure the cable nice and tight to the transmitter. This is a welcome upgrade. I noticed you need to firmly push the 3.5mm connector in when tightening. You can get a false sense that it’s locked. This is important, especially if you are using the TX as a recorder and are not monitoring the audio. If the mic isn’t fully seated, it won’t work. Make sure it’s screwed on all the way to ensure a solid connection.
RØDE Lavalier II and Built-in mic Sound Quality
The two microphones are very similar, but I feel the Lavalier II is a bit better. It’s great to have both options, and they pair fine if you are using one with Lavalier II and the other with the built-in. Below is a sample recording in 32-bit float with both Lavalier II and the internal microphone.
The sensitivity of both microphones is very similar. I didn’t change the level settings. My take is the Lavalier II is a bit warmer with better bass.
The included dead cat windscreens work very well. You can get in extreme wind environments and still get clean audio. Dead Cats work very well in general. The only downside is they are large and look funny on camera, but I can live with that, especially if it means you can hear the subject without wind noise.
Some Lavalier II Isuess
Windscreen
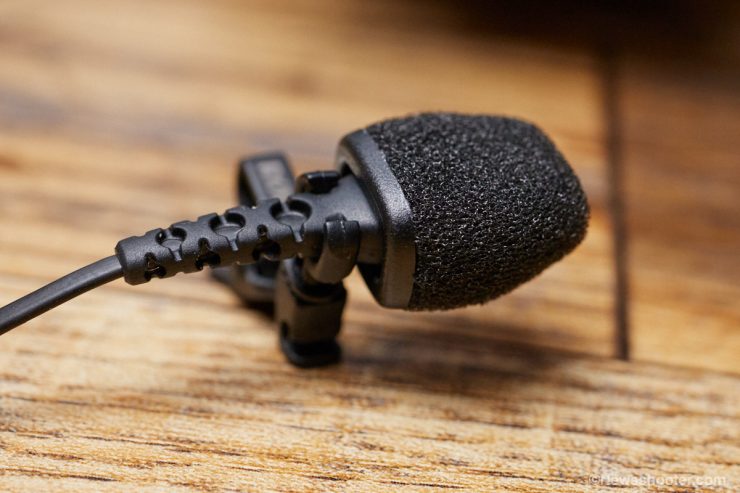
The Lavalier II has some issues worth noting. I mentioned they sound good. Check out Matts’s review, but you must be careful when using them with the windscreen; due to the front-facing element, you could accidentally mount the mic backward on the clip as you can’t visually tell the difference when the windscreen is attached.
The audio quality will be affected if the lav element is pressed up against a surface. This is a downside to this design. The top element design is much more versatile for hiding under clothing.
The windscreen also slips off easily, so I need to make sure I take it off before letting the talent run it up a dress or shirt. When they take the mic off, it can slip into the clothing or fall to the ground.
Mic Clip
The mic clip for the Lavalier II doesn’t hold the mic firmly. I haven’t had the mic fall off while using it, but you should remove it when taking the mic off talent, especially under clothing, as it will fall off.
Another issue is the reflective Rode logo on the front of the clip. It’s very visible on camera because it has a metallic shine and catches the lights. However, the small letters don’t help with branding either because it’s so small, and the reflective color pops on camera, looking odd and distracting.

I decided to use a Sharpie to cover the logo. It’s not perfect, but it will no longer reflect light and draw attention.
Other Microphones
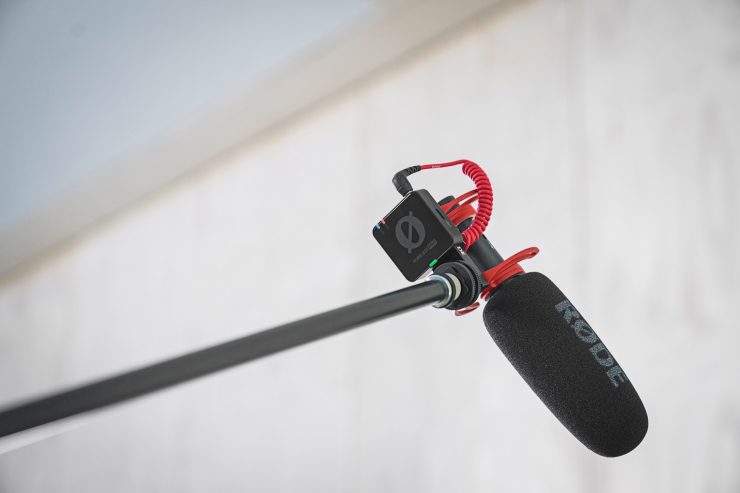
With the Wireless Pro, you can use any microphone with a 3.5mm connector. This means it can be mounted on a boom with a shotgun mic for a very compact, portable setup. I did this with the Rode Go, and it works well.
NOTE:
Sony lav mics with 3.5mm connectors are not compatible with any other devices other than Sony. This is because Sony uses a different pin configuration on the lav mics. It’s unfortunate that they do this. If you have a Sony wireless system and want to use a 3.5mm connector lav mic you already purchased for it, you are out of luck. I ran into this issue when I purchased a Sanken COS-11D for a Sony system. I later sold the wireless but kept the Sanken. I ended up having it rewired for a few bucks. Why Sony? why!
Wireless Range
The RØDE Wireless Pro is a 2.4 GHz system. This frequency is crowded, but it performs very well in short range and line of sight. An issue is when traffic with other cell phones and devices using the 2.4 GHz frequencies is vast, like a convention or stadium where tons of people and their devices are being used, getting a solid, uninterrupted single can be problematic. This is not a typical use scenario.
I generally use UHF systems that allow me to select different frequencies if I run into issues, but to be fair, they also have issues, so it truly depends on the location in a lot of ways. Plus, an alternative system, such as a 2.4 GHz, could be useful.
RØDE states the Wireless Pro has RØDE intelligent GainAssist technology that produces a clear, strong signal. The stated line of sight range is 260 meters or 850 feet of range. This is a long-range, and most scenarios would be around 100 feet from the camera. It’s important to note ‘line of sight” as even your body can block the signal. It is best to make sure they have a clear path.
I used the system for a promo shoot in the main studio. The talent was behind a desk, and the TX was in front of their bodies. I didn’t have any issues. When you are pushing the distance range, you need to be careful.
I tested the RØDE Wireless Pro in my neighborhood to see how it performed, walking around my home with walls as obstacles.
I found that the range is pretty good, and the key to success is using it with the recommended line of sight. These systems don’t do well if placed behind a person, like on a person’s back on a belt. The body will interfere with the signal even around 100 feet. If you keep it clear, you will have success. I do feel these systems are great for close-range shooting, such as news gathering or stand-ups. This is where they shine. No one likes to deal with cables, especially when on the move and capturing audio.
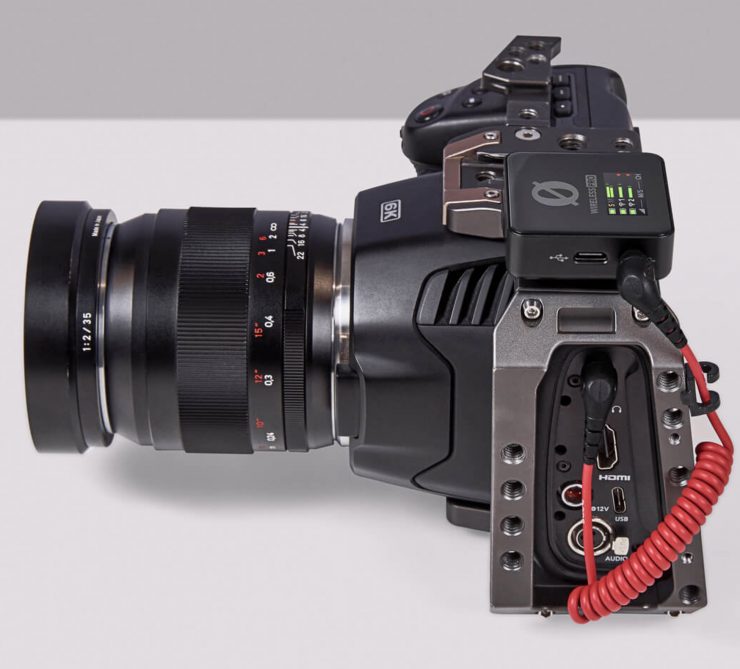
Dual-channel Receiver
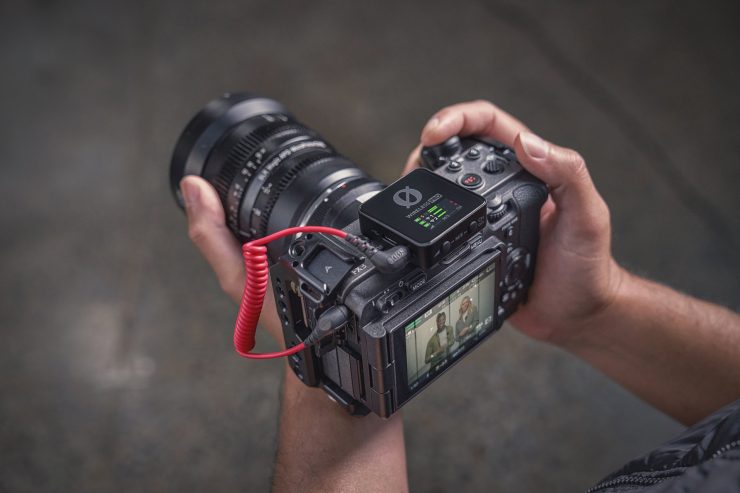
The receiver is universally compatible with cameras, smartphones and tablets, computers, and other audio devices via its analog 3.5mm TRS and digital USB-C outputs. It also has the same mounting clip as the TX. The clip doubles as a cold shoe mount, making it easy to attach to a mirrorless camera or handle on a cage. The beauty of these systems is how tiny and lightweight they are. This makes mounting a breeze on any size camera you want to use.
Auto on/off
I love the auto on/off function of the RX. When you power the camera on or off, the receiver will follow. This takes out the potential issue of forgetting to power it down and will save your bacon later when you pull the camera out.
Not just for cameras
Since the RX can connect with USB-C input you can use the Wireless Pro with a computer, Simply plug it into an available USB-C input and change the audio device in the computer’s settings. Now you can use two channels of audio for an online meeting with any app such as Zoom, Skype, and other popular streaming platforms. Make sure to also select the Wireless Pro in the app being used.
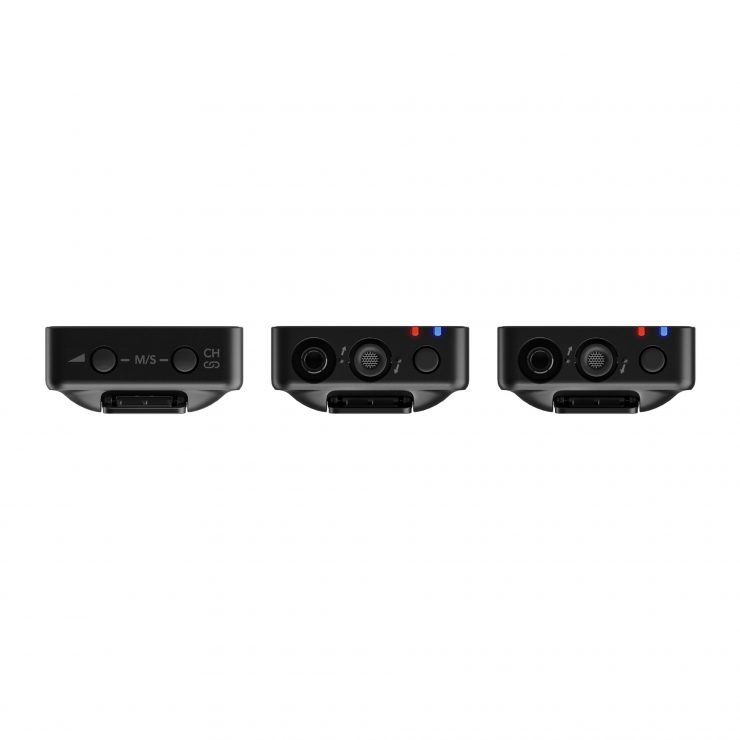
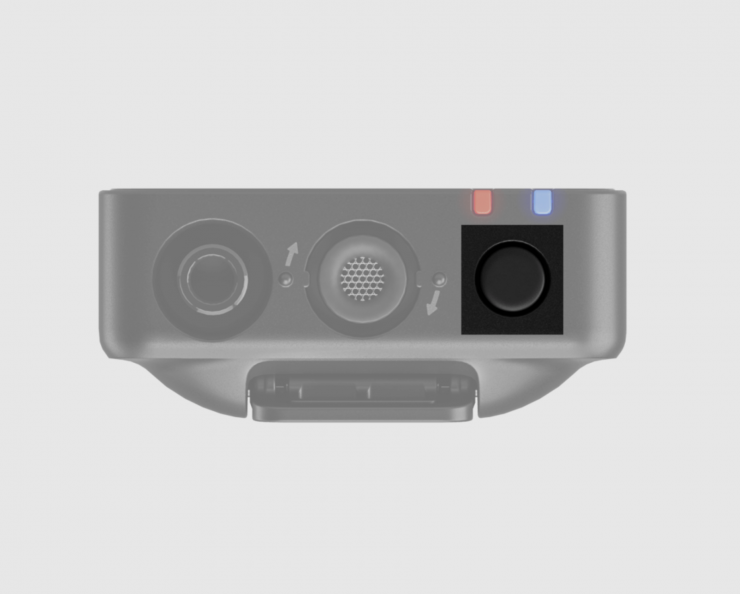
Customize the Power Button
Both the transmitters and receiver feature a Ø button, which, when long-pressed, functions as a power on and off, but you can also configure each button to perform a variety of short-press functions.
Receiver (RX)
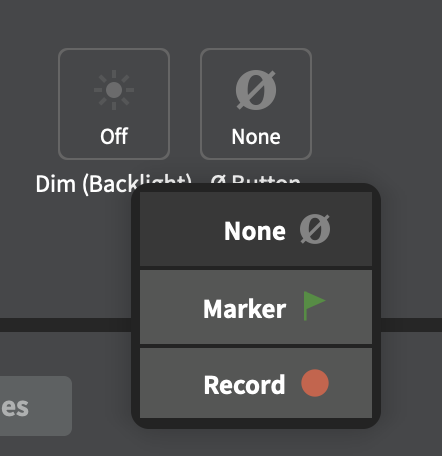
Marker – places a marker in the on-board recordings of both transmitters.
Record – starts or stops on-board recording for both transmitters simultaneously.
Transmitter (TX)
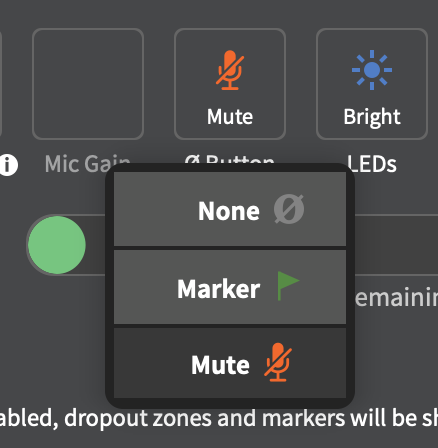
Marker – places a marker in the on-board recording of just the transmitter on which you press the button.
Mute – mutes the signal being sent from the transmitter to the receiver (but doesn’t affect on-board recording).
Note: Short-pressing the Ø button will enter pairing mode if a transmitter is unpaired. Also, the markers, if set to add on the RX, will be added to both TX recordings.
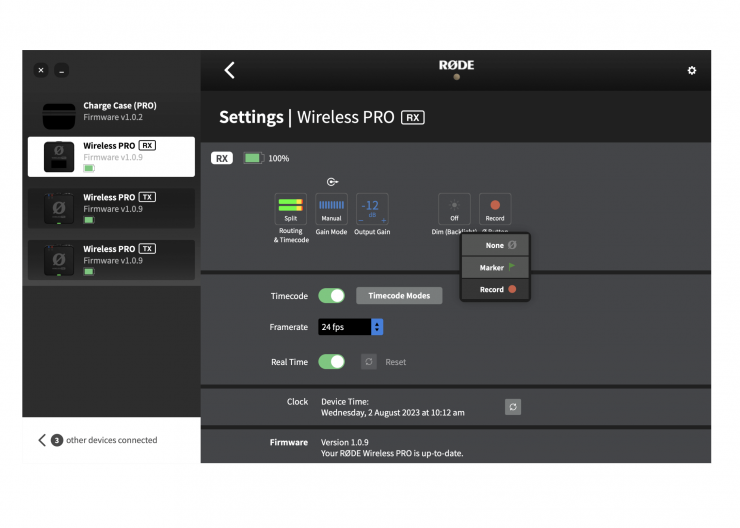
I like the option of customizing the power button on the receiver and transmitter. I set mine to start and stop recording on the TX units. This is handy if you don’t want to record when not rolling continuously. The other option is to set it for adding markers. It’s great to have options.
Configuring Camera Presets in RØDE Central
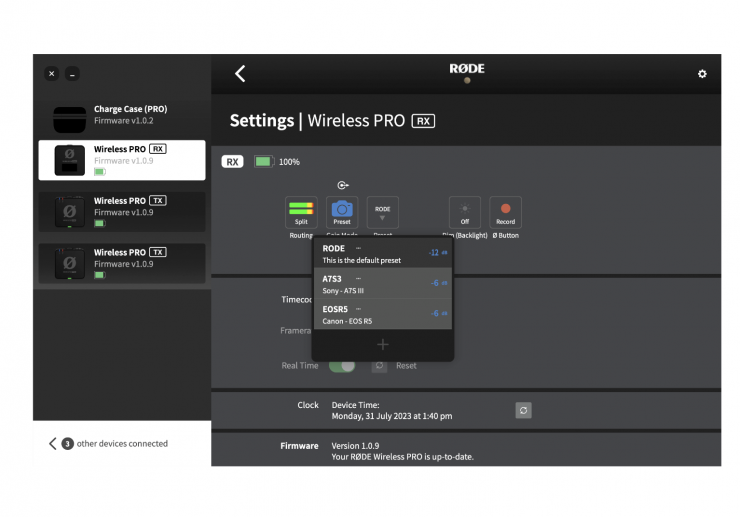
In RØDE Central, you can select from a list of presets for a wide range of popular camera models. These presets automatically set the gain levels of your Wireless PRO’s output to match the camera you’re using it with.
To access these presets, connect your Wireless PRO receiver to your computer and open RØDE Central then Click ‘Gain Mode’ and select ‘Preset’ with the camera icon. Now you can click the next button labeled ‘Preset’, click the ‘+’ button, and select the manufacturer and model of the camera you are using.
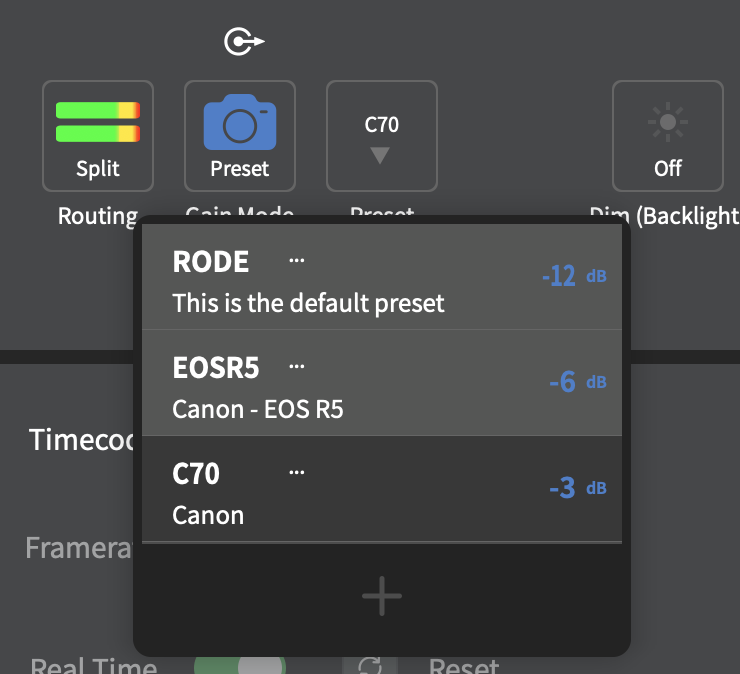
You can also add your own custom profiles by selecting Custom and adding the camera you use and the settings for that camera. It saves it and is now available to load.
I made a custom setting for the Canon C70. I set the C70 ch.3 and ch.4 levels to “Manual” at a record level of 30. I’m getting a good level without clipping. If it needs adjusting, I will go into the C70 menu and make changes.
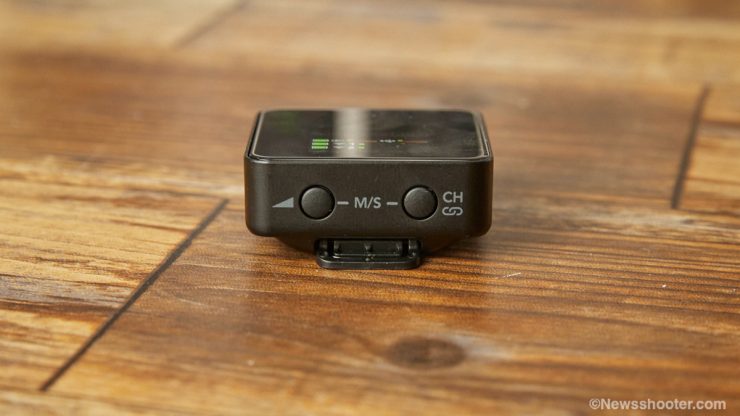
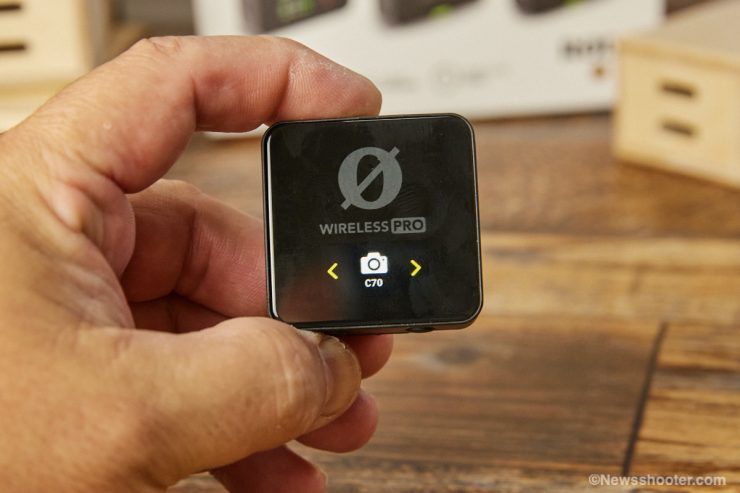
With your camera presets loaded and your Wireless PRO in the Camera Preset gain mode, you can cycle through your saved presets by pressing the Left Navigation button on the receiver while on the home screen and then using the Left and Right Navigation buttons.
32-bit float on-board recording
32-bit float onboard recording is a welcome addition as it’s a powerful feature that eliminates the chance of over or under-recording levels. It won’t save the day if you have other issues, such as wind noise or fabric rustle, but it sure is magical in situations where recording over or under happens, and you can fix it post by simply adjusting the level. Easy as it gets!
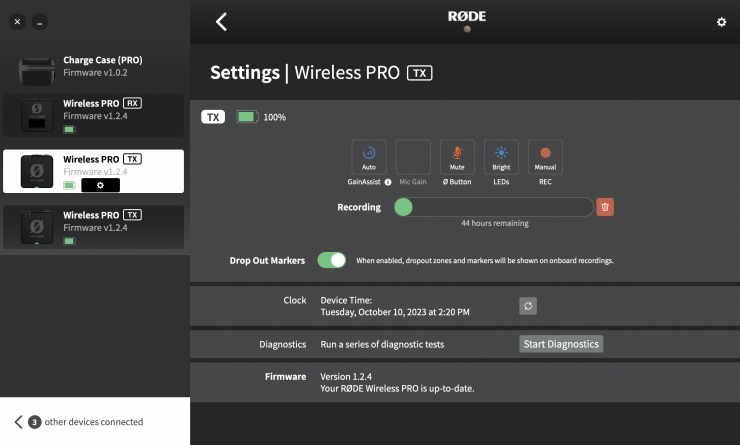
The transmitters have 32GB of internal memory, allowing for over 40 hours of onboard recording, with dedicated buttons on the transmitters making triggering recordings fast and easy.

The Wireless PRO includes RØDE’s GainAssist technology, which utilizes intelligent algorithms to automatically control audio levels on the fly, ensuring balanced output and minimizing the risk of clipping. It also features a flexible output control with a 30dB gain range available, allowing users to precisely tailor the mic’s output to their camera and pre-configured camera presets for quick setup.
For added peace of mind, the Wireless PRO also offers a safety channel feature, which outputs a second channel of audio 10dB lower than the primary channel in case the signal is too hot and clips the camera input.
You can configure the transmitter to start recording when powered up or manually start recording automatically.
Manual: In this mode, on-board recordings are started and stopped when you press the record button on the transmitter.
Always: In this mode, on-board recordings will always be running if the transmitter is powered on, even if it’s not paired or connected to a receiver.
RØDE Central App
The RØDE Central App is required to make certain setting changes. However, it also makes it much easier to make those changes on the Wireless Pro since the device is so small and has a tiny LCD screen with limited buttons. You have to use a combination of button pushing to navigate. Navigating the menu with RØDE Central is also available for mobile devices on both iOS and Android. The app is clutch and very easy to use.
I really like that you can use the charging case with the Rode Central app. This way, you can charge all three plus the case and make setting changes. It’s the perfect multitasking scenario, all with one USB-C cable.
When connected, you can now have access to the recordings on both transmitters. More on this later in the review.
iOS App

Don’t have a PC avaiable? No problem, as they also have the RØDE Central available on mobile for both iOS and Android that can do pretty much the same as the desktop version, including the timecode settings. You will have to use the included cables to connect to the app, as it doesn’t have a Bluetooth option.
One cool feature is you can use the supplied cable to connect the charging case to the mobile device and have access to all the Wireless Pro devices at the same time. This makes it easy to change settings or to double-check that you are set up correctly for the shoot. I like the direct connection, as Bluetooth can be problematic. You can’t change the frame rate when using the mobile app.
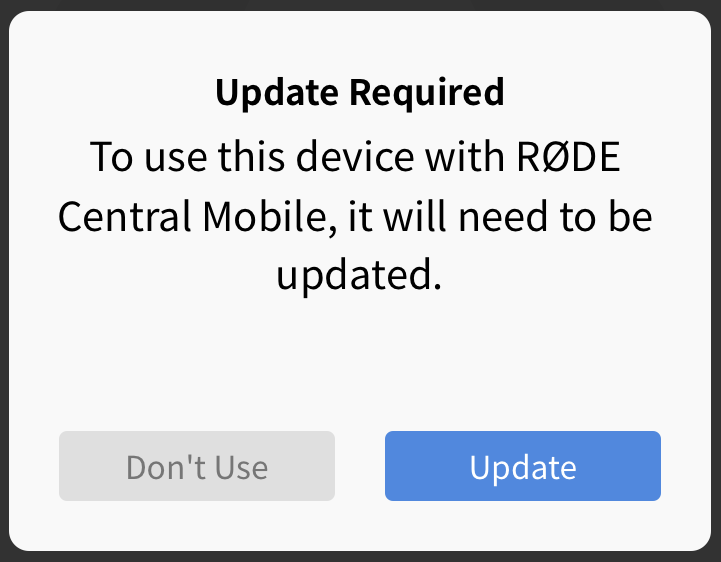
To use the iOS app, I needed to update the firmware on the Wireless Pro RX and TX’s. This is performed by directly plugging into the mobile device and performing the updates. It’s very easy and doesn’t hiccup. Once it’s done, you get a warning that all of them need to be updated, or it will not function.
Mobile Video
Since we are talking about connectivity with a mobile device, the Wireless Pro can be used as a two-channel wireless audio system with your mobile device.

I tested it with my iPhone’s new Blackmagic Camera app, and it works great. You have to change the audio input to the Wireless Pro in the Blackmagic Camera app. In “Audio Settings,” simply select Wireless Pro RX.
The audio input automatically changed to the Wireless Pro on the iPhone camera app when connected.
Exporting On-board Recordings
There are two methods for exporting your on-board recordings onto your computer. The best way would be to use the RØDE Central app, as it has many export options. You can also drag and drop the files directly from the transmitter, like an external drive attached via USB-C. The transmitters will not appear as a mounted drive if you don’t have the RØDE Central software installed. It will once you open the RØDE Central app. This might be frustrating for some if they don’t want to open an app to move files; however, you have export options using RØDE Central.
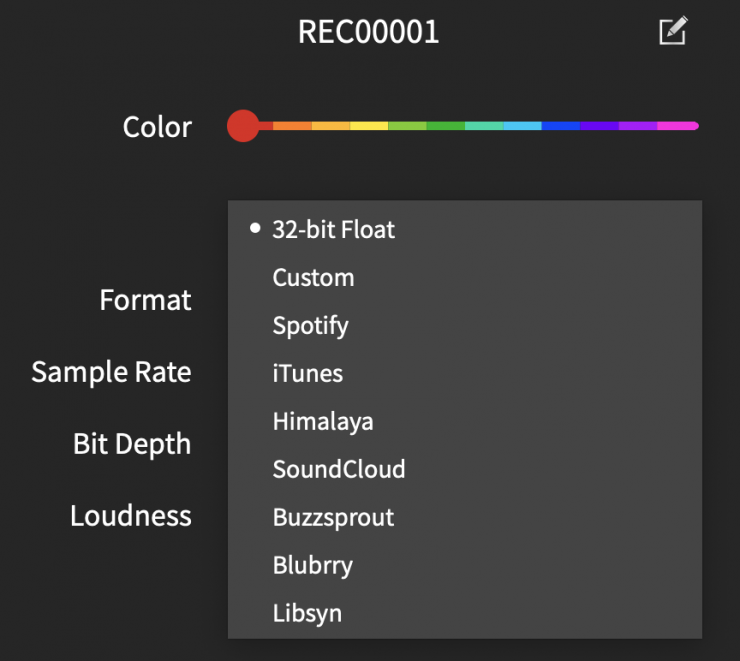
With the file recorded in 32-bit Float, I can use installed presets for different platforms so the audio will be compatible. This is handy for the less audio-savvy user.
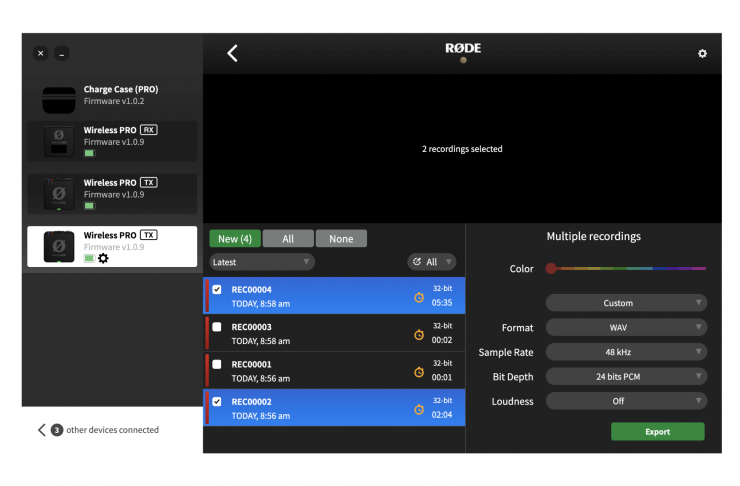
It gives you access to placed markers along with a variety of export options, such as the ability to normalize your audio and change its file format, sample rate, bit depth, and loudness.
Deleting Recordings
Each transmitter can record over 40 hours of 32-bit Float audio. That is a lot! When the storage in the transmitter is full, new recordings will begin overwriting the oldest recordings. It’s a good idea to export all of your audio and then delete the files from the Wireless PRO to ensure you don’t lose any audio you haven’t saved.
Unfortunately, you can’t delete individual files from the transmitter. All or nothing is a bit of a bummer. You also can’t delete files when accessed as a mounted drive.

Clicking the transmitter settings cog in RØDE Central will allow you to see how much storage space you have left and the ability to mass delete all recordings on the transmitter.
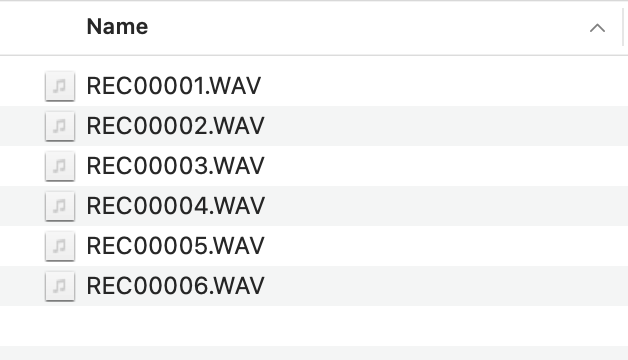
Unfortunately, the naming convention defaults back to the REC00001 and so on. It would be better if it had an option to continue from the last. It also names the files the same on both transmitters, so you end up with duplicate file names. If you are doing a two-person interview, you are going to want to do some organization with these file names, or it could get messy. In the app, you can change the names of individual files, but that would take way too long. I would export the files to separate folders and batch rename them to be more edit-friendly.
The application offers several formats for exporting or changing the original file to a different format.
Click on a recording, and you’ll see its waveform data, as well as information on any audio dropouts or markers (more on that shortly) in the timeline at the top of the software. In the bottom-right corner, you’ll see a number of export settings for your selected recordings, which you can adjust before clicking the export button.
Normalise 32-bit Float Files With RØDE Central
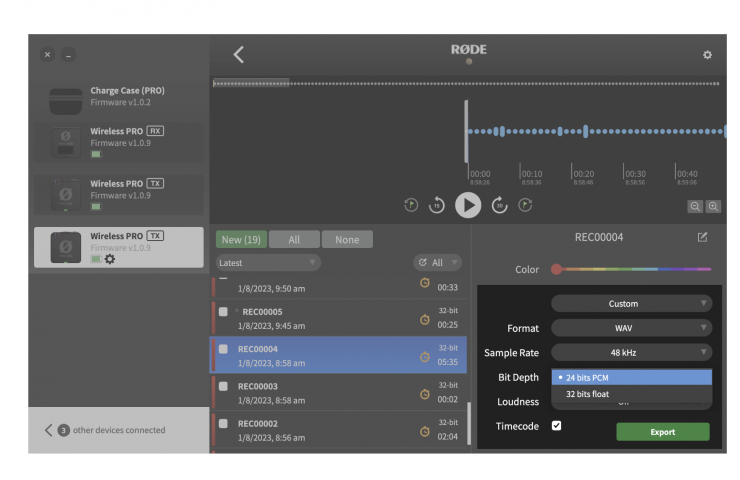
If you don’t want to use an NLE or audio application to normalize the 32-bit float files, you can do so with the RØDE Central software on export. When exporting using RØDE Central, select “Custom” from the first dropdown menu in the export settings, and then choose “24 bits PCM” from the ‘Bit Depth’ dropdown and then click ‘Export’ – this will automatically normalize your 32-bit float files and export them as 24-bit files, ready for use.
I think it’s a better practice to do your audio editing in the software than with the RØDE app. 32-bit float is compatible with all the popular NLE and audio editing software.
32-bit Float Compatible Software
- DaVinci Resolve
- Adobe Premiere Pro
- Final Cut Pro
- Reaper
- Ableton Live
- Adobe Audition
- Audacity
- Pro Tools
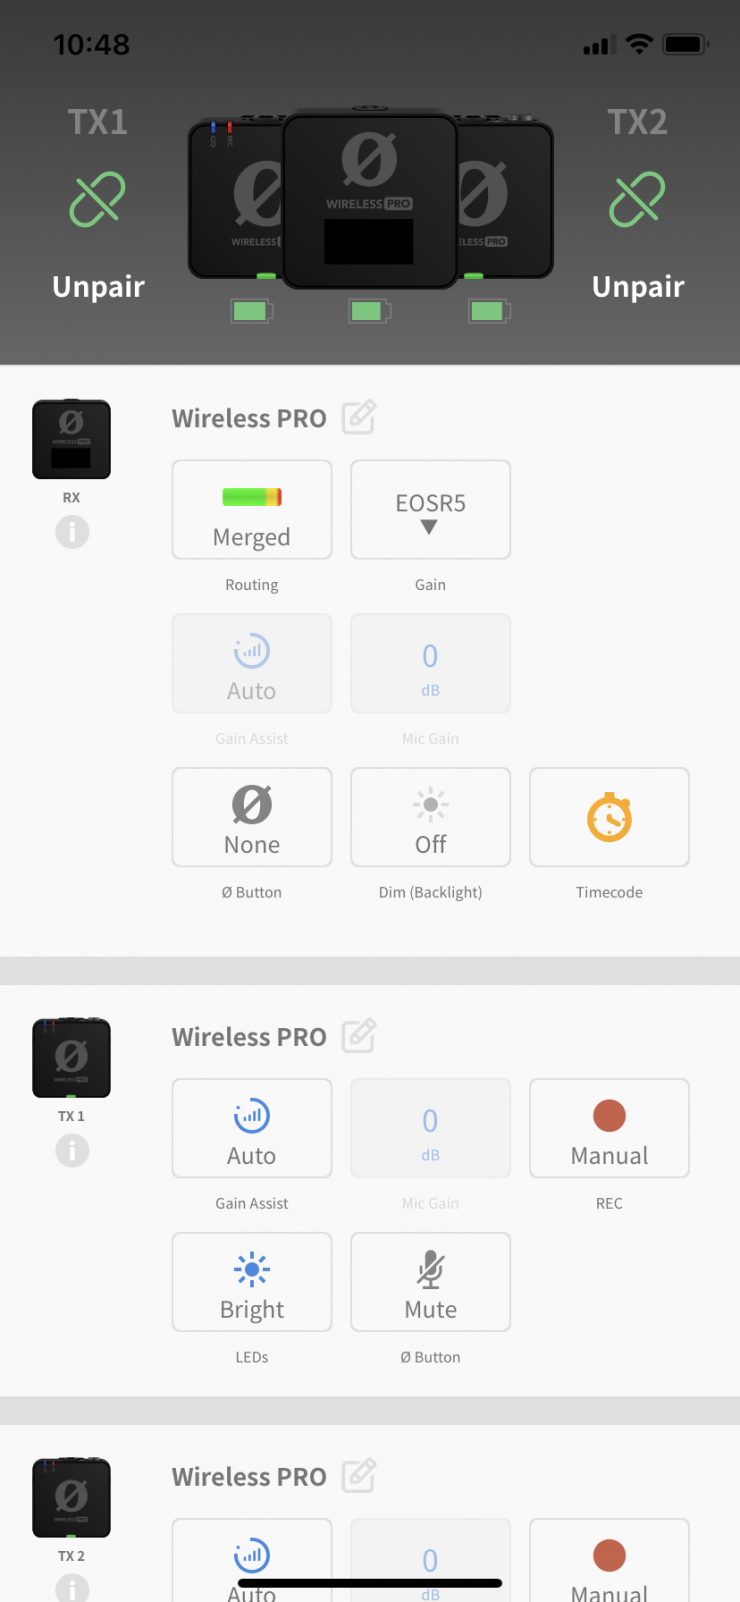
Merged, Split & Safety Channel Modes
In most cases, you will want the audio split not mixed so you can adjust them separately in post. A lot depends on the use of LTC timecode as it requires its own track. Rode offers a lot of configuration options.
By default, the Wireless PRO will be in Merged mode. I would switch to Split mode so you are ready for separate two-channel audio.
You can make changes by pressing and holding both the Left and Right Navigation buttons at the same time to enter the routing menu.
Cycle through the available modes by short-pressing the Left Navigation button and selecting your desired mode with the Right Navigation button. It’s a bit cumbersome, so using the Rode Central app is a much better way to change settings.
Merged Mode
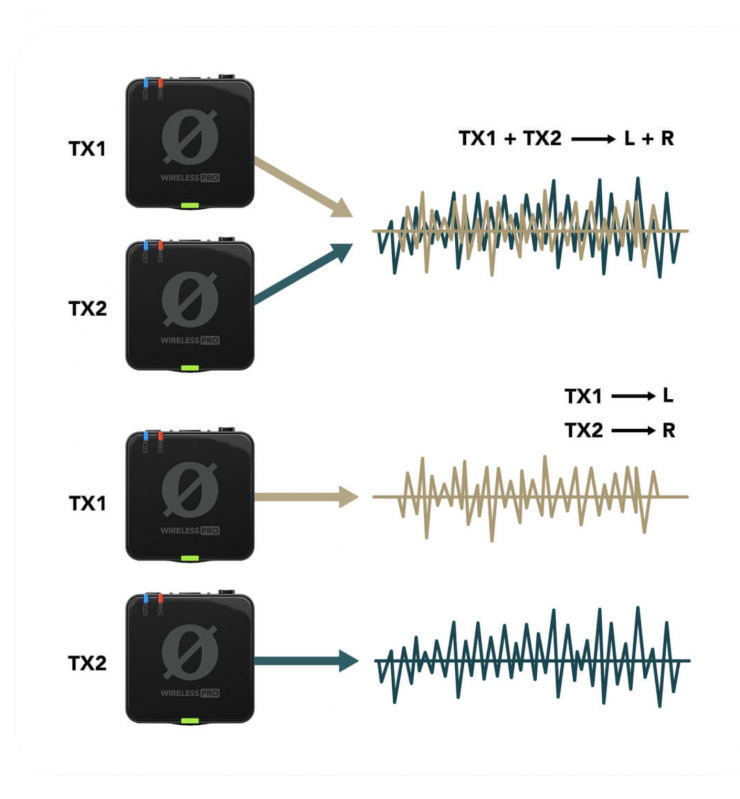
In Merged mode, the two transmitters (and RX Mic, if it is being used) are combined into a single summed output. This is great if you’re using the Wireless PRO in a live presentation setup, or only using one transmitter and want the audio to be recorded onto both channels of your recording device.
Split Mode
In Split mode, each transmitter’s output is recorded onto separate channels (left and right) on the Wireless PRO’s output. This means each channel can be processed individually in post-production, which is great for two-person interviews and other recording scenarios where you need to be able to edit and mix each sound source independently. If you are using a headset microphone connected to the receiver’s 3.5mm connection (RX Mic), the audio from the transmitters will be merged onto the output’s left channel and the RX Mic will be routed to the right channel. See the below table for more information on split-mode routing.
Safety Channel Mode
When Safety Channel mode is activated, the Wireless PRO will also output a second channel of audio -10dB lower than the main channel. This is useful in case your sound source gets very loud unexpectedly and your audio clips, as having this second channel means you will have a clean backup of your recording. The safety channel is indicated by the blue shield icon and is only available in merged mode. When activated, all of your inputs (both transmitters and RX Mic) will be merged to the left channel and the safety channel will be output to the right channel.
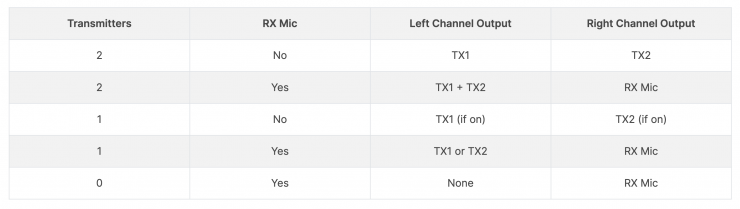
When in Split mode, the stereo (Left/Right) output will be configured differently depending on which inputs are being used and which transmitters are actively paired. Below is a table showing each possible output mode in Split mode, depending on which transmitter (TX1 or TX2) you have connected, as well as a headset or Lavalier microphone connected to the receiver (RX Mic).
Timecode with the Wireless PRO?
Here we are… finally! So much to cover with the Wireless PRO, and timecode is a biggy!
Timecode synch makes life so much easier in post-production. Yes, the good old clap in front of the lens works, but synching separate audio with frame-accurate timecode is the best and fastest way.
The Wireless PRO uses the SMPTE (Society of Motion Picture and Television Engineers) timecode standard with LTC encoding (Linear Timecode), which is the most widely used format. The Wireless PRO receiver acts as the ‘Source’ in a timecode setup, meaning that the timecode is generated by the Wireless PRO and is received by other ‘Sync’ devices, such as cameras and audio recorders. The video below is worth a watch…
Working with timecode is a bit cumbersome with the Wireless Pro, but don’t get me wrong, as it’s worth the effort if you can follow the workflow. It’s mainly due to the LTC timecode that records an audible signal to one track on the camera, and the timecode is embedded in the transmitter recordings.
If you are using one transmitter and recording simultaneously, you can monitor and record into the camera as well as a 32-bit float recording, but
if you want to use two transmitters, you will have both transmitters on the left channel with LTC recording on the right channel. This is a bit of a sacrifice with the LTC system. It is not ideal, but you can monitor both and have a recording of both mics in camera and easily replace the audio tracks in post since the timecode will match. You will have to convert the video clips LTC audio in either dedicated software or DaVinci Resolve. More on this later in the review.
You have to make some decisions on workflow.
Other timecode devices cannot jam the Wireless Pro. It uses “time of day” or can be reset to “0”. You can use the Wireless Pro to jam a camera like the C70 with a dedicated TC input and keep it connected for the best sync. Jamming then removing works well but is more prone to drift over time.
While you can’t jam the Wireless Pro directly, you can use another jamming device such as the Tentacle SYNC E or Deity Microphones TC-1 and leave it attached to the TC port on the camera set to time of day and can use the Rode transmitter for recording and wireless transmission. This option doesn’t fix the issue with LTC timecode on the recording, as you have to record LTC on one track on the TX. Yes, it’s a bit clumsy if you want to use both transmitters for a two-person interview. The recorded audio from both transmitters will have to be on the same track, and the transmitted audio into the camera will be mixed on the left channel. This isn’t an issue since you are recording the audio with timecode on both transmitters that you will sync in post. The in-camera wireless audio is more for monitoring and recording the LTC timecode track.
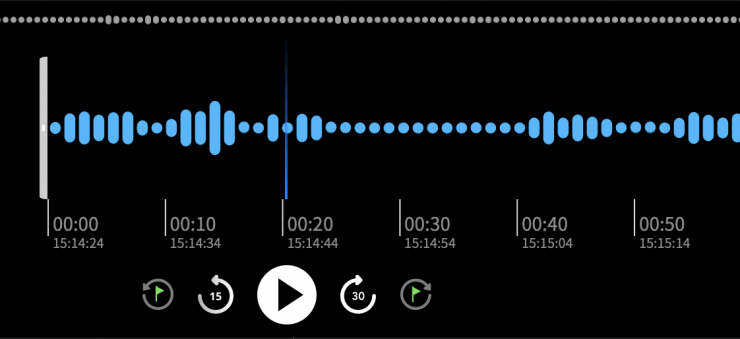
In the picture above, the audio file was recorded without using LTC timecode option. I was surprised that I could see the time of day that the audio file seems to have recorded on the file, but when you export that clip or copy it off the transmitter, the TC isn’t present. I’m not clear how the transmitter has the metadata on the clip when playing it in the Rode Central app, but is not embedded.
My only theory is that the metadata includes the date and time the audio file was created, and the Rode Central app uses that as a base starting time. If you could add an in and out point on the audio clip and export, you could get a good synch with your camera’s time of day TC. Unfortunately, the Rode Central app doesn’t support editing sections for export.
Walkthrough Guides
RØDE has created walkthrough guides for a number of popular cameras and devices that accept timecode natively. Any camera or device that accepts the SMPTE standard format will work with the Wireless PRO:
- Arri Alexa Mini LF
- Arri Alexa 35
- Blackmagic Ursa Mini Pro 12K
- Blackmagic Pocket Cinema Camera 4K
- Blackmagic Pocket Cinema Camera 6K
- Blackmagic Pocket 6K Pro
- Canon EOS R5 *
- Canon EOS R5C
- Canon EOS C70
- Canon EOS C300 Mk II
- Canon EOS C300 Mk III
- Canon EOS C500 Mk II
* These cameras don’t accept timecode, but you can still follow the linked guide to record timecode information as audio.
NOTE:
If you are using the receiver as a timecode device with the Wireless Pro set to Timecode 5, you won’t be recording audio on the camera, as it becomes a TC-sending device that is usually attached to a dedicated BNC port. The obvious issue is not being able to monitor the recordings on the transmitter. Yes 32-bit float will save your bacon when it comes to levels, but wind noise, fabric rustle/rubbing, or a mic that becomes unclipped can all be problematic if not recognized and fixed.
No video/audio merging options for synched clips
One HUGE miss is that the Rode Central app cannot merge the timecode audio recordings with the video clips. This is something you will have to do with another program. Rode has instructions for using DaVinci Resolve to sync and export the clips for us in FCP and Premiere Pro.
A big issue is LTC timecode isn’t supported with Premiere Pro or Final Cut Pro. Only DaVinci Resolve supports it natively, so you will need to buy software to merge the audio and video files together to take full advantage of separate synched audio or use DaVinci Resolve to merge the audio with the video.
An option is to purchase Tentacle Sync Studio Software. It works great, and since I already own several of their Track E and Sych E devices, I have the software included. To purchase it costs $149.
The receiver (RX) must always be powered on for the Wireless PRO to generate the timecode correctly. The transmitters (TX) on-board recordings need to be paired to the receiver at all times for them to contain timecode information.
Connecting The Wireless PRO to a Dedicated Timecode Port
Some cameras feature dedicated timecode ports, such as the Blackmagic Cinema Camera, in which case you will need to use Timecode Mode 5. If the port doesn’t feature a standard 3.5mm TRS connection, you’ll need an adaptor to connect your Wireless PRO receiver’s 3.5mm output to whichever proprietary format your camera uses. If your camera isn’t recognizing the timecode signal sent to its dedicated timecode port, try raising the output gain level on the Wireless PRO receiver. Some cameras only detect very loud signals.
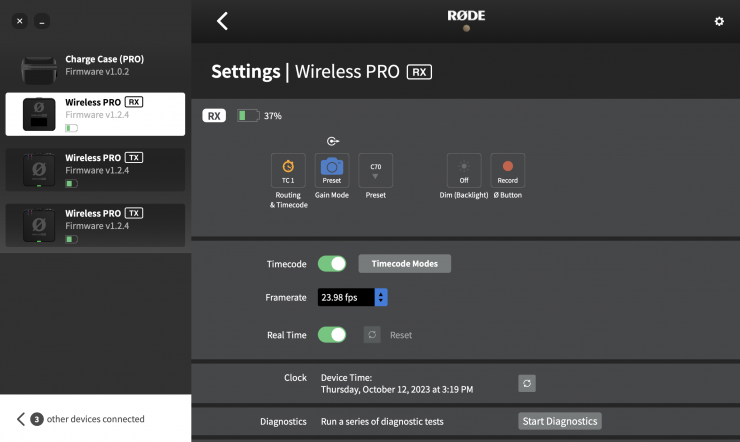
Timecode Framerate
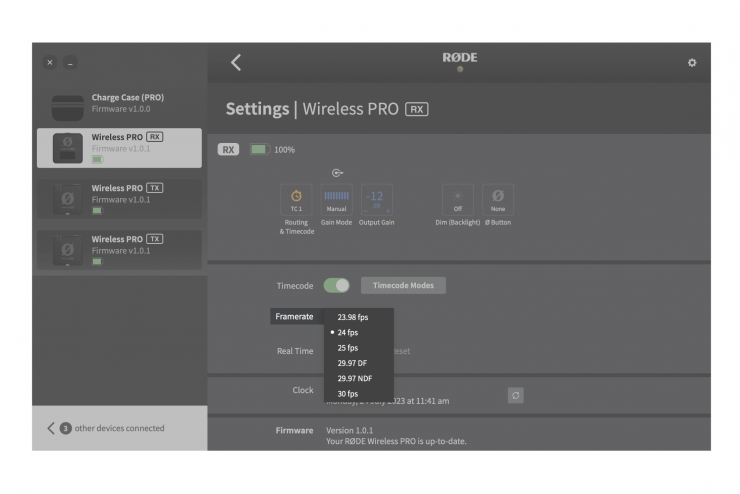
It’s important to establish the framerate you’ll be shooting your project at and set the timecode to match it. This forms the foundation for how your timecode keeps track of time, and if it doesn’t match your footage, it will fall out of sync or fail to sync in the first place.
If your selected framerate is higher than those available in the below list, select the option that divides perfectly into your project’s framerate (e.g. when shooting in 47.96fps, choose 23.98fps).
- 23.98 fps
- 24 fps
- 25 fps
- 29.97 DF (Drop Frame)
- 29.97
- 30 fps
Note: Some cameras offer a 29.97 framerate without specifying if it’s drop frame – in this case, check the camera’s documentation to determine which format it is.
Timecode Modes
Timecode Mode 1 (3.5mm and USB, Merged)
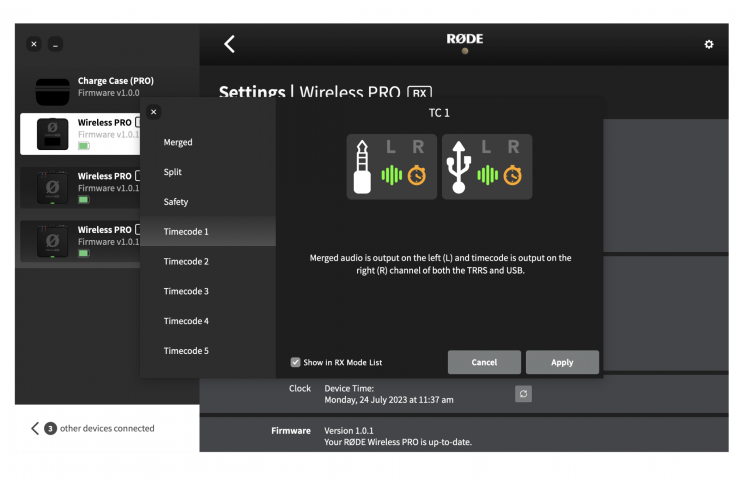
This is most likely the mode that will suit your setup. In Mode 1, the audio signal from both transmitters will be summed and sent to the receiver output’s left channel, and the timecode signal will be sent to the receiver output’s right channel (via both the 3.5mm and USB outputs). This means your camera will receive timecode information on the right channel and audio on the left channel.
Timecode Mode 2 (USB with Headset, Split)
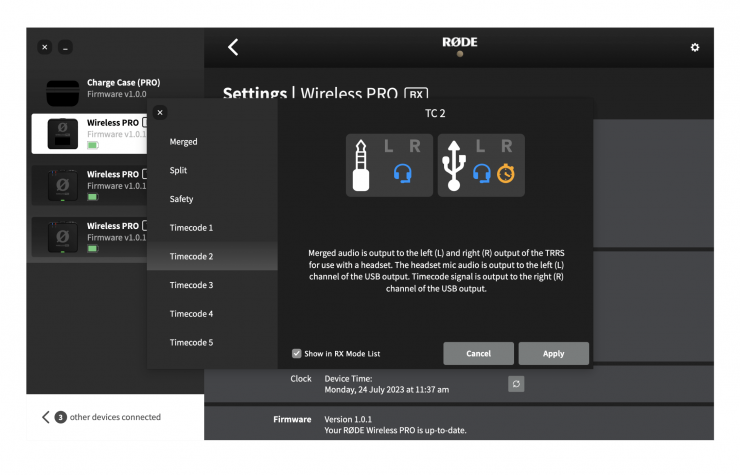
Mode 2 is for when you have a headset connected to the receiver’s 3.5mm TRRS output and you want to capture audio from both transmitters and the headset microphone on separate channels. In this mode, the headset mic audio will be sent via USB in the left channel, and the right channel will contain the timecode information. Each transmitter will capture audio as on-board recordings, and all three input sources will be summed and sent to the receiver’s 3.5mm output so you can monitor all sources in your headset.
Timecode Mode 3 (USB with Headset, Merged)
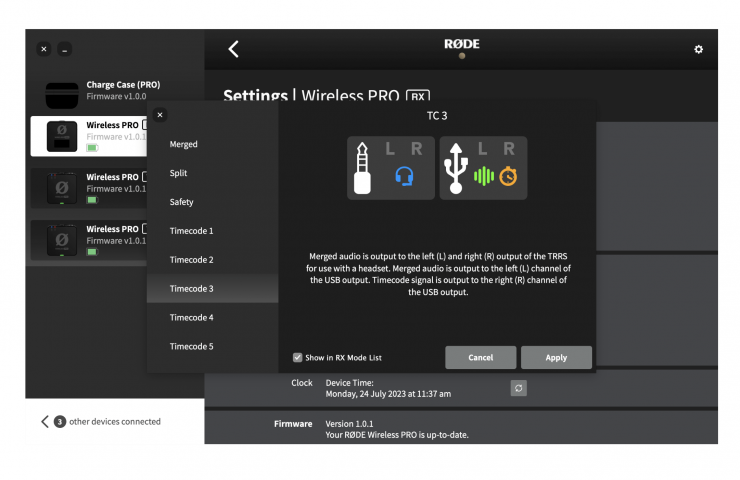
Mode 3 works identically to Mode 2, except the audio sent to the left channel of the USB output will be a summed output of all three microphones (TX1, TX2 and your headset microphone) rather than just the headset microphone.
Timecode Mode 4 (USB with Monitoring, Merged)
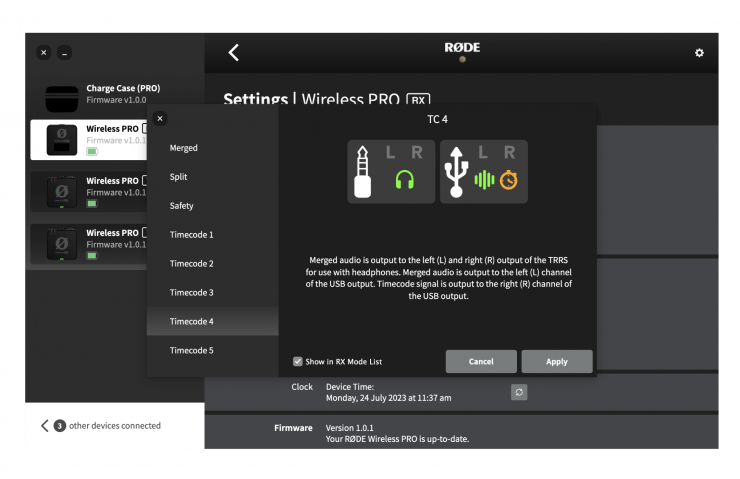
Mode 4 is the same as Mode 3, except that it is optimized monitoring with headphones instead of a headset (i.e., there is no headset microphone input). The USB output contains a summed output from both transmitters (TX1 and TX2) on the left channel and the timecode information on the right channel. This leaves the receiver’s 3.5mm output available to connect headphones for monitoring your audio.
Timecode Mode 5 (Timecode Only / Jam Sync)
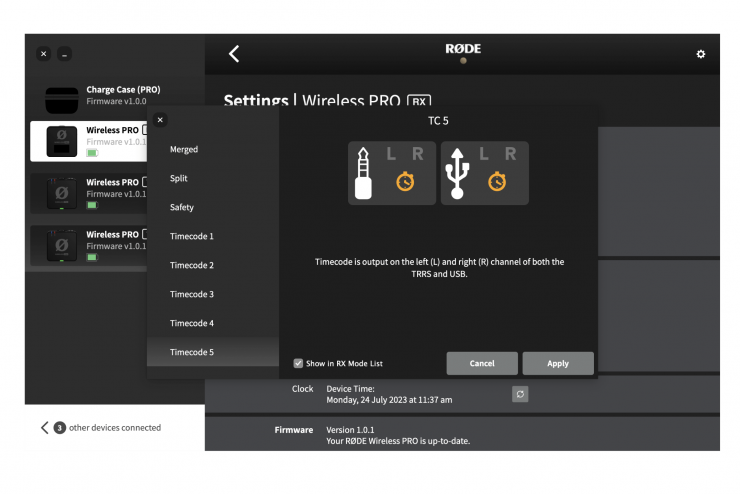
Mode 5 will send timecode information on both left and right channels of both the USB and 3.5mm TRRS outputs on your receiver. While the first four modes deliver both audio and timecode over the receiver’s outputs, this mode will only send timecode – this makes it the preferred mode if your Wireless PRO receiver is connected to your camera’s dedicated timecode port if it has one.
Jamming Time Code
I don’t recommend jamming cameras with timecode and removing the generator. All cameras drift, defeating the purpose of such. If you are doing the jam method, you should jam every few hours to ensure a more consistent synch.
If you disable real-time, the Wireless PRO’s timecode will instead start continuously counting up from a particular moment, which is established by hitting the ‘Reset’ button in RØDE Central.
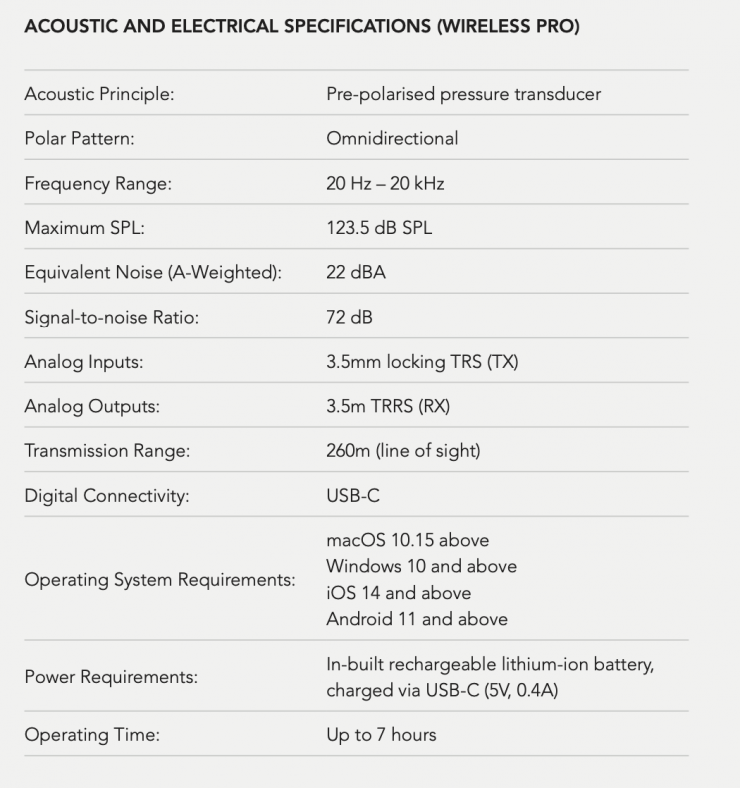
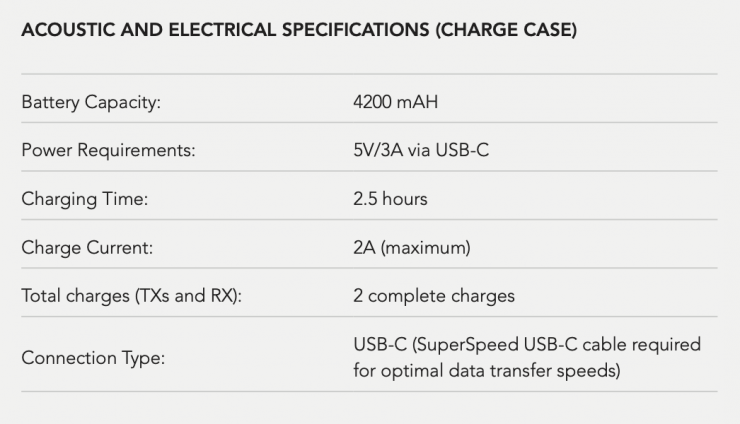
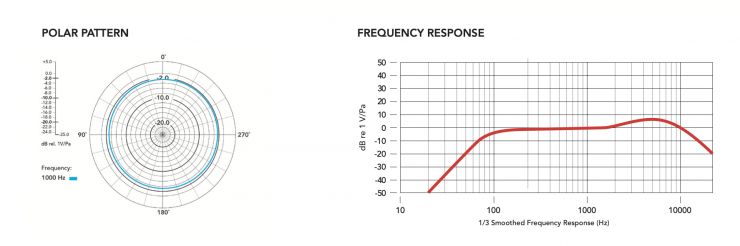
Specifications
Compatible RØDE Accessories
- Lavalier GO
- RØDELink Lav
- HS2
- Lavalier II
- DCS-1
- Interview GO
- MagClip GO
- FlexClip GO
Conclusions
The RØDE Wireless PRO is a feature-rich wireless audio system with its 32-bit float recording and wireless transmission in all regions of the world, all for $399. It is simply impressive. A tiny audio device packed with features makes audio capture possible for any camera, computer, or mobile device.
Timecode
LTC timecode has its limitations, but RØDE gives the user many configuration options to help you get audio into the camera and record on the transmitter. I have to say the settings are vast, but having them is a godsend.
In many ways, when using both TX for two-channel recording, not using timecode is a better option since you will have a 32-bit float version recorded alongside the wireless recording in the camera if you run into issues. Avoiding the use of another software program to synch the audio will save you the hassle.
Needs the app for most settings
The system is reliant on an app. This might be problematic, but we all have smartphones, and the mobile app allows you to change a lot. However, you need the software to get the most from the system. For example, you can’t change the frame rate with the mobile app.
The included RØDE Central software is easy to use, and its integration with the charging case makes it simple to change settings, download clips, and charge simultaneously.
Battery Life
The approximately seven-hour battery life isn’t an issue for my needs, but wedding and documentary shooters will find it challenging. This is a downside to internal batteries; if it used an off-the-shelf battery, the whole system would be larger to accommodate the battery.
Branding and Logos
The Wireless Pro has a lot of logos and branding on it. Even the tiny clip for the included Lavalier II has a shiny RØDE logo. I feel it’s a little much, as it can distract the viewer. RØDE did soften the branding on the product substantially from the RØDE Wireless Go II, so that is a great step in the right direction.
The system is an incredible value, but I would use my Sanken COS 11D mics with a 3.5mm connector as they are a better option. They cost a heck of a lot more than the $99 Lavalier II, and if you buy two, you’ll spend $778.
Well Thought Out
The system will be used for journalism, documentaries, weddings, events, and video productions. Rode put a lot of effort into adding a lot of features to a tiny wireless audio system at an incredibly affordable price. That alone deserves a round of applause. I also greatly appreciate the more subtle branding, except for that lav clip. I know a lot of feedback was sent. I see myself using the Wireless Pro in my kit. More so with a lav mic, but placing the TX tucked away close to talent in a scene for nat sound is going to be very handy.
Pricing and Availability
The RØDE Wireless PRO is US $399. That’s a great price for such a feature-rich product. The Wireless GO II retails for $299. I think it’s a no-brainer to step up to the Pro for $100 more.