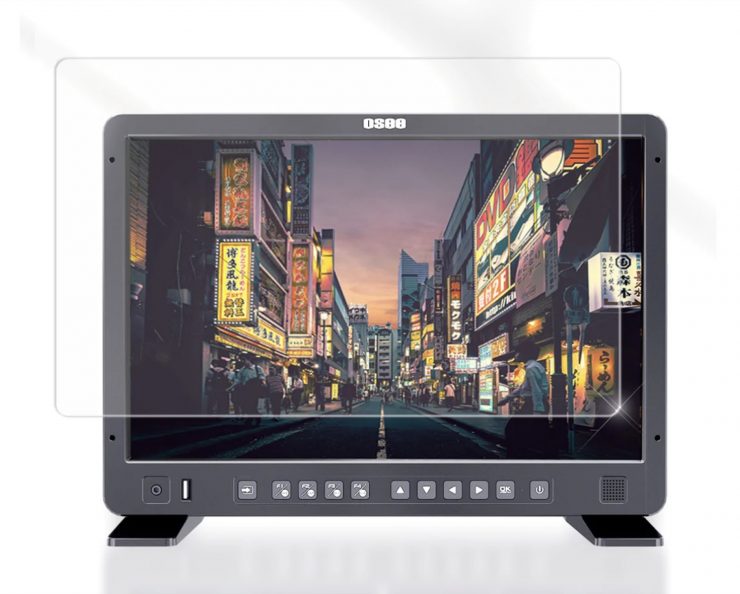
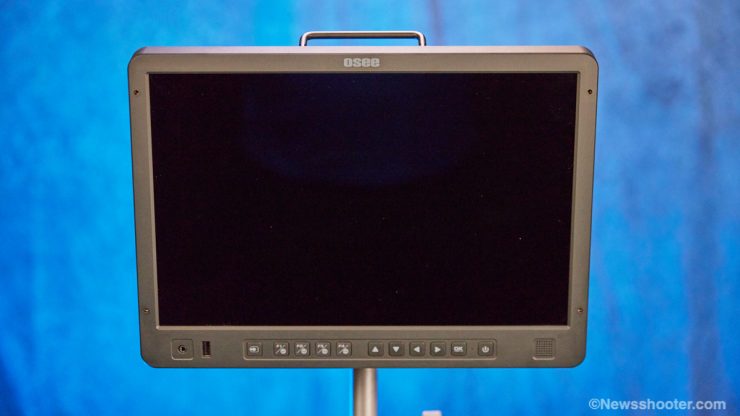
The OSEE Megamon 15 is a 15.4″ 1000-nit Production Monitor with many great features at an affordable price of $899. The monitor is a 10-bit 8+2 FRC Mini-LED LCD and now has 1000 nits as opposed to the 800 nits in the original version. Yes, this is an improved version 2.
The 15.4″ viewable screen size is excellent for portability on set. Obviously, it’s too big for an on-camera monitor. A 7″ is the largest I would use, and even then, with small camera packages, it is a bit big; however, I prefer the 7″ with my aging eyes.
Important to know is the MEGAMON 15 is an HD monitor that can handle 2K. This means you can’t send a UHD image to it as it won’t downconvert the signal. A good thing is most, if not all, cameras have excellent downconversion options.
If you use Premiere Pro IO devices like the Blackmagic Design UltraStudio 4K Mini doesn’t have the ability to downconvert, so if you are using the Megamon 15 for editing with a 4K timeline, you will need a downconverter of some kind in the output chain.
2K Input Specifications
| Default | Value Range | Input Signal Formats |
| 1.896:1 | 1.896:1 2.39:1 | 2048X1080 PSF24/23.98 2048X1080 PSF25 2048X1080 PSF30/29.97 2048X1080 P24/23.98 2048X1080 P25 2048X1080 P30/29.97 2048X1080 P48/47.95 2048X1080 P50 2048X1080 P60/59.94 |
You might think I’ve seen this monitor before, and you are correct! The 1000-nit Megamon 15 is an updated version of the original. I asked OSEE what their differences are.
New Megamon 15 Compared to the V1
- New and improved LCD display.
- Calman Color calibration software. Requires X-Rite i1 Display Probe that isnt included.
- 1000 nits. The former version was 800 nits
- The price dropped to $899 from $1000
Similar to the OSEE G7 4K ULTRAHD. OSEE didn’t change the name of the Megamon 15 to differentiate it from the former model. With the G7, OSEE added “4K ULTRAHD” to the name, but that branding isn’t on the monitor.
I think OSEE should have added an MKII or changed the name, so it’s more obvious this is a next-generation product.
Megamon 15 Key features
- Slim bezel design
- Multi-format input, including 3G/HD/SD-SDI, VIDEO, and HDMI
- Full HD, wide viewing angle TFT glass
- 10-bit (8+2 FRC) signal processing technology plus advanced conversion
- Waveform, vectorscope, histogram, and audio meter
- HDR technology and a wide range of color space
- Multiple color space: SMPTE-C, EBU, ITU709, ITU2020, P3
- Multiple tools: zebra, focus assist, exposure assist, etc.
- IMD remote control
- MARKER, Time Code, MET display
- Supports presetting the color temperature using customized values
Another big plus is it handles LUTs very well. I shoot in Clog 2 Cinema Gammet in high-contrast situations. This means I have a very viewable image with a good representation of what the image will look like when the LUT is applied. Yet another advantage is I can set the Waveform before the LUT is applied. This way, I know exactly what I’m shooting—all this and more for $899.
One upside is it’s an SDI and HDMI monitor but doesn’t have a loop-through, so you can’t send out the SDI output when using the HDMI input and vice versa.
Specifications
| Panel Size | 15.4inch |
| Resolution | 1920X1200 |
| Aspect | 16:10 |
| Brightness | 1000nits |
| Backlight | White LED |
| Backlight Life | 20000 Hrs Minimum |
| Contrast | 1450:1 |
| Color Depth | 1.06G |
| Response Time | 18ms |
| Viewing Angle | 178˚ |
| Data I/O | |
| USB Slot | 3D LUTs upload and Firmware Upgrade (USB under 16G and formatted to FAT32 is recommended) |
| Remote | 2.5mm Jack |
| Environmental | |
| Work Temperature | 0°C~40°C |
| Dimensions | 368.9mmx264.9mmx54.5mm |
| Weight | 3.7kg (bare monitor) |
| Mounting Style | Vesa Mount(retail)/C-stand Mount |
| Power | |
| AC | 100~240V 50/60Hz |
| DC Battery | 11~16.8V |
| Power Consumption | 29.3W |
Included Items
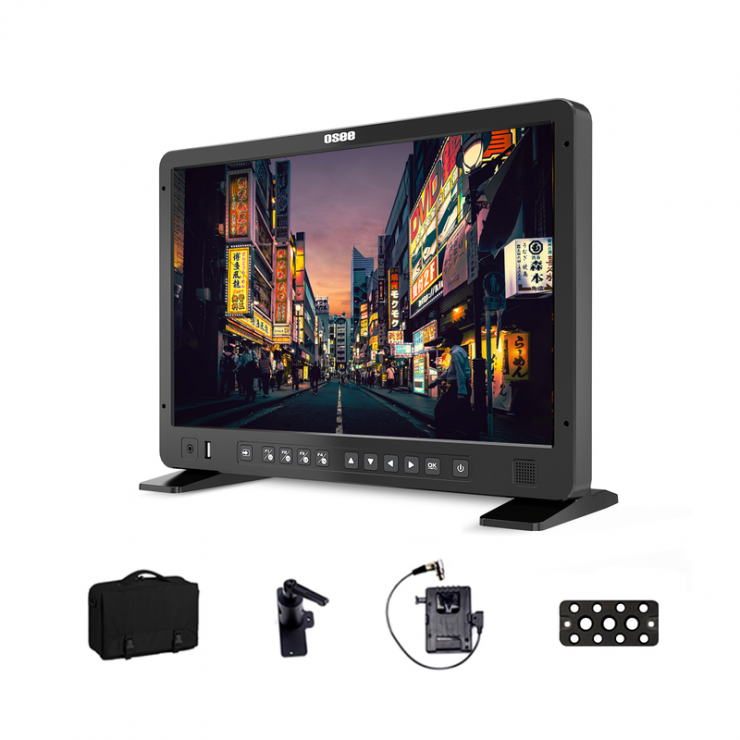
The Megamon 15 includes a nice kit with a custom case that doubles as a shade. I like that you have two options for mounting with removable feet for desk use and a C-Stand Adapter. One downside is you have to take the feet off to use it in the case.
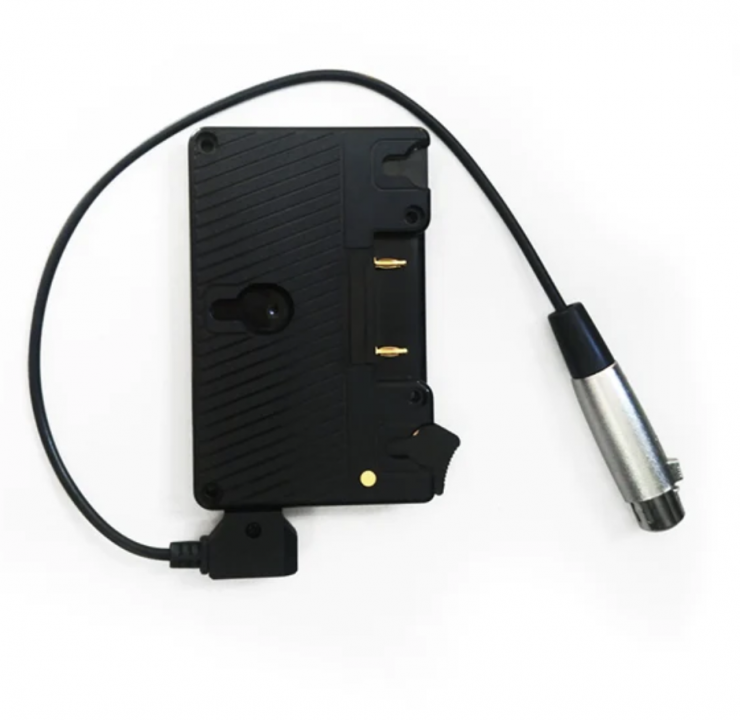
You can choose either V-Mount or Gold Mount battery plate options. I appreciate the extras that OSEE includes. Out of the box, you only need a battery and video cables to get to shooting in the field.
- Megamon 15 Monitor
- Portable Bag
- V-mount Battery Plate
- C-stand Adapter
- Cheese Plate
- Desktop Stand Feet
- Power Cable
You can also use a Vesa mount; however, doing so will replace the area where the battery plate is installed, so you would either have to use a different battery mount, like a stand clamp and a longer power cable, or run AC to power it. There is only so much real estate on the 15.4″ monitor to work with.
Available Accessories
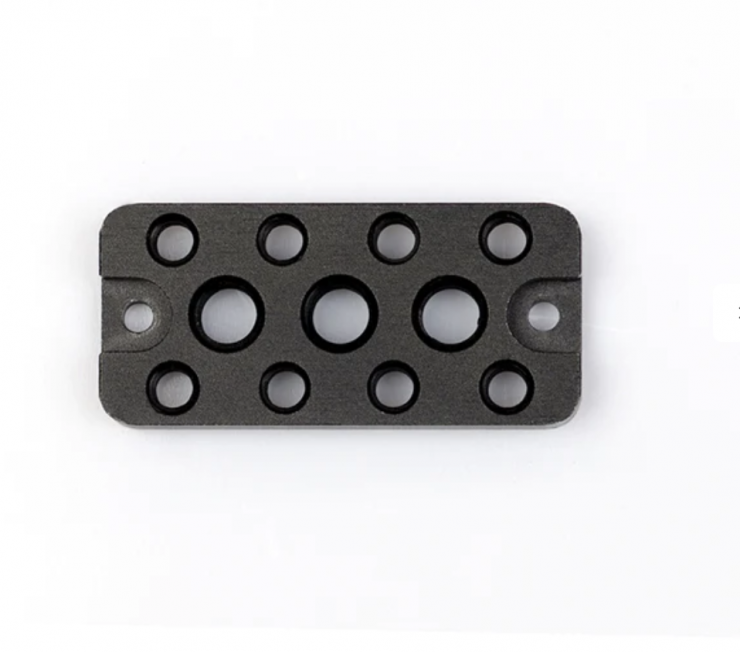
For the most part, the Megamon 15 is well-equipped with what you need. You can add an additional Cheese Plate for $89. Swap out the battery plate for a different version for $189, and add a protective screen cover for $89. The protective screen should have been included. Field monitors can take a beating, and the screen needs to be protected. I would definitely purchase one.
Included Case Doubles as a Monitor Hood
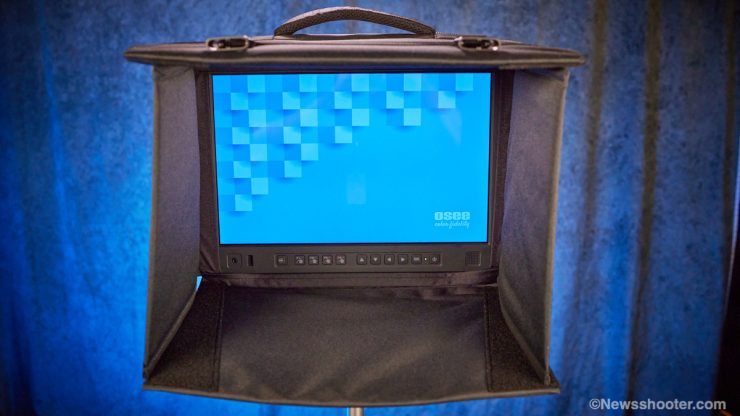
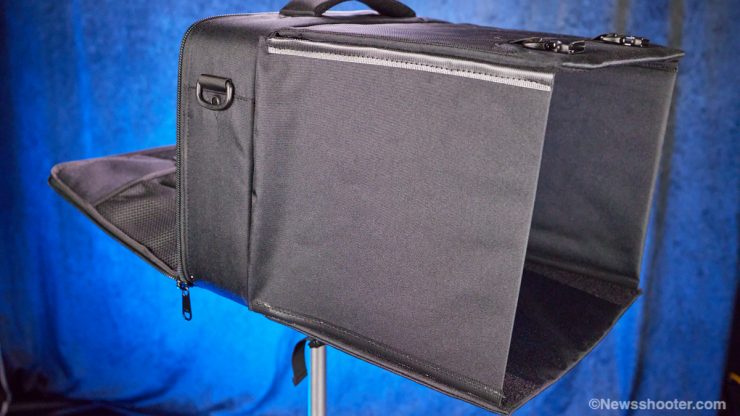

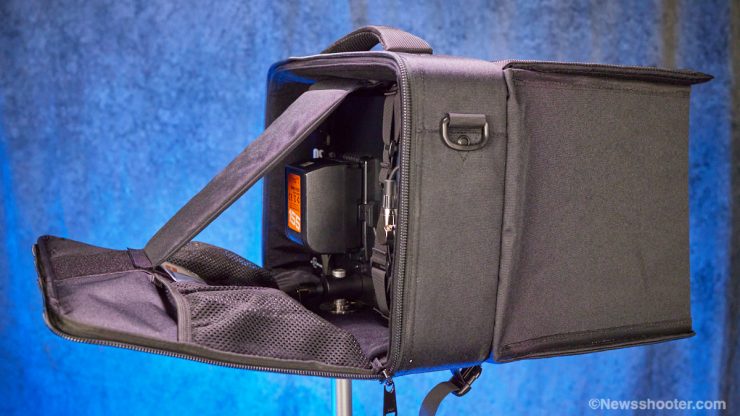
This might be one of my favorite features! Sometimes the simple stuff is what makes you happy. The case stores the Megamon 15 and converts it to a big shade. This design is excellent as a dedicated 3rd party case will cost a few hundred bucks, and having this included is excellent.
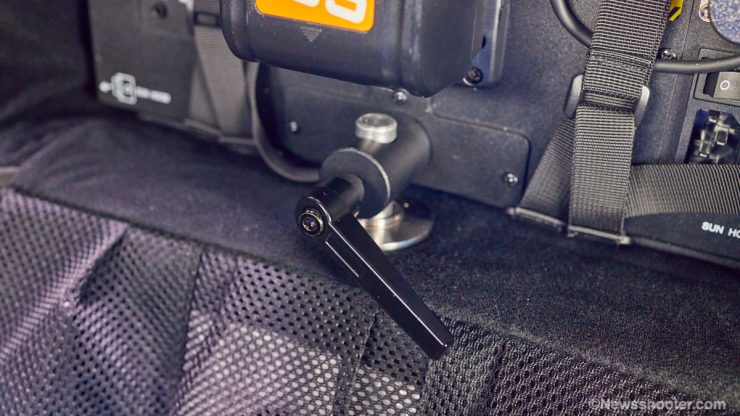
On the bottom of the case is a metal-reinforced hole that lines up with the C-stand adapter that is attached to the monitor. It’s so easy and fast to set up on a stand. If you don’t want to use the case with a hood, it’s also very easy to remove and mount it.
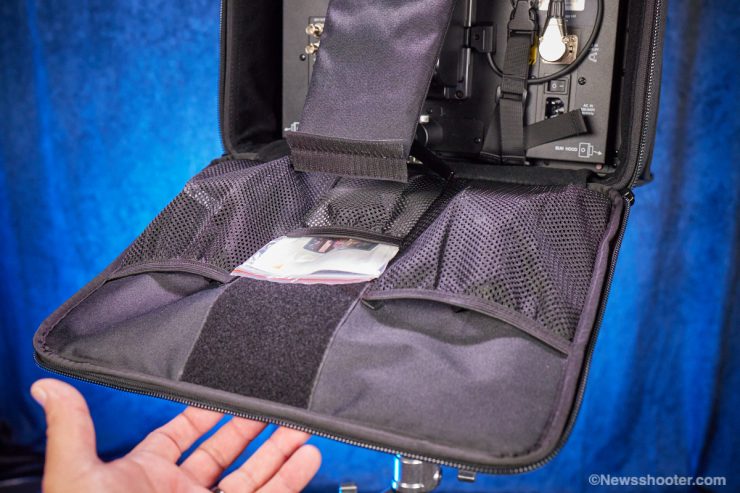
The back panel needs to open if you use a battery on the back to power the Megamon 15. In the picture, you can see this isn’t an ideal way to do it, making it very awkward. Instead, taking the velcro support off and zipping the back panel up a bit will allow the panel to be more compact and also give you access to the inputs. You could also have the panel flop fully open, but you will need to remove any accessories from the mesh pockets, or the contents will fall out.
As I mentioned, what’s not included is the acrylic protective screen cover that retails for $89 from OSEE direct. While the monitor is priced very competitively, not including the protective cover is a bummer, especially if you intend to use it a lot as a field monitor. It can get a little rough out there.
The acrylic protective screen mounts to the front with four screws.
Included Feet
For desktop use, you add the feet. Unfortunately, the feet require two screws each, so it’s not as quick to attach them. The feet have to be removed if you use the case. That is also a bummer, as it would be great to grab it, stick it in the case and pack it up for field use. Still, it’s such a great price I can deal with it. I’m going to head over to the hardware store and see if I can find some toolless screws. That would be great if possible.
I also found that the monitor can sit on the desk with the stand adapter attached just fine. I actually prefer it as it tilts back a little and is plenty stable. Not as much as with the included feet.
Build Quality
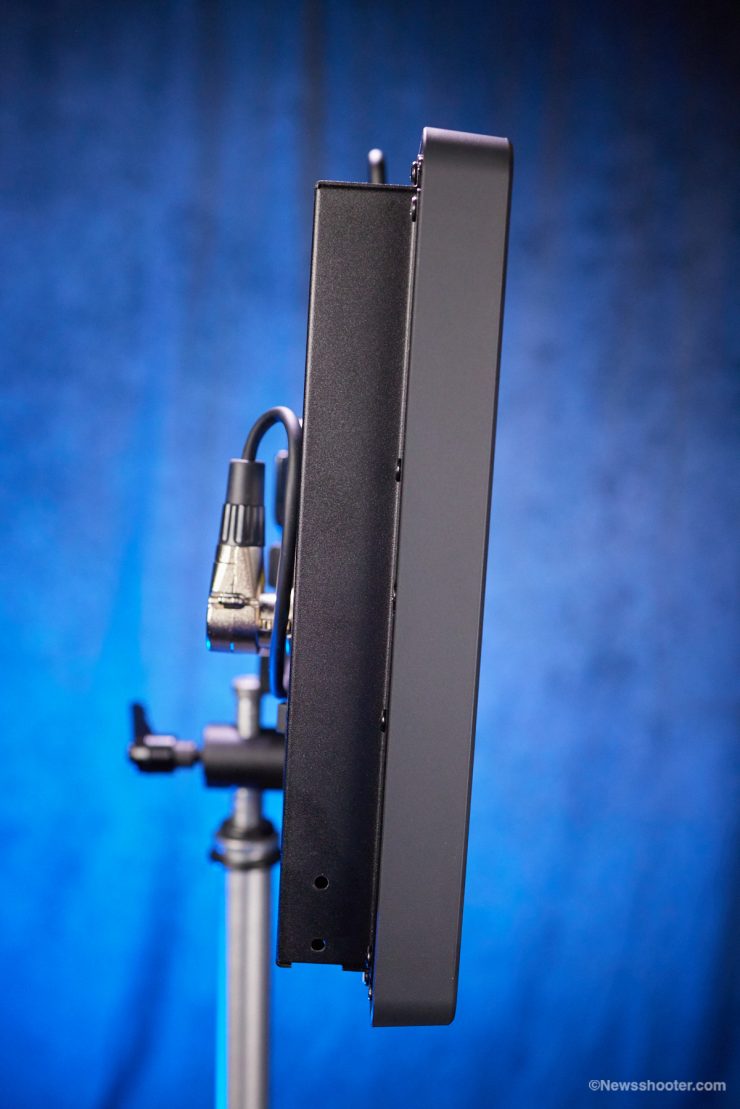
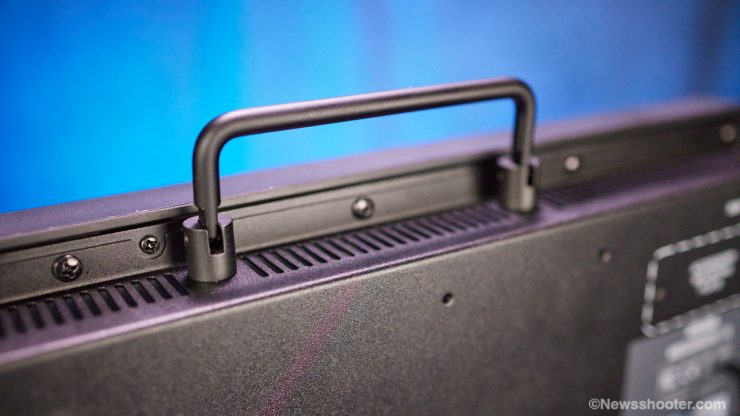
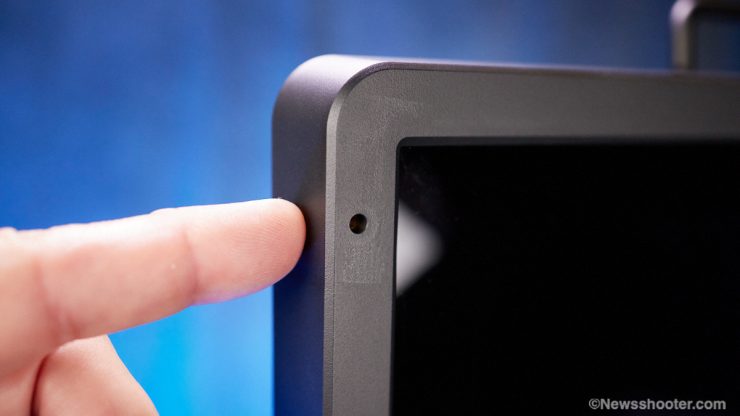
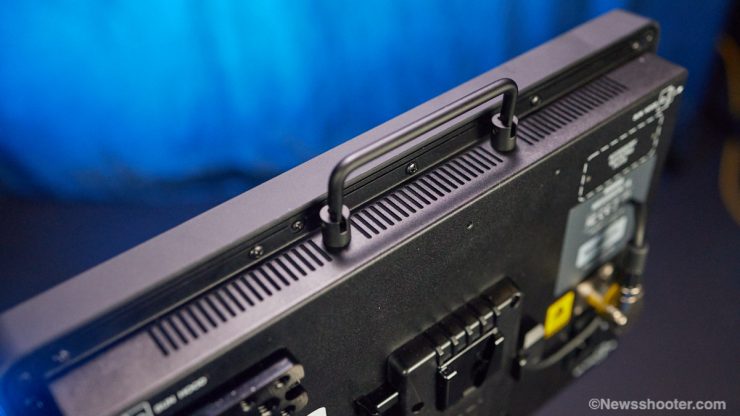
No plastic frame here! The MEGAMON 15 has an all-metal body with a sturdy top handle. It’s a bit heavy, but at 3.7kg or 8.15 lbs without accessories, it can get heavy once a battery and possibly a wireless receiver are added. A sturdy light stand should be used to prevent the monitor from tipping over and getting smashed. With this kind of weight, it would get seriously damaged if it tips over from 5-6′. I used the monitor on a light stand with wheels with an added sandbag, and it worked great.
As you can see in the picture, the monitor tilts forward a bit when mounted. This isn’t ideal, and I need to figure out a way to have it at least flat, if not slightly tilted back. I was considering a Grip Finger, but for safety, I wouldn’t want it to be easily messed with by a producer. Do you know what I mean?
Megamon 15 IO Specifications
Single HDMI Input
- 720p – 50 p60/59.94
- 1080sf – 24/23.98 sf25 sf29.97 sf30
- 1080i – 50 i60/59.94
- 1080p – 24/23.98 p25 p30/29.97
SDI Inputs Plus Video in
For SDI, the Megmon 15 includes two SDI inputs and one output, plus a composite input.
- SD
- 480i60
- 576i50
- HD
- 720p24/23.98 p25 p30/29.97 p50 p60/59.94
- 1080sf24/23.98 sf25 sf29.97 sf30
- 1080i60/59.94 i50 i60/59.94 i50 i60/59.94
- 1080p24/23.98 p25 p30/29.97
- 3G
- 1080i50 i60/59.94
- 1080p24/23.98 p25 p30/29.97 p50 p60/59.94
- 3G-2K
- 1080sf24/23.98 sf25 sf29.97 sf30
- 1080p24/23.98 p25 p30/29.97/48/47.95 p50 p60/59.94
Inputs and Outputs
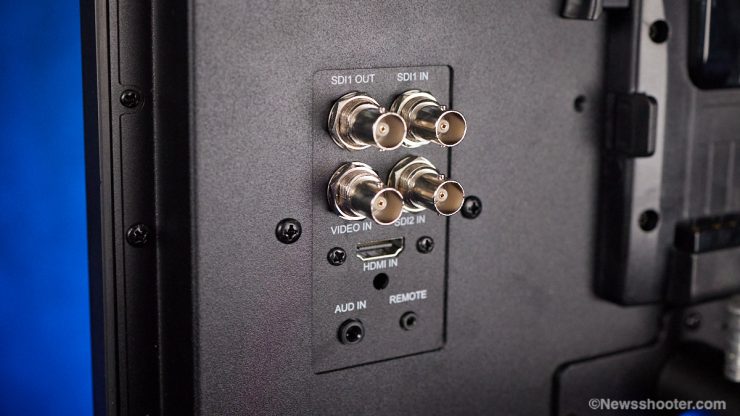
The monitor has one Video in and two SDI inputs with one SDI output. The HDMI is only an input, so you can’t cross-convert the SDI signal out of the HDMI. This would have been handy to have.
You also can’t view two sources simultaneously, so there is no picture-in-picture option. You can switch manually from the four source inputs. There is also a BNC Composite (10-Bit 4:2:2 YCC) input that supports 480i: 60 576i: 60.
Usability
As I mentioned, the 15″ monitor is a nice size for portability as a field monitor. In the past, it was 7″, then jumped to 24″. Now we have this 15″ and some nice 17″, 18″ and 19″ options but be prepared to pay a lot more than $899. The OSEE is one of the least expensive feature-rich monitors around.
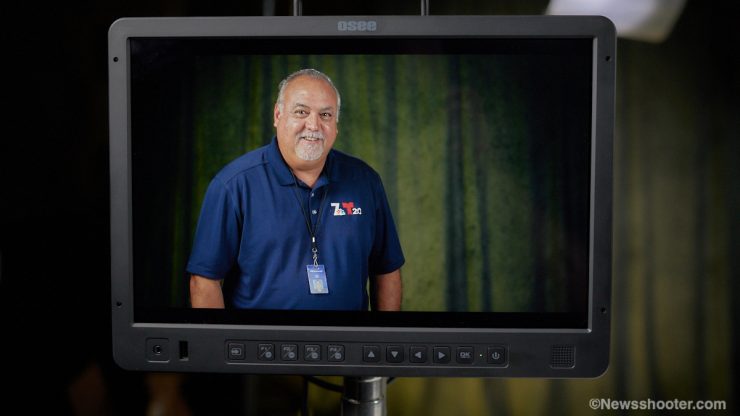
The producer was pleased when I arrived on set with the MEGAMON 15. I’m not sure I can hand a 7″ monitor to them again! The size is such a sweet spot for field production. I used an Impact Folding Wheeled Base Stand with a max weight of 26 lbs. Always good to use a stand with some extra capacity left over. I also added a sandbag on the base to ensure it wasn’t going to tip over—better safe than sorry, especially with rolling stands. With a battery added, it comes in at around 15 pounds.
Functions and Tools
As a Field Production Monitor
The 15.4″ size is nice on set. Just big enough for a few people to look at at the same time. You can get a good look at the scene and image with a 15″ monitor.
With the hood assembled, it makes it a little harder for multiple people to see the monitor, but it helps make it viewable in bright conditions. The 1000 nits are just entering the “bright” monitor space. You need to use the shade in the direct sun for the best viewing. In the shade, it’s awesome.
As a Post Production Monitor
The OSEE Megamon 15 is an ideal size for field production and an excellent option for post-production when using smaller setups with a laptop or computer and a smaller monitor like a 24″.
My main driver is an M1 Max Macbook Pro and a 27″ Apple Studio Display. this takes up a lot of room on my 53″ wide desktop. A 24″ would barely fit next to it. The 15″ size does nicely. It’s a sweet spot for the cramped desk. Being 15.4″ also means you have to be closer to it and have it on a riser. It’s too low.
While it fits well on my desk, the size can be a bit small for playback, depending on the size of the playback you set on the NLE software. I think, as a daily driver, a larger 21″ or 24″ might be a better choice, but it’s nice to have a good representation of the color. That is where a production monitor shines, and the OSEE Megamon 15 looks accurate next to my Apple Studio Display.
HD Input Only Has Drawbacks
As I mentioned earlier, being an HD input only, if you are editing in 4K, you will need an IO device like a Blackmagic Design UltraStudio product or Aja IO to get a proper HD signal to the monitor. This is mainly a Premiere Pro issue. You will have to use a downconverter as it doesn’t support HD output when editing in higher resolutions.
My Blackmagic Design UltraStudio 4K mini doesn’t support downconversion, so I would need to replace it with another product or buy and add a 4K to HD device. This starts getting messy and expensive. This is an issue with Premiere Pro, and it’s a bummer as other software, such as DaVinci Resolve and FCPX, has the ability to playback in HD when editing in 4K.
Color Management
One impressive feature that is coming in an update is the included Calman Software for Color Calibration. You need to provide an Xrite i1 Display Pro/Plus puck to use with the Calman software. I’m looking forward to this update, as color calibration in this price range is nonexistent.
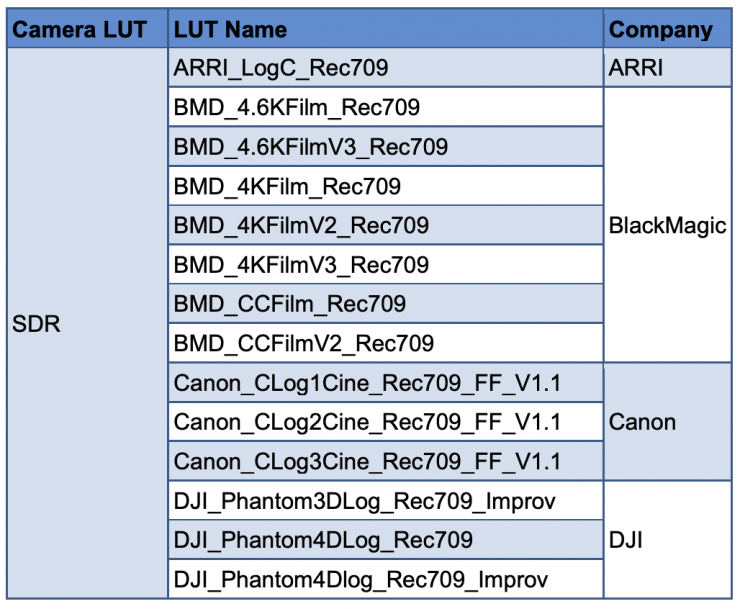
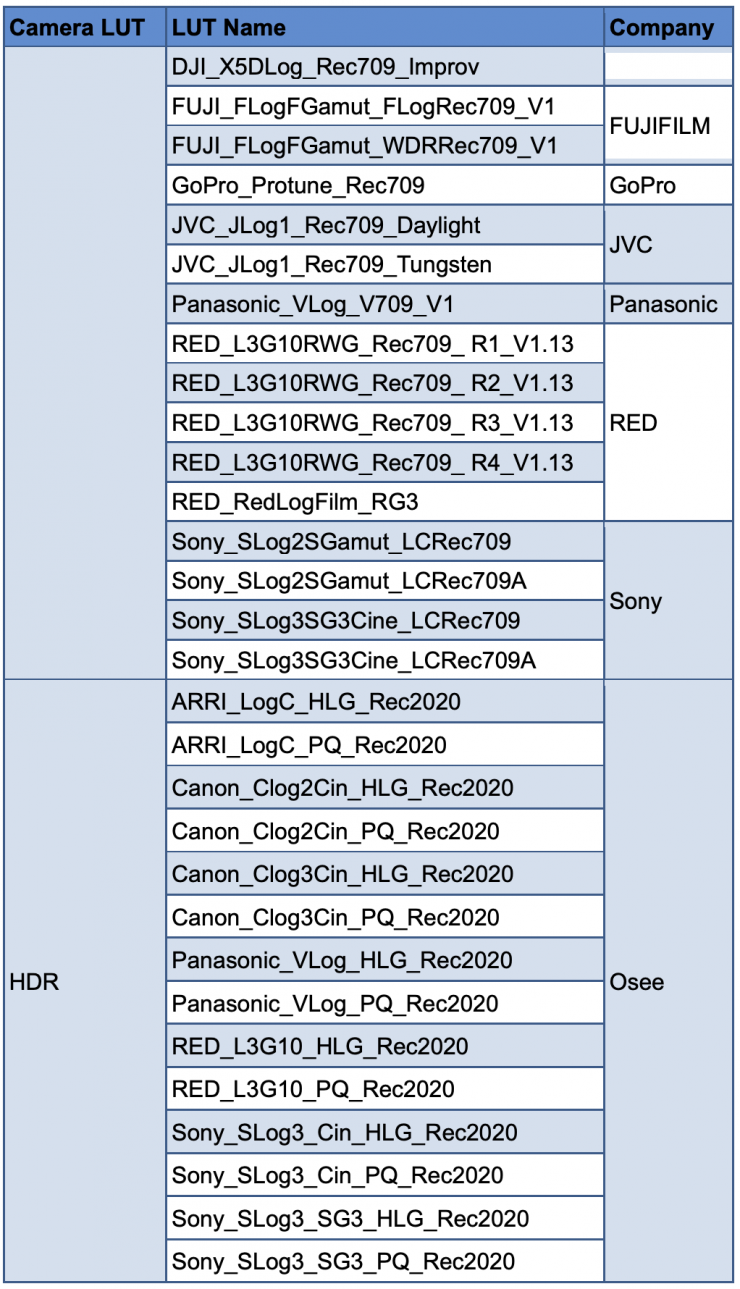
- Camera LUT – 30 SDR&14 HDR LUTs, Detailed in User Manual
- Load LUT File – USB, Up to 16 User LUTs can be Stored
- Gamma – PQ, HLG
- Color Temperature – D55, D61, D65, D93, DCI, User1, User2
- Color Space – ITU709, EBU, SMPTE-C, Native, P3, ITU2020
- Color Calibration – Calman (OSEE calibrator will be released later) with Xrite i1 Display Pro/Plus
Scope Tools
With exposure tools, you can select the location of the tool on the display from left, center, or right sides and corners.
The tools are nice to have, but they are a bit primitive. The Waveform, for example, has a large spread of 25 IRE. For example, it goes from 0 to 25, then 25 to 50, 50 to 75, and 75 to 100 IRE.
- Waveform Mode: LUMA/RGB/Parade; Size&Location: Small&Left UP/Left Center/Left Down/ Center Up/Center Down/Right Up/Right Center/Right Down, Middle&Right Down/Center Down/Left Down, Large&Center Down; Opacity: 25%/50%/75%/100%
- Vectorscope Location: Left UP/Left Center/Left Down/ Center Up/Center Down/Right Up/Right Center/Right Down; Opacity: 25%/50%/75%/100%
- Histogram Mode: LUMA/RGB; Location: Left UP/Left Center/Left Down/ Center Up/Center Down/Right Up/Right Center/Right Down; Opacity: 25%/50%/75%/100%
Exposure Tools
- False Color Spectrum
SONY Slog3/SONY Slog2
ARRI LogC
Canon Clog2/Canon Clog3
Panasonic Vlog
RED RedLogFilm/RED RL3G10
BMD/BMD 4K
ARRI Rec709
SONY LC709A/SONY LC709
Panasonic V709
RED G3 and RED G4 - Zebra – Level 1-100 Adjustable
Frame Tools
- Aspect – 16:9/4:3/15:9/14:9/13:9/1.85:1/2.35:1/ Variable Value 1.00-3.00 Adjustable/Off
- Center Marker – On/Off
- Area Marker – 80%/85%/88%/90%/93%/95%
- Crosshatch (On/Off)
- Marker Fit – On Area Marker Based on the current input /Off: Area Marker Based on the Aspect Marker.
- Marker Level – Marker Line Luminance 50%/75%/100%
- Marker Mat – Darkness of the Outside Area of Aspect Marker Off – Half/Black
Focus Tools
- Focus Assist – Red/Green/Blue/Mono; Sensitivity Value 0-100 Adjustable
- Peaking – Level 1-16 adjustable
Look Tools
- Look – Built-in 33 De-log 3D LUTs/Support 16 User 3DLUTs Import by SD Card
- Audio Meter – Location & Opacity Adjustable
Audio Tools
- Audio Source (Embedded/External/No Signal)
- Speak Out L/R (Select Channels for Left or Right Speaker, Embedded Signal Only)
- Meter Display
- Meter Select (CH1-2/G1/G2/G3/G4/G1+G2/G1+G3/G1+G4/G2+G3/G2+G4/G3+G4/G1-G4)
- Meter Position (Left/Right)
- Display Mode (Simple/with Channel Number&Frame)
- Meter Opacity (Value 0-100 Adjustable)
Other Tools
- Anamorphic (2.38/Off)
- Blue Only (Blue/Green/Red)
- IMD Display (Protocol: TSL3.1/TSL4.0/Local; Color: Red/Green/Yellow; ID Number:0-255; Baud Rate: 2400/4800/9600/19200/38400/side0/115200)
- Key Inhibit (On/Off)
- Mono (On/Off)
- Mute (On/Off)
- Osd Time (10/30/60s)
- Scan (On/Off)
Menu & Button Interface
The OSEE MEGAMON 15 Menu is pretty straightforward to navigate. You have four preset options that you can customize. From what I understand, the buttons are also upgraded from the original version.
Preset Options
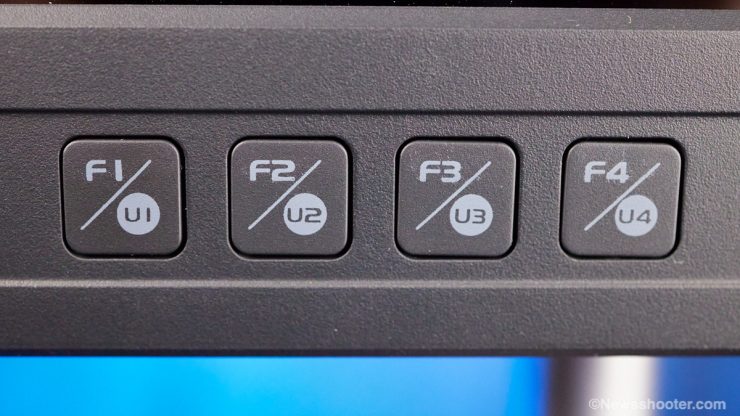
With a larger 15″ monitor, you have more room for buttons. All navigation buttons are on the front bottom section of the monitor. You have four preset options that you can customize. I like this as they are easy to access; side and back buttons are the worst.
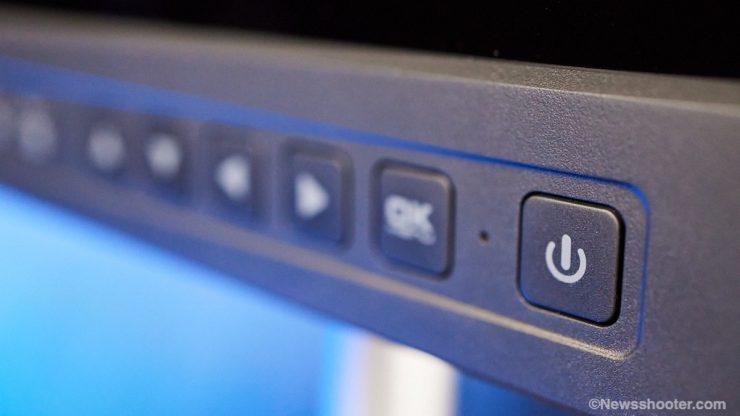
The icons on the buttons are not illuminated and are a little more muted than I like. In low-light environments, they are a bit hard to see.
The presets are a bit quirky. Press the button, and the option shows what it’s set for, then press again to activate the function.
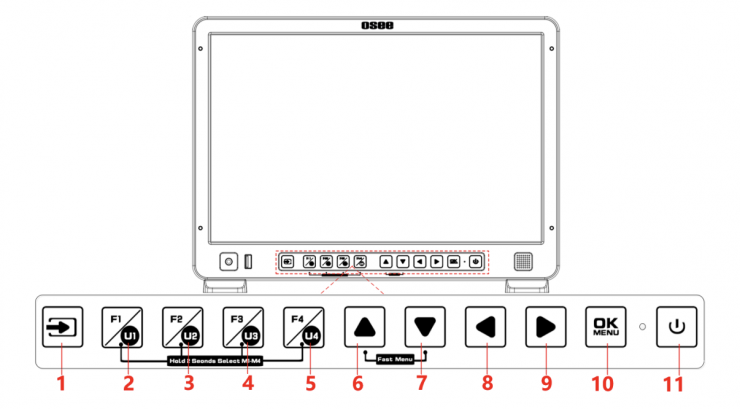
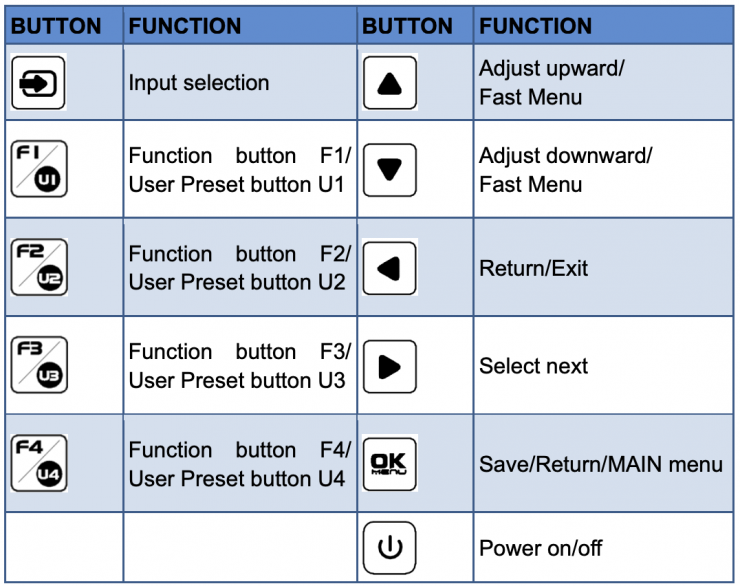
The FUNCTION KEY F1 through F4 can be assigned to the following.
- Undefined
- Camera LUT
- Blue Only
- Mono
- Marker
- Audio Meter
- Time Code
- Waveform Type
- Vectorscope
- Histogram
- Scan
- Aspect
- Anamorphic
- Native, Mute
- IMD Display
- False Color
- Focus Assist
- Peak
- Zebra
Color Accuracy
The Megamon 15 looks pretty darn good out of the box. The image is crisp with accurate color. I feel it’s a bit over-saturated. Different cameras will output differently. I don’t feel the need to calibrate the Megamon 15. I lowered the saturation a touch, and it looks very nice. With a quick adjustment to around 45 from the stock setting of 50, I was very happy.
Color Calibration
OSEE states the Megamon 15 can be calibrated with included Calman Software and an Xrite i1 Display Pro/Plus puck. However, I couldn’t find any information on how this is performed. The software wasn’t included in the retail box. On their website, in the specifications section, they state it’s not available yet.
Image Quality
The panel is 1920×1200 with a white LED backlight. The aspect ratio is 16×10 with a contrast ratio of 1450;1. The response time is 18mm, and the viewing angle is 178˚.
The image quality is impressive out of the box. Unfortunately, pictures don’t represent the actual image quality. I will say it’s one of the best images I have seen in this price range. It punches way above its weight.
Screen Brightness
The OSEE Megamon 15 has a new 10-bit 8+2 FRC Mini-LED display panel. Mini-LED is in many of today’s latest TVs, and you will find them in other devices, such as the MacBook Pro 14-inch (2021) and the iPad Pro. Mini-LED backlighting will allow LCD panels to get much closer to OLED performance levels with better blacks and color rendition.
Version 2 of the MEGAMON 15 is now 1000 nits making it a bit more usable outside in the sun than the original 800 nits of the former version. It would be nice to have a few more nits for sunny days; however, the built-in sun hood does work well. The sweet spot for bright outdoors is 1500 to 2000 nits.
Is it 1000 nits?
I tested the nits by cranking up the backlight to 10, feeding pure white video, exposing the image well over 100 IRE from Premiere Pro, and metering the output with a cd/m2 monitor display probe. I got a reading of 1070 cd/m2. To be clear, 1 cd/m2 = 1 nit. It’s great the Megamon 15 outperforms the specification.
I tested the monitor’s corners to see how even the brightness was.
Upper Right – 1075 cd/m2
Lower Right – 1035 cd/m2
Upper Left – 1000 cd/m2
Lower Left – 1050 cd/m2
I found that just increasing the backlight is plenty for a great image outdoors. No need to boost the brightness. The monitor does a good job of keeping the contrast under control for a pleasing image. It really is impressive.
When using the Megamon 15 in an edit bay, setting the backlight at 3, 4, or 5 looks great for editing. With the backlight set to “5”, I got a reading of 585 cd/m2. I preferred to set it at “4” or “3” for editing and dropped the saturation down to 45 from the stock setting of 50.
Passive Cool
The monitor has a passive cooling system with vents on top of the monitor. No fan makes it very versatile for onset use as a Director’s monitor to a DIT station setup.
Response Time
The OSEE MEGAMON 15 has a response time of 18 ms. This is a little below average as a mid-tear value is closer to 14, so 18 ms is not bad at all. A higher response time will increase the motion blur and is especially more noticeable in faster-moving scenes. I found the image to be very pleasing, and the 18 ms response time wasn’t an issue.
LUT Support
I like having the ability to use LUTS on a monitor when shooting with Log profiles. The C300 has the option to output a viewing Lut. Shooting Clog2 or any very flat log setting makes it difficult to focus, and viewing the image is rough for producers as well. Here is where having Lut support saves the day!
The OSEE MEGAMON 15 has several preinstalled Luts for popular cameras, such as Blackmagic Design, Sony, Canon, RED, Panasonic, Fujifilm, DJI, JVC, GoPro, and ARRI.
Included SDR and HDR LUT
While I love the idea of having preinstalled LUTS, I found the Canon Clog ones to be a bit off. I highly recommend installing your own camera LUTS for the best experience. You can install Luts with a USB thumb drive that is formatted FAT32. The slot is on the front of the monitor.
I found the Megamon 15 doesn’t support 65Grid 3D Luts. I tried to load the Canon stock versions, and it didn’t work. I then tried the 33Grid 3D Luts, and that worked as expected.
Fortunately, when using a LUT while monitoring with Waveform, you get the reading without the LUT applied. I prefer this as I want to know precisely my exposure in the field, not one with a LUT applied.
Powering Options
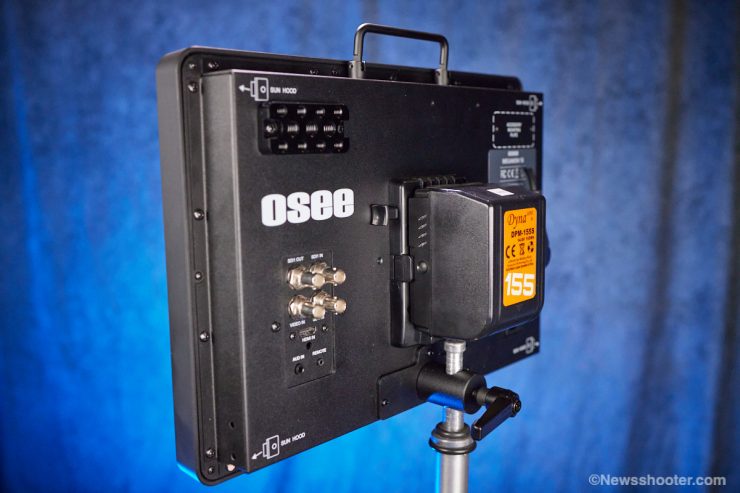
The MEGAMON 15 has a power draw of 29.3 watts, making it very usable as a field monitor with a single Gold Mount or V-Mount battery. With a lean and mean 98 wh V-lock, you can run the monitor for approximately three hours.
Democratizing Production Monitors
Low-cost Field Monitors have been hard to find, but lately, more are appearing on the market. I like to see image quality rising with budget monitors. In the not-so-distant past, the affordable ones were just plain bad. This isn’t the case now.
Brands like Feelworld, Desview, and Lilliput, to name a few, are all competing for your hard-earned cash in the budget space. We first were seeing the smaller 5″ and 7″ monitors come way down in price while gaining in IQ. Now the larger 15″ up are starting to do the same. Brands like Flanders Scientific, TVlogic, and SmallHD cover the high-end market with offerings in the thousands. For budget-minded productions, they are probably not something you would buy but rather rent for a gig. Paying under $1000 makes a difference. This is not to say you are getting the same product for less. You aren’t. The higher-end monitors offer more features, with more precise tools and UHD input, and 4K displays. I think it’s great to see monitors that deliver the basics really well at a fair price.
The new 1000-nit Megamon 15 retails for $899. It’s hard to believe they improved the Megamon and dropped the price from $1000. Since OSEE didn’t change the name with an MKII or V2, you will have to make sure you’re purchasing the new version by checking the specifications. It needs to state 1000 nits of brightness. If it states 800 nits. It’s the former model.
While B&H and other retailers have the Megamon 15 in stock, it seems they are selling the former version for $799. I’m not sure how long it will take for the new model to hit popular retailers. It’s available direct from OSEE as well.
Like what we do and want to support Newsshooter? Consider becoming a Patreon supporter and help us to continue being the best source of news and reviews for professional tools for the independent filmmaker.