Bright monitors have come a long way in the past few years, and the OSEE G7 4K ULTRAHD is one of the brightest in the budget monitor space. At 3000nits with good color accuracy out of the box, it’s a genuine bargain for only $499 USD.
You might think I’ve seen this monitor before, and you would be correct! The G7 4K ULTRAHD is an updated version of the OSEE G7. It was also rebranded as SWIT CM-S75C. I asked OSEE what their differences are.
New G7 4K ULTRAHD Compared to the V1 G7
- Screen display quality is much improved.
- The Color Shift on the highlight has been improved.
- An adjustable fan has been added to the G7. (with new firmware)
- The speaker has been removed.
- Coming in October, The G7 will support color calibration software.
- The price dropped from $899 to $499 USD
I think OSEE should have added an MKII or changed the name so it’s more obvious this is a next-generation product. Yes, they changed the name by adding 4K ULTRAHD, but it is still confusing. Is it a new panel? This isn’t clear, but they fixed an issue with color shift when increasing the backlight. A firmware fix for the later model was not offered, so this makes me believe the panel is different.
Another big plus is it handles LUTs very well. I shoot in Clog 2 Cinema Gammet in high-contrast situations. This means outside, with the high amount of nits of brightness, I have a very viewable image with a good representation of what the image will look like when the LUT is applied. Yet another advantage is I can set the Waveform before the LUT is applied. This way, I know exactly what I’m shooting. All this and more for $499 USD.
One upside is it’s an SDI and HDMI monitor but doesn’t have a loop-through, so you can’t send out of the SDI output when using the HDMI input and vice versa.
Specifications & Included Items
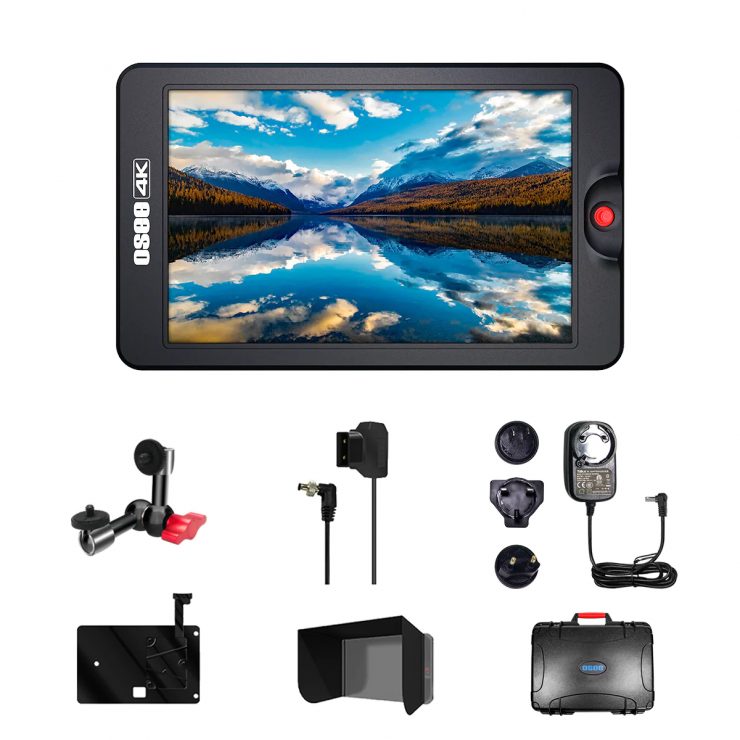
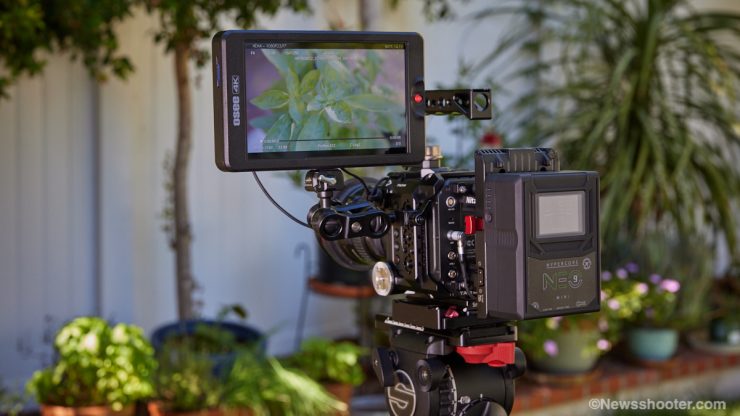
I appreciate the extras that OSEE includes with the G7. Out of the box, all you need is a battery and video cables to get to shooting. The kit comes with a nice hard case with laser-cut foam.
- G7 Monitor
- Screw Articulating Arm Trestle
- D-tap to Lockable Pole DC Cable
- AC-DC Power Adaptor
- V mount Battery Plate
- Sunhood
- Carrying Case
Monitor Hood
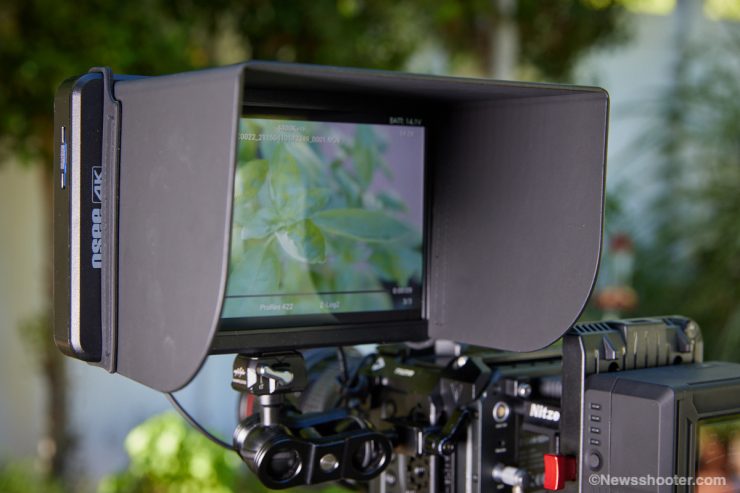
The hood is very easy to attach. It uses rubber bands attached to the hood and loops over the monitor. There is a slot for the band to sit in, so it doesn’t slip off. I’m not sure how long the rubber bands will last. They are thicker than most.
Specifications
| Size | 7″ |
| Screen | IPS |
| Input | SDI, Full-Size HDMI in/out (No cross conversion) |
| Dimension | 192.0mm×116.3mm×24.7mm |
| Mounting Points | 1/4’’ 20 Thread Points w/anti twist pin. Top & Bottom |
| Aspect Ratio | 16:10 |
| Anamorphic De-squeeze | 1x, 1.33x, 1.5x, 1.66x, 1.8x, 2x, 2x MAG |
| Backlight | Level 0-10 Adjustable |
| DSLR Scale | Canon 5D Mark 2, Canon 7D |
| Zoom | 2x, 4x Zoom, and Pan |
| Screen Rotate | Screen Rotate Auto/0/180 & Image Rotate 0/180 |
| Brightness | 3000nits |
| Resolution | 1920×1080 |
| Contrast Ratio | 1200:1 |
| Weight | 450g |
| Color Depth: | 16.77 Million |
| Material | Plastic frame |
| Input Voltage | DC 7~24V |
| Maximum Power | 16.2W |
| Battery | Sony NP-F970/F960/F750/F550 |
| Headphone | 3.5mm / Volume Level 0-31 Adj stable |
| Speaker | No |
| Fan | Yes. Fan speed adjustable |
| SD Card Slot | 3DLUT upload and Firmware Upgrade |
HDMI Supported input/output resolution and frame rate (UHD Max)
- 3840x2160p(30/29.97/25/24/23.98)
- 1080p(60/59.94/50/30/29.97/25/24/23.98)
- 1080i(60/59.94/50)
- 720p(60/59.94/50)
- 480i/576i/480p/576p
SDI Supported input/output resolution and frame rate (2K Max)
- 2KP60/59.94/50
- 1080P60/59.94/50/30/29.97/25/24/23.98
- 1080i60/59.94/50
- 1080SF30/29.97/25/24/23.98
- 1035I60/59.94
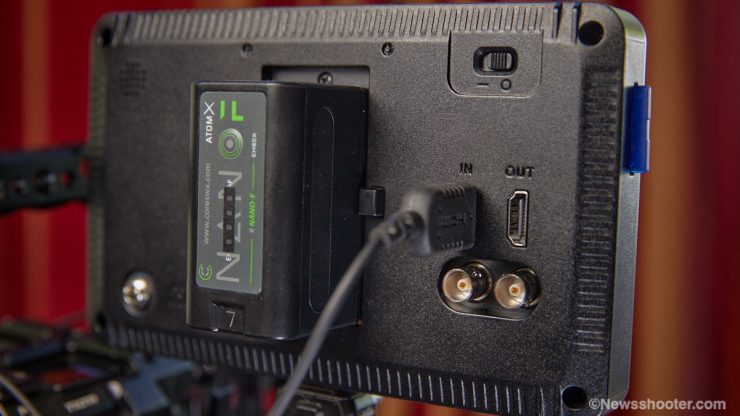
In and Outputs
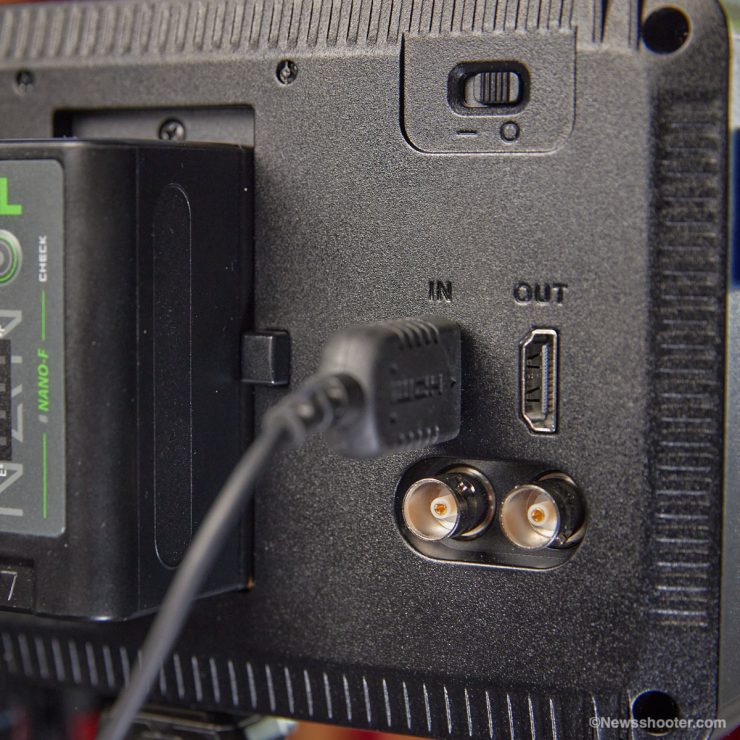
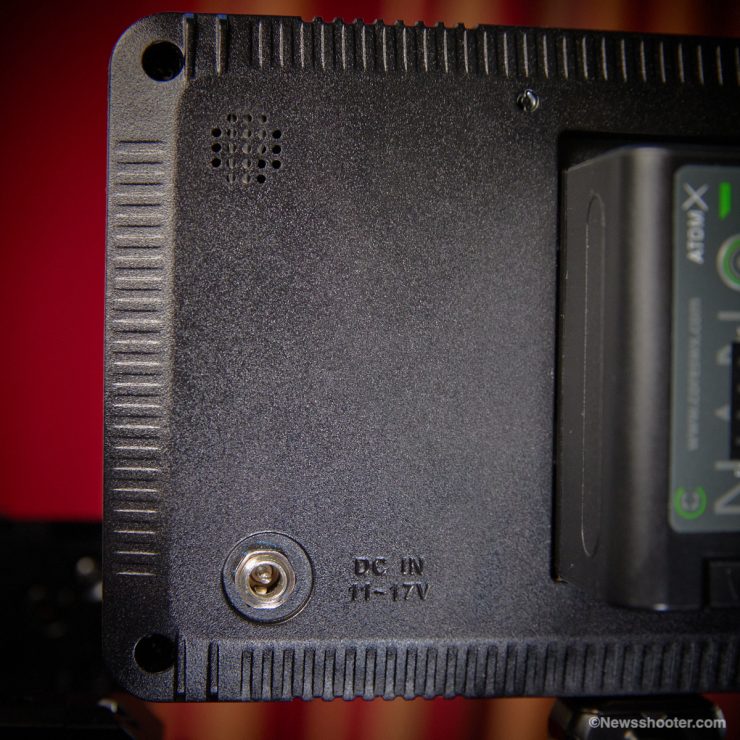
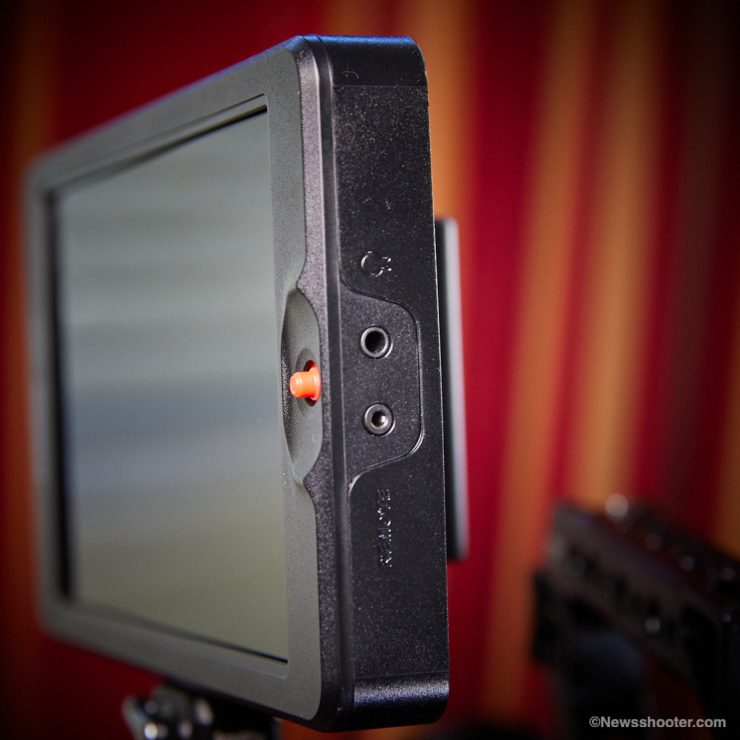
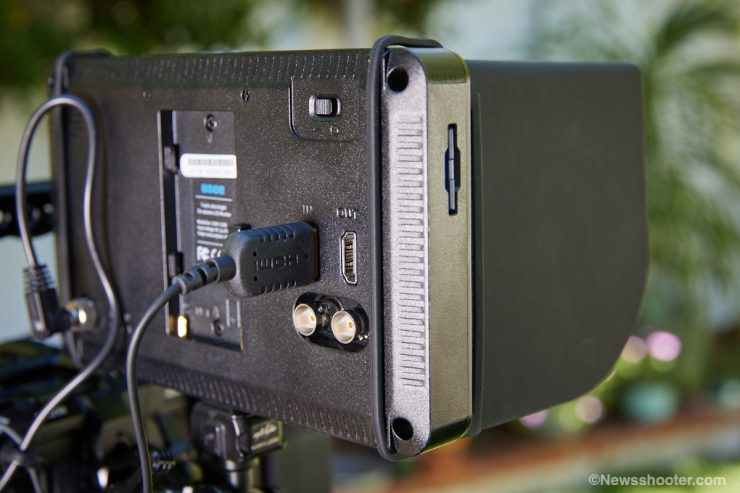
One thing I like a lot is all the video inputs are on the back of the monitor. Side inputs are a bit messy and make the camera wider. The AC power input is also on the back, and the headphone and remote are on the operator’s right side of the monitor.

The SD Card reader is on the operator’s left side of the monitor.
Usability
Once you figure out how to navigate the menu, the monitor is straightforward to use. The inputs are on the back, and I like this a lot. Several monitors have inputs on the side and tend to stick out more than I like. It’s much cleaner on the back.
The monitor doesn’t have any preset buttons. All the navigation is done with the joystick.
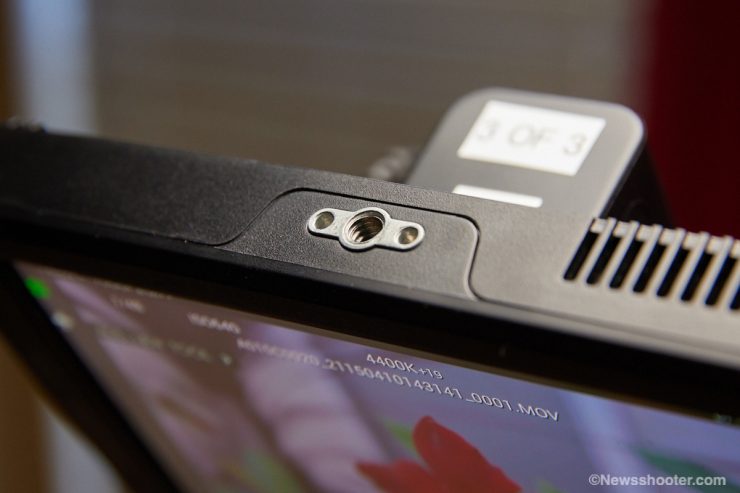
It has mounting points on the top and bottom. These are 1/4 20″ with ARRI-style anti-twist pins. The new SmallRig HawkLock Quick Release works perfectly. I like the quick release a lot. I might have to pick up a couple more. 😀
Functions and Tools
The OSEE G7 has many tools that mostly get the job done. I think they are very useful if you are using a hybrid or any camera that doesn’t have a solid set of tools already available to you. While peaking and zoom are more common, many cameras don’t have Luma or RGB Waveform.
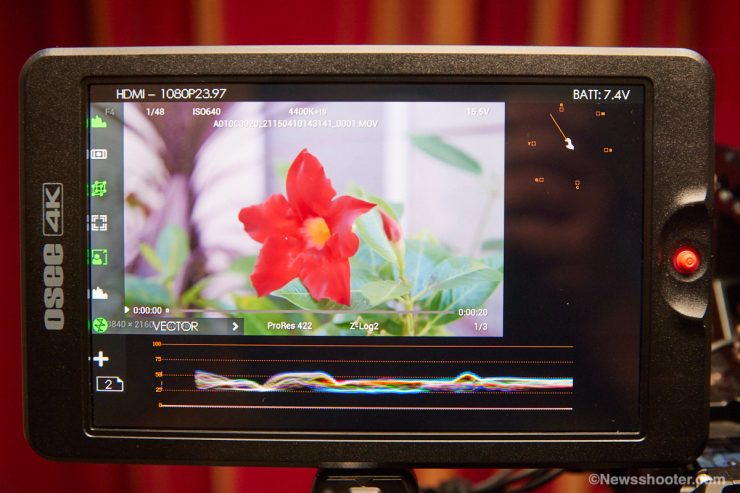
I did have a strange issue with the Waveform. While I was testing, I had highlights clipping before 100 IRE; the scale showed clipping at around 85/90 IRE on the Waveform. After power cycling both the camera and G7, the waveform worked as it should. Very odd. It’s hard to say if the G7 or the Z Cam was having issues.
One tool that is always available is Zoom. You can push the joystick up in all scenes, and it zooms in 2x. Push up again, and it goes to 4x. You can change the view by pushing the joystick in and navigating around the zoom image when zoomed. It’s a fast and handy feature.
Exposure Tools
- False Color – 17 Curves
- Zebra – Level 1-100 Adjustable
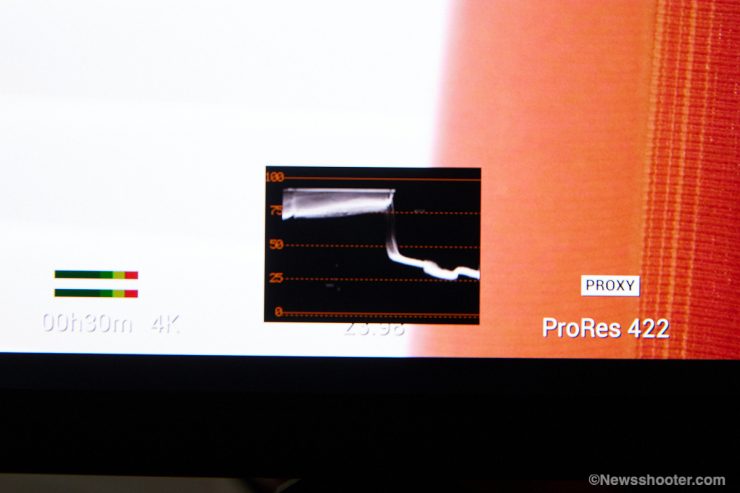
- Waveform – LUMA/RGB/Parade Mode, Size, Location & Opacity Adjustable
- Vector Scope – Location & Opacity Adjustable
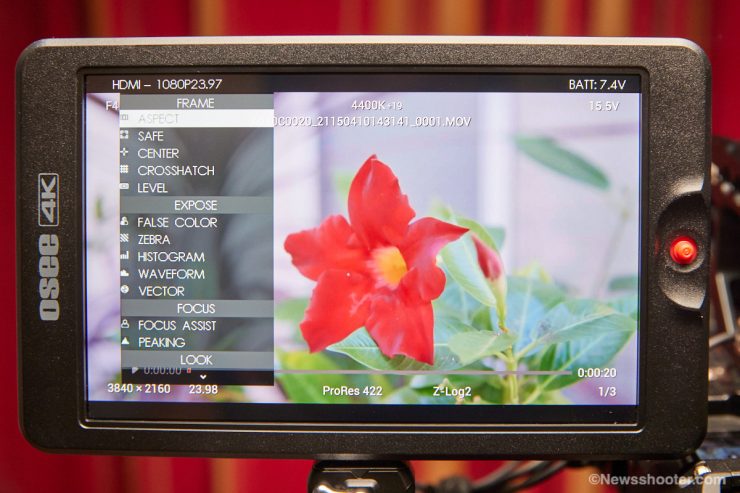
Frame Tools
- Aspect – 4:3/1.85:1/2.39:1/16:9/Custom Ratio, Matte/Line Mode
- Safe – 16:9 / 14:9 / 4:3, Action & Title Selectable
- Center – On/Off
- Cross Hatch – 2×2, 3×3, 9×9
Focus Tools
- Focus Assist – White/Red/Green/Blue Mode, B&W Background, Sensitivity Level 1-10 Adjustable
- Peaking – Intensity Level 0-10 Adjustable
Look Tools
- Look – Built-in 33 De-log 3D LUTs/Support 16 User 3DLUTs Import by SD Card
- Audio Meter – Location & Opacity Adjustable
Scale Tool
- Image Scale – Location Adjustable
Build Quality
The G7 has an aluminum frame with a polycarbonate exterior. It’s light in weight. The NP battery slot holds the battery securely.
Screen Quality
The screen isn’t a touchscreen, and I’m good with that. Navigating the menu is simple with the joystick, plus you don’t have to deal with greasy fingerprints. The screen is reflective, and it doesn’t have a protective cover over the screen. This could be an issue with scratches over time. Just make sure to use the case or get a lens wrap to protect it.
Menu
A lot of inexpensive monitors have terrible menu systems. The user experience is important. I wouldn’t say I like fumbling through multiple menu levels to make changes. The OSEE G7 menu is much better than most. Like all menus, you have to learn how to navigate them. This is no different for the G7; however, if you have used a SmallHD monitor, the interface will be a little more familiar.
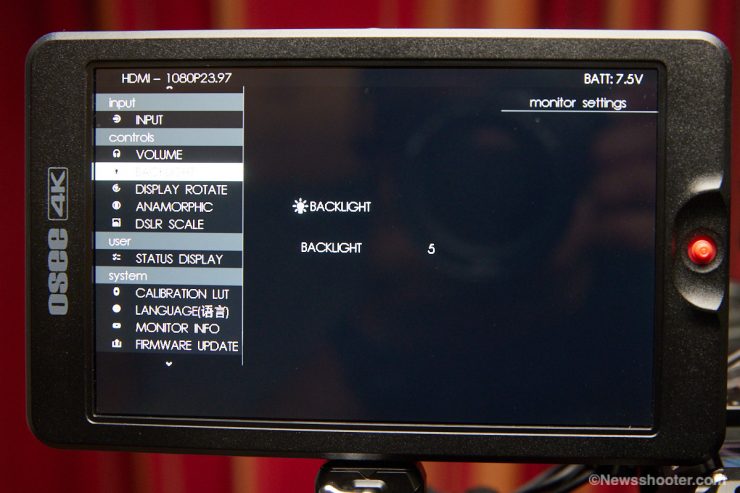
OSEE G7 ULTRAHD has a “scene views” system. You have up to eight scenes available that you can customize with different tools. The monitor settings page is straightforward to navigate. You hold the joystick to the left for three seconds, and the monitor settings page pops up. Here you can select the input SDI/HDMI, make changes to the backlight and adjust the color. Basically, all the main settings for the monitor.
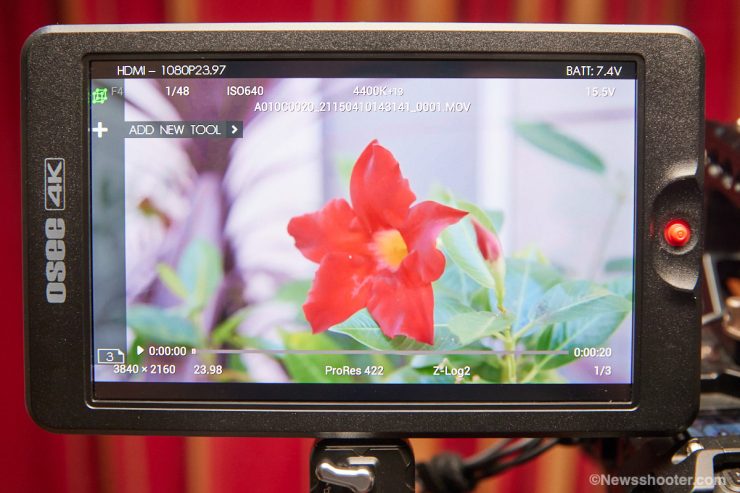
You can customize the tools on several different scene screens and navigate with the joystick. You can’t have two versions of a tool with various settings on the same page. This is a bummer if you want Waveform RGB and Waveform Luma on simultaneously. To get around it, you need to toggle between them in the side sub-menu for the page or set up another screen.
Brightness
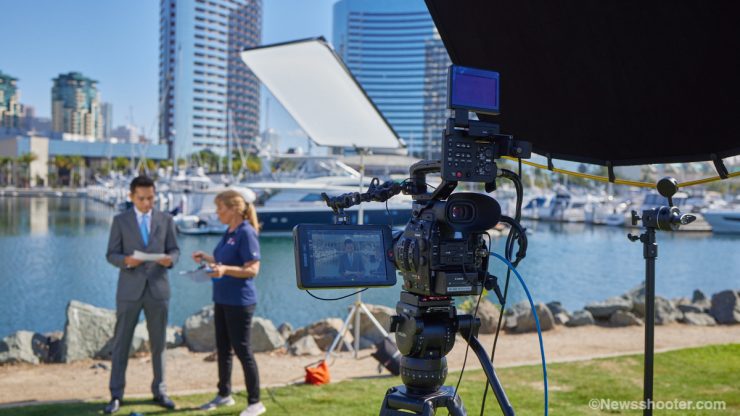
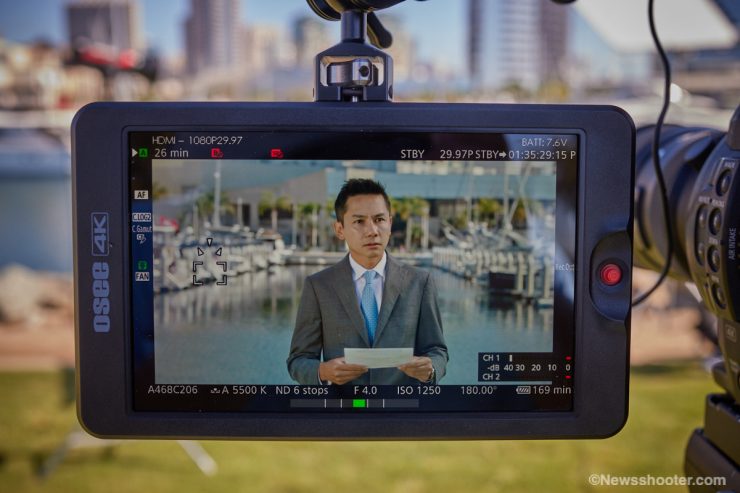
For me, the top feature of the OSEE G7 is it being daylight viewable. I live in San Diego and shoot in full sun a lot. Monitors struggle in the California sunshine. The image above shows how the C300 MKII LCD is almost unusable. Without the daylight-viewable monitor, I would have to use the EVF.
The OSEE G7, with its 3000nits screen, is much more useful than any onboard LCD monitor included with a camera; it can be a little too bright at times, especially indoors. You have a backlight adjustment that makes it less bright without looking dull. I had it set to 7 or 9/10 outside. Indoors five works well.
Keep in mind when boosting the backlight, the colors will get a bit washed out. This is typical for high-bright monitors. Is it a deal breaker? Heck no! The only reason I would buy a high-bright monitor is to exploit its usefulness in the bright sun. Personally, I give a lot of leeway in the color-accurate zone. If you can’t see an image, then what good is color accuracy? It in no way means the G7 isn’t accurate. It works just fine in that department. At $499, it’s impressive.
Is it 3000 nits?
I tested the nits by cranking up the backlight to 10 and brightness to 100, feeding white video, and exposing the image well over 100 IRE, and metering the output with a Sekonic C-700-U. I got a reading of 2390 lux. It’s close but shy 610 lux. FYI nits and Lux can be interchangeable for testing purposes.
Keeping it Cool
The monitor does have a fan to keep it cool. With so many nits, it can make the monitor toasty. It doesn’t have a user-selectable fan speed setting. Instead, it adjusts the speed based on the backlight setting. With the backlight set to 4, the fan will not kick in. With each increase in the backlight setting, the fan also steps up. At 10, the fan is loud; however, 10 is very bright, and you would only need to go that high outside in the bright sun, making the fan noise a non-issue. I had a shoot on such a day and didn’t notice the fan until I powered it up indoors with the backlight still set to 10. Indoors I set the G7 backlight to 5. It’s relatively quiet, as the fan speed is very low.
I didn’t have any issues with noise; while audible, it didn’t bleed into microphones. I can safely say the fan is not an issue. The G7 didn’t overheat when I used it, with the backlight set to 10 on a hot 80-degree day for several hours.
OSEE told me a new future firmware update would add user-selectable fan speeds.
Latency
The OSEE G7 has some latency, but it also depends on the camera used. Hybrid Mirrorless cameras are the worst of the bunch, and cinema cameras perform much better. I tested the SDI and HDMI inputs with the C300 MKII, and it performed well with a little latency that wasn’t overly distracting. I would say the G7 is par for the course of budget monitors.
Regarding 4K (UHD) down-scaling, there’s usually a noticeable delay over HDMI if you output a UHD signal from your camera. This latency is worse than if you are sending a straight 1080p signal to the monitor. With that, I always recommend setting the external output on the camera to 1080. This helps decrease the HDMI delay, as most cameras will do a better job downscaling than a monitor.
Color Accuracy
The G7 looks pretty darn good out of the box, but I found the panel to be a bit over-saturated. This became more apparent when using Luts. The good news is it’s a simple adjustment by taking the saturation down to approximately 35 to 50; it looks much more natural without affecting the color accuracy. This will depend on the camera used and color settings as well.
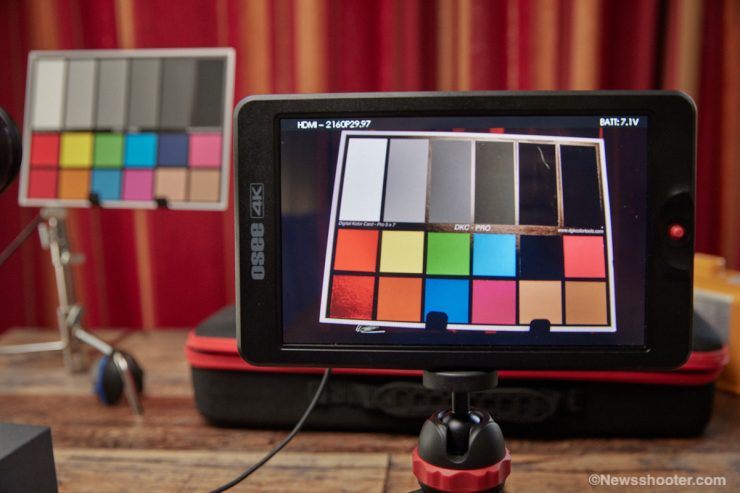
One issue I found is the Red channel, when under-exposed, turns black. I didn’t notice it in real-world shooting, but it showed up when I used a color chart as a background. Once the exposure was corrected, the black smear went away. Very odd. I’m sure it can be corrected in a firmware update. Again, I didn’t see any of this in real-world shooting.
LUT Support
I like having the ability to use LUTS on a monitor when shooting with Log profiles. The C300 has the option to output a viewing Lut. Shooting Clog2 or any very flat log setting makes it difficult to focus, and viewing the image is rough for producers as well. Here is where having Lut support saves the day!
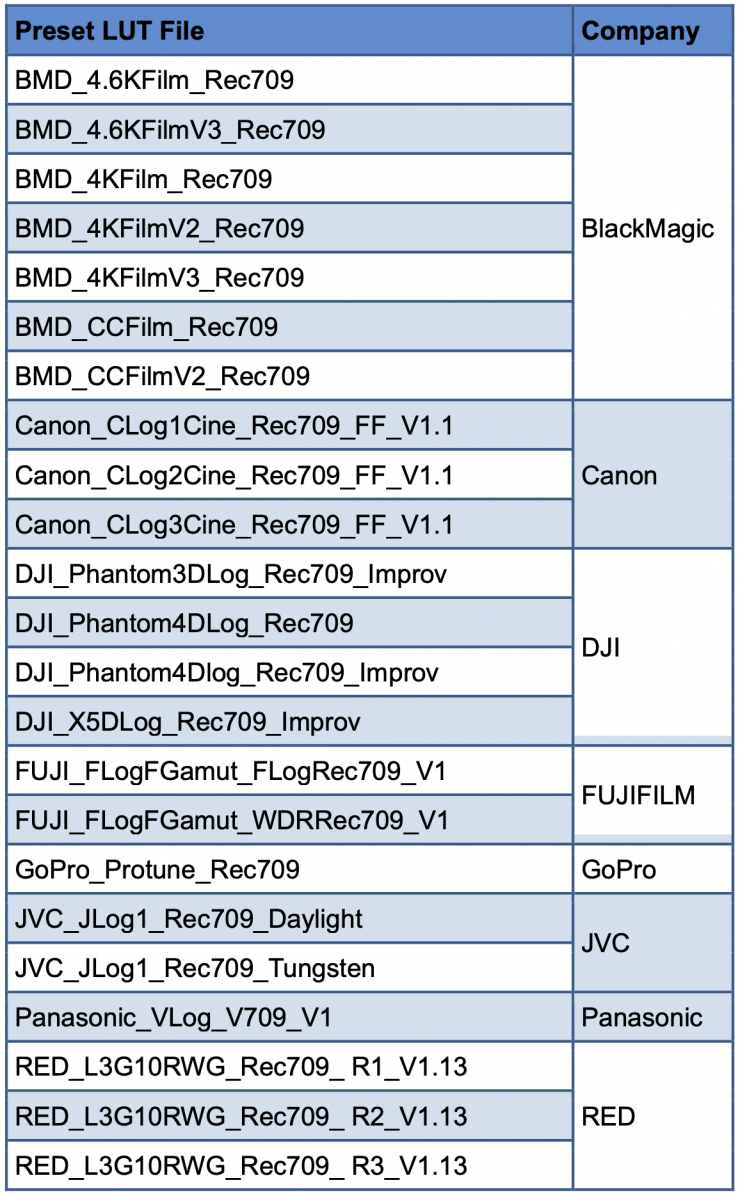
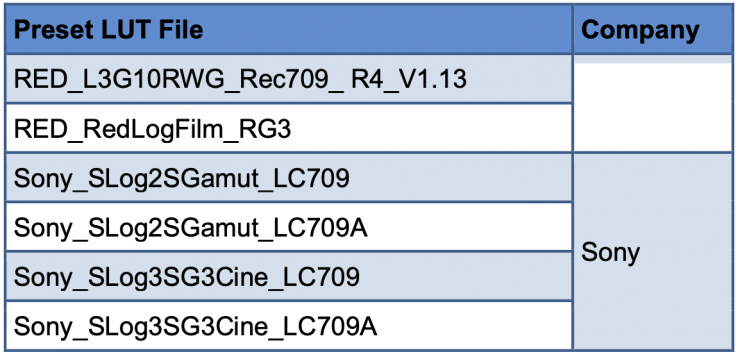
The G7 has several preinstalled Luts for popular cameras such as Sony, Canon, RED, and ARRI.
Included Camera LUT
You can install Luts with an SD Card that is formatted FAT32. This is important as the G7 only supports FAT32. I formatted an SD Card with my mac, but I couldn’t get the G7 to recognize the SD Card. For some reason, I had to format the card with a PC for the G7 to recognize the SD Card. I did try a few cards with the same results. OSEE recommends cards 16GB or smaller.
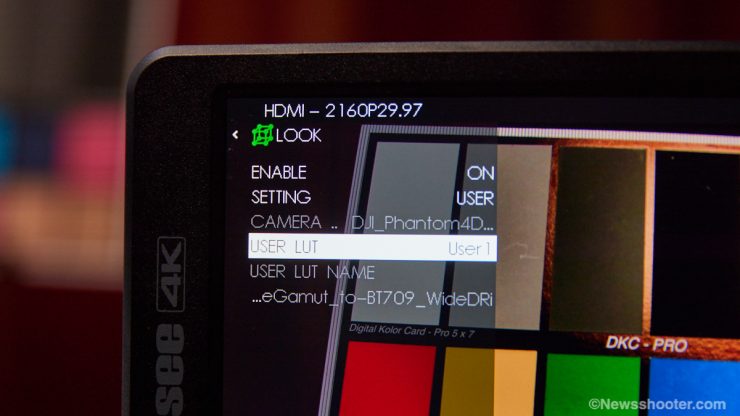
When USER Luts are installed, the G7 doesn’t show the name from the beginning of the file. It shows it in the middle of the name, which makes it a little difficult to pick the Lut you need. The fix is to rename the LUT with a very short name. Hopefully, this can be fixed in future firmware.
Fortunately, when using a “Look” and monitoring with Waveform, you get the reading without the Lut applied. I prefer this as I want to know precisely my exposure in the field, not one with a Lut applied.
Powering Options
The monitor uses a single Sony NP-F L-style battery. Most 7″ monitors have two battery slots. This would give you double the run time but will make the monitor heavier.
I’m now using the new Core SWX Nano F 6300mAH 47WH battery. I like these a lot. Two of them last all day. The beauty of the NANO F is they pack the same power as the largest Sony NP-F970 versions but in a smaller form factor. I love fuel gauges on batteries. After a shoot, it’s nice to be able to quickly check the batteries that need to be charged and, of course, while using them.
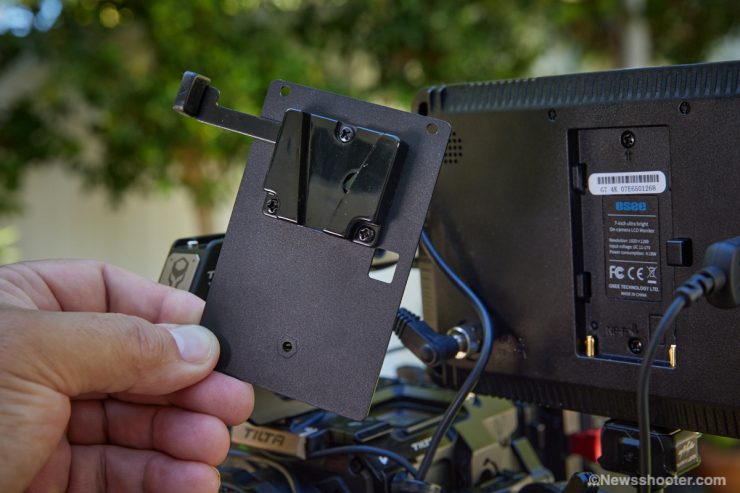
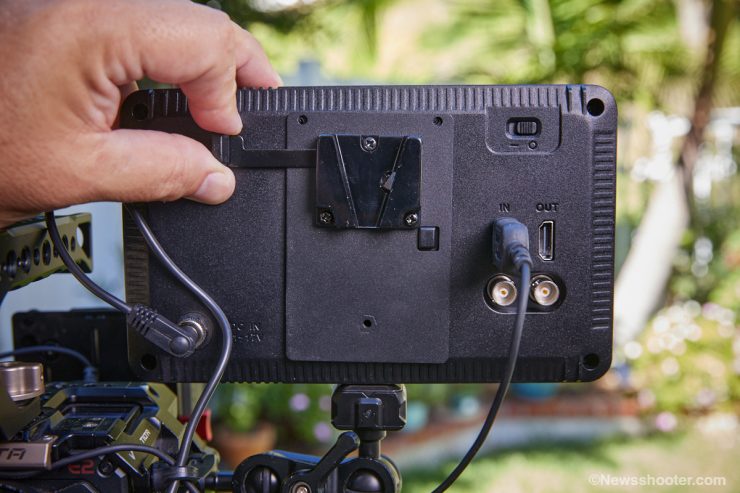
The kit has a V-Mount plate that attaches with three screws to mount over the NP-F slot. To switch back to an NP-F battery, you must unscrew the V-Mount plate. The V-Mount plate doesn’t supply power. You use the included D-Tap to DC plug. Of course, your V-Mount battery has to have a D-Tap option.
I appreciate that OSEE includes the V- Mount plate and power cables. Using the smaller 98-watt versions is great as they are relatively light and compact, with approximately twice the capacity of an average NP-F battery.
I got approximately two hours from a 970-type NP-F battery at half brightness. It can also be powered with a DC input and includes an AC power adapter.
So Many Options
Field monitors have been saturating the market lately at reasonable prices. It can make choosing the right one more challenging. I like monitors over 1500nits as they can be used in the sun. If I were looking into buying, I would get one with at least 2000 nits. I’m also seeing more of the high bright models at good prices. Brands like Feelworld, Desview, and Lilliput, to name a few, are all competing for your hard-earned cash in the budget space. I will say the OSEE menu is much easier to navigate than most lower-budget monitors, and with some tweaking, it’s a fine choice.
Final Thoughts

The OSEE G7 at $499 is priced very competitively. 3000 nits or, actually, 2390 nits are nothing short of impressive at this price point. The monitor is light due to its plastic frame, but its durability will have to be considered over time. The waveform monitor needs some improvements. Hopefully, a firmware update can fix it. I feel it’s very usable at this price, especially for bright outdoors. I appreciate the simple operation and the included SDI input. Adding SDI to a monitor usually increases the price by several hundred dollars.
For the budget shopper, build quality is only half of the equalization. The life span for budget gear will be less, but having a monitor in this price range with many useful tools opens up pro-level features to the masses. Just be nice to the little guy.