Nikon has released a Version 3.0 Firmware update for the Z9 and a new N-Log LUT. To Nikon’s credit, they continue to improve and update their flagship Z9. It is good to finally see a new LUT that has actually been optimized to work with Z9, as the old one was just a rehash of the LUT that was made for the Z6.
This update also adds support for wireless Bluetooth connections between the camera and Atomos UltraSync BLUE AirGlu accessories.
If you are worried that N-RAW may have been removed in this firmware update, don’t worry, it hasn’t!
Version 3.0 Firmware
Hi-Res Zoom
The camera now offers Hi-Res Zoom during video recording. Essentially what is happening here is that the camera is taking the 8K image and recording 4K. This allows you to zoom in up to 2.0× without losing any image quality. This zoom function can be set to three different speeds.
This feature will work with any Nikon lens and you can now turn a prime lens into a zoom. I am not sure whether it will work with adapted glass.
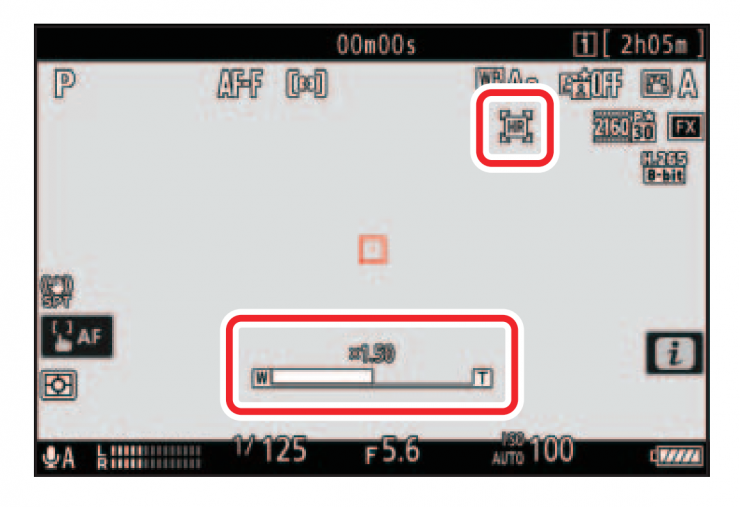
According to Nikon, even if you don’t have a zoom lens, you can still zoom in on your subject with no loss in resolution by selecting [ON] for the newly-added [Hi-Res Zoom] item in the video recording menu (“Hi-Res Zoom”).
• Hi-Res Zoom is available when all the following conditions are met:
- [FX] is selected for [Image area] > [Choose image area] in the video
recording menu, - [ProRes 422 HQ 10-bit (MOV)], [H.265 10-bit (MOV)], [H.265 8-bit
(MOV)], or [H.264 8-bit (MP4)] is selected for [Video file type] in the
video recording menu, and a frame size and rate of from [3840×2160; 30p] to [3840×2160; 24p] or from [1920×1080; 120p] to [1920×1080; 24p] is selected for [Frame size/frame rate] in the video recording menu. - To zoom in or out during filming, press 4 or 2 or use buttons to
which [Hi-Res Zoom +] and [Hi-Res Zoom −] have been assigned via
Custom Setting g2 [Custom controls]. You can zoom in to a maximum of 2.0×. - A H icon appears in the display when Hi-Res Zoom is enabled. The zoom position is shown by a bar as you zoom in or out.
Hi-Res Zoom can be assigned to the camera [Fn1 button] and [Fn2 button], to the lens Fn ring via [Lens Fn ring (clockwise)] and [Lens Fn ring (counterclockwise)], and via [Lens control ring] to the lens control ring.
- When Hi-Res Zoom is assigned to the [Fn1 button], [Fn2 button],
[Lens Fn ring (clockwise)], or [Lens Fn ring (counterclockwise)],
zoom speed can be controlled using Custom Setting g8 [Hi-Res
Zoom speed], which offers a choice of [Slower], [Standard], and
[Faster]. - When Hi-Res Zoom is assigned to [Lens control ring], the control
ring response can be adjusted using Custom Setting f10 [Control
ring response]. - Instead of using the control ring, users of compatible lenses can
employ the focus ring for Hi-Res Zoom by selecting [ON] for Custom
Setting f11 [Switch focus/control ring roles]. - Restrictions apply to some camera features while Hi-Res Zoom is in
effect; in particular, enabling Hi-Res Zoom: - Fixes [Electronic VR] in the video recording menu at [OFF], and
- Fixes the AF-area mode at [Wide-area AF (L)] (the focus area is not
displayed).
Nikon N-Log LUT Version 1.04
Finally, Nikon has released a new N-Log LUT for the Z9. The previous N-Log LUT was nothing short of terrible and it massively crushed blacks and oversaturated the image.
- Added cube-format 3D LUTs (identified by file names ending in “V02-00”) compatible with the Z 9’s N-Log curve. Color reproduction, shadows, and highlights have been revised.
- These Z 9 N-Log 3D LUTs (cube files with names ending in “V02-00”) help address:
- “tone jumps” and the like visible across what should otherwise be smooth tone transitions, and
- overly-saturated colors visible in shots of high-chroma light sources or of subjects lit by the same.
New “ATOMOS AirGlu BT Options” Item
- Connection status is now shown in the shooting display when the camera is connected to an FTP server.
- The camera now supports FTPS.
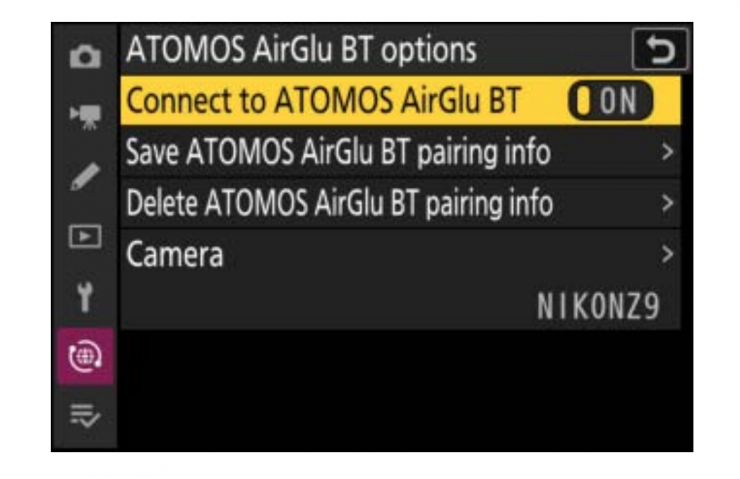
- Added an [ATOMOS AirGlu BT options] item to the [NETWORK MENU].
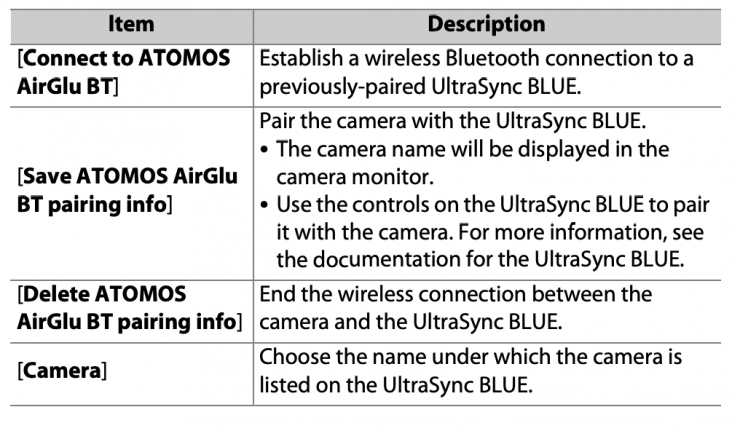
An [ATOMOS AirGlu BT options] item has been added to the network menu. You can use it for wireless Bluetooth connections between the camera and Atomos UltraSync BLUE AirGlu accessories.
The UltraSync BLUE can be used for wireless connections to up to six
compatible cameras or audio recorders. Time codes are transmitted to the connected devices from the UltraSync BLUE, synchronizing time codes even across devices from a mix of manufacturers.
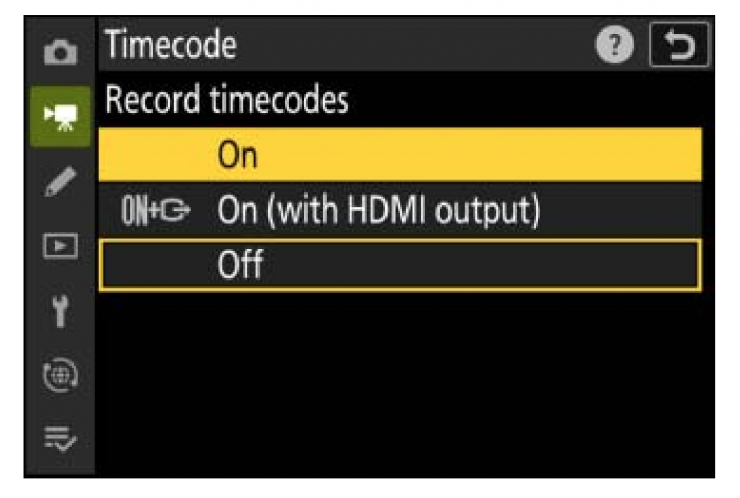
After establishing a wireless connection to the UltraSync BLUE, select [On] or [On (with HDMI output)] for [Timecode] > [Record timecodes] in the video recording menu to start receiving time codes. The camera shooting display will show the same time code values as the UltraSync BLUE.
If no time code is received, the shooting display will show “–:–:–:–” (or
“00:00:00:00” when an external device is connected via HDMI). No time codes will be recorded if filming is begun at this stage.
Time codes will not be recorded if [H.264 8-bit (MP4)] is selected for
[Video file type] in the video recording menu.
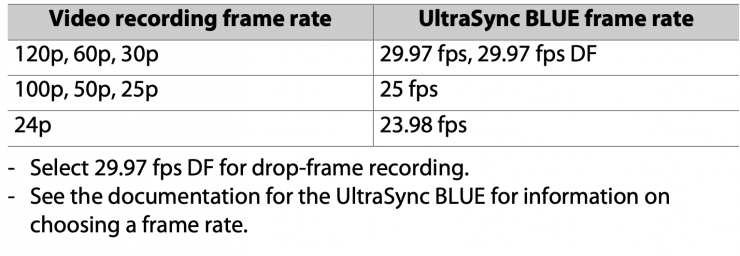
The UltraSync BLUE allows users to choose the frame rate. If the value is not a match for that chosen with the camera, time codes will not be recorded or output via HDMI. Match the frame rate for the UltraSync BLUE to the video recording frame rate as follows:
The options selected for [Timecode] > [Count-up method], [Timecode origin], and [Drop frame] in the video recording menu cannot be changed
while the camera has a wireless connection to the UltraSync BLUE.
If the camera loses the wireless connection to the UltraSync BLUE while
filming is in progress, it will continue to record time codes until the end of
the current shot, although the time code shown in the shooting display will
switch to “–:–:–:–“ about 60 seconds after the connection is lost. The time
code will reappear when the wireless connection to the UltraSync BLUE is
re-established.
The wireless connection to the UltraSync BLUE will end when the camera is turned off or the standby timer expires. We recommend choosing [No limit] for Custom Setting c3 [Power off delay] > [Standby timer].
New “Timecode” Option: “Reset Using Remote”
[Reset using remote] has been added to the options available for
[Timecode] > [Timecode origin] in the video recording menu
(Reference Guide, 0 605). This allows the time code to be reset by
pressing the shutter-release button on an optional WR-T10 wireless
remote controller paired with a WR-R11a or WR-R10 wireless remote
controller attached to the camera.
Selecting [Reset using remote] displays a time-code reset dialog. Press the shutter release button on the WR-T10 to reset the time code.
Paring a single WR-T10 with multiple WR-R11a/WR-R10 wireless remote controllers allows the time codes for multiple cameras to be reset with a single press of the WR-T10’s shutter-release button. The time codes for multiple cameras can thus be synchronized.
The Time-Code Reset Display
Pressing the camera shutter-release button all the way down while the timecode reset dialog is displayed resets the time code. No photograph will be taken.
Photography
- The [Image size] item in the photo shooting menu is now [Image size settings] and offers new options that apply only to pictures taken using the DX image area.
- Added [C60] to the frame rates available for high-speed frame capture. Custom Setting d4 in the [CUSTOM SETTINGS MENU] is now [Pre-Release Capture options].
- Added [High-frequency flicker reduction] to the [PHOTO SHOOTING MENU].
- Added [Focus position auto reset] under [Focus shift shooting] in the [PHOTO SHOOTING MENU].
VF & LCD
- The [Prioritize viewfinder] monitor mode has been replaced by [Prioritize viewfinder (1)] and [Prioritize viewfinder (2)].
- Expanded the range of monitor brightness options to include both brighter and darker settings.
- Made the following additions to the [CUSTOM SETTINGS MENU]:
- – Added a [3D-tracking focus point color] option for Custom Setting a11 [Focus point display].
- – Added [Always] and [Only when flash is not used] options for Custom Setting d9 [View mode (photo Lv)] > [Show effects of settings].
Playback
- The [Rotate tall] item in the playback menu is now [Auto-rotate pictures]. If [ON] is selected, the playback displays in the monitor and viewfinder will rotate automatically to match camera orientation.
- The playback display now shows the color temperature for pictures taken with [Preset manual] selected for [White balance].
- Options are now available for handling as a group each series of photographs taken in continuous-release modes.
- Added [File info] to the options available under [Playback display options] in the [PLAYBACK MENU].
Controls
- Added a full-format option under [Format memory card] in the [SETUP MENU] for use with compatible CFexpress memory cards.
- Made the following additions to the [CUSTOM SETTINGS MENU]:
- – Added a [Type A auto restore delay] option for Custom Setting d14 [Release timing indicator].
- – Added [Center-weighted area] to the items available for customizing shooting displays using Custom Settings d18 [Custom monitor shooting display] and d19 [Custom viewfinder shooting display].
- – Custom Settings f2 [Custom controls (shooting)], f3 [Custom controls (playback)], and g2 [Custom controls] now offer access to an expanded selection of custom roles and controls.
Other Changes
- Improved autofocus accuracy.
- Improved low-light autofocus performance, lowering the minimum level of illumination required by 0.5 EV.
- Reduced the sensitivity of [3D-tracking] to objects passing between the subject and the camera.
- Improved focus performance when [Animal] is selected for [AF subject detection options] during [3D-tracking].
- Reduced the tendency of the camera to focus on the background during subject detection when [Wide-area AF (S/L/C1/C2)], [3D-tracking], or [Auto-area AF] was selected.
- Focus peaking, electronic rangefinding, and the focus distance indicator are now available when focus is adjusted using the lens focus ring, not only in manual focus mode but in other focus modes as well. In addition, adjustments have been made to the length of time the focus distance indicator is displayed.
- Shutter speed, aperture, and ISO sensitivity will now be displayed if exposure is adjusted while the live view display is zoomed in.
- Improved manual focus response in video mode and when silent mode is selected during still photography.
- The shooting display now shows synchronized release connection status. Improvements have also been made to the display in the remote camera list accessed via [Connect to other cameras] > [Remote camera list] in the [NETWORK MENU].
- [Português (PT)] has been added to the languages available via the [Language] item in the [SETUP MENU] for Z 9 cameras sold in Canada and the United States.
- Fixed the following issues:
- – If (a) AF-S was selected for focus mode, (b) an AF-area mode that supported subject detection was selected via a control to which [AF-area mode + AF-ON] had been assigned using Custom Setting f2 [Custom controls (shooting)], and (c) an option other than [Subject detection off] was selected for [AF subject detection options] in the [PHOTO SHOOTING MENU], then pressing the custom control would sometimes fail to activate subject detection.
- – If (a) 3D-tracking was selected for AF-area mode, (b) an option other than [Subject detection off] was selected for [AF subject detection options] in the [PHOTO SHOOTING MENU], and (c) the shooting settings recalled via a control to which [Recall shooting functions] or [Recall shooting functions (hold)] was assigned using Custom Setting f2 [Custom controls (shooting)] had [3D-tracking] selected for [AF-area mode] and [Subject detection off] chosen for [AF subject detection options], then subject detection would continue during AF-ON after the custom control was pressed.
- – If (a) AF-C was selected for focus mode, (b) an option other than [3D-tracking] was selected for AF-area mode, (c) an option other than [Subject detection off] was selected for [AF subject detection options] in the [PHOTO SHOOTING MENU], and (d) the shooting settings recalled via a control to which [Recall shooting functions] or [Recall shooting functions (hold)] was assigned using Custom Setting f2 [Custom controls (shooting)] had [3D-tracking] selected for [AF-area mode], then subject detection would not be performed where expected when AF-ON was initiated via the custom control.
- – Shutter speeds of 1/320 s to 1/640 s would produce uneven exposure across the frame in pictures taken with SB‑800 flash units using auto FP high-speed sync.
- – Choosing a different Custom Settings bank in the [CUSTOM SETTINGS MENU] after selecting a non-default setting for [Auto bracketing] > [Increment] in the [PHOTO SHOOTING MENU] would cause the value for [Auto bracketing] > [Increment] in the [PHOTO SHOOTING MENU] to revert to 1.
- – Shooting information would in rare circumstances disappear from the viewfinder.
- – Attempting to record 8K video with a NIKKOR Z 14-30mm f/4S lens attached and an option other than [Off] selected for [Vibration reduction] in the [VIDEO RECORDING MENU] would sometimes cause the camera to stop responding.
- – Tracking small or low-contrast subjects against a solid-color background such as a blue sky would sometimes cause the focus area to move to the top of the display.
- – Selecting [C30] or [C120] for release mode when an option other than [Off] was chosen for [Active D-Lighting] in the [PHOTO SHOOTING MENU] would cause monitor or viewfinder brightness to change.
- – The camera would in rare circumstances fail to record 8K video correctly.
- – In video mode, the camera would fail to increase the aperture (lower the f/-number) after reaching the upper limit for ISO sensitivity in modes P and S if the value selected for [ISO sensitivity settings] > [Maximum sensitivity] in the [VIDEO RECORDING MENU] was below [12800].
Nikon Wireless Transmitter Utility Version 1.9.8
- Added support for Z 9 firmware version 3.00.
- The Wireless Transmitter Utility now functions as an Apple Silicon native app on Apple Silicon computers.
Nikon NX Studio Version 1.2.2
- Added support for Z 9 firmware version 3.00.
- Fixed the following issues:
- With some models, the vibration reduction data in the [Info] palette [Camera Info] pane sometimes differed from that in the camera playback display.
- The colors in JPEG files created from NEF/NRW (RAW) pictures shot using the AdobeRGB color space would sometimes differ from the originals.
- Certain TIFF files could sometimes not be opened.
- Cropping a picture, copying and pasting the result, and then cropping it a second time would result in abnormal crop boundaries displayed in a location different from the actual crop.
- Adjustments to pictures containing embedded GPS data would sometimes be lost when the pictures were saved or prevent the pictures being successfully exported.
- Reduced the amount of time needed to display pictures transferred to NX Studio after they were taken in Camera Control Pro 2.
- Fixed the following issues:
- The shift key would not function to select additional pictures after being used to select multiple files for transfer to another folder.
- Tools in the adjustment tabs for NEF/NRW (RAW) pictures selected at launch would sometimes be disabled.