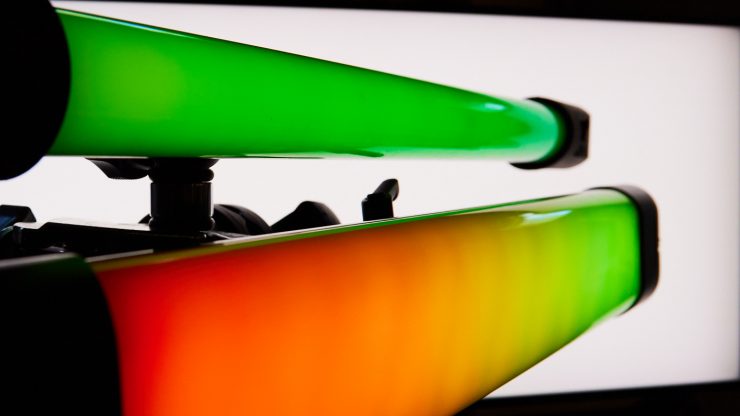
I’ve used Quasar Science tube lights for many years. The 4 foot T8 tubes worked great as a background practical, and the Crossfade lights in an array for a key. They are different, and it’s up to you to find an excellent way to use them in your productions. After all, they are tubes, and they can be a practical and for lighting the subject.
One thing about tube lights when they first started rolling out was there wasn’t a mounting system. You had to get creative. Cardellini clamp was a popular option, but it has some flaws. One big one is over-tightening the clamp could damage the light. The other is the amount of rigging was a bit overwhelming.
When I popped open the case with the new Rainbow 2 and Double Rainbow demo tube lights, I was instantly impressed with how far Quasar Science has come. These new lights have been thought out, and they addressed many issues with tube lights—namely, the mounting system.
These fixtures out of the box have preset effects for popular ones like police cars, fire, and flashes, but the full potential comes when you use a console and DMX to control the individual pixels. This is where things get creative. A designer can create patterns with multiple Rainbows tied together using SACN and Art-Net.
Let’s dive in and go over the features of the new Rainbow 2 and Double Rainbow tube lights, but first, I think we need to talk about the Ossium Mounting System.
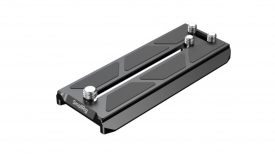
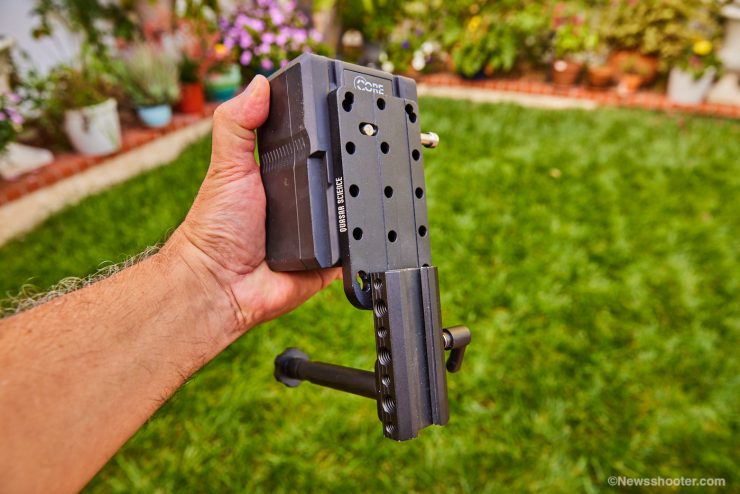
Ossium Mounting System

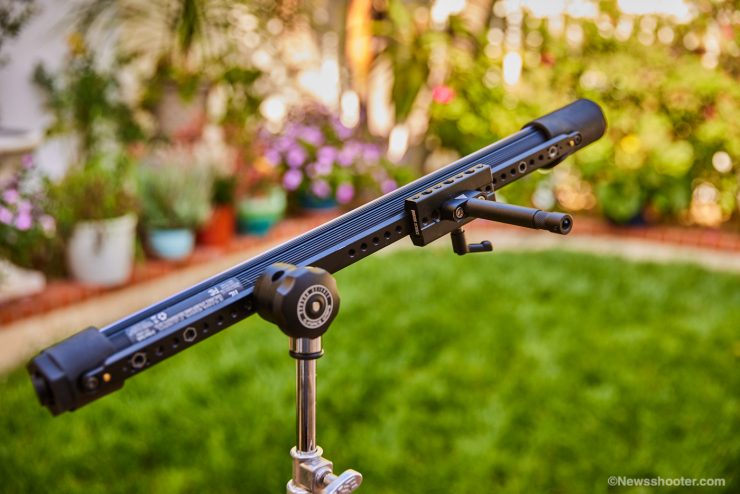
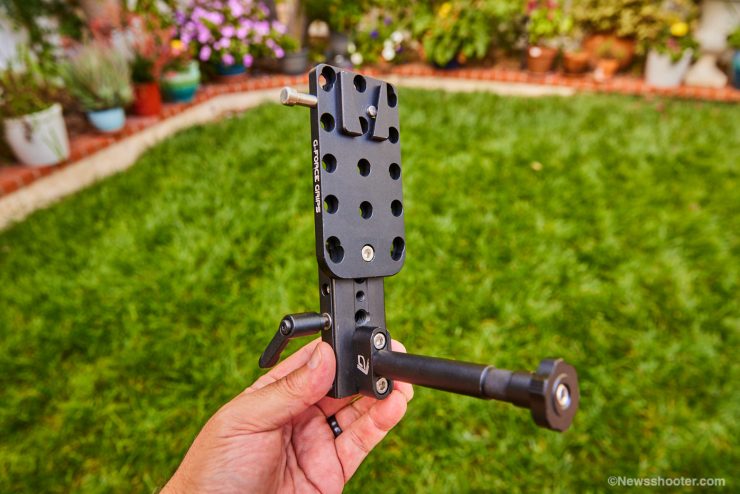
The Ossium Mounting System is the key to making the Quasar Science lights more manageable. These are well-thought-out mounts. As I mentioned, mounting has been a challenge, but not anymore.
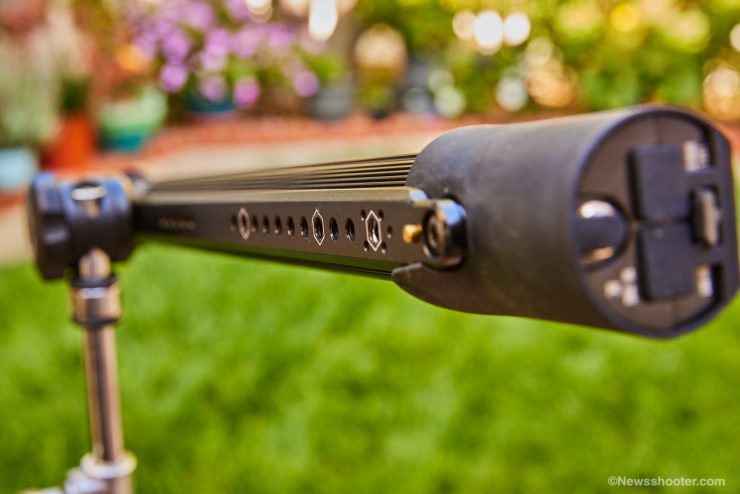
On the back of Rainbow 2 and Double Rainbow is an Ossium Rail that goes the entire tube length. The included rail is covered with 1/4 20″ taps for more options. The also included Ossium Clamp has several 1/4 20″ and 3/8″ taps as well. This is the base mounting system.
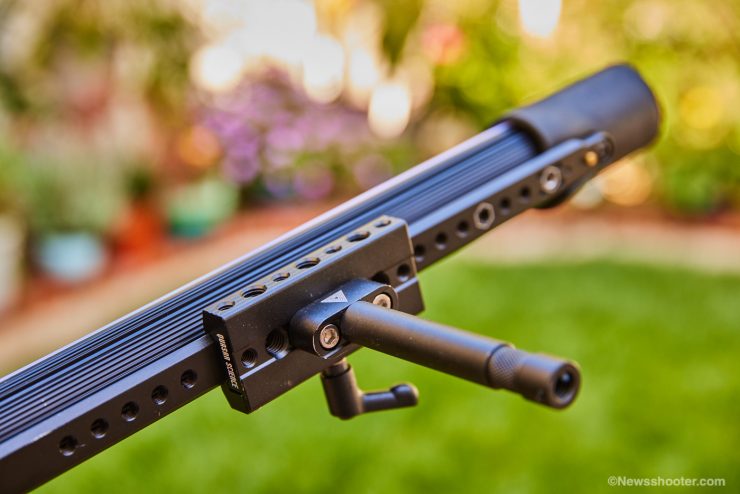
From here, you can add a baby pin to the clamp or screw the baby pin directly to the Ossium rail. Both options make it easy to mount to a grip head. That’s it. Done. All you need now is a creative vision.
A new V-Mount Battery Plate is available if you want to use a battery. It has four 1/4 20″ threads that allow multiple accessories to be attached. I can’t stress how big of an improvement this Ossium Mounting System is. Nice work!
Ossium Rotator
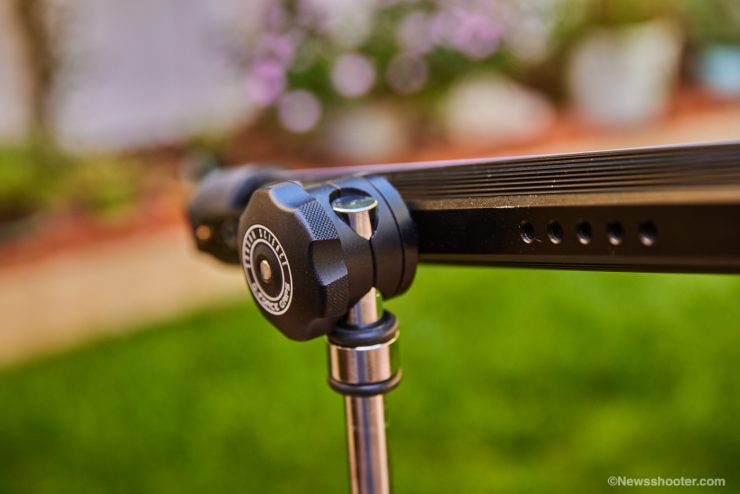
Another option is to use the sold separately is the Ossium Rotator ($55.00), which acts as a mini-grip head. This is my favorite mounting option. Now you can attach the light to a baby pin or directly to a light stand giving you more flexibility in positioning your lights. They screw directly to the NATO Rail in the position of your choice. Since there are many taps along the rail, allowing you to attach your batteries to any 5/8″ or 3/8″ rod. Screw two Rotator Blocks back to back, giving you two swivel points on two separate axes.
Ossium Battery Plate
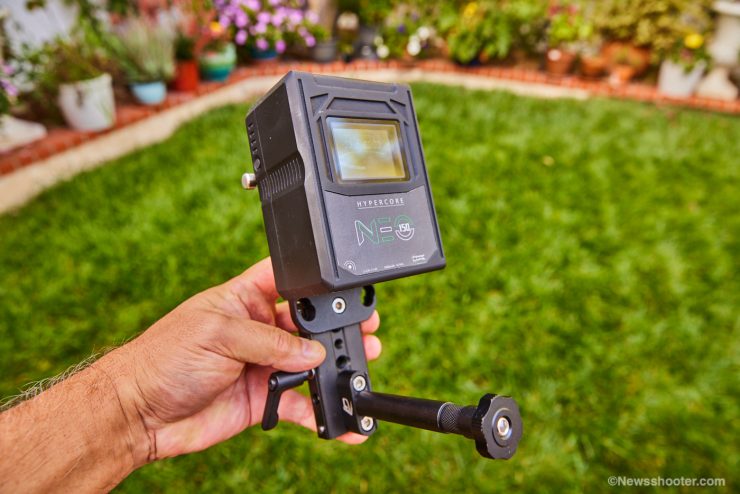
The Ossium Battery Plate gives you the option to mount a battery to the fixture, allowing you to rig your batteries to the back of the light seamlessly. No need to re-rig a light when the internal battery dies. Simply swap out the dead battery.
Ossium Magnets
The Ossium Magnets are sold in sets of two. As the name states, they are magnets and allow the fixture to attach to a metal surface. Fitted with 1/4 20″ threads, the Magnets sturdily attach to the Ossium Rail or Slider.
Menu System
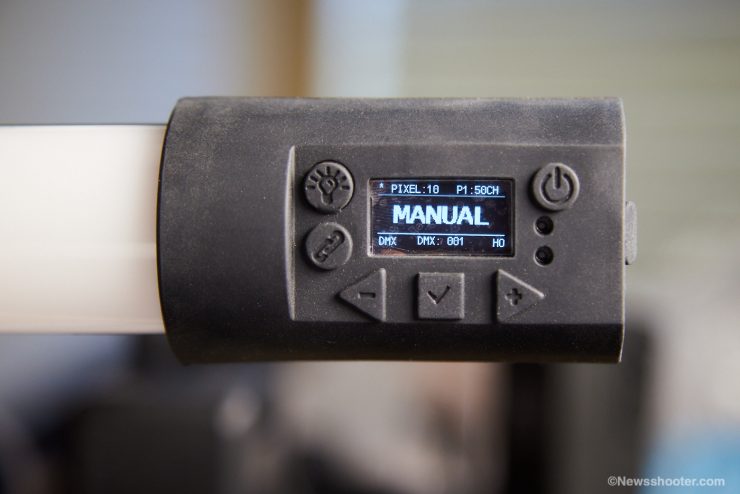
The menu system on both models is very similar and easy to navigate. Left and right scrolls through the options, and to select the functions of each option, you click down. Very simple.
Double Rainbow
The Double Rainbow has two rows of LEDs with the ability to control them separately. They are basically like having two Rainbow 2’s in one fixture. As I mentioned earlier, a consol and DMX are required to gain access to individual pixels. Quasar Science doesn’t have an app.
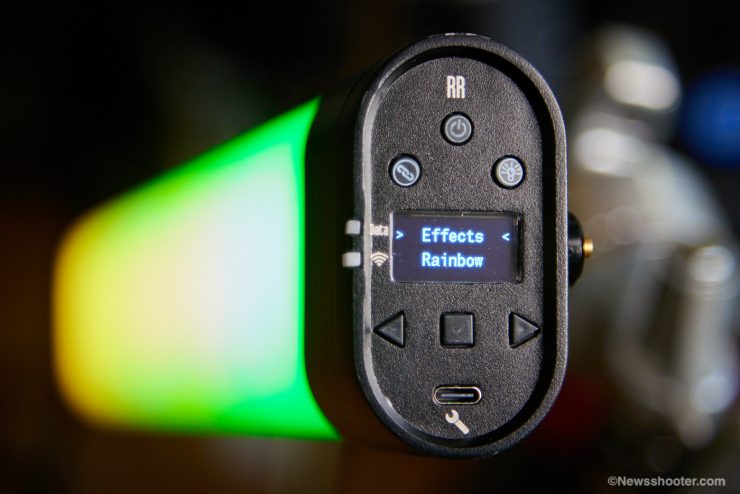
Industry First
Another industry first is the Spectrum Control feature which gives users the ability to choose the spectral quality of any color point the lights can produce. 100% on this parameter gives the optimal spectrum for that color, and 0% gives the spikiest RGB-only spectrum.
Double Rainbow Light Includes the following:
- 1 – RR Double Rainbow Light
- 1 – Ossium Slider
- 1 – Ossium Baby Pin
- 2 – Q-Boot Bumpers
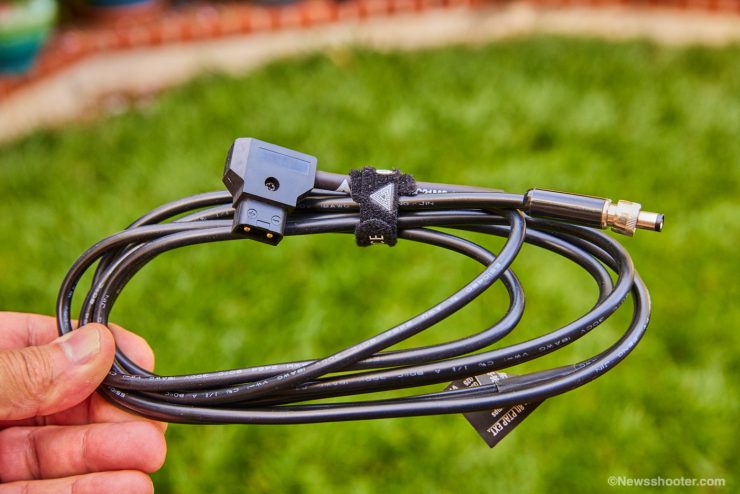
- 1 – 8′ AC Power Cord
- 1 – 8′ DC Power Cord
- Quick Start Guide
- Shortcut Guide
| Model | RR50 | RR100 |
|---|---|---|
| Pixels | 2 Rows of 10 = 20 Total | 2 Rows of 24 = 48 Total |
| Wattage | Max 50W | Max 100W |
| Weight | 3.30lbs (1.5 kg) | 5.73lbs (2.6kg) |
| Dimensions | 22.7 x 3.34 in (577 x 84.8 mm) | 46.1 x 3.34 in (1171 x 84.8 mm) |
| Power (vac) | 120vac = 0.45 amp 240vac = 0.25 amp | 120vac = 0.90 amp 240vac = 0.50 amp |
| Power (vdc) | 12vdc = 4.50 amp 24vdc = 2.30 amp | 12vdc = n/a 24vdc = 4.80 amp |
The Double Rainbow comes in two sizes. The RR50 2′ has two rows of 10 pixels, and the RR100 4′ has two rows of 24.
Rainbow 2
Rainbow 2 Light Includes the following:
- 1 – R2 Rainbow 2 Light
- 1 – Ossium Slider
- 1 – Ossium Baby Pin
- 2 – Q-Boot Bumpers
- 1 – 8′ AC Power Cord
- 1 – 8′ DC Power Cord
- Quick Start Guide
- Shortcut Guide
| Model | Q25R2 | Q50R2 | Q100R2 |
|---|---|---|---|
| Pixels | 10 | 24 | 48 |
| Wattage | Max 25W | Max 50W | Max 100W |
| Weight | 1.76lbs (0.8kg) | 3.30lbs (1.50kg) | 5.84lbs (2.64kg) |
| Dimensions | 23 x 1.75 in (584.2 x 44.45 mm) | 46.9 x 1.75 in (1161.7 x 44.45 mm) | 90.86 x 1.75 in (2307.8 x 44.45 mm) |
| Power (vac) | 120vac = 0.25 amp 240vac = 0.13 amp | 120vac = 0.45 amp 240vac = 0.25 amp | 120vac = 0.90 amp 240vac = 0.50 amp |
| Power (vdc) | 12vdc = 2.50 amp 24vdc = 1.30 amp | 12vdc = 4.50 amp 24vdc = 2.30 amp | 12vdc = n/a 24vdc = 4.80 amp |
Rainbow 2 2-foot Color and Output
I’ll break this into two sections. One for kelvin and the other for HSI output with the preset colors.
Rainbow 2 2-foot Output
My Sekonic C-700-U doesn’t take readings below 2000K, so I decided to start at 3200k. All readings are from one meter.
- 3200k 309 lux
- 5600k 366 lux
- 10,000k 351 lux
Rainbow 2 2-foot Kelvin Accuracy & CRI
3200k


The average CRI is 91.0 with an extended CRI of 86.56
CCT comes in at 3227K
5600k
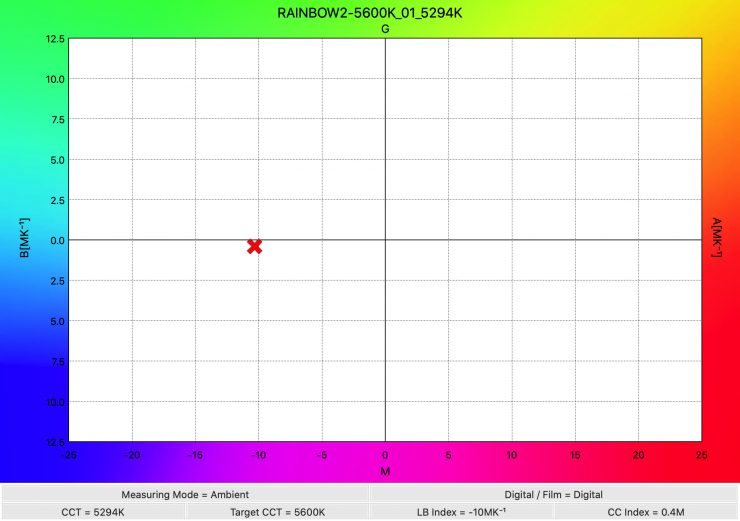
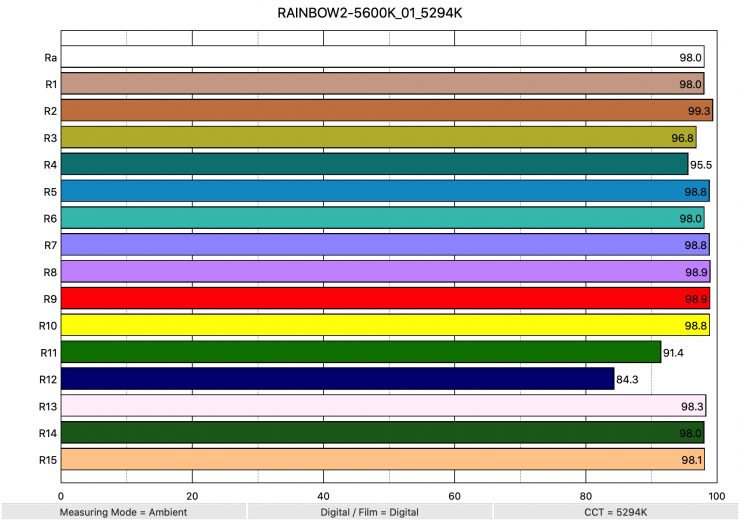
The average CRI is 98.0 with an extended CRI of 96.79
CCT comes in at 5264K
10,000k
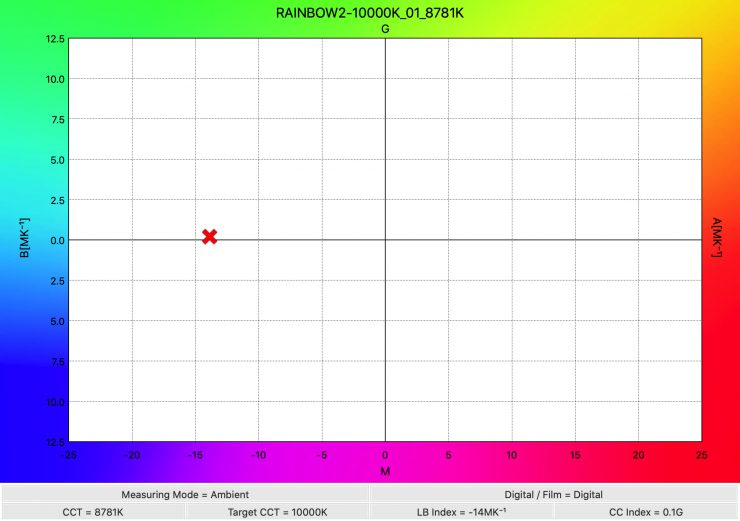
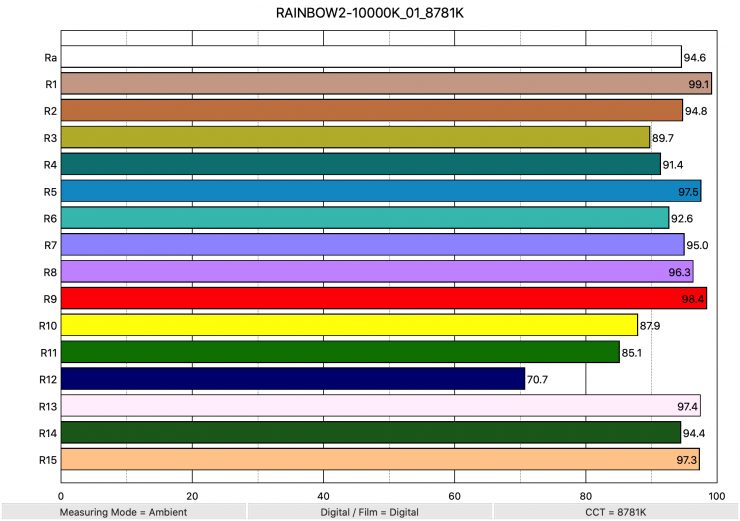
The average CRI is 94.6 with an extended CRI of 92.50
CCT comes in at 8781K
All the test scores are excellent. While the fixture set to 3200k has some big swings in the end, they still have impressive color rendition. One thing with tube lights is I generally don’t use them as keys, but having solid kelvin is important when mixing with other lights. Since tubes are used frequently as background elements, it’s essential for them to represent color properly.
Pricing
The Rainbow 2
- Quasar Science Rainbow 2 Linear RGBX LED Lamp with Ossium Mounting System (2′) $625 USD
- Quasar Science Rainbow 2 Linear RGBX LED Lamp with Ossium Mounting System (4′) $850 USD
- Quasar Science Rainbow 2 Linear RGBX LED Lamp with Ossium Mounting System (8′) $1,400 USD
- Quasar Science Rainbow 2 Linear RGBX LED Light Quad Kit (2′) $3,800 USD
- Quasar Science Rainbow 2 Linear RGBX LED Light Quad Kit (4′) $4,700 USD
The Double Rainbow
- Quasar Science Double Rainbow Linear LED Light (2′) $1,000 USD
- Quasar Science Double Rainbow Linear LED Light (4′) $1,400 USD
- Quasar Science Double Rainbow LED 2-Light Kit (2′) $3,300 USD
- Quasar Science Double Rainbow LED 2-Light Kit (4′) $4,100 USD
These types of lights can be expensive in nature because you could need several to create your vision. For many renting is a better way to go. I can see using a couple here and there as practicals, but the control you have with these is deep, and when used with DMX and art design, you can pull off some crazy cool stuff.
Final Thoughts
It’s great to see how far Quasar Science has come since the Crossfades. Solving the DIY mounting with an out-of-the-box included Ossium Mounting System is a great upgrade.
Lighting design has come a long way in concerts, music videos, and films. These lights are tools that allow you to create beautiful and compelling lighting.