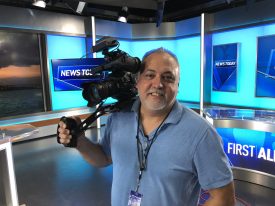
I work in local broadcast in the Creative Services Department. I co-produce, shoot, and edit news image promos. What is a news image promo? It’s basically a fifteen or thirty-second commercial spot that represents our brand and what we are all about.
On March 16th, due to the global pandemic, we were told that going forward, we will be working remotely from home indefinitely. This would include some reporters and anchors doing newscasts from home.
I had a promo to finish editing that day and do some technical setups to my workstation for remote access. Needless to say, it was a very hectic day. In hindsight, I didn’t truly take in what working remotely could mean and regret not taking gear home like the C300 MKII and a few lights. All the station’s gear that I use is still at the station. I was basically going to have to use what I have if I need to shoot anything. I do own a lot of lighting and grip and have a few camera options too, so I felt I could fair well in a pinch.
Editing From Home
I have a fairly modern 2017 27″ iMac at home with Adobe Creative Cloud software as well as Apple Final Cut Pro. At the station, we edit with Premiere Pro, so I figured, to keep things simple, I would continue to use Premiere Pro at home just in case I had to share a project with a co-worker.
Accessing your computer at work remotely is one thing, but editing in that space is not very doable. Lots of workarounds had to be used, such as specific programs and shared drives can only be accessed from the workstation. Editing remotely is possible but the sluggish performance makes it very frustrating.
I found a workflow that, to this day, I’m still using. Basically, I access all the servers and software that we use for news footage and network elements and upload them to the cloud, then download them to my local computer and edit. It took a while at first to get all the production elements I need for all my projects, such as station logos and lower thirds, but once I had them, I was set. I did find using After Effects remotely for updating lower thirds was fairly easy as playback wasn’t that important.
My Home Desk Chair Sucks!
One thing I learned pretty quickly is how my body missed that nice ergonomic chair I have at the station. My back and legs started hurting. After a solid fulltime week of editing in my old leather executive chair, I realized it wasn’t cutting it. I looked around for options on the internet since going to an office supply store wasn’t going to happen, therefore, shopping online was my choice, but I would have to wait for shipping, unfortunately.
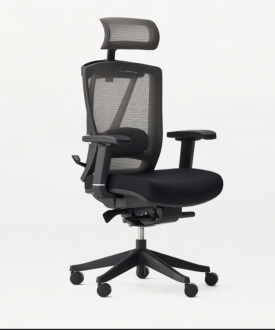
I settled on the Autonomous Ergochair 2. It’s not the cheapest nor the most expensive option. The total shipped was $349.12. It took a week and a half to arrive. The chair is so much better than the old leather executive chair I had. I should have made this purchase years ago, but I didn’t spend this kind of time in it.
The Ergochair 2 has plenty of adjustability and support where I need it. If you’re looking for a chair upgrade, I can highly recommend it. We are all different so take advantage of the 30-day return policy. I personally don’t know after fully assembling the Ergochair 2 how I could break it down and repack it, but thankfully, it’s working out great for my needs. I’m now looking at one of their SmartDesk 2 that can go from a standard sitting desk to a standing desk with a push of a button. That would really be great – the best of both worlds. I can’t have a standing-only desk in my environment, so being able to lower the desk is a great option.
Anchoring From my House?
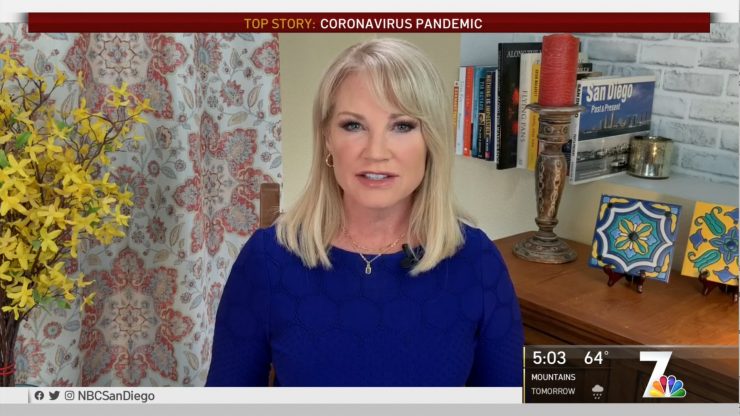
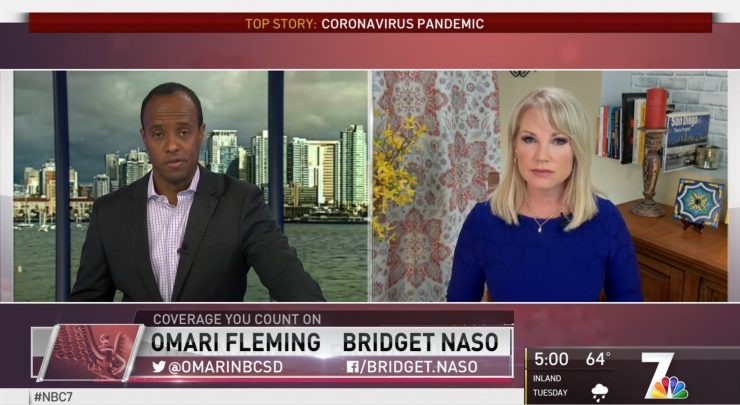
Things are running smoothly in the editing department now, but one thing I knew was coming. My wife also works at the station. She anchors the weekend news as well as covers the military. As I mentioned earlier, the goal was to get as many anchors as possible to do the newscasts from home. Weather anchors were the first to go. It was a rough start, but it got much better quickly.
The following week anchors started getting setup at home to do the newscast from a laptop, iPhone or iPad. With social distancing, I or others from the station were not allowed to go to the homes and set up the gear. The main issue is we were making this stuff up as we go mostly with the gear we already had. I did my best to help with the lighting by using FaceTime and seeing where to place the fixtures and dial the output and kelvin in. It was a very strange way to work.
I noticed that most webcams and mobile phones tend to auto white balance to the background since it is the majority of the frame. You want to set the color temperature of the lights to match the background and the image will look much better.
Setting Up Anchoring Live From Home
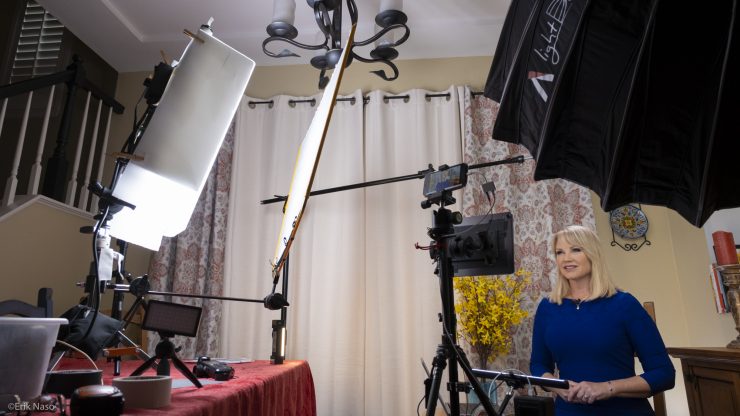
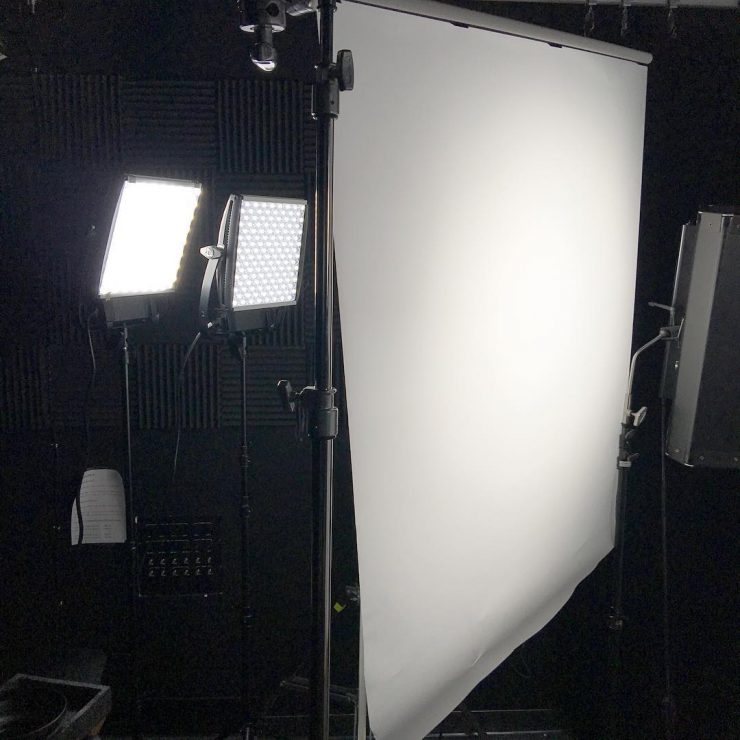
The tough part is where to set up. This is always a hard decision when working at someone’s home. We decided a corner in the dining room would be the best. It’s out of the way so I can leave gear setup and still be able to watch TV and chill in the family room. Hey, it’s my day off! 😀 The corner of the background was a dark spot so I put a white brick background that I use for product shooting to block it off. It worked well. I simply mounted it to the wall with some gaffers tape.
My method for setting up is to get the camera shot first then dress that area in frame. This saves a lot of time. No sense moving stuff around that isn’t going to be in the background.
The Camera
Shooting and uploading news content to the station is a daily affair: shoot, edit, export, and upload. You have to love digital. Even going live is easier these days, and in a perfect situation, a video camera with an SDI or HDMI out would be ideal to a break out box with live capabilities. This is not the case for these remote lives from home as we are using iPhones with the Dejero LivePlus app.
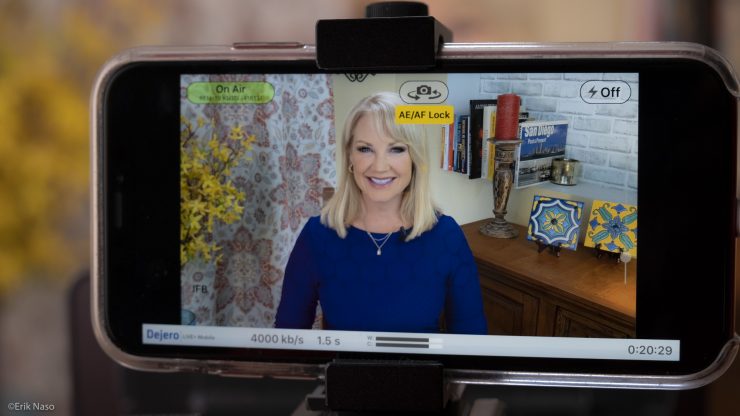
The Dejero app is a broadcast app that is very simple to use. I have little control over the camera. I can lock focus and exposure, plus zoom in. It’s designed for breaking news. If I’m out and about and see a breaking news story developing, I would call the station and let them know. Then bring the app up, and they will see it and trigger my iPhone to go live. I don’t have to do anything but frame up the shot. It’s really that simple, and it’s also secure. They can record the footage or go live with it from the control room. That is some very cool technology.
While this is some cool tech, it’s not formally designed for remote anchoring. Yes, it will work, but it feels out of place. When told we would be using the Dejero LivePlus for this I scratched my head. What about a teleprompter? Audio? Lighting for an iPhone for anchoring? Yes to all the above.
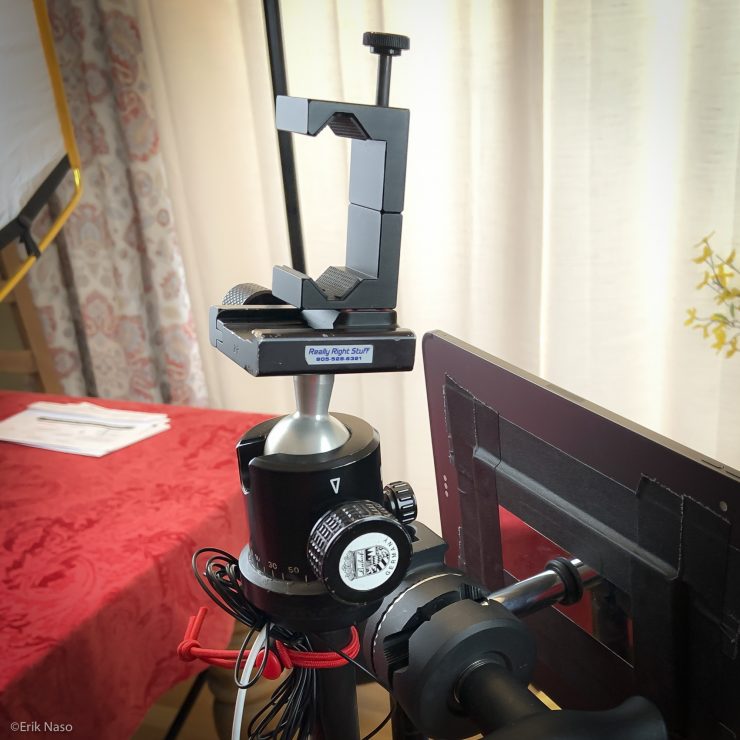
The iPhone is mounted with a RetiCAM Smartphone Tripod Mount to a stills tripod with Arca/Swiss plate attached to the 1/4 20″ tap on the bottom of the clamp. This thing is built like a tank. I’ve had mine for over five years, and it’s going strong. I don’t like the springloaded clips very much because the phone can easily be bumped out. The RetiCAM Smartphone Tripod Mount clamps down securely. It will not fall out of the holder.
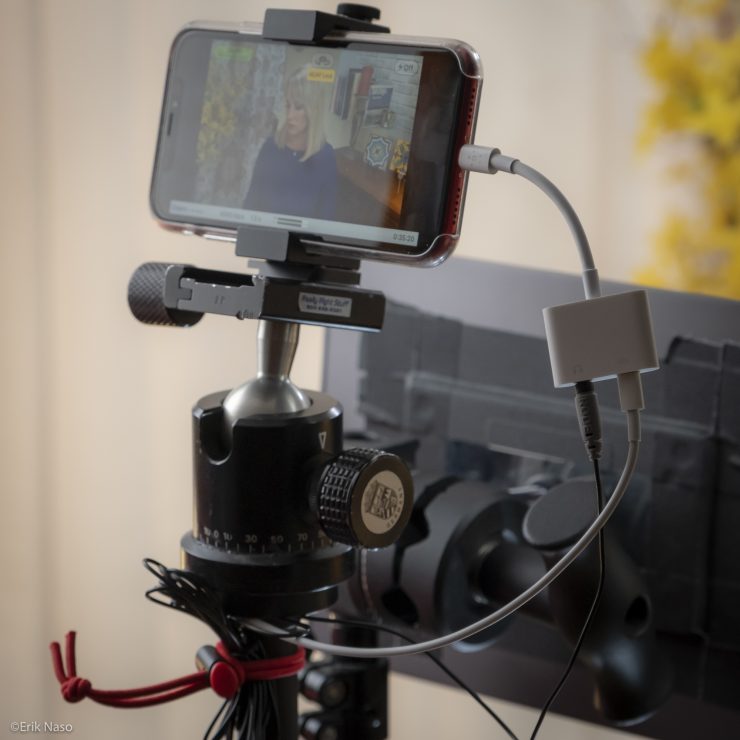
A lighting dongle is used so I can keep the camera charged with an external USB battery, and use of the Rode SmartLav + at the same time. I did have one issue where the camera for some reason went back to the internal microphone. The control room pointed it out and I simply pulled the lighting cable out and reinserted it. That fixed the issue. It’s a little unnerving not being able to monitor the audio.
Here’s a quick tip: Always get the camera at least or very close to eye-level. Shooting up the nose looks horrible. If you are using a laptop web camera stack up books or grab a box to achieve a better eye line to the camera.
Proper Audio Is A Must
One of my pet peeves is how bad the audio is with webcams on local news and the networks as well. Most are using the built-in microphones on the device they are using. It’s very thin and hard to hear. While this is okay when it’s a one-off interview in a show, but having to listen to very poor audio all day long becomes distracting.
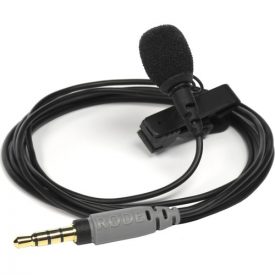
Early on during the planning stages, when I found out that we are going to use phones for the lives, I mentioned getting Rode SmartLav + with Rode SC1 3.5mm TRRS Microphone Extension Cable for all the kits. What a difference this made. You have to have good audio. No, if and or buts!
Another option is a Deity V.Lav that also works with TRRS inputs as well as laptops and recorders.
Hey, We’re Using an iPad for a Teleprompter!
I didn’t know we would have a teleprompter until later in the day, and I didn’t have a mounting system for it. I looked around in my grip kit for a way to mount it without breaking the glass. I’ve heard stories of clamps cracking the front glass, so I didn’t want to try that method.

I did find a baby pin wall plate. That will work!
With a little or maybe to much gaffers tape, I mounted the wall plate to the iPad. It’s very secure and worked perfectly mounted to a grip head just under the lens. The iPad uses Dejero software and is remotely controlled from the control room at the station. All worked very well together.
Time to Make a Plan
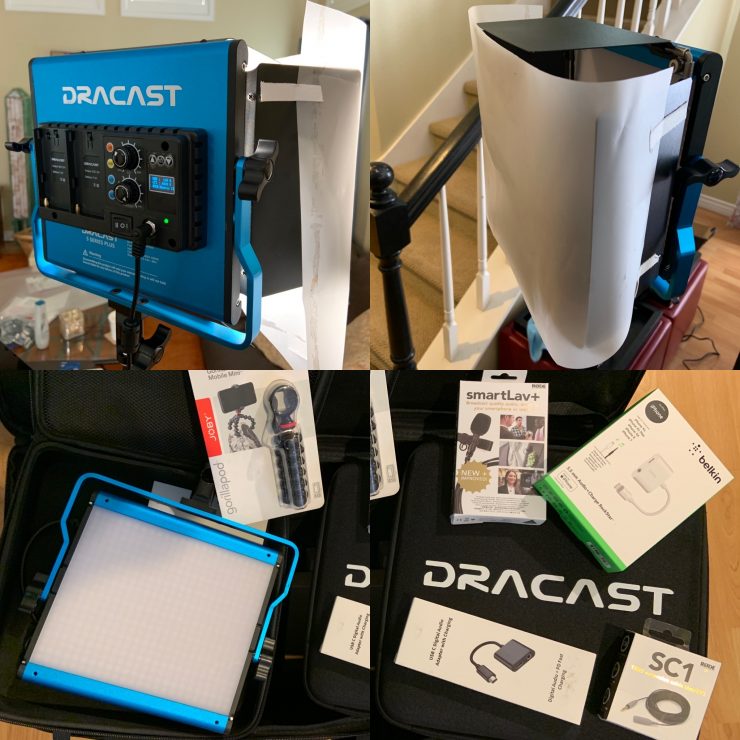
So, What do I want to do? I could go with a basic two-light setup. One key and one fill or evenly separate them on both sides for even coverage. These Dracast S-Series are inexpensive and will do the job but not soft enough or bright enough to use with a diffusion frame. It’s important to have even lighting with cameras that have low dynamic range and poor highlight rolling. They will bloom quickly. Therefore, I didn’t want to overlight the scene either with hard bright sources. It felt like a challenge. You know like a quickfire challenge on a cooking show. I felt up to the challenge. I love lighting a lot. It’s fun, plus I like grip gear so yes, I’m in my element for this one.
The fill was a little more challenging. I tried the Dracast S-Series Plus Bi-Color panel with diffusion, and it was still too harsh for my liking, so I pulled out a Matthews Road Rag frame and added diffusion fabric to the frame, and attached it to the light stand with a Matthews MiniGrip and clamp kit. While it was much softer, the output wasn’t enough.
The S-Series cost $200 each without barn doors. They do run off NP-F batteries and are bi-color, so for a portable fixture, they do check several boxes, but in this home anchor studio overachiever setup it just didn’t make the cut. How’s that for a quickfire challenge elimination!
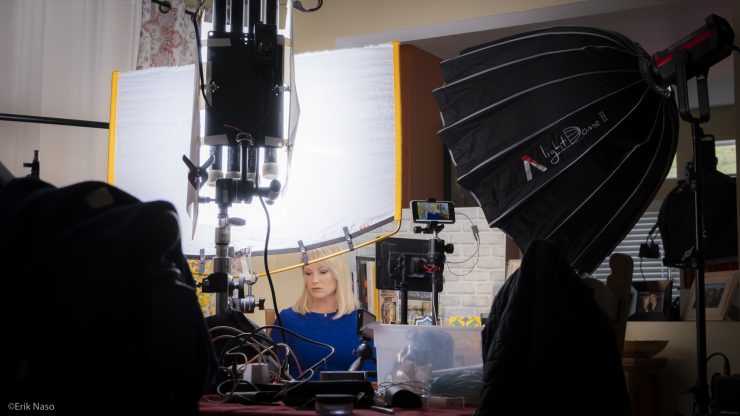
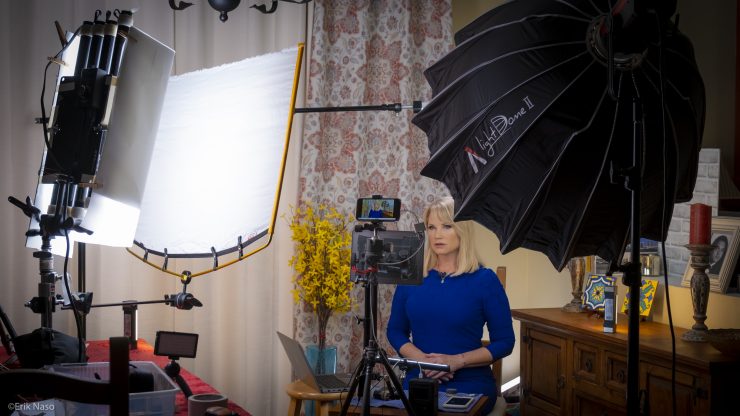
I put the provided Dracast panels back in the kit and grabbed an Aputure 300d II with the Light Dome II for the key. I love this set up a lot. The Light Dome II is fast to set up, and the 300d II is very punchy. I only had it set to 13%, and it was plenty.
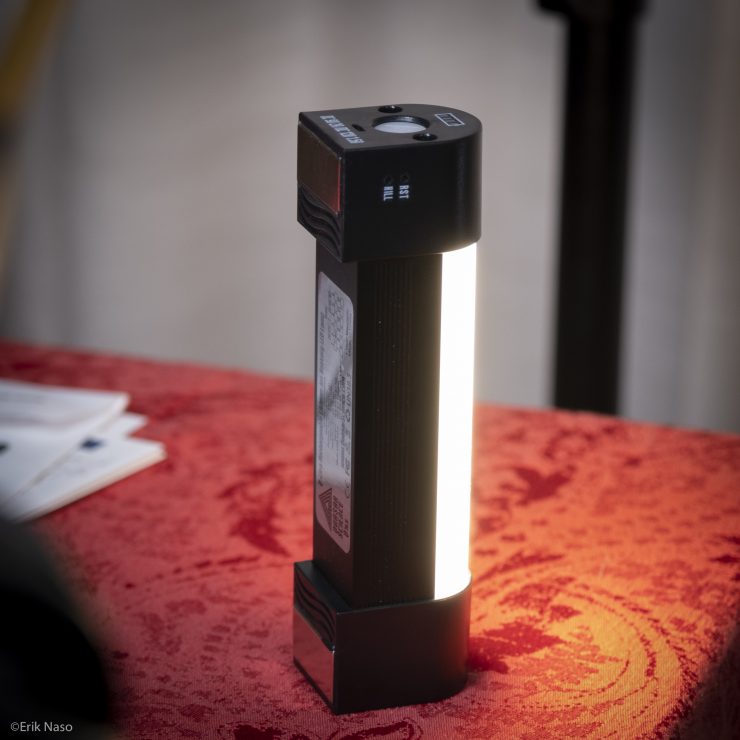
I’ve been using Quasar Science X-Crossfades for some time now, and I like them a lot as they are very versatile. They are bi-color and adjust with a small dial on each tube. It’s a good idea to have a color meter on hand to dial them in if you’re mixing different brands together.
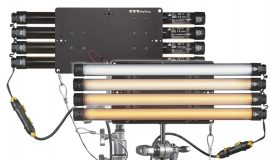
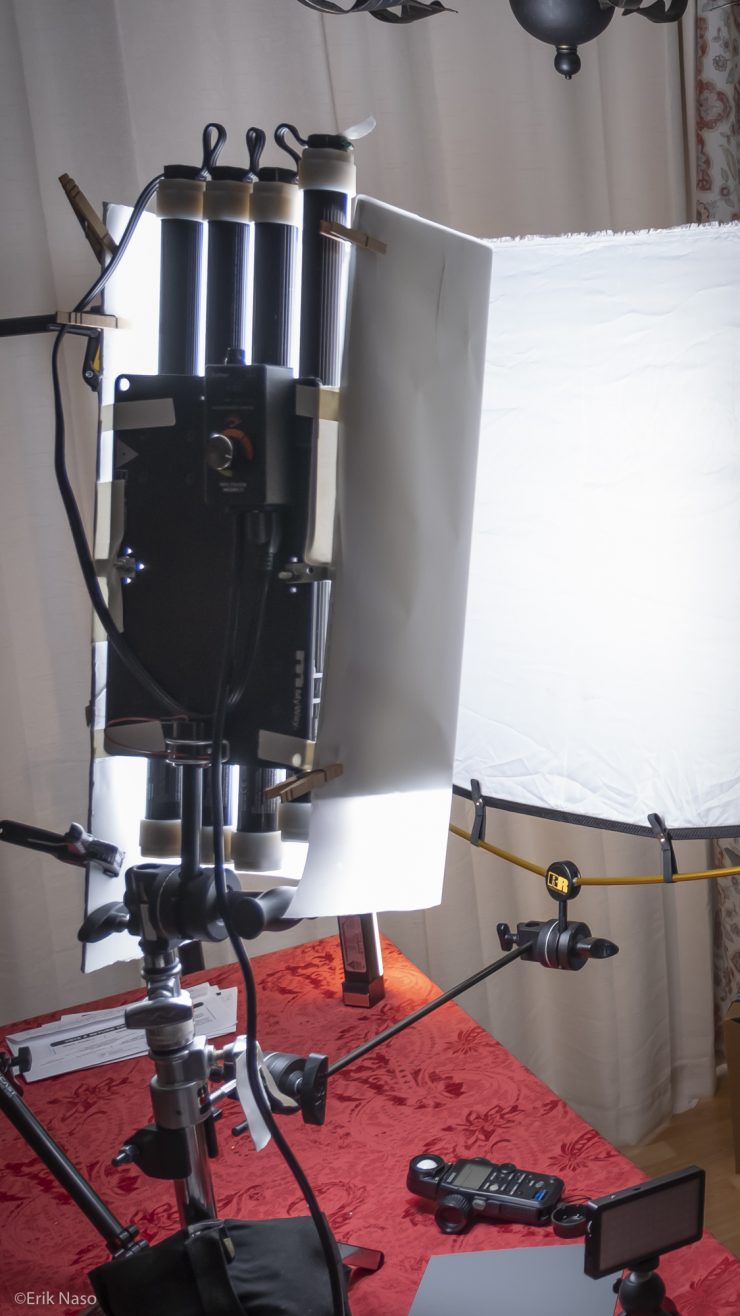
You do need to figure out how to mount them. That part can be a challenge. I’ve wanting to use them as a bank of 4-tubes for some time, and recently I purchased the Matthews MyWay plate for the tubes. Good timing. I like the plate a lot. They come in several different configurations. The one I have is a four bank base with the Quasar Science X-Crossfade clips installed. The quick-release MyWay baby pin mounts on any side of the MyWay plate.
To save a few bucks, I made my own harness and added a dimmer. I also added foam core barn doors with L-brackets and clipped diffusion to them to soften the light more. I use this for fill in my product reviews. It’s fantastic.
We have a big dining room table, and it had to stay in the room, so I used a small Matthews Mini Preemie Baby Steel Stand on top of the table. I love these stands. They are very solid and heavy. If you kicked it you would probably break a toe! It’s a mean mini. 😀
To make the fill even softer, I kept the Matthews Road Rag 24×36″ frame with diffusion in place from my previous tests to soften the Dracast panel. It’s attached with Mathews mini clamp and a Westcott clamp. The Road Rag is 21″ from the front of the tube, and the barn doors with diffusion are 8″ deep.
This knocked the Quasars output down a lot and softened the heck out of them too. I took a reading and was getting approximately 800 LUX from both the Light Dome II and X-Crossfades. As you can see the lights are close to the talent. Low and close will give you some beautiful soft light.
I love the Road Rag kit. It gets a lot of use due to its super lightweight, compact form factor. The poles are lightweight and pitched just like tent poles. It breaks down fast, and it all fits into a slim soft bag. A very handy piece of kit.
The up light is a BB&S Lighting Pipeline Free LED Light 1′ 5600K attached to a magic arm and clamp. This worked great just under the iPad to fill under the chin and brighten the eyes.
Adding background fill lighting and accent

Once I had the main lighting set, it was time to get hair and accent lighting going. I used several Quasar Science Li-ion battery-powered tubes. These are great, and I use them a lot for fill. They have a 3/8″ tap on the end for mounting. I added a 3/8″ baby pin to the 1-foot and mounted it overhead for a hair light. I did a full review of these and is worth checking out.
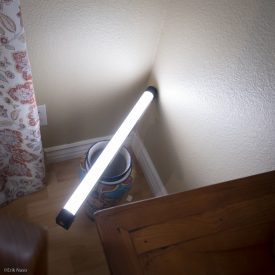
In the background, I put a 2-foot on top of a vase to fill the corner with light, and two small 7″ versions to light the table and the flowers.
It’s very subtle but gives the scene a little pop of color.
On the left side, I used another 7″ for a little pop on the flowers, and on the right another to brighten up the tabletop and tiles.
As I said it’s very subtle and clean. I wasn’t going for a narrative look as that isn’t appropriate for this type of shot.
The Key is Softening the Light
Clipping diffusion to the front of barn doors will soften the light but it won’t get the same softness as having diffusion farther away from the light. Yes, it’s better than nothing, but the next level in lighting is pulling that diffusion farther away from the source. The larger the better. Remember, The diffusion becomes the source once it’s in front of the fixture. The larger the size the softer the light will be.
You Don’t need the same lights I used to get similar results. but you will need lights with higher output. Again, the key is using diffusion that is approximately three feet wide and a minimum of 3-feet or more away from the light. This makes it very soft.
The farther away the diffusion is the larger it needs to be to cover the beam angle. The common frame sizes are 4′, 6′ and 9′. You need to test this out and see how it works. The main issue with this technique is space. a 4’x4′ frame, stands and lights take up a lot of room.
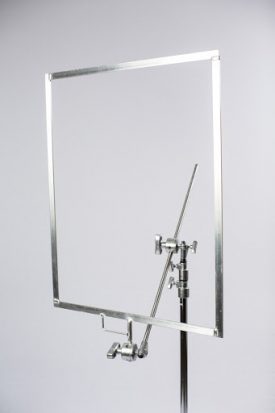
You can also use a Matthews Knife Blade Gel Frame 4’x4′ with diffusion tapped to it.
These are heavy-duty and don’t breakdown but they are inexpensive at $89.00. They have a built-in pin for mounting to a grip head.
I buy rolls of diffusion and cut sheets off of it when I need them. below is a 4’x4′ cut sheet with Velcro tabs added. The PVC pipe has a strip of Velcro as well.
This setup is very cool as I can use different types of diffusion on them. I also have Westcott Scrim Jim fabrics and frames. They attach with hook and loop fasteners. The Scrim Jim fabrics can also be attached to the PVC since they use Velcro to fasten to the frames.
Slide the PVC on a grip arm and attach the diffusion. It’s very fast and can be rolled up for storage or transport. I don’t recommend this set up for outdoor use as a slight breeze will blow the diffusion around. Frames are best for outside.
If you are really tight on space a ringlight is a good option. It has a specific look to it since the light is centered on the face and adds a circular catch light in the eyes.
The beauty of the ring light is you can mount the camera inside the ring making it super compact.
Makeup and beauty vloggers use the ringlight primarily for their video because the light is so soft and even, again it’s very easy to set up and hardly takes up any room.
What I learned
I was very happy with the final results of the shot. The lighting was very soft and wrapped around the face very nicely. The key is to not make it overly bright. Instead, going for a nice soft look. The iPhone XR worked very well considering. I’m actually surprised it looked as clean as it did. Shooting into a corner also helps keep the background more manageable and clean, but it does make it harder to get hair and backlights set.
Using two lights, one for a key and the other for fill is a good way to go. It’s very difficult to get even lighting on a face when the light is on one side. Having a fill allows you to model the lighting creating different looks. Maybe you want a more mysterious look. Simply lower the level on the fill to create a darker exposure on the side of the face or put the light more behind the subject for a slight rim light. It’s endless and a lot of fun.
Adding little accent and fill lights on the background makes it more interesting and less flat. I do need to get more small practicals for this reason, like a small lamp on the table would be nice.
It took me a few hours to figure it all out, and this set up will be used again on the weekends or for shooting a stand up to insert into the story. I have a feeling it’s going to get a lot of use as this pandemic doesn’t look remotely close to being over any time soon. Please be safe folks, and I hope you are all well in these trying times.
Peace.
Like what we do and want to support Newsshooter? Consider becoming a Patreon supporter and help us to continue being the best source of news and reviews for professional tools for the independent filmmaker.