The Kinefinity MAVO LF is one only a handful of cameras that can shoot full-frame 6K. I have previously reviewed the S35 MAVO on the site, but I was keen to see how its bigger brother, the MAVO LF performed.
My previous review of the Kinefinity MAVO was quite mixed, to say the least. I liked the image quality and a lot of the aspects of the camera, but the one that Kinefinity sent me for the review was plagued by reliability and operational issues.
Kinefinity has a rather niche place in the digital cinema camera space. They are a small company that has been around for quite a few years now. I actually shot with their first-ever prototype camera, the KineRAW S35 way back in 2012.
Kinefinity has come a long way in the last 7 years and in that time they have since released numerous cameras that have gradually started to win cinematographers over. No longer are they thought of as “That Chinese camera“, but rather, a legitimate alternative to other more well-known brands.
While Kinefinity was alone in the small independent camera space for quite some time there is now a lot more competition, especially from Z-Cam. Kinefinity also now faces competition from Canon and Sony, who both introduced more affordable full-frame digital cinema cameras.
6K Full Frame
The MAVO LF is Kinefinity’s current flagship camera and features a full-frame CMOS image sensor, with an effective area of 36x24mm. It can shoot in resolutions up to 6K: 6016×3984.
MAVO S35 Sensor 
MAVO LF Sensor
According to Kinefinity, if you compare the MAVO LF to the MAVO S35, the CMOS imaging sensor area is 2.25 times; the pixel pitch is 50% bigger; the SNR is better, and the picture is cleaner.
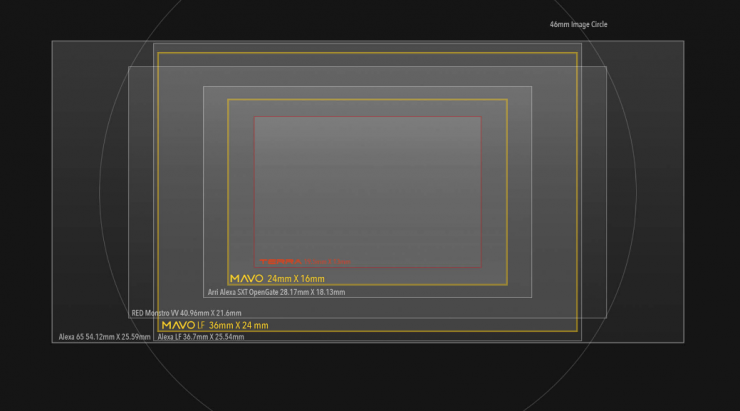
Above you can see how the MAVO LF sensor compares to some other cameras on the market.
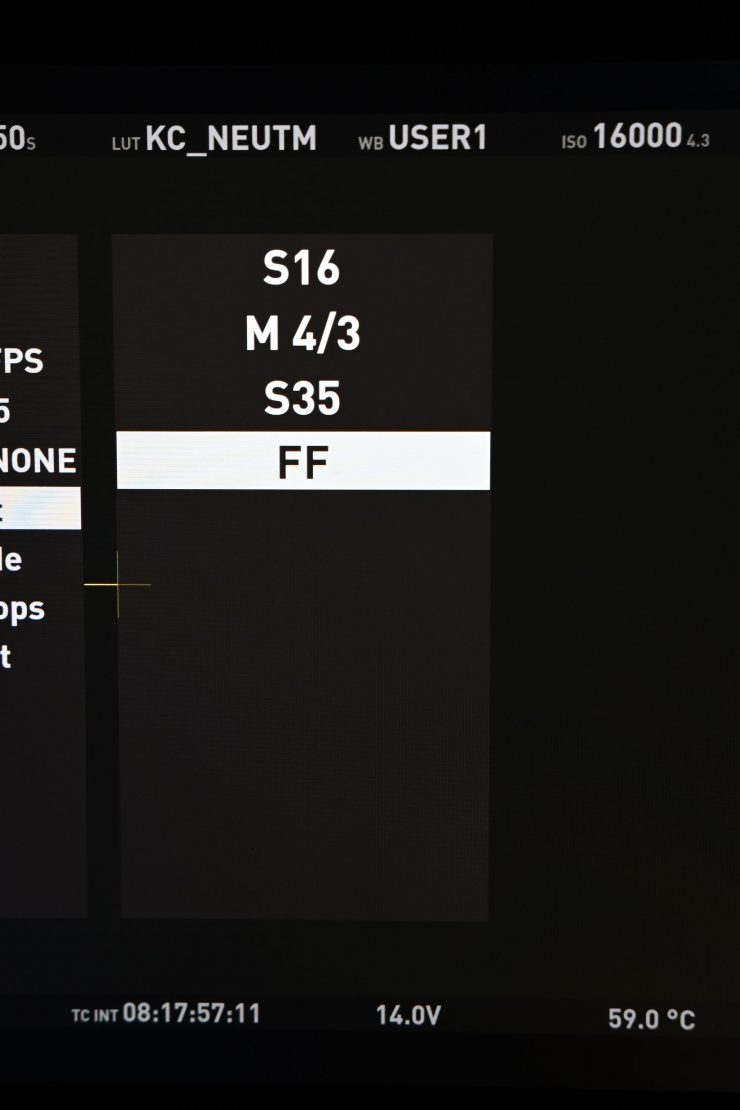
The sensor on the MAVO LF can also be cropped or oversampled to shoot in M4/3, S16, and S35 modes. There is also a multitude of frame rates you can record at depending on what resolution or image format size you are shooting in.
In the S35 mode, the highest resolution you can shoot at is 5K DCI 5120×2704.
In the M4/3 mode, the highest resolution available is 3072×1620.
In 16mm mode the highest resolution available is 2048×1080.
Resolution, Frame Rates & Codecs
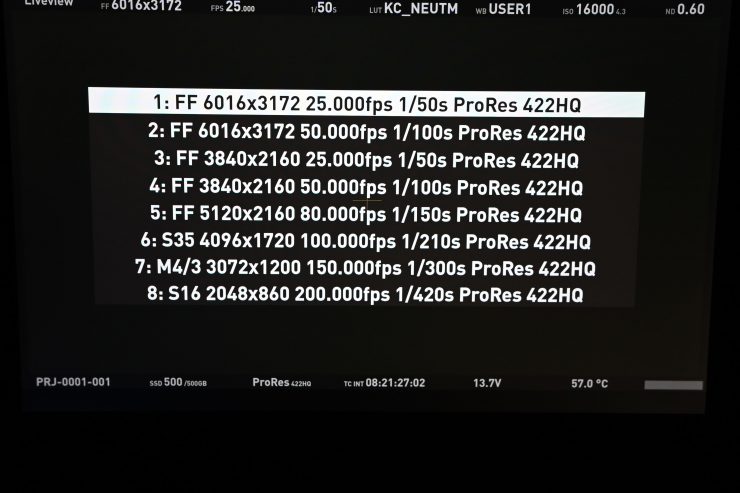
The MAVO LF has a large range of resolutions and frame rates that you can choose from. Almost all of them are available in both ProRes and cDNG RAW. All the flavors of ProRes are available on the camera including ProRes4444 and ProRes4444XQ.
- Compressed cDNG 12bit (3:1/5:1/7:1)
- Compressed KineRAW 2.0 .krw 12bit (Not available yet)
- ProRes422HQ/422/LT/Proxy- 10bit
- ProRes4444- 12bit up to 6K 30fps
- ProRes4444XQ- 12bit up to 4K HD 48fps
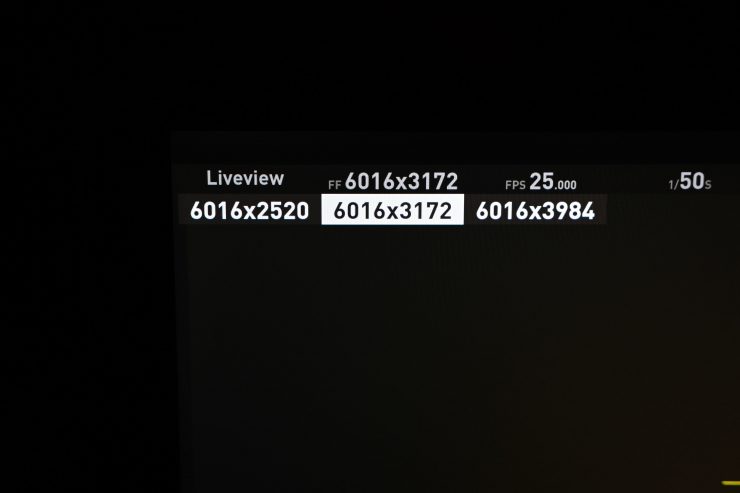
The camera is capable of recording full 6K DCI at up to 60fps in full frame. In 6K Wide (6016×2520) you can do up to 75fps. The fact that you can do this continuously at these resolutions is certainly impressive.
As far as high frame rates go, you can get up to 290fps in the 2K HD Wide (1920×800) S16 mode.
What you need to know is that you can’t shoot in HD resolutions in full frame, S35 or M4/3 modes. If you need to shoot in HD it can only be done in the S16 mode. UPDATE: Kinefinity has told me that the MAVO LF will do a Full HD downsample in s35. This is not reflected in any material on their website.
In M4/3 mode you can only record in 3K resolutions.
| IMAGE FORMAT | FORMAT | RESOLUTION | MAX FPS | CODEC |
| FULL FRAME | 6K Wide | 6016×2520 | 75 | ProRes or RAW |
| 6K DCI | 6016×3172 | 60 | ProRes or RAW | |
| 6K HD Wide | 5760×2400 | 75 | ProRes or RAW | |
| 6K HD | 5760×3240 | 58 | ProRes or RAW | |
| 6K Open Gate | 6016×3984 | 48 | ProRes or RAW | |
| 4:3 FF Anamorphic | 5376×3984 | 86 | ProRes or RAW | |
| 6:5 FF Anamorphic | 4864×3984 | 48 | ProRes or RAW | |
| 4K HD Wide (Oversample) | 3840×1600 | 75 | ProRes | |
| 4K HD (Oversample) | 3840×2160 | 58 | ProRes | |
| 3K HD Wide (Oversample) | 2944×1200 | 75 | ProRes | |
| 3K HD (Oversample) | 2944×1620 | 58 | ProRes | |
| S35 | 5K Wide | 5120×2160 | 80 | ProRes or RAW |
| 5K DCI | 5120×2704 | 60 | ProRes or RAW | |
| 5K DCI | 4096×3432 | 70 | ProRes or RAW | |
| 4:3 S35 Anamorphic | 4096×3072 | 80 | ProRes or RAW | |
| 1:1 S35 Anamorphic | 3072×3072 | 80 | ProRes or RAW | |
| 4K Wide | 4096×1720 | 140 | ProRes or RAW | |
| 4K | 4096×2160 | 112 | ProRes or RAW | |
| 4K HD Wide | 3840×1600 | 150 | ProRes or RAW | |
| 4K HD | 3840×2160 | 112 | ProRes or RAW | |
| M4/3 | 3K Wide | 3072×1200 | 195 | ProRes or RAW |
| 3K | 3072×1620 | 144 | ProRes or RAW | |
| 3K HD Wide | 2944×1200 | 195 | ProRes or RAW | |
| 3K HD | 2944×1620 | 150 | ProRes or RAW | |
| S16 | 2K Wide | 2048×860 | 270 | ProRes or RAW |
| 2K | 2048×1080 | 200 | ProRes or RAW | |
| 2K HD Wide | 1920×800 | 290 | ProRes or RAW | |
| 2K HD | 1920×1080 | 220 | ProRes or RAW |
Frame Rate can be adjusted as 0.2~MAX fps, step accuracy of 0.001fps. Note: ProRes4444 and 4444XQ do not apply for all resolution and fps.
Example Footage
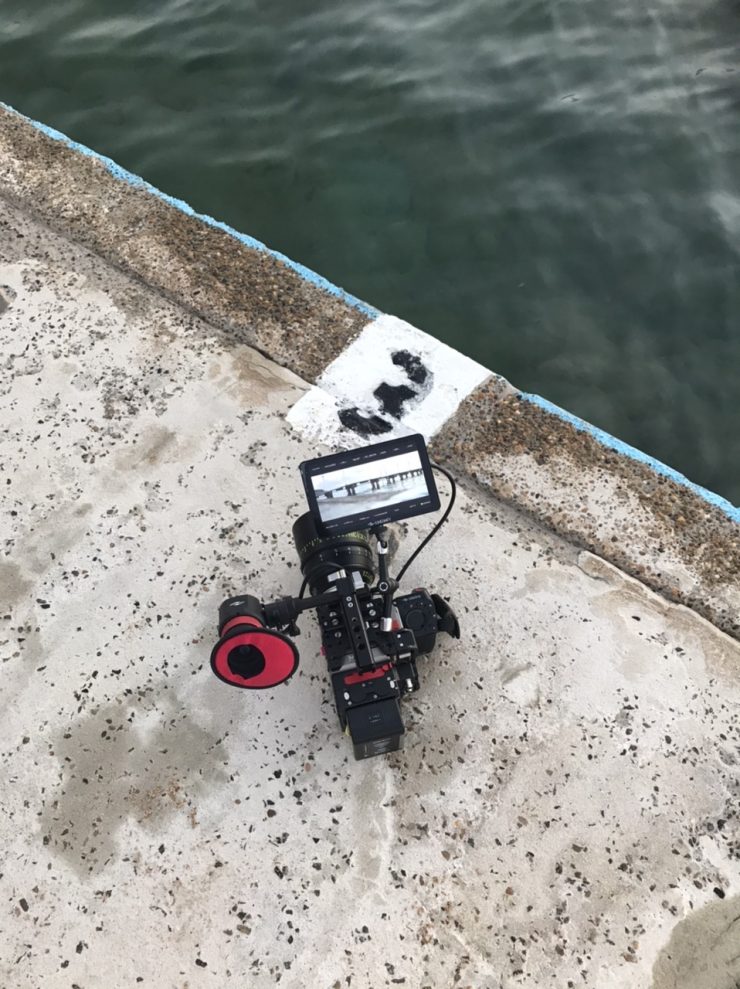
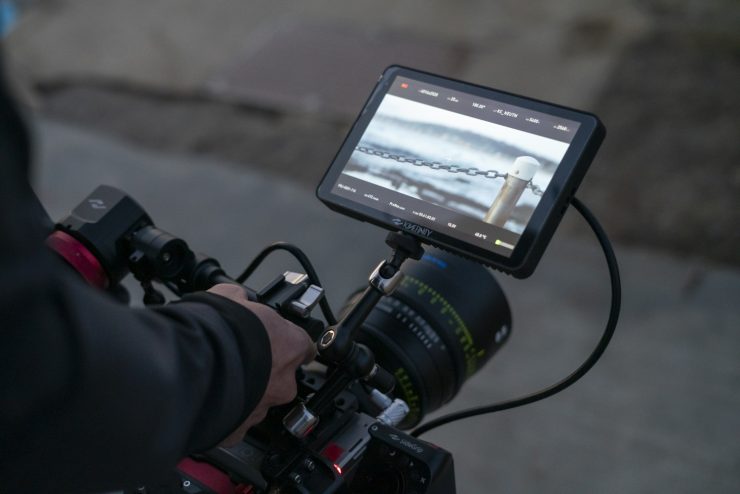
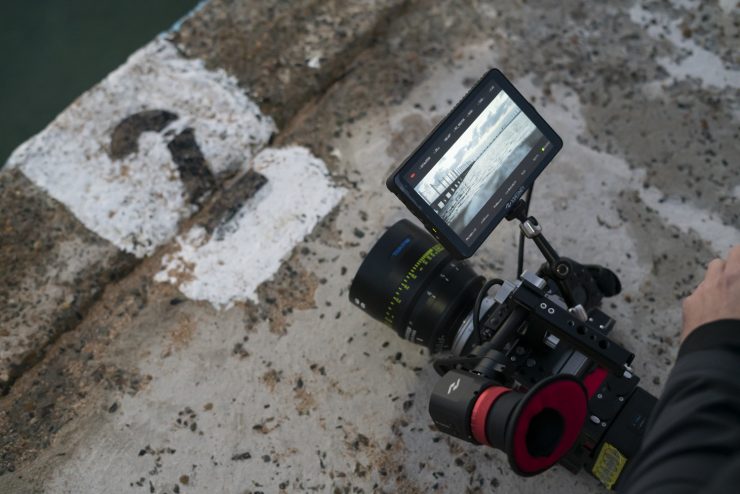
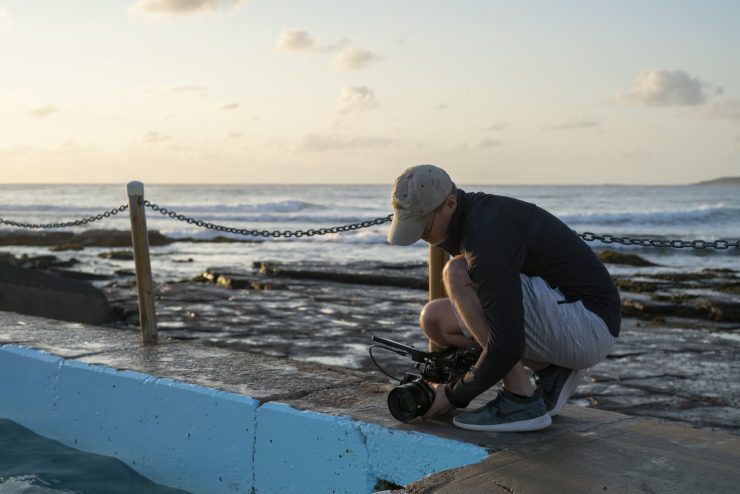
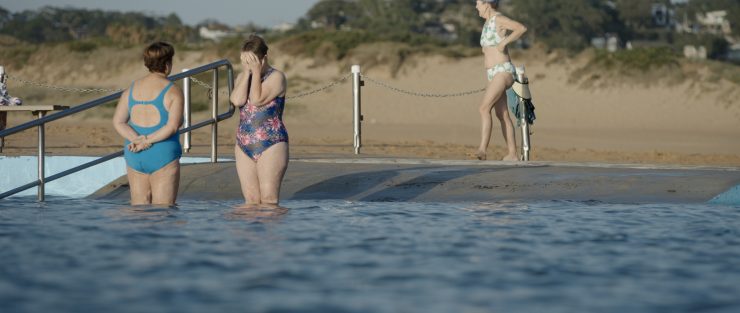
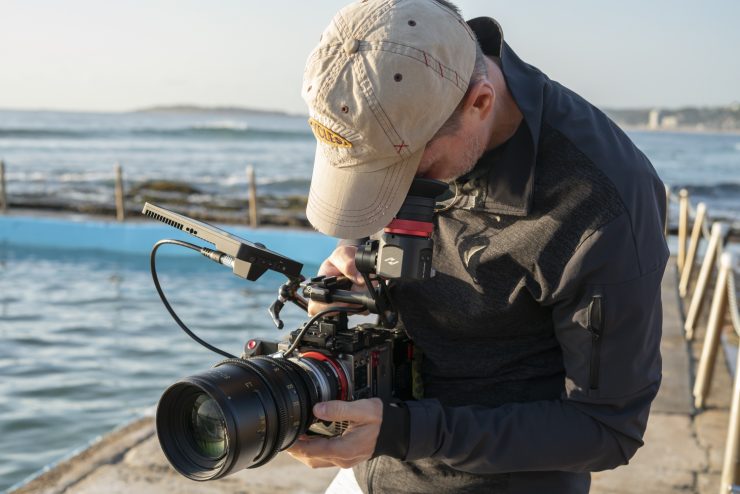
At the top of this review, you can see some example footage I shot with the MAVO LF. Most of the footage was taken at 800 ISO. I shot in the 6016 x 2560 wide mode at 25fps, 50fps, and 75fps and captured material in ProRes 422HQ. Shooting in RAW wasn’t a realistic option considering I only had two 500GB KineMAGs
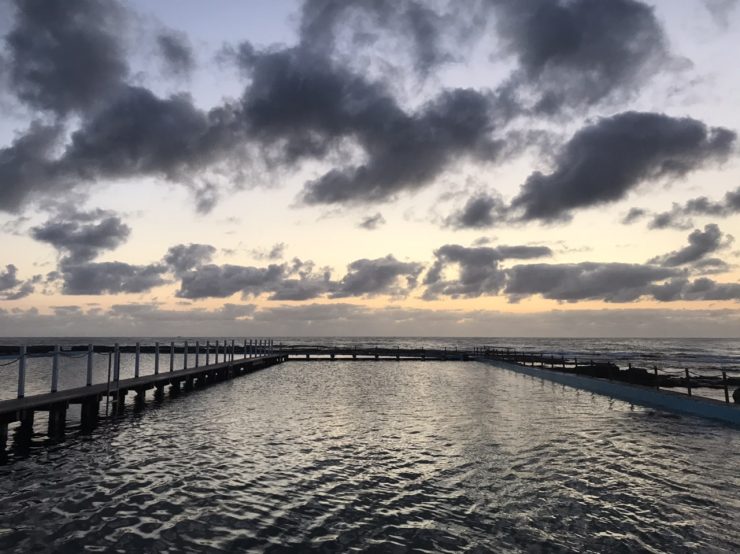
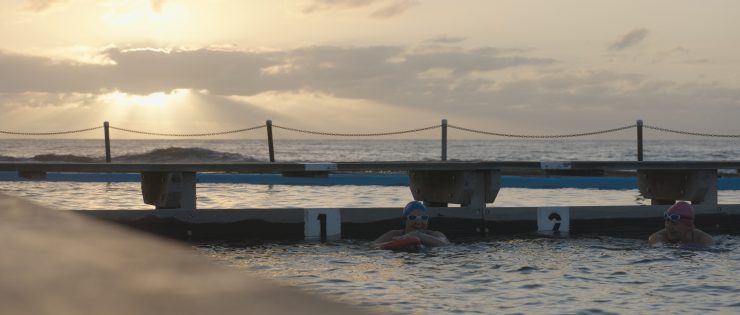
Shooting at the beach at sunrise in Australia will challenge the best of cameras. You have harsh sun, shadows, and sparkling water. Not only will shooting in these conditions really test out a cameras dynamic range, but also highlight roll-off, and color response.
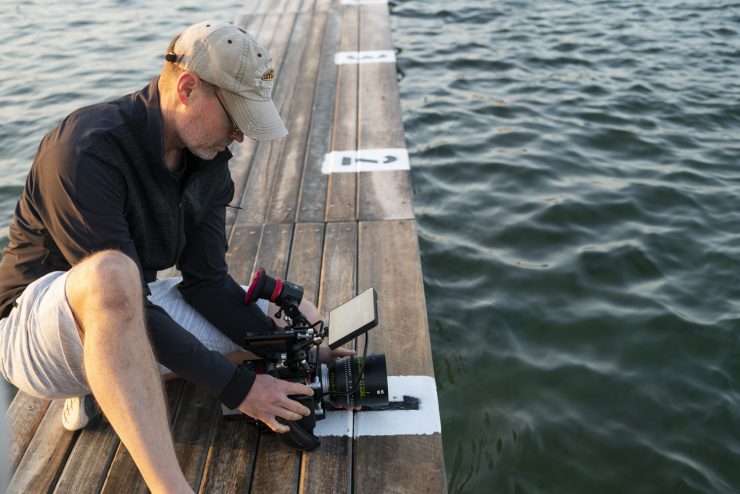
The MAVO LF produces lovely imagery and I was very happy with the results I got. All of the vision was captured without a tripod and I haven’t done any heavy grading.
Who is the MAVO LF aimed at?

This is a hard question to answer. The MAVO LF could be used for a wide variety of applications. There is no reason why you couldn’t use the camera for anything from small jobs, all the way up to large productions. It’s probably a disservice to Kinifinty to think of the MAVO LF as a low-cost alternative to a RED, ARRI, or Sony. I think it is certainly a camera that can punch well above its weight and compete with more high-end offerings.
If you are shooting events, documentaries or news, then the MAVO LF could work for you if recording audio internally isn’t a big concern.
I personally think the camera is well suited to mid tier indy film makers who want a full frame look, but can’t afford to buy or rent an ARRI, RED, or Sony.
The MAVO LF offers quite a lot of features that weren’t previously available unless you were prepared to spend a lot of money. That has started to change recently, and as I already mentioned, the MAVO LF now has to compete against affordable full-frame offerings from Z-Cam, Sony, and Canon.
Dynamic range & sensor response
For me personally, I’m not that interested in dynamic range numbers. I’m not so concerned about the number of stops, but I’m more interested in where those stops are allocated and how the highlights roll-off. There is a big difference between the usable dynamic range and actual dynamic range. Kinefinity claims that the MAVO LF has more than 14 stops of dynamic range.
I wasn’t interested in shooting charts in controlled environments to work out what the actual dynamic range was, as that only tells you part of the story. I wanted to see how it actually performed in real-world scenarios.
Shooting a sunrise in very contrasty conditions will always challenge even the best of cameras. The dynamic range of the MAVO LF is impressive and right up there with some of the best cameras I have ever used.
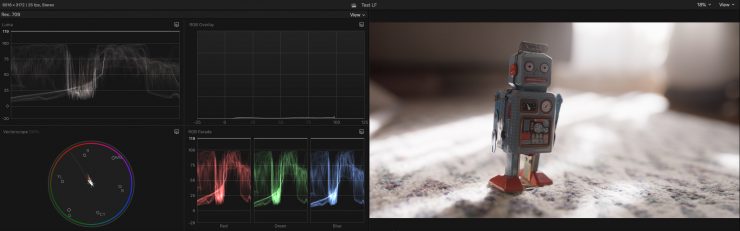

Above you can also see a screenshot where I shot a little robot who was very heavily backlit. Even though I’m losing detail in the highlights the highlights still look pretty good and you can see from the scopes that there isn’t any hard clipping occurring.
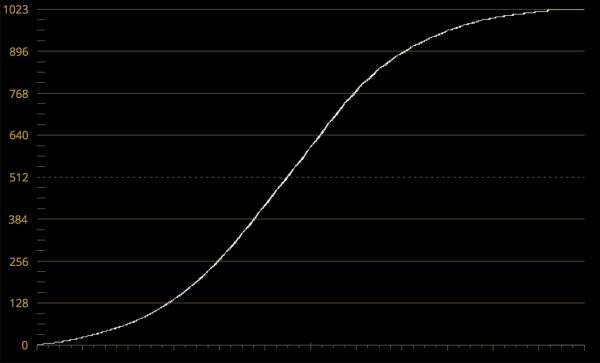
Above you can see what the KineKC_NEUTM LUT looks like on a waveform. Below you can see how it compares to a standard ARRI REC.709 LUT.

While the MAVO LF isn’t as good as the ARRI when it comes to handling highlights (few sensors, if any, are), it was still fairly impressive. Kinefinity has done a good job with this sensor and it shows impressive amounts of dynamic range, but in saying that, their sensor might be capable of even better results with an improved LOG curve and LUT. With the curves between the ARRI and the MAVO LF being fairly similar I found I could also get pretty decent results by using some of the ARRI LUTs.
Range of codecs
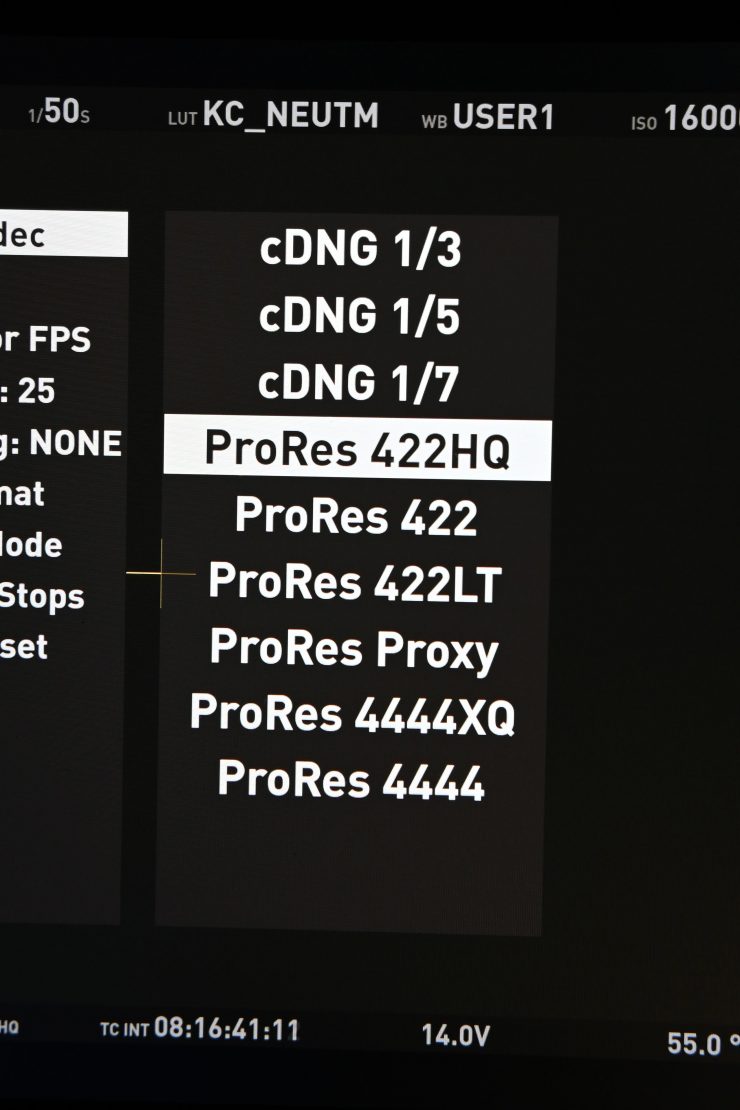
I touched on codecs earlier, but I think it is important to talk more about them. As far as codecs go, the MAVO LF can record compressed RAW using cDNG. It has compression ratios of 3:1, 5:1, and 7. If you prefer you can also shoot directly to ProRes 444XQ/444/422HQ/422/LT/Proxy. Having all these options is very impressive for a camera at this price point. Kinefinity really has done a good job of offering users a range of recording options. Not everyone wants to record in RAW, and having the ability to record in a range of compressed ProRes codecs is extremely handy.
The camera is also supposed to be able to record in KineRAW at some stage. KineRAW is actually a fairly efficient RAW codec. If you were to shoot at a compression ratio of 3:1, one 500GB KineMAG SSD can record around 100 minutes of 4K RAW data. The data rate of KineRAW (3:1) is only slightly larger than ProRes 422HQ.
Dual Native ISO
The MAVO LF has dual native ISO of 5120 and 800. The noise performance is claimed to be a lot better than any previous Kinefinity camera.
Just how the dual native ISO works and how you can best take advantage of it, isn’t documented anywhere, so I reached out to Kinefinity for some help.
They told me, the MAVO LF has dual ISO: 5120 and 800. When you set highlight stops to 4.3, the native ISO for range from 320 to 1280 is on 800 base. 5120 is for the range from 1600 to higher ISO values. As you know, MAVO LF also supports EI and ISO models, so when you use the EI mode, the native EI range for 200 to 2000 is set at the 800 base, 5120 is for the range from 2560 to higher ISO values. In regard to the highlight stops, the more highlight stops mean the less detail in the shadows. For example, when you need more highlight details, you can increase the highlight stops to higher than 4.3 stops or use EI mode. EI model can give you more highlight stops. When you change ISO, your highlight stop remains unchanged.
I wanted to see just how good the MAVO LF was in low light conditions, so I did some tests. You can see those tests further down in the article.
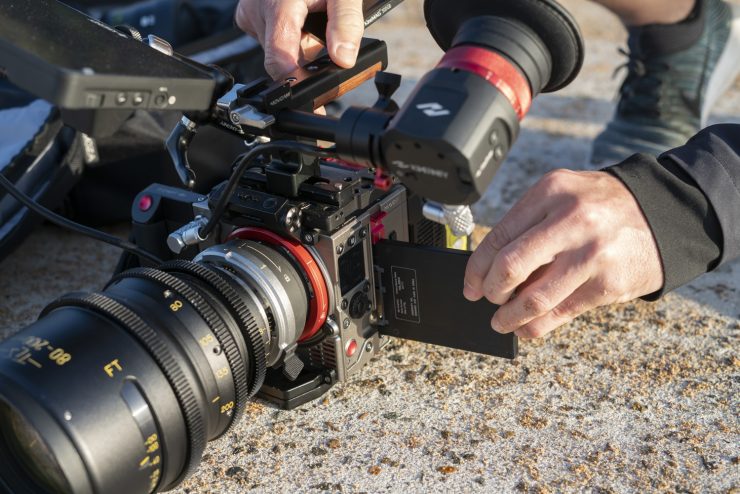
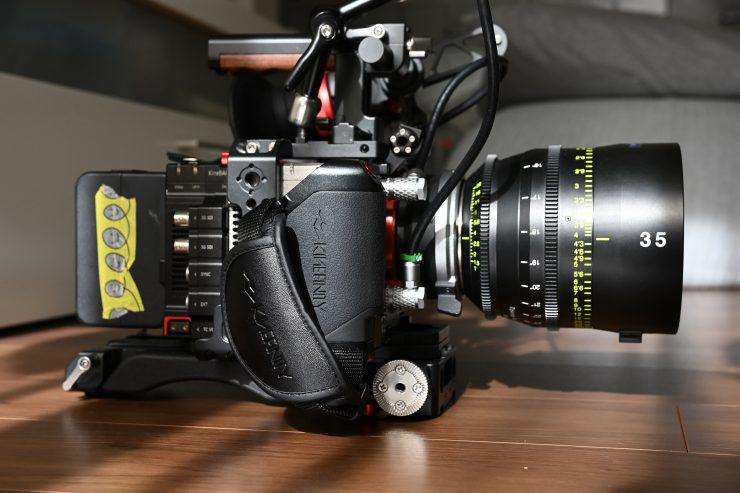
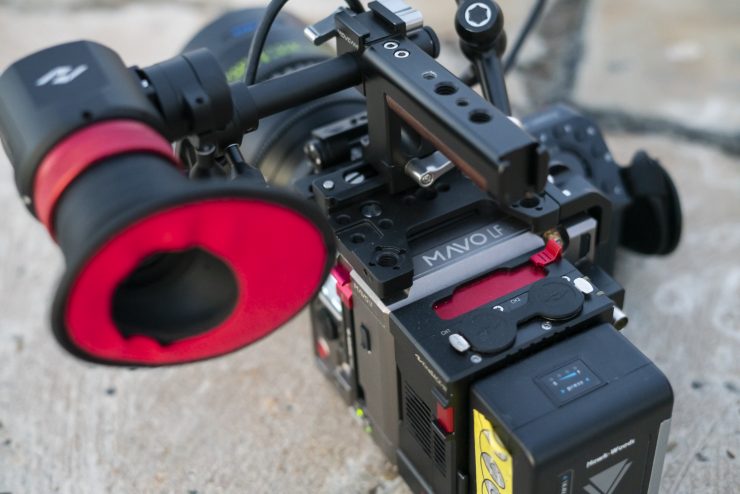
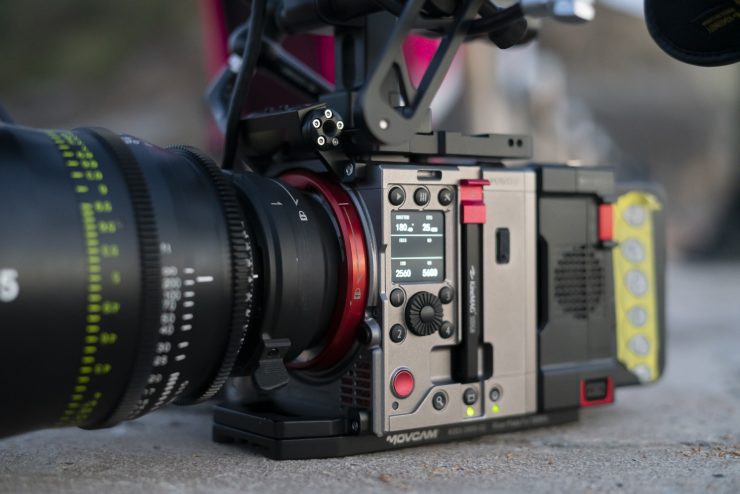
Size & weight
The MAVO LF really is tiny. At 2.1 lb (990 g) and with dimensions of 4.5″ x 4.3″ x 3.7″ (115mm x 110mm x 95 mm) for the body alone, it can literally fit in the palm of your hand. It really is impressive that Kinefinity has been able to fit so many features in such a small camera body. Of course, just like a RED, you can’t use the body just by itself, you need to build it up with a bunch of parts to make it useable.
The other positive aspect of the camera being so light is it’s easy to switch it from a tripod to a gimbal or even a drone (but you will need a large drone). This flexibility is what a lot of shooters are looking for in a camera, and it’s why we are now seeing so many cameras coming to market that have been designed with this in mind. It’s nice that the MAVO LF has a compact size and form factor.
Here is what some of the other smaller cameras on the market weight (body only):
- RED DSMC2 Brain with Gemini – 1.5 kg (3.5 lb)
- Sony FS5 – 827.8 g (1.82 lb)
- Sony FS7 – 2 kg (4.4 lb)
- Sony FX9 – 2 kg (4.4 lb)
- Canon C200 – 1.5 kg (3.2 lb)
- Canon C300 Mark II – 1.77 kg (3.9 lb)
- Canon C500 Mark II – 1.77 kg (3.9 lb)
- Blackmagic URSA Mini Pro – 2.3 kg (5.1 lb)
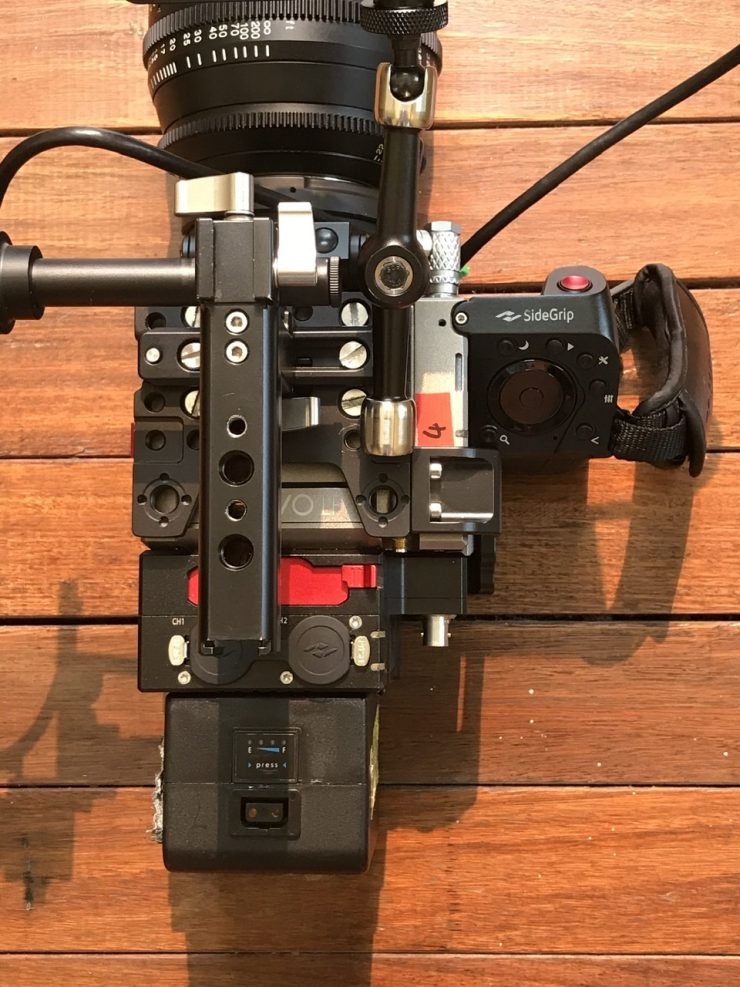
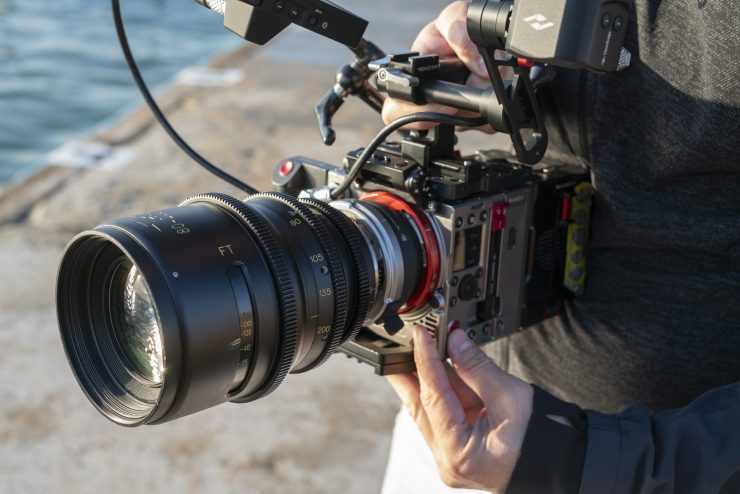
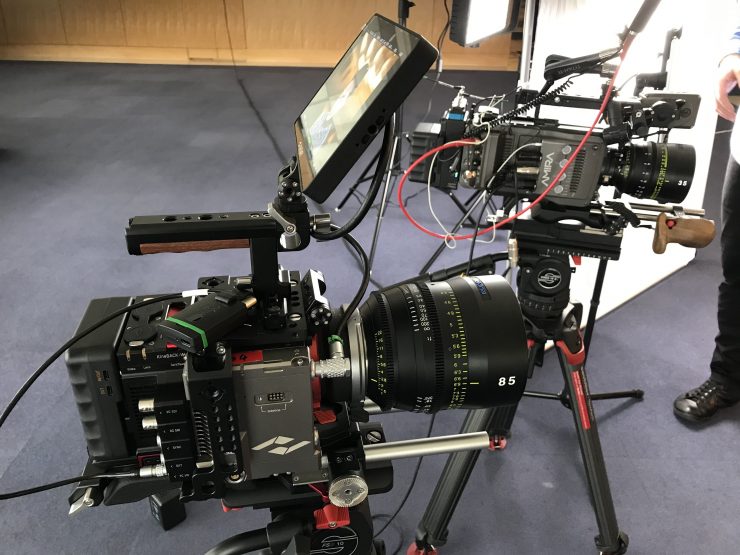
As I previously mentioned, what you do need to keep in mind is that the MAVO LF is much like a RED where you need to add accessories to turn it into a workable camera for most applications. By the time you add a lens, battery, KineBack-W, SideGrip and monitor or EVF, the size and weight of the camera can massively increase.
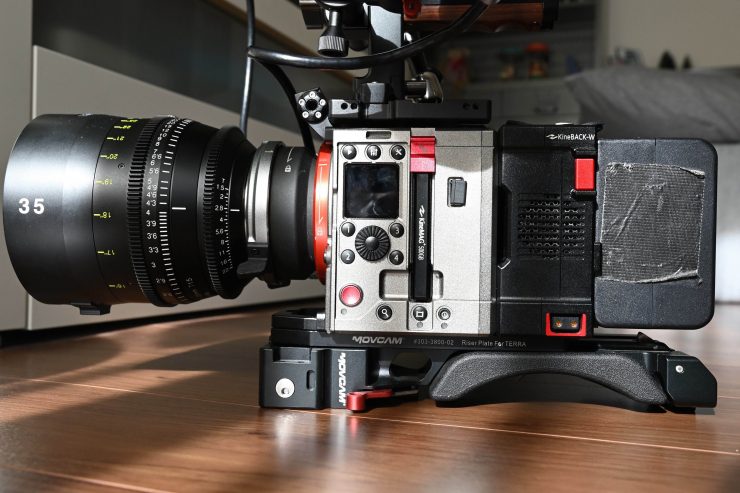
Just to give you some idea of a workable real-world combination, with a V-lock battery, KineBack-W, Sidegrip, Movecam baseplate, top handle, Kinefinity EVF, PL Mounting adapter with Built-in Electronic ND (e-ND), and a Tokina Vista 35mm T1.5 lens the MAVO LF tipped the scales at 6.6 kg (14.5 lb). This is almost 7x the weight of the camera body.
Build quality
The MAVO LF’s form factor is very reminiscent of a RED. Like a lot of other cameras, it is basically a box with buttons on it. As I mentioned earlier, it’s incredibly lightweight, but surprisingly it feels very solid and well made. It doesn’t have the plastic feel of some offerings from Sony, Panasonic, and Canon. The build quality is probably on par with a RED. The quality of the buttons and dials are ok, but they aren’t as solid and as tactile as on a RED. If you try and move the scroll wheel too quickly, the system can’t keep up and there is a delay.
The camera certainly feels more solidly made than some of the offerings under $12K from Sony, Canon, and Panasonic.
Ergonomics
The MAVO LF, like so many of today’s cameras, is just a box that needs other accessories if you plan on shoulder mounting it or making it more usable. I have a love-hate relationship with this type of form factor. On one hand it’s great to be able to break a camera down and use it in a very minimalistic way, but on the other hand, I don’t like having to put a ton of things on a camera to make it usable for most shooting scenarios.
Everyone’s shooting style is different, but I like to be able to put a camera on my shoulder and use an EVF. Unfortunately just like a lot of other modern day cameras, if you want to do this with the MAVO LF, you need to add some sort of shoulder support system and EVF.
Luckily Kinefinity offers a lot of accessories that you can use to configure the MAVO LF into whatever combination best works for you.
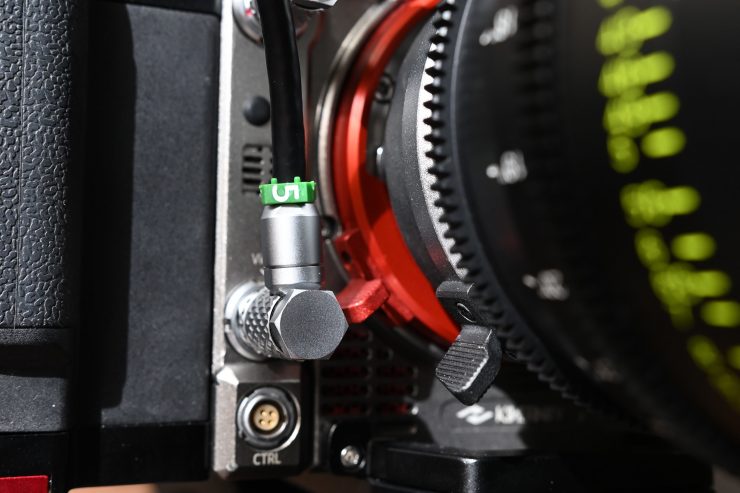
The trouble is, once you do add a shoulder mount to the MAVO LF, you can’t easily get to the menu or camera controls. As the SideGrip can’t be relocated, it becomes virtually useless in a shoulder configuration. These are things you need to keep in mind if you plan on using the camera with a shoulder rig.
The other problem when using really small cameras like the MAVO LF is it’s very easy to quickly run out of room to mount accessories such as wireless video transmitters, an assistants monitor, remote FIZ control units and anything else you may need.
On the bottom of the camera, there are three mounting holes. Two 3/8″ and one 1/4-20″.
Ease of use & operation
I am so glad the company moved away from the complicated multi dial operating system they were using on the Kinefinity Terra. That was just downright confusing and not easy to use. I’m a stickler for wanting to use cameras that are easy to control and operate. There is nothing worse on a camera than confusing menus and badly labeled or placed buttons and switches. So how does the MAVO LF fair?
Well, in all honesty, it’s definitely an improvement over previous cameras, but there are still many things that could be done better. A well-designed camera, in my opinion, is one that you can turn on and get up and running within 5 minutes of using it for the first time.
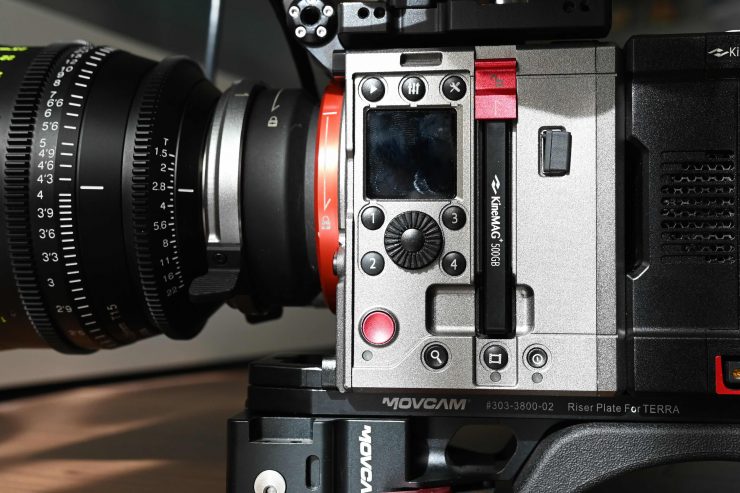
The MAVO LF does have a few physical buttons on the body of the camera, but some of the buttons could be better labeled. A menu button should be clearly labeled MENU, but Kinefinity prefers to label it using a vague icon. I’m probably being a little picky here, and yes, if you buy the camera you will get comfortable with operating it, but I still think the labeling could be better.
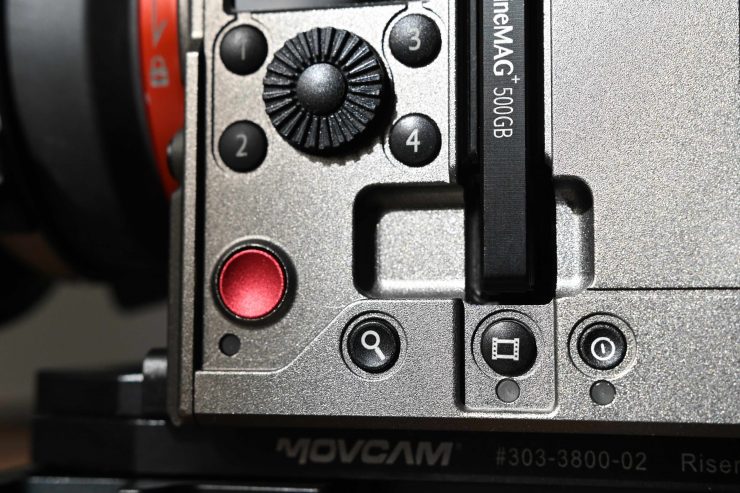
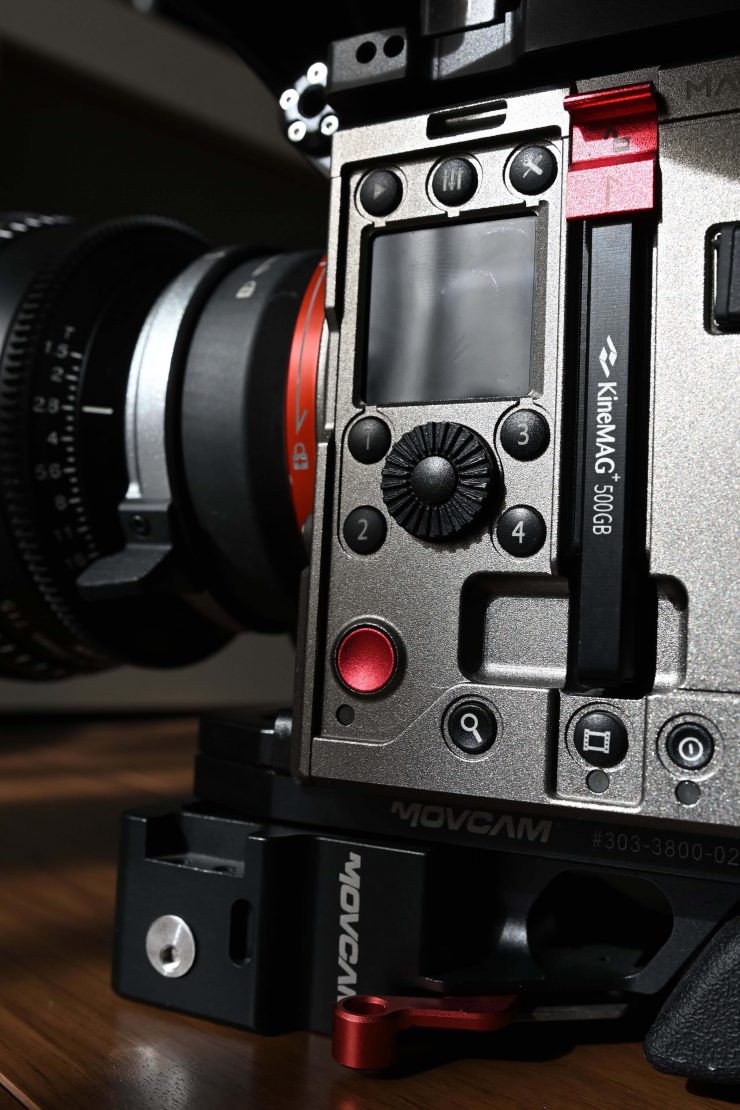
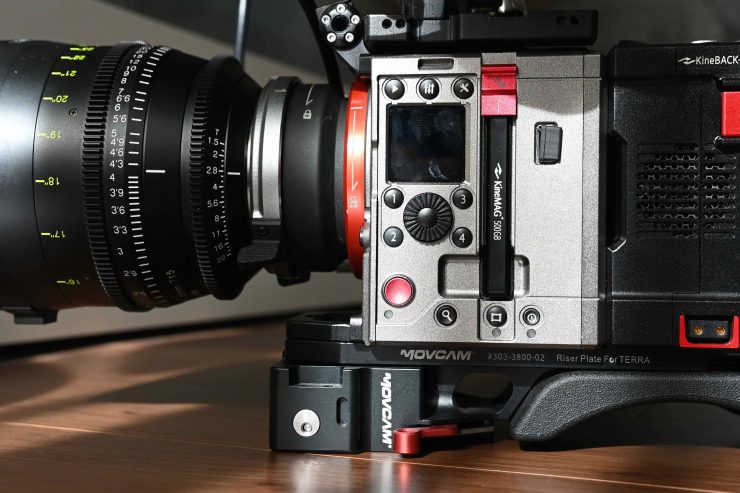
There is a button underneath the SDD media slot that isn’t labeled and has an icon that looks like a film strip. You have to press this button to access the SSD media options menu.
There is also no way of customizing any of the buttons to do what you would like them to do.
Now, I may be sounding very picky about these little details, but potential buyers of this camera need to be aware of these types of quirks.
In terms of actually shooting with the camera, I like the small form factor and it was easy to use and operate if you don’t need to make any changes. As soon as I had to change frame rates or ISO etc. I found myself pressing the wrong buttons. The buttons are small and hard to see this makes making changes quickly difficult.
I wish the KineMon 72 screen was touchscreen and you could change key parameters such as frame rate, ISO and white balance directly on the screen.
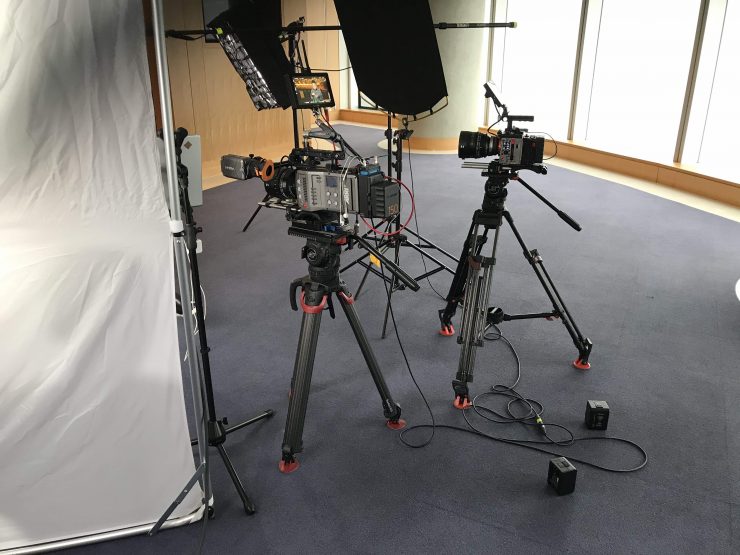

I used the MAVO LF in conjunction with my ARRI Amira on a couple of shoots as a ‘B’ cam to see how it went. I found it worked quite well and while the pictures don’t match, with a bit of fiddling in post, you can get something that cuts in fairly well.
Menu System
The menu system certainly is a lot less complicated than some of the offerings from Sony and Panasonic. Like any camera, the more I used it, the more comfortable I got with the controls and menu.
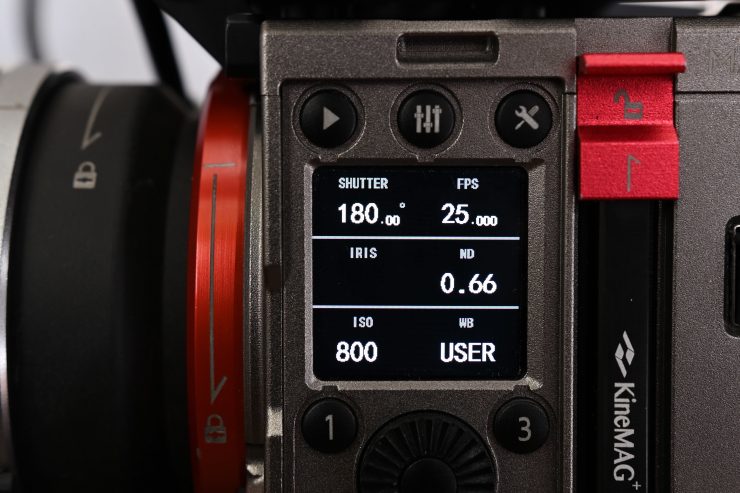
There is a small LCD screen on the side of the camera body that shows me key information about the camera, but strangely you can’t make any direct changes on that screen. It would have been nice to be able to use the jog wheel to cycle between the options shown so you could make changes to things like ISO, frame rate, shutter angle etc.
Perhaps this is something that will be implemented in a future firmware update.
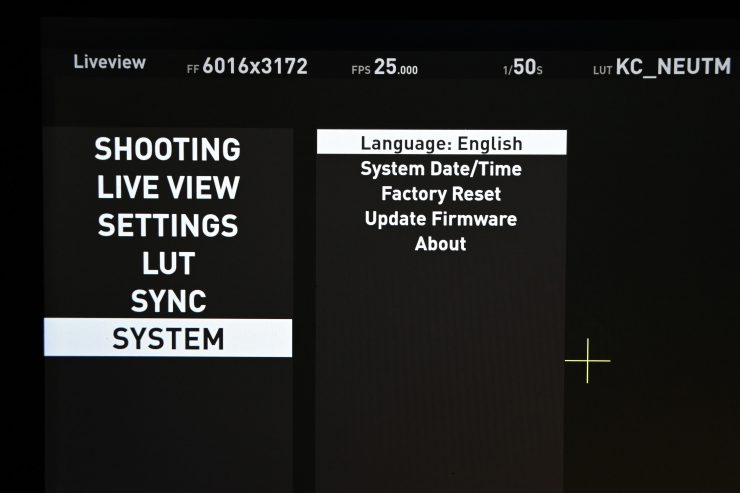
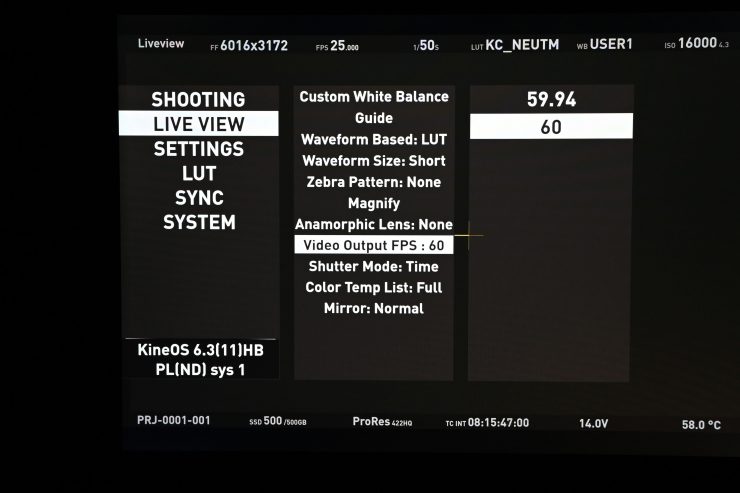
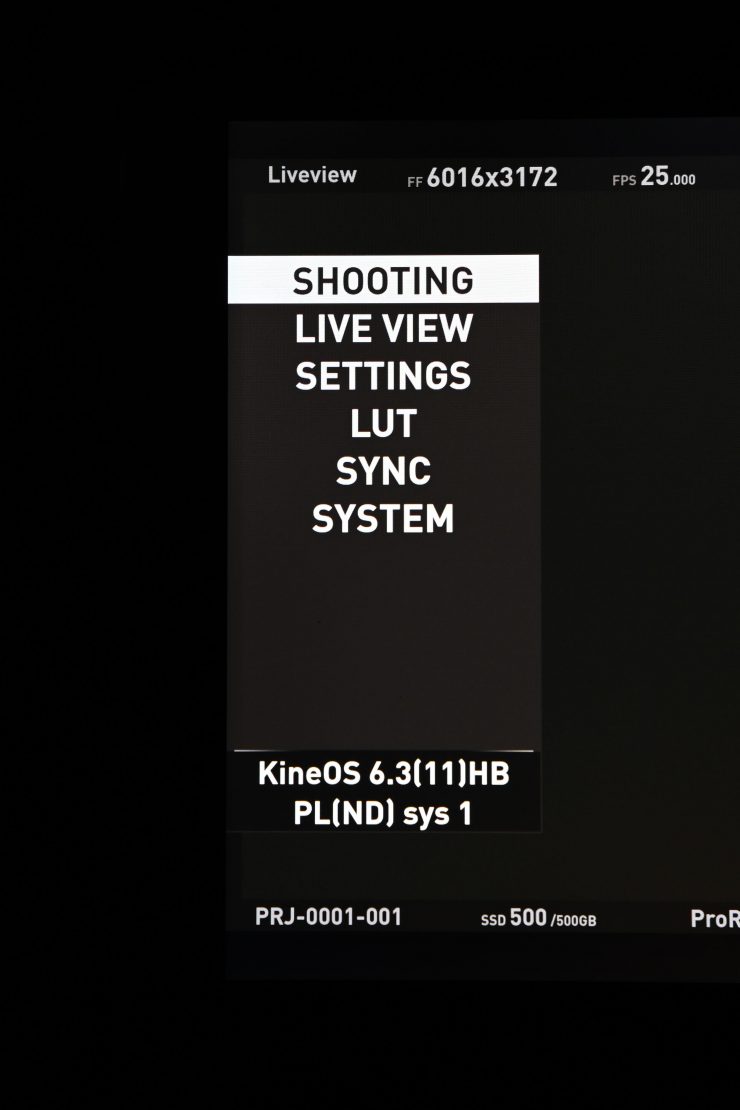
To access the actual menu and make the changes you need to have a monitor or EVF hooked up to the camera. The Menu is divided into 6 categories:
- SHOOTING
- LIVE VIEW
- LUT
- AUDIO
- SYNC
- SYSTEM
Making changes in the menu is pretty straightforward, but again if you could just do it on the side of the camera for key parameters it would be so much better.
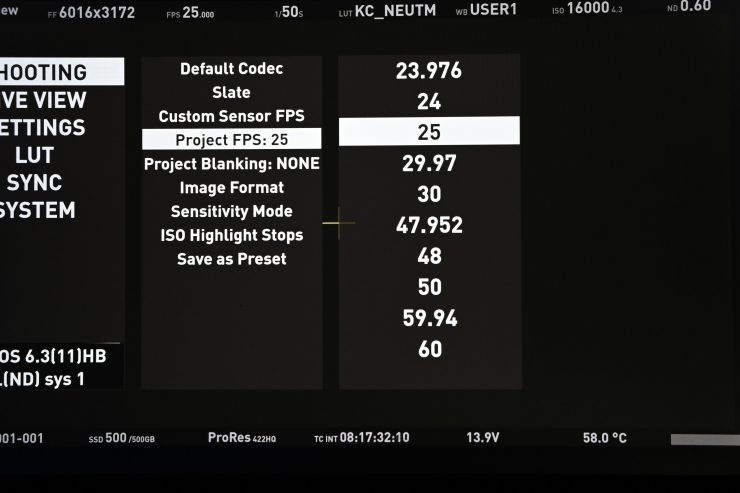
One of the nice things I found you can do is saving camera presets. You do this by going into the Menu and choosing Configuration, then Shooting, then Save as Preset. These camera presets (there are 8 you can use) enable you to set the following parameters:
- Image Format
- Resolution
- FPS
- Shutter Speed
- Record Format
Some of the ways you make changes to certain aspects of the operation of the camera are a little confusing. Some things can be changed in the menu and other things need to be changed using the function buttons on the side of the camera. While I am a fan of being able to change things without having to go into a menu, there are certain things, for example, if you want to change the resolution you are shooting in, that can’t be done in the main menu.
Changing key parameters using the scroll wheel and buttons when not going directly into the menu is not very responsive and if you try and make changes too quickly the system bogs down and takes time to catch up. This is not ideal when you are trying to change settings such as frame rates or ISO in a hurry.
Power
The MAVO LF uses Sony BP-U style batteries. These batteries fit into the side grip and this is the easiest way to keep the camera small and compact. If you want longer run times then you can use the optional KineBACK-W and attach a V-mount battery.
The great thing about the MAVO LF is that it draws just 23W. This is very low and allows for long run times on small batteries. If you use a larger V-mount battery, like a Hawkwoods 150Wh mini V-lok you can go pretty much all day on a single battery. What you do need to remember is that the 23W power draw doesn’t take into account the use of the KineBack-W, an EVF or monitor, or running any +48 audio devices.
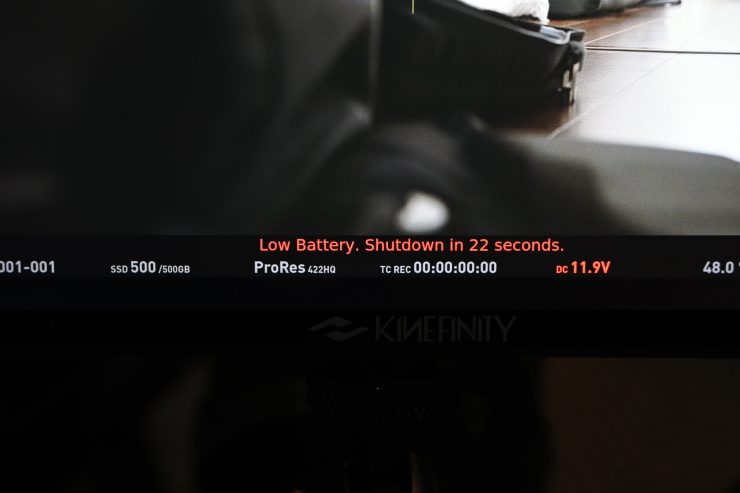
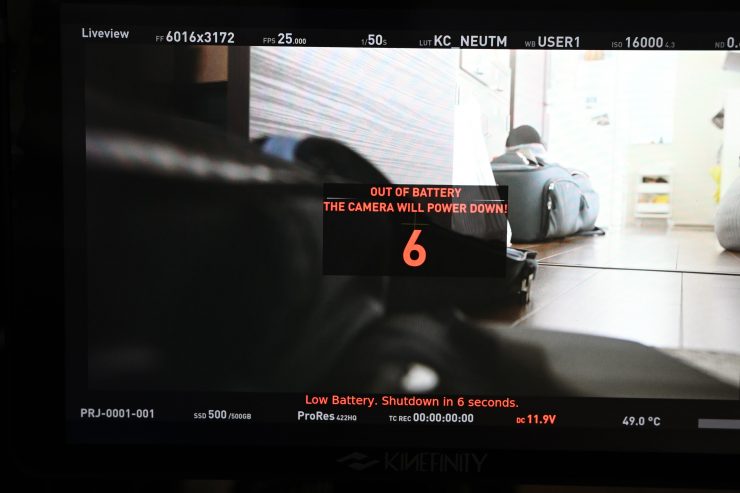
If the battery does get very low you will get a warning that comes up on the screen. The MAVO LF will then give you a countdown and it will safely shut itself off. I like that it does this.
Kinefinity also makes its own mini V-lock batteries. They come in capacities of 73Wh and 145Wh. The company has good deals on multiple battery and charger packages.
Boot-up Time
The MAVO LF certainly doesn’t get up and running quickly. It takes around 20 seconds from the time you power it on until you get a picture up and can start to record. This doesn’t really make the camera as suitable for filming events, news or documentaries as some other available cameras.
For a lot of the work that most people will be using the MAVO LF for, the boot-up time won’t be an issue. Whether a quick boot up time is important or relevant to you will depend on what type of work you do.
White Balance
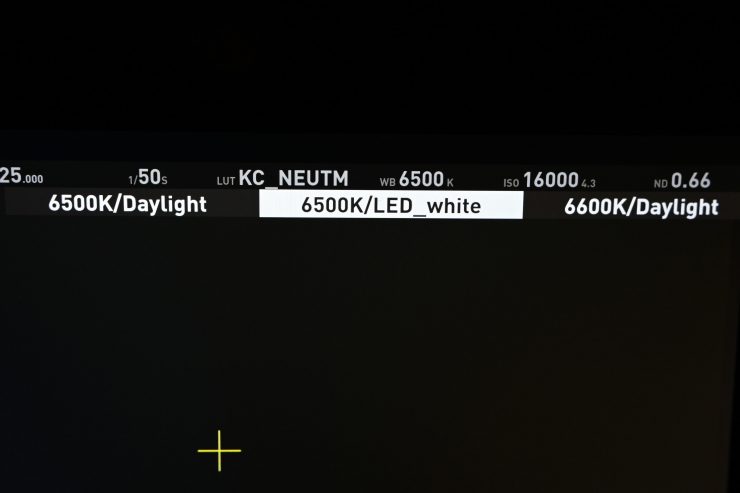
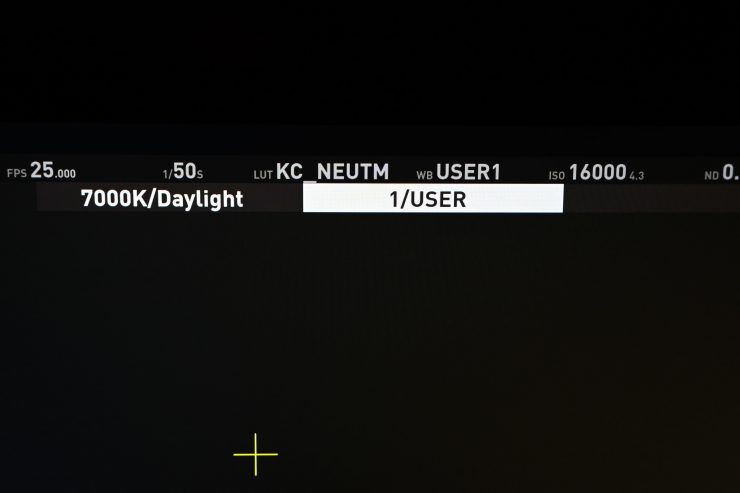
The camera has preset white balance values that range from 2600K up to 7000K. These preset values go up or down in 100K increments. Despite having so many preset white balance options, there is only one user preset where you can store your own white balance.
The white balance and the color temperature are tuned by directly adjusting RGB channels of the sensor to change the original RAW data, rather than applying a digital LUT. Although you can modify the white balance of the RAW data or change color temperature during post-processing, all the modifications are based on the data you have shot.
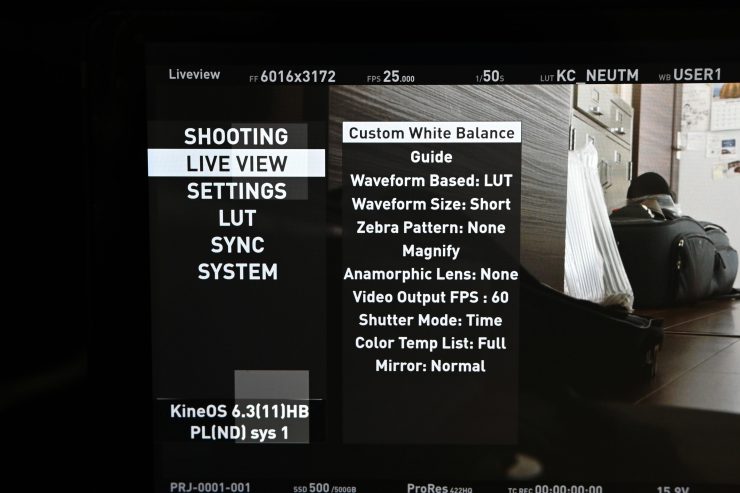
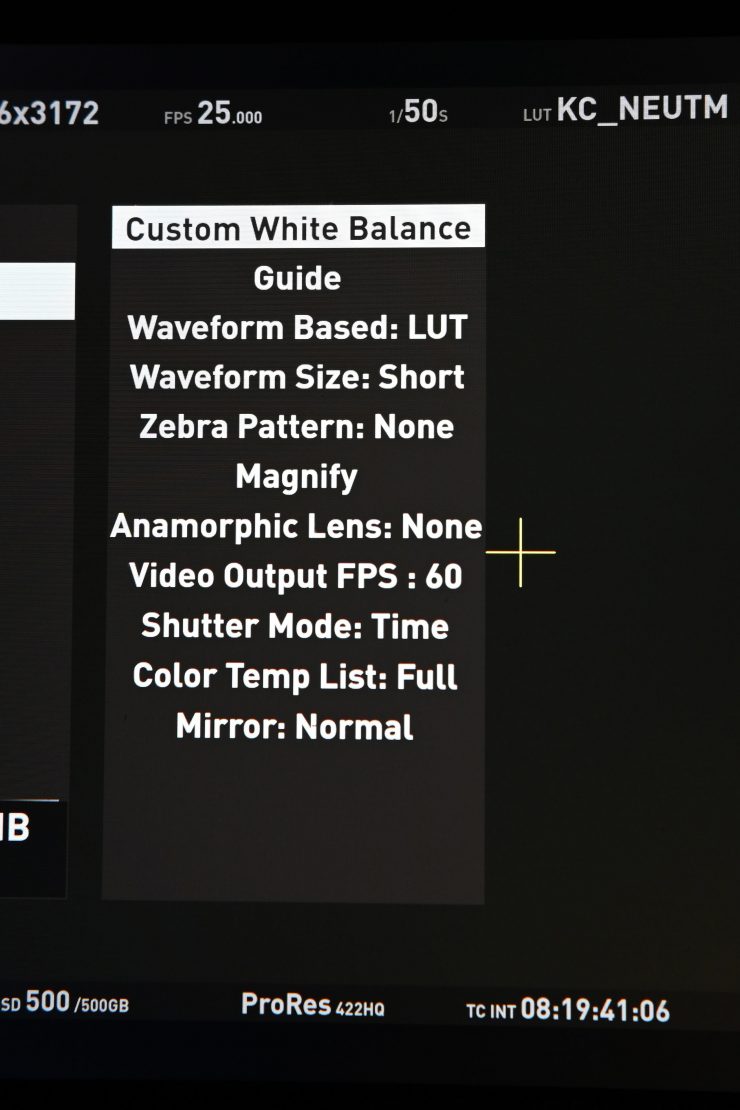
Doing a manual white balance on the MAVO LF isn’t a particularly quick process. You need to go into the Menu and choose Configuration, then LiveView, then Custom White Balance.
I would have liked to have seen at least three user presets for white balance made available on the MAVO LF. The camera also has a CC adjustment so you can add or subtract green or magenta. This is something that can be found on so many of today’s digital cinema cameras.
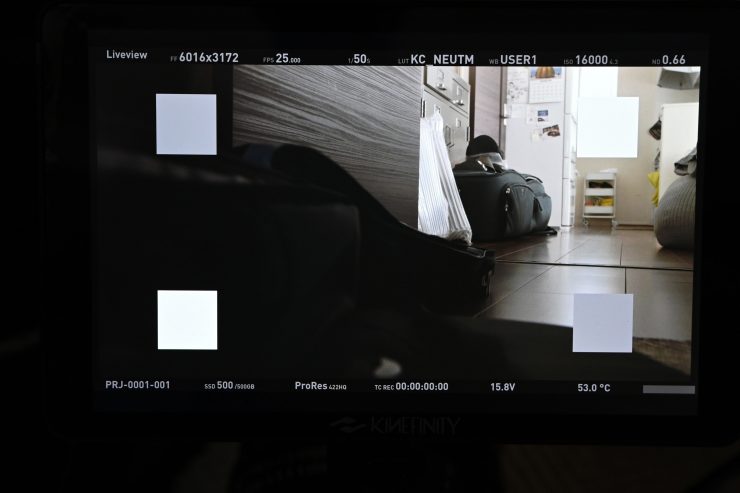
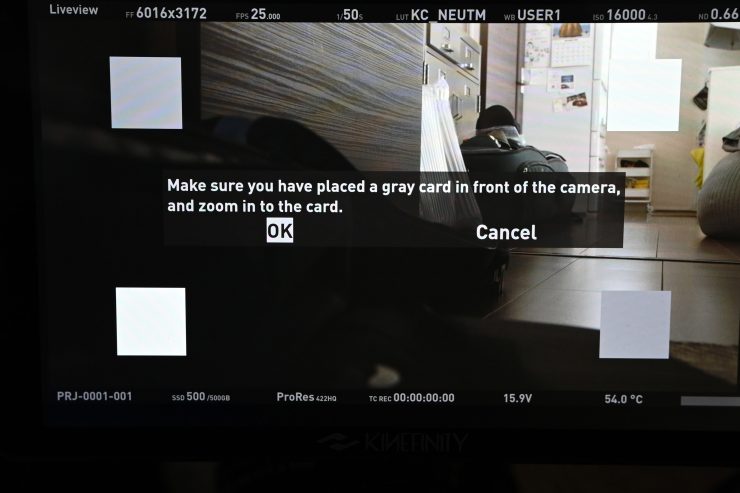
In a nice touch, you can bring up a white/grey card checker in the menu system so you can compare them directly against a white/grey card that you may have. This is a handy way of making sure you are getting your white balance settings correct.
Waveform and zebras
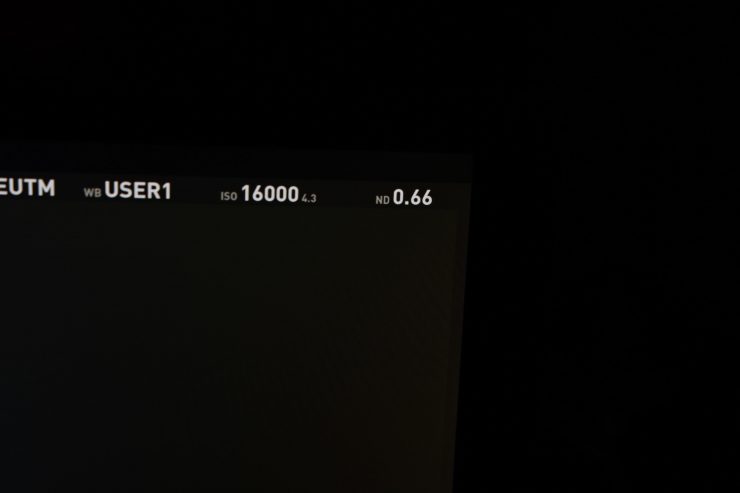
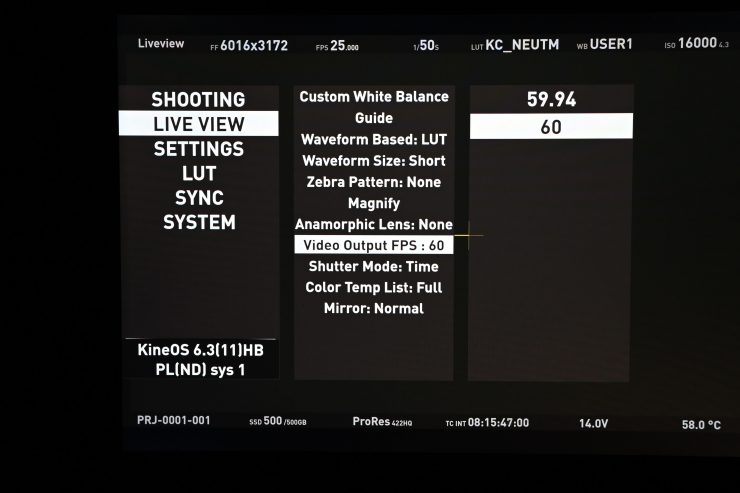
You can bring up a waveform on the display. The waveform is displayed across the bottom of the screen and indicates the brightness of images over the horizontal direction. By default, the waveform shows the LUT KC-Neutral. The waveform will change according to whatever LUT is being used. You can also change the waveform to display LOG. When this is set the waveform shows the distribution based on the LOG image.
For example, if you have the waveform set to LUT then if your waveform goes over 100% you will still probably not be clipping your image (as the MAVO LF only records in KineLog. If you set the waveform to LOG then if the information is exceeding 100% then you will definitely be clipping your image. Kinefinity recommends that the main image should exceed over 50% to avoid noise.
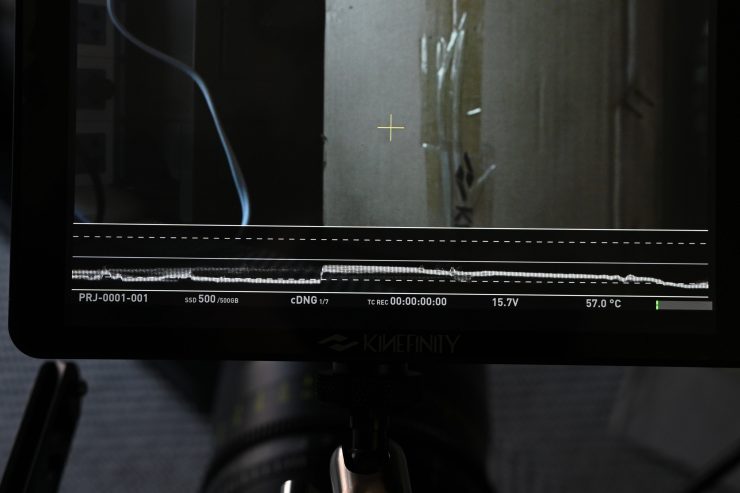
The waveform has two key line marking on it. The first shows where an 18% Grey card should be exposed correctly and the other shows where 90% should land on a white card.
The zebras on the MAVO LF are a very easy way to show overexposed areas in the image. On the MAVO LF, the zebra calculation is based on RAW data. This means that when your zebras are set to 90% if you see zebras appear your image is getting close to being overexposed.
SDI & HDMI
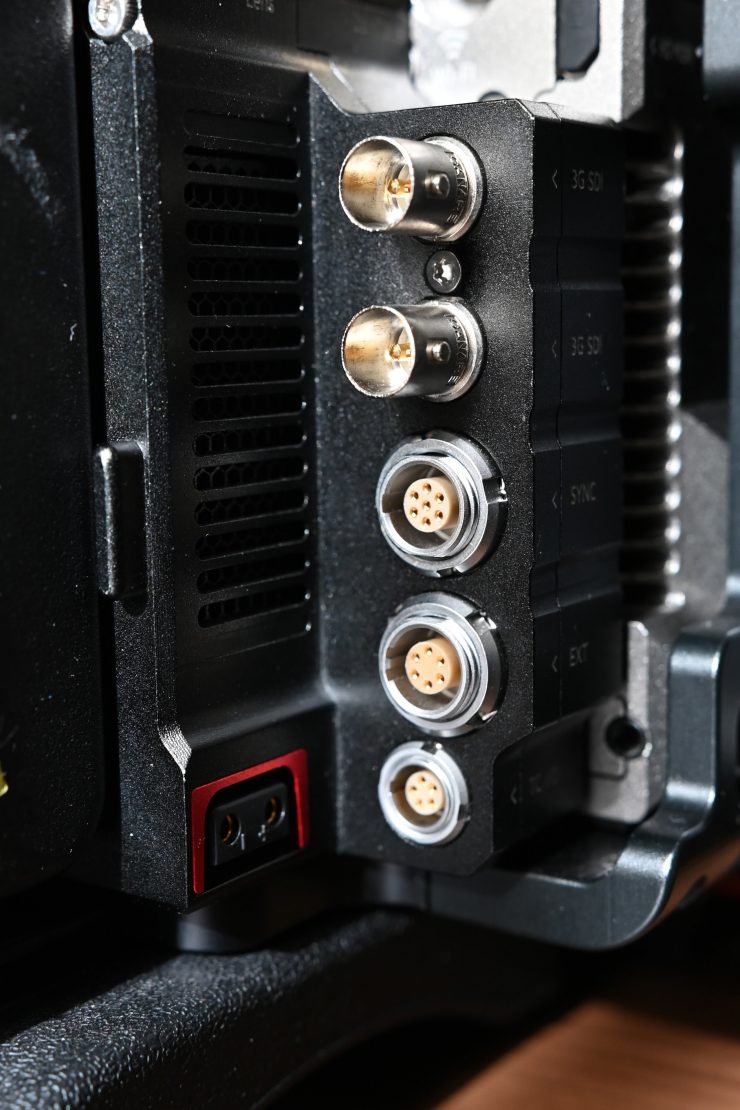
I tested the SDI and HDMI outputs of the MAVO LF using the KineBack-W. Both of these outputs worked without any issues.
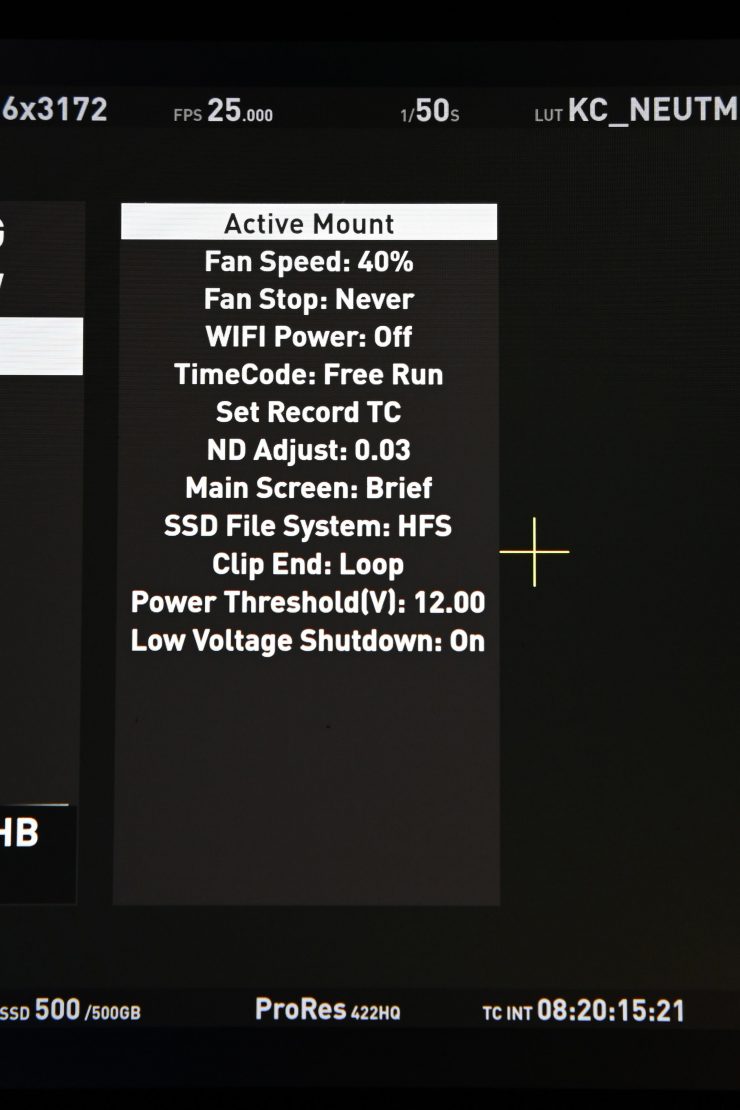
The biggest caveat is there also doesn’t seem to be any way of sending a clean output over SDI without turning off all the overlays for both the EVF and the KineMon monitor. You can only select Main Screen: Brief or OFF.
The MAVO’s on-screen menus are always enabled on all outputs, or always off on all of the outputs depending on what you select. Despite having two SDI outputs and two outputs for a Kinefinity EVF and/or a KineMon monitor, the MAVO LF has no way of letting you assign what goes out over those outputs. You can’t for instance, send a clean feed over one SDI, and a LUT over the other. And you can’t keep overlays up on your EVF and have a clean feed going to your monitor. This lack of customization doesn’t make the camera very friendly for larger productions.
Now, I reached out to Kinefinity to ask them about why you couldn’t individually select what goes out on the outputs and they told me that the current hardware does not support that functionality, but in the next generation of products, they want to add those important features.
The other problem I encountered is that there doesn’t seem to be any audio being routed through either the HDMI or SDI outputs. Maybe this has to do with the fact that you only seem to be able to select either 59.94 or 60fps as the Video output.
Again, I asked Kinefinity about this and they told me the only time you can get audio over SDI is when the camera is in playback mode. In live view, no audio goes out over SDI. There is no audio going over HDMI in either live view or playback modes.
The other problem is that there is no timecode going out over SDI or HDMI. I double-checked with Kinefinity to make sure this was the case.
This lack of customization on the outputs, coupled with no audio or timecode being embedded in the signal definitely throws a shadow on this cameras ability to work in serious production environments.
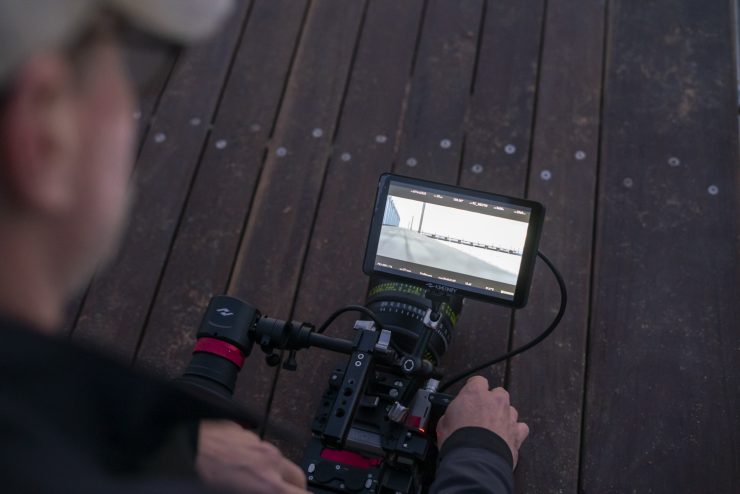
KineMON-7H High-bright Monitor
Kinefinity have a new 7” field monitor called the KineMON-7H. I was hoping this would be a big improvement over the KineMON-5L.
I previously reviewed the KineMON-5L. In reality, I didn’t find that the KineMON-5L was very useable. It’s not that there is anything wrong with the image, it’s just that it wasn’t bright enough to use outdoors. Why camera manufacturers or third-party monitor manufacturers (there are some exceptions) keep making screens that you can’t see in daylight conditions and insist on calling them daylight viewable is beyond me. How you are supposed to judge focus on a screen you can’t see when shooting in 5K or 6K resolutions is a mystery to me. At the end of the day, everything you are capturing with a camera is being determined by what you are seeing through a monitor or EVF. Using one that you can’t see makes absolutely no sense.
The KineMON-5L also got ridiculously hot even after it has been used for just 15 minutes. The back of the monitor almost burnt your hand if you touched it.
If that wasn’t enough in the way of problems I also found that there was a definite delay in the signal path. If I move something in front of the camera I don’t see that image move until slightly after. It’s not like it’s a second off or anything but there is at least a 50-100 millisecond delay.
I was keen to see if the new KineMON-7H High-bright Monitor was an improvement over the KineMON-5L and whether it had any of the same issues.
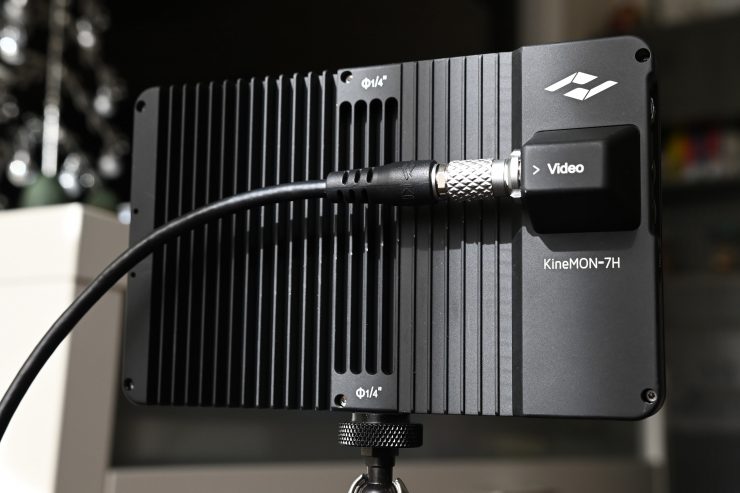
The KineMON-7H ($699 USD) is a 1080p full-HD high-bright 7″ monitor that has a claimed brightness of 1000nit. Only one Kine video cord is needed for the monitor to get power and a video signal from the MAVO LF.
The screen has 325ppi, a 1000:1 contrast ratio, a good full viewing angle, and LED back-illumination.
You can also add a 7-inch KineMON Sunhood to facilitate shooting in ultra bright conditions.
KineMON-7H has a standard 1/4″ threaded hole and two pin-holes at the bottom to fasten itself to the camera.
So is the KineMON-7H an improvement? In short, yes! The new monitor is a massive improvement over the previous 5″ version. It’s bright, clear, and it doesn’t get ridiculously hot like the KineMON-5L. Like the KineMON-5L, the 7H also has a delay in the signal path. While it isn’t as bad as the 5L, there is still a small delay that you do need to be aware of.
As the monitor gets its power and video signal through a single cable the monitor is always displaying whatever you have up on the camera. There isn’t many things you can do on the monitor itself. There is only peaking, a waveform, and the ability to adjust the brightness.
It would be nice if the monitor had more video assist functionality built-in, such as audio meters, image zoom, false color etc. I asked Kinefinity about this and I was told:
About the image zoom, you can do this with zoom button on the camera body. The audio meters are in the lower right corner of the monitor. And if you want to adjust the audio, you can press the audio button which is between the playback button and configuration button. We will add false color for you on the next firmware.
I can understand some of this logic as the KinMON only works on Kinefinity cameras. I, however, like to be able to just press a button directly on a monitor instead of having to press a button on the camera.
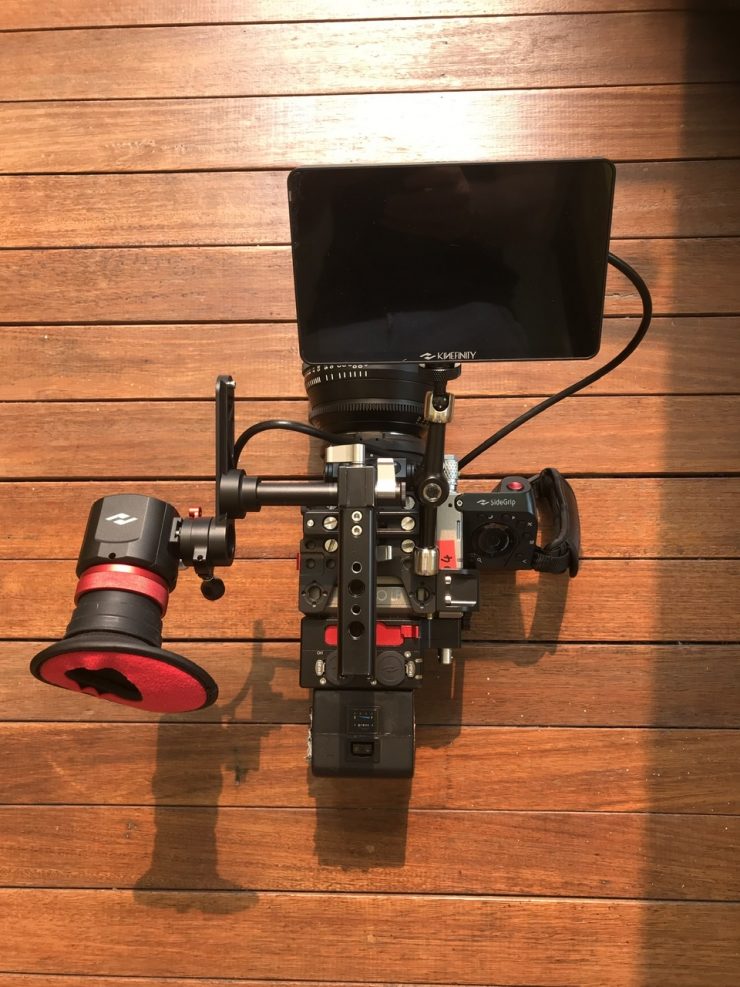
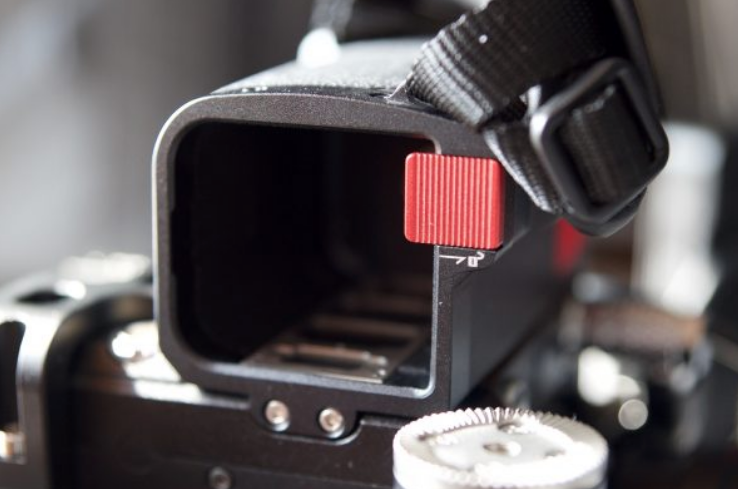
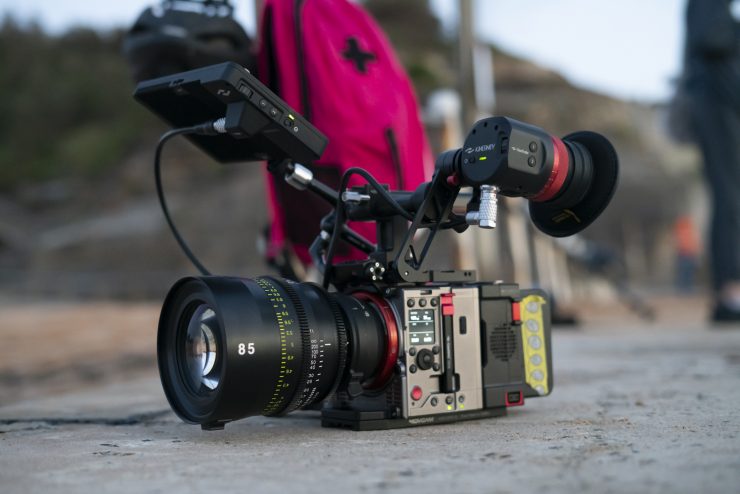
KineEVF

Kinefinty has its own proprietary EVF called the KineEVF.
The viewfinder features a micro-OLED 1080p display which Kinefinity claims delivers accurate and sharp picture quality with 16 million colors.
The EVF connects via a single KineMon MOCO cable to deliver power & video from the camera making it a proprietary EVF, specific to Kinefinity cameras. On the MAVO LF there are two video out ports for MOCO cables so you can have both the KineEVF and the KineMON-7H connected at the same time.
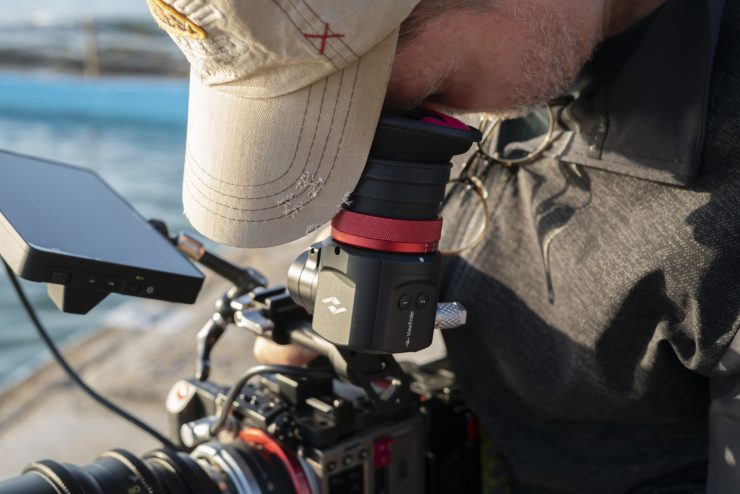
I really like the KineEVF, for its price, it is probably one of the better EVFs I have come across in recent years. It is sharp, bright and displays nice colors. It is also incredibly small and compact. It only weighs 290g. The design really suits the camera.
The only downside to the EVF is that there isn’t much in the way of monitoring tools. There is only an ON/OFF switch, a scroll wheel, and two buttons on the side of the EVF.
You can change the brightness from Standard to High and you can activate peaking and a histogram, but that is it. As the EVF is getting its power and video signal through the MOCO cable any menu you brng up, or change you make, such as focus punch in, gets reflected in the EVF.
While a lot of people won’t like the fact that the EVF is proprietary most other EVFs from companies such as ARRI, Canon, and RED are also proprietary.
As for mounting, there isn’t any 1/4″ or 3/8″ mounting points. It has been designed to specifically work with the Movcam EVF bracket.
The KineEVF retails for $1,499 USD and is also available together with the mounting bracket for $1,699 USD.
Built-in Wireless
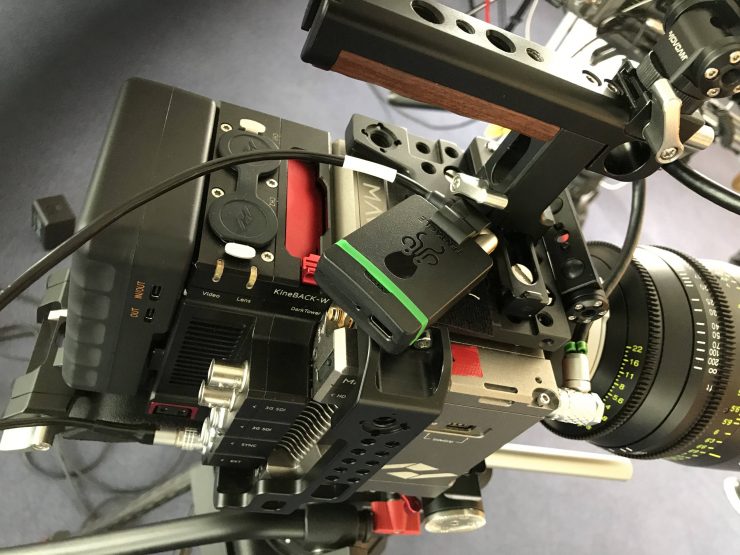
The MAVO LF has the ability to insert a wireless card using Movcam’s DarkTower platform, into the new KineBACK-W, this gives the MAVO LFwireless camera functionality including wireless video transmission and wireless lens control system using Movcam’s lens motors. The wireless video can work at up to 2000ft/3000ft depending on which DarkTower card is used.
I tried out Movcam’s DarkTower and it worked really well. It was nice that you could just drop the DarkTower module into the back of the KineBACK-W and you don’t need to power it or hook up any additional cables.
The MAVO LF also had a dedicated menu for DarkTower where you can turn it on/off and make channel selections etc.
SSD recording media
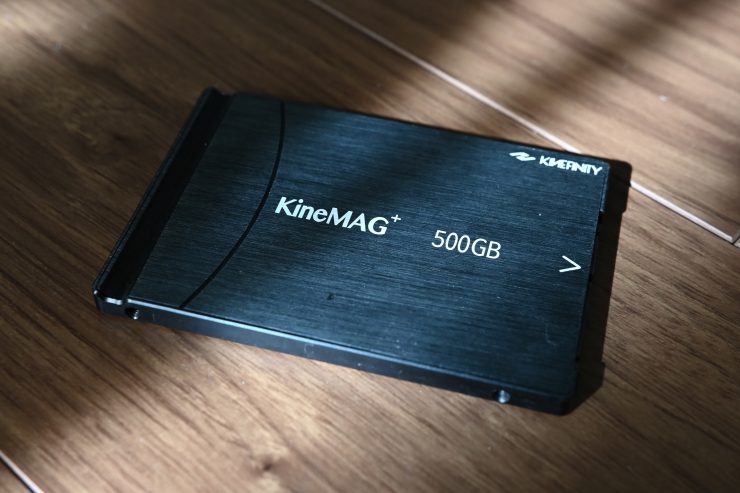
The MAVO LF uses standard 2.5″ 7mm SSD SATA 3.0 recording media. There are many off-the-shelf 7mm SSD drives available, however, the performance of 3rd party SSD drives is not guaranteed by Kinefinity. Kinefinity offers no technical support or help on recording issues such as frame drop or data loss for 3rd-party SSDs. Kinefinity does make their own 7mm KineMAG+ SSD which are available in 500GB & 1TB variants, retailing at $699 & $999 USD.
You do need to make sure that the SSD is umounted before you take it out of the camera. You have to go into the SSD Maintenance menu to do this. This is something that is easy to forget to do and I’m not a fan of this process.
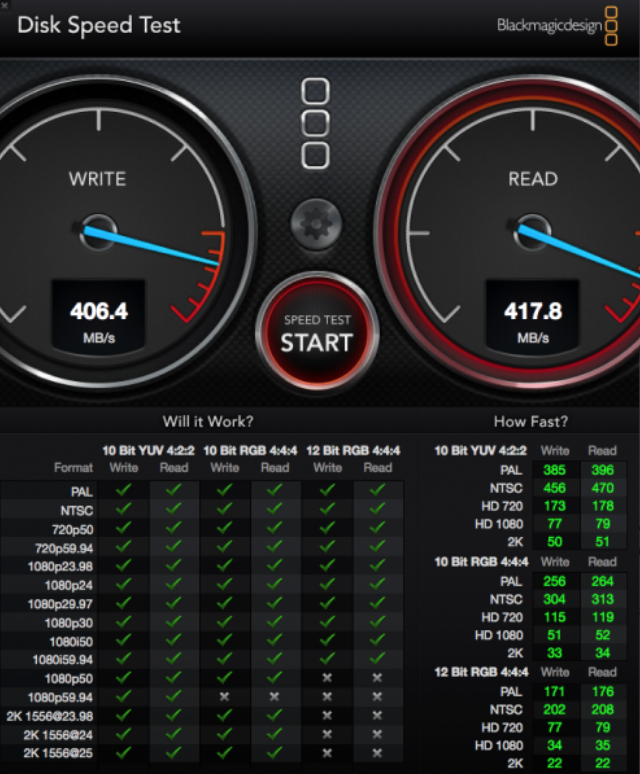
Above you can see the read and write speed of the KineMAG+ 500GB SSD when using Kinefinity’s USB3 SSD reader.
6K file sizes are going to be enormous in both ProRes and cDNG. Recording 6K 24p in ProRes 422HQ equates to 764GB for every hour of footage. With a 500GB KineMag, you aren’t going to get less than 40 minutes shooting time.
Custom in-camera LUTs
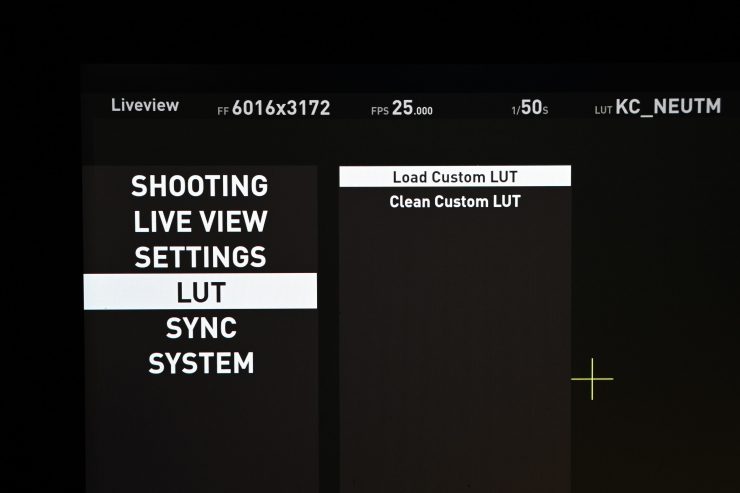
The MAVO allows you to upload a LUT to the camera. The LUT does not get burnt into the footage, the footage is always recorded in a Log image (KineLOG3). Whatever LUT you are using at the time of recording gets saved to the same folder. This is a really nice feature because the editor or whoever is dealing with the footage knows exactly what LUT you were using and therefore has an idea of how the cinematographer intended the footage to look. The size of 3D LUT is from 8x8x8 up to 33x33x33.
Currently, there is only one LUT in the camera, the KC_NEUTM.cube. As there is only one LUT available in the camera I had Ben Allan ACS CSI create a LUT that doesn’t so aggressively crush the blacks and mid tones. I found this LUT was a lot nicer to use than Kinefinity’s own LUT.
Slate
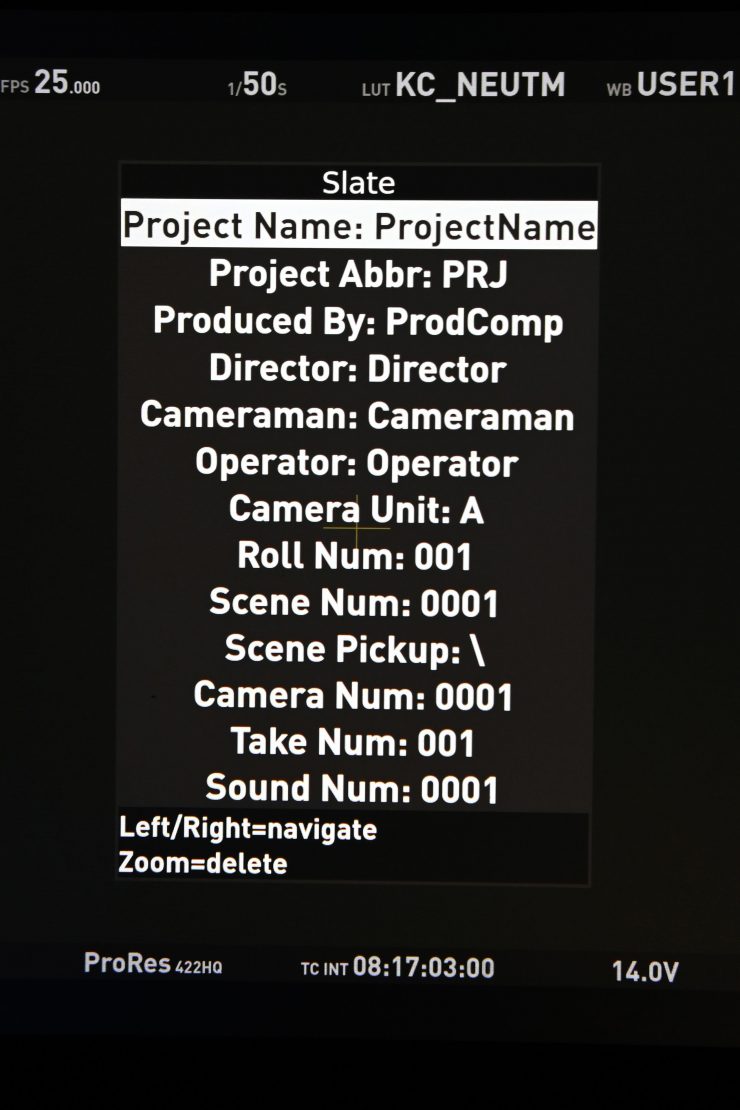
Along with all the information such as the LUT you were using that gets recorded with your clips, Kinefinity also gives you the option to fill out a full slate with all of your shooting details and information. This can be done in the menu, but I will warn you, it is a fiddly system to use and it takes considerable time to fill out. Hopefully, as part of the future camera control, you will be able to get a 1st AC or an assistant to fill out the slate details remotely.
The MAVO & MAVO LF have built-in Wi-Fi but as of yet, there is no iOS or Android app to control the camera or adjust settings remotely.
It’s the little things that matter
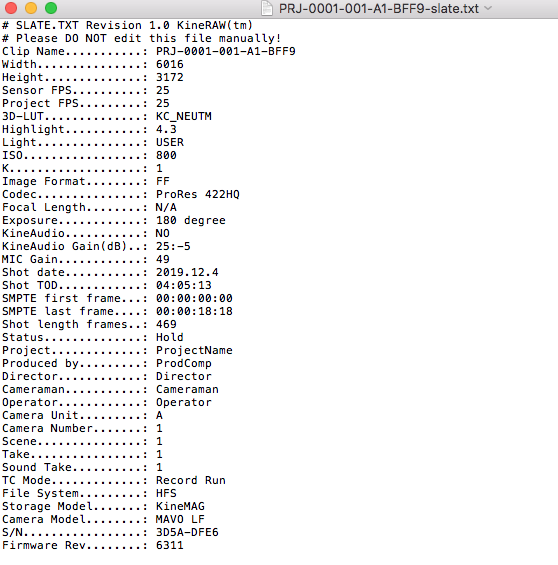
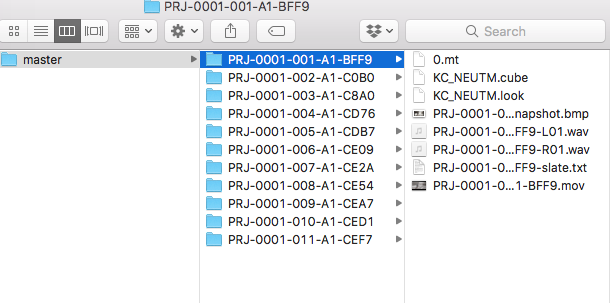

I love how Kinefinity includes extra information that gets recorded into your files. There is .txt file that contains all the information about your clip and camera settings, the .cube LUT file you were using, and a .bmp still grab of your shot with the LT you were using.
KineMOUNT

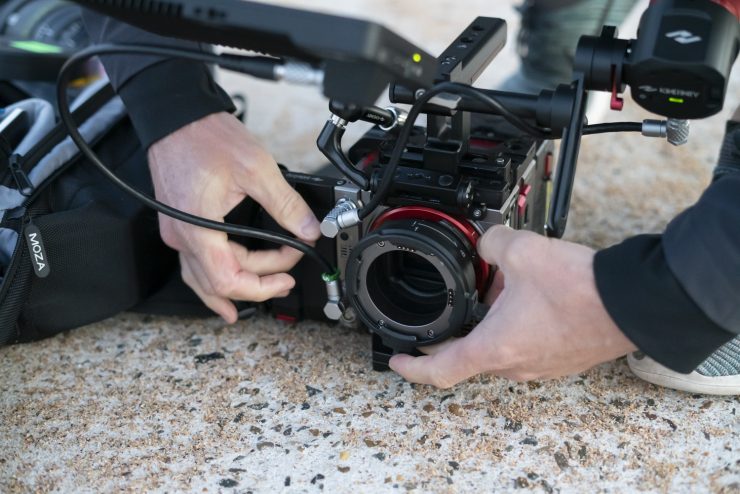
The MAVO LF uses the KineMOUNT that has an electronic contact (active) in order to support a PL mounting adapter with /i tech. This mount has to be one of the most versatile systems on the market. It allows you to put a vast array of mount adapters including Sony E Mount, PL mount, PL e-ND EF, EF e-ND, and EF Enhancer. Kinefinity is one of the few cameras on the market that has a Sony E-mount option, making it compatible with a wide variety of glass.
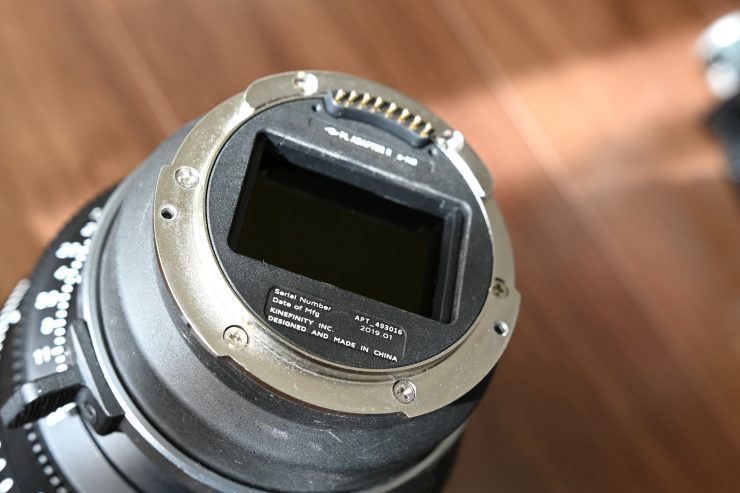
What excites me personally is the optional PL Mounting adapter with Built-in Electronic ND (e-ND) ($999 USD). According to Kinefinity, it employs a high-precision hybrid of liquid crystal material, optics, and electronic technology. It covers a wide range from 0.6 to 3.3 (2 stops to 10 stops). You can make changes in increments of 0.03.
Not having to use a matte box with a small digital cinema camera like this is a big deal.
I tried out the PL Mounting adapter with Built-in Electronic ND (e-ND) and it certainly works as advertised. The only real caveat with the adapter is that the lowest setting is 0.6 stops, so if you are using the mount you are always going to have ND engaged.
If you use the Canon EF mount, the iris can be adjusted using the control wheel or the wheel on the SideGrip. The iris will adjust in 1/3 stop increments. If you are using an EF lens on the MAVO LF in the standard-setting the iris transition is not smooth and the brightness level jumps when you make changes. Changing aperture during recording means your shot will be unusable. If you try and change apertures very quickly you just end up with this massive delay while you wait for the lens to catch up with what you are doing. To solve this problem you need to activate the mode called “Enhanced Mode”. This makes the iris transition a lot smoother. You can only get to this mode by resetting the camera to its default settings.
If you are using mounts with electronic connection pins, Kinefinity strongly recommends that you power off the camera when swapping different adapters to avoid damage to the camera.
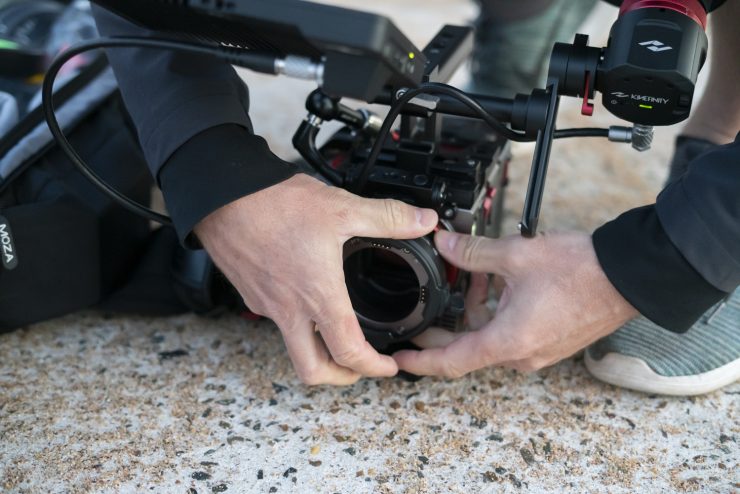
SideGrip
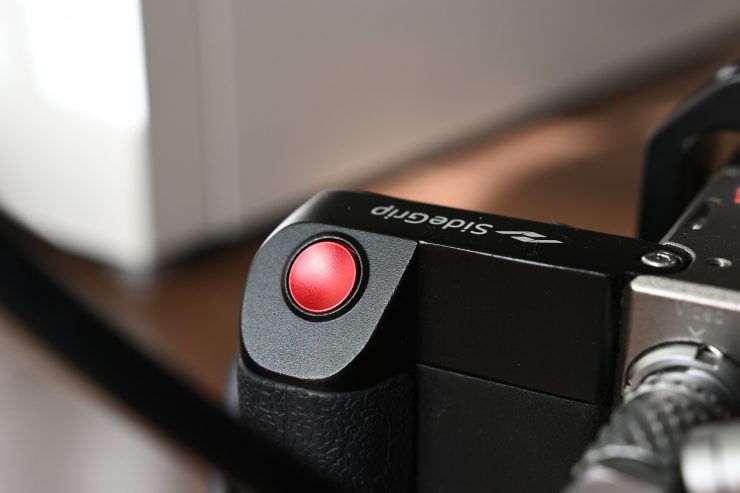
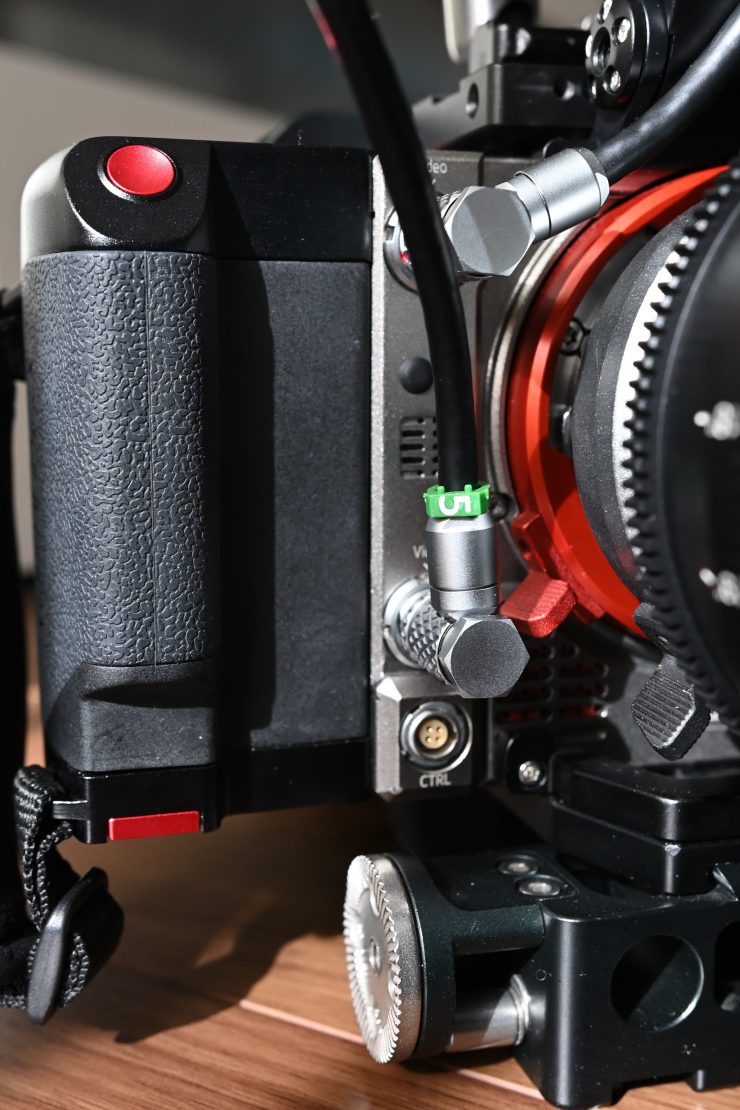
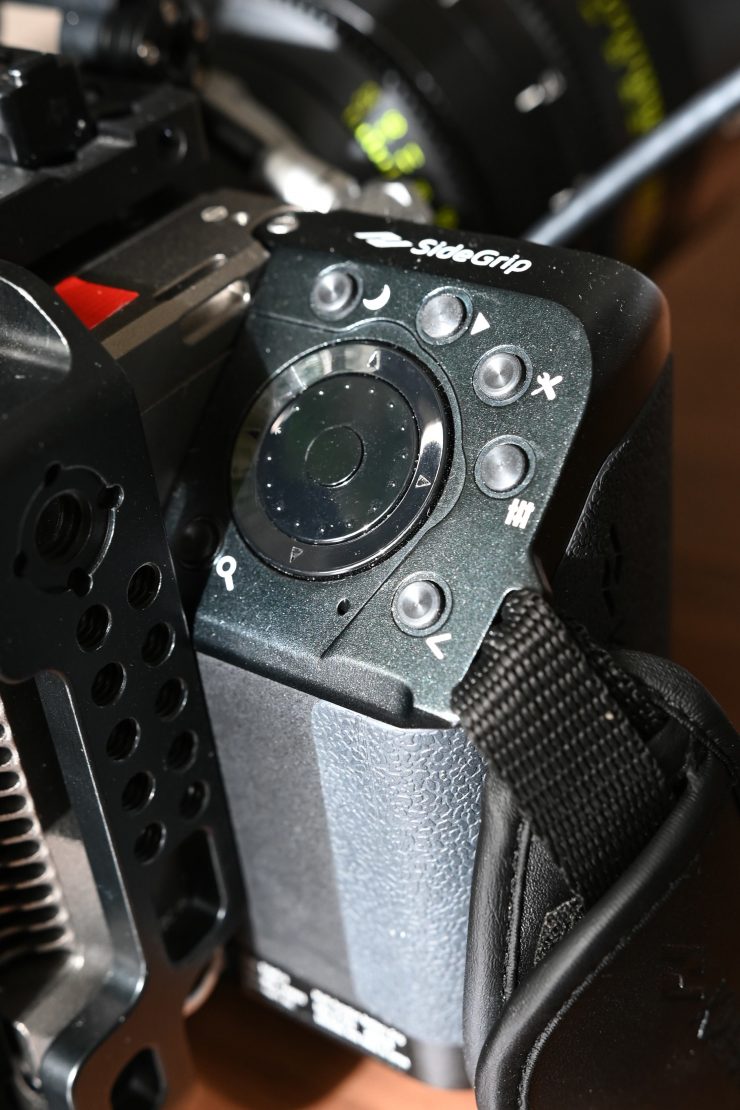
The SideGrip gives you the same menu controls and functions that are available on the operators’ side of the camera. It is also where the BP-U style battery goes to power the camera. The SideGrip doesn’t rotate or move.
The SideGrip controls are nicely placed out, but it’s not designed very ergonomically, and it’s not nearly as comfortable to hold onto as offerings from Sony, Canon, and Panasonic which are contoured to the hand. This is probably due to the fact that it is quite square to house the BP-U type battery. It is also mounted directly onto the body and does not use a rosette and cable meaning you can’t relocate the handgrip when using the camera on a shoulder rig.
The other thing I don’t like about the SideGrip is that there is no physical battery hatch on the bottom of it. If you don’t have a battery inside the grip then it’s just exposed to the elements.
In a nice touch, if you have a battery in the SideGrip and you are using the KineBack-W or a V-lock battery plate, you can hot-swap your batteries.
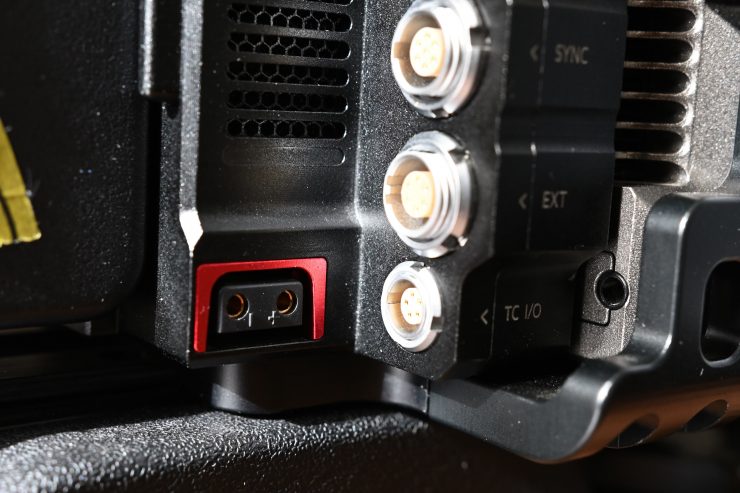
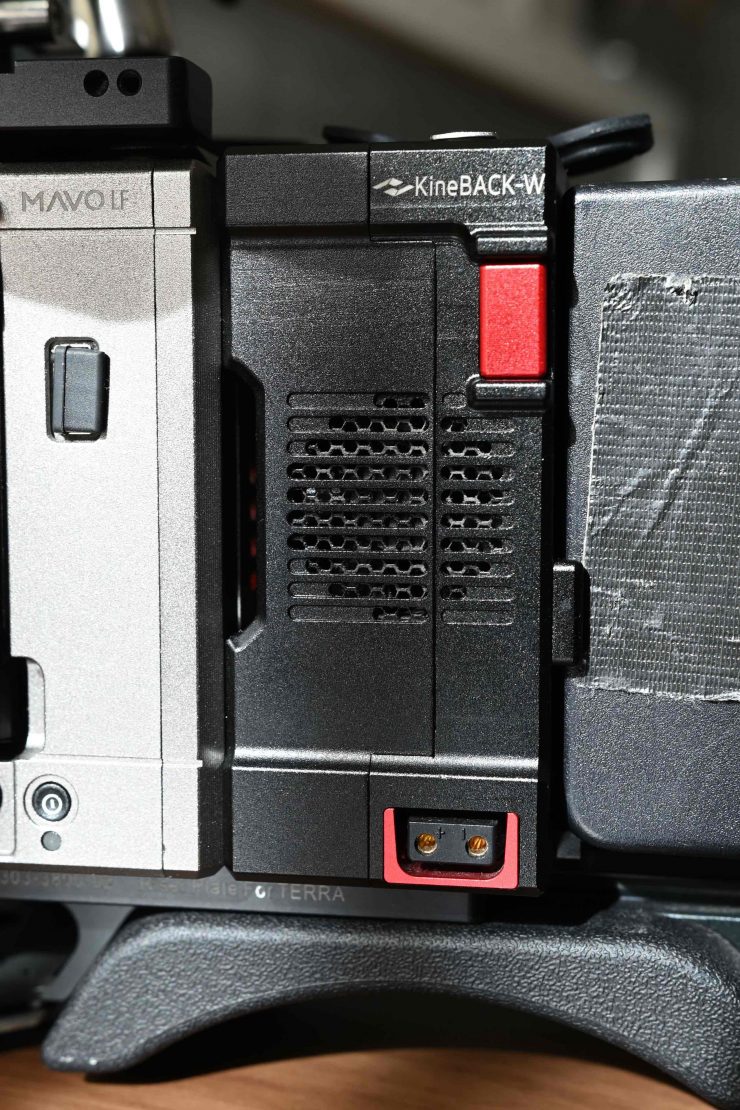
KineBack-W
The KineBack-W ($1,190 USD) really is an optional accessory that you need to make the MAVO a functional camera. Without the KineBack-W, you can’t record any real professional audio, you don’t have any SDI outputs, and you don’t have any timecode in/out.
The KineBack-W adds dual 3G-SDI monitoring outputs, dual XLR ports for Phantom-powered 48V mics, timecode input and output, SYNC, DC Power outputs, and an all-metal V-mount battery plate with dual D-Tap ports. Removing the KineBack-W is not something can be done easily or quickly. So let’s have a closer look at what it offers.
Dual 3G-SDI Monitoring
KineBACK automatically supports 3G SDI by both hardware and software. For SDI monitoring:
It works with HD digital port and KineMON port simultaneously: this allows for either display with parameters or a clean display. As I mentioned earlier you can’t customize any of the outputs.
The SDI function can be turned on or off in the camera setting to save power:
Configuration→SYSTEM→SDI Power: ON/OF
Notice for SDI monitoring output:
As the SDI output is either 720p@60p or 1080p@60p, the SDI monitoring is not suitable for external recording.
The monitoring signal in its default configuration is set as 720p@60p. 1080p@60p can be applied only when you are sure that your SDI monitor/EVF can support 3G-SDI.
Audio
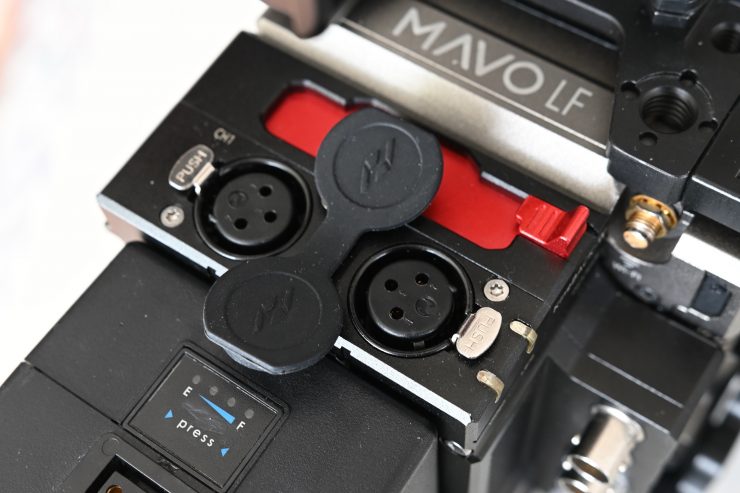
The KineBack-W has a recording module which supports dual balanced MIC-IN with or without +48V phantom-power. The XLR ports face straight upwards just like on a Blackmagic Design URSA Mini, which I’m not a fan of. I find these ports difficult to access, especially when the camera is raised high on a tripod.
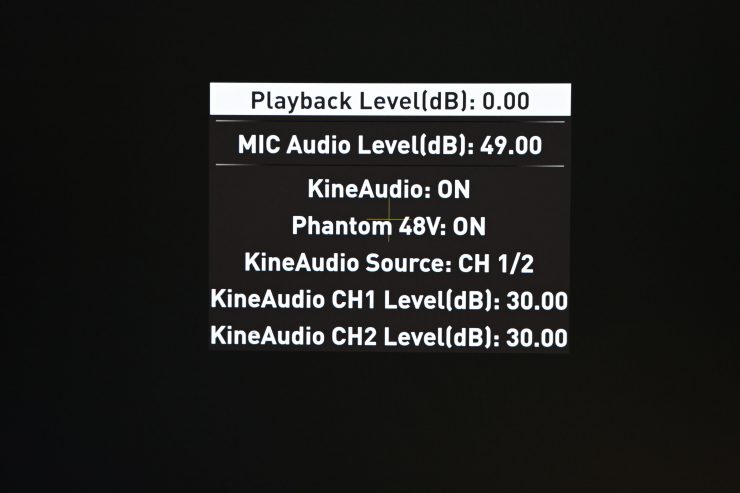
As far as audio recording goes there are some things you need to be aware of. In the main menu, there is an audio section you can go to. Here you can choose to turn on the two XLR inputs, or just CH1 or CH2. This audio menu can also be accessed by double pressing on the audio icon on the side of the camera. You can choose to enable phantom power, but there doesn’t seem to be any way of assigning phantom power to just one of the two channels. There is no Line Level function available, it is only Mic Level.
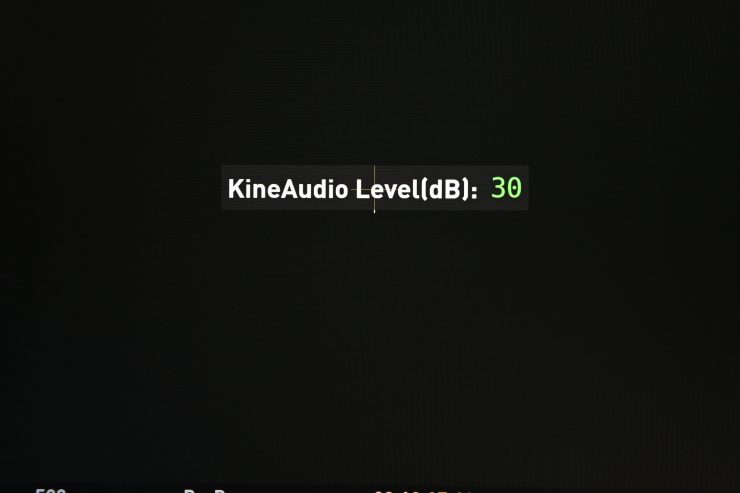
You can also set the individual levels for the two XLR inputs in the menu. The problem is if you want to adjust the audio levels without going into the main audio menu, Kinefinity only gives you the option to make an adjustment that affects both XLR inputs. If you have both XLR inputs activated and are using two microphones, any adjustment you make will be made to both of the mics.
You can also adjust the mic level by pressing a button on the side of the camera and then using the scroll wheel to make changes. This is fine, but the catch is, if you are using two different microphones they usually aren’t going to be at the same levels. If you have the level adjustment set to Channel 1 and Channel 2 in the menu this is going to be a problem. Now if you go back into the menu and choose Channel 1, then you can only adjust Channel 1 from the side of the camera. If you want to then adjust Channel 2 you need to go back into the menu and change the setting to Channel 2.
As far as headphone monitoring goes, you can adjust the headphone volume in the Audio Menu. You can’t choose to just listen to Channel 1 or just Channel 2, unless you have only one of the XLR inputs enabled. If for example, you only enable XLR 1 then you can listen to that output through both sides of your headphones. If you have both XLR inputs enabled you have to listen to Channel 1 through one ear and Channel 2 through the other.
One of the other big drawbacks with the audio is you can’t set any of the channels to auto. That means if you are running an on-camera microphone you have to continually adjust the levels. When I was filming at a drag racing event this was a pain in the backside. As the audio conditions go from quiet to ridiculously loud I ended up with many instances where I had unusable audio. There are also no built-in limiters or options to record a safety track.
The MAVO LF also only shows you two tiny small colored bars to display audio levels. There are no numbered indicators as to what levels you are actually recording.
The current huge glaring issue with the audio is that it isn’t recorded in perfect sync when you are using the XLR inputs on the KineBack-W. The audio doesn’t match the picture. From my testing, I found that it was about 5 frames off. This is a big deal if you want to record audio onboard the MAVO LF. When I asked Kinedinity about this they told me that there will be a new firmware soon. They said that they are placing grave importance on solving this issue.
While the pre-amps sound pretty good and the audio quality is good, in reality, the audio recording and control options on the MAVO LF (using the KineBack-W) are quite limiting. If you are someone who needs to record your own sound in the camera, it’s not the easiest system to deal with.
Yes, you could argue that there are other cameras on the market that have audio limitations, but if you look at the Canon C500 Mark II there is an optional audio module available that adds two additional XLR inputs (so you can have 4 inputs) as well as giving you physical audio controls and mic/line settings etc. I would like to see Kinefinity come up with a more dedicated KineBack that focuses more on audio. At the moment, audio is the camera’s, Achillies Heel.
Cameras such as the MAVO LF (just like a RED or an ALEXA) aren’t really designed for proper audio recording, or for making adjustments in a hurry. If one of your requirements for a camera is easy to use and control audio, then the MAVO LF certainly isn’t for you.
V-Mount Battery Plate
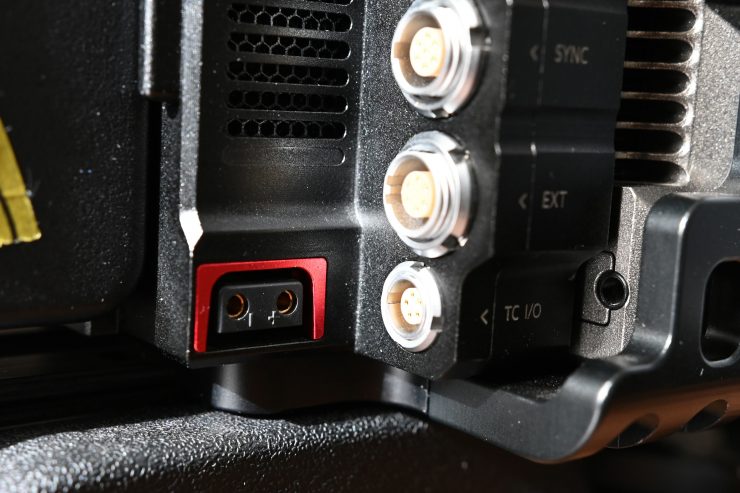
The V-mount battery plate has been designed to match the shape of KineBack-W. The battery plate also has dual D-Tap ports for powering other accessories. It’s important to note that the D-Tap outputs are connected directly to the V-mount battery, so the output voltage varies from 11V to 17V, instead of being a regulated 12V.
If you want to use Anton-Bauer (gold mount) broadcast battery, a V-mount to Anton-Bauer Plate Adapter is available.
Timecode Input & Output
The KineBACK-W also adds support for timecode input and output. This allows you to output timecode to other equipment such as sound recorders. The KineBack-W can also use timecode from an external timecode generator if you use the MAVO LF as a timecode slave.
The timecode port is a 5-pin MOCO socket, but it can be adapted to become a BNC port or timecode port of other timecode generators if you use the appropriate Kine Timecode Cords.
I tested the timecode with a Tentacle Sync and it worked without any issues.
Power Outputs
The KineBack-W features two 12V@1A DC D-tap outputs (one on each side), which can be used to power external monitors, wireless transmitters, and other accessories.
SYNC (3D/VR Ready)
Due to its lightweight and small form factor, the MAVO LF can be used to create a 3D or VR/360° system. The 3D/SYNC allows for true synchronization of CMOS sensors as follows:
- Timecode SYNC
- Frame SYN;
- CMOS sensors SYNC
For a 3D system, both MAVO cameras need to be equipped with Kine-Back-Ws and SYNC cords connecting the SYNC ports of the two KineBackk-Ws. No extra software option needs to be purchased;
For a multi-camera sync system (more than two), all TERRA cameras need to be equipped with KineBACK. One KineSYNC device can sync up to eight MAVO LF cameras (one master camera and seven slave cameras).
Audio without the KineBack-W
Without the KineBack-W audio recording is extremely limited. The camera body only has an in-camera microphone or the ability to connect up a 3.5mm external microphone. The in-camera microphone is pretty horrible and you can’t really use it for anything other than a scratch audio track.
Anamorphic shooting
The MAVO LF has a host of anamorphic recording options. For full frame anamorphic you can shoot in 4:3 5376×3984 or 6:5 4864×3984 (the height of the active area is 24mm). The desqueezed image coming from MAVO LF will be a 65mm format with FF anamorphic lenses mounted. For S35 anamorphic: both 4:3 4096×3072 and 1:1 3072×3072 (the height of the active area is 18.3mm) can work up to 50fps.What you do need to be aware of is anamorphic lenses are expensive to both rent and buy.
The camera also has options for monitoring, depending on the type of anamorphic lens you are using. The choices are:
- 1.25
- 1.33
- 1.5
- 1.75
- 2
- 0.5
Image quality
For me, image quality and usability are the two most important factors I look for in a camera. All the specifications mean absolutely nothing if the camera isn’t easy to use and doesn’t produce nice imagery. The MAVO LF produces really accurate colors and it is very easy to get nice imagery with the camera without having to do much in post (unless you are shooting RAW). The ProRes imagery is really, really nice and I was very happy with the results I got from the camera.


I really like the overall look of the MAVO LF. It has a nice organic quality to it and its own character and personality. To me, image quality is the camera’s biggest trump card. I have always liked the images coming from Kinefinity cameras.
I personally think that the full-frame sensor compliments Kinefinity’s ‘look’ really well. In saying that, there are a lot of factors that come into play when creating a look, from lens choice to lighting conditions, to how you grade the images.
The camera can produce some mild aliasing. This could potentially be a problem depending on what you are shooting.
There is an OLPF in front of the CMOS sensor named FF1 which Kinefinity claims allows the MAVO LF to create sharp images while avoiding most aliasing. Kinefinity also has a more complex “heavy” OLPF with high performance for avoiding aliasing named FF3.
The OLPF can block high image frequencies that lead to image artefacts when shooting in certain situations. The sharpness of captured images gets reduced as the OLPF blocks high image frequencies. According to Kinefinity, the optical properties of their OLPF has been carefully fine-tuned to assure a perfect match between the image content and avoiding aliasing artefacts when designed. “Light” OLPF is to keep sharp images while “heavy” OLPF is more likely to avoid aliasing.
OLPF FF3 is optional, the camera comes standard with the OLPF FF1. I was using the camera with the FF1 version.
Resolution & Detail
The MAVO LF resolves fine detail really well. It has a very nice organic look to the footage. It is sharp without looking overly sharp.
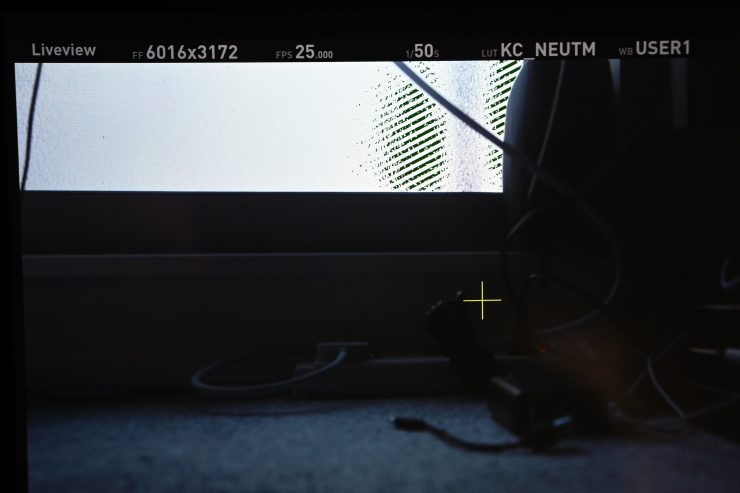
Above you can see a clip shot at 6016x 3172. The detail being resolved even when cropping in on a 6016x 3172 timeline is impressive.
Skin tones & colors
The MAVO’s color science is really nice. While the camera still maintains a rather unique look, I think Kinefinity has come a long way with their color science. I hate to use the term ‘color science’, because if you are shooting Log or RAW then what exactly are we talking about? I think color science can only be talked about if you are shooting with a baked-in look or just adding a LUT and doing nothing else.
In saying that, the camera produces very accurate colors straight out of the box and the skin tones look very natural and pleasing to the eye. Above you can see a couple of quick skin tone tests I did where all I have done is add a ARRI LOG C to Rec709 LUT straight to the image. I haven’t adjusted anything in post. The skin tones have a very slight push towards magenta but in a pleasing way. Of course what skin tones are going to look like is determined by not only the cameras sensor and processing, but also by the lens and lighting conditions. Skin tones can also be massively manipulated in post and taken in any direction you wish.
Just like the S35 MAVO, the colors the camera produces are far more accurate then previous Kinefinity cameras I have seen and used. Even though the camera isn’t really designed to be used for turning around material quickly, it’s nice to know you can just add a LUT to your footage and get a nice looking image straight away.
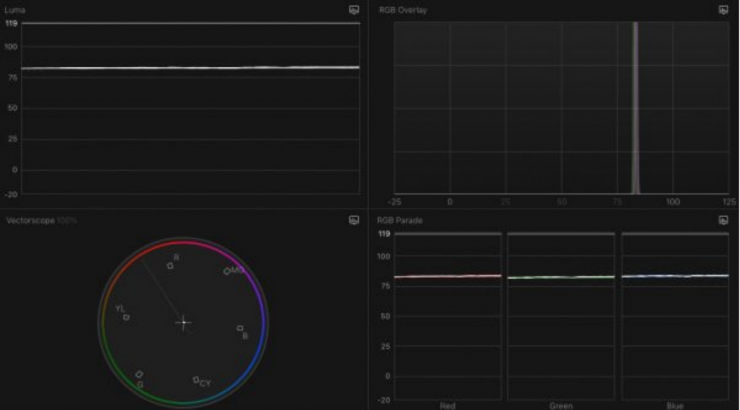
I shot pure white on a color checker chart with the camera set at 5600K and a Luxli Timpani 1×1 RGBAW light was also set to output 5600K. I wanted to see if the MAVO had a color push in any direction. As you can see from the above scopes, it is fairly neutral. There is a tiny push towards magenta, but it is very, very small.
Reliability
The big problem I had with the S35 MAVO was when it came to reliability. To be fair to Kinefinity, a lot of this probably had to do with the camera they sent out for review. They should have sent out a more current version of the camera and they should have gone over it carefully to make sure everything was working correctly before they shipped it out.
I didn’t have any major issues with the MAVO LF, but that’s not to say I didn’t run into any problems. I had a few instances where the KineMON-7H monitor just displayed red noise on the screen when you first booted up the camera. The only way to solve this was to pull out all of the connectors and plug them back in.
I also found on occasion that the SSD wouldn’t mount and I would have to re-boot the camera to get it to recognize the drive.
The good news is that I didn’t have any reliability issues with the camera freezing up or doing anything weird. Whenever I was shooting with it it worked without any problems.
Rolling shutter
The MAVO LF does suffer from some rolling shutter problems like most other CMOS sensor cameras. In saying that, it’s not horrible and I didn’t find it interfered with anything I was shooting in a negative way.
Rolling shutter performance is hard to generalize. It really comes down to what you are shooting as to whether you find the amount of rolling shutter acceptable or not.
ISO RANGE
You can adjust the ISO values from 250 to 16,000 ISO.
ISO and EI
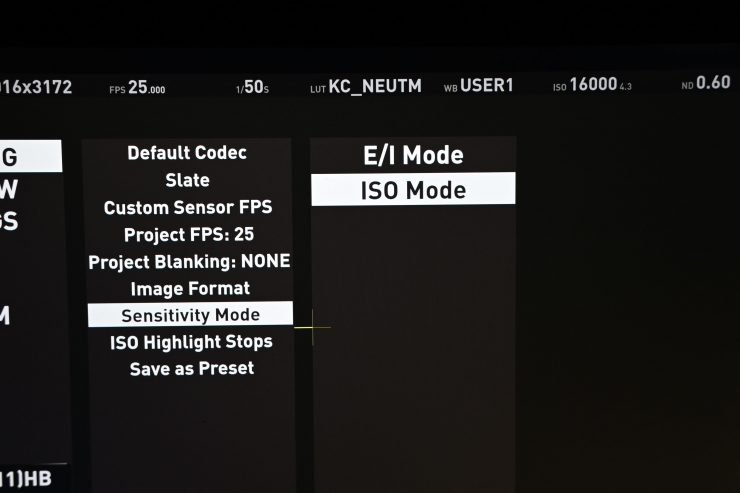
The MAVO LF can be used in both ISO and EI modes. The default ISO values are 800 and 5120. The highlight level (Highlight, that is 18% gray to ADC Clip) is 4.3 stops.
If you set the MAVO LF to EI Mode, changing the nominal EI value affects the Highlight and shadow stops. The image brightness is adjusted by digital gain while the CMOS image sensors analog gain remains unchanged.
Highlight Stops
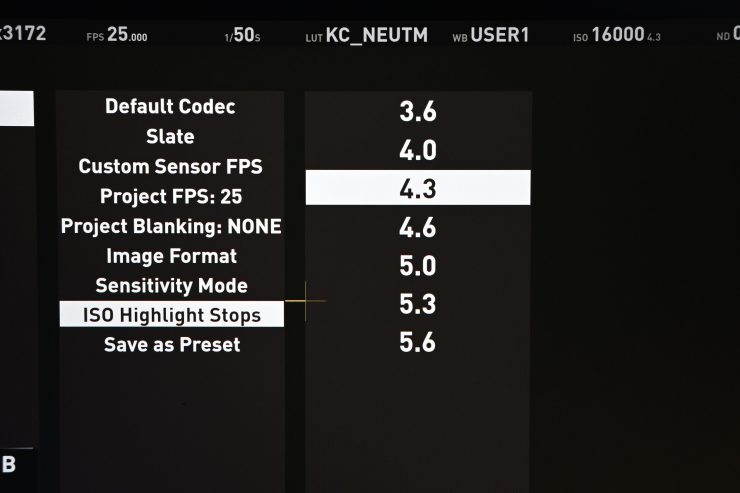
As the name suggests highlight stops is a way of assigning more stops to the highlights and having less in the shadows to help reduce unwanted noise. Kinefinity recommends that if you want to retain highlight details, you should set the highlight stops to at least 4.0. By changing highlight stops you aren’t changing the amount of dynamic range being captured, you are just changing where those stops of dynamic range are being allocated. Highlight stops can only be adjusted when the camera is in ISO mode.
How’s the noise?
Kinefinity cameras have never been known as low light cameras, but the MAVO LF certainly bucks that trend. Above you can see material shot at 5120 ISO. There is a couple of shots of a surfer stretching on the beach whee I did a 100% crop and a 200% crop so you can see what sort of noise you will get.
So how much noise is there? Well, I did some tests with the camera in 6K, UHD and HD resolutions to find out. I set up a small scene and illuminated a small robot so he was at 50IRE as Kinefinity recommends that the main image should exceed over 50% to avoid noise. I kept this 50 IRE value consistent on the robot when I changed the ISO values by adjusting the light intensity, or stopping down the lens. The darkest points in my background were all giving me readings above 0% so nothing was being hard clipped in the shadows.
At 6K in full-frame I found that the images looked pretty good up to about 6400. As a reference when I did a similar test with the S35 MAVO I found 1600/2560 ISO to be about the limit I would shoot at. Once you went above 6400 ISO the noise starts to get a bit too much for my taste. In saying that, it still wasn’t that horrible even at its maximum ISO setting.
I also did a test in 6K full-frame in the EI mode.
In UHD S35 the results were worse than those that I got in 6K full-frame. There is noticeably more noise in the images and I think that I would only personally use the camera in this mode up until about 4000/5120 ISO.
In 3K (M 4/3) the results were better than in both 6K and UHD. From my tests, I thought you could probably push the camera to 3200 ISO without any problems. The good news about shooting in HD in the M 4/3 sensor size is that you don’t get that nasty push towards green at higher ISO values as you do shooting in 6K or UHD.
I also did a test in the HD S16 mode at 290fps at 5120 ISO to see what the noise is like. It’s not great, as you would expect. The combination of S16, 290fps, and a high ISO is never going to provide great results.
Finally, I did a quick test of 6K full-frame at 48fps at 5120 ISO to see what it looked like. It still looked pretty good at this ISO.
The MAVO LF isn’t a low light beast, but it still performs very well up to around 6400 ISO. If you are looking for a digital cinema camera that looks great at 5000 ISO and below, then this will certainly tick that box. If you stick to the two base ISO settings and below I think you will be very happy with the results.
Post-processing
If you want to shoot RAW then you have to be prepared to not only deal with the huge amounts of data, but also the post-processing that needs to be done. Currently, the camera doesn’t have KineRAW 2.0 as I mentioned earlier, and if you want to shoot RAW, then you can only do it in Cinema DNG
Whether or not the MAVO LF gets ProRes RAW Or Blackmagic RAW capabilities in the future is anyone’s guess. Either one of these options would be great in the camera.
Competition
As far as competition goes, that is a tricky one. If you are comparing the MAVO LF based just on specifications then the direct competitor would be the Canon C500 Mark II
At $11,999 USD (body only), or $13,499 (basic kit) the MAVO certainly offers good value for money. So what else can you get these days that could potentially be considered a competitor at or around that price?
Well, if you want 6K full-frame and don’t want to spend $40K+, then as I previously mentioned, the Canon C500 Mark II is the obvious direct competition.
You could also potentially make an argument that the Panasonic S1H is another camera you should look at if 6K and full frame are the two biggest criteria you are looking for.
You could also strongly argue that the MAVO LF is a lower-cost alternative to a Sony VENICE, ARRI Alexa Mini LF, or RED VV.
Selected Accessories
The MAVO LF has been designed to be compatible with TERRA accessories such as the KineBACK-W which provides SDI monitoring, XLR 48V audio, V-mount plate, regulated DC output, timecode sync and 3D sync in one module. It also supports the Darktower platform that allows for wireless video and lens control. For monitoring, Kinefinity has the KineMON, a full HD 5″ monitor that is powered and feeds video from only one cable.
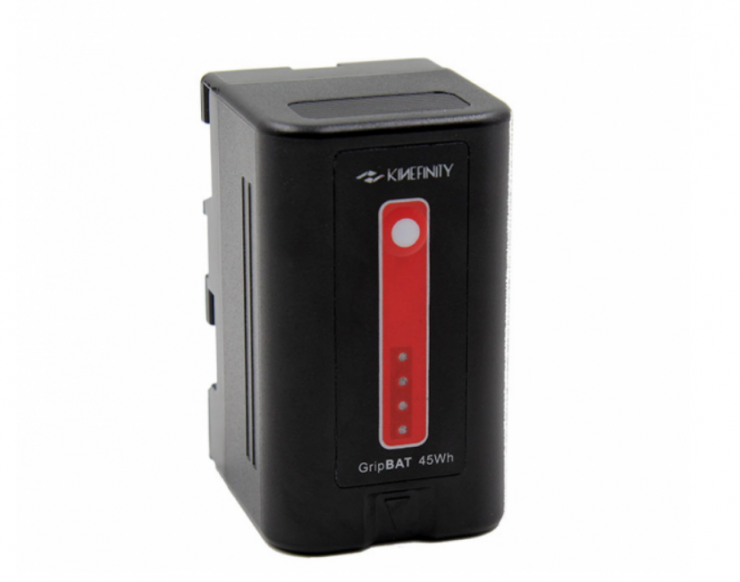
There is also a SideGrip that provides control and power for the MAVO using a GripBAT 45Wh (BP-U30 compatible) battery, which Kinefinity claims provides more than one hour of usage. There is also a KineBAT 120Wh, a compact V-mount battery to provide additional run times.
The KineKIT-TERRA from Movcam is a complete shoulder mounting kit with a baseplate, top plate, handle, hand grip with stop/start trigger and much more. This kit is not bad, but you still need to use a reasonably heavy battery along with the KineBack-W to get a reasonable balance.
The problem with this setup is that you can’t easily control the camera, as the SideGrip can’t be relocated from the camera body and if you are using a Canon EF lens the only way you can control the aperture is from the side dial or the dial on the SideGrip. Both of these are very hard to reach when using the camera on your shoulder.
Price
- Body Only: $11,999 USD
- Basic: $13,499 USD
- Pro: $14,999 USD
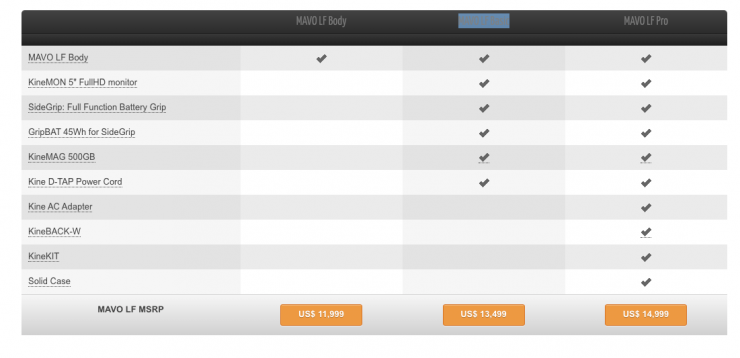
MAVO LF backorder time: 2 weeks

Above you can see other accessory pack deals that are available.
Update
Since completing this review, Kinefinity has released new beta firmware for the MAVO LF that adds and fixes:
Playback improvement
When playback clips of very high resolution or ProRes4444 codec, the camera system may encounter some lag or frame drop. Firmware KineOS 6.4 could record a tiny but high image-quality file when recording the main footage, which will enable a real-time and fluent playback.
MAVO LF/MAVO 6K/TERRA 4K adopt the way of recording and playback automatically, under the following settings:
Note: there may have some difference from original footage when playback the tiny file, but it does not affect the original footage recorded on the SSD.
Tint/cc Adjustment
For white balance, the new firmware brings tint tuning/color correction function besides the color temp (Blue and Yellow), which means photographer could adjust Green and Magenta based on the live-view image, for more accurate control over the color of the clip recorded.
Note: In the white balance option box, press Zoom button to activate tint adjustment.
SSD management
The new firmware optimizes SSD management as following:
- New design on the interface of formatting SSD, also support roll number change manually when formatting SSD.
- Move Format SSD interfaces to: Configuration -> Shooting
- NTFS as default SSD file system format, and move file system format option to calibration mode;
- Support rebuild KineMAG at calibration mode to restore performance of KineMAG.
Other new functions
Project fps allows 120fps;
Support iris control of Samyang XP lens (“Active mount->Normal mode”);
Optimize algorithm for bad-pixel removal;
Optimize parameters shown on UI for better readability;
Optimize information dialog and description;
CTRL port supports TALLY;
Default threshold power supply voltage changed to 12V
Reboot to exit from calibration mode, no need of reset settings;
Add an 70% option of Zebra threshold
Bugs fixed
Audio off-sync issue at some setting;
TC display error when camera TC output to other devices;
Monitoring nonfluency at some setting when recording very high fps.
Functions on new monitors
KineMON 7H/EVF: add ARRI-style false color (Keep pressing button 2)
KineMON 7H: support manual image rotation (Keep pressing wheel);
KineMON 7H/EVF: fix display bug of histogram at some settings.
So should you buy one?
The biggest stumbling block for owning a Kinefinity camera is still when it comes to after-sales service and support. If you buy one of their cameras in China, Europe, or a select few other countries, there is someone you can turn to for information and support. Unfortunately, in many other places in the world, there is no easy way of getting repairs done or receiving after-sales service. For many potential owners, this is probably the primary reason that they shy away from buying a Kinefinity camera. This really is a shame, because I think the company makes good cameras that are a nice alternative to what’s on offer from other manufacturers.
For many owners and prospective users, the Kinefinity Facebook group is one of the quickest ways to have your questions or issues about the camera answered. Kinefinity’s own Jihua Zheng is frequently posting updates and answerings questions in the Facebook group.
The other two problems you may well encounter are resale value and clients having no knowledge about the camera. In some cases, clients will either request a particular type of camera or want to know what you are shooting on. In the case of owning a Kinefinity, you may well be met with some resistance because the client has never heard of that camera before and could be reluctant to want to use it. These are real-world situations that you have to think about carefully before investing in a Kinefinity camera.
So should you buy one? That’s a hard question to answer. It really depends on the type of work you do and the clients you have. If you are working for clients or production houses they may not want to hire someone who has a camera they are not familiar with. Is this a stereotype, absolutely, but it’s also the reality. If you are a mid-tier Indy filmmaker and you can choose to use whatever equipment you want, then the MAVO LF could definitely be the answer.
I certainly think the MAVO LF is worth looking at if you are after a 6K full-frame camera. There is a lot to like about the camera The hardest thing for potential customers is there isn’t a lot of places where you can go and try one out or rent one for a few days to see how you like it. With cameras from the main manufacturers, it is easy to find a camera and try it out.
If you can get your hands on one to try out, it is certainly worth doing. You might find that the camera surprises you. As far as straight out image quality goes, it is a very, very good camera.
Conclusion
Kinefinity has made an impressive camera given how small their company is. Making a camera, let alone a good one is no easy task. Many have tried and failed, but Kinefinity has continued to improve over the years. The MAVO LF is an impressive offering and it punches well above its weight.
I was very impressed with how easy it was to obtain great vision that I didn’t have to spend much time finessing. To me, that is a very important aspect of any camera. Lots of cameras can be made to look great, but a good proportion of them require time in post to achieve a good result. With the MAVO LF you don’t have to work hard.
If image quality was the only criteria you were looking at, the MAVO LF would be right up there with cameras that cost considerably more money.
I really enjoyed using the camera, especially with the PL adapter that has the built-in ND. The new EVF and LCD screen are fantastic and really enhance the overall usability of the MAVO LF.
The menu and operation systems could be better and more streamlined, but Kinefinity has continually improved this facet of their cameras over the years.
At $11,999 USD (body only) the MAVO LF is sitting in a pretty niche spot in the market. The MAVO LF when it was first announced really didn’t have any competition at all, now you have lower-priced 6K full-frame cameras such as the Z-CAM E6 FF and the Panasonic S1H. There are also now full-frame offerings from both Sony with the FX9 and Canon with the C500 Mark II.
The caveat with buying any product from a small company is that it has to be better than what’s on offer from the big boys. You can’t just make a product that is the same, otherwise, nobody will buy it. Kinefinity has positioned itself as an alternative solution to more popular cameras on the market. Despite being a very good camera, it will be a hard sell for Kinefinity to convince people to buy their camera over an FX9 or C500 Mark II. In some ways, that is a pity, because the MAVO LF is a very good camera.
There’s absolutely no doubt that the MAVO LF is a very capable camera that can produce beautiful imagery, It is feature-rich, well made, and I like a lot of the new accessories, however, there are a few things that need to be improved.
If you are going to target the MAVO LF as being a serious high-end digital cinema camera you need to offer flexibility with what goes out over various SDI outputs, you need to be able to send timecode and audio over SDI, and you should be able to customize buttons to work for how you want them to work.
Kinefinity cameras always leave me a bit frustrated, because they come so close to being really great all-round cameras. The MAVO LF has bucket loads of potential, it just needs to be refined a bit more. KInefinity is working hard behind the scenes and they are listening to feedback.
From my time spent shooting with the camera, I was left with a much better overall impression than my time with the MAVO S35. The images are really nice and the camera certainly offers good value for money. The MAVO LF, at least in my opinion, is the best camera Kinefinty has ever made.