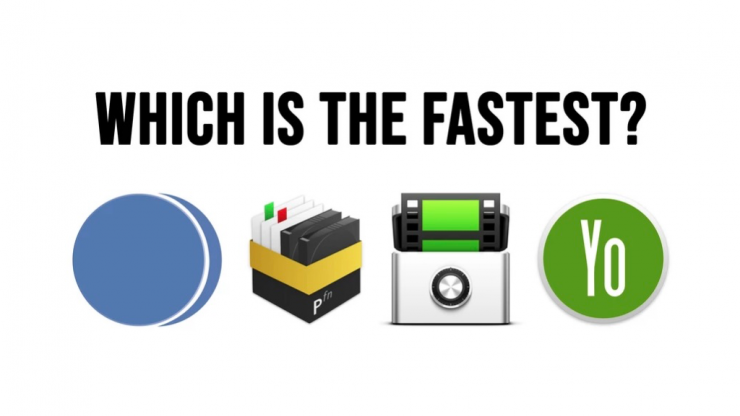
You might be under the impression that all copy and verification software must do the same thing in the same way, and take the same amount of time to complete. What if I was to tell you that is not the case.
I caught up with Bradley Andrew from Filmdrives to ask him some questions and to show you his super in-depth article comparing some of the most popular copy and verification software.
Bradley recently ran some tests comparing the offload speeds of Shotput Pro, Silverstack, Hedge and YoYotta. He compiled his results into a detailed blog post and sent it through privately to each respective developer. They all got back to him and posed some questions bringing new information to the surface which he looked into and then decided to run the tests again.
Here are the questions I posed to Bradley.
Why did you decide to look more deeply into copy and verification software?
A few years ago I did a TVC all around Australia using the Alexa 65. It was one of the first jobs in the country to use this new camera system and there was a lot of prep work and learning to be done as we figured out the best way to manage bucket loads of data while traveling from state to state on a very tight schedule.
Before the job, I had been a dedicated Shotput Pro user. I believe this was before Hedge was on the scene and I wasn’t aware of YoYotta. I had been curious about Silverstack for a while but had never given it a red hot go. If there was any job worthy of testing out a different data management system, it was this one.
We were using the Codex Vault XL coupled with a MacBook Pro and 2x 5 Bay RAID 5 Drives. Standalone I was getting around 600MB/s off the RAID Drives. I recall offloading with Shotput Pro and thinking it wasn’t as fast as it should be. So I decided to grab a trial version of Silverstack XT and run some tests. The specifics I have archived in my email but I believe we were getting around 100MB/s faster offloads with Silverstack compared to Shotput Pro. This was using the exact same drive, media, and connection configuration. When you are doing 1TB Offloads this 100MB/s equates to a massive time-saving. For the rest of the job I used Silverstack and it has been my software of choice ever since.
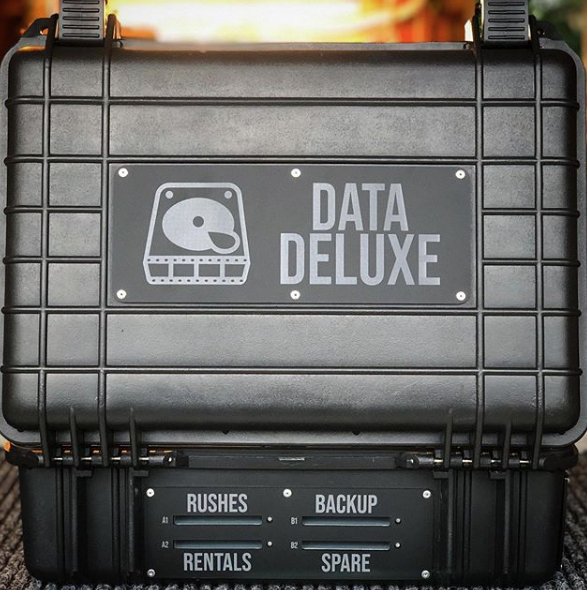
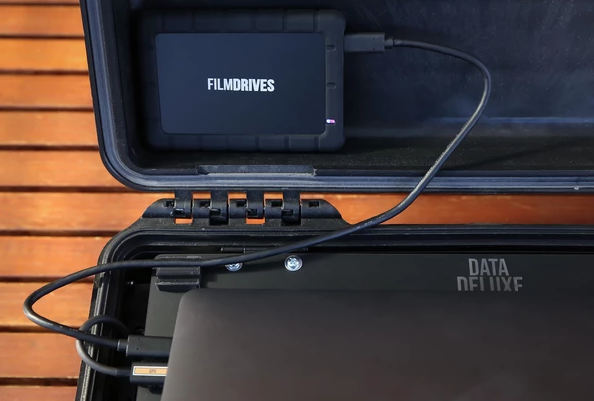
Over the past few weeks I’ve been testing out our new Data Deluxe System and as always, speed is a priority. I want to be able to recommend the fastest and safest offload tool so I decided to run an experiment and pit the four big players against one another. This was my process.
Why is it important to use copy and verification software and what are your recommended practices for doing it?
When working as a DIT or Data Wrangler you are responsible for the data integrity of a project. I work primarily in TVCs and I’m often in situations where you are managing big data on multi-million dollar commercials and no one else is checking your work. If you make a mistake there is no one there to call you out until it is too late. Copy and Verification Software has your back, it performs checksums to verify your offloads, creates detailed reports and produces a paper trail that can be referenced later. My process factors in the human condition and has lots of contingencies built in that allows for human error and software error.
Often times you will get interrupted while running your quality control checks and have to come back to it, when starting and stopping tasks like this it’s easy to forget where you are up to or to make mistakes and miss things. We are humans, not robots, so I take a layered approach where I am always cross checking myself and the software. Only when I get ticks from all my little processes do I move on. This becomes particularly crucial when you are 14 Hours into a shoot day and feeling very tired, mistakes will be made and you need to be able to catch them.
Do you think a lot of people don’t take copy verification seriously enough?
Definitely. I’ve seen a lot of undermining of the DIT / Data Wrangler Role where Producers or Production Managers try and save some money by doing data themselves or farming it out to the runner who already has 300 other things to do. They see it as an easy task, ‘it’s just copy and paste so it should be simple right?’. Wrong. The task itself seems simple on the surface but it’s definitely more complex than meets the eye and the responsibility is huge.
I’ve personally seen clients copying crucial material without using copy and verification software and only making one back up. What are the dangers of doing this?
That’s very concerning. What you are really doing is just making an unverified clone of your data, there is no cross-check to see if macOS has actually copied all of the data that actually exists on your source media or camera card. What if the system read from your card incorrectly or there was a hardware problem with your reader? What if the drive you copied too had a fault and didn’t write the material correctly? You’d never know.
What’s more concerning is making only one backup, if your hard drive or SSD fails you’ve lost all of your footage, if the drive is lost or damaged in transit you’ve lost all your footage. This definitely happens and the last thing you’d want to be doing is a re-shoot just because you didn’t backup your footage properly. 3-4 Separate Copies of your footage stored in different locations is considered safe, though often in TVC world many companies only make two copies, a rushes drive for editorial and a backup drive for production.
You need to ask yourself how much is your shoot day worth? If it costs you $100,000+ for equipment and labor for a shoot day and you’re putting that on a $200 Drive, it feels like a big risk to take. Even if you shoot day is only costs $10,000, it’s still a big risk to take.
I think a lot of people just assume that all copy and verification software works the same way. Were you surprised by your findings?
I knew there would be some difference but after round one of testing when Hedge came out on top I was surprised at how big that difference was. Then I reached out to each of the developers and they shed some new light on the backbone that makes up each software. I began round two of testing and it was super interesting to see what is really happening behind the scenes as each software copies and verifies.
In your opinion, are companies selling copy and verification software being upfront enough with exactly how their product works?
There seems to an interesting balance between being 100% open with the end-user and the protection of your intellectual property. You need to consider that each offload software that I looked at is aimed at a different target market and the level of detail that each user of a particular target market wants varies a lot.
Shotput Pro is aimed at individuals while Silverstack is for the high-end DIT market, Hedge is aimed as a step up for people just using Finder copy and paste while YoYotta shows its strengths when dealing with archives and LTO libraries.
I’m from Melbourne, Australia and I know a variety of Data Wranglers that are using Hedge, Shotput Pro and Silverstack for high-end data work, so in that respect, the target market is null and void as each software is servicing the same jobs that demand high quality with no compromises. I fall in the camp of honesty and transparency, if you aren’t up front and open with your customers you’ll eventually be caught out.
I can appreciate the need for a fluent user experience and the fact that many people don’t want to get bogged down with unnecessary information, but there should be a choice for the users that do. So yes, I’d like to see more openness in what is exactly happening behind the scenes as an offload runs.
What is your preferred copy and verification program and which one would you recommend to people looking at buying something for the first time?
I prefer Silverstack, hands down. It’s reporting capabilities and project management features are second to none. Many of my commercial clients love that I can output a Contact Sheet on wrap giving a clear visual overview of everything that we captured that day.
Shotput Pro has proven to be easy to understand and use, traditionally it’s been the go-to and it’s still a great option for many newcomers out there.
Hedge has a great user interface that takes ease of use to a new level which I think is great, I’d happily recommend it but I think the offload differences that are outlined in my article need to be understood by new users which conflict with Hedge’s aim of simplicity.
You better grab a cup of coffee, because you are going to need it. Here is Bradley’s entire experiment.
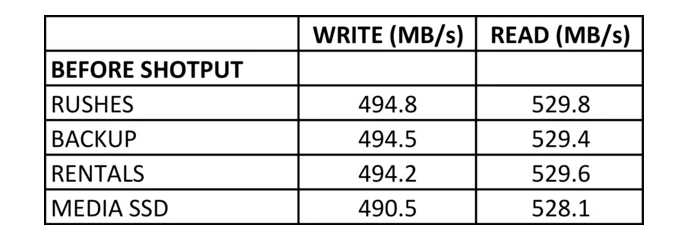
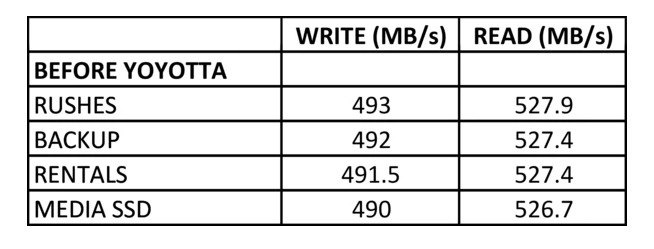
SOLID STATE DRIVES

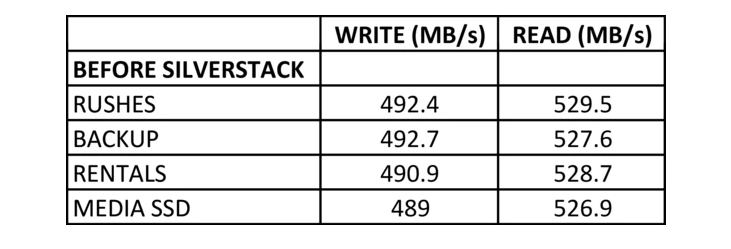
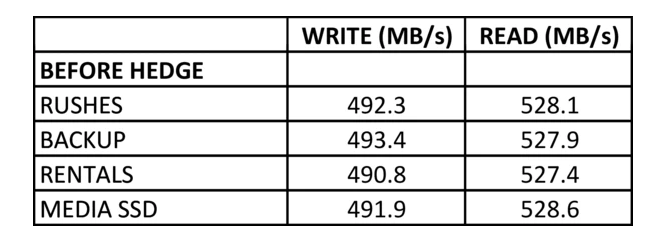
The SSDs that I used for the tests were Samsung 4TB 860 EVO 2.5″ SATA SSDs. These SSDs average around 492MB/s WRITE SPEED and 528MB/s READ SPEED. The SATA Form Factor has adequate heat dissipation due to it’s larger size and allows for consistent offload speeds during lengthy transfers as no thermal throttling takes place. Each SSD was formatted as Mac OS Extended (Journaled) with a GUID Partition Map.
DESTINATION DRIVES
The Data Deluxe is capable of mounting 4x 2.5″ SATA SSDs simultaneously. There are two SSD Readers in the system that connects via USB 3.1 Gen 2 which gives you 10GB/s (1250MB/s) connection speeds per reader. Each SSD Reader can mount 2x SSDs, thus the 4x SSDs in total between the two units. If you max out 2x SSDs as described above they will come in at 984MB/s WRITE SPEED and 1056MB/s READ SPEED which is under the 1250MB/s provided by USB 3.1 Gen 2 which means there is no bottleneck present with the connection interface.
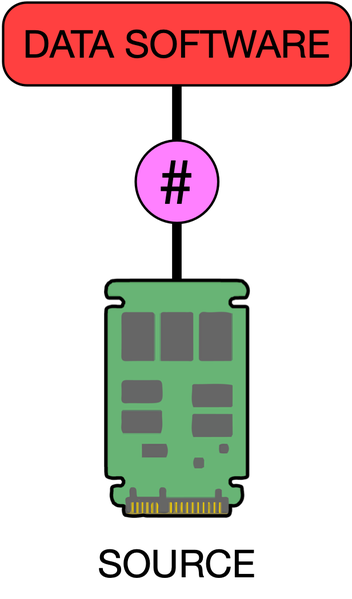
SOURCE MEDIA
I don’t readily have access to an Alexa LF or Alexa Mini LF alongside their corresponding Media and Card Readers. So I gathered some Alexa LF Footage from The Vision House and stored it on a Custom Film Drives SSD which runs in our USB 3.1 Gen 2 Enclosure.
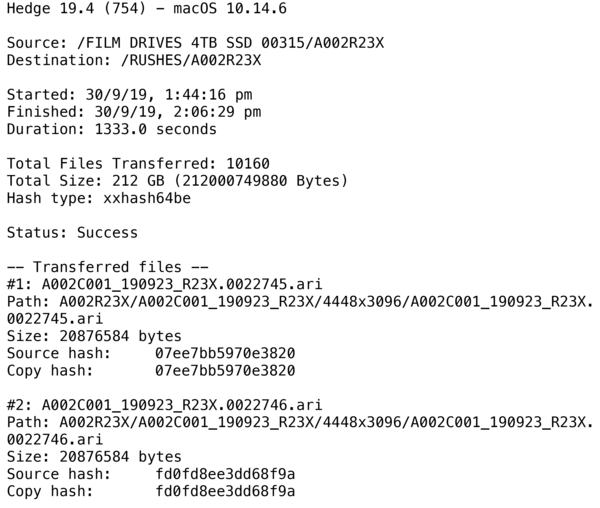
For the purposes of this test, this External SSD will be acting as our source media for the offloads. The files for offload were made up of four clips shot on the Alexa LF in 4.5K Open Gate ARRIRAW, we didn’t use HDE thus the files are a .ARI Image Sequence. In total, the card came in at 212GB.
COMPUTER
For the tests, I connected the Data Deluxe SSDs and the External Film Drives Custom SSD to my 2018 15″ MacBook Pro that is equipped with an AMD Raedon Pro 560X GPU, 32GB of RAM and 1TB Internal SSD. It was also connected to a Vega 64 eGPU via Data Deluxe. The MacBook Pro is running the latest version of macOS Mojave 10.14.6.
SOFTWARE
To level out the playing field, I decided to download the latest trial versions of all the offload software and clean install them on my system. The version numbers were as follows:
Before each offload test I would format and delete any existing files off the Destination SSDs, this means they would be fresh 4TB SSDs as if you were starting a brand new job. To ensure each Destination SSD was performing as it should a speed test was run using Blackmagic Disk Speed Test. This allowed me to get a metric for the write speed and read speed of each SSD prior to the offload, this number stayed consistent throughout each software eliminating drive performance as a variable.
I would also run a speed test on the ‘Source Media’ SSD before each offload test to ensure that the write speed and read speed was consistent. Again, eliminating drive performance for the source media as a variable.
For this test I decided to offload the source media to 3x Destination SSDs as 3 Copies of your footage is generally considered the gold standard. I wanted the test to be as close to a real-world, on-set situation as possible.
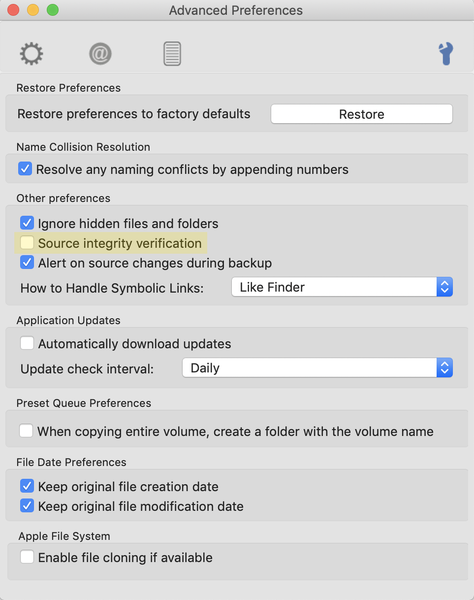
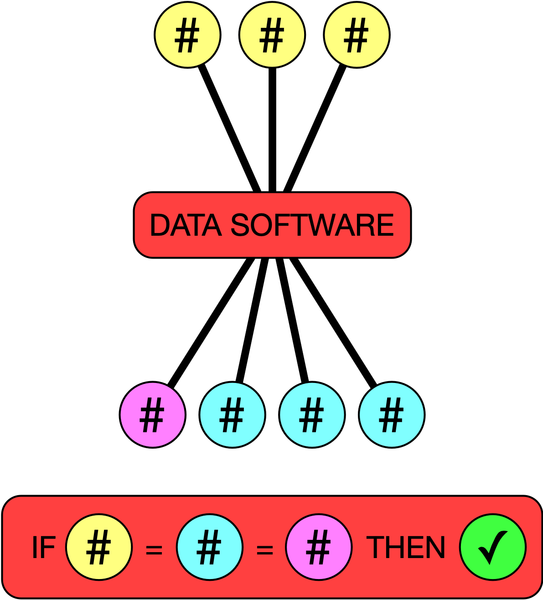
Prior to each test I went through and checked all the offload settings of each software to ensure things like Source Integrity Verification were on and that they were using the XXHash Checksum. Source Integrity Verification adds an extra layer of reliability to your offload as it scans your source media to check for errors in the data. XXHash is my preferred checksum method as it’s the fastest and has proven very reliable, it’s also the best checksum method for an ARRIRAW Image Sequence as there are thousands of files to run checksums on.
During the offload process, I would record the screen of my MacBook Pro using ScreenFlow. I set ScreenFlow to run at 25fps for each recording as this is the standard frame rate here in Australia.
When the offload was finished I would end the screen recording and analyze what had been recorded. This allowed me to dial in frame by frame exactly when the offload started and exactly when the offload finished. From this information, I could get an objective measure of the time it took to complete the transfer and verification. This means I wasn’t reliant on the time readout from each software which would have introduced a bias as there wouldn’t be a consistent measure of time.
While I was at it, I checked the software’s estimated time remaining at the start of the offload and compared it to the final offload time. I figured this was a great time to also compare the estimation engine of each application as historically I have found them to be a bit inaccurate.
Some software does the offload and verification process in tandem, dynamically switching between offloading the footage and verifying the copy. Other software does all the offloading as a batch followed by all of the verification as a batch. Where applicable I have broken down the offload time, verification time and total time as separate pieces of data for you to consider.
I believe that outlines all of the measures and variables I had in place. Now for what you’ve really been waiting for…the results!
SHOTPUT PRO OBSERVATIONS
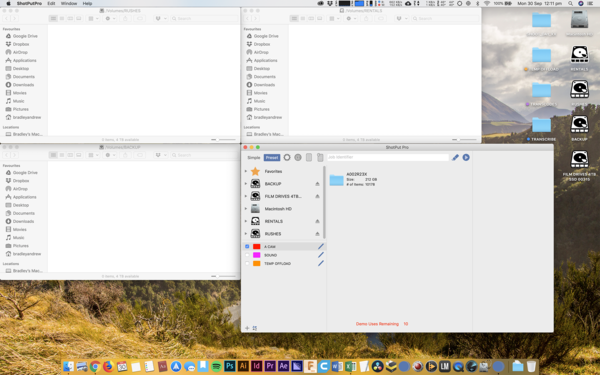
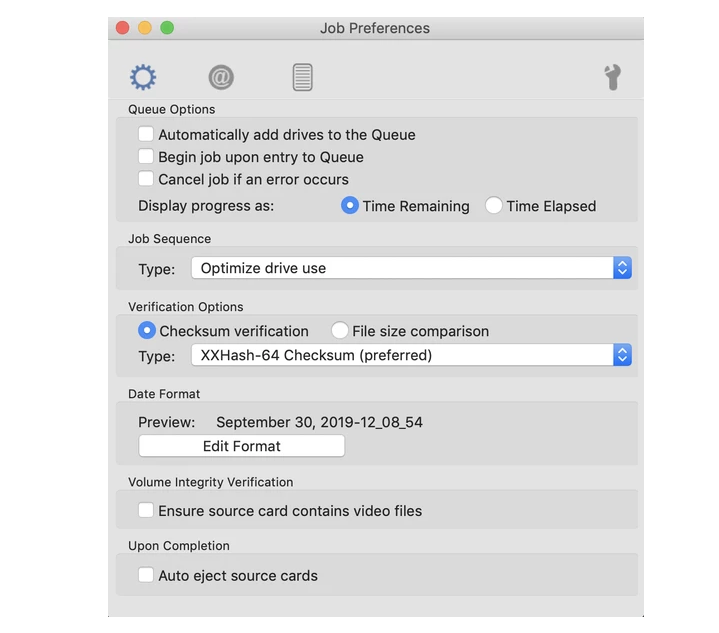
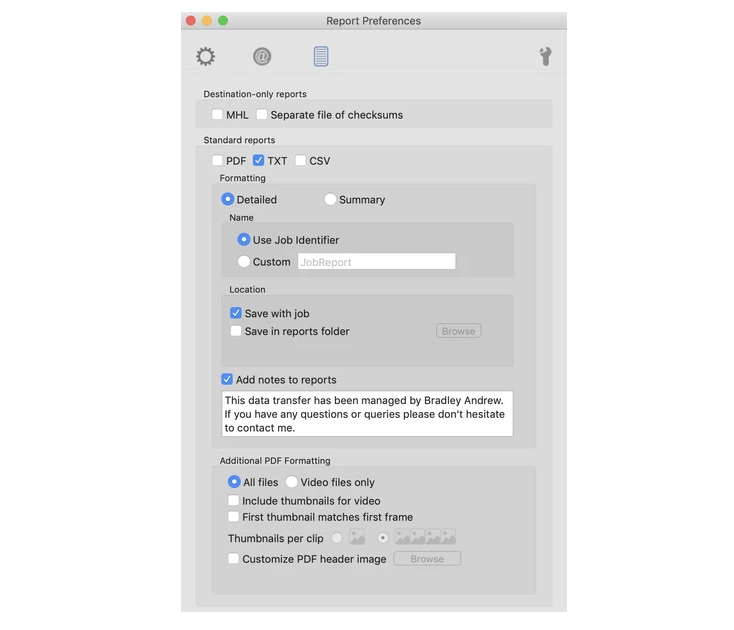
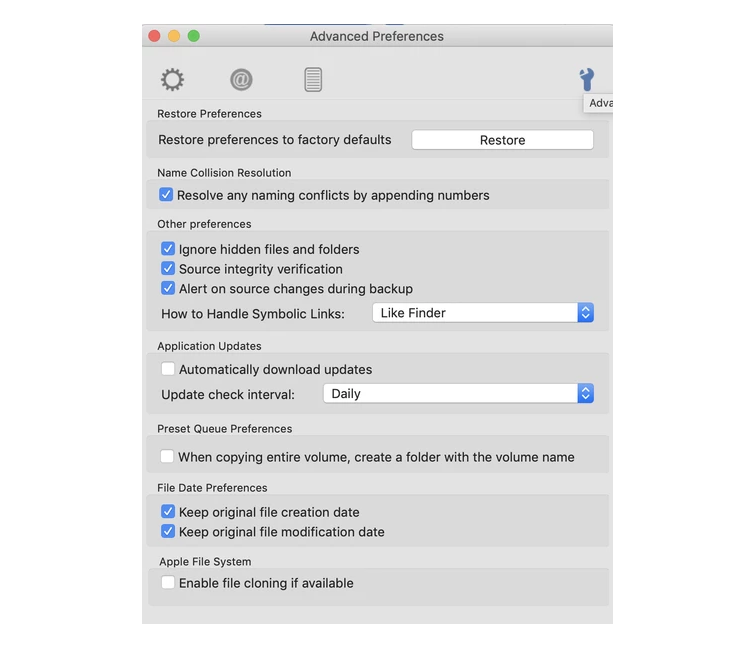
I ran Shotput Pro in it’s classic ‘Preset View’. Job Sequence was set to its default value ‘Optimize Drive Use’ which I have found to be the best choice based on past experience. I used the XXHash-64 Checksum. I only enabled Text Reports as I’ve had instances in the past where the PDF Report Option will try and get a frame grab for every single frame in an image sequence which is very time-consuming. Ignore Hidden Files and Folders is a great default so I left that as is. I had ‘Source Integrity Verification’ turned on.
Please find the screen grabs of my settings below:
These are the pre-offload speed test results of the Destination SSDs and Media SSD:
SHOTPUT PRO RESULTS
Estimated Time: 33:00 Minutes
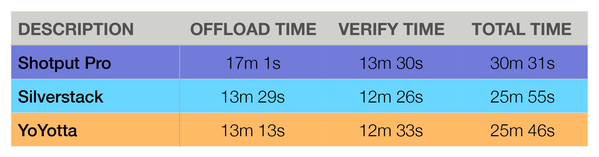
Offload Time: 17:01 Minutes
Verification Time: 13:30 Minutes
Total Time: 30:31 Minutes
SILVERSTACK OBSERVATIONS
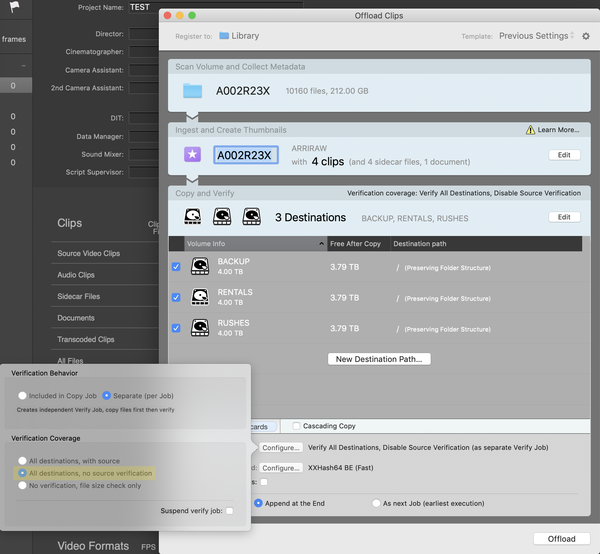
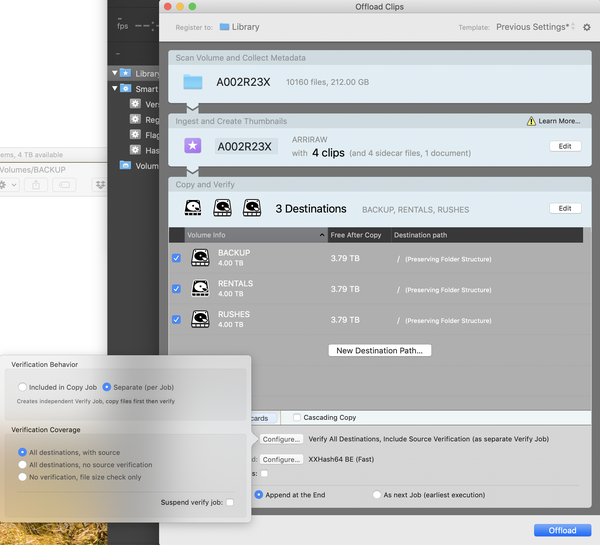
For this test, I was running Silverstack XT. In the Preferences -> Copy & Jobs Tab I left Number of Parallel Tasks set to it’s default ‘1 (Optimized, Recommended)’. Number of Parallel Jobs set to ‘1’. Read Buffer Size set to ‘8MB (Recommended)’.
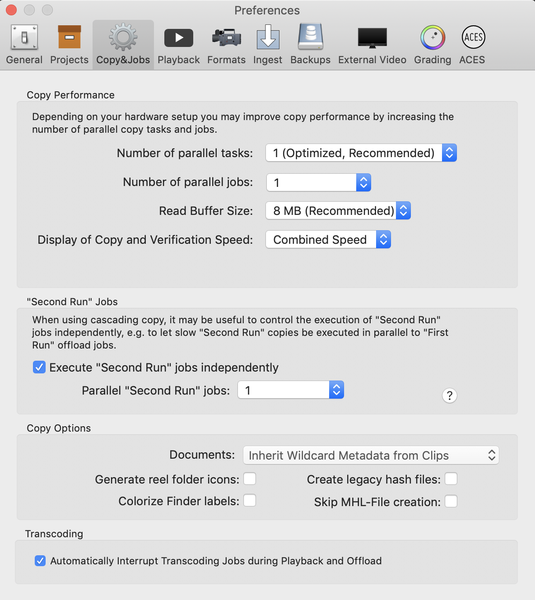
In the Offload Clips Window, I set Verification Behaviour to ‘Verify All Destinations, Include Source Verification (included in Copy Job)’ which is the setting that I mainly use when offloading with Silverstack. This setting does the offload and verification process in tandem, dynamically switching between offloading the footage and verifying the copy, thus Offload Time and Verification Time can’t be calculated. I used the XXHash64 BE Checksum.
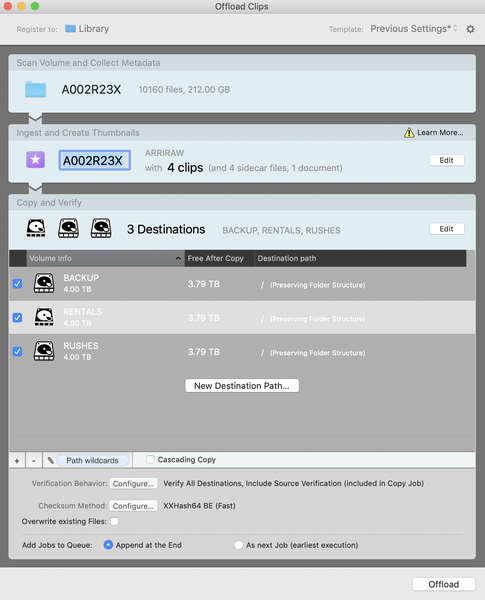
These are the pre-offload speed test results of the Destination SSDs and Media SSD:
SILVERSTACK RESULTS
Estimated Time: 25:30 Minutes
Total Time: 26:11 Minutes
HEDGE OBSERVATIONS
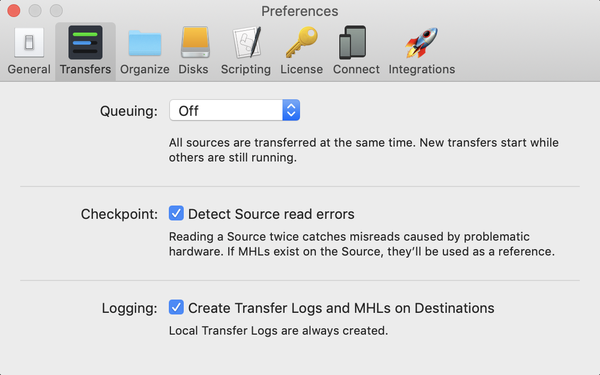
Hedge loves to simply things. The preferences weren’t as complex as Shotput Pro or Silverstack. As you can see below, in Preferences -> Transfers I could enable ‘Detect Source Read Errors’ and ‘Create Transfers Logs and MHLs’. That’s about it, both of which I enabled.
I couldn’t even select what checksum to use. But upon investigating the Text Log that is generated upon completion of an offload, I can confirm that Hedge uses XXHash64 BE Checksums.
Hedge does the offload and verification process in tandem, dynamically switching between offloading the footage and verifying the copy, thus Offload Time and Verification Time can’t be calculated.
These are the pre-offload speed test results of the Destination SSDs and Media SSD:
HEDGE RESULTS
Estimated Time: 22:00 Minutes
Total Time: 22:16 Minutes
YOYOTTA OBSERVATIONS
I’d never used YoYotta before so it took a little bit of getting used to in regards to finding where the settings were and figuring out exactly what they did.
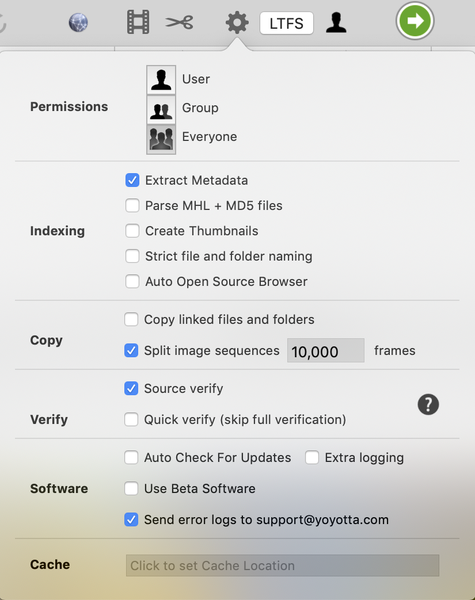
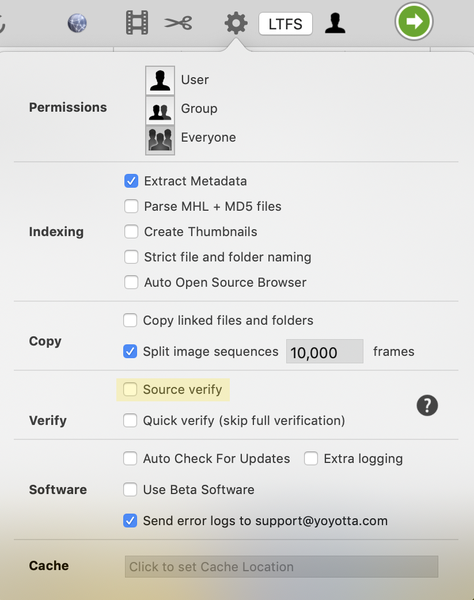
In Preferences I selected ‘Extract Metadata’, Silverstack does this as a standard so I figured it would put it on par with the processing that Silverstack does. I left ‘Split Image Sequences’ at its default of 10,000 frames, this was likely to play a role given we are testing an ARRIRAW Image Sequence. I enabled ‘Source Verify’ so that it matched the source verification that all the other software uses.
It seems that YoYotta does an XXHash and MD5 Checksum as default. This is useful as some older LTO Systems require the use of the slower MD5 Checksums. How they implement this with an image sequence and still keep it fast is unclear. What would make sense to me is to run an XXHash Checksum on each individual frame and an MD5 Checksum on each folder that houses an image sequence.
These are the pre-offload speed test results of the Destination SSDs and Media SSD:
YOYOTTA RESULTS
Estimated Time: 25:00 Minutes
Offload Time: 13:13 Minutes
Verification Time: 12:33 Minutes
Total Time: 25:46 Minutes
ANALYSIS
TOTAL TIME
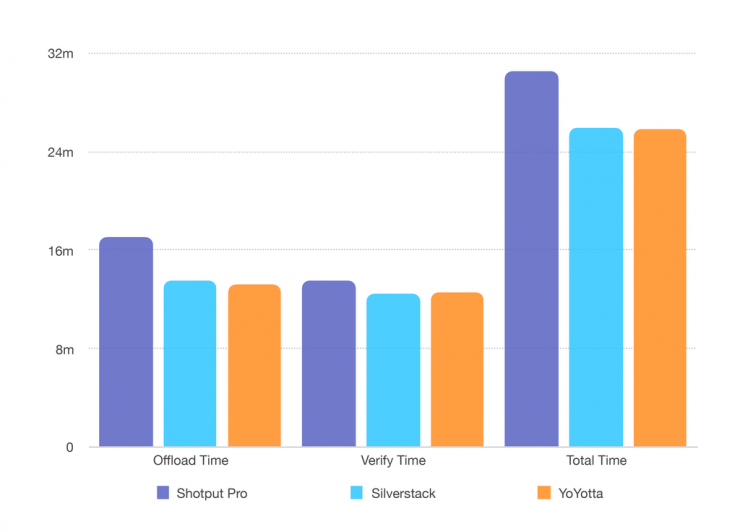
To help understand things visually I have put together this graph. It details the ‘Total Time’ of each offload side by side, these are the results:
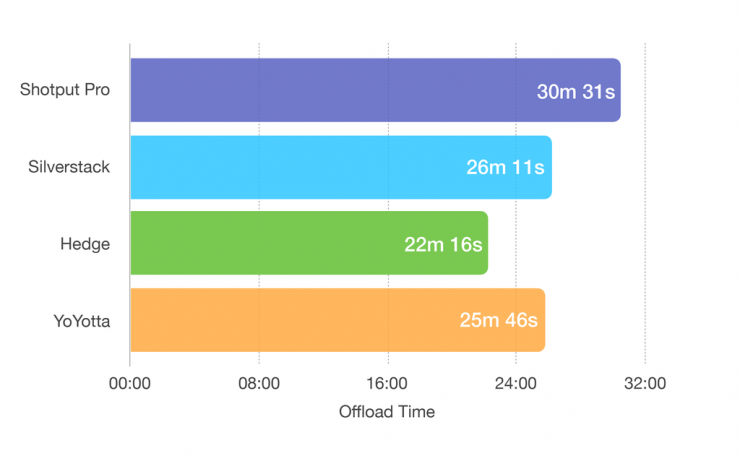
As I stated before, the results were quite surprising. I expected there to be differences but I didn’t expect there to be such a great time difference between each software. In particular, the difference between Shotput Pro and Hedge was over 8 minutes, this is a lot of time, especially when you are finishing the final offload for the day.
Even the 3.5 Minute to 4 Minute Difference between Hedge and YoYotta / Silverstack is considerable. Just looking at these figures it seems that the fastest offload software is Hedge.
I wasn’t quite satisfied just yet. I wondered is Source Verification played that much of a difference in offload time and since Hedge only specified their Source Verification as ‘Detect Source Read Errors’ it was unclear if it was indeed performing the same Source Verification as other software and thus giving it an unfair advantage. So I decided to run the same test through each software with Source Verification turned off. The toggle for Source Verification in Shotput Pro, Silverstack and YoYotta can be seen below highlighted in yellow:
These were my results:
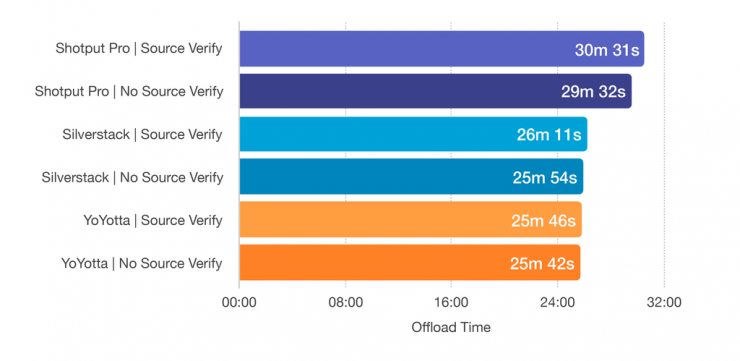
The tests showed that with source verification turned off, Shotput Pro performed 59 Seconds faster, Silverstack performed 17 Seconds faster and YoYotta performed 4 Seconds faster. I didn’t try Hedge with ‘Detect Source Read Errors’ off as this was more a test to see if the other software could catch up to Hedge with it disabled. I would say that the difference is mostly negligible (4 Secs / 17 Secs) except in the case of Shotput Pro where the difference was almost a minute. Faster, but still quite far off from any other software in terms of ‘Total Time’ for a complete offload. This test made it quite clear that even if Hedge isn’t doing a source verification that is on par with the other software, it still is faster. Even when the others have source verification turned off.
ESTIMATED TIME
I noted the ‘Estimated Time’ displayed at the start of an offload, I then compared this to the ‘Total Time’ to see how accurate the software algorithms were that inform the user of time till completion. Below is the graph:
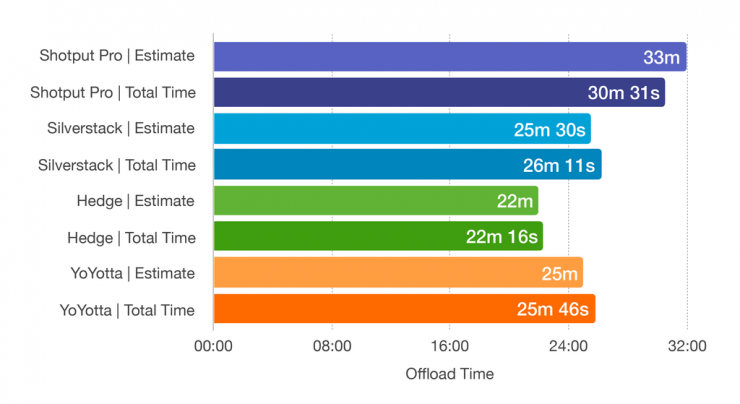
To help quantify the accuracy I performed an equation, Estimated Time ÷ Total Time, accurate to two decimal places. This gives me a percentage of the deviation between estimate and result. Each software ranks as follows:
Shotput Pro: Within 8% Accuracy
Silverstack: Within 3% Accuracy
Hedge: Within 1% Accuracy
YoYotta: Within 3% Accuracy
I would consider 5% an acceptable tolerance between estimate and result. Hedge, Silverstack, and YoYotta all fell within this window, with Shotput Pro falling short.
Due to the nature of TVC Work in Australia I am often working on set as a 2nd AC and DIT simultaneously. I generally have a good sense of how long an offload will take, but the software readout is very useful as well. If I need to be present on set and my data station is just offset, I generally set a timer on my Apple Watch, then when it buzzes I will leave set to check the offload and finalize the reports. If I am solely relying on the software readout for setting my Apple Watch timer, an inaccurate readout can result in a few minutes where the offload is complete but I don’t know it’s finished yet. Not a deal-breaker, but on those data-heavy jobs, it can make a real difference by saving you many minutes throughout the day. I like to say ‘if your computer isn’t working and you have footage to offload, you’re likely doing something wrong’.
Props go to Hedge on this front for their very impressive estimation algorithm with only a 1% deviation in accuracy.
OFFLOAD TIME AND VERIFY TIME
In Silverstack, rather than running the offload and verification process in tandem, you can alter this setting in the Offload Clips Window which allows Silverstack to function in the traditional manner of offload first, verify second.
As a further look into exactly what was happening, I decided to breakdown the offload and verify process between the different software, except for Hedge as this wasn’t an option. For this comparison Source Verification was on.
Here is the data:
Here is the graph:
Looking at this data, the verification processes of Silverstack and YoYotta perform very much the same, while YoYotta trumps Silverstack ever so slightly in regards to offload speed. Worth noting, YoYotta performs XXHash and MD5 Checksums while Silverstack performs just XXHash Checksums, given that the YoYotta verification time is only 7 seconds longer than Silverstack this is to be commended.
The stark contrast comes when comparing Silverstack / YoYotta to Shotput Pro, the verification time is slower by 1 Minute but the offload time falls behind by around 3.5 Minutes. Considering the gold standard status that Shotput Pro holds in the industry, it seems like there is definitely room for improvement and a bit of catch up needs to be done in order to match the offload speeds of their competitors.
FOLLOW UP OBSERVATIONS
I wanted to present a fair, unbiased and well-rounded set of data to the reader. Part of that process was checking that I didn’t make any mistakes. I decided to touch base with the software developers, Pomfort (Silverstack), Imagine (Shotput Pro), Hedge and YoYotta to listen to what they had to say.
One point that was noted is that my tests did a great job of comparing each software in an identical environment, but they didn’t factor in how each software was verifying the data or exactly what was going on behind the scenes. This tied back to one of the opening paragraphs in this article, it isn’t just about speed, it’s also about safety and reliability.
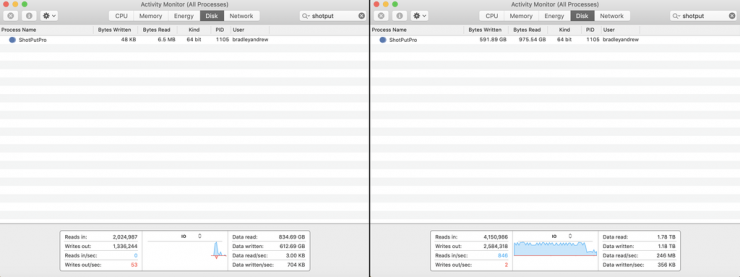
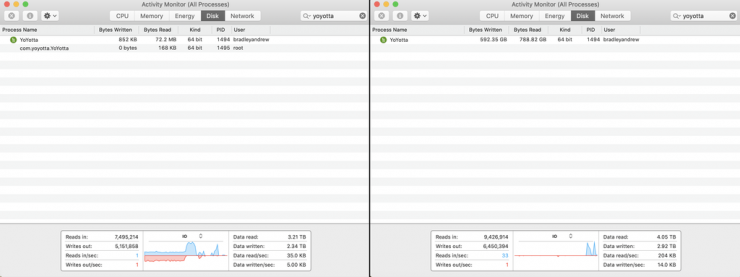
After a few emails back and forth it became clear that I should run my tests again while analyzing the data from Activity Monitor or iStat Menus. When you open Activity Monitor on macOS you can select the ‘Disk’ Tab and see the amount of data that is being written and read by each application and process. So that is exactly what I did.
The images presented below are screen grabs from Activity Monitor before the offload starts and immediately after it has finished. For all offloads I had Source Verification enabled.
SHOTPUT PRO
At the end of a complete offload, Shotput Pro had Written 591.89GB and Read 975.54GB.
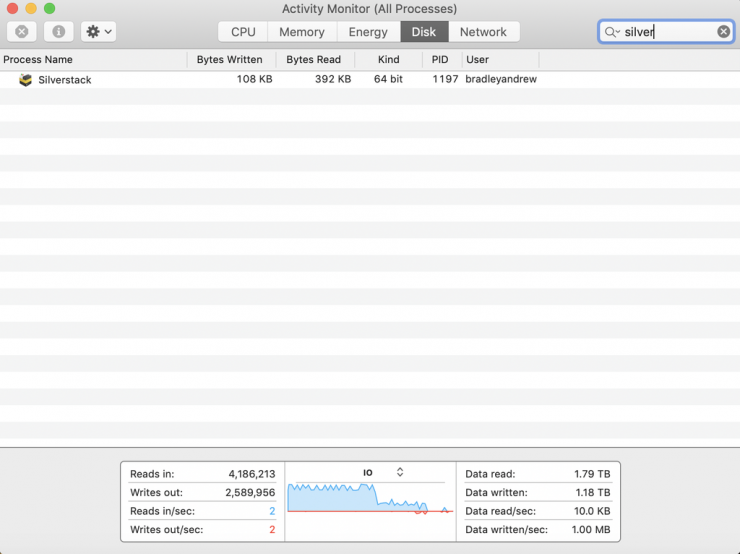
SILVERSTACK
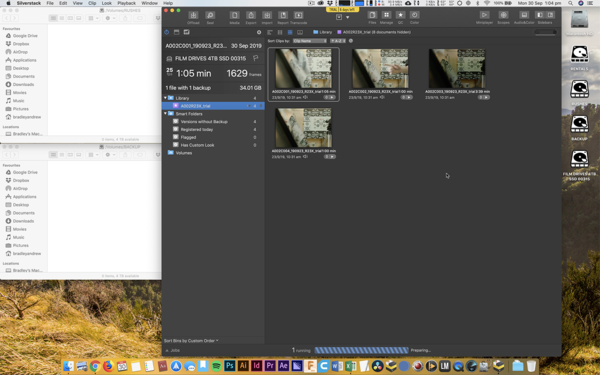
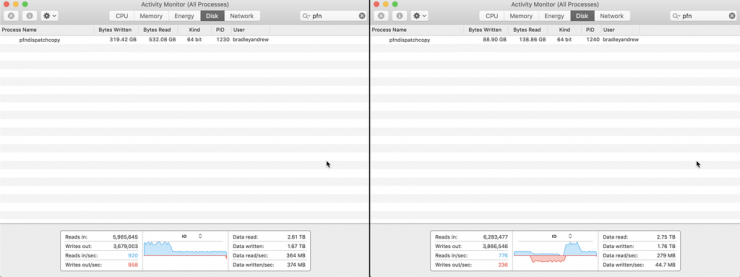
Silverstack works a little bit differently than other software. There is the core Silverstack App which the user interfaces with, then they have a utility app that does the actual offloading called ‘pfndispatchcopy’.
It seemed that my offload was broken down into four distinct sequences when I analyzed the screen recording. What immediately made sense was that Silverstack offloads and verifies a single clip then moves onto the next clip. This is how Silverstack can have an interruption to an offload (ie. accidentally ejected drive, loss of power, etc.) and still pick up where it left off in terms of the offload. This became evident when I compared my clip sizes to the Bytes Written and Bytes Read in Activity Monitor.
For reference my clip sizes were as follows:
C001 – 34.03GB (34,027,024,648 bytes)
C002 – 31.82GB (31,812,593,114 bytes)
C003 – 114.35GB (114,320,183,778 bytes)
C004 – 31.84GB (31,833,481,218 bytes)
Below you can see the screen grab before the offload had begun, followed by the screen grabs taken at the end of each ‘pfndispatchcopy’ operation, one per clip. When added together, at the end of a complete offload Silverstack had Written 592.18GB and Read 974.02GB.

HEDGE
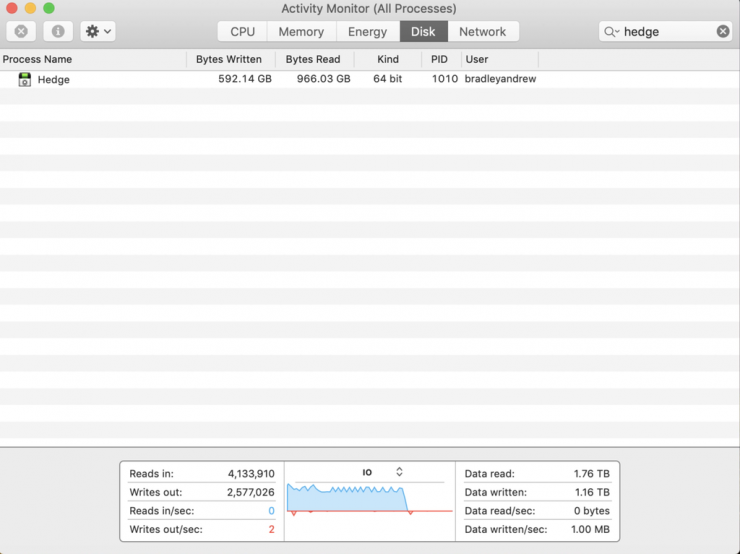
At the end of a complete offload, Hedge had Written 592.12GB and Read 394.94GB. I should clarify that this is at the end of the offload, meaning when Hedge displays the transfer as complete via both UI and system notification.
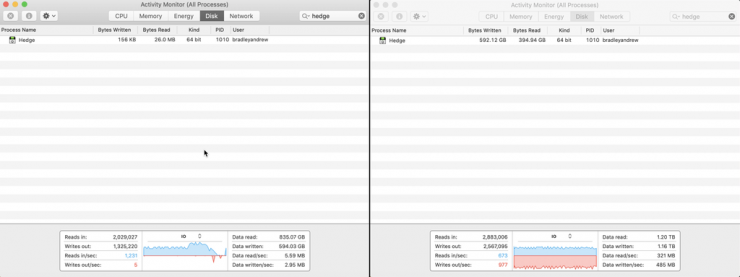
If you were to leave Hedge after it has displayed ‘Disk is Done – Transfers are Completed’ you will notice that it continues to read from the destination drives. After 12 Minutes 4 Seconds, it seemed to stop reading from my destination drives and came in with 592.14GB Bytes Written and 966.03GB Bytes Read.
YOYOTTA
At the end of a complete offload, YoYotta had Written 592.35GB and Read 788.82GB.
FOLLOW UP ANALYSIS
So you might be thinking, how the heck am I meant to interpret all of this? I must admit, it’s complex. Allow me to break it down.
My first question came from looking at the ‘Bytes Written’ metric. All of the applications seemed to present a similar readout:
GB vs. GiB
Bytes Written
Shotput Pro – 591.89GB
Silverstack – 592.18GB
Hedge – 592.12GB
YoYotta – 592.35GB
This averages to 592.14GB. In total, I was offloading 212.04GB to 3 Destinations, so it made sense that this number should be 636.12GB running with the equation 212.04 x 3. So why was there a 44GB difference? Surely all 4 Applications weren’t copying an incorrect amount of data. They, in fact, were not.
Activity Monitor uses binary sizing. 1GB = 1024 x 1024 x 1024. Referenced as GiBs.
Disk Files use decimal sizing. 1GB = 1000 x 1000 x 1000. Referenced as GBs.
For our purposes, it is easier to discuss GBs. In order to convert the Activity Monitor GiBs to GBs, you need to perform this calculation. ‘Number’ x 1024 x 1024 x 1024. In this instance, that equation is 592.14 x 1024 x 1024 x 1024 = 635,805,483,663 Bytes. Very close to our expected 636GB. Thank you to the teams at Pomfort and YoYotta for clarifying this difference and providing the equation.
RESULTS
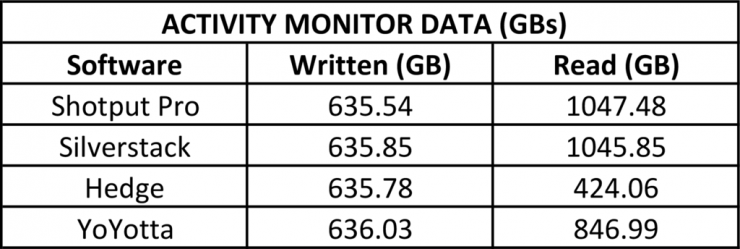
With that equation in mind, I have converted all of the data above into GBs and presented it below, broken down for each application.
We have already determined that the Data Written is on par with what is expected and that each application wrote a similar amount of data which can be interpreted as correct. Getting a gauge on the Data Read takes a little bit more explanation.
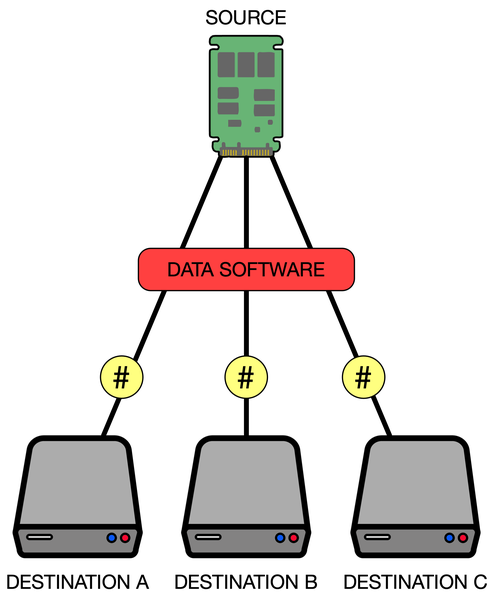
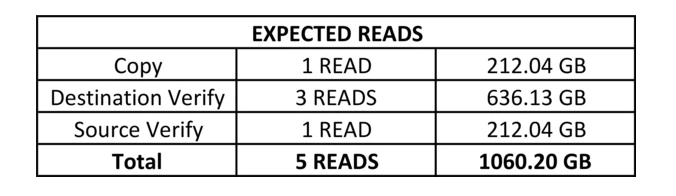
Traditionally speaking, there are four steps in the offload and verify process. With three tasks that need to be completed after an offload to ensure that it has been copied successfully. They are as follows:
Data Copying
Data is copied from the Source to the Destinations. A checksum hash is generated for the Source.
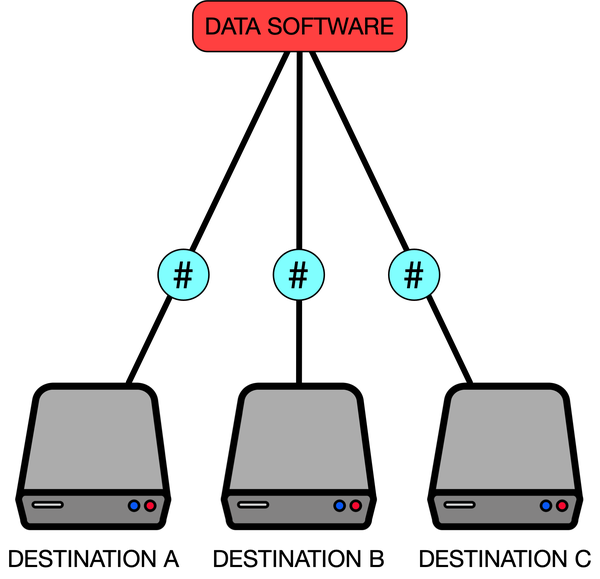
Destination Verify
Read the data from each destination and create a checksum hash for each destination.
Source Verify
Read the source again and create a checksum hash for the second time. The first checksum is generated on the initial read which happens when the copy is underway. This whole process is referred to above as Source Verification.
Compare
Compare all checksum hashes against the ones that were generated during the copy process.
So how does this apply to the Data Read in our tests? When you are copying from the source to three destinations the data will be read once from the source. When you do a Destination Verify the data will be read once from each destination, in our example three times. When you do a Source Verify the data will be read again from the source. In our example you would expect as follows:
Looking at the data that we have gathered above, we can run a simple equation to determine how many reads are happening, thus giving us an indication of what is likely occurring with each software. The calculation that I used is Actual Data Read (GB) ÷ Source Media (GB).
Shotput Pro returned a value of 4.94 Reads (1047.48 ÷ 212.04). It makes sense to round this number up to 5 Reads. This indicates that Shotput Pro is likely performing all 5 Reads that we would expect.
Silverstack returned a value of 4.93 Reads (1045.85 ÷ 212.04). It makes sense to round this number up to 5 Reads. This indicates that Silverstack is likely performing all 5 Reads that we would expect.
Hedge returned a value of 2.00 Reads (424.06 ÷ 212.04). This indicates that Hedge is likely performing only 2 Reads, we can only assume one read is for the initial copy and one read for the source verify.
As mentioned above, when I left Hedge open and running it continued to read from my destination drives for 12:04 Mins after the completion of the copy. When it stopped reading it came in at 966.03 GB Read. If we equate that, Hedge returned a value of 4.56 Reads (966.03 ÷ 212.04). This is closer to the 5 Reads that we would expect.
YoYotta returned a value of 3.99 (826.99 ÷ 212.04). It makes sense to round this number up to 4 Reads. This indicates that YoYotta may not be performing a Source Verify Read due to the result of 4 Reads compared to the 5 Reads that is expected. The team at YoYotta assure me that source verification is indeed happening so I theorize the software is likely combining its copy read and it’s source verify read as well as doing individual reads to each of the three destination drives.
INTERPRETATION
It seems that Shotput Pro and Silverstack are essentially performing the same copy and verify operation coming in with 5 Reads. It’s worth noting that Silverstack performs this operation faster, perhaps it is better optimized for dealing with SSDs.
YoYotta seems to be performing a similar yet slightly different copy and verify operation with 4 Reads in total. My assumption is that it combines the ‘copy read’ and ‘source verify read’ into one process. Also worth noting is that YoYotta does XXHash Checksums and MD5 Checksums in tandem, a stark difference from all other software which is always one or the other.
Update:
I have received an update from the team at YoYotta as to why I wasn’t seeing the Source Verify (5th Read) on my tests.
‘YoYotta will perform a Source Verify (Second Read and Checksum) of source footage when it sees new footage on a particular drive. When YoYotta sees clips previously processed on the same drive it realizes that they have already been verified twice. So for real-world camera card offloads, YoYotta will always perform the second source verification pass.’
As I processed the tests numerous times with the same set of drives, the source verify was bypassed by YoYotta, the first run when I wasn’t looking at the Activity Monitor Data would have completed the full 5 Reads. For new camera cards, YoYotta will perform the full 5 Reads, putting it on par with the Silverstack and Shotput Pro. I can force YoYotta to forget my drives via terminal and run the test again to be sure, I will endeavor to do this when I have a moment.
While Hedge seems to be performing a completely different copy and verify operation to any of the other applications. Based on the information detailed above, it appears that Hedge does a ‘copy read’ and a ‘source verify read’ as part of its copy and verify operation. This is then followed by a background operation that goes on to perform a ‘destination read’ on each destination.
Based on information gathered from Hedge’s website and various sources online, it seems that Hedge does more than an XXHash Checksum to verify the data that has been copied correctly. This includes ‘cross verifying issue-reporting provisions provided by macOS’ and ‘smart detection of kernal errors during write operations’.
Putting this all together while utilizing the Hedge lingo, it appears like Hedge does an initial copy and verify, this verify uses their integrated software called ‘Fast Lane’. From what I can gather ‘Fast Lane’ is a combination of source verification (if you have it selected) and other software checks based on macOS provisions. Then Hedge goes on to use another integrated software called ‘Checkpoint’ which then performs a ‘destination read’ on every offload destination and creates checksum hashes.
There seems to be some controversy about Hedge’s copy and verify process online. This is mainly because it is very different from the traditional method that everyone is used to.
The primary concern is that macOS has a feature often referenced as ‘System Caching’ which happens on an individual drive level as well as an operating system level. ‘System Caching’ keeps recently used files and stores them in the Computer’s RAM. In normal operation, this is great as it allows the system to show the user files from the RAM rather than the drive which is always faster. This comes down to the read/write speed of RAM being quicker than the drives that store data.
In most cases, when you complete a copy operation the system is moving data from your Source Media, through the Computer’s RAM and then onto the Destination Drives. Many people feel that for a true verification to be done, the data needs to be read from the destination drives, not the RAM, as the RAM is temporary and a completely separate instance to the data that you are handing off when you eject the destination drive from the system.
This primary concern stems from an assumption that the claimed ‘macOS Provisions’ utilized by Hedge are simply checksum hashes generated from the data stored in the Computer’s RAM. You can check out this Reddit Post to read more on this topic.
The secondary concern is that when Hedge gives you the big tick of approval saying that your offload is complete, you can then eject the destination drive and hand it off to the client with no consequences. What this means is that Hedge has run it’s ‘Fast Lane’ software on your offload, it has generated reports complete with XXHash Checksums and said that your data is backed up and safe. As mentioned above, once ‘Fast Lane’ has been completed, Hedge then runs ‘Checkpoint’ which is essentially ‘destination reads’. When you eject your destination drives this ‘Checkpoint’ process is stopped, meaning you don’t have completed ‘destination reads’. In the eyes of many technicians, this isn’t a good thing as it means your offload safety is being determined by only the ‘System Caching’ detailed above and the other checks run by Hedge.
How I would best think about it is two completely different types of verification:
Traditional Verification
After the copy process, the software reads again from the source and all destination drives, it creates separate checksum hashes and compares them to the ones generated during the copy process.
New School Verification
Part 01
During the copy process, the software is utilizing ‘macOS Provisions’ to detect offload errors while running checksums on the source. Multiple facets of propriety code also continuously run to ensure data integrity.
Part 02
Once Part 01 is complete, the software reads from all the destination drives in the background. It creates separate checksum hashes and compares them to the ones generated during Part 01. This process is considered optional and can be canceled at any time by closing the software or ejecting the destination drive.
Shotput Pro, Silverstack and YoYotta all use Traditional Verification while Hedge uses New School Verification. The important thing to keep in mind, when you see a Completion Tick in Shotput Pro it means something vastly different to the Completion Tick you see in Hedge. Many people assume the tick means the same thing, it doesn’t, as detailed by the evidence above.
CONCLUSION
This has been a very informative process for me. It’s really helped to clarify how each software performs and what considerations need to be made when comparing each software side by side.
Initially, I was looking at the data related to speed only and had concluded that Hedge performed the fastest when it came to the offload and verification. But looking at the results from my follow up it became clear that this was an inaccurate assessment. Hedge was completing a New School Verification, while all other applications were using the Traditional Verification Method. The two couldn’t be compared as the processes utilized are vastly different. It’d be like comparing apples to oranges.
How would this be thought about if you ignored the ‘macOS Provisions’ and other proprietary code run by Hedge? For Hedge’s verification process to be on par with all of the others (based on the Activity Monitor data) you’d need to wait an additional 12:04 Mins for it’s ‘destination reads’ to be completed via ‘Checkpoint’. This takes Hedge’s total copy and verify time up to 34:20 Mins, previously coming in at 22:16 Mins. This is slower than Shotput Pro, Silverstack and YoYotta. With that being said, it’s not a fair comparison as Hedge does utilize ‘macOS Provisions’ and runs proprietary code, conforming to and inventing the ‘New School Verification’ Method.
What is conclusive, is that Shotput Pro, Silverstack and YoYotta all use a very similar copy and verification method, with Silverstack and YoYotta coming in faster than Shotput Pro. Silverstack clocking in at 26:11 Mins, YoYotta at 25:46 Mins and Shotput Pro at 30:31 Mins.
So where does this leave us?
It doesn’t feel right to declare a clear winner. If you take this as an apples to apples comparison as it was originally intended to be, it’s clear that Hedge is the fastest. But keep in mind that what you get with Hedge is different from what you get with Shotput Pro, Silverstack or YoYotta.
If the utilization of the tried and true Traditional Verification Method is important to you, then use Silverstack, YoYotta or Shotput Pro with the above speed comparisons in mind.
If you have read the Follow Up Section above, have a solid understanding of what it means and feel good about the New School Verification Method that Hedge uses, then use Hedge.
OTHER POINTS WORTH NOTING
These speed differences are apparent with SSDs, when using spinning disk drives that run between 100MB/s and 250MB/s the speed difference is likely to be less obvious.
It’s likely that each application has different copy engines built into them. This means that if you are offloading ARRIRAW, the software may use a different process than if it was offloading RED and a different process again if it was offloading ProRes in .mov format. Each different file format may use a different process and thus generate different results. This article is a great example of ARRRIRAW and SSDs, so if you are dealing with something different, keep this in mind and do your own tests.
I tweaked the ‘Job Sequence’ Setting in Shotput Pro from the default ‘Optimize Drive Use’ to ‘All at Once’. ‘All at Once’ achieved a Total Time of 30:41 Mins, compared to the 30:31 Mins of ‘Optimize Drive Use’. This test was intended to see if one setting performed better over the other when dealing with SSDs.
Slightly faster ‘Total Time’ Offloads can be achieved with Silverstack when you choose to offload first, verify second rather than the default of offload and verify in tandem. Silverstack completed the transfer in 26:11 Mins ‘Total Time’ when used in tandem. Silverstack completed the transfer in 25:55 Mins ‘Total Time’ when used as offload then verify. Both were measured with Source Verification Enabled.
KEEP US HONEST
I believe in being transparent and upfront about what you are doing or trying to do. If there is anything I can do that allows you to check up on my process, I will. So please help to keep us honest and check through the evidence below. I have uploaded the screen recordings of each software’s offload. They are long, boring videos but you can scrub through and see the offloads happen in real-time. A good way to verify the times listed above is actually what happened.
If you would like to download the Excel File that was used to log the original data, that is available for download here.
If you would like to download the Excel File that was used to log the follow-up data, that is available for download here.
SHOTPUT PRO
Please Note: Upon Offload Completion, Shotput Pro states ‘Time Elapsed’ to be 30:16, but we have noted it as 30:31. This is because Shotput Pro doesn’t include the generation of Reports / MHLs in this ‘Time Elapsed’ number. All of the software was clocked off after this paper trail was generated, we treated Shotput Pro in the same manner.
SILVERSTACK
HEDGE
YOYOTTA
SILVERSTACK FOLLOW UP
This is a video of the follow up test we ran with Silverstack. You can see how Silverstack branches off from the main application and uses ‘pfndispatchcopy’ to process each offload and verification clip by clip.
HEDGE FOLLOW UP
This is a video of the follow-up test we ran with Hedge. You can see how Hedge keeps running read operations to the destination drives after it has notified the user that the offload is complete and verified. This can be seen in both Activity Monitor and iStat Menus.