We all love to tinker and make DIY modifications to equipment we buy, but that’s a far cry from building something from scratch. Would you attempt to make your own LED lights? I personally wouldn’t, but that’s probably because I’m not a DIY sort of guy, but some people are.
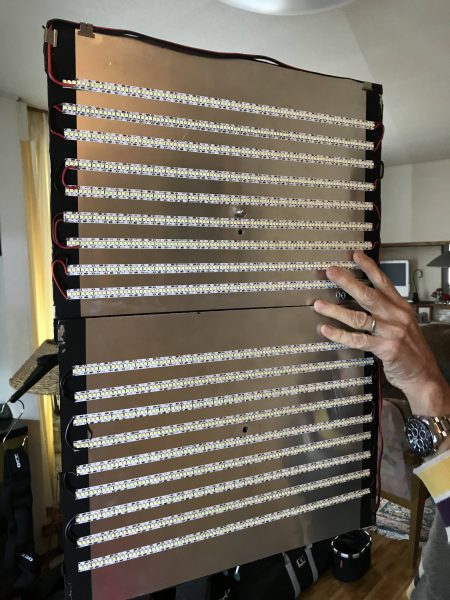
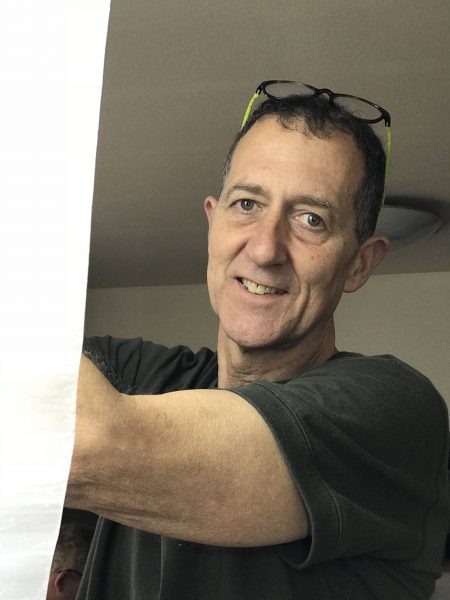
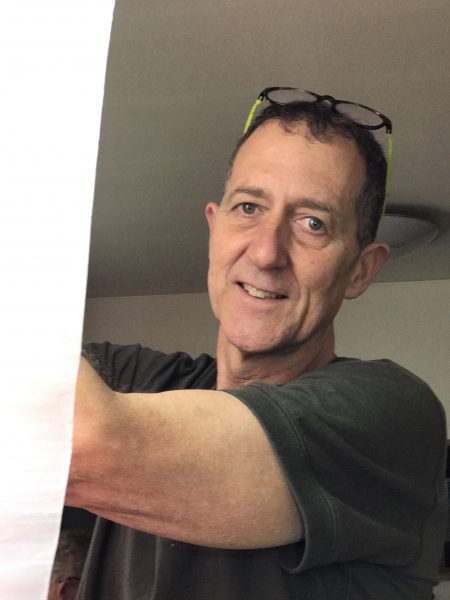
When a good friend of mine Jeff Cooke invited me over to check out his homemade LED lights I was of course sceptical. With so many affordable LED lights on the market, why would you want to build your own? This was a question I posed to Jeff, and his answer simply was “Price and utility.”
Building your own LED lights certainly isn’t for everyone. It’s not only time consuming, but you also need to know what you are doing. It’s not like you are working off a set of instructions, everything is trial and error. Jeff has been using homemade LED lights for the last few years so I thought it was a good idea to take some photometric measurements and have a look at what he had actually done.
Before we get into the results I asked Jeff a series of questions about his DIY LED lights.
Why did you decide to build your own LED lights?
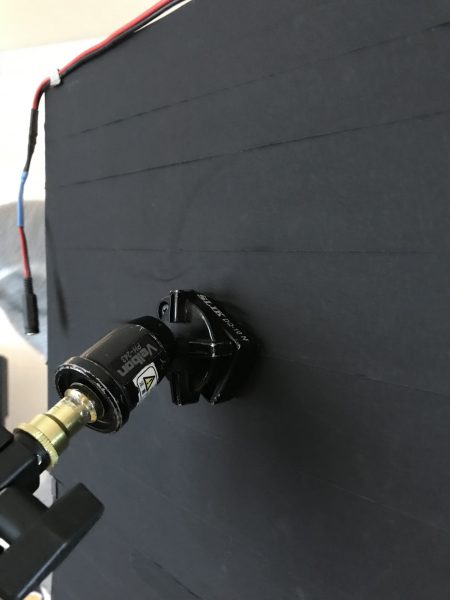
Two reasons mainly: Price and utility. For factory-made lights, the price is usually around $1000 for a 1×1 unit. Utility – the factory made lights are heavy and bulky (except for the wave of flexible panel lights coming out lately) The lights I built can be flown out on an arm on a light stand easily. They can even be taped to the wall or ceiling if needed. Plus a third reason: I like making things and experimenting.
How did you come up with a concept of what to build and what type of lights you needed?
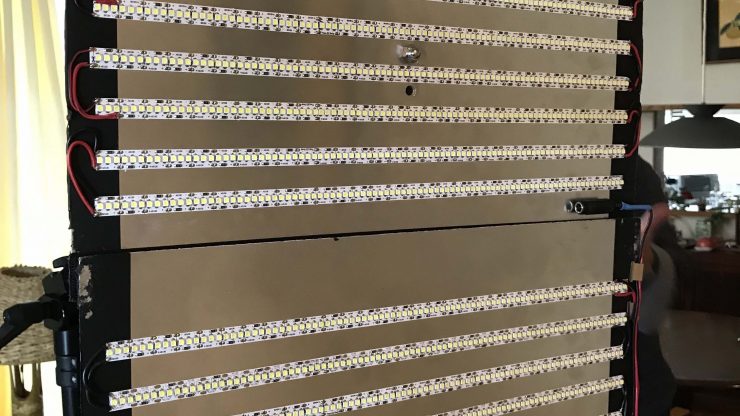
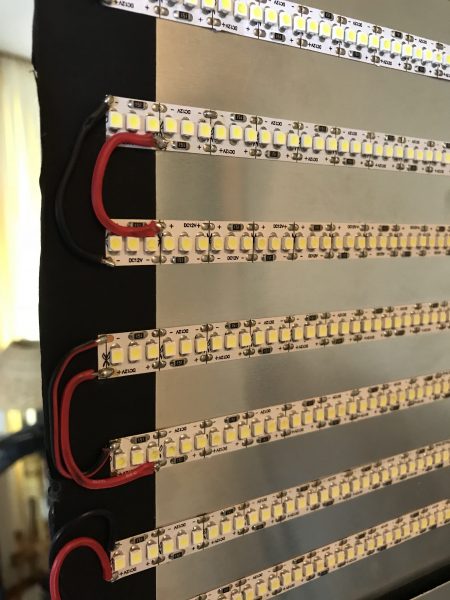
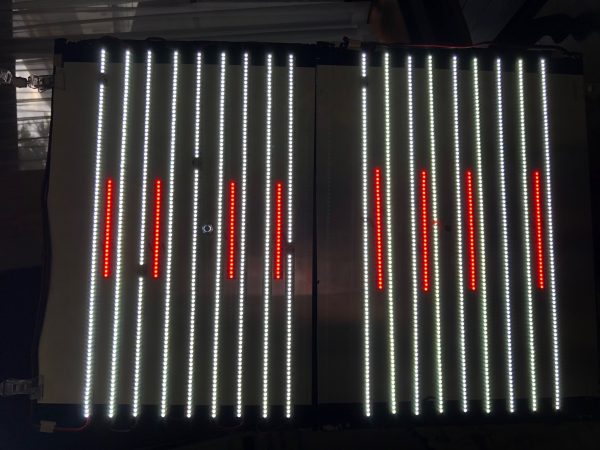
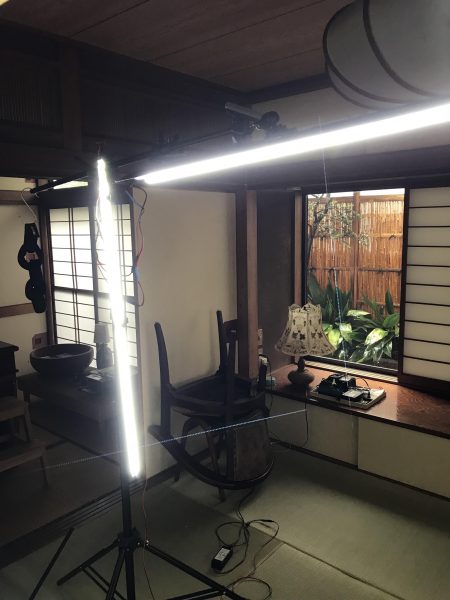
I found a shop in Akihabara (Tokyo) that sold a variety of LED tape I hadn’t seen anywhere else. That remains true to this day. The LED’s are tightly packed and very bright. From a distance, they look like a solid line rather than a series of dots. I bought some and experimented with them. I made some panel lights by applying the tape to some aluminium sheets and I made some sticks using meter long aluminium extrusions. For my key light, I wanted a large source so I velcroed two panels together and attached a large sheet of diffusion over the front. The big floppy hunk of diffusion gives the same quality of light (except bigger and softer) as a heavy, $400.00 softbox attached to a factory panel.
How long did they take to build?
A panel takes an hour or so to build. Measuring the tape and applying it to the panels or extrusions is the easy part. Next, comes the soldiering. I haven’t soldered anything in quite a while, but your technique gets better, the more you do it.
Were they complicated to make? Could anyone do it?
They don’t require a whole lot of skill. The lights, themselves, can look quite awful, but it won’t affect the quality of the light that they emit.
How much do you estimate did it cost to build?
One of the panels costs around $140 USD, and a stick around $50 USD.
Have your DIY lights evolved over the years?
I’m always trying to improve them. Everything is modular. I have bags of power supplies with power cables. I made the power cables long so the light can be high on a stand without the power supply hanging in the air halfway down the stand. I can hook multiple power cables together, if needed. I also made splitter cables so I can power more than one lighting unit from one power supply. Another benefit of having long power cables is that it eliminates the need for many extension cords.
Have you been happy with the results you get from the lights?
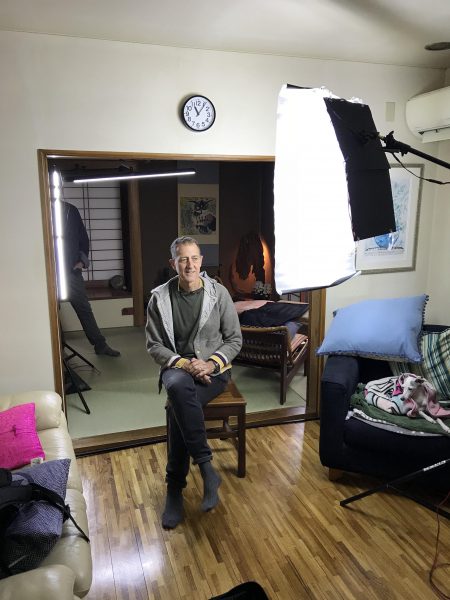
I am very happy. I made the type of light I need for the purpose I have. A large surface area for key light and a long stick for a backlight that covers the hair and shoulders to separate the subject from the background. I also have a stick light mounted vertically on the stand that supports my backlight to put a little kicker on the cheek. This also gives a nice rim on the shoulder and if the subject is female, a nice highlight on side of her hair.
Things I would like to improve: I haven’t found a dimmer that doesn’t cause a nasty flicker yet, so for now, I have to use the inverse square rule for now. The lights aren’t bi-colour, but I find daylight to be what I use most. Usually, I’m shooting in an office or room with windows so the daylight works well. I have tungsten panels too and they don’t take up much space in my bag, so I use them when I need to. I could pack have a dozen “kino-flo” size lights into my bag if I wanted to.
What are the limitations of using your lights?
They can only be run off mains power and I don’t have any way of dimming the fixtures. I tried building some dimmer units but I found that they just caused the lights to flicker. Of course, there are no off the shelf softboxes or accessories, so anything I need, I have to build or create myself.
What do clients think or say when you pull them out on a job?
They are often corporate clients that comment on how professional the lighting set up looks. They are usually surprised and impressed when I tell them they are “homemade”. (which always shocks me)
Photometrics
So now let’s get to the photometric results. I always test lights in this way so that I get a reference to how they compare to other fixtures. Results only tell part of the story and should never be used alone to judge a light. I have found from extensive testing over the years that certain lights that have good photometric results don’t always look good, and lights that have worse photometric scores can sometimes look better than their results indicate.
OUTPUT AND KELVIN COLOUR TEMPERATURE ACCURACY
I tested Jeff’s 2×1 Daylight DIY LED light with a Sekonic C-700 Spectrometer to find out how much output the light had and how accurate the Kelvin colour temperature reproduction was. The readings were taken at a distance of 1m (3.28ft) in a controlled environment.
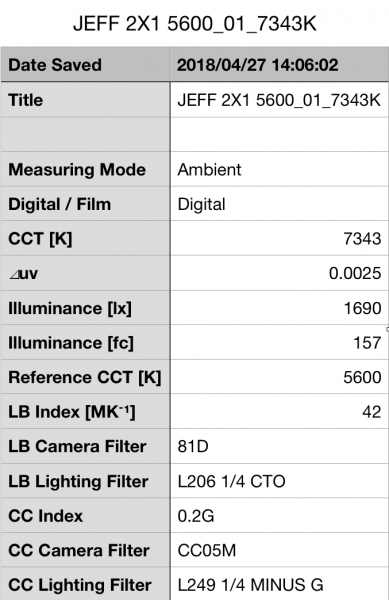
As you can see from the above readings the light recorded an output of 1690lx (157fc). 1690lx from a 2×1 sized flexible fixture is a little on the low side. The light recorded a Kelvin colour temperature of 7343K which was more than 1700K off replicating a true 5600K source. This certainly shows you that buying off the shelf daylight LED strips doesn’t necessarily guarantee you are actually getting 5600K LEDs.
Just to put the DIY 2×1’s performance into perspective lets compare it to the Aladdin Bi-Flex 2×1 when it is set at 5600K:
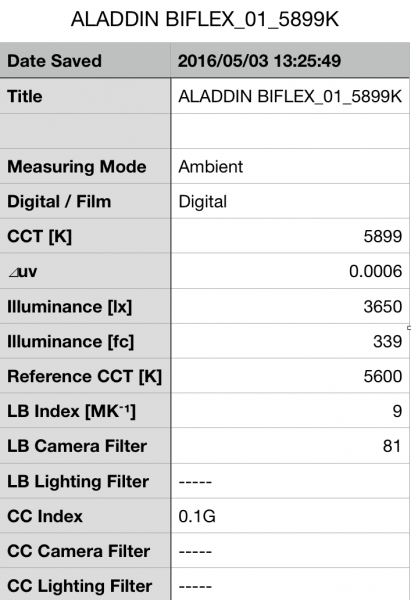
As you can see the Aladdin puts out 3650lx (339fc) and recorded a Kelvin colour temperature of 5899K.
Colour Rendering
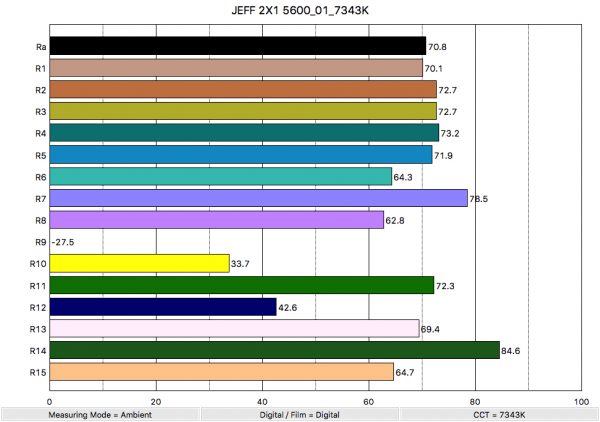
So now that we have seen how much output Jeff’s DIY 2×1 produces, how does it perform when it comes to replicating accurate colours. Above you can see that when the light recorded an average CRI (R1-R8) of 70.8 and an extended CRI (R1-R15) of 60.4. For replicating accurate skin tones it recorded -27.5 for R9 (red), 69.4 for R13 (closest to caucasian skin tones), and 64.7 for R15 (closest to Asian skin tones). These results were quite frankly terrible, and the figures were the worst of any LED light I have ever tested.
Scores this low indicate that the DIY light cannot replicate most colours accurately and your images would need to be seriously colour corrected in post to achieve a reasonable looking image.
Again let’s see how this compares to the Aladdin Bi-Flex 2×1 (just so we have something to compare it to):
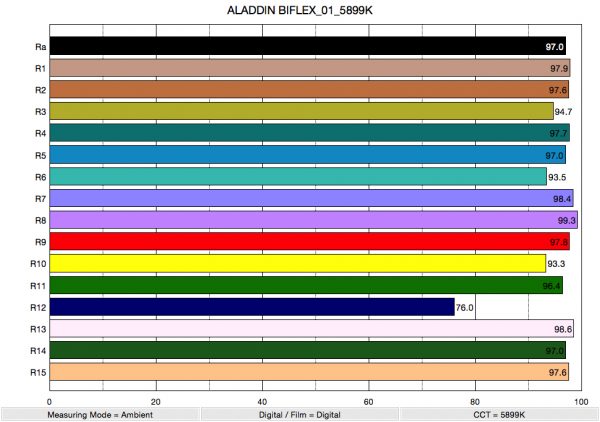
As you can see there is a massive difference between these two lights when it comes to replicating colours accurately.
Spectral Distribution
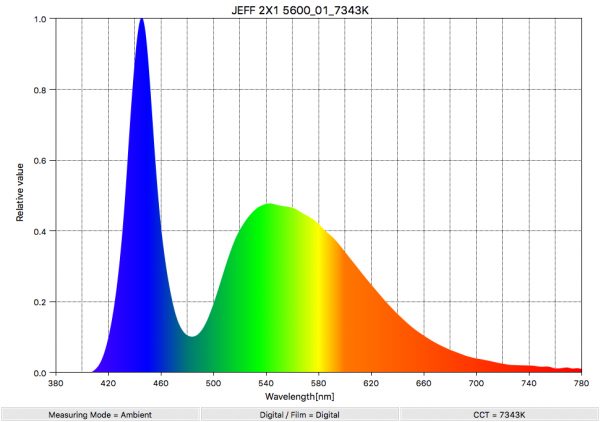
Above you can see the spectral distribution of Jeff’s DIY 2×1. Based on the colour rendering scores I obtained, it’s no surprise that the spectral distribution is pretty horrible. Despite having an even spectrum from around 600nm to 540nm, the light is missing a ton information across most wavelengths. Not only is the spectrum not full, but it has massive gaps where it can’t replicate certain colours at all.
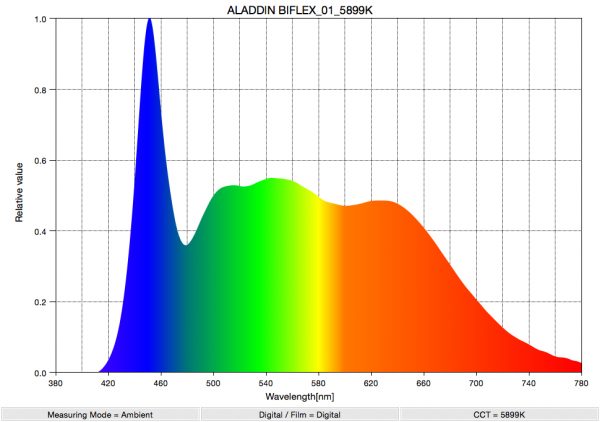
Again let’s compare Jeff’s DIY 2×1 against the Aladdin Bi-Flex 2×1. Above you can see what a good LED light when set at 5600K should look like.
I asked Jeff a question after I had shown him the photometric results for his lights:
We did some photometric readings of your lights, were you surprised by the results?
I have always been happy with the quality of the light, but a little suspect of the colour. The photometric readings confirmed my suspicions, so I was surprised, and a bit embarrassed by the results.
Real-world performance
While it’s important to test lights for photometric performance, graphs and figures can only tell you part of the story. Just because a light performs well when it comes to photometrics, there is no guarantee that those results transfer over to a nice quality of light.
Despite Jeff’s DIY 2×1 recording horrible photometric scores, it surprisingly didn’t look as bad as I thought it would. That’s not to say it was good by any stretch of the imagination, but it did perform better than what its photometric results were indicating. I could clearly see how the lights inability to replicate a full spectrum was affecting the images we got. The lack of red from the DIY 2×1 was clearly making skin tones look very green, and other colours just didn’t quite look right.
In situations where the lighting is completely controlled and you white balance your camera these lights would probably perform better. The biggest problem with using the lights is in environments where there are other ambient lighting sources. As soon as you white balance for the DIY lights you will start to see that other objects in the background start to take on a strange colour cast.
As far as quality of the light goes, it was more than capable of producing a nice soft, even source when used with diffusion. There was certainly nothing wrong with the light, apart from how it replicated colours.

Jeff had a strip of red LED’s laying around so I suggested we add a few in front of his light to see what would happen. Surprisingly the light suddenly looked a whole lot better, and the CRI results jumped up considerably. Below you can see how this change affected skin tones.
Below you can see some quick test footage we took using the lights. The material was shot on a Sony a7R II.
As you can see from that vision the results are far from great and trying to correct the images was very difficult. With so much information missing in the colour spectrum, it’s hard to get an image that looks natural and flattering to skin tones. I’m no colourist, and I’m sure someone with a more deft skillset could probably get a better result. Once we added the red strips to the light the results did improve to the point where it was probably getting a little bit closer to looking like a cheap off the shelf 1×1.
I’m pretty sure that if Jeff was able to find some better quality LED strips to use, the results from this light could actually be pretty good. We managed to improve its colour accuracy by just adding a strip of red LEDs, hardly scientific, but it did work.
I asked Jeff,
Did you learn anything from the results that have made you re-think how to improve your LED lights?
Yes, I had a stock of red LED’s purchased from the same shop so I added a few strips of red between the white and it really helped round out the colour spectrum of the lights.
The “Frypan”
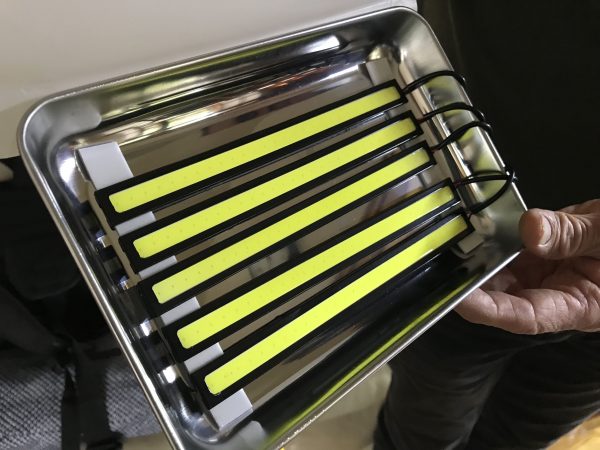
One of the other lights Jeff was working on I dubbed the “Frypan” because it was literally LED strips mounted to the inside of a pan. This is a novel approach and using a highly reflective metallic base such as a pan certainly helps with increasing the intensity of the light. As the LEDs are recessed in the pan it also helps the light source from spilling everywhere. I can just see the Kickstarter now “Light by day, cook by night”.
Hit and miss
Building your own DIY lights is still very much a crapshoot. While you can achieve some decent results, it really does come down to the quality of the LEDs you are using. Finding and sourcing the correct ones requires a lot of trial and error. With some LED fixtures retailing for only a few hundred dollars building your own may not seem like a wise decision. If you do fancy yourself as a bit of a handyman/engineer you could definitely give it a go, but personally, I’d rather just fork out some cash and buy one that someone else has already made.
Have you used or made DIY lights before? What has your experience been? Let us know in the comments section below.