With Convergent Design version 2017.06 firmware now supporting 2K/240fps RAW recording on the Panasonic Varicam LT, I thought I would be a good idea to go out and shoot some material to find out what is now possible with this combination of camera and recorder.

The latest firmware update enables RAW recording at up to 2K/240fps (as well as 4K/60fps) from the Panasonic VariCam LT to either the Odyssey7Q or Odyssey7Q+. The Variframe is supported from 2-240 fps and you can record the following frame rates and resolutions:
- HD LT RAW -> HD CinemaDNG 23.98, 25, 29.97, 50, 59.94, 100, 120, 200, 240
- 2K LT RAW -> 2K CinemaDNG 23.98, 25, 29.97, 50, 59.94, 100, 120, 200, 240
- 4K LT RAW -> 4K CinemaDNG 23.98, 25, 29.97, 50, 59.94
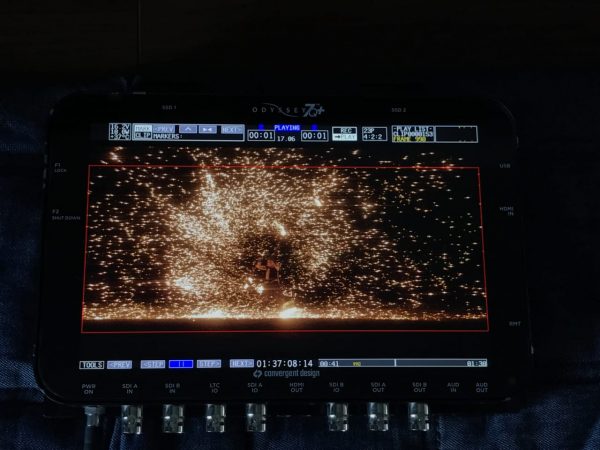
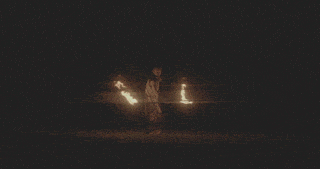
As the Varicam LT is now capable of recording 2K RAW at up to 240fps, I wanted to find something to film that would really push the camera’s capabilities. The idea I eventually settled on was to film the Fire/Light Performance Company – Kaguzuchi. Kaguzuchi is the name of the god of fire in Japanese ancient mythology, and the performance company have done work for clients such as Sony, Coca-Cola, and Google.
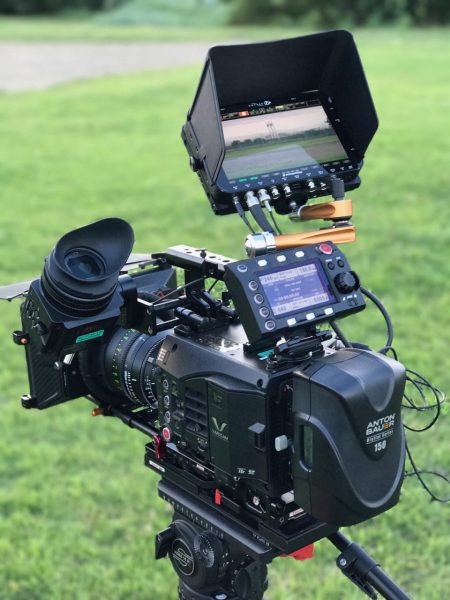
Kaguzuchi are very busy but luckily for me they agreed to have three of their performers turn up for a couple of hours to help out with the shoot. The challenge for the Varicam LT was that I was going to be shooting in a dark environment, with bright fire, and at 240fps. Luckily because the Varicam has a dual native ISO of 800 and 5000, I was able to set the camera at 5000 and use a fast Tokina VISTA 35mm T1.5 lens. Without this combination it would have been very difficult to capture images as we were shooting without lights in the middle of a dark field.
I also had to keep in mind that doing high speed recording up to 240p on the Varicam LT can only be performed by cutting out the 2K or HD pixel region of the image sensor. This meant I had to go a long way back on a 35mm lens to frame up wide shots.
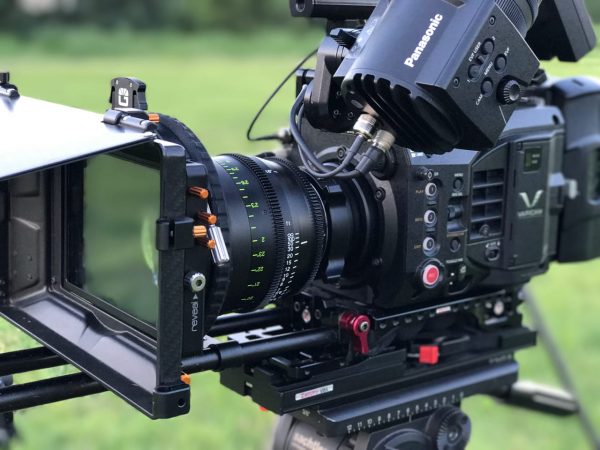
Not only did the Varicam LT have to look into the shadows but it would have to deal with extremely bright flashes of light that would be coming from the fire performance. I decided to try something different for the shoot and I used a Schneider 4 x 5.65″ 2mm Blue True-Streak Filter in combination with a Tiffen 4 x 5.65″ Glimmerglass 1/4 Filter. I had never tried using the filters in combination like this when shooting fire, so I had no idea what it was actually going to look like, especially the effect it would create from shooting at 240fps.
The effect I got ending up giving me a look that created a feeling that you were watching Gods playing with fire. If I hadn’t have used the filters I’m pretty sure the images wouldn’t have invoked the same feelings.
Setting the Varicam LT and Odyssey 7Q+ up to record RAW
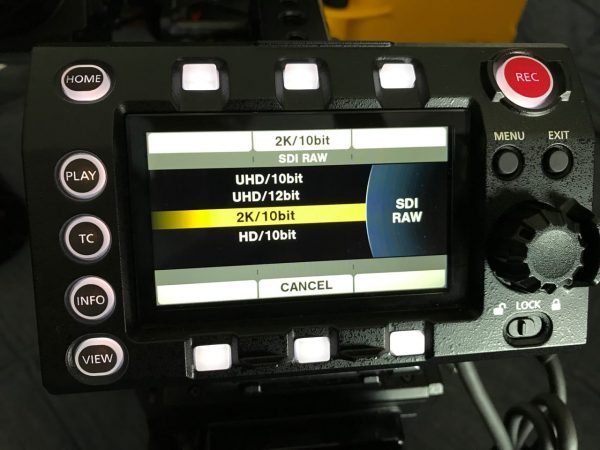
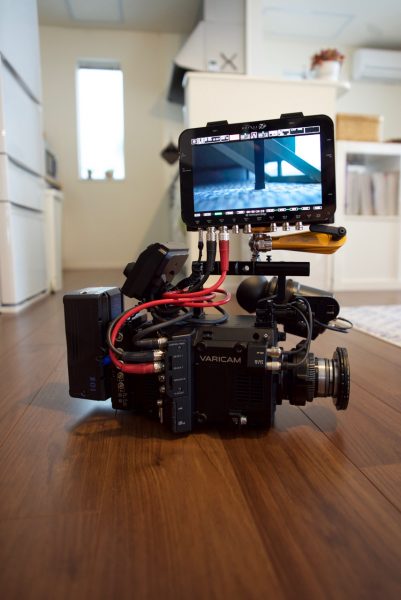
This is fairly straightforward to do, but it does require making settings adjustments on both the camera and recorder. The first thing you need to do on the Varicam LT is to go into the System Settings and then System Mode. There you need to set the SDI RAW output to whatever you want to record. In our case I need to choose 2K RAW 10bit. This then tells the camera what to output over the SDI.
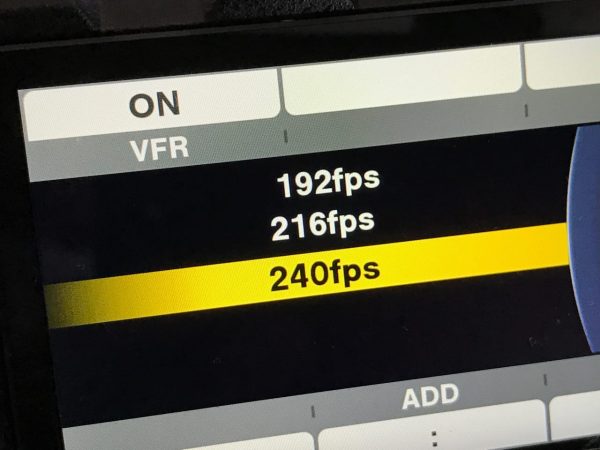
You then need to make sure you have the variable frame rate set to ON. Then you can select how many fps you want to record – in our case we chose 240fps.
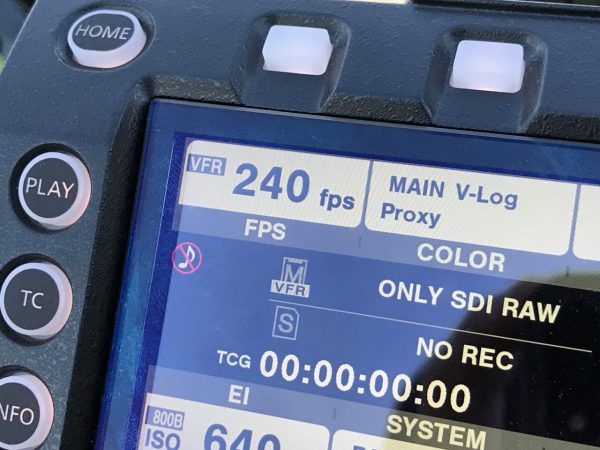
You don’t need to change the COLOR setting as this doesn’t apply to RAW recording. This will always be set as V-LOG.
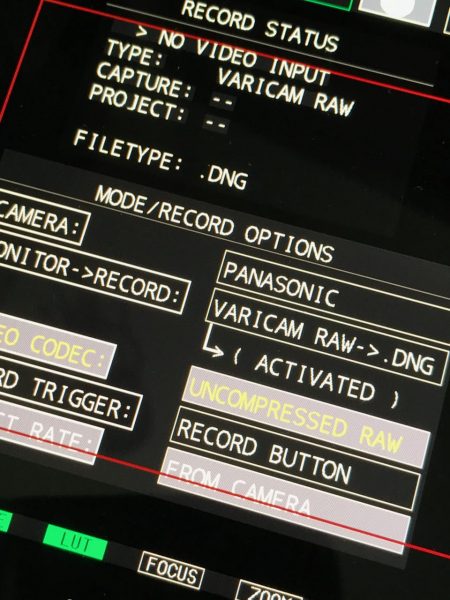
You then need to set up the Odyssey 7Q+ (you can also use an Odyssey 7Q) to record the RAW signal from the Varicam LT. You do need to have the optional Convergent Design RAW bundle installed for this to work. All you need to do is choose your camera as Panasonic and then select the recording option as Varicam RAW .DNG
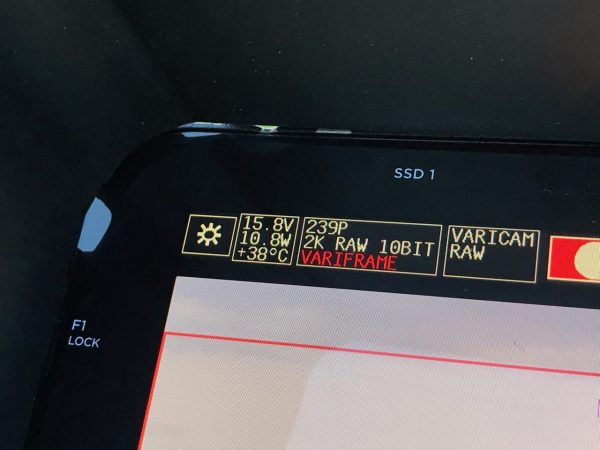
When recording VariCam LT RAW the Project Rate selection on the Odyssey7Q+ is locked to FOLLOWS INPUT to reduce complications. As long as the correct Project Rate is selected on the VariCam LT the Odyssey7Q+ will compensate accordingly, no matter the SDI Link Rate. In our case once we set the output on the Varicam LT to 240fps 2K RAW the Odyssey displayed 239P 2K RAW 10BIT VARIFRAME.
For 240FPS 2K RAW you do need to use two SDI cables between the Varicam LT and the Odyssey 7Q+. This is required due to the data load. You can then set the record trigger to start/stop from the camera or you can simply set it to start/stop by pressing the record button on the Odyssey.
As the RAW output from the camera will always be V-Log that is what you will see on the Odyssey. There is however, a Odyssey LUT System that features a preset for VariCam LOG to Rec709A. Additionally custom LUTs can be loaded into the Odyssey and programmed per output to be on or off.
Dealing with the RAW in post
Shooting RAW images is certainly not the best option if you need to turn around material quickly and don’t want to deal with massive amounts of data. When capturing RAW from the Varicam LT to the Odyssey 7Q+ there are several steps you need to take in post before you can even start to edit your material.
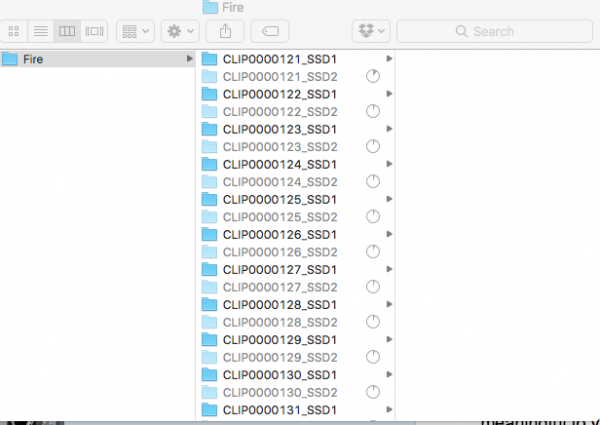
As the RAW recording on the Odyssey7Q+ will be RAIDed across two SSDs you need to first copy all the individual files from both drives into a common folder on a single drive.
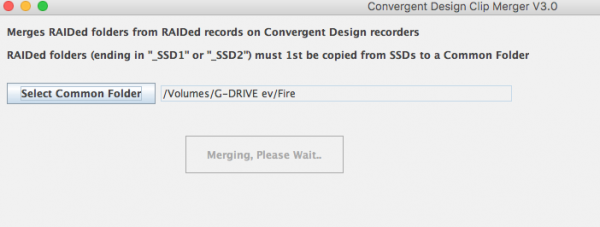
Once you have done this you then need to use Convergent Design’s CD CLIP MERGER software to merge all the files into a common folder.
Now that all the files have been merged you need to convert them in DaVinci Resolve. In this case what I am going to do is take the CDNG clips and put them all on a timeline. I will then check how the RAW settings look and make adjustments if needed. Then I go to Deliver, tick “individual clips” and select ProRes 4444XQ and my output resolution. In the advanced option I check “Force debayer to highest quality.” Then I go to the File tab and set to “Source File Names” and select an output folder that was different to my original file. Finally I send the timeline to the render queue and hit render.
What about the noise?
The biggest problem with shooting RAW at a high ISO, even the Varicam LT’s 5000ISO native ISO setting, is that you are going to get a lot of noise in your images. Above you can see a low resolution version of how much noise was present before the vision was graded. The Varicam LT does give you an option even when shooting RAW to turn noise reduction on or off. I chose to leave this off, as my preference was to apply noise reduction in post rather than having the camera try and do it in real time.
The RAW images were very noisy and I’m certainly no colourist, so I got Ben Allan ACS to do a quick grade on the shots after I had cut up the material in FCPX. It was quite amazing just how much noise Ben was able to remove from the images. The converted CDNG clips that were turned into ProRes 4444XQ held up very well in the grade and Ben was able to push and pull the image in just about any direction he wanted without having them fall apart.
2K/240fps RAW recording on the Panasonic VariCam LT and Odyssey7Q+ – Final thoughts
The combination of the Convergent Design Odyssey 7Q+ and the Panasonic Varicam LT is certainly a very powerful one. With an already impressive array of onboard recording options, adding the ability to to record 2K RAW at up to 240fps and 4K RAW at up to 60p certainly increases the Varicam LT’s versatility. Despite the large amount of data and the time consuming post processing you really can get some great results recording RAW onto the Convergent Design Odyssey 7Q+.