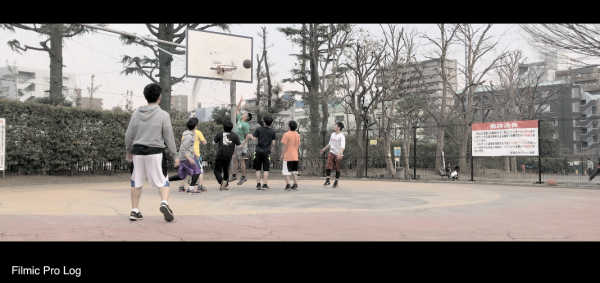
Is there really any point to shooting low-bit-depth Log video footage on your iPhone? I wanted to find out by trying Filmic Pro Version 6 on my iPhone 7 Plus. So how does the Log recording work if you use Filmic Pro?
Paying attention to the details
If you need to modify or correct mobile-originated Log footage in post production, it is important that raw data must be used before it becomes encoded. As long as your footage is exposed properly, Filmic Pro Log can preserve most of the entire tonal range of the raw buffer in the encoded medium. Filmic Pro Log has been specifically designed to remap images produced by 1⁄3” sized smart phone sensors.
What we do in the shadows
Unlike traditional Log gamma profiles that feature an exaggerated log shoulder, Filmic Pro Log (you can read the entire Filmic Pro Log White Paper here) uses a composite curve whose spline is heavily influenced by a base-10 logarithmic function. The Filmic Log function has been designed to expose an additional stop in the encoded media without blackpoint/whitepoint modification. Filmic Pro Log is somewhat tolerant of underexposure, but it was not designed to correct footage that was intentionally underexposed. If you don’t expose correctly, you are not going to get good results.
The Filmic Pro Log adds a little more bit depth to the shadows than the highlights and this is where it is different to the curves from Arri, BMD, Canon etc. who place a high priority on highlight detail.
The Filmic Pro Log was designed to maximize the available dynamic range of the image buffer, it cannot add dynamic range that is not there. To capture more latitude, Filmic Log can be safely underexposed by -0.75 EV, and it is tolerant of -1.5 EV underexposure (but this is not ideal) and +1.25 EV overexposure (again not ideal). I mentioned earlier, it is best to not underexpose your image. In saying that, you don’t want to overexpose it either.
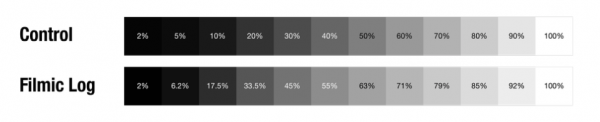
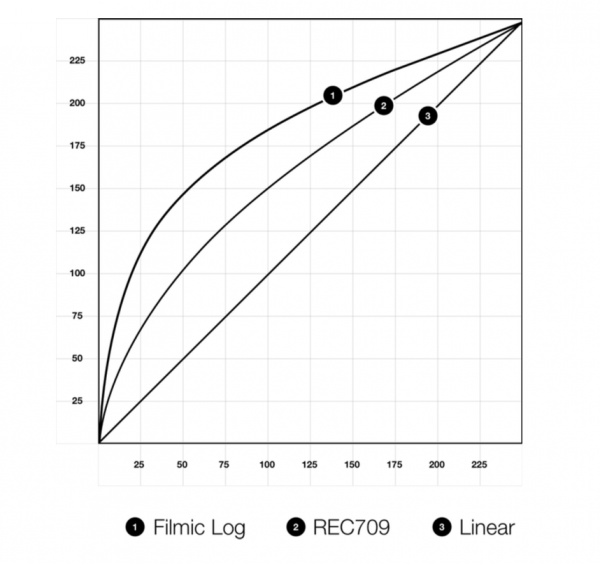
Filmic Pro Log tries to maintain a natural looking gradation through the tonal range without too much modification of the blackpoint or the whitepoint. Filmic Pro uses platform-specific controls that crush basal gray if the dynamics of the video capture device are not supported by the remap. The default configuration of Filmic Log is designed to not remap luma as aggressively as other logarithmic solutions. As you can see from the above chart, most of what Filmic Pro Log is doing is changing the middle graduations from black to white, the black and white points are only very slightly modified. The problem with using a 8-bit colour cube is that it it doesn’t have enough data in its root sector to support an unmodified logarithmic remap without producing artifacts such as striping, chroma noise,and sparse-datanoise. To try and avoid getting image artifacts, the Filmic Pro application compensates for this limited 8-bit colour by strictly maintaining the native blackpoint and whitepoint coming from the raw image buffer. By making minor blackpoint and midpoint adjustments, you can capture the entire available dynamic range of the image buffer in the encoded media.
Colour Curve, Gamma Curve
The other thing worth noting is that they are processing the colour saturation on a different Log curve to the exposure (gamma) curve. The main reason for this is to minimise chroma noise in the shadows. The saturation remap will increasingly desaturate the color as it approaches basal gray. The red, green, and blue channels are remapped separately with distinct weights. The red channel desaturates at 9.333% IRE; the green channel desaturates at 4.888%; the blue channel desaturates at 20.222%. This is why the Log images on Filmic Pro look very different to other Log images you may be used to. Above you can see an example of what I mean.
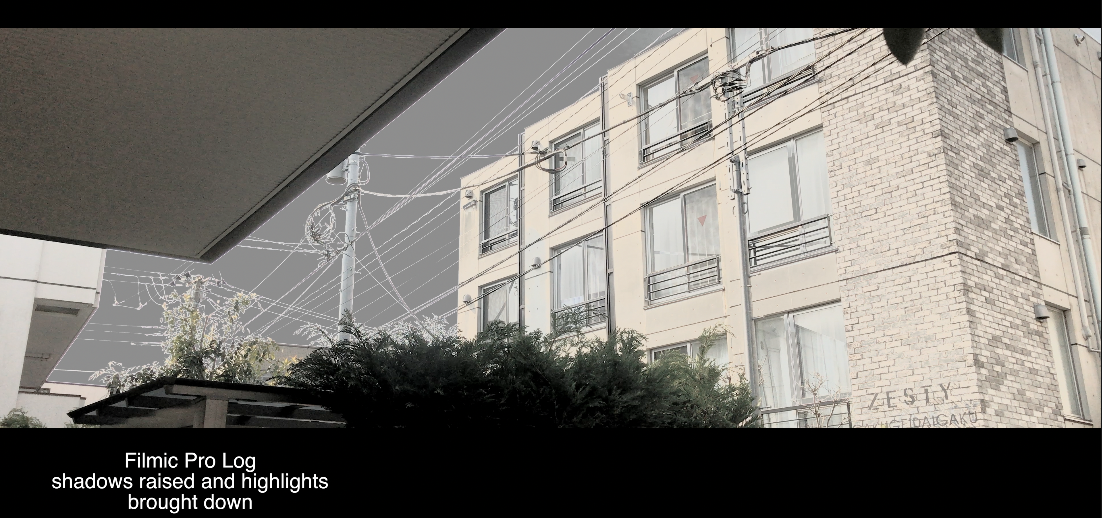
Using the technique of processing the colour saturation on a different Log curve to the exposure (gamma) curve effectively controls chroma noise in critically underexposed regions of the image buffer. The problem with this is that blue channel dominant colors may be rendered with a gray cast when dramatically underexposed. This is a phenomenon that I saw even when areas of the picture weren’t underexposed. Also if you try and use the highlight protection slider in the Log controls you can very quickly get skies or hot spots in your image to go grey. If you also overexpose certain areas of your scene you can also see areas go this weird grey colour.
10 stops of dynamic range? If you’re lucky (and careful)
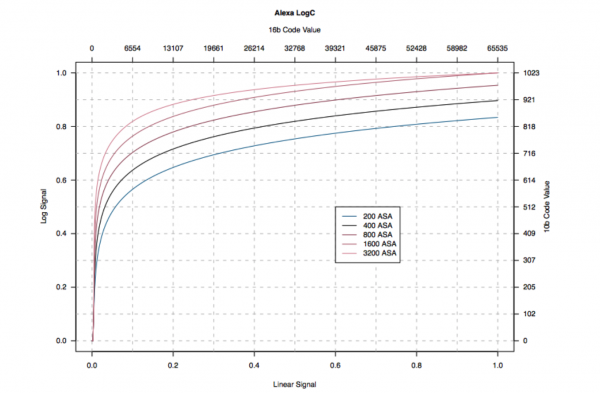
Some of the newer CMOS sensors offer dynamic range that varies with ISO in a bell shaped curve, peaking well past the base ISO. Above you can see how this characteristic works if you were shooting Arri C-Log. The maximum value of the Arri Log C curve depends on the EI value. When you step down the exposure, by one stop for example, the sensor will capture one stop more highlight information. Unfortunately this is not a characteristic of most mobile cameras. With mobile phone sensors, dynamic range peaks at (or very near) the base ISO and falls off rapidly from there. You really do need to be aware that when you are shooting on any mobile phone, that the total dynamic range of the sensor will be much less than a dedicated stills or video camera. In saying this, some of the hight end mobile phones such as the iPhone 7/7 Plus are capable of capturing up to around 10 stops of dynamic range. I’ll let you decide just how many stops are actually useable.
Manual controls
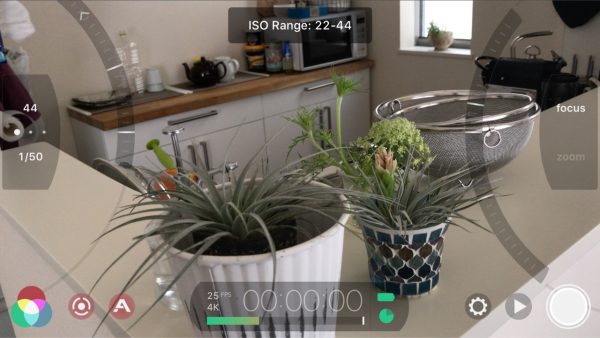
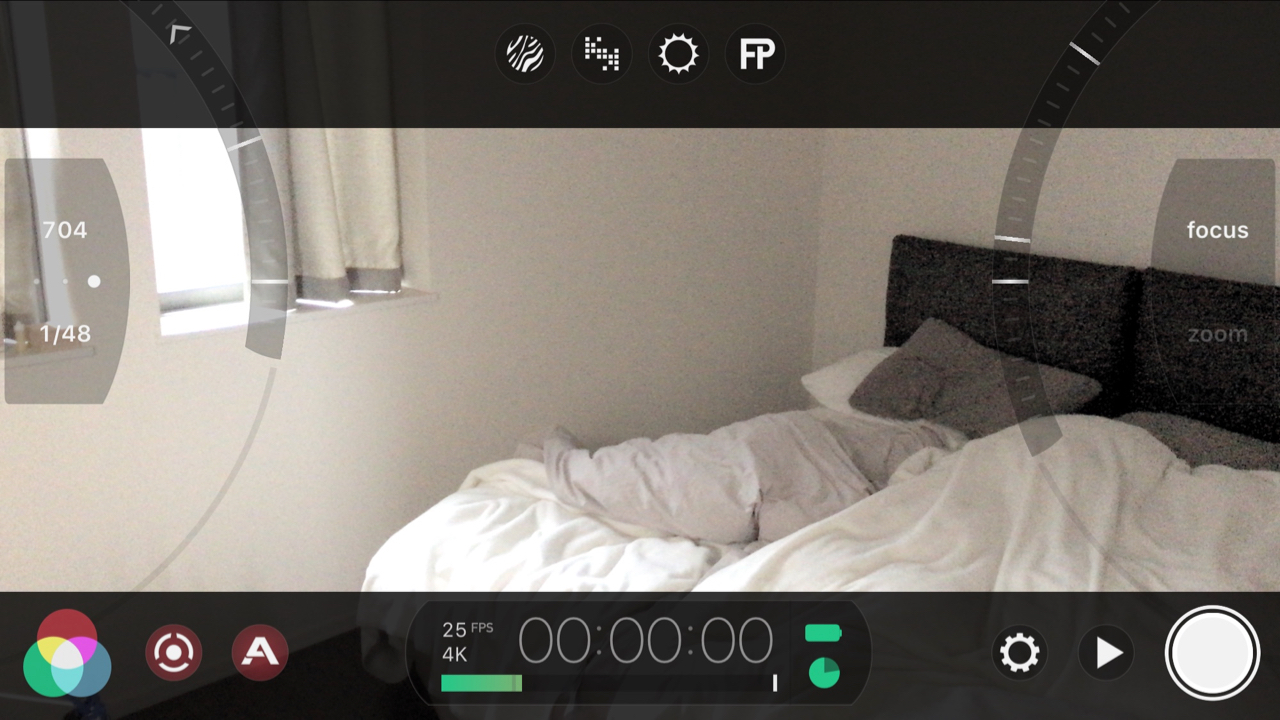
The footage from the iPhone is also quite noisy, even at low ISOs. This is something you don’t necessarily notice on the iPhone if you are shooting video and not using Filmic Pro. I am pretty sure Apple is applying some sort of noise reduction algorithm to the footage during processing. On version 6 of Filmic Pro you can manually control the shutter speed, and to a certain extent the ISO. There are five positions for setting the ISO, that are sort of bracketed into low/mid/high (even though they aren’t actually labeled that way. The ISO value does fluctuate if you change the shutter angle. If you keep your shutter angle the same, for example 1/50th or 1/48th, then the ISO can be changed between 44, 88, 176, 352, and 704. For those use to shooting on digital cinema cameras these ISO values are extremely low, and I found that the noise generated on settings above 176 border on being unusable. For best results you really need to be shooting at the lowest ISO settings available. When I asked Filmic Pro what the base ISO was for the iPhone 7/7+ was, I got told it was 22 ISO. No that isn’t a typo, it’s 22 ISO. It is important to note though that base ISO is just the ISO that someone picks as the best response. This explains why there is considerable noise introduced into the image if you start bringing that ISO up. Unfortunately unless you are shooting in bright sunny conditions or using lighting you are going to have to bring the ISO up when shooting on a iPhone in a lot of situations.

To try and limit the shutter speed and keep to a 180 degree shutter angle, I taped my iPhone onto the back of a Bright Tangerine Misfit matte box and used a circular and linear polariser to create a variable ND. This way I was able to correctly expose images while keeping the shutter speed down. This is hardly a practical solution, but it does work.
Log on the iPhone: not straightforward
I must admit that I did struggle trying to get good results the first time I tried shooting Log on the iPhone. I found it very difficult to get the colours to look right when I shot in Log and then tried to grade the images. To my eye there is not a huge difference from shooting Log, as opposed to shooting normally using Filmic Pro and controlling the exposure manually and de saturating the colours slightly. For me you can’t just obtain the “Filmic Look” from shooting in Log on an iPhone. The best way to make your smartphone footage not look like video is to be able to control your exposure and shutter speed. If you are shooting at 1/400th of a second shutter it doesn’t matter whether you are using a flat profile or not, it’s not going to look very filmic.
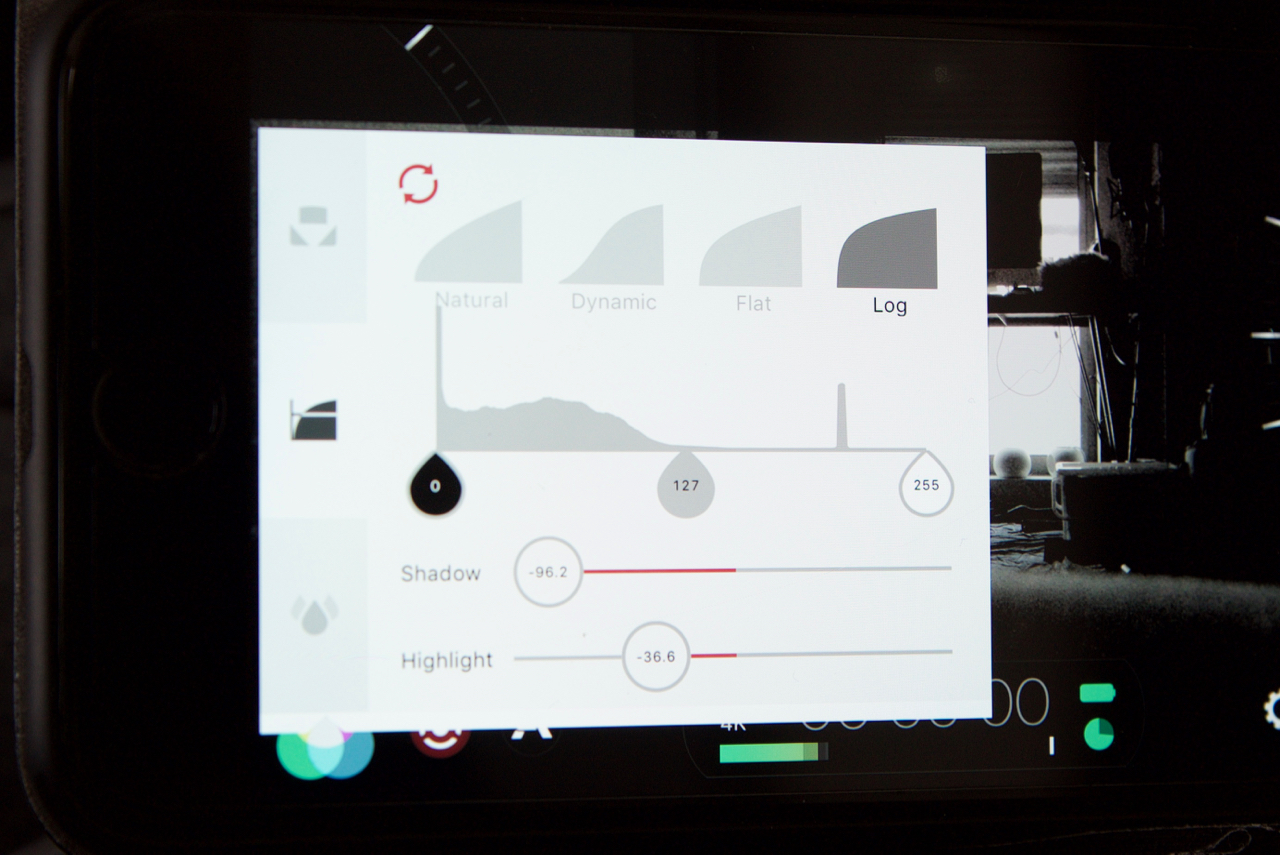
Including Log, there are three other new gamma curves to choose from – Natural, Dynamic, and Flat. There are various controls for making adjustments to your image when using any of these curves. There are indepensdent Shadow and Highlight controls as well as another slider that sits below a histogram image where you can control both the black.white and middle grey values. I did quite a bit of experimenting with these and found that if you try and make any type of major changes to the setting you can destroy your image fairly easily. In particular the Shadow and Highlight controls tend to be items you need to deal with carefully. I tried making aggressive changes to both, particularly bringing the shadows down to reduce noise in the image, only to find that the changes make the image look very artificial.
Beyond Log capture: useful tools for shooting video
Filmic Pro Version 6 isn’t just all about capturing Log images, there are some really nice new features that I found to be of a lot more interest for the average shooter. For getting correct exposure and your images in focus, version 6 offers some really easy to use tools. There are zebras, clipping, false colour and focus peaking options available.
Zebra Stripes

The zebra tool can help you with exposure as it overlays the image with coloured stripes to depict areas of over/under exposure. Red stripes indicate areas of over exposure, while blue stripes indicate areas of under exposure.
Clipping
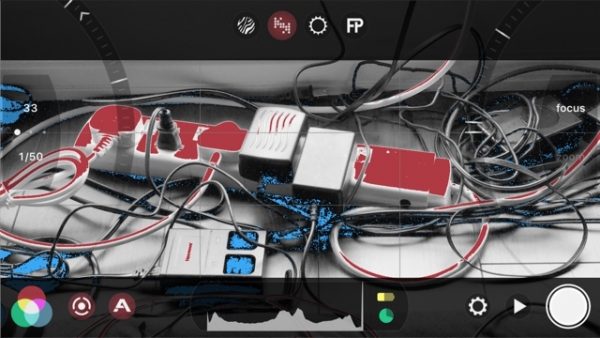
The clipping overlay shows you areas of over exposure where the image is clipped – areas that are overexposed to the point where that information will not be able to be recovered. This is a very important tool when shooting on an iPhone as you can’t recover much information, if any, if you overexpose parts of your scene.
False Colour
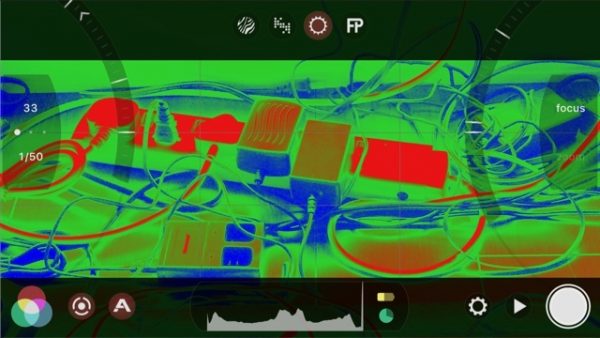
False colour is similar to zebras, but instead of showing you areas of over/under exposure, it shows you a complete overview of your image’s exposure. Just like zebras, areas that are red indicate overexposure, and areas of blue indicate underexposure. Even though Filmic Pro doesn’t give you an indicator graph to show you the exact IRE values of certain colours, it is still very useful. If you are unfamiliar with how false colour works, areas that are green/grey/pink usually reflect a nice middle exposure range for the key items in your scene.
Focus Peaking
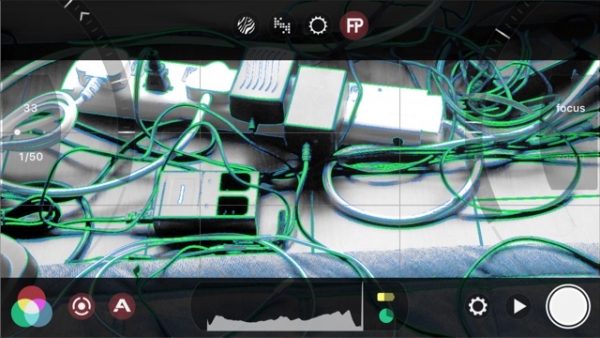
Focus peaking is a very useful addition and it really helps you get accurate focus on your images. One of the hardest things to do on an iPhone is to get accurate focus. Having a little box that you move around and then can lock focus with is very handy on Filmic Pro, but you never could quite see if the focus was accurate. Having focus peaking now allows you to get extremely accurate focus without some of the guesswork that was previously required.
iPhone bokeh?
There are also new ways to both focus and adjust zoom manually. On the right hand side of the screen there is an arc where you can manually adjust both the focus and zoom. If you want to create some mild shallow depth of field (yes even from a small 1⁄3” sized sensor) you can using this manual focus arc setting. As most smartphones with small lenses are calibrated to focus to infinity in a very short range, you can achieve a small amount of shallow depth of field by placing an object very close to the lens and focusing on that. This gives you a decent amount of background blur, and you might be surprised by the results you can achieve.
Pulling focus with Filmic Pro 6
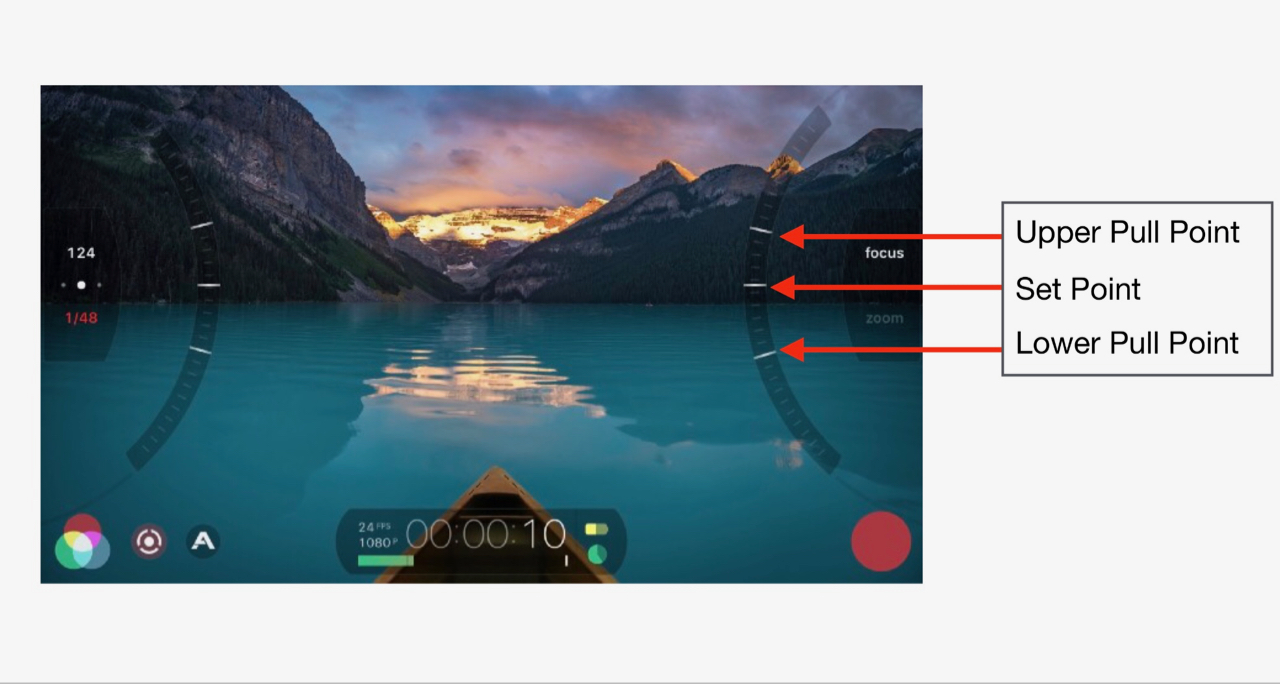
The other nice part of the manual focus and zoom settings is that you can actually set marks and transition automatically between two focus/zoom points. This works relatively well, and you can create a speed ramping effect of how fast the transition is, but it is tricky to get right. I often found myself not bothering to use this function as I found it too time consuming and fiddly to use. and You also really do need to do it when the iPhone is on a tripod and completely locked down. I tried doing it on a DJI OSMO Mobile and every time I touched the screen to start the transition the whole image moved. While the transitions are not ultra smooth, they do a pretty good job at getting you useable results.
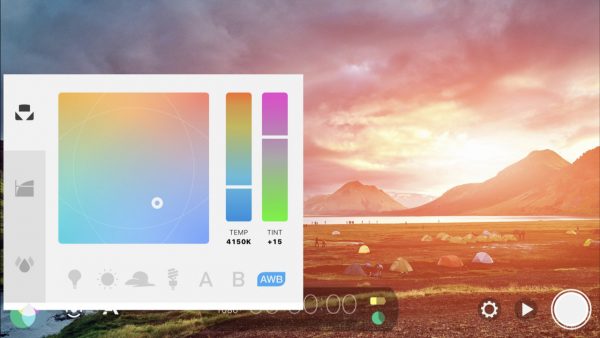
The Imaging panel gives you complete control of white balance and colour tints on your image. I found this feature very easy to use and you can get the exact colour temperature or look you want to obtain in camera. This is far better than trying to correct the colours in post.
Resolution, Frame Guides, and Recording Quality
Filmic Pro offers a lot of choices for recording both frame rates and resolution. You can choose to record in the following resolutions and frame rates:
- UHD 2160p at 24,25 and 30fps
- 3K 1836p at 24,25 and 30fps
- 2K 1152p at 24,25 and 30fps
- HD 1080p at 24,25,30,48,50,60 and 120fps
- HD 720p at 24,25,30,48,50,60, 120 and 240fps
- SD 540p at 24, 25, 30, 48, 50 and 60fps
The frame sizes you can choose are 1:1, 4:3, 16:9, 17:9, 2.2:1, 2.39:1, 2.59:1 and Ultra Panavision 2:76:1. The nice thing is you can choose to actually record your footage in camera in those frame sizes without having to convert it later in post. All you need to do is have the box called Crop Source to Overlay enabled. I really like this function and I wish you could do it on other cameras.
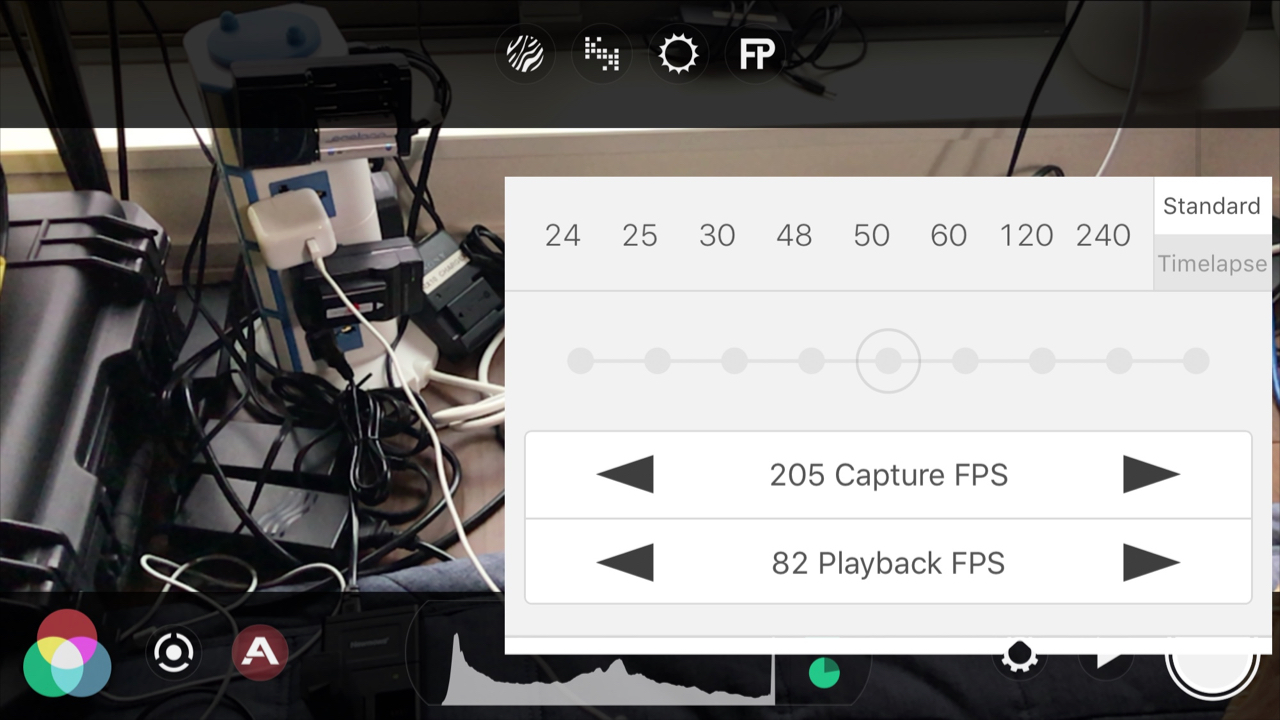
Another nice feature is you can individually select both the capture frame rate and the playback frame rate. That way you can record a clip for example at 120fps and play it back at 120fps. You can also capture that clip at 120fps and then play it back at 25fps.
Perhaps the biggest advantage of using Filmic Pro of all is the ability to record at higher bit rates. This makes the footage a lot more useable if you plan on using an iPhone for say broadcast. Filmic Pro gives you the following options:
Filmic Extreme (which I use all the time)
Lets you set a target range of 100mbps for 2k, 3k and 4K capture. If you drop down to 1080p the target is 50mbps.
Filmic Quality
You can use this to record 1080p at 32mbps.
Apple Standard
The same data rate you get with the native recordings when using an iPhone (around 47mbps in UHD and 16mbps in HD)
Economy
A unspecified low bit rate recording is made.
Recommendations for shooting from Filmic Pro
Low Dynamic Range Shooting
To maximize total dynamic range in a low dynamic range scene, metering indirect ambient light against an 18% reflectance gray card is appropriate. Slight underexposure may be required to protect highlights.
Medium Dynamic Range Shooting
In a medium dynamic range scene, at least a portion of the composition will need to be moderately underexposed. In this case, meter for the highlights. In compositions where the requisite underexposure has resulted in nearly crushed blacks, the black point should be raised slightly. If this does not recover enough information in the shadows, a shadow boost may be employed. However, use the shadow boost tool sparingly as it can result in unwanted hue shifts and gradation changes.
High Dynamic Range Shooting
In a high dynamic range scene use a spot meter to determine if the total dynamic range of the environment exceeds 9-10 stops. If the scene does not exceed that gamut, consider raising the black point slightly and use Filmic Pro’s luminosity map overlay to optimize the midtone/highlight balance.
Indoor Setting
If windows or television screens are present, neutral density film will be required. If a character is using an electronic device with a screen, turn down the brightness. If there is a lighting fixture in the scene, replace the bulb with a low-lumen equivalent. Only after the brightest light sources are moderated, should the global ambient lighting of the scene be evaluated.
Outdoor Setting
For static scenes, a graduated neutral density filter may be required to compensate for the brightness of the sky. Evaluate artificial light sources and external windows, applying the same methodologies to them that you would when shooting indoors.
Conclusion
Filmic Pro Version 6 is a very powerful tool that makes capturing video on an iPhone a whole lot better. The myriad of features and ability to manually control everything, from exposure to focus, enhances the iPhone’s value as a filmmaking tool. It does, however have its limitations. After all, it’s just a phone and was never intended to be a professional video camera. From my experience trying out version 6 I found that there wasn’t any great benefit to shooting in Log on the iPhone. The limitations of the smartphone’s sensor quickly become evident when you try and milk everything you can out of it. Sure you can shoot in Log, but i found that there is just too much noise produced at all but the lowest of ISO settings, and that you really need to expose your image precisely or you will run into problems very quickly. It certainly isn’t the same as shooting Log on other cameras and you shouldn’t expect the same results either.
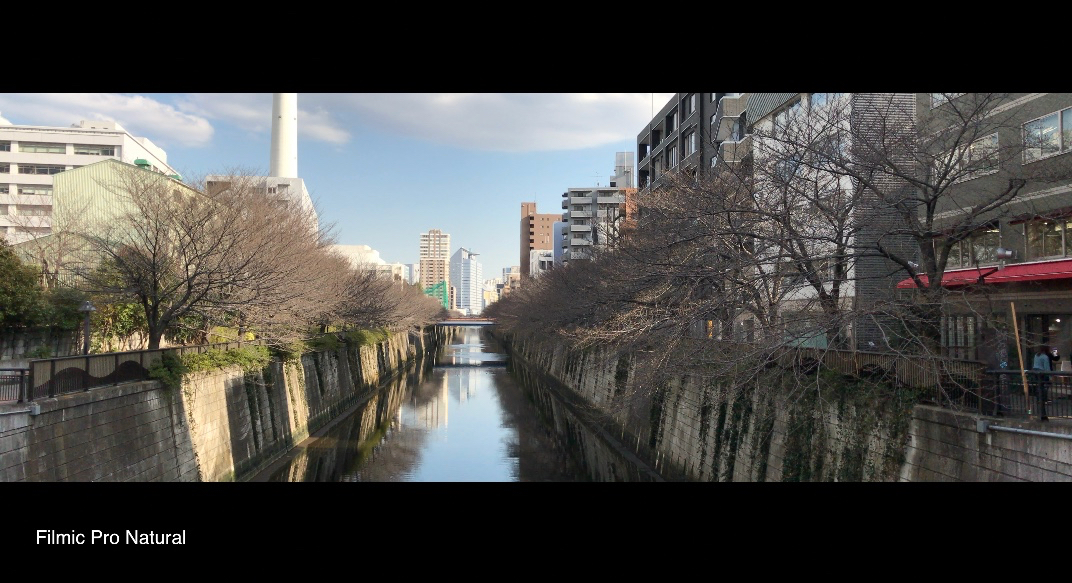
I found the images I got by just using the manual exposure controls and shooting in the Natural profile yielded far better results, and more importantly, the footage was easier to deal with. Trying to capture Log images from a low-bit-depth sensor is always fraught with difficulty. I don’t think it’s a good idea shooting Log on any camera that isn’t capable of capturing that vision in at least a 10bit colour space on a robust codec. The Log on the iPhone works OK in some scenarios, and struggles badly in others. The biggest problem is there is just way too much fiddling around with the image to get it right before you hit the record button. For me this defeats the whole purpose of using an iPhone in the first place. For the type of work I generally do I would only use an iPhone in situations where I need to be very discreet and blend in without anyone noticing what I am doing. In these type of scenarios stuffing around with settings for ages to try and get the image to look right is counterproductive.
The app is still buggy and I found that it crashed on me every now and then, which wasn’t ideal. The other downside is that it chews through your iPhone battery very quickly. If you are going to be using Filmic Pro for extended periods of time you really do need to think of adding an external battery solution. Be aware though that if you are using your iPhone on say a DJI OSMO Mobile the power connection input is blocked when the phone is in the cradle. There are also times where the lag on what you are doing and what you are seeing gets so bad that you need to reboot the app. The phone also gets incredibly hot when using Filmic Pro for extended periods of time.
I really enjoy using Filmic Pro, and if you stick to the basics and don’t try and push the image around you can get incredible results from a phone. No the quality isn’t as good as other cameras, it’s not even close, but if you know exactly how to use it and you can control your shooting situations you can certainly achieve results where people would never know that the vision was captured on a phone.
My point is, any camera is capable of producing good results if it’s in the right hands and being used in the right conditions. Filmic Pro gives you great tools that certainly make this a lot easier, but don’t expect miracles. After all it’s just a phone.


