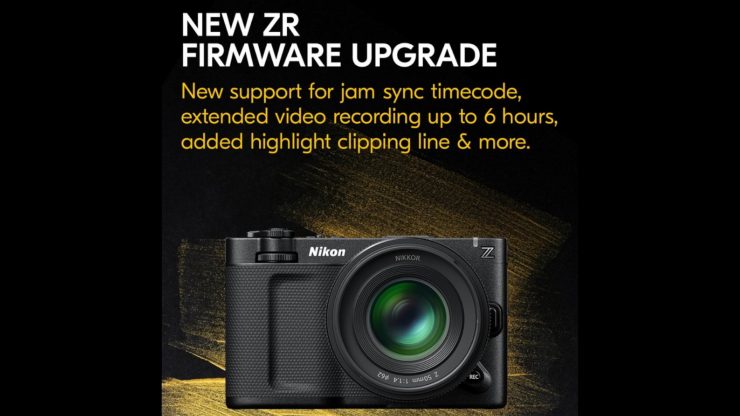
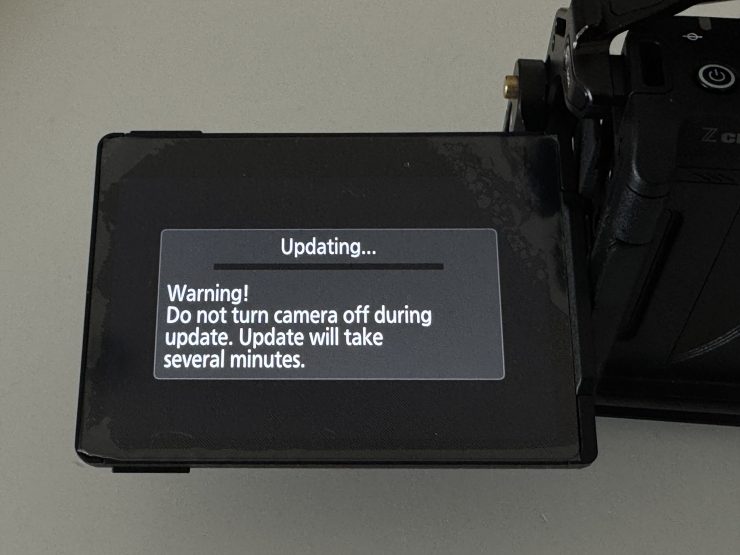
Nikon has released a new firmware update for the ZR. Firmware Version 1.10 adds support for wired timecode, extended maximum recording times, and a few other improvements.


Firmware Version 1.10 – Key Updates:
- Supports timecode input over wired connection, improving synchronization with audio recording devices and other cameras.
- Implements a file-naming function similar to that of RED cameras to improve efficiency when handling a large number of files and prevent duplicated video file names.
- Significantly extends the maximum recording times for continuous recording, from 125 minutes to up to 360 minutes (6 hours).
- Offers a warning line indicating the maximum brightness level in the histogram or waveform monitor to avoid unintentional clipping.
- Additional enhancements include a [Power-on lamp energy saver] menu option, the ability to set [Video file type] to [R3D NE 12-bit (R3D)] in the video recording menu while in AUTO shooting mode and the option to view up to 50 LUTs while importing from a memory card using Custom Setting.
- ZR owners can visit the Nikon download center to get the new firmware for free here.
While it is good to see these new features being added, it is disappointing to see Nikon not fix a lot of the most complained-about issues that still exist with the camera.
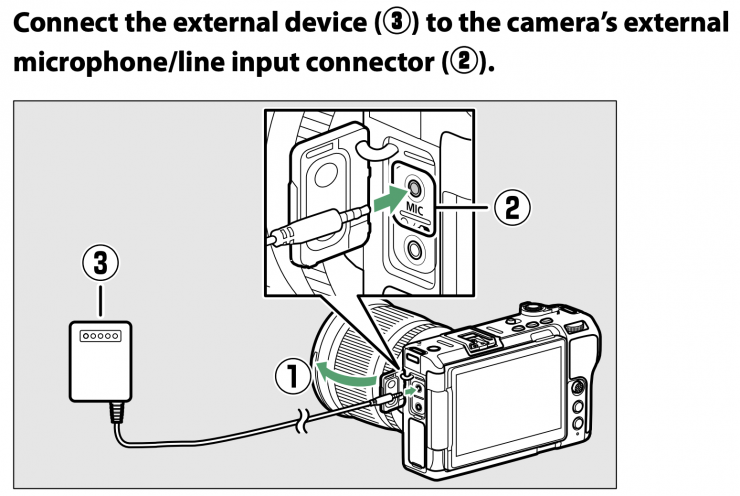
Synchronize timecodes with external devices connected to the external microphone/line input connector
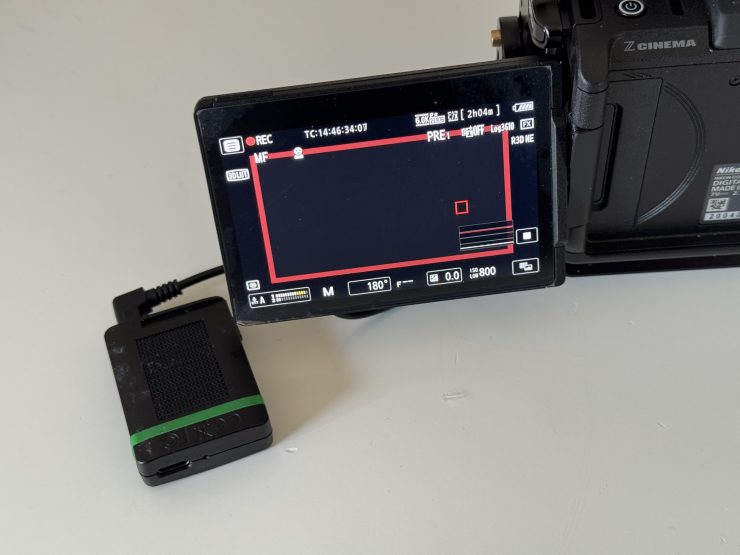
You can now get timecode directly embedded into your video recordings when connecting up a timecode device via the mic input jack. While you do lose one channel of audio by doing this, you don’t have to use any software to convert the LTC signal. If you own a Nikon ZR and a Tentacle Sync, then this is a very welcome addition.
New [LTC signal input] option for [Timecode] in the video recording menu
An [LTC signal input] option has been added to [Timecode] in the video recording menu. Select [ON] for [LTC signal input] to synchronize timecodes with external devices connected to the external microphone/ line input connector.
- The following external device has been tested and approved for use:
- Tentacle Sync SYNC E Timecode Generator
- Also see the documentation supplied with the external device.
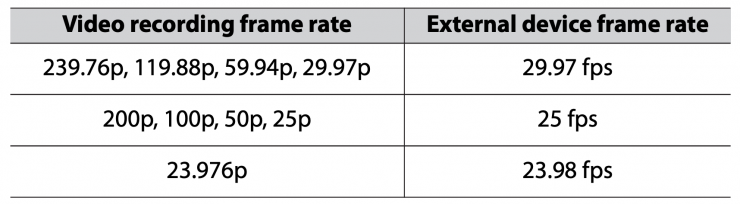
Synchronizing timecodes with external devices
Match the frame rates of the camera and external device.
• If the value is not a match for that chosen with the camera, timecodes will not be recorded or output via HDMI. Match the frame rate for the external device to the video recording frame rate as follows:
Select [On] or [On (with HDMI output)] for [Timecode] > [Record timecodes] in the camera’s video recording menu.
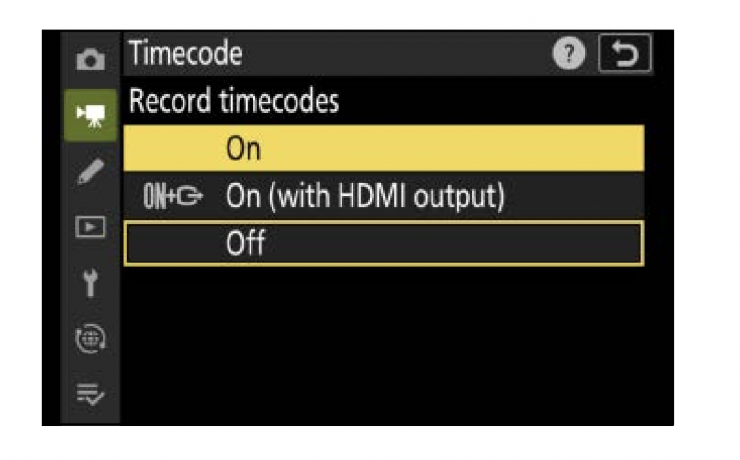
Timecode recording will begin. The timecode appears in the shooting display.
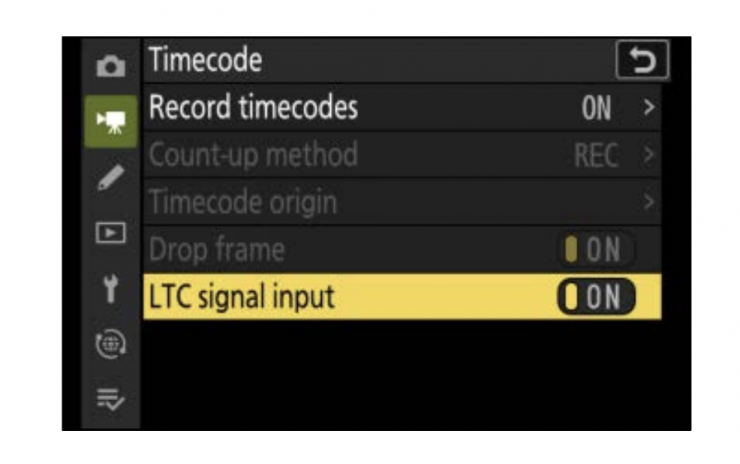
Select [ON] for [Timecode] > [LTC signal input] in the camera’s video recording menu. The camera will begin to receive timecodes from the external device.
- If no timecode is received, the shooting display will show”:::” (or “00:00:00.00” when an external device is connected via HDMI).
No timecodes will be recorded if filming is begun at this stage. - Sound will not be output to headphones or HDMI.
- Timecodes are received from either the left (1) or right (2) output channel of the external device. The output channel will differ depending on the external device. See the documentation provided with the external device regarding which channel will be output.
- If the external device timecode is output on both the left (1) and right (2) channels, the timecode will be received from the left (1) channel.
- If an external device is not connected when [LTC signal input] is set to [ON]: -Timecodes will not be received. Sound will be recorded from either the built-in microphone or an external microphone attached to the digital accessory shoe.
Timecodes will not be recorded if [H.264 8-bit (MP4)] is selected for [Video file type] in the video recording menu.
The options selected for [Timecode] > [Count-up method], [Timecode origin], and [Drop frame] in the video recording menu cannot be changed if [LTC signal input] is set to [ON].
Timecodes cannot be received from an external device connected to the external microphone/line input connector at the same time that timecodes are being received using UltraSync BLUE.
Extended maximum length of time for each video
The maximum length of time that can be recorded for each video has been extended up to 360 minutes for certain video file types. Unfortunately, it hasn’t been extended when recording in ProRes RAW, N-RAW, or R3D NE 12-bit.
The maximum length of time can be extended when one of the following options is selected for [Video file type] in the video recording menu.
- [ProRes 422 HQ 10-bit (MOV)] (except when the frame rate is
119.88p or 100p) - [H.265 10-bit (MOV)] (except when the frame rate is from 239.76p to 100p)
- [H.265 8-bit (MOV)] (except when the frame rate is from 239.76p to 100p)
- [H.264 8-bit (MP4)] (except slow-motion video)
Changes when [R3D NE 12-bit (R3D)] is selected for [Video file type] in the video recording menu
Changes to the brightness information display
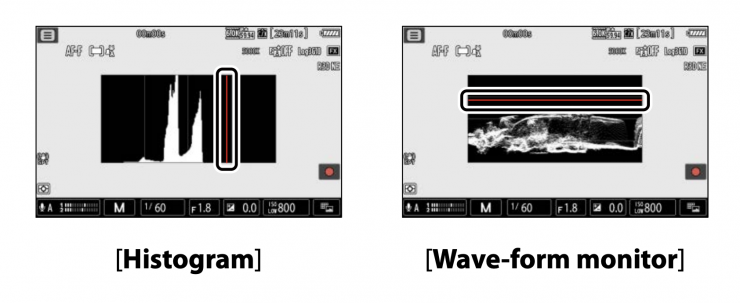
When [R3D NE 12-bit (R3D)] is selected, a warning line will appear in the displayed brightness information ([Histogram], [Wave-form monitor]) as a guideline for overexposed highlights. If the brightness of the video being recorded exceeds this line, the recorded video will be overexposed.
- The level of brightness that results in overexposure varies depending on the ISO sensitivity. The warning line will appear at a brightness level that corresponds to the brightness settings for [Base ISO sensitivity] and [ISO sensitivity] in [ISO sensitivity settings] in the video recording menu.
- The brightness information can be displayed by placing a check (M) next to the Histogram icon in the list for Custom Setting g21 [Custom monitor shooting display].
- The display type ([Histogram], [Wave-form monitor]) can be selected using Custom Setting g19 [Brightness information display].
Cautions: Selecting [R3D NE 12-bit (R3D)]
When set to [R3D NE 12-bit (R3D)], overexposure will occur even if the brightness is not at the upper limit (on the right edge for [Histogram], on the upper edge for [Wave-form monitor]). Check the brightness using the warning line when shooting.
When set to [R3D NE 12-bit (R3D)], we recommend setting [Vignette control] to [Off] in the video recording menu. If [Vignette control] is set to an option other than [Off], the correction for the drop in brightness at the edges of the picture will cause the brightness of the video being recorded to exceed the warning line, which may result in overexposure.
[R3D NE 12-bit (R3D)] can be set when the shooting mode is Auto
[Video file type] can now be set to [R3D NE 12-bit (R3D)] in the video recording menu, even if the shooting mode is Auto. However, the shooting mode will change to M.
Cautions: Combinations with shooting mode Auto
If you set the shooting mode to Auto when [R3D NE 12-bit (R3D)] is selected for [Video file type] in the video recording menu, you will not be able to record video. Setting the shooting mode to anything other than Auto will switch the shooting mode to M and enable video recording.
If the shooting mode switches to M after selecting [Video file type] > [R3D NE 12-bit (R3D)] in the video recording menu in Auto mode, the shooting mode for photo mode will also switch to M.
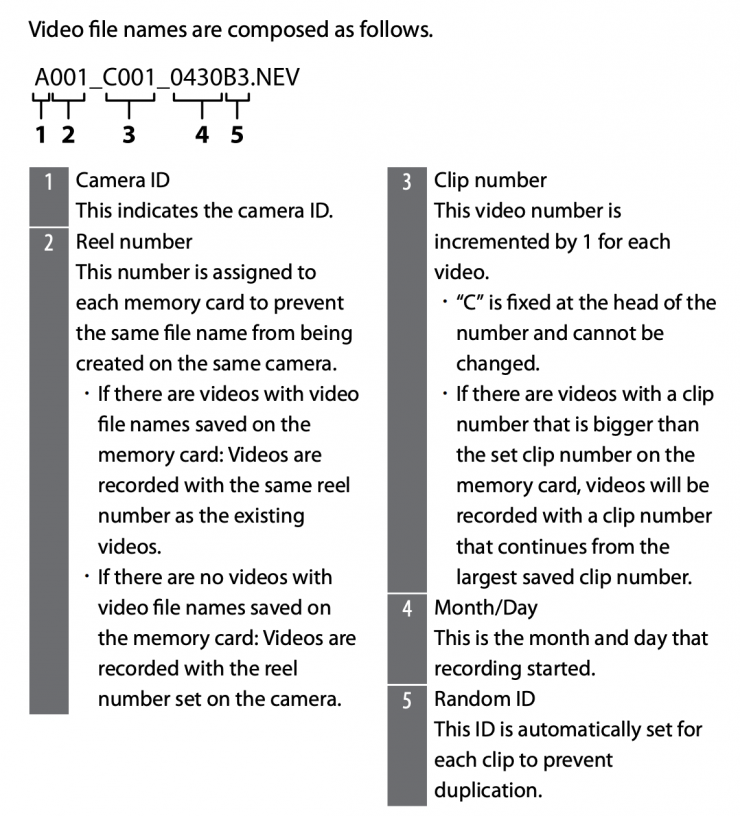
Support for video-specific file names
New video recording menu item: [Video file naming]
A [Video file naming] item has been added to the video recording menu. Select [ON] for [Video file naming] > [Video clip name] to enable video recording using a video-specific file name. Video file names are composed of information such as the camera ID, reel number, and recording date, making them suitable for editing large numbers of videos, or when shooting with multiple cameras.
Videos can be recorded with video file names only when all the following conditions are met:
- The video recording destination is CFexpress/XQD card slot.
- The destination memory card has been formatted to exFAT.
- [ON] is selected for [Video file naming] > [Video clip name] in the video recording menu.
Controls
- Increased the maximum number of files displayed to import from g15 [LUT view assist settings] > [Import CUBE file] in the [CUSTOM SETTINGS MENU] to 50. CUBE files with names starting with a period (“.”) are no longer displayed.
Displays
- Added a [Power-on lamp energy saver] item to the [SETUP MENU]. The power-on lamp remains lit while the camera is turned on when [OFF] is selected.
Network
- Updated some guidance texts displayed on the camera when connecting to the Nikon Imaging Cloud service (the connection procedure itself remains unchanged).
Other Changes
- Fixed an issue where noise sometimes occurred in the audio during live streaming (USB streaming).