I speculated during my original article on the release of the RED V-RAPTOR [X] and V-RAPTOR XL [X} that the new Extended Highlights mode might have been using something similar to HDRx. Well that appears to be true.
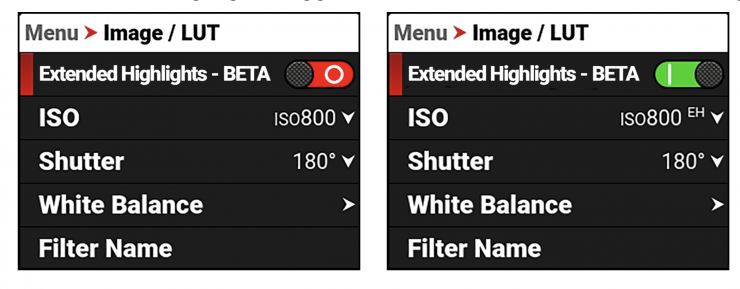
RED has released some details about how the Extended Highlights mode works. It is important to note that the Extended Highlights mode is a beta feature.
Global Vision is a suite of tools that uses the global shutter sensor to offer even greater flexibility and ease of use throughout your production process.
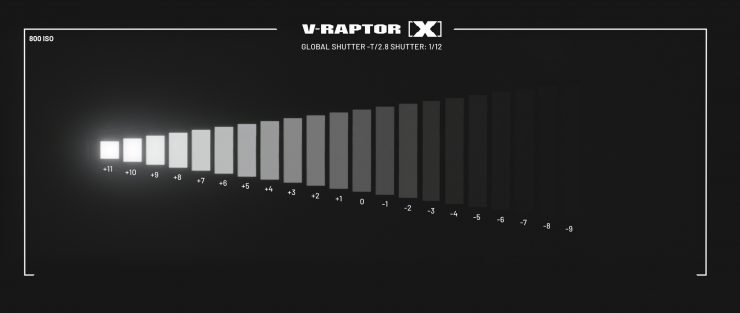
These tools include Extended Highlights mode which is said to allow the camera to see color and detail into extreme highlights like never before, providing even softer and more subtle highlight roll-off when in uncontrollable environments. Global Vision’s Extended Highlights is said to offer over 3 stops of additional dynamic range. RED claims an overall dynamic range of over 20 stops when using this mode.
WHAT IS EXTENDED HIGHLIGHTS?
RED states that Extended Highlights uses multiple exposures to reconstruct previously clipped detail in the most faithful way possible. There are no adjustments or levers for the Extended Highlight process, it is simply an On or Off feature.
Extended Highlights is only recommended to be enabled on a scene-by-scene basis. You can use it anytime uncontrollable highlight clipping is seen either in the Exposure False Color, Gio Scopes, or RGB Scopes. When enabled, Extended Highlights shows a preview of the image with the reconstructed highlight information.
When Extended Highlights BETA are enabled, the camera displays “EH” next to the ISO value to remind you of the increased dynamic range when deciding your exposure.
How do you use it?
According to RED, exposing with Extended Highlights is no different than exposing without them. Exposure False Color, Gio Scopes, and the RGB Stoplights all reflect the new dynamic range with Extended Highlights Enabled.
Using the Exposure False Color tool, the system references the LOG version of your image using the set ISO value. Parts of the image which are clipped are indicated by the color red. If red is seen in the Exposure False Color, you can enable Extended Highlights to recover additional information, and the new clip point will be reflected. Middle grey will remain unchanged.
Using the Gio Scopes tool, the system is referencing the linear sensor data and does not take into account the ISO you have set. Parts of the image which are clipped are represented as black within the 16th step of the tool. All steps of the Gio Scope tool are represented by a single color except for 16. The 16th step has multiple shades of red throughout it to represent approaching clip, with black being true clip. If black is seen in the Gio Scope, you can enable Extended Highlights to recover additional information, and the new clip point will be reflected. Your middle grey will remain unchanged.
What are the caveats?
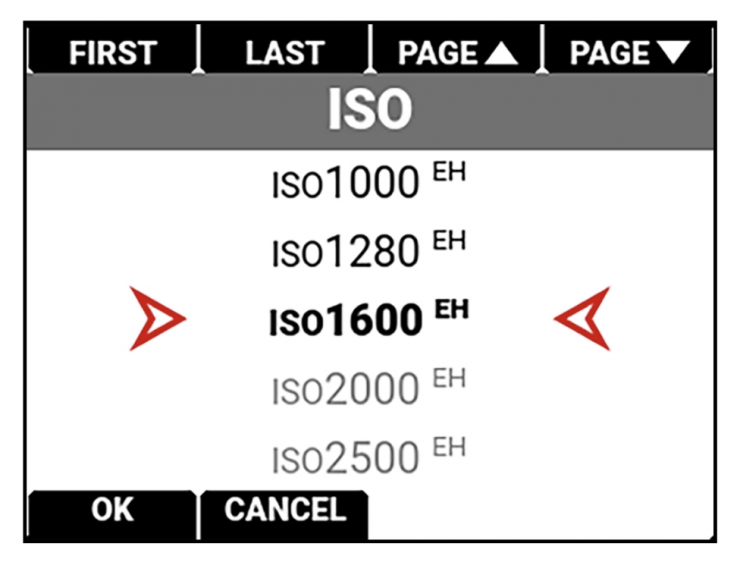
When Extended Highlights are enabled, the maximum frame rate in all recording options is halved. In addition, data rates are doubled and in some cases available R3D Qualities may be reduced. In-camera ISO selection is also limited to ISO 1600. Also all of the monitoring pipelines are limited to HD or 2K formats.
There may be additional motion blur or “ghosting” in the image if excessive motion is present in the region of reconstructed highlight detail.
Extended Highlights are also not recommended when shooting with an LED Volume, or any other environment where sync is critical. It is also not recommended to use Extended Highlights in high action handheld scenes.
POST-PRODUCTION
Clips which are captured with Extended Highlights enabled require RED’s SDK 8.5 or later. You need to ensure the NLE you are using has implemented RED’s latest SDK. If your post tool has not implemented 8.5 or later, you need to use REDCINE-X version 62 or later to transcode the Extended Highlight clips into another format for compatibility with your NLE. Extended Highlights clips take more processing power than standard clips, and are only compatible with ½ or Full Resolution decoding. According to people who have tried it out the render times are about 3x longer when utilizing Extended Highlight mode.
Extended Highlights can be disabled in Post Production, as it is a non-destructive process.
How does Extended Highlights differ from HDRx?
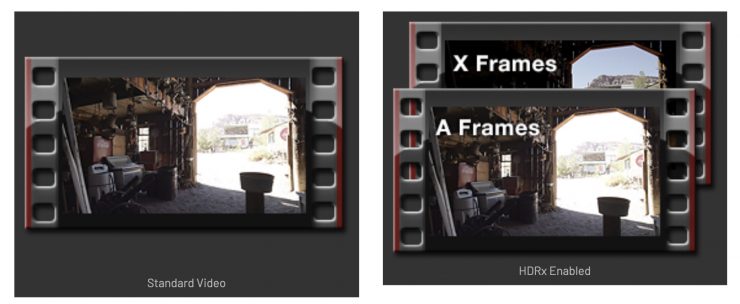
HDRx was a proprietary HDR video solution that was invented for the RED EPIC and SCARLET cameras. It worked by recording two exposures within the interval that a standard motion camera would record only one.
The primary exposure is normal, and uses the standard aperture and shutter settings (the “A frame”). The secondary exposure is typically for highlight protection, and uses an adjustable shutter speed that is 2-6 stops faster (the “X frame”). For example, if the A frame is captured at 24 fps and 1/50 second shutter speed, then specifying 2 stops HDRx causes the X frame to be captured at a shutter speed of 1/200 second.
A higher HDRx setting can make the blend more difficult since the A and X frames have less in common. RED states that, when possible, it’s also always better to expose optimally using single exposures than to use HDRx to compensate for poor technique. Similarly, in post-production, it is easy to take the HDR effect too far. If an object was darker than the sky in the original scene, footage will lose its sense of realism if this tonal hierarchy is reversed in post-production.
An added benefit of HDRx was that it could also be used to control motion blur, which varies proportional to the shutter speed difference between the A and X frames. A 3-stop HDRx setting meant that the blur distance in the X frame is an eighth of what it is in the A frame, for example.
HDRx is easier and more cost effective than utilizing something like Dual Gain sensor architecture has been used by ARRI in their Alev III, and now Alev IV sensors for more than 13 years. Canon also uses a similar system in some of their latest cameras.
A DGO sensor produces images optimized for HDR by creating two images. One prioritizes saturation in the highlight areas and the other prioritizes lower noise in the shadows and dark areas. Essentially each photodiode is being read out at two separate gains. This creates two signals for each photodiode which are then blended to produce an image that has both high dynamic range and low levels of noise. Noise is greatly reduced because the Dual Gain Output signal is taken directly from the sensor and before any image processing takes place.
HDRx can be pushed further than a DGO sensor, but DGO requires more power and it is more costly to make. DGO is arguably a better and safer way to do things because it doesn’t produce any image artifacts.