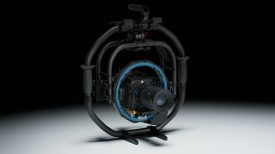
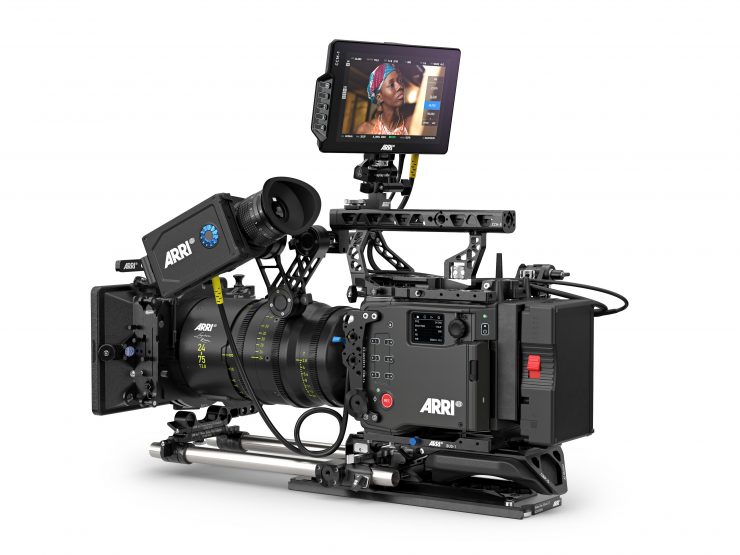
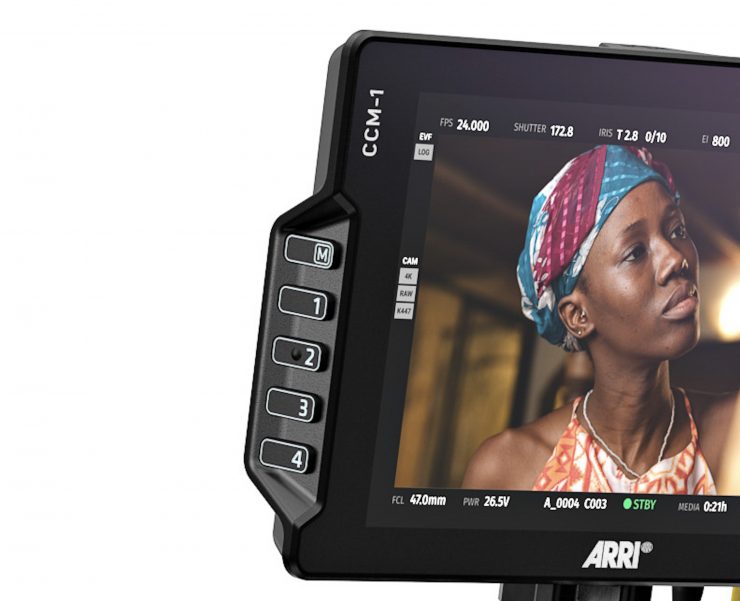
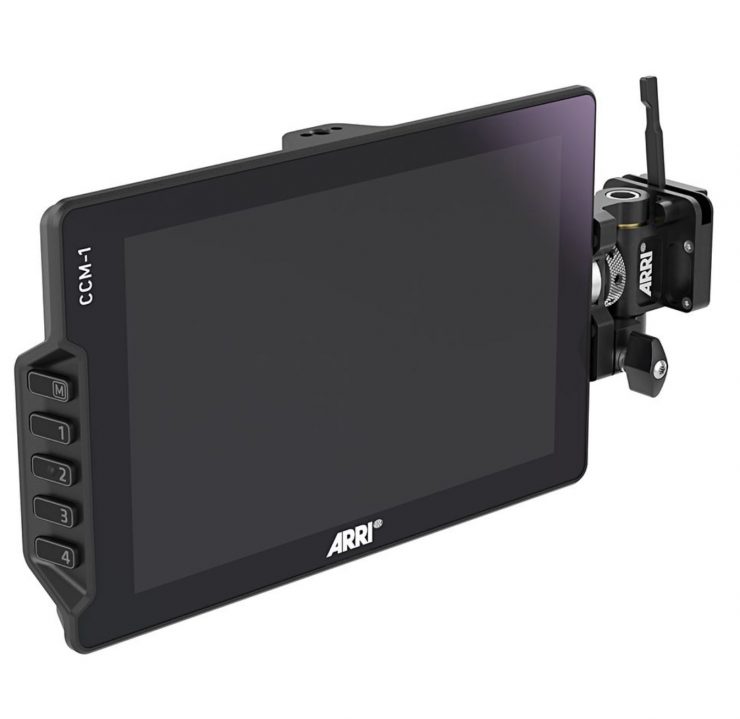
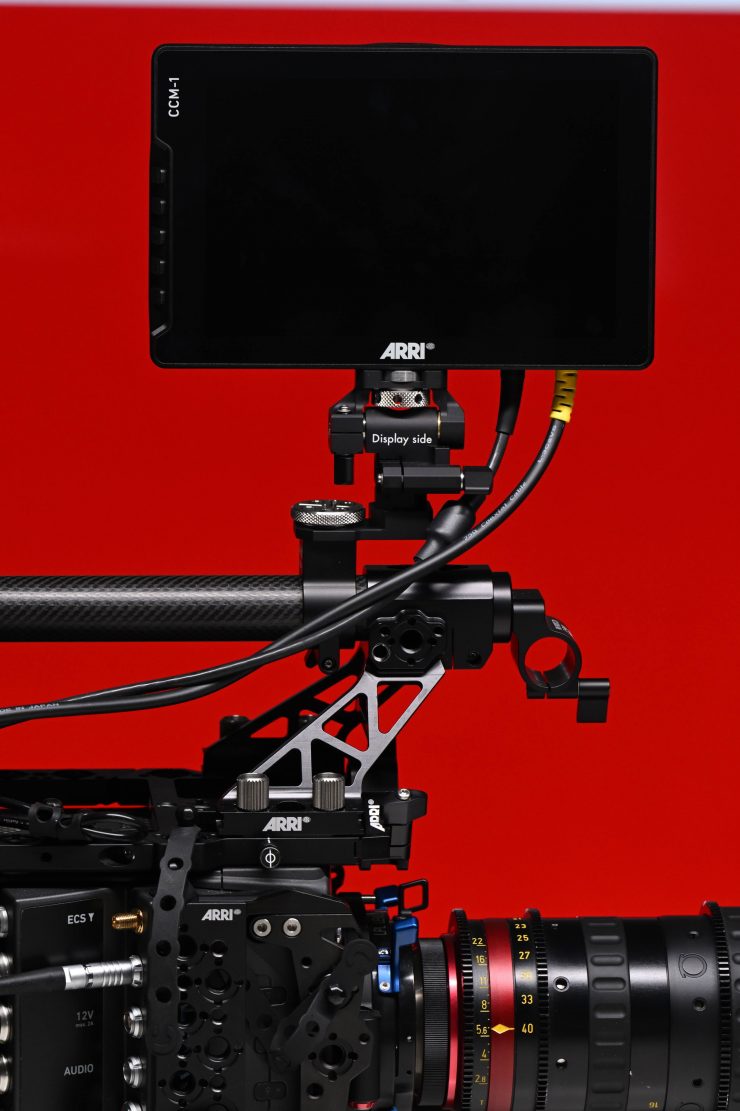
Back in May, ARRI announced the Camera Control Monitor CCM-1. The CCM-1 was made in collaboration with SmallHD as ARRI felt that they were the best company to team up with when it came to making an on-camera monitor. The CCM-1 is much more than a monitor as it offers full camera control for the ALEXA 35 and ALEXA Mini LF.
The benefit of utilizing the new CCM-1 is that you end up with a much cleaner solution as you don’t have to run power and SDI cables from your camera to the monitor, as that is now all handled by the CoaXPress cable. Now, there is a caveat when doing this that I will talk about later on in the review.
By using a single CoaXPress cable you also free up power and SDI outputs for other accessories.
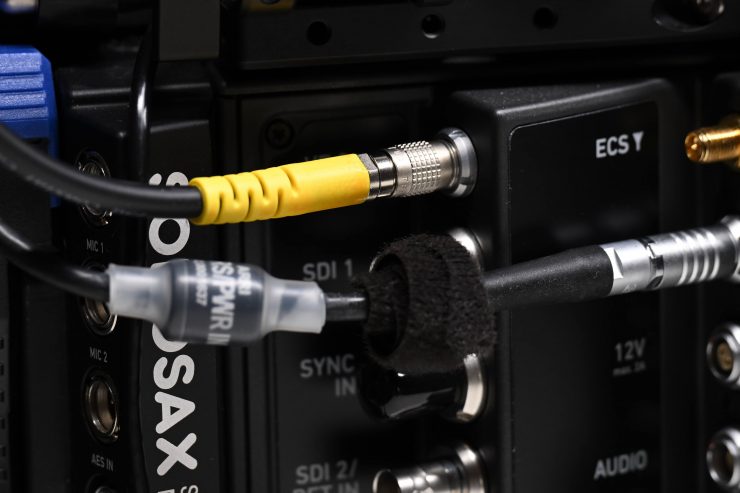
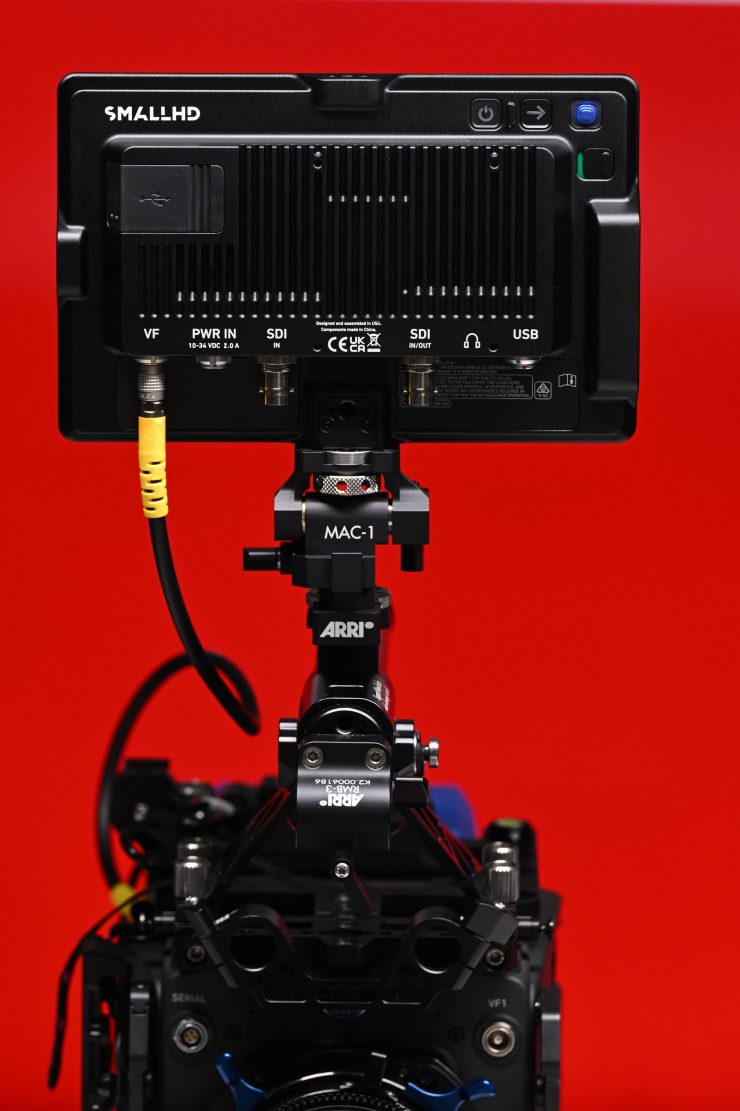
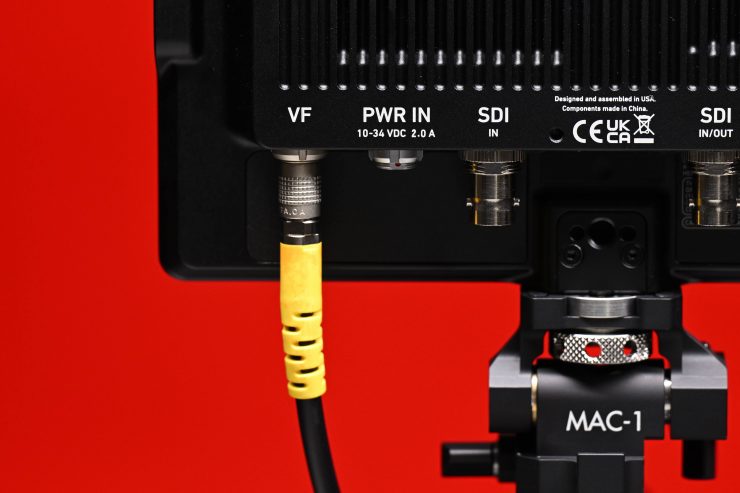
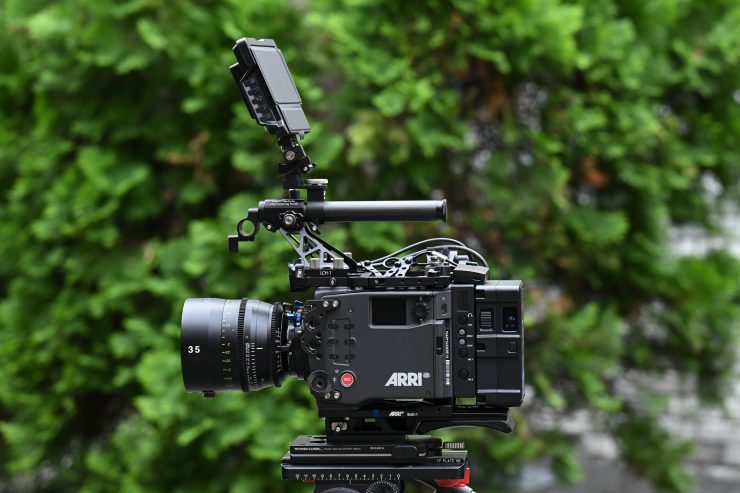
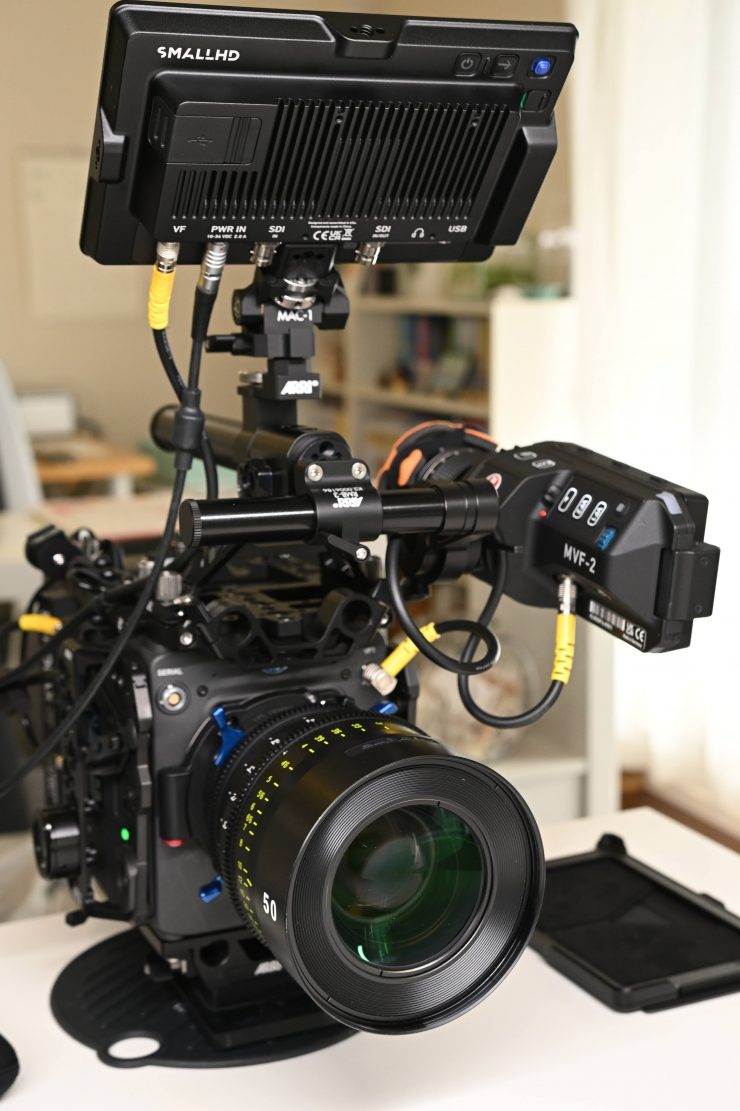
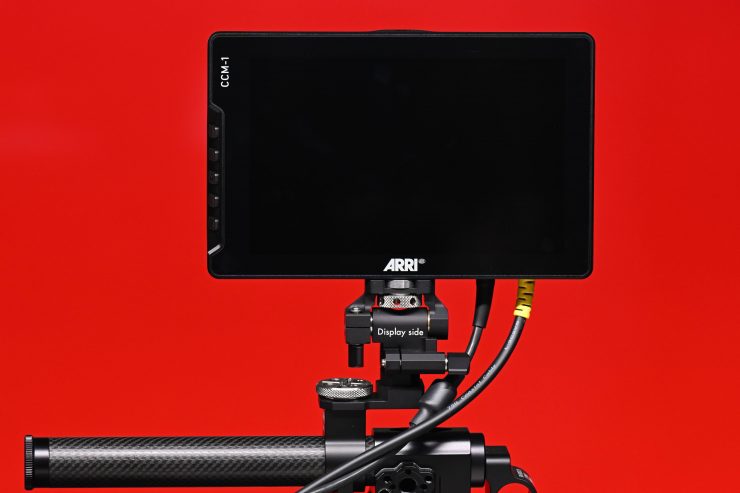
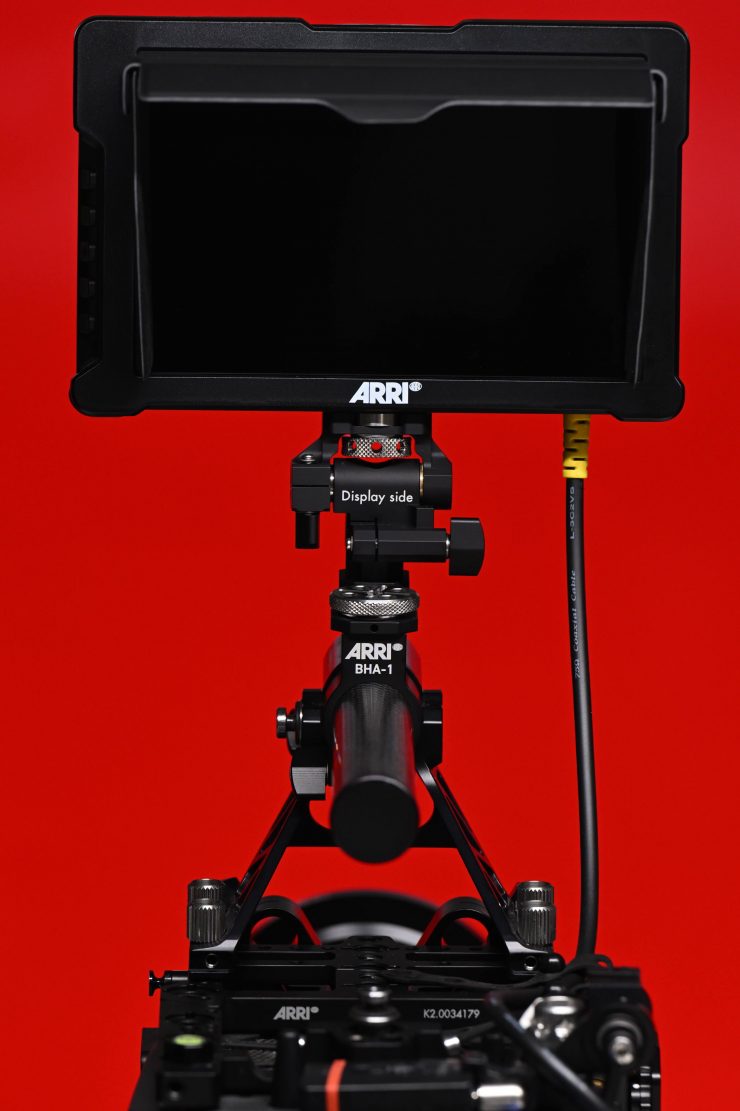
As the ALEXA 35 has two VF ports, you can utilize one of them to directly attach the CCM-1. This allows you to send video, audio, power, and camera control protocols all through a single CoaXpress cable. You can also use the CCM-1 with the ALEXA Mini LF as well.
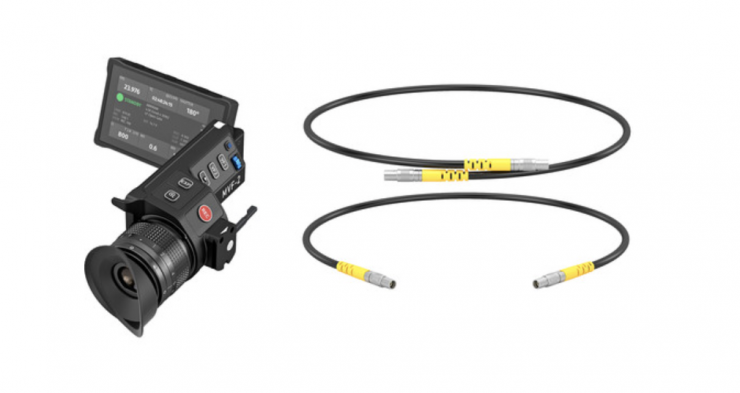
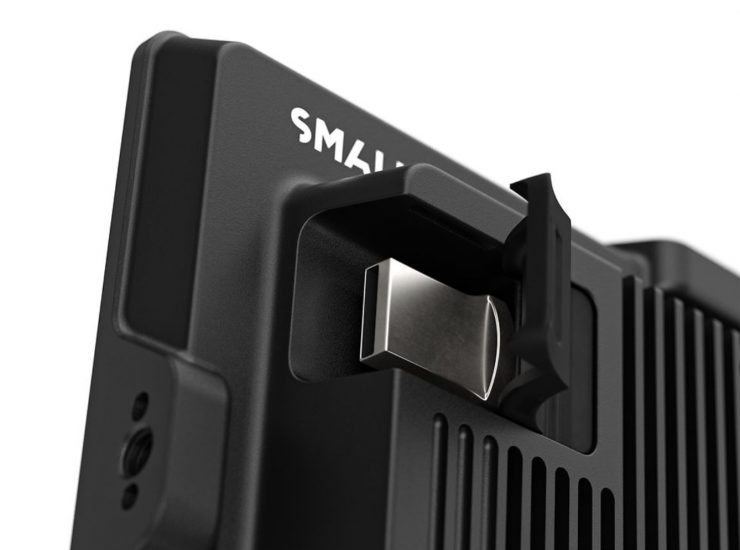
If you are not familiar with a CoaXPress cable, it features a spring-loaded locking collar like a Lemo connector but is not keyed which almost makes it a hybrid between a Lemo and a BNC. It is the cable that is used with the ARRI MVF-2 viewfinder.
ARRI hasn’t just made the monitor proprietary as it still features SDI In/Out ports as well as a 3-Pin Fischer connector 10-34V DC 2.0A power input option. This is handy if you want to use it with other ARRI cameras or any other camera for that matter. However, you won’t get full camera control without the CoaXpress cable. You will get some limited camera control when using the monitor through an SDI connection. For this reason, I don’t personally see anyone buying it who isn’t using an ALEXA 35 or ALEXA Mini LF.
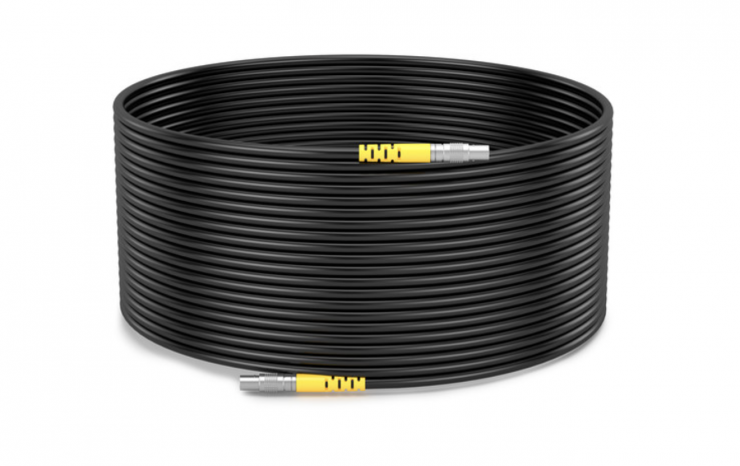
If you need to remove the monitor from the camera, it will still work up to a distance of 10m / 32.8′ using a longer optional CoaXpress cable. This will be handy for anyone working with cranes, car rigs, etc. Now, the caveat is that if you are just using a CoaXpress cable you will need to attach an additional power cable if you want to run the monitor at full brightness, otherwise you are limited to just 100 nits. This is a pretty big caveat and it essentially means you will need to run both the CoaXpress cable and the RS – RS/PWR IN (0.5m/1.6ft) at the same time.
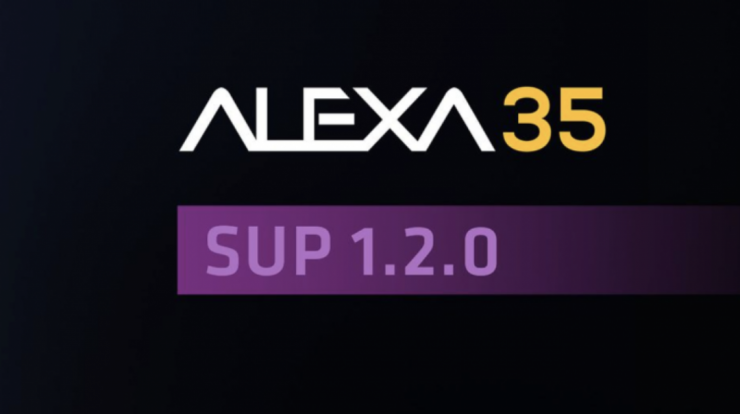
The ALEXA 35 and the ALEXA Mini LF do require a firmware update for the CCM-1 to work. The ARRI ALEXA 35 SUP 1.2.0 firmware update that was released in August added this functionality.
Above you can see a very good Tech Talk where Sean talks extensively about the features and functionality of the CCM-1.
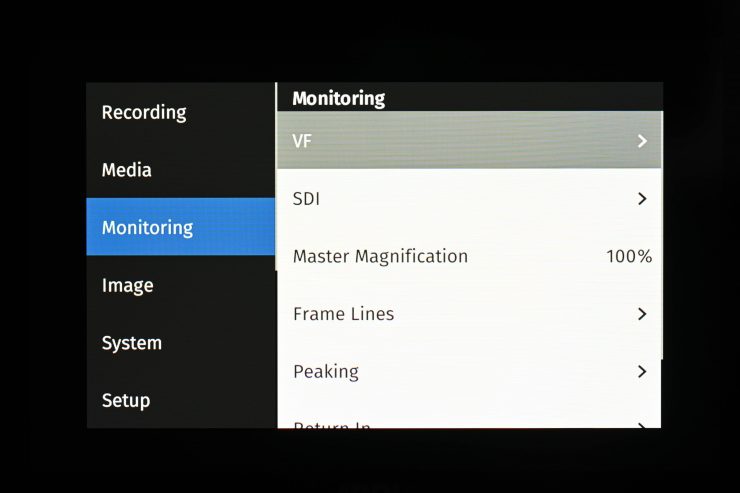
Key features
- Rugged yet sleek 7” onboard monitor combines the expertise of ARRI and development partner SmallHD
- Bright display with color-accurate ARRI image quality
- Full ARRI camera and menu control gives operators freedom and new configuration options
- Can replace or work alongside the MVF-2 viewfinder
- Customizable touchscreen and physical controls
It mimics the ARRI MVF-2
The CCM-1 is essentially a direct representation of the ARRI MVF-2 viewfinder but in the form of a monitor. Anything you can do on the ARRI MVF-2, you can do on the CCM-1.
As a lot of younger operators don’t use a VF, ARRI wanted to give users the choice to have the exact same functionality that is offered with MVF-2 in a monitor. This makes a lot of sense as not everyone wants to use an EVF so it is good to have options.
The exact same menus that can be brought up on the MVF-2 are available on the CCM-1. This familiarity is what people are looking for. Nobody wants a separate system with different menus, they want to know exactly where everything is located. Having the same menu system shared between two devices means that there is no learning curve.
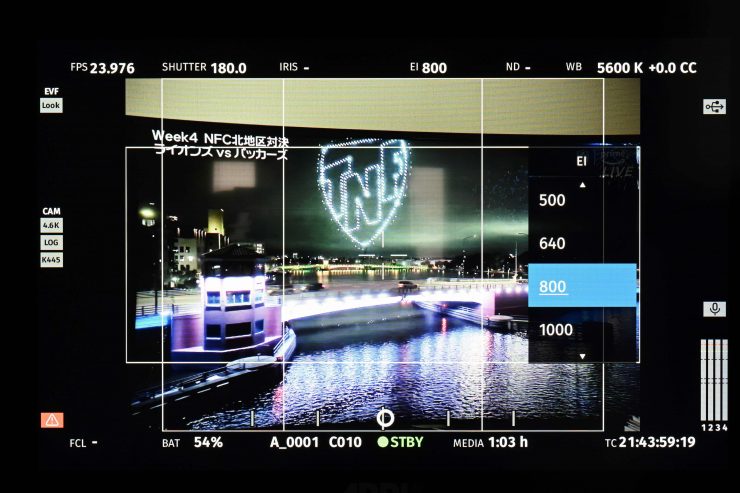
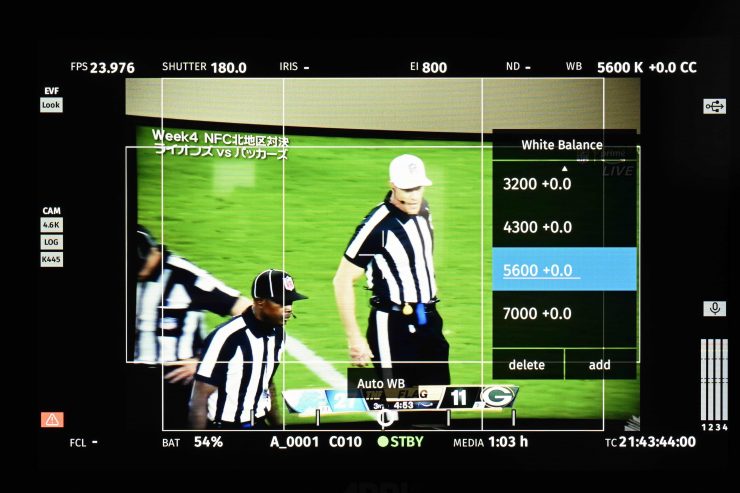
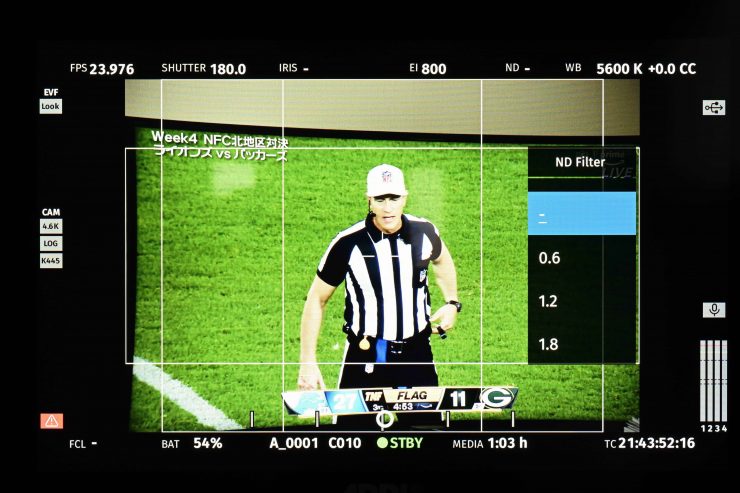
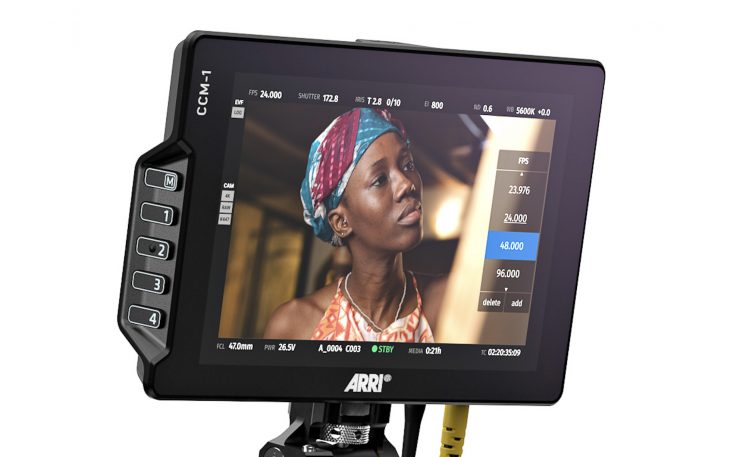
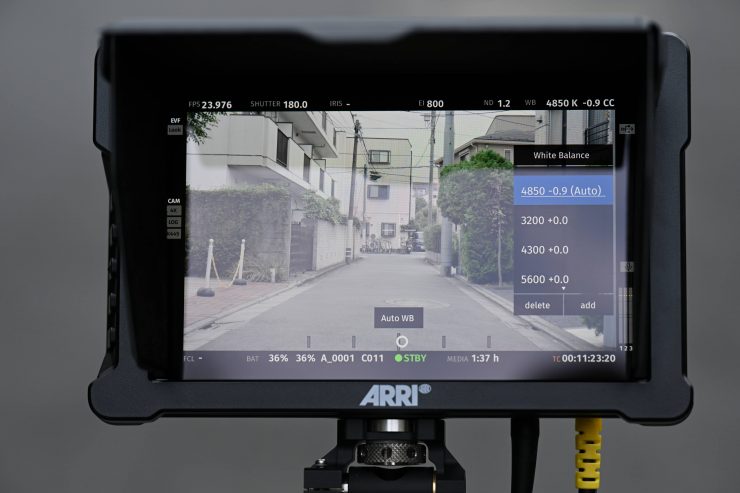
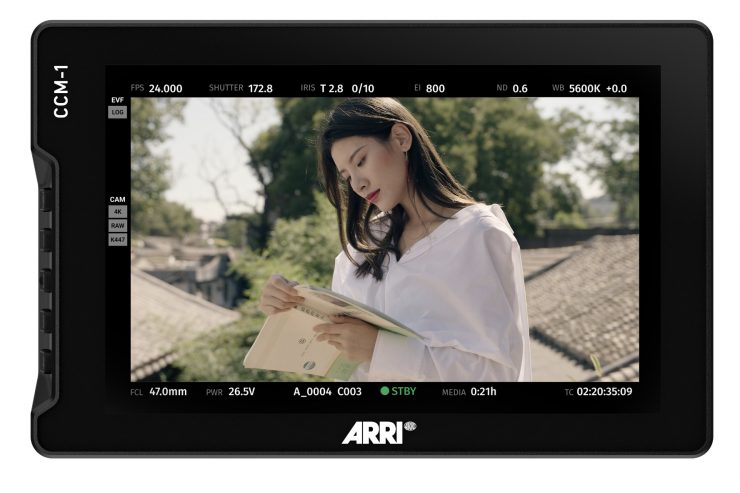
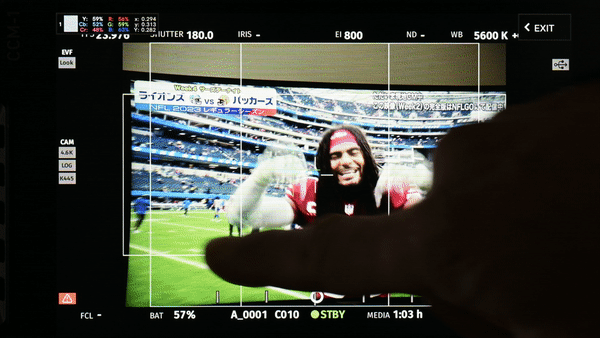
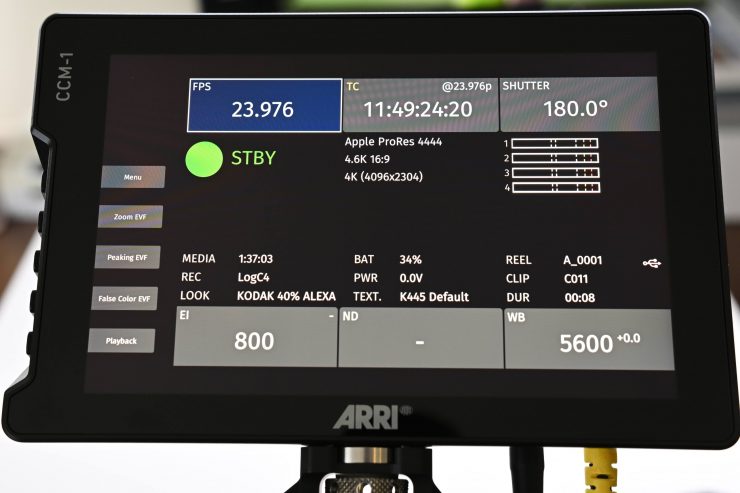
While the CCM-1 offers all of the same functionality as the MVF-2, ARRI has made a few small changes to make it easier to change key parameters such as FPS, Shutter, EI, ND, and WB. All of these parameters can be accessed and changed directly on the screen without going into any menus. As soon as you tap on one a menu appears where you can make direct adjustments. Whatever is selected is highlighted in blue to avoid confusion. Just to be clear, you can only change one parameter at a time.
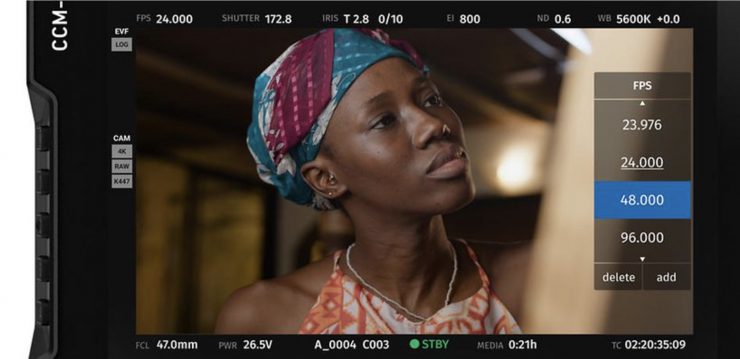
Having the ability to make these adjustments on the CCM-1 is handy, as a lot of the time, the key settings are the only ones you need to access when you are shooting.

What is nice when you select WB on the CCM-1 is that you can add or delete values directly on the menu as well as do an Auto WB.
For 1st ACs, they will also appreciate the ability to use the monitor for making direct changes to the camera without having to use the MVF-2 or an app, especially since ARRI moved away from having a screen and controls on the non-operator side of the camera.
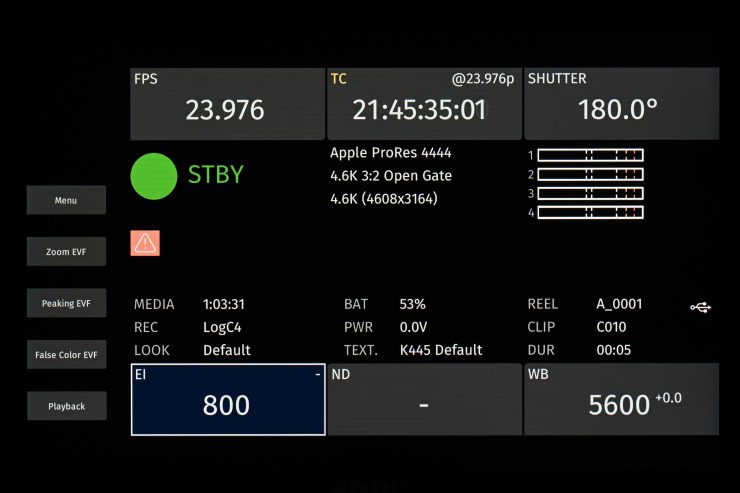
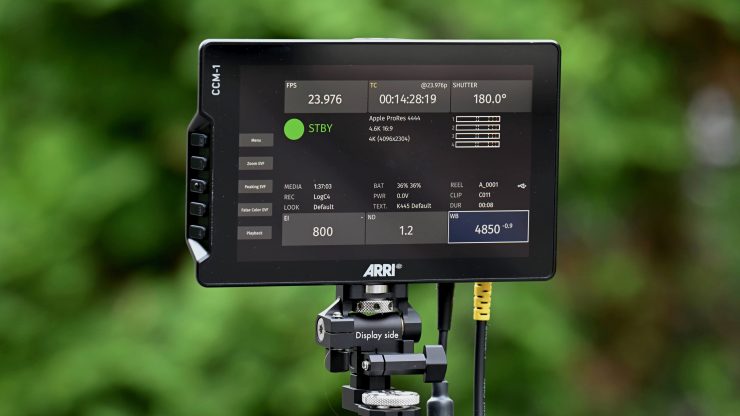
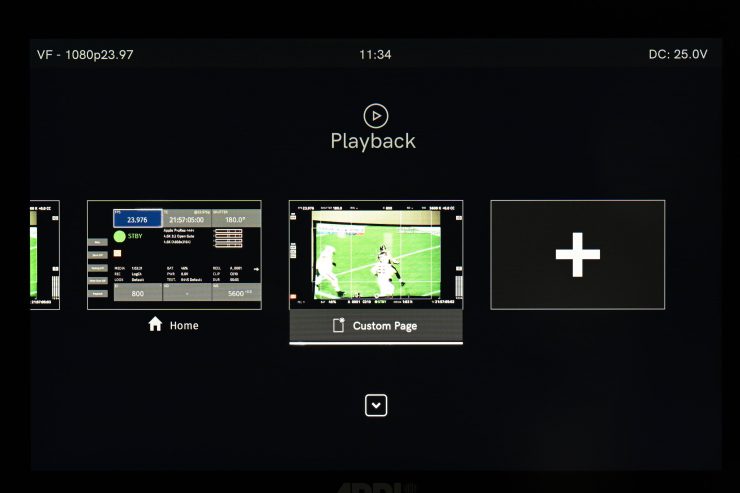
The home screen on the CCM-1 is very reminiscent of what you will find on the MVF-2, except ARRI has made it slightly cleaner. What you will notice is that there are direct indications on the left-hand side of the screen that show you what is being mapped to the user buttons.
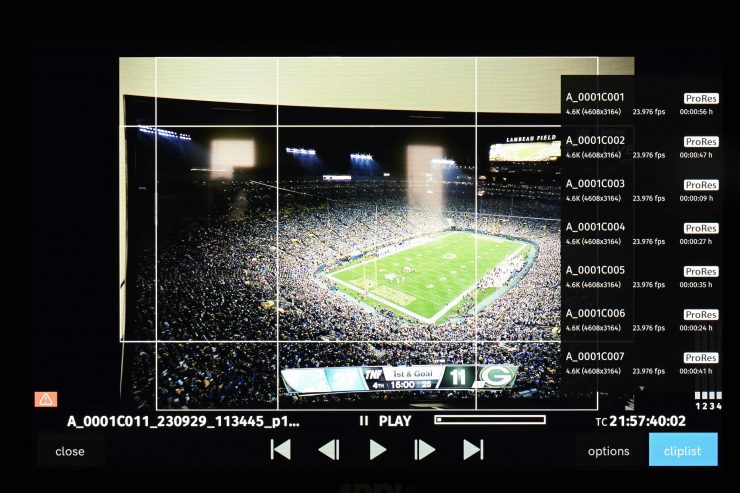

The playback screen has also been slightly changed from what you see on the MVF-2. There are now two direct touchscreen settings for quickly accessing the Cliplist and for changing playback options.
I also like how you can access the playback screen directly on the CCM-1 without needing to touch your camera.
What is also interesting is that the control functionality could be expanded in the future and it could very well be possible to control other ARRI products or accessories directly from the CCM-1.
A proper 1:1 zoom is already included in the first software, but the ability to control the area of interest using touch will not be. So the classic zoom to a designated area exists as a User Button.
What do you get?
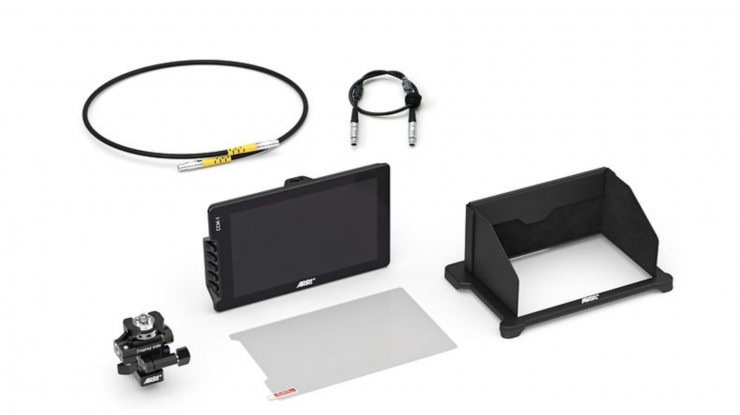
The Camera Control Monitor CCM-1 Set KK.0048851 includes:
• 1x K2.0048523 CCM-1 with Foldable Sunhood, Screen Protector
• 1x K2.0048394 Monitor Arm for Camera MAC-1
• 1x K2.0023943 Cable VF (0.5 m / 1.5 ft)
• 1x K2.0001637 Cable RS – RS/PWR IN (0.5 m / 1.5 ft)
Layout Overview
Screen
The CCM-1 utilizes a 7″ 1920 x 1080 Thin Film Transistor Liquid Crystal Display (TFT LCD) with LED backlight. It has touchscreen capabilities and a claimed brightness of 1300 cd/m². It covers 97% of DCI-P3 and it has a contrast ratio of 1200:1. According to ARRI, the typical luminance uniformity is 89%.
I believe this is a brand new display, as at least to my knowledge, no other 7″ SmallHD monitor on the market is 1300nits.
Now, this isn’t your regular SmallHD monitor as it is running custom color management specifically for the ALEXA 35 and ALEXA Mini LF.
How does the 1300 cd/m² brightness compare to some other 7″ monitors on the market? Below you can see:
| BRIGHTNESS | |
| ARRI CCM-1 | 1300 cd/m² |
| SmallHD Cine 7 | 1800 cd/m² |
| SmallHD INDIE 7 | 1000 cd/m² |
| SmallHD 702 Touch | 1500 cd/m² |
| Transvideo RainbowHD7 | 900 cd/m² |
| Atomos Shinobi 7″ | 2200 cd/m² |
| TVLogic F-7HS | 1800 cd/m² |
| SWIT 7″ Super-Bright Compact HD LCD Monitor | 3000 cd/m² |
The 1300nits of the CCM-1 is arguably enough for use in bright conditions outdoors, although I am actually surprised that ARRI didn’t go with a slightly brighter screen.

So, is it actually 1300 cd/m²? Well, let’s find out.
To check the claimed brightness of the CCM-1, I shot a white card with a light set at 5600K and then exposed the image so it was just below 100% so there was no clipping. I then took a reading from the CCM-1 using a Sekonic C-800. The CCM-1 was set in its D65 mode. The CCM-1 has a claimed maximum brightness of 1,300 nits so does it produce 1,300 nits?
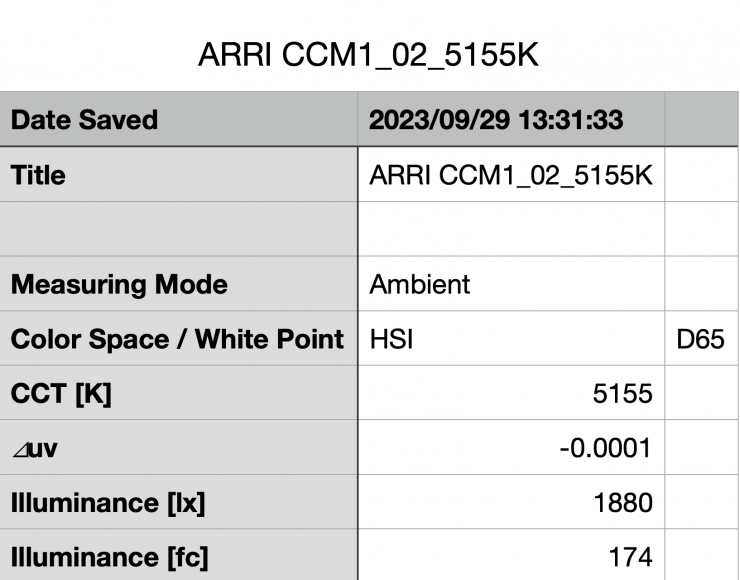
Above you can see the results for the CCM-1 with its backlight set at 100. It recorded an output of 1880 lx (174 fc). This was quite a lot more than the claimed brightness of 1300 nits. I guess in typical ARRI fashion, they like to understate figures.
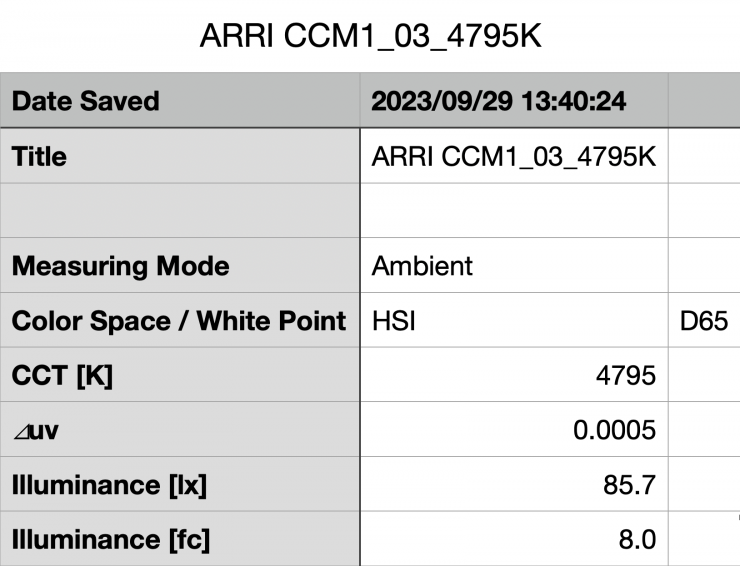
Above you can see the results when I used the CCM-1 with just the CoaXpress cable. It recorded an output of just 85.7 lx (8 fc). This was slightly below the claimed brightness of 100 nits.
I found that in real-world use the screen was easily bright enough to be used outdoors, even in direct sunlight, as long as you were feeding it power. It certainly helps that the screen isn’t super reflective. What is impressive, is that even at maximum brightness the monitor still has nice saturation and contrast.
If you are just running the CCM-1 with a CoaXpress cable and no additional power, then the screen is not very bright at all. While 100 nits might be a Rec.709 standard, we are so used to seeing brighter screens that the CCM-1 looks quite dark. It is fine if you are in a dark room, but in any sort of ambient room, I personally found it to be too dark.
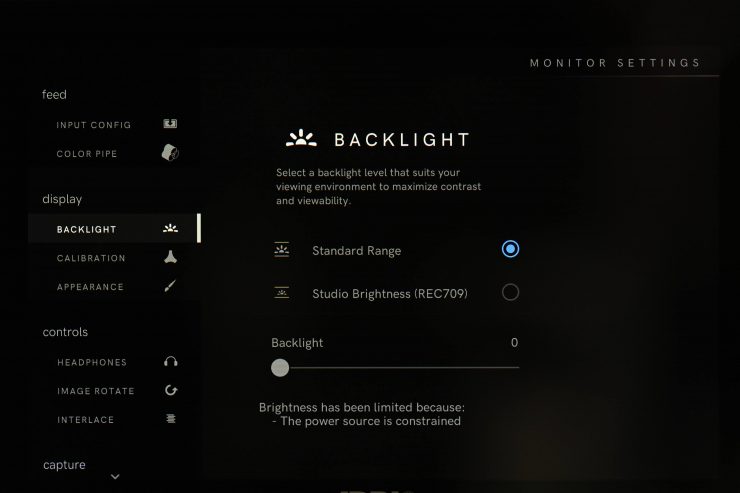
If you try and adjust the backlight while you are running the CCM-1 with only the CoaXpress cable you will get a warning on the screen.
Just like higher resolution doesn’t always equate to a better camera, higher nits don’t always equate to a better monitor. I have seen countless 3,000 nit screens that look washed out and terrible.
The screen is listed as 10-Bit, but it isn’t a true 10-bit display, instead, it features the commonly used 10-bit (8+2). Some potential buyers may find this a little disappointing given the high cost of the monitor. However, what you should clearly know is that no panels with true 10-bit color exist in this size, everyone just uses dithering to achieve the 10-bit target. 10-bit (8+2) is pretty much imperceptible to 99% of people.
A lot of companies list their monitors as 10-bit even though they are really using a 10-bit (8+2 FRC) panel. FRC stands for Frame Rate Control Technology and an 8+2 FRC panel is basically a way of trying to approximate the color reproduction of a true 10-bit panel. A true 10-bit monitor can display 1024 shades of color, whereas a 10-bit (8+2 FRC) panel can only truly display 256 shades. So what a 10-bit (8+2 FRC) panel does is artificially create in-between shades of color by quickly shifting the pixels to go between certain shades of colors.
For example, you would show the main shade of one color for 75% of the time and then another one for 25% of the time. This creates an illusion for the viewer that they are actually seeing more colors than what can actually be displayed.
8+2 FRC can be very hard to distinguish from an actual 10-bit panel. As I already mentioned, most people couldn’t tell the difference between an 8+2 or a true 10-bit display.
The monitor has 322 ppi (pixels per square inch) which is a common amount for a 7″ sized display. As a comparison, if you want to put that ppi figure into perspective, below you can see what other 7″ monitors have:
| PPI | |
| ARRI CCM-1 | 322 ppi |
| SmallHD Cine 7 | 322 ppi |
| SmallHD INDIE 7 | 323 ppi |
| SmallHD 702 Touch | 322 ppi |
| Transvideo RainbowHD7 | NA |
| Atomos Shinobi 7″ | 325 ppi |
| TVLogic F-7HS | 323 ppi |
| SWIT 7″ Super-Bright Compact HD LCD Monitor | 323 ppi |
Basically, every monitor of this size has an almost identical number of PPI.
How does the picture quality compare to the ARRI MVF-2?
I was personally very intrigued to see just how well the CCM-1 matches the MVF-2. ARRI claims that they should match well.
At least to my eye, I found that the image in the MVF-2 was very similar to that of the CCM-1 in terms of the colors, etc. It is hard to quantify whether they are an exact match as looking into an EVF and looking at a monitor are too different experiences.
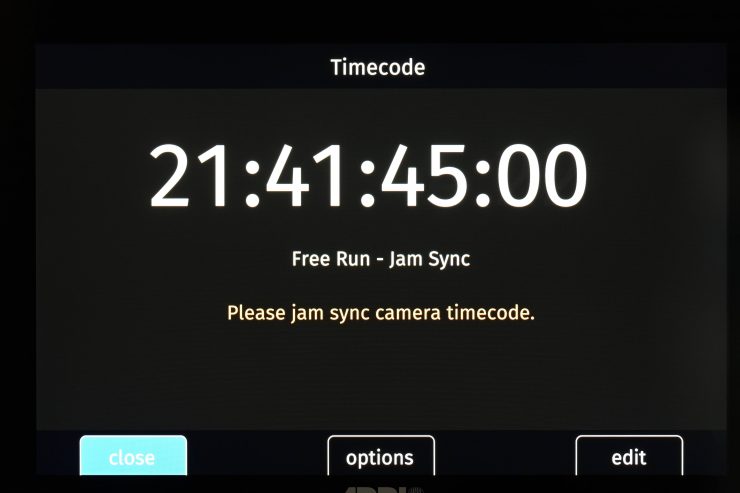
You can’t currently use both the CCM-1 & MVF-2 at the same time
Until a firmware update comes out (it should be available within the next few months) you can’t use both the CCM-1 and MVF-2 at the same time.
If you try and connect both the CCM-1 and MFV-2 at the same time on the ALEXA 35 you will get a warning on the screen.
Touch screen & physical buttons
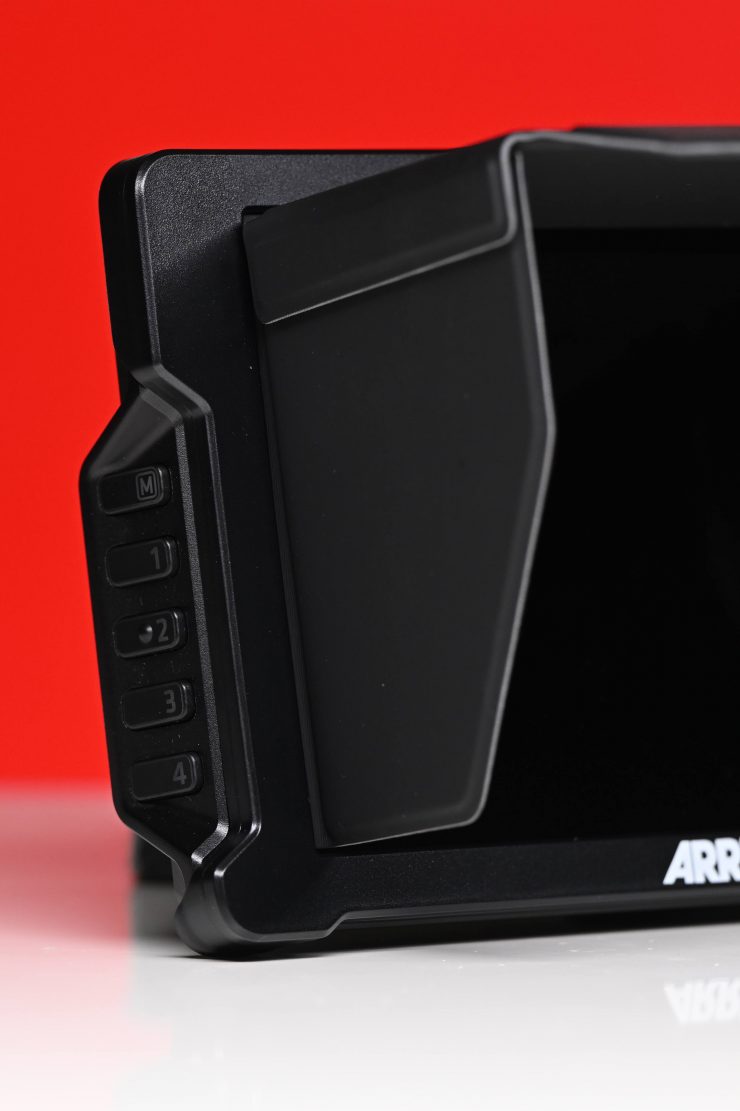
ARRI recognizes that while touch screen operation is going to be the preferred method of control for a lot of users, it is not always the best solution depending on the conditions you are working in. That is why they have also included physical buttons if you happen to be wearing gloves, working in adverse weather conditions, or simply don’t want to get fingerprint marks on your screen.
Speaking of the touchscreen, it is very responsive and snappy.
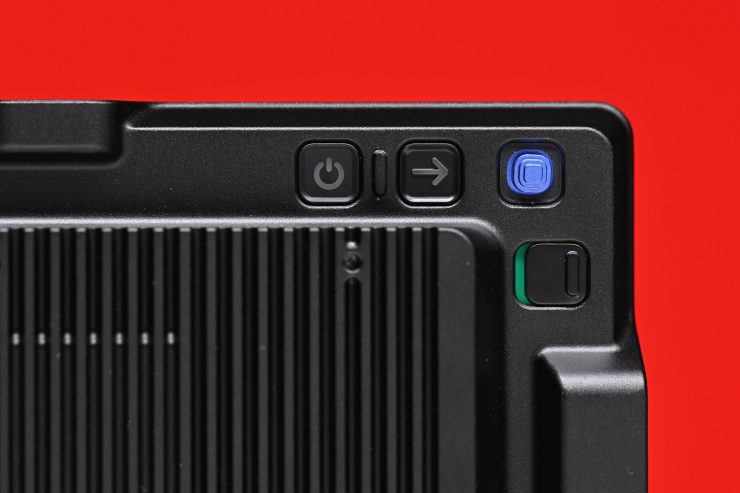
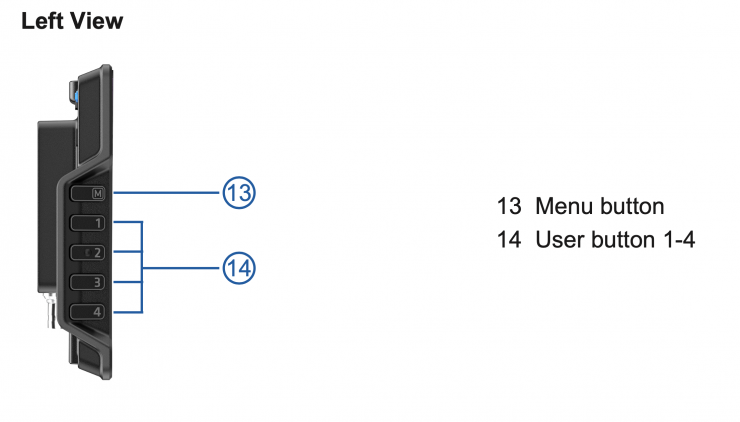
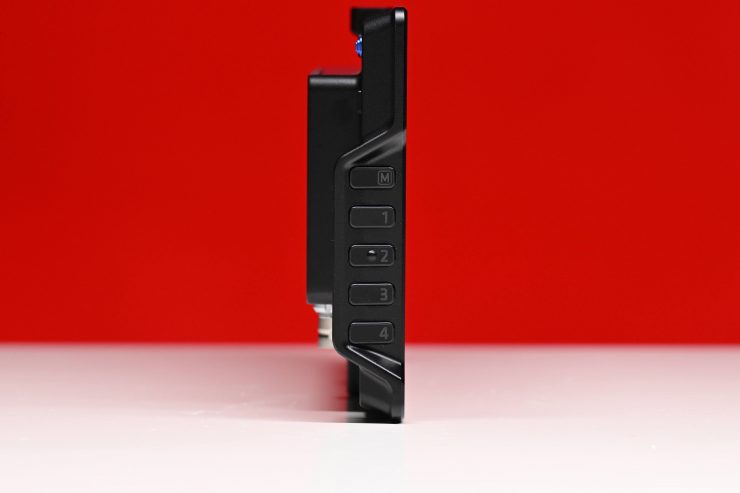
There is a navigation joystick, a power on/off button, a select button, and five user buttons that can be mapped to either SmallHD monitoring assist tools or ARRI user buttons. The top user button, by default, is set to Menu.
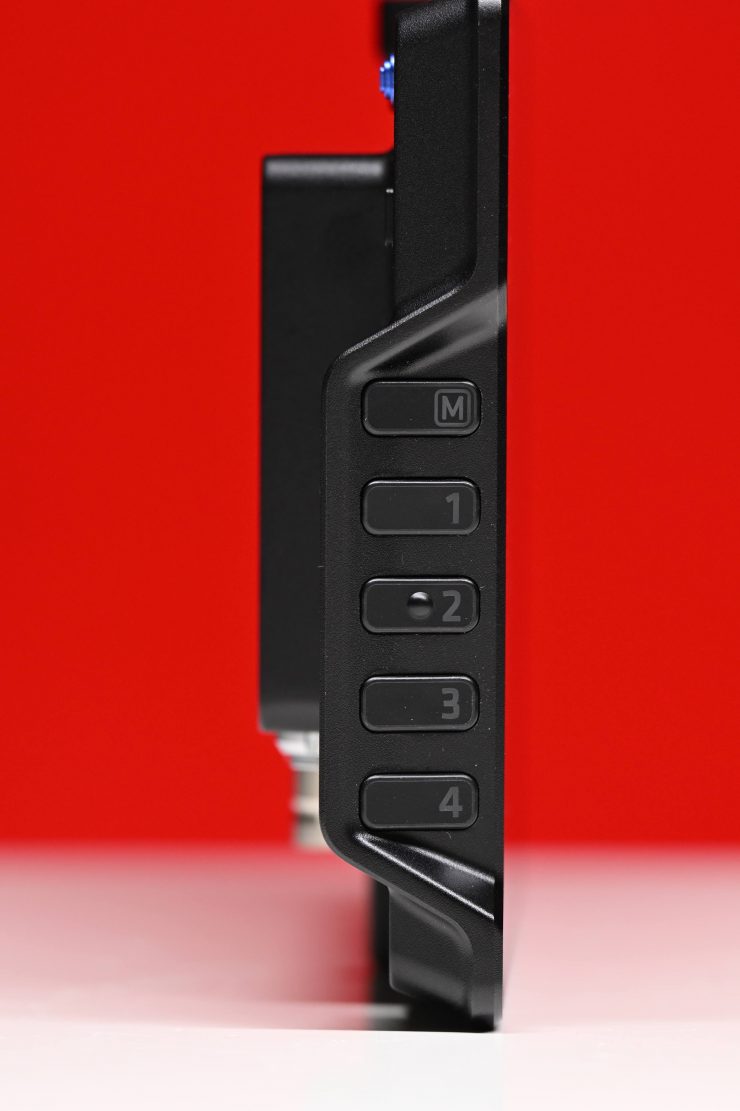
This allows you to map any tool from your camera and place it onto a user button on the CCM-1. This could be anything from adding ND to doing a manual WB, to changing the EI value, etc.
This is a great feature and it allows you to either mimic user buttons on your camera or choose completely different ones depending on your requirements.
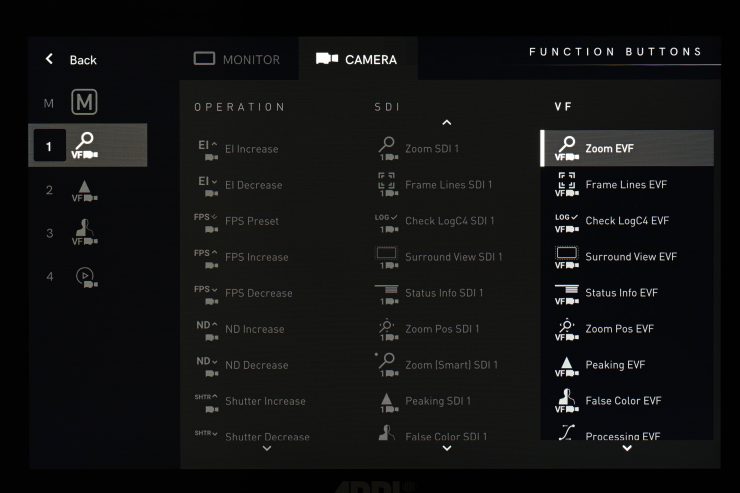
You can select what features to assign to the function buttons on the CCM-1.
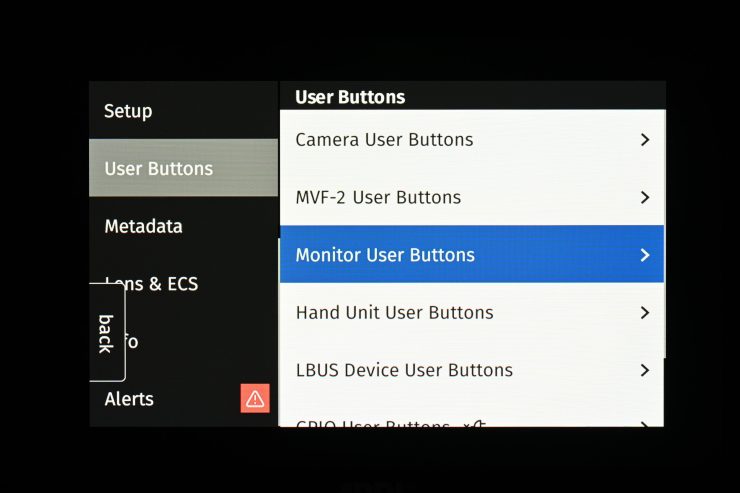
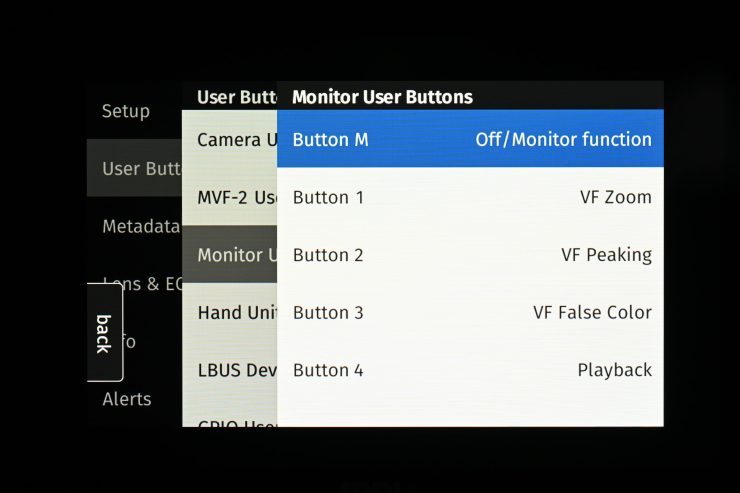
If you prefer you can also do it by going into your camera’s menu and selecting User Buttons and then Monitor Buttons.

What is nice is that you can see exactly what the user buttons have been mapped to on the CCM-1 screen, but only when you are on the ARRI menu page.
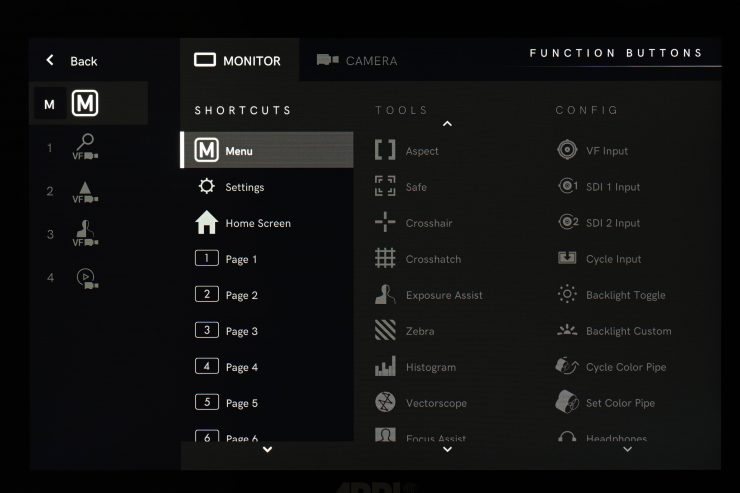
As I previously mentioned, along with being able to assign camera functions to the CCM-1 user buttons, you can also assign SmallHD monitoring assist functions and settings to them as well.
Everything works really well, but I did come across one small issue when using the SmallHD Color Picker. If I selected to change the position of the color picker and then wanted to exit that screen by touching on Exit I couldn’t because it would bring up the ARRI WB settings. The only way to exit the screen was to use the physical button on the CCM-1.
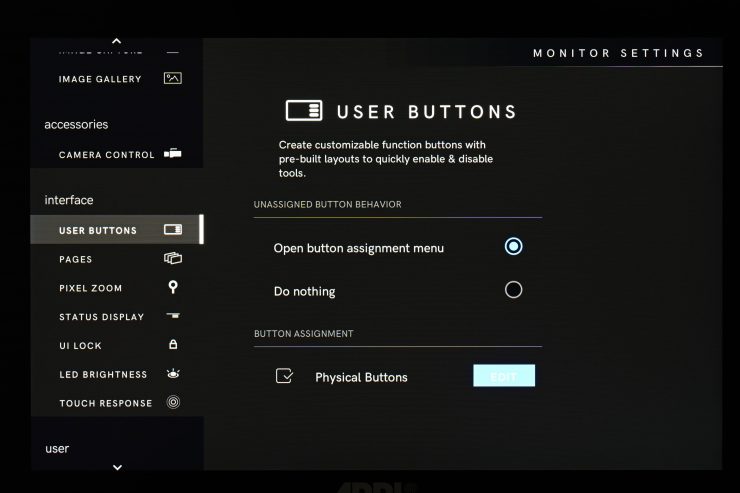
In the SmallHD menu on the CCM-1, you have the ability to determine what happens to unassigned buttons if you select them. If you press a button that doesn’t have anything assigned to it and you have the Open button assignment menu selected, it will take you directly to the menu so you can assign that button. Conversely, if you have Do nothing selected, then nothing will happen.
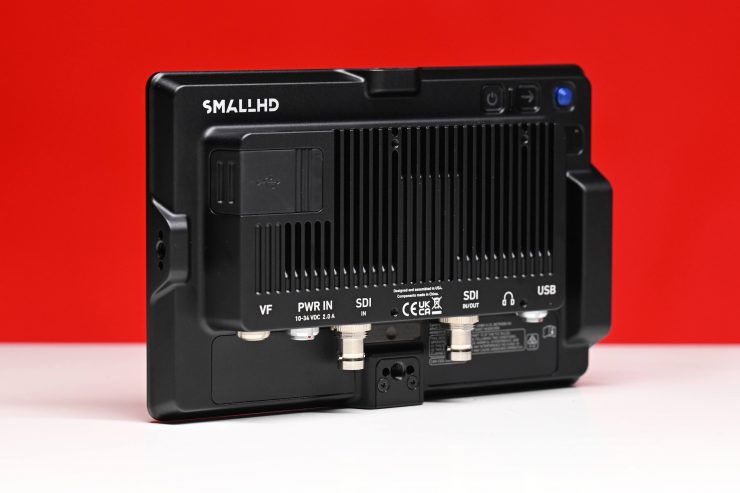
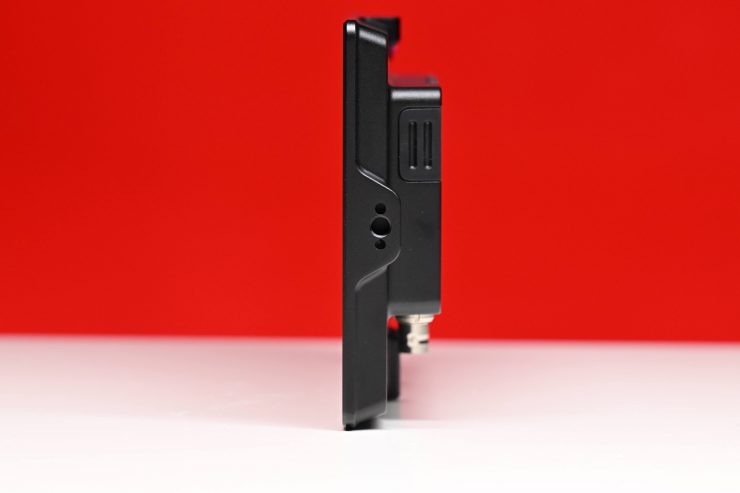
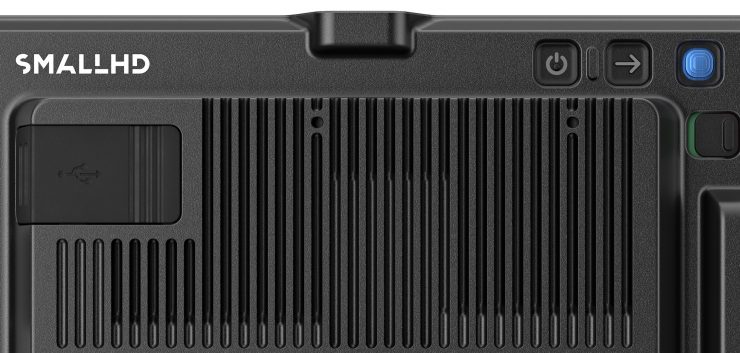
Mounting Points
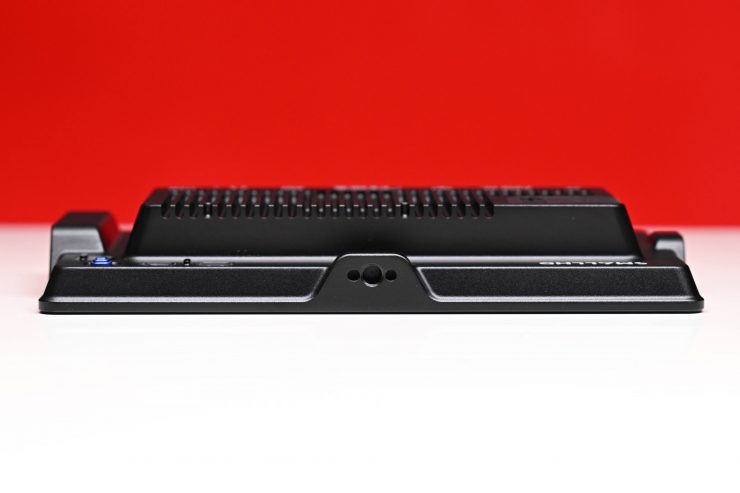
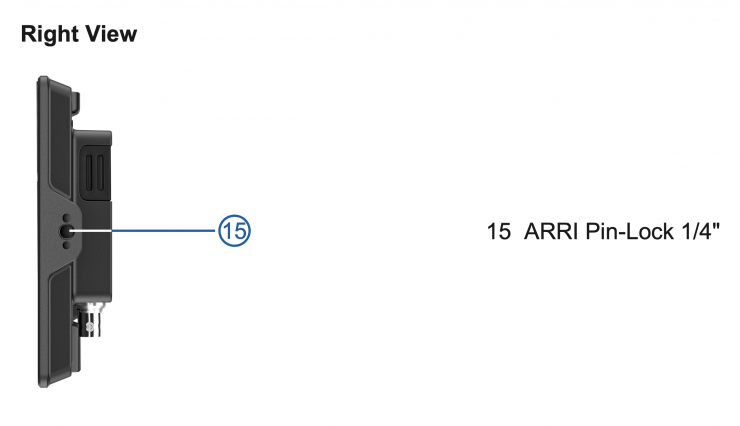
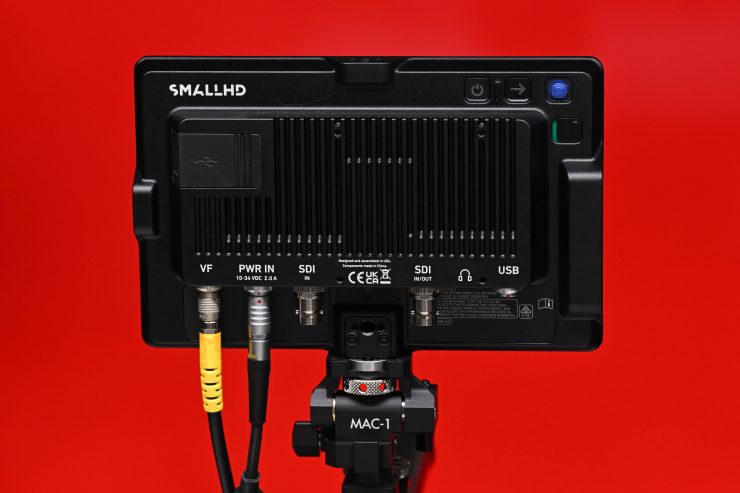
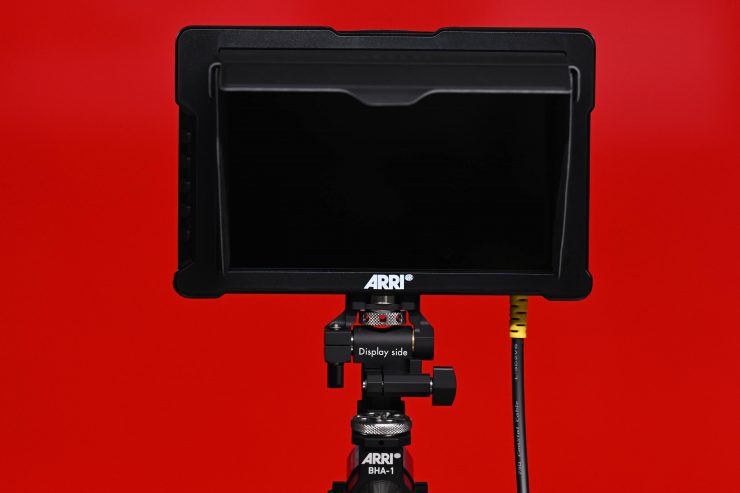
The CCM-1 has multiple mounting points with locating pin holes. On the top and right-hand side of the CCM-1, there are 1/4-20″ mounting holes with locating pins.

On the bottom, there is a removable block that features 1/4-20″ mounting holes with locating pins.
To use it with the MAC-1 (which I will talk about later) you can mount it on all ¼” ARRI Pin-Lock interfaces directly.
Cinematographers want mounting flexibility with on-camera monitors, and giving them as many options as possible is a smart move. You can’t just assume that everyone will want to mount their monitor the same way.
Viewfinder Adapter VFA-4
The VFA-4 enables mounting of the CCM-1 to standard ARRI viewfinder brackets without tools, and comes with inserts for ARRI Pin-Lock and SmallHD mounting standards. A folding mechanism allows quick repositioning and flat storage.
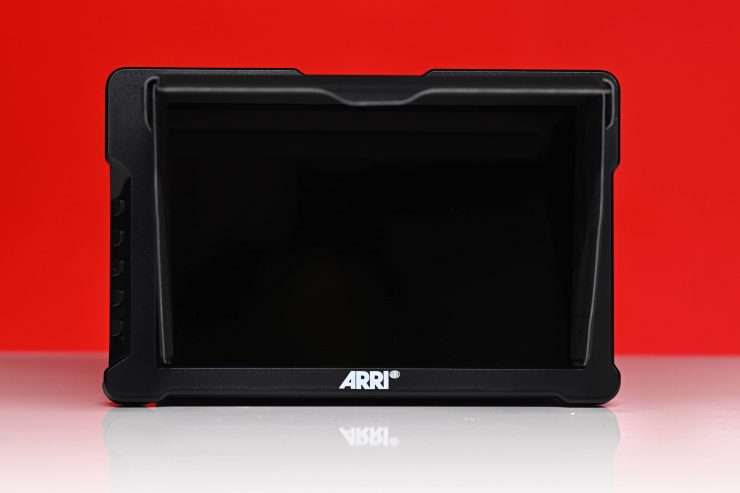
Build Quality

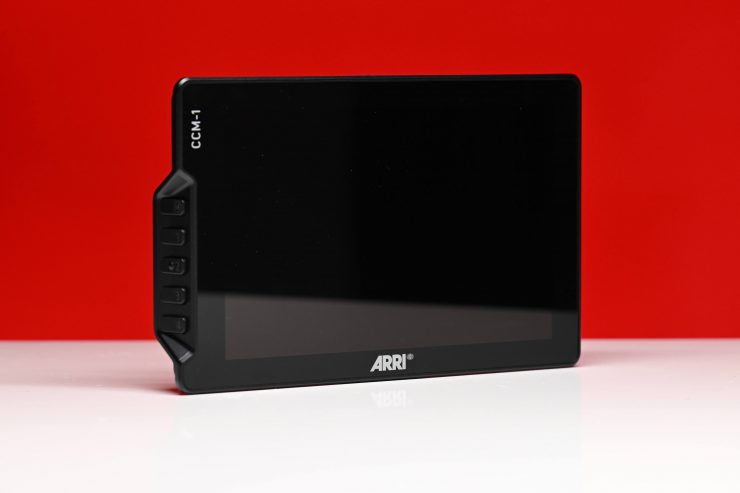
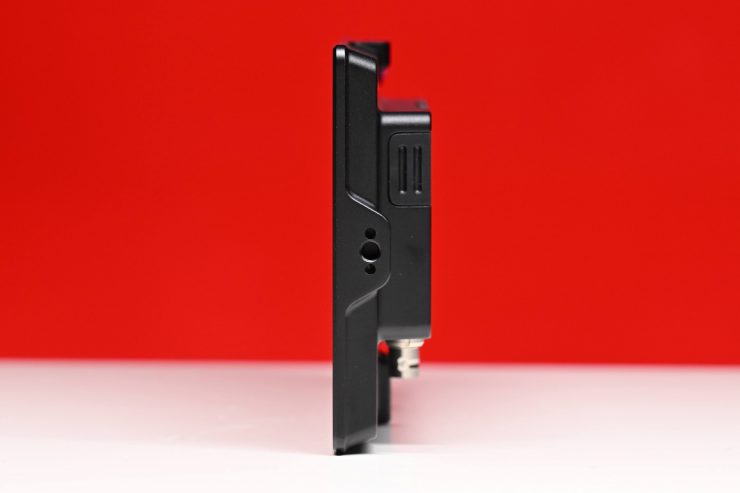
Appearance-wise, the CCM-1 looks a little bit different from other 7″ SmallHD monitors we have seen in the past. It is also a lot thinner than some of the recent SmallHD 5″ offerings.

The black finish and understated design point to the philosophy of keeping things clean and simple. Professional monitoring solutions need to be well-made and stand up to the rigors of field use. This is especially true when ARRI wants to attach its name to a product.
The CCM-1 features an anodized aluminum chassis with an exchangeable steel bottom interface. ARRI runs a tight ship and I was interested to see if the build quality of the CCM-1, especially since it isn’t made by them, would live up to their standards. The overall build of the CCM-1 is very good and is in line with other high-end SmallHD monitors.


The CCM-1 housing isn’t made out of the same type of materials as the MVF-2 which it was designed to mimic. In ARRI’s defense, if they had made the housing out of the same material as the MVF-2 then the CCM-1 would have been ridiculously heavy.
The CCM-1 is durable, weather-sealed, and temperature-resistant. Everything has been well thought out and it certainly looks like it was designed to stand up to the rigors of field use.
The build quality of a lot of monitors these days leaves a lot to be desired, however, in saying that, if you are only forking out $200 USD for a monitor then you shouldn’t expect the build quality to be good in the first place. You could certainly make the argument that if you buy a cheap monitor and it breaks then you just buy another one. However, do you really want your monitor breaking in the middle of a crucial shoot? I know I don’t. As the old saying goes, buy once, cry once.
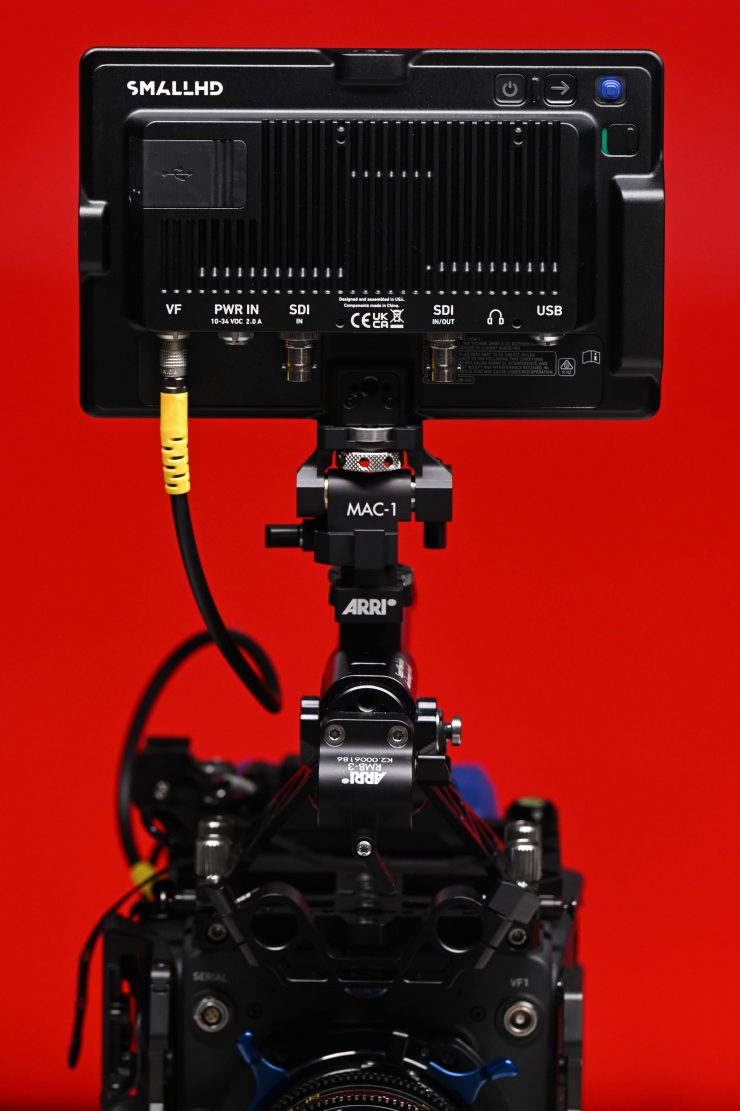
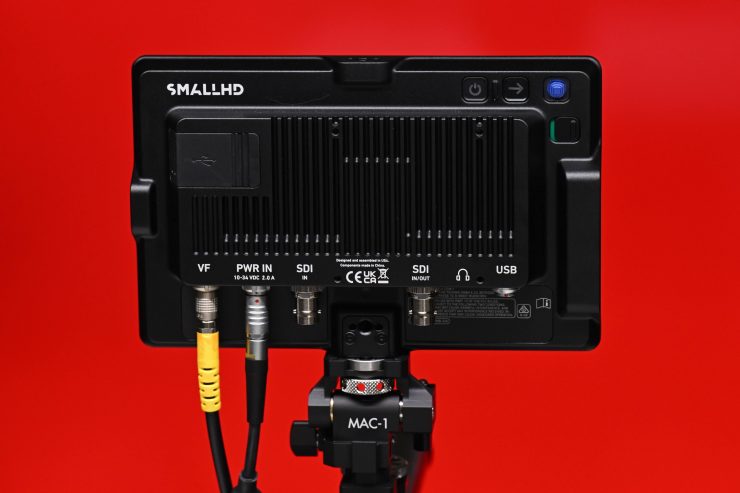
ARRI and SmallHD have paid close attention to the small details and they have thought about professional users’ needs. It is rare to see properly recessed SDI and other connection ports. So many monitors have totally exposed ports that stick out from the body. The first thing you are likely to break apart from the screen if you drop a monitor is the SDI ports, especially if they are sticking out of the side or back of the casing.
Now, some users may prefer having the ports on the back, but I personally prefer having them on the bottom.
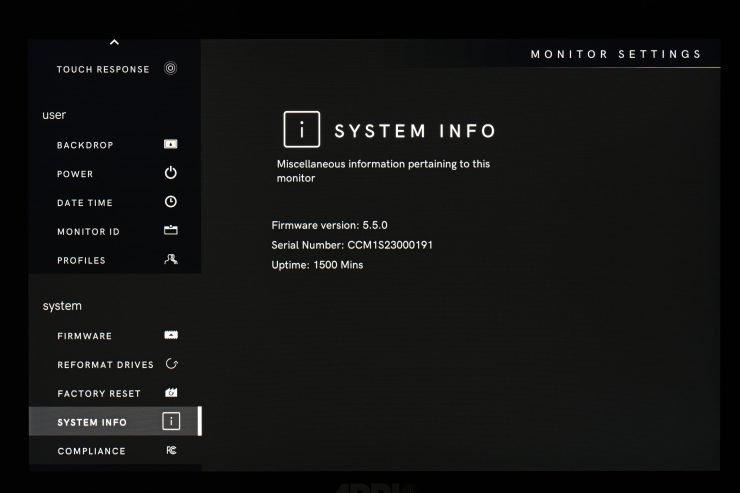
It appears that SmallHD or ARRI runs the monitors for quite some time before they are shipped out. When I went to the info page on a brand-new CCM-1 it showed that the uptime was 1500 minutes.
According to ARRI, the CCM-1 can operate in temperatures of 32° F to 113° F (0° C – 45° C) and it can be stored in temperatures from -4° F to 158° F (-20° C – 70° C).
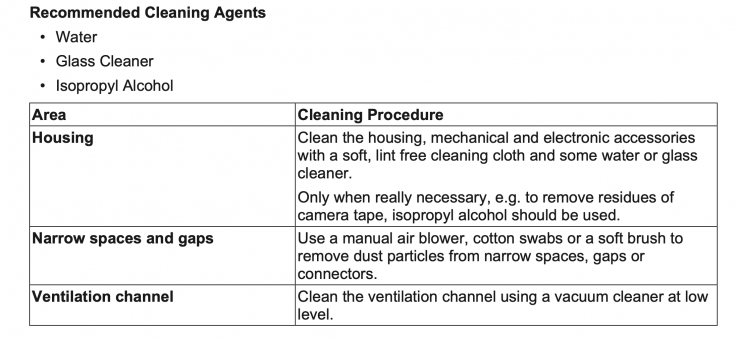
Above you can see what ARRI recommends when it comes to cleaning the CCM-1.
Size & weight

The CCM-1 weighs 594g / 20.95oz and it has physical dimensions of 4.72 x 7.36 x 1.15 in (120 x 187 x 29 mm). This weight is reasonably good for a 7″ monitor. As a comparison, below you can see what some other 7″ monitors weigh:
| WEIGHT | |
| ARRI CCM-1 | 20.95 oz / 594g |
| SmallHD Cine 7 | 20 oz / 567 g |
| SmallHD INDIE 7 | 26 oz / 737 g |
| SmallHD 702 Touch | 18.9 oz / 536 g |
| Transvideo RainbowHD7 SBL 7″ | 23.2 oz / 660 g |
| Atomos Shinobi 7″ | 1.3 lb / 577 g |
| TVLogic F-7HS | 1.8 lb / 800g |
| SWIT 7″ Super-Bright Compact HD LCD Monitor | 17.64 oz / 500 g |
As you can see, the CCM-1 isn’t overly heavy at 594g and it is very similar in weight to most other 7″ monitors on the market.
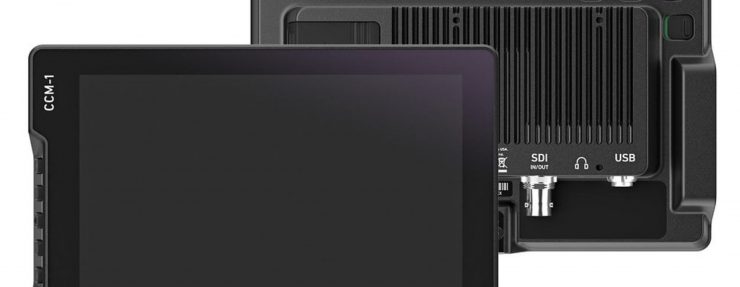
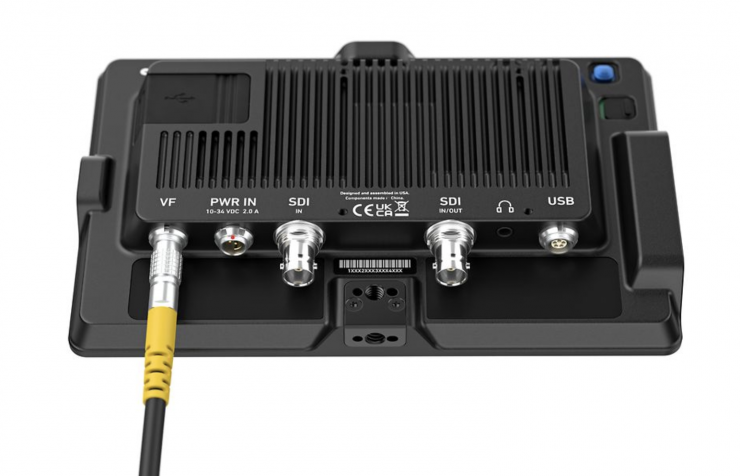
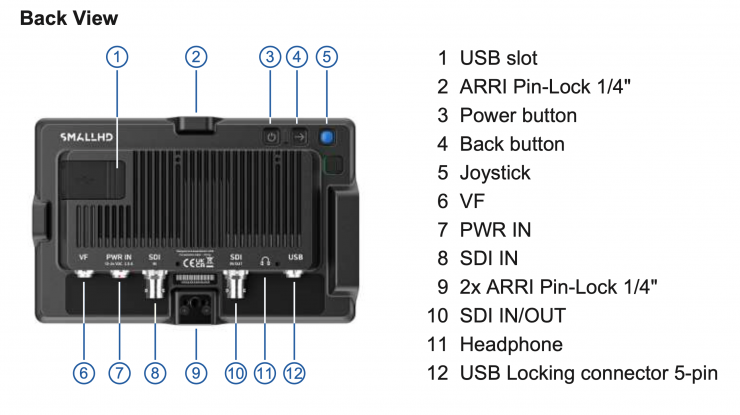
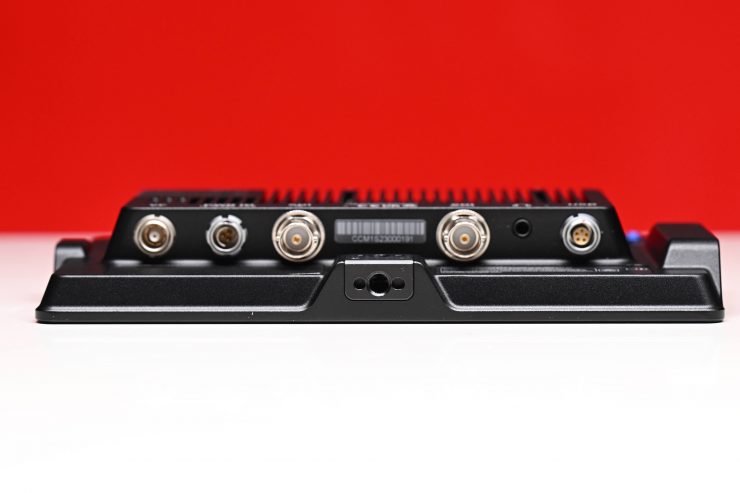
Inputs & outputs
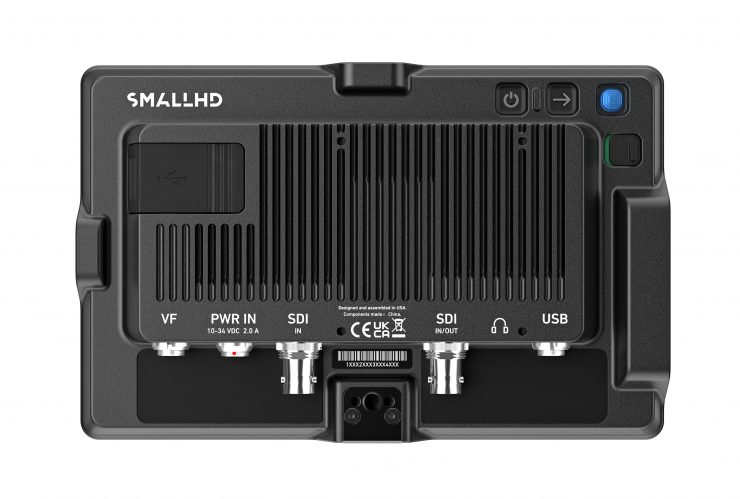
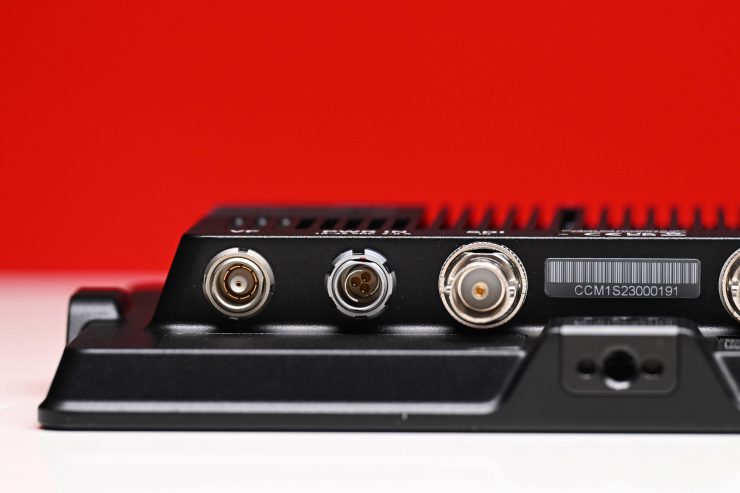
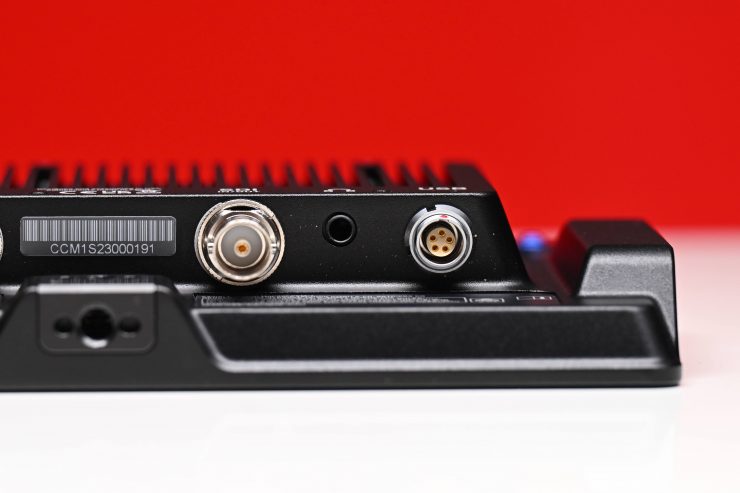
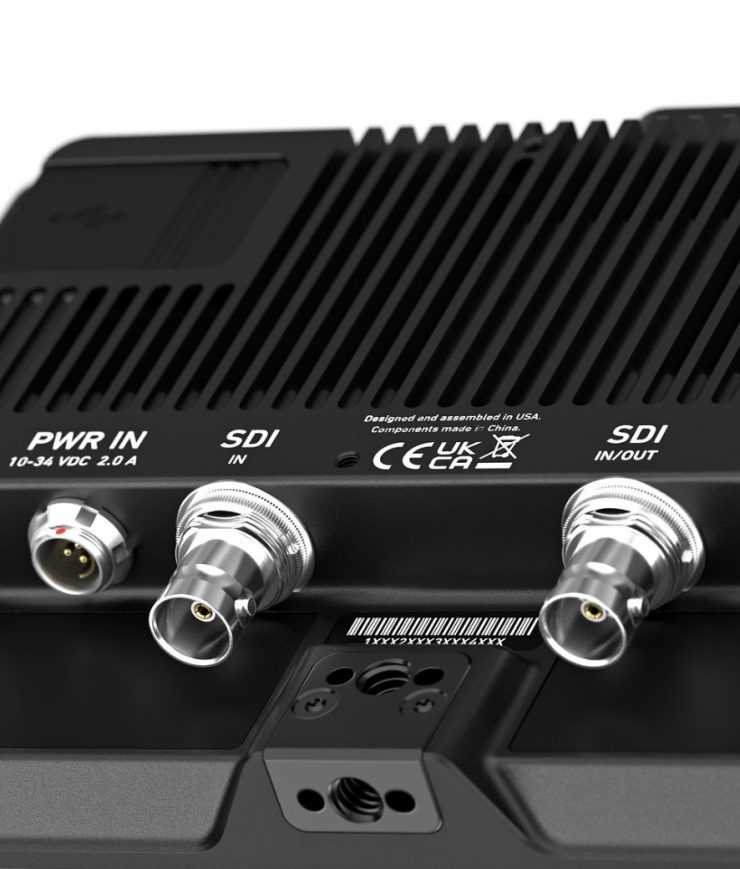
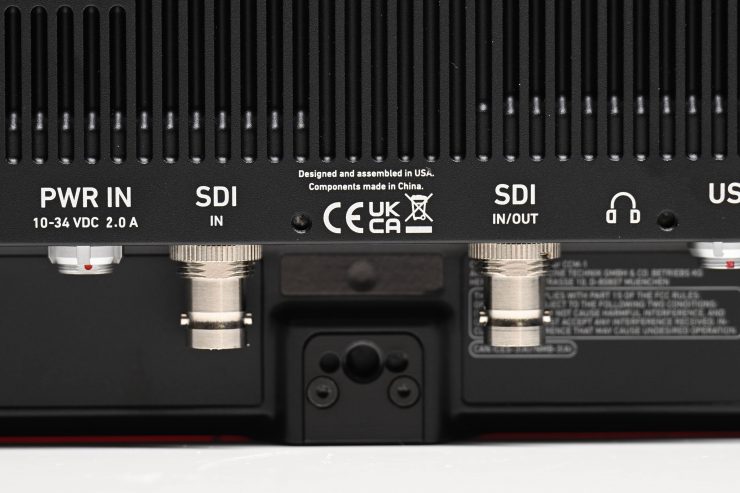
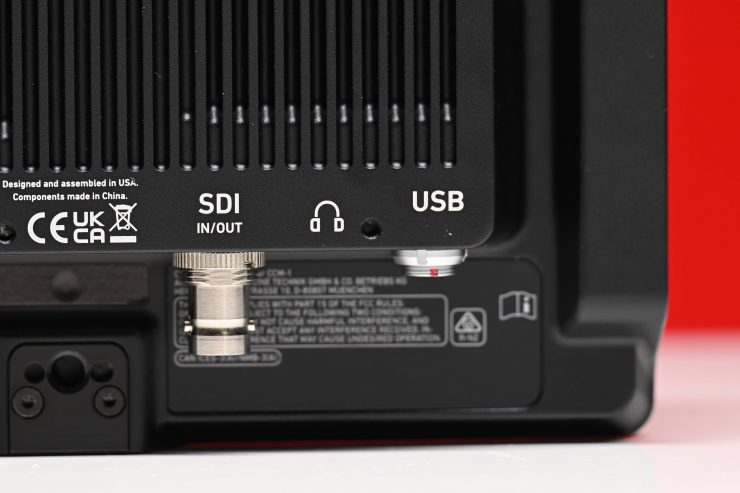
The monitor includes the following inputs and outputs:
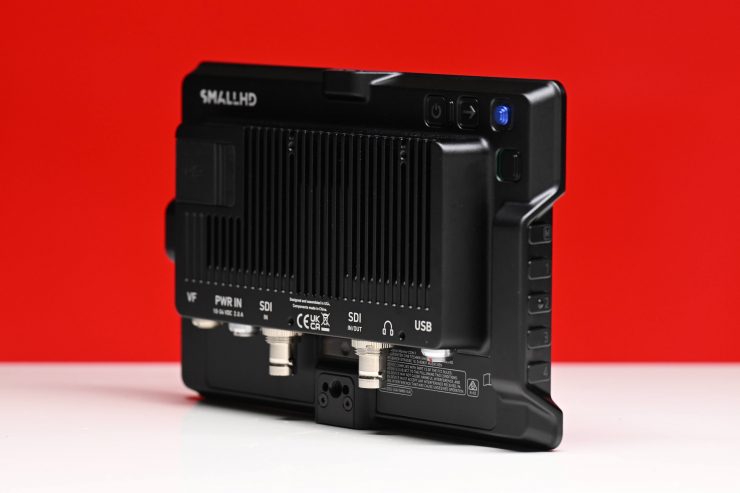
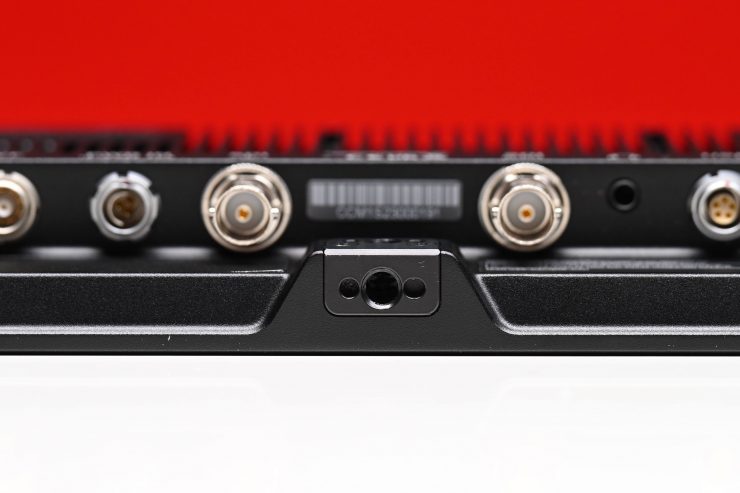
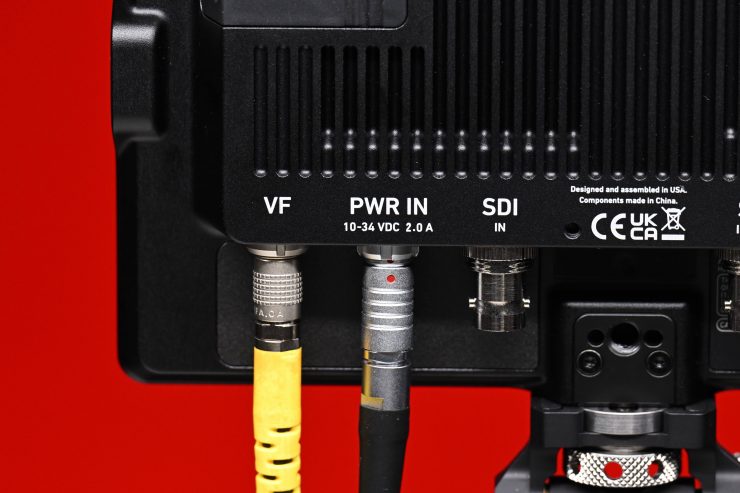
- 1 x BNC (3G-SDI) Input
- 1 x BNC (3G-SDI) Input/Output
- 1 x ARRI VF input
- 1 x 3-Pin Fischer connector 10-34V DC 2.0A input
- 1 x 1/8″ / 3.5 mm Headphone Output
- 1x 1 x LEMO 5-Pin 2.0 Output
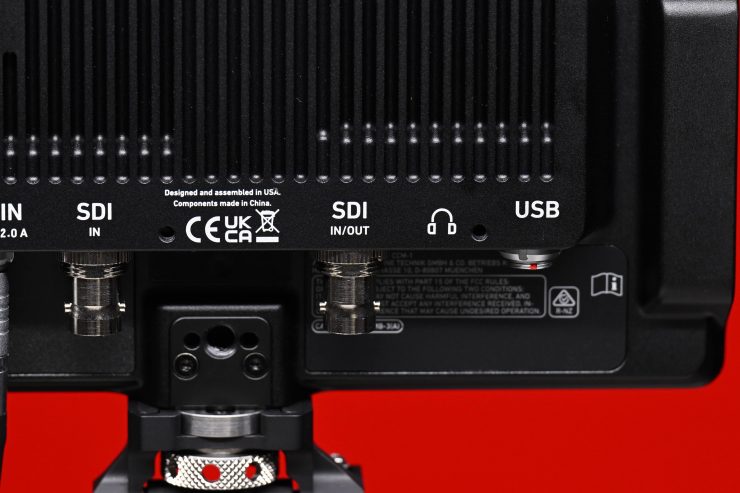
The CCM-1 offers you a good array of inputs and outputs for a monitor of this size.
Now, there is a caveat with the inputs and outputs. You can’t output anything over SDI if you are using the VF input on the CCM-1. The only way the SDI Out works is if you are using the SDI input instead of the VF input. I imagine this is a limitation of the hardware and not something that can be fixed via a software update.
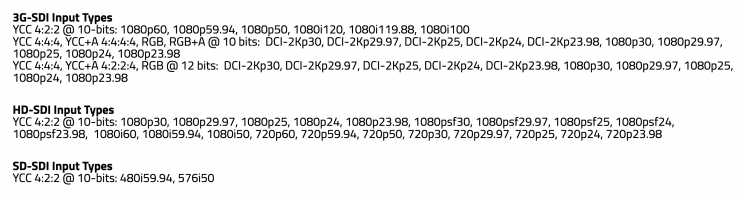
Above you can see what video signals the CCM-1 can accept over 3G-SDI.
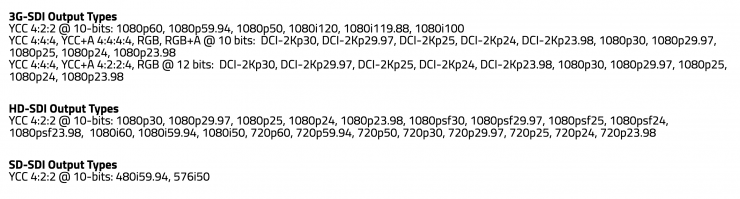
Above you can see what video signals the CCM-1 can output over 3G-SDI.
Power
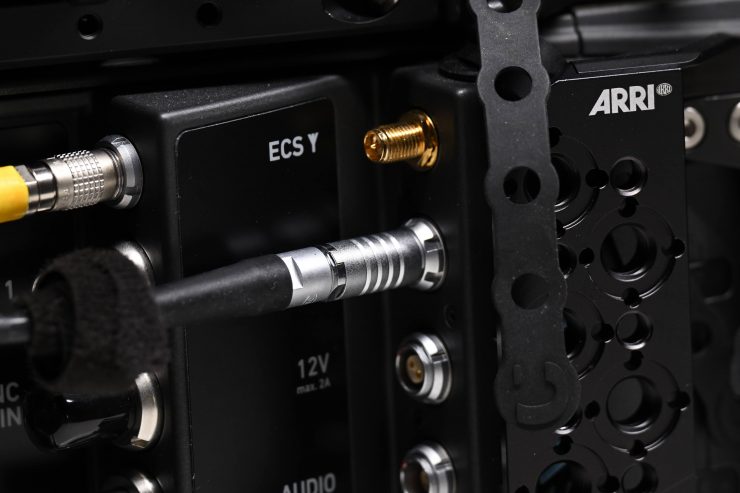
Although you can power the CCM-1 through the CoaXpress cable, the brightness will be limited, so you will need to use the 3-Pin Fischer connector (10-34V DC), 2A Input. The monitor doesn’t come with a battery plate like a lot of other monitors. This isn’t really a big deal considering that the monitor was made specifically for the ALEXA 35 and ALEXA Mini LF. In saying that, there are four M3 mounting points on the back of the monitor where you can attach third-party micro battery plates from companies such as bebob and Anton Bauer. This is handy if you want to power the CCM-1 if you are running it a long way from where the camera is. You would need to run an optional d-tap to RS cable from the battery plate to the CCM-1.
While the CCM-1 does come with an RS – RS/PWR IN (0.5m/1.6ft) in the kit, ARRI does have other cables available for D-tap, etc.
You cannot power accessories from the CCM-1. The 5-Pin Lemo is a USB that can be used for Camera Control through Ethernet. This allows using SDI, Power, USB to also do camera control (no menu access though). Basic control of a few parameters of ALEXA Mini and AMIRA will also be possible.
The CCM-1 draws up to 20 W.
Heat
The CCM-1 doesn’t have an inbuilt fan, and it runs completely silent. The monitor does have a couple of reasonable-sized cooling vents on the back.
I found that it didn’t get nearly as hot as other SmallHD monitors such as the Ultra 5, Cine 5, Cine 7, etc.
Operating System

In my opinion, SmallHD monitors have the easiest OS system to use and operate and that was one of the reasons ARRI decided to partner with them. There is so much more to a monitor than just image quality, and a good operating system is what often sets monitors apart. Usability and operability sometimes get overlooked by people looking at monitors, but to me, they are right up there with image quality. I own a few different SmallHD monitors and I like being able to go between all of them and using the exact same menu and operating system. This makes going from one to the other seamless.
Lots of monitors have pretty good-looking images, but a lot of them are let down by poorly designed operating systems and monitoring assist tools that are not in any way accurate.
Like all modern SmallHD monitors, the CCM-1 uses the same PageBuilder OS graphical user interface (GUI). SmallHD built the PageBuilder OS to make menus less confusing. PageBuilder is a very customizable system as it allows you to selectively apply monitoring tools such as waveform, vectorscope, multiview, LUTs, and focusing aids on different “pages”.
At least, in my opinion, the PageOS 5 operating system is far superior to any other operating system on the market, especially the ones that you will find in competing 7″ monitors. The customization and features that are available, put a lot of other operating systems to shame.
SmallHD’s PageOS 5 was released back in September 2022 and it added quite a few new features and enhanced functionality. Below you can see what some of those key new additions were:
Since the initial release, there have already been two new firmware updates for PageOS 5. SmallHD’s Page OS v5.2.0 firmware update adds a couple of nice new features.
One of the main reasons I personally like SmallHD monitors is that they continually update and add features and improvements to their monitors. With almost all of the cheaper monitors on the market, what you buy is what you get and it is very rare to see firmware updates or new features added.
If you haven’t used a S
Having the ability to assign just one, or many tools to a single page makes it very quick to access a monitoring assist tool or make a change. It also allows you to customize what you actually need instead of being forced to use what a manufacturer gives you.
You can also rename and customize the individual pages you create.
Like most touchscreen monitors these days, you just pinch to zoom.
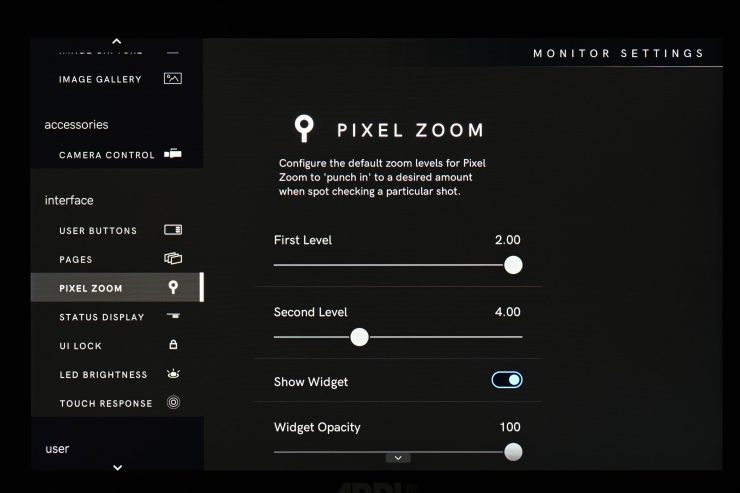
In the SmallHD menus, you can customize the levels of zoom magnification.
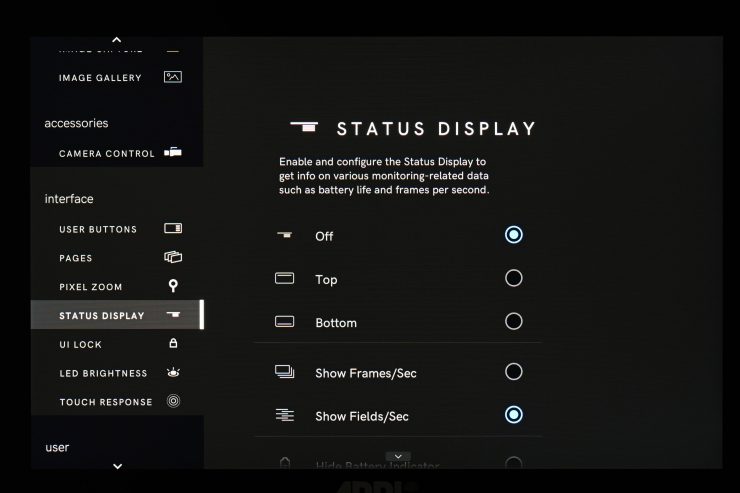
You also have the ability to turn Status Display parameters on/off and change what information is displayed and what position it is displayed in.
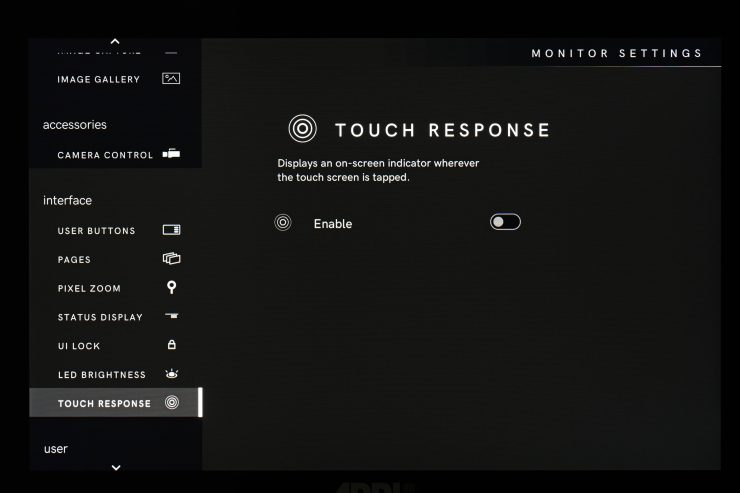
SmallHD has also included a nice feature where you can enable an on-screen indicator whenever the touchscreen is tapped.
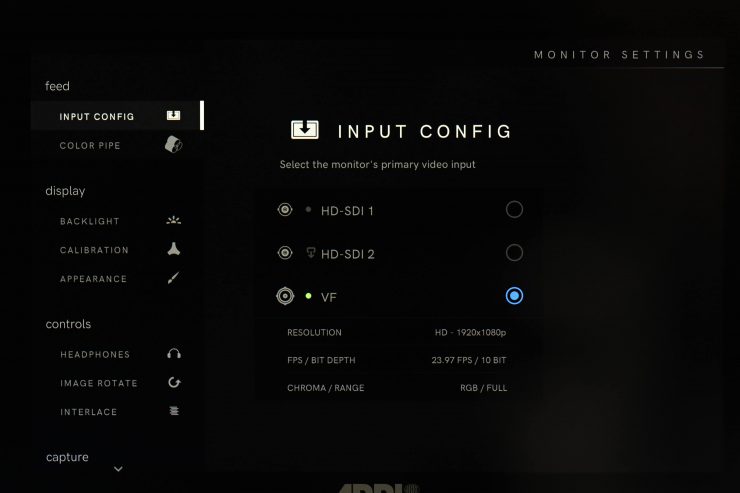
On the Input Configuration page, if you have the CCM-1 hooked up with the CoaXpress cable it will already automatically default to the VF input.
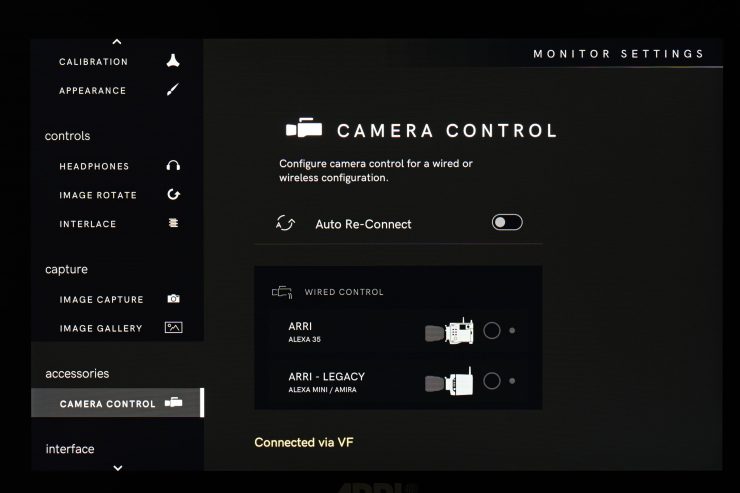
On the Camera Control page, you can configure the ALEXA 35 or legacy ARRI cameras for wired control. By default, this is not available when you have the CCM-1 hooked up using the CoaXpress cable. I am not sure how the wired connection works if you are not using the CoaXpress cable, as camera control is normally only available for ARRI cameras through the use of an Ethernet cable, and the CCM-1 doesn’t have an Ethernet port.
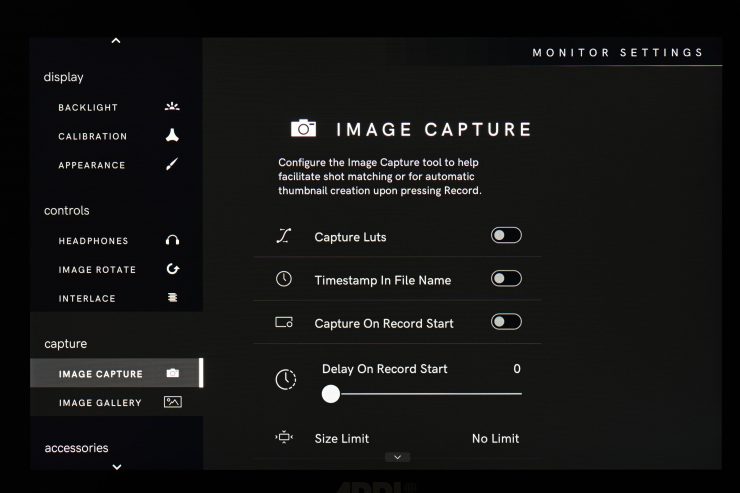
SmallHD monitors also have the ability to do Image Capture which is a very handy feature. You can choose to manually capture images or you can set the monitor up to automatically capture every time you hit the record button on your camera.
You do need to have a USB-C memory stuck attached to the CCM-1 to do this. You have to source this yourself as ARRI doesn’t include one in the kit.

What I also like is that you can save individual Profiles for future use, so that you can configure different settings and then bring them up depending on your requirements. Again, you need to have a USB-C memory stick plugged in to do this.
SmallHD Monitor Assist Tools

There are a ton of monitor assist tools to choose from on the CCM-1 and if you are familiar with SmallHD monitors you will know them all well.
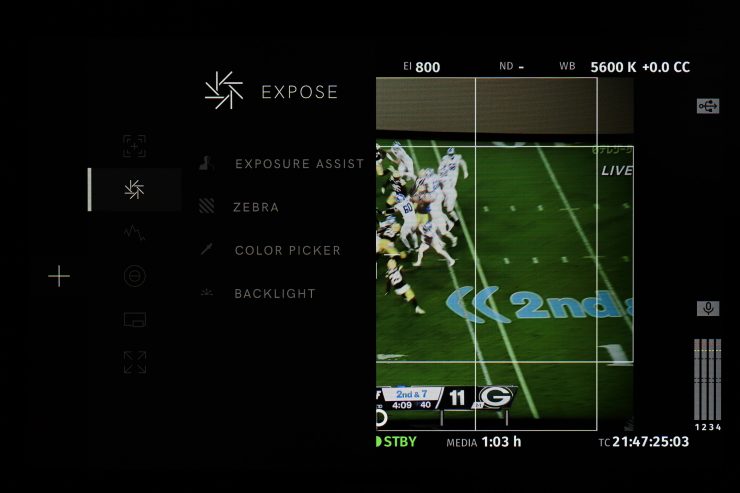
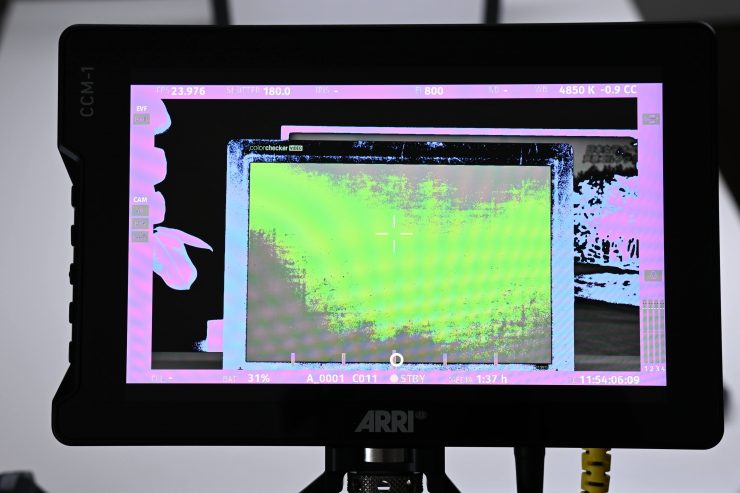
I especially like the Color Picker function where you can move a target icon around and it will display color values for you. On the CCM-1, you can set up to four different reference points which are extremely handy for making sure you get accurate exposure and colors.
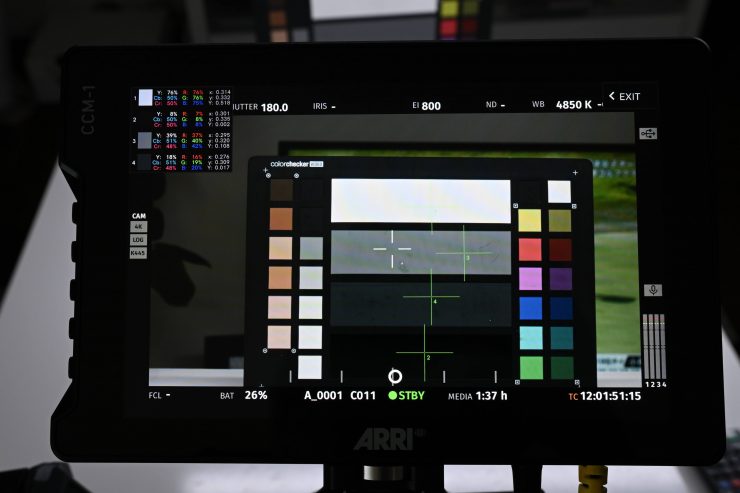
By setting multiple color picker points on a color checker chart you can make sure that your colors and exposure are as accurate as possible.
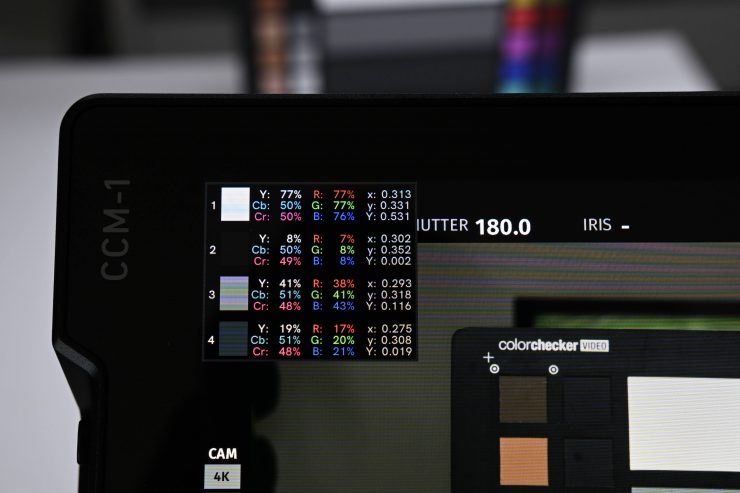
As the color picker gives you representations for Y, Cb, Cr, and R, G, B you can clearly see exposure levels and RGB values. This way you can be sure that white is actually white and you can make adjustments so that middle grey exposure is accurate. As you can see above, my IRE for middle grey is set at 41%, this is within the 38-42% specified by ARRI.
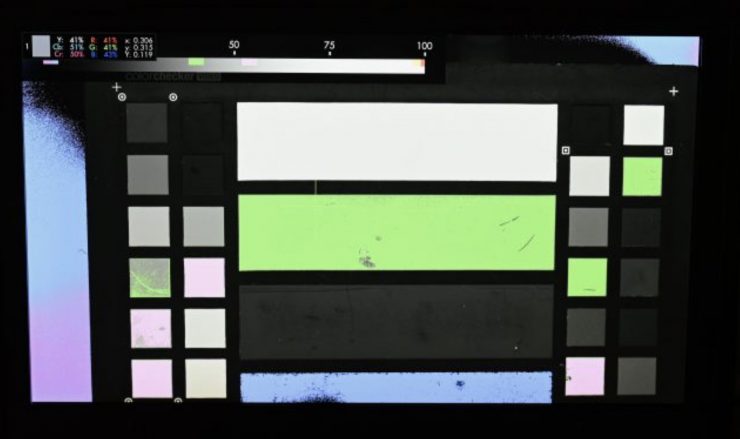
You can also use the color picker in conjunction with false color to make sure middle grey exposure is accurate.
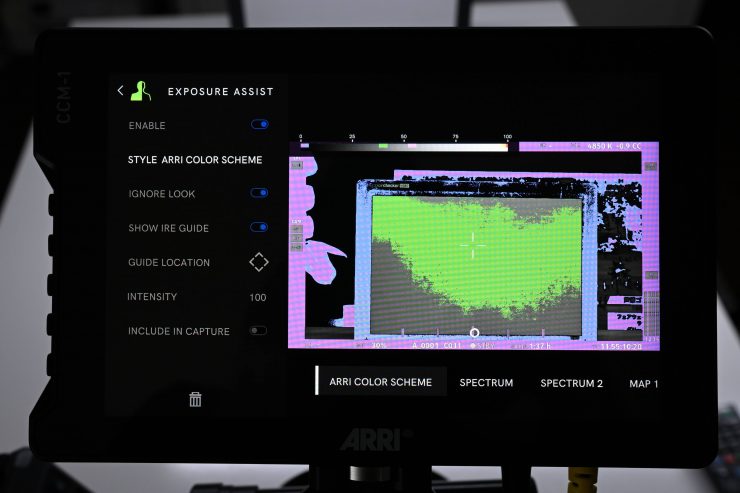
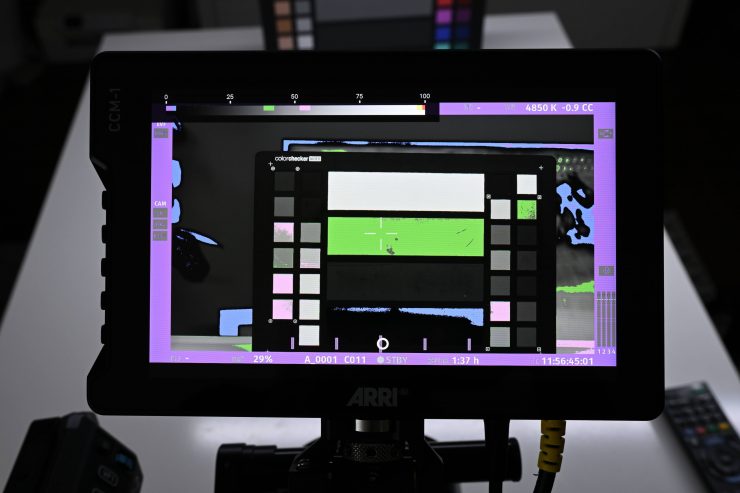
One of the other nice aspects of PageBuilder OS is that SmallHD has actually bothered to standardize the false-color functionality. As a default, the false colors are mapped directly to ARRI cameras, but you can also customize them to whatever camera you are using. This is a big deal. A lot of other monitors just have false color with no scale or markings and you have no idea what you are actually seeing. As the false color indicators on the CCM-1 accurately reflect what I am seeing in my EVF I know I can rely on them.
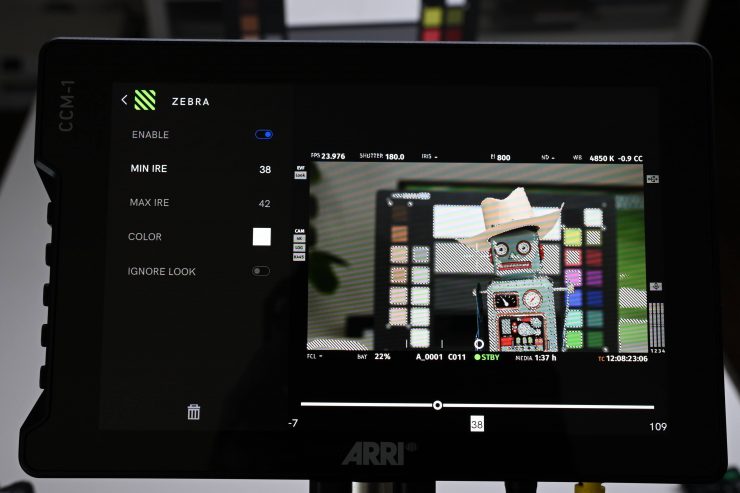
With Zebras, you can set the IRE range that you want to see. This is very handy. Above you can see that I have set the IRE for the zebras between 38-42% which is ARRI’s IRE value range for 18% middle grey on the ALEXA 35.

Above I have changed it so that the IRE value range is 52-56% which is the value for the ALEXA 35 for 1 stop above middle grey.
As I own a few SmallHD monitors it is nice to be able to go between them and have the OS system be exactly the same.
SmallHD doesn’t just release an operating system and then never change it. The PageOS system is constantly being updated and improved.
Color Pipe
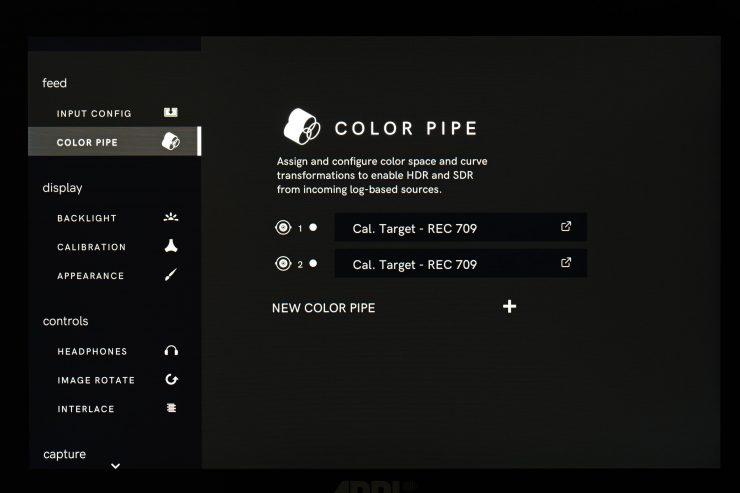
SmallHD’s Color Pipe allows you to assign and configure color space and curve transformations for the different inputs. This is found on the ARRI CCM-1.
Calibration
On the calibration page, you can choose to use the factory calibration or you can make manual adjustments. You can also do a new calibration by choosing CalMAN but you need to hook up the monitor to a computer that has the licensed CalMAN software on it. The other option is to choose Generic Calibration where you can choose from some presets or create your own custom one.
As the CCM-1 has already been calibrated by ARRI, I wouldn’t personally be doing any calibration to the monitor.
Is 7″ the right size for an on-board monitor?

Whether or not a 7″ display is too big for use as an on-camera monitor really depends on what your intended use is. Personally if I was running a monitor and an EVF, then I think 5″ is a good size, but if I am not running an EVF then 7″ makes more sense. There really is no correct answer to this question, as everyone has different needs and requirements. ARRI obviously did their homework and worked out from user feedback that users of their cameras preferred a 7″ monitor over a 5″ monitor.
Any issues?

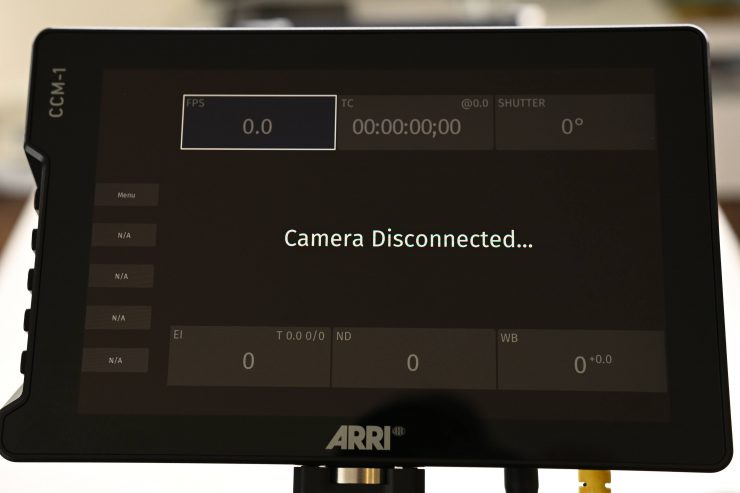
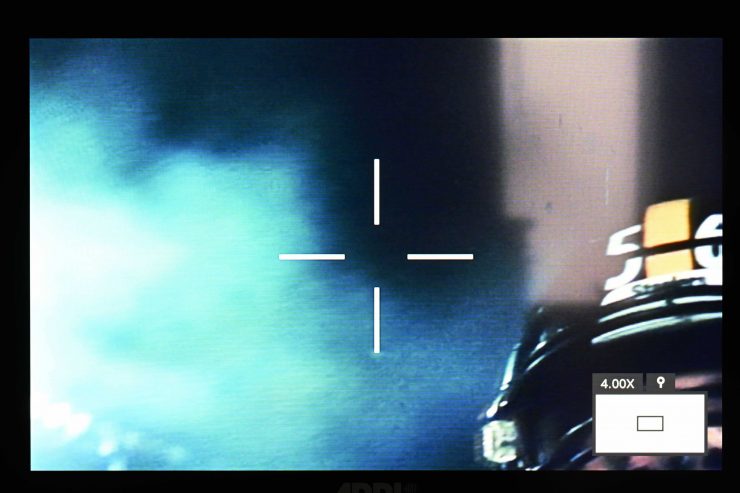
You can run into an issue if you already have the CCM-1 powered up and then you attach the VF cable to it. I found that on occasion, if I did this then if I tried to access the camera’s menu using the CCM-1 I would get the above screen.
To fix the problem I just needed to turn the camera off and then back on again.
No HDR
The CCM-1 isn’t an HDR-capable monitor. While the CCM-1 reaches 1,300 nits, it doesn’t do so dynamically as to technically meet the HDR spec (for contrast ratio). However, it can still be used to monitor HDR.
According to SmallHD, their view is that on the monitoring side, relying on the picture alone, even a true HDR picture in anything other than a studio environment is not ideal and would result in improper exposure adjustments since the perceptions of what is on screen changes so drastically along with the viewing environment. For example, if monitoring on a bright sunny day, any subtleties in the darkest areas of an HDR picture will be completely lost to the eye and may not be accounted for – in this case, you actually would want a boosted black point so that issues can be spotted due to the environmental constraints.
In this methodology, reliance on exposure tools and scopes is even more important than before when speaking of HDR because, in a proper viewing environment, any issues at the extremes of a camera’s dynamic range get magnified much further than with SDR.
When people ask how to best shoot for HDR, SmallHD normally recommends using a waveform set to RGB or parade (so if one individual color channel gets clipped you can pick it up before the luma waveform would see the same issue) or to set a custom exposure assist (false color) to the points in the image where clipping occurs. If shooting in log and at least 10-bit (12 bit+ preferred) and the extremes of the exposure range are managed, you’ll be capturing future-proof HDR-ready material. Now what to do with that footage next is a whole new issue with all the competing standards, and a surge of HDR10+ across manufacturers, etc. help demystify for the shooter while treading carefully not to further complicate this already complicated world.
Sun hood

ARRI has designed a nice sun hood for the CCM-1 which is similar to an iPad cover. It uses small magnets to stay together so it won’t sag or droop. This foldable sunhood can be mounted to the CCM-1 without any tools, the side flaps and the top flap hold together magnetically. The outside material is strong and durable, the inside microfiber material protects the display and prevents reflections.
This is a very clever design and it is by far the best sun hood solution I have seen as it still gives you full access to the touchscreen. Again, leave it to the Germans to design something that is not only practical but functional and well-designed!
What is also nice is that it folds completely flat so you can leave it on the monitor when you are not shooting so it is protected.
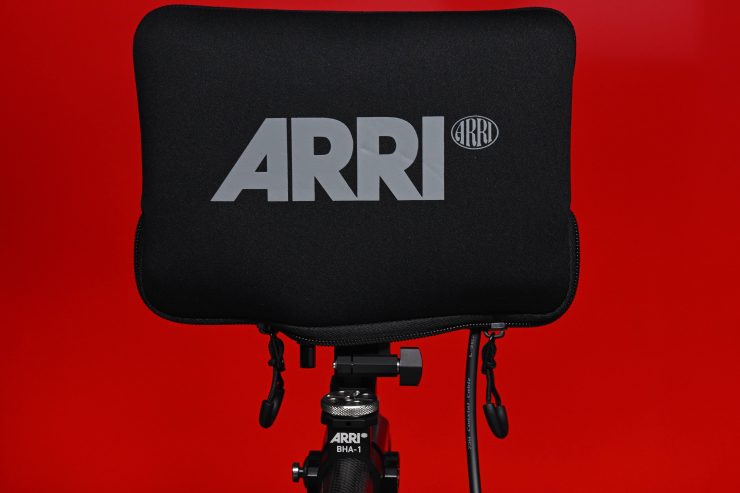
The monitor also comes with a cover which for added protection you can also slip over the monitor and sun hood.
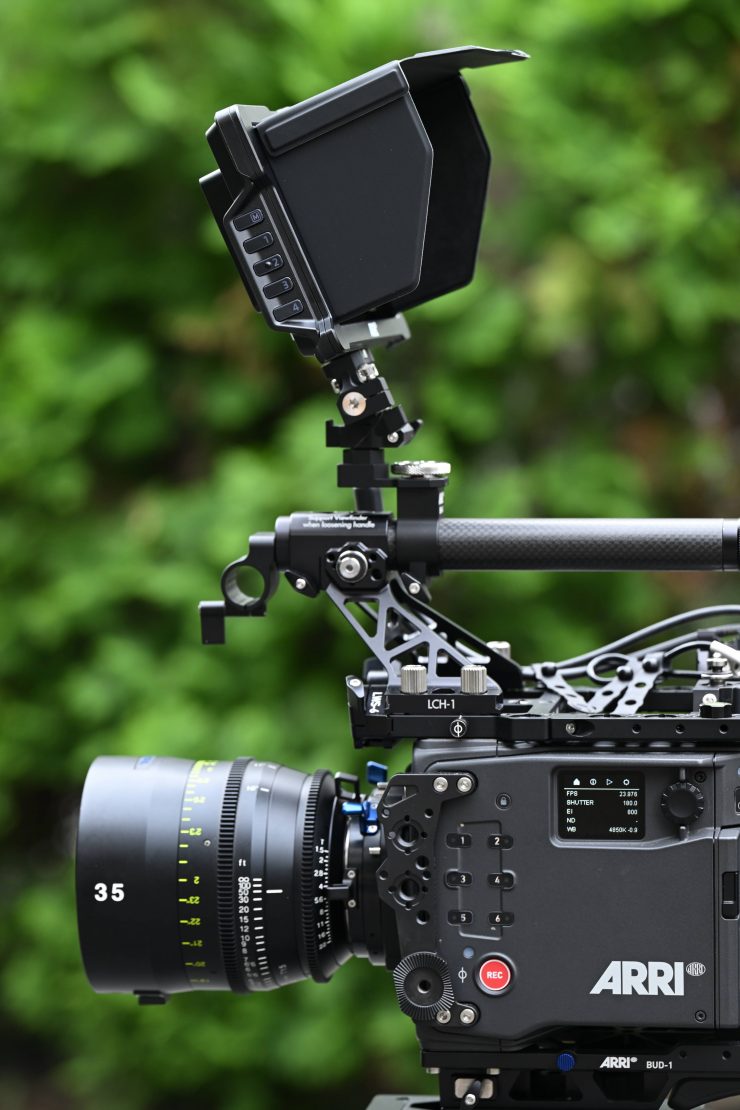
MAC-1 Two-Axis Monitor Arm
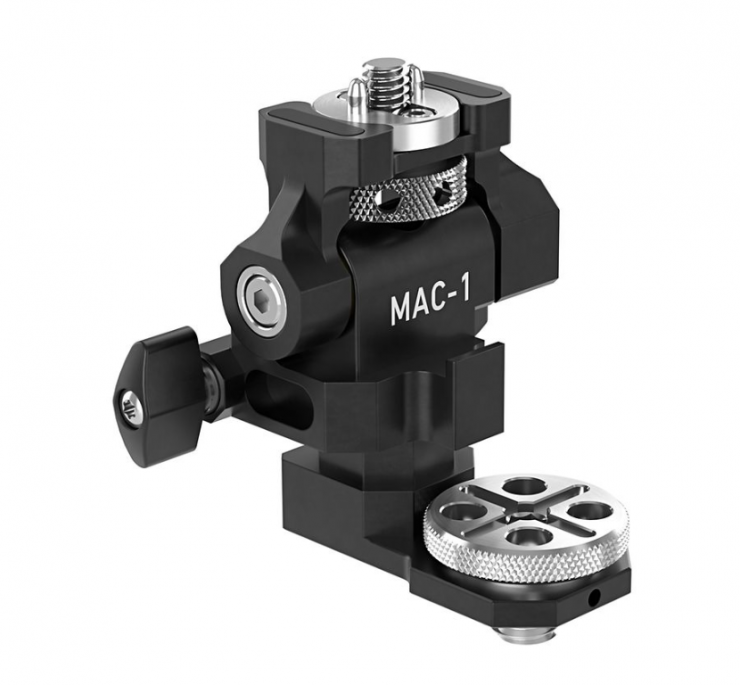
ARRI wasn’t happy with any of the available monitor arms that were on the market so they came up with their own. The MAC-1 is a small-sized two-axis monitor arm that was designed to be compact and lightweight.
From user feedback, ARRI found that most of its users prefer to have a monitor mounted in a fixed position where they only need to adjust two axis.
You can set the MAC-1 to a friction level you are happy with so you can quickly adjust the tilt and pan position of the monitor without having to loosen and retighten anything. The concept behind this is speed and ease of use as you can make adjustments with a single hand.
I really love the MAC-1 as it is so simple and easy to use. ARRI is so good at coming up with complimentary accessories for its products. They don’t just make the main product and then leave it up to the end user to work out how to configure or use it. This is at least in my opinion, what sets ARRI apart from other companies that make cameras and other accessories. They think about the big picture and not just an individual item.
Now, of course not everyone will want to use a two-axis monitor and that’s fine because ARRI isn’t locking you into doing so. You can use any monitor arm you like with the monitor.
Price & Availability
The CCM-1 is available to order now. The CCM-1 (KK.0048851) retails for €4,950 (around $5,250 USD). This is roughly 50% of the cost of the ARRI MVF-2 Viewfinder Set.
It is only available as a set. It will also be included in new ALEXA 35 packages so people can buy it together with a camera.
This is certainly a lot of money for a 7″ monitor, however, you are getting a lot of functionality and features that you don’t get with any other monitor that you could use with the ALEXA 35 or ALEXA Mini LF. This is also a monitor that is being targeted at a very specific user base and I think anyone who owns an ALEXA 35 or ALEXA Mini LF will be looking very closely at it.
Camera Control Monitors are nothing new
Having a monitor that has the ability to do camera control is not a new concept. Companies such as RED and Kinefinity have offered solutions for years, and third-party on-camera monitor manufacturers such as SmallHD and Portkeys also provide solutions.
It is a little surprising that it has taken ARRI so long to come out with its own camera Control Monitor.
Technical Specifications
- Power Input Range: 10-34 V
- Display Type: Thin Film Transistor Liquid Crystal Display (TFT LCD) with LED backlight
- Resolution: 1920 x 1200
- Pixel Density: 322 ppi
- Aspect Ratio: 16:10
- Screen Luminance: 1300 nits
- Colors (Typical): DCI-P3
- Viewing Angle: 160° all axes
- Dimensions: 187 x 120 x 29 mm / 7.36 x 4.72 x 1.14″
- Weight: 594g / 20.95oz
- Material: Anodized aluminum chassis with exchangeable steel bottom interface block
- Mechanical Interfaces: 4x ARRI Pin-Lock 1/4″ (1x bottom, 1x rear, 1x right side, 1x top)
- Operation Temperature: 0°C to 45°C / 32° F to 113° F
Conclusion
The CCM-1 is one of those products that you need to use in person to see all of the benefits it offers. It is a complete, one-stop monitoring and camera control system for the ALEXA 35 and ALEXA Mini LF.
It has been well designed and a lot of thought has gone into the integration with not only SmallHD’s operating system but also how you control and access camera functionality.
It is certainly bright enough for use outdoors, but the caveat is that you do need to run external power from the camera to be able to do this. With just the CoaXPress cable, the brightness is limited to just 100 nits, which for a lot of use case scenarios won’t be bright enough. Yes, it would be great to just run a single cable that does everything and allows you to run the monitor at peak brightness, but it does free up your SDI and Lemo outputs to use for other accessories.
The MAC-1 monitor mount and the sun hood are beautifully designed and well thought out. It is one thing to make a good monitor, but if you don’t have good accessories for it the operating experience can be severely compromised.
It is very hard to fault the CCM-1, and believe me I tried! The only aspect about the CCM-1 that may leave a sour taste in someone’s mouth is the asking price. At €4,950 (around $5,250 USD) this makes the CCM-1 the most expensive 7″ monitor on the market by a considerable margin. In saying that, you do need to clearly remember that this is being squarely targeted at rental houses and owners of the ALEXA 35 and ALEXA Mini LF, and in terms of how much those cameras cost, I don’t think too many people will ultimately complain about the price tag given the benefits that the CCM-1 offers.
As I mentioned earlier, camera control on monitors is nothing new, but ARRI has managed to implement it in a clever way that increases the versatility of the ALEXA 35 and ALEXA Mini LF. If you own an ALEXA 35 or ALEXA Mini LF then it is definitely worth looking at.