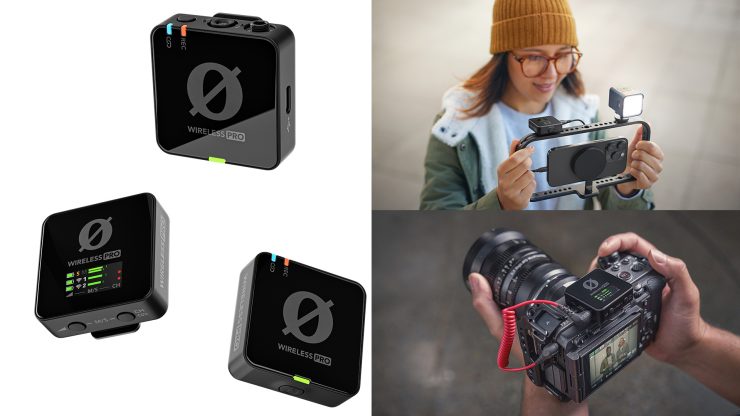
RØDE introduced the RØDE Go in 2019, becoming a popular lower-priced 2.4 GHz wireless audio option. A lot of companies have copied the design over the years. Today RØDE has a new version, and the Wireless Pro is packed with a lot of new features, including a longer-range and 32-bit float internal recording while transmitting. RØDE states the recording feature will be supported with the US versions. This is a huge plus!
RØDE Pro includes 32-bit float on-board recording, timecode sync, RØDE intelligent GainAssist technology, over 260m range, and more – it comes in a complete accessory kit with a charging case, two lavs, mounting clips, and more.
Wireless PRO Key features
- Dual-channel compact wireless microphone system
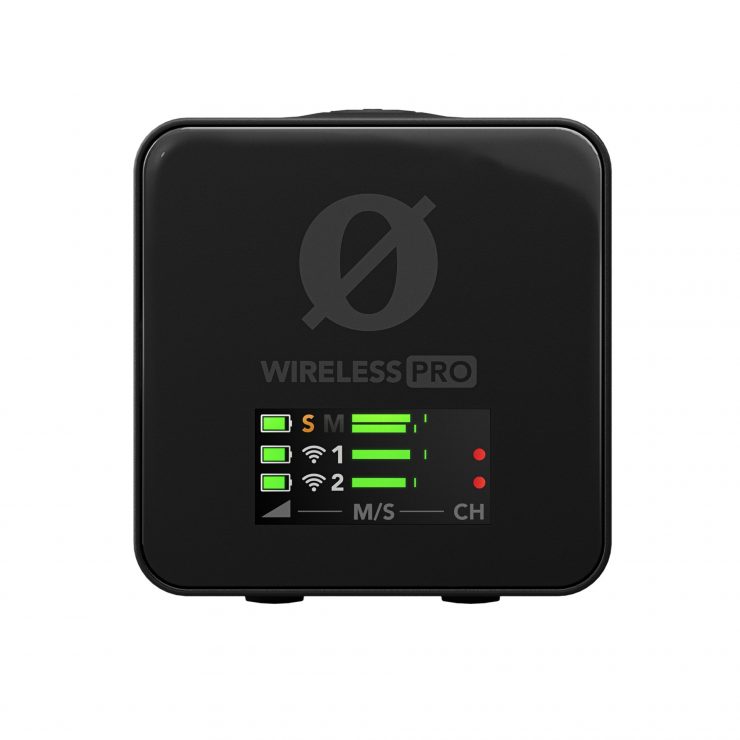
- RØDE’s state-of-the-art Series IV 2.4 GHz digital transmission with 128-bit encryption for crystal-clear, incredibly stable audio with up to 260m range
- Universal compatibility with cameras, smartphones, and computers
- 32-bit float on-board recording allows for the recovery of clipped or quiet audio files
- Advanced timecode capability for quick-and-easy audio sync in post-production
- intelligent GainAssist technology, flexible output gain control and safety channel for ensuring pristine audio when recording direct to camera
- 32GB of storage on each transmitter for over 40 hours of backup recordings
- Locking 3.5mm TRS connectors for complete security
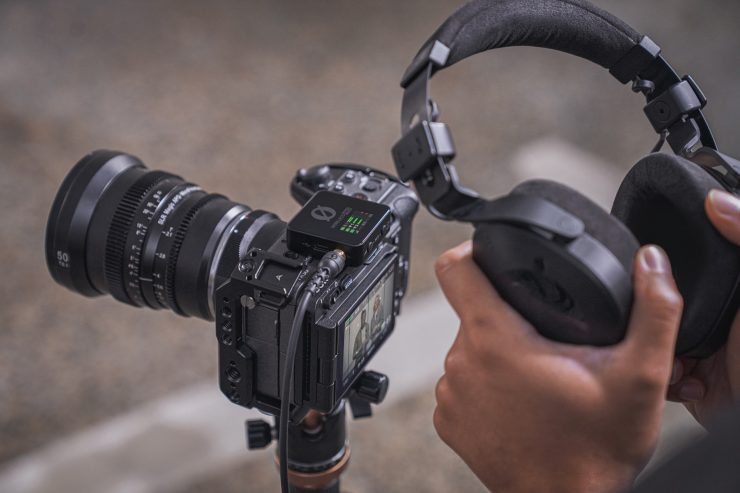
- Headphone monitoring with on-board level control
- Plug-in power detect for extended battery life
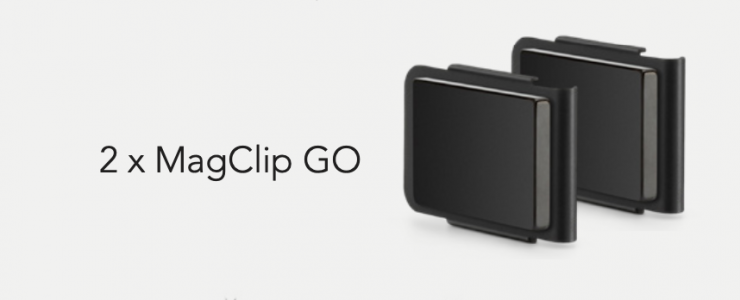
- Complete accessory kit, including smart charging case, two Lavalier II microphones, cables, MagClip GO magnetic mounting clips and accessory case
- Easy configuration on a computer or smartphone via RØDE Central
- Designed and made in RØDE’s precision facilities in Sydney, Australia
What’s Included
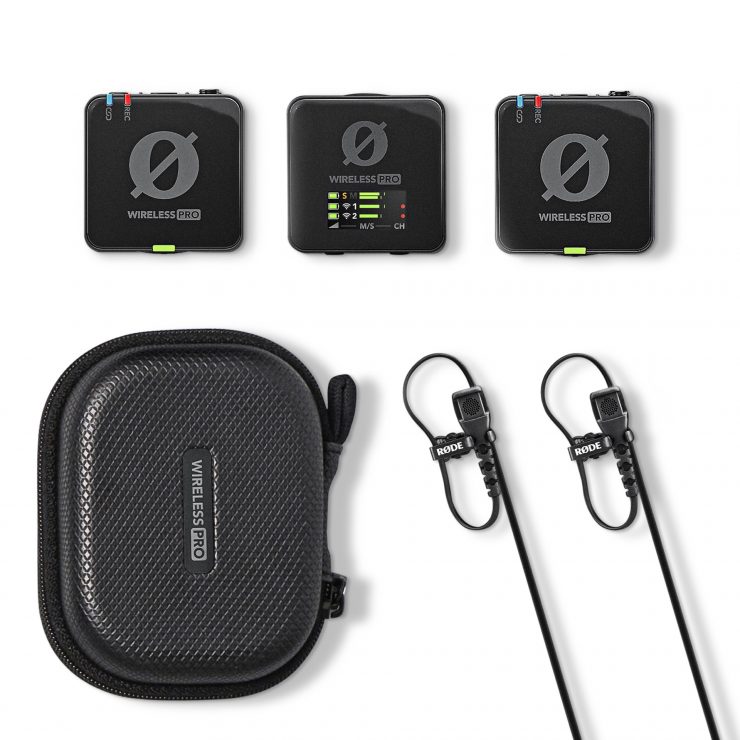
The Wireless PRO comes with a complete pro accessory kit, giving you everything they need to get recording right away.
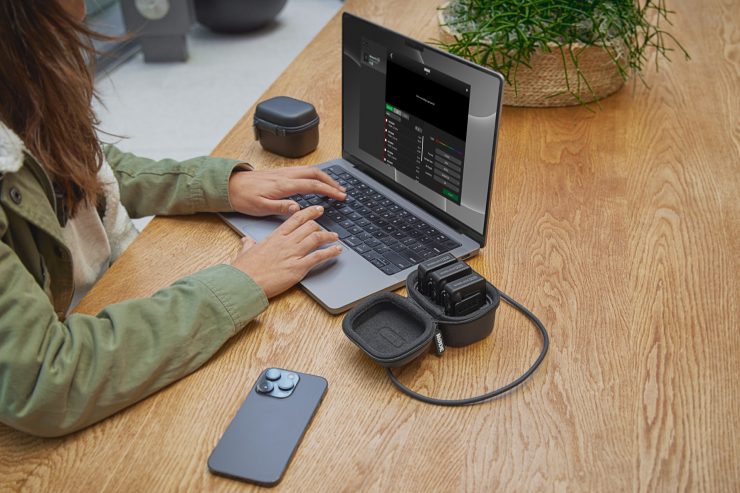
This includes a smart charge case, which not only protects the transmitters and receiver when in transit, but also ensures they are always fully charged and facilitates ultra-fast data transfer for quickly exporting on-board recordings to a computer in the studio or in the field.
Two Lavalier II microphones. The MagClip GO magnetic clips for flexible mounting of the transmitters on talent or the receiver on a recording device.
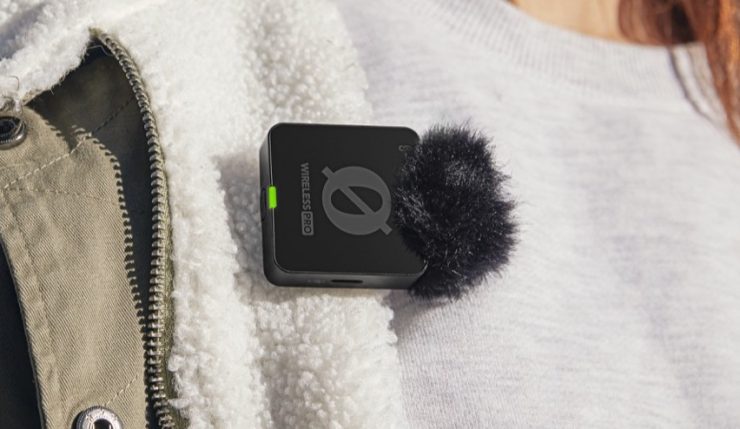
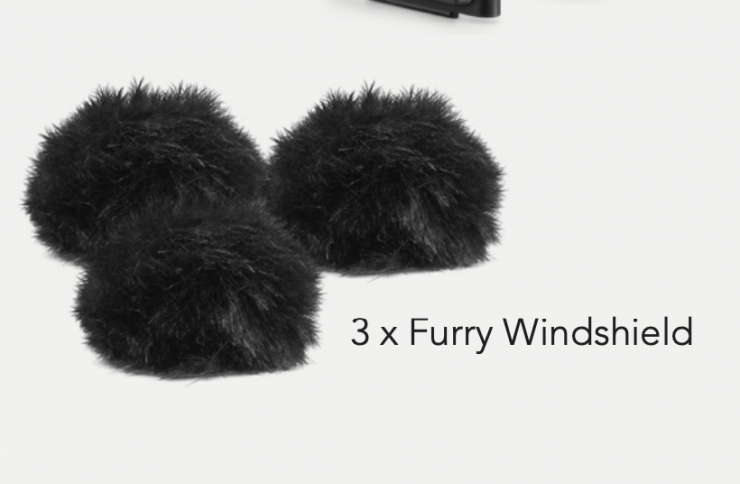
It also comes with three high-quality furry windshields for recording in windy conditions, all necessary cables for connecting to cameras, phones and other devices, and a handy case for keeping these
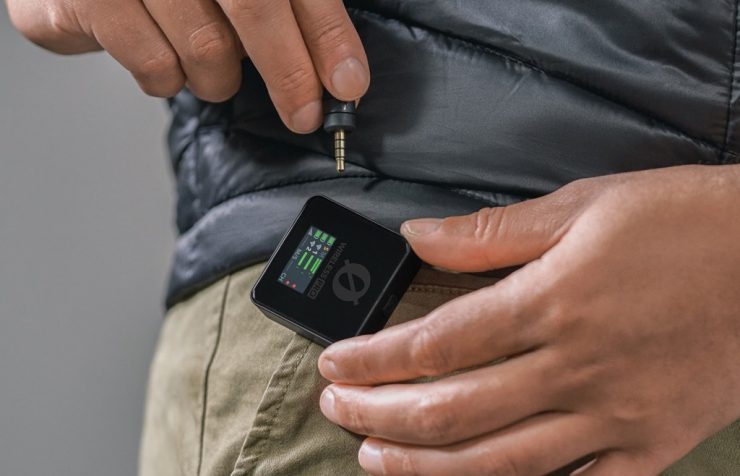
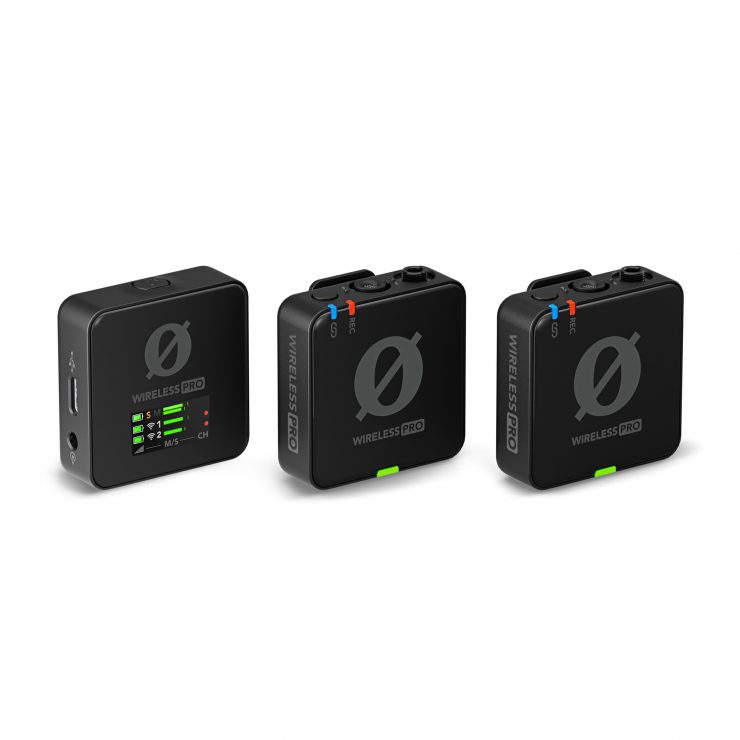
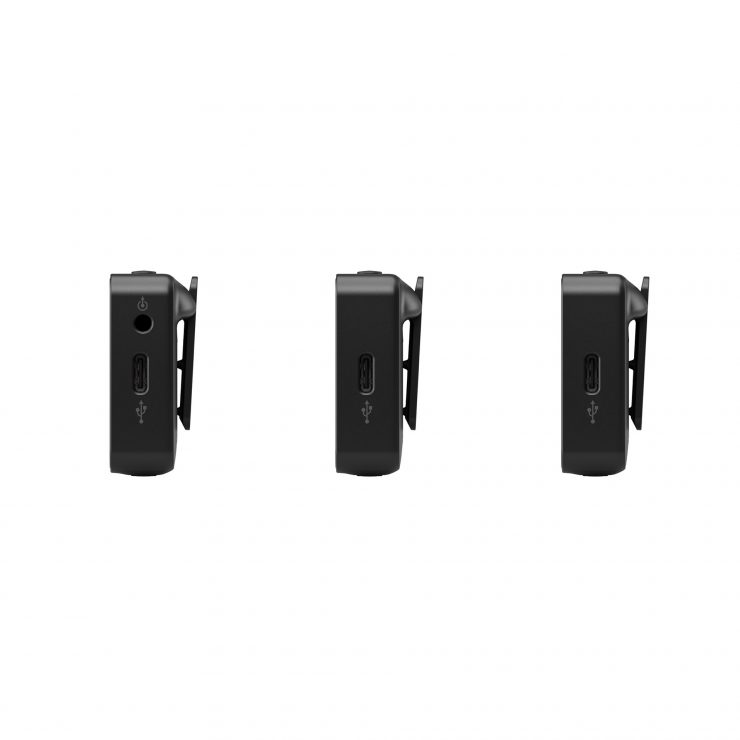
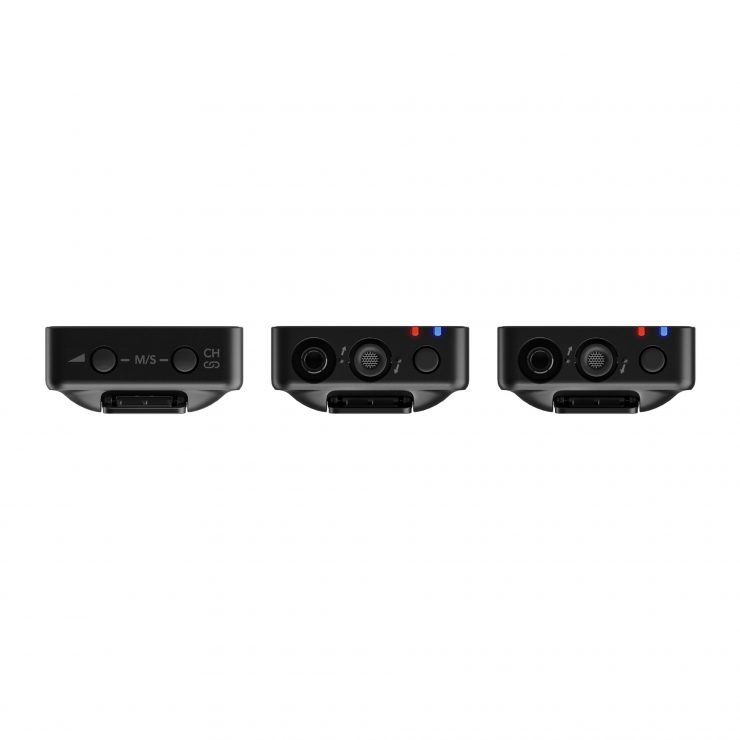
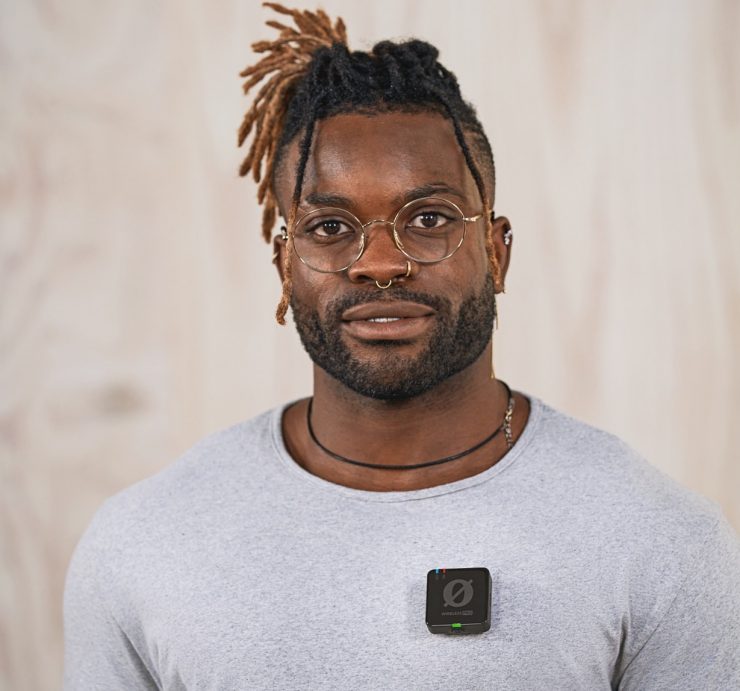
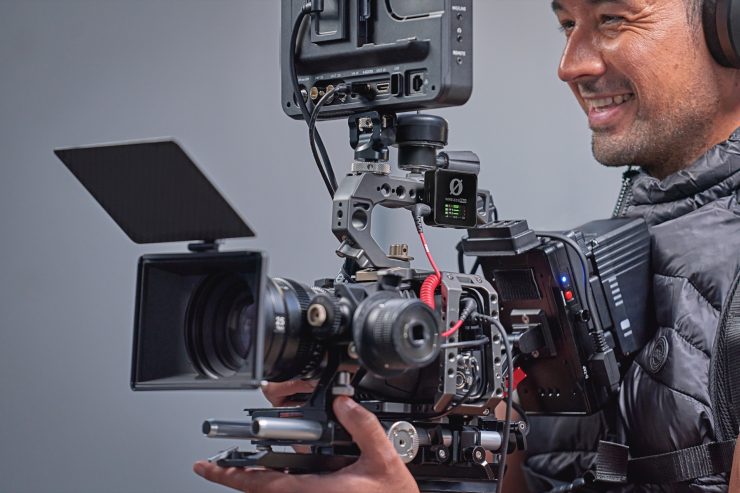
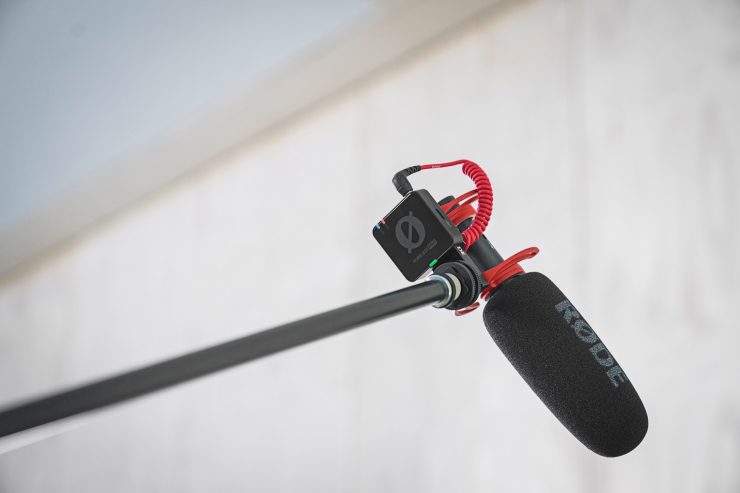
The Wireless PRO features the same pocket-sized form factor as the rest of RØDE’s compact wireless range, with a new black-on-black aesthetic. The lave microphone has a 3.5mm locking connector to secure the cable nice an tight to the transmitter.
Dual-channel Receiver
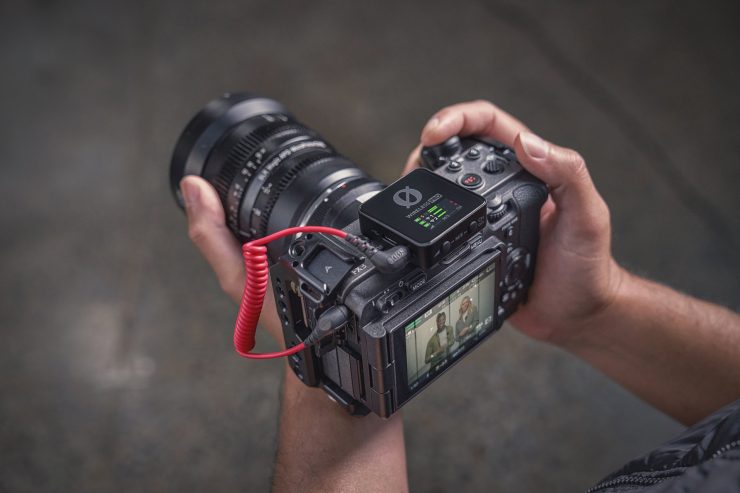
It comes in a dual-channel set with two transmitters and a receiver and utilizes RØDE’s state-of-the-art Series IV 2.4GHz digital transmission and stated proprietary near-zero latency codec with 128-bit encryption to deliver crystal-clear, incredibly stable audio at distances up to 260m (850 ft) line of sight. Integrated clips for mounting on clothes and broadcast-quality in-built omnidirectional microphones on the transmitters make getting set up easy, and it is universally compatible with cameras, smartphones and tablets, computers, and other audio devices via its analog 3.5mm TRS and digital USB-C outputs.
32-bit float on-board recording
32-bit float onboard recording is a welcome addition as it’s a powerful feature that eliminates the chance of over or under-recording levels. It won’t save the day if you have other issues, such as wind noise or fabric rustle.
The transmitters have 32GB of internal memory, allowing for over 40 hours of onboard recording, with dedicated buttons on the transmitters making triggering recordings fast and easy.
For users that want to record audio directly into their camera, the Wireless PRO includes RØDE’s GainAssist technology – first introduced with the Wireless ME – which utilizes intelligent algorithms to automatically control audio levels on the fly, ensuring smooth and balanced output and minimizing the risk of clipping. It also features a flexible output control with 30dB gain range available, allowing users to precisely tailor the mic’s output to their camera and pre-configured camera presets for quick-and-easy setup.
For added peace of mind, the Wireless PRO also offers a safety channel feature, which outputs a second channel of audio 10dB lower than the primary channel in case the signal is too hot and clips the camera input.
There are two different modes for recording on your Wireless PRO transmitters that you can configure using RØDE Central – Manual and Always:
Manual: In this mode, on-board recordings are started and stopped when you press the record button on the transmitter.
Always: In this mode, on-board recordings will always be running if the transmitter is powered on, even if it’s not paired or connected to a receiver.
How to Export On-board Recordings
There are two methods for exporting your on-board recordings onto your computer from your Wireless PRO transmitters. You can either quickly copy the files from the transmitters (direct export) directly or use RØDE Central. While it’s faster to directly export your recordings to your desktop, using RØDE Central gives you access to placed markers along with a variety of export options, such as the ability to normalise your audio and change its file format, sample rate, bit depth and loudness.
Direct WAV Export
To export recordings directly, start by placing your Wireless PRO in its charge case and connecting the case to your computer using the included SuperSpeed USB-C cable. Your Wireless PRO transmitter(s) will show up as a removeable device on your computer, just as any other hard drive or USB storage device would. Here, you can quickly copy your recorded files to your computer.
Note: When exporting recordings using this method, your files will be saved in their original 32-bit float WAV format.
Exporting On-board Recordings Using RØDE Central
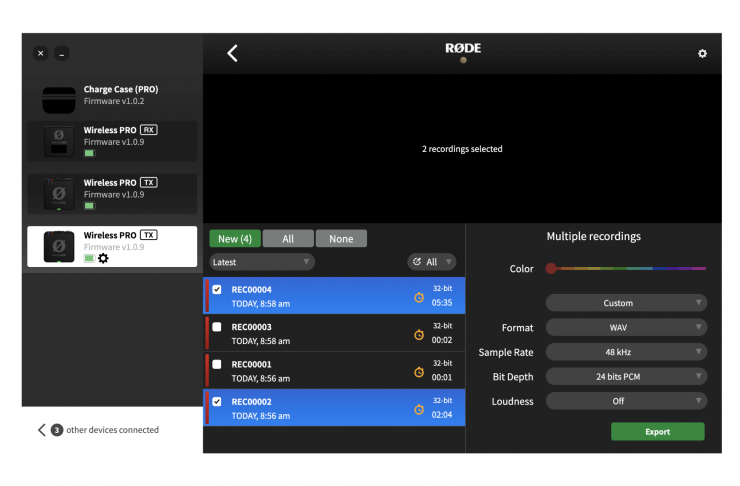
To export recordings via RØDE Central, place your Wireless PRO in its charge case and connect the case to your computer using the included SuperSpeed USB-C cable. Open RØDE Central and click on the transmitter (TX) from the left-hand side that you wish to export audio from. Your recordings will be listed chronologically in the left-hand column from newest to oldest.
Click on a recording and you’ll see its waveform data, as well as information on any audio dropouts or markers (more on that shortly) in the timeline at the top of the software. In the bottom-right corner you’ll see a number of export settings for your selected recording(s), which you can adjust before clicking the export button.
How to Adjust or Normalise 32-bit Float Files
Normalizing audio is a process that adjusts the volume level of your entire recording so that its loudest point sits at a particular volume level (typically, at or below 0dB, to avoid clipping or distortion). Most editing software can normalize your audio using an automatic function.
There are two ways you can normalize your 32-bit float audio files if the audio is too quiet or has clipped: within RØDE Central or within your editing software.
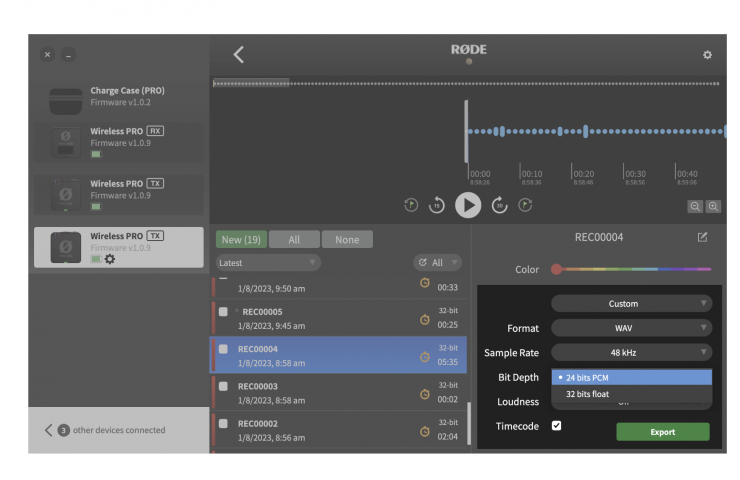
Using RØDE Central
When exporting using RØDE Central, select “Custom” from the first dropdown menu in the export settings, and then choose “24 bits PCM” from the ‘Bit Depth’ dropdown and then click ‘Export’ – this will automatically normalize your 32-bit float files and export them as 24-bit files, ready for use.
Using Your Editing Software
Whether you’ve directly copied your recordings from the Wireless PRO transmitters or exported them as 32-bit float files from RØDE Central, you’ll need to normalize them in your editing software. Once imported into your software, you can simply adjust the volume of the audio clip or use your software’s normalize function to raise or lower your recording’s volume.
32-bit Float Compatible Video and Audio Software
- DaVinci Resolve
- Adobe Premiere Pro
- Final Cut Pro
- Reaper
- Ableton Live
- Adobe Audition
- Audacity
- Pro Tools
Merged, Split & Safety Channel Modes
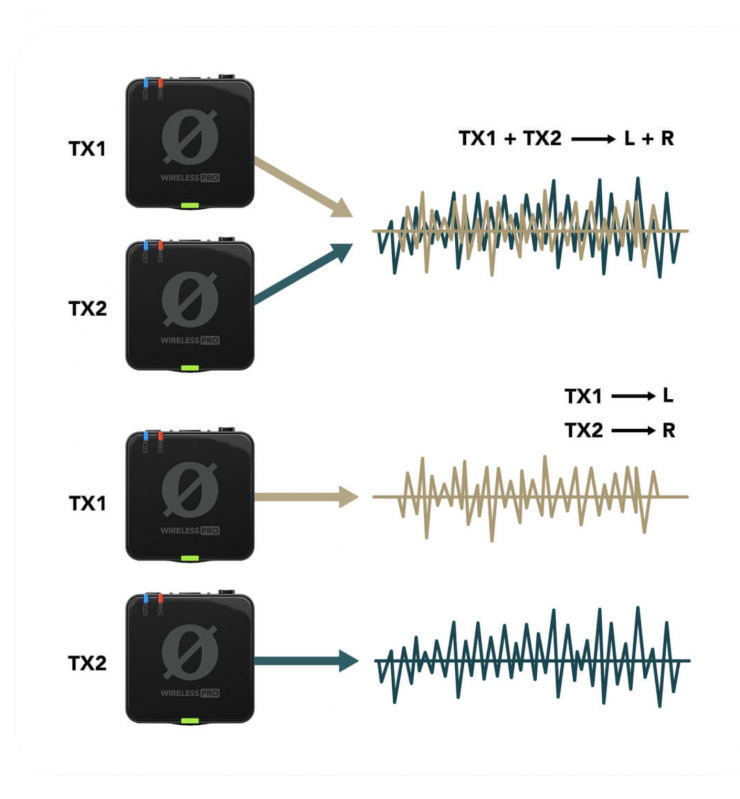
By default, the Wireless PRO will be in Merged mode. To switch between Merged and Split mode, press and hold both the Left and Right Navigation buttons at the same time to enter the routing menu. Here you can cycle through the available modes by short-pressing the Left Navigation button and select your desired mode with the Right Navigation button.
Merged Mode
In Merged mode, the two transmitters (and RX Mic, if it is being used) are combined into a single summed output. This is great if you’re using the Wireless PRO in a live presentation setup, or only using one transmitter and want the audio to be recorded onto both channels of your recording device.
Split Mode
In Split mode, each transmitter’s output is recorded onto separate channels (left and right) on the Wireless PRO’s output. This means each channel can be processed individually in post-production, which is great for two-person interviews and other recording scenarios where you need to be able to edit and mix each sound source independently. If you are using a headset microphone connected to the receiver’s 3.5mm connection (RX Mic), the audio from the transmitters will be merged onto the output’s left channel and the RX Mic will be routed to the right channel. See the below table for more information on Split mode routing.
Safety Channel Mode
When Safety Channel mode is activated, the Wireless PRO will also output a second channel of audio -10dB lower than the main channel. This is useful in case your sound source gets very loud unexpectedly and your audio clips, as having this second channel means you will have a clean backup of your recording. The safety channel is indicated by the blue shield icon and is only available in merged mode. When activated, all of your inputs (both transmitters and RX Mic) will be merged to the left channel and the safety channel will be output to the right channel.
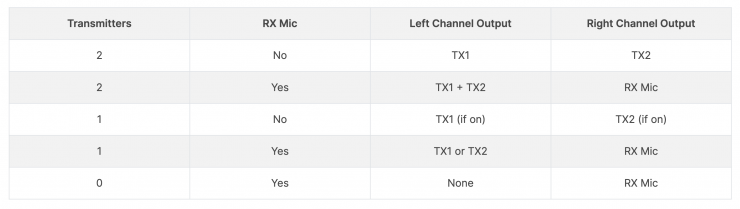
When in Split mode, the stereo (Left/Right) output will be configured differently depending on which inputs are being used and which transmitters are actively paired. Below is a table showing each possible output mode in Split mode, depending on which transmitter (TX1 or TX2) you have connected, as well as a headset or Lavalier microphone connected to the receiver (RX Mic).
How does Timecode work with the Wireless PRO?
The Wireless PRO uses the SMPTE (Society of Motion Picture and Television Engineers) timecode standard with LTC encoding (Linear Timecode), which is the most widely used format today. The Wireless PRO receiver acts as the ‘Source’ in a timecode setup, meaning that timecode is generated by the Wireless PRO and is received by other ‘Sync’ devices, such as cameras and audio recorders.
The Wireless PRO outputs timecode information as an audio signal. If your camera accepts timecode, it will record this data into your video files directly, but if it doesn’t then you can still record this audio timecode signal into your camera’s mic or aux input just like you would a microphone, this audio is then later recognized as timecode in your editing software.
The Wireless Pro receiver (RX) will automatically send timecode to the transmitters (TX), so the recordings on your transmitters will have timecode baked into them and be perfectly synchronized, but you need to record the timecode onto your camera(s) so that your video files also have this sync information.
Cameras and other recording devices differ in how they handle internal video and audio file synchronization, as well as in how they accept timecode, and this can have some consequences for timecode syncing.
While the Wireless PRO system is perfectly synchronized internally between the receiver and transmitters, there’s a small chance that your video and audio may be out of sync by a tiny amount depending on a wide range of variables in the other equipment you’re using (this disparity could measure 1 or 2 frames in extreme cases).
Even with this in mind, it is still significantly quicker to use timecode to synchronize your files and then adjust them by a frame or two. We recommend you record a clap that’s visible and audible on all of your video and audio recording equipment. Once you’ve synchronized your files using timecode, this can be used as a reference point for nudging your video or audio if it’s needed.
Enabling Timecode on the Wireless PRO
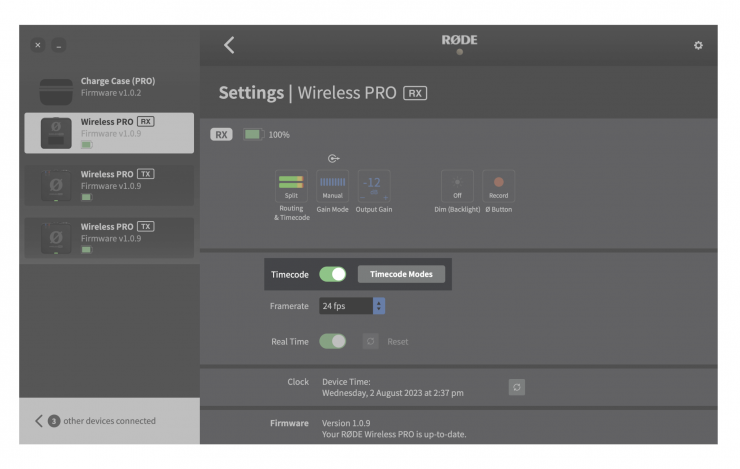
To enable timecode for your Wireless PRO, you have to connect the receiver (RX) to your computer or phone and open RØDE Central. In Central, click “Wireless PRO RX” in the left-hand menu, toggle the ‘Timecode’ setting on and click on the ‘Timecode Modes’ menu. Here you’ll see a list of the available timecode modes. Click the “Show Mode on Wireless PRO” toggle for any mode you wish to have access to on your Wireless PRO system and then click ‘Apply’.
Once the timecode modes you wish to use have been added to your Wireless PRO, you can select them on the receiver by pressing and holding the Left and Right Navigation buttons, cycling through the modes with the Left Navigation button until your desired mode is displayed on-screen, and then pressing the Right Navigation button to ‘set’ this mode.
What is important to know is that for the Wireless PRO to generate timecode, the receiver (RX) must be powered on at all times. For the transmitters’ (TX) on-board recordings to contain timecode information, they need to be paired to the receiver at all times.
Connecting Your Wireless PRO to a Camera for Timecode
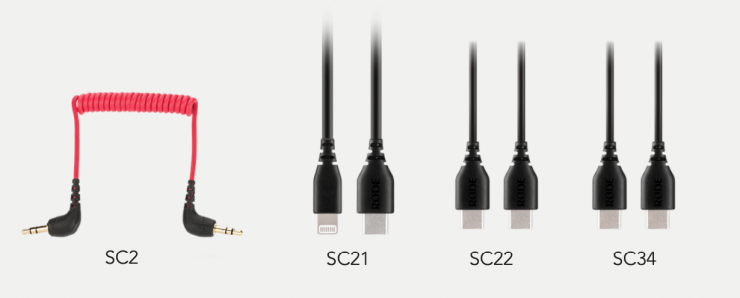
If you are using a camera or other device that doesn’t have a dedicated timecode port or doesn’t accept timecode, you’ll need to record the timecode information as audio into its mic input, in the same way you would record any microphone audio. For this, use the included SC2 3.5mm-to-3.5mm cable alongside any of the Wireless PRO timecode modes.
Some cameras feature dedicated timecode ports, in which case you will need to use Timecode Mode 5. If the port doesn’t feature a standard 3.5mm TRS connection, you’ll need an adaptor to connect your Wireless PRO receiver’s 3.5mm output to whichever proprietary format your camera uses. If your camera isn’t recognizing the timecode signal sent to its dedicated timecode port, try raising the output gain level on the Wireless PRO receiver – some cameras only detect very loud signals.
Timecode Modes
The timecode can be a little confusing to use and set up as there are 5 different options to choose from.
Timecode Mode 1 (3.5mm and USB, Merged)
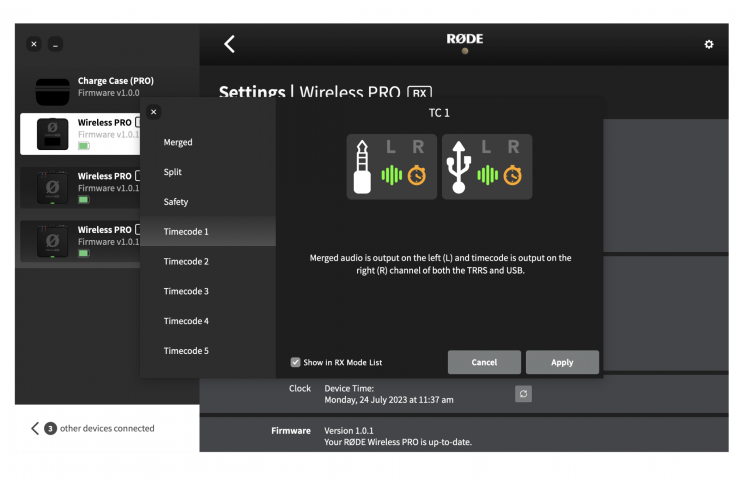
This is most likely the mode that will suit your setup. In Mode 1, the audio signal from both transmitters will be summed and sent to the receiver output’s left channel, and the timecode signal will be sent to the receiver output’s right channel (via both the 3.5mm and USB outputs). This means your camera will receive timecode information on the right channel and audio on the left channel.
Timecode Mode 2 (USB with Headset, Split)
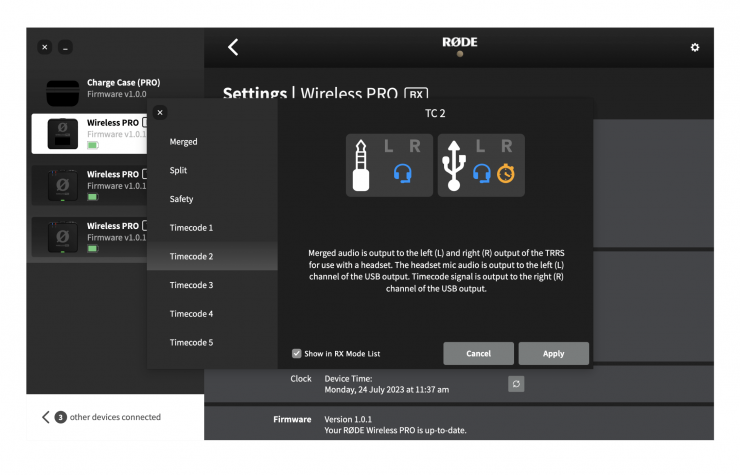
Mode 2 is for when you have a headset connected to the receiver’s 3.5mm TRRS output and you want to capture audio from both transmitters and the headset microphone on separate channels. In this mode, the headset mic audio will be sent via USB in the left channel, and the right channel will contain the timecode information. Each transmitter will capture audio as on-board recordings, and all three input sources will be summed and sent to the receiver’s 3.5mm output so you can monitor all sources in your headset.
Timecode Mode 3 (USB with Headset, Merged)
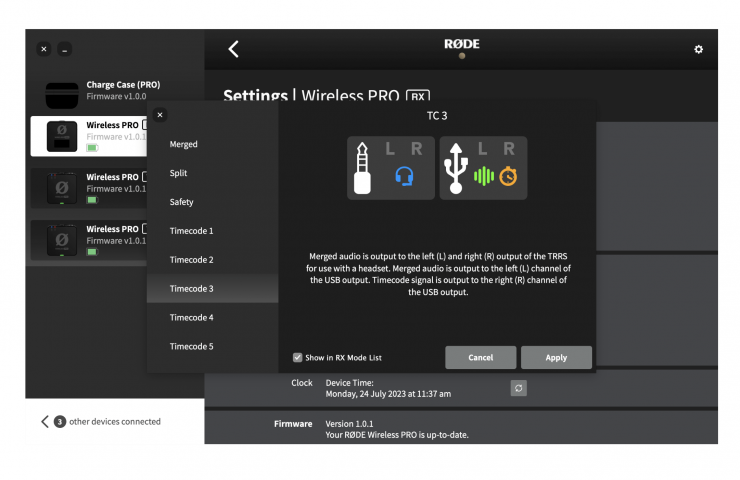
Mode 3 works identically to Mode 2, except the audio sent to the left channel of the USB output will be a summed output of all three microphones (TX1, TX2 and your headset microphone) rather than just the headset microphone.
Timecode Mode 4 (USB with Monitoring, Merged)
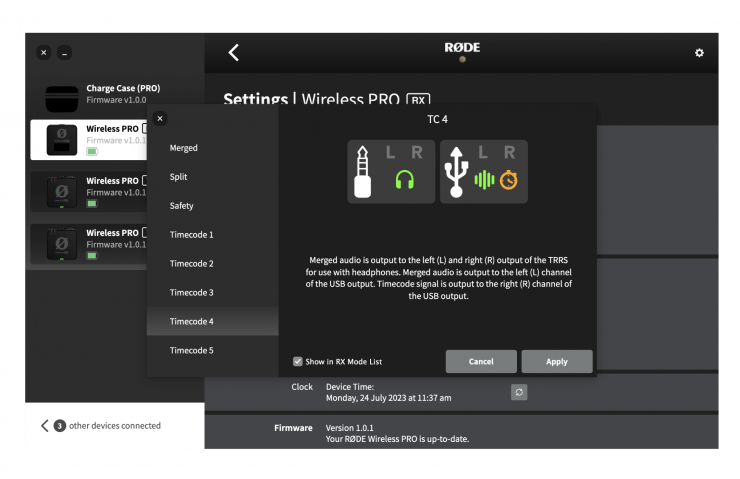
Mode 4 is the same as Mode 3, except that it is optimised monitoring with headphones instead of a headset (i.e. there is no headset microphone input). The USB output contains a summed output from both transmitters (TX1 and TX2) on the left channel, and the timecode information on the right channel. This leaves the receiver’s 3.5mm output available to connect headphones for monitoring your audio.
Timecode Mode 5 (Timecode Only / Jam Sync)
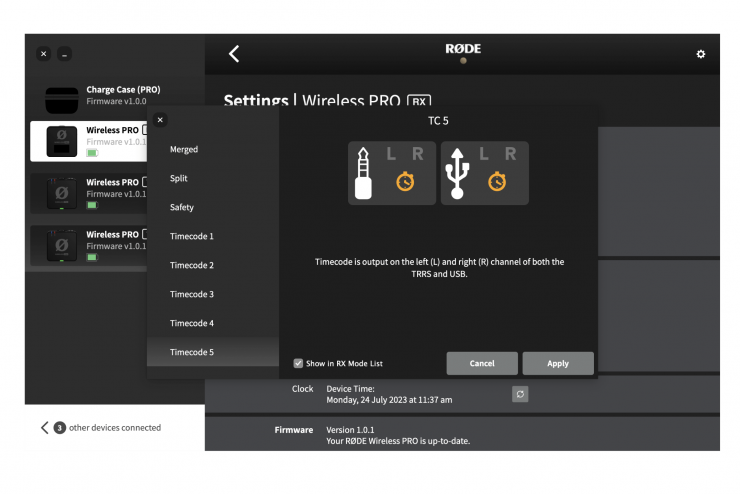
Mode 5 will send timecode information on both left and right channels of both the USB and 3.5mm TRRS outputs on your receiver. While the first four modes deliver both audio and timecode over the receiver’s outputs, this mode will only send timecode – this makes it the preferred mode if your Wireless PRO receiver is connected to your camera’s dedicated timecode port, if it has one.
This mode allows you to use the Wireless PRO as the ‘source’ clock to sync multiple cameras or other equipment to each other. This is achieved by ‘jam syncing’, which is the process of temporarily connecting the Wireless PRO receiver to each of your devices in order to sync the internal timecode generator of each device.
If your camera isn’t recognising the timecode signal sent to its dedicated timecode port, try raising the output gain level on the Wireless PRO receiver – some cameras only detect very loud signals.
Note: Using the jam sync method can result in very minor fluctuations in the synchronization between your devices over time (referred to as ‘drift’) as their internal generators aren’t perfectly matched. As such, we recommend performing a jam sync about every four (4) hours, or whenever you power cycle your cameras, to ensure frame-accurate syncing.
You can choose to generate the Wireless PRO’s timecode in ‘real time’ or as a ‘continuous’ mode in which you select the start point. Real time mode reflects the actual time in your region (determined by the ‘Clock and Device Time’ section in RØDE Central) and will be displayed as 24-hour time with seconds and frames in the format HH:MM:SS:FF. For instance, “14:34:42:12” represents 2:34pm, 42 seconds, and 12 frames.
If you disable real time, the Wireless PRO’s timecode will instead start continuously counting up from a particular moment, which is established by hitting the ‘Reset’ button in RØDE Central.
Timecode Framerate
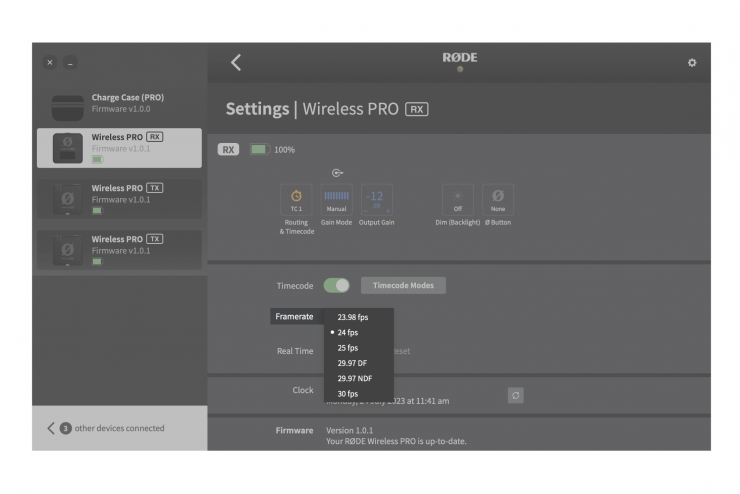
Before you record with timecode, it’s important to establish the framerate you’ll be shooting your project at and set the timecode to match it. This forms the foundation for how your timecode keeps track of time, and if it doesn’t match your footage, it will fall out of sync or fail to sync in the first place.
If your selected framerate is higher than those available in the below list, select the option that divides perfectly into your project’s framerate (e.g. when shooting in 47.96fps, choose 23.98fps).
- 23.98 fps
- 24 fps
- 25 fps
- 29.97 DF (Drop Frame)
- 29.97
- 30 fps
Note: Some cameras offer a 29.97 framerate without specifying if it’s drop frame – in this case, check the camera’s documentation to determine which format it is.
Configuring Camera Presets in RØDE Central
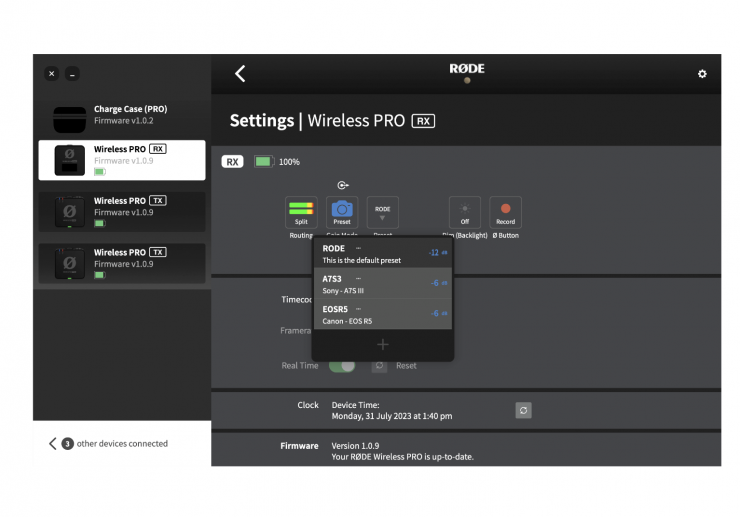
In RØDE Central, you can select from a list of presets for a wide range a popular camera models. These presets automatically set the gain levels of your Wireless PRO’s output to best match the camera you’re using it with.
To access these presets, connect your Wireless PRO receiver to your computer and open RØDE Central (desktop). Click ‘Gain Mode’ and select ‘Preset’ with the camera icon. Now you can click the next button labeled ‘Preset’, click the ‘+’ button, and select the manufacturer and model of camera you are using.
On the next screen, you’ll find a link to a guide on setting up your camera’s audio settings for optimal use with the Wireless PRO. Once you’ve followed these instructions, click ‘Add’ to load the preset onto your Wireless PRO. Repeat the process to add other presets (up to 10) for any other cameras you’ll be using with your Wireless PRO.
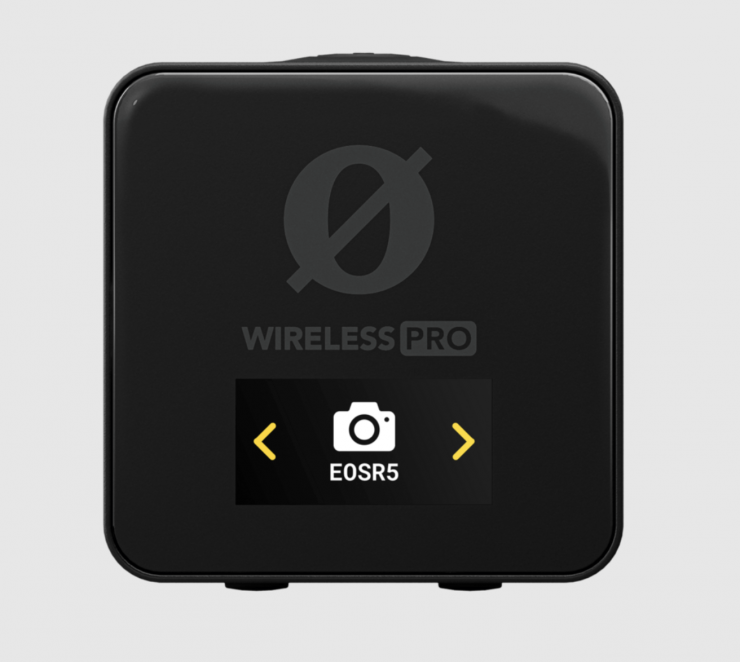
With your camera presets loaded and your Wireless PRO in the Camera Preset gain mode, you can cycle through your saved presets by pressing the Left Navigation button on the receiver while on the home screen, and then using the Left and Right Navigation buttons.
Along with any camera and custom presets you have saved, there will also be a ‘RØDE’ option that acts as a default preset. The gain level of this preset can be adjusted within the RØDE Central desktop app by clicking the three dots next to RØDE in the preset list.
You can also create your own presets by selecting ‘Custom’ from the list of manufacturers. Here, you’ll be able to give your preset a label (that will show up on your Wireless PRO receiver display), set its gain level, and give it a description for easy selection within RØDE Central.
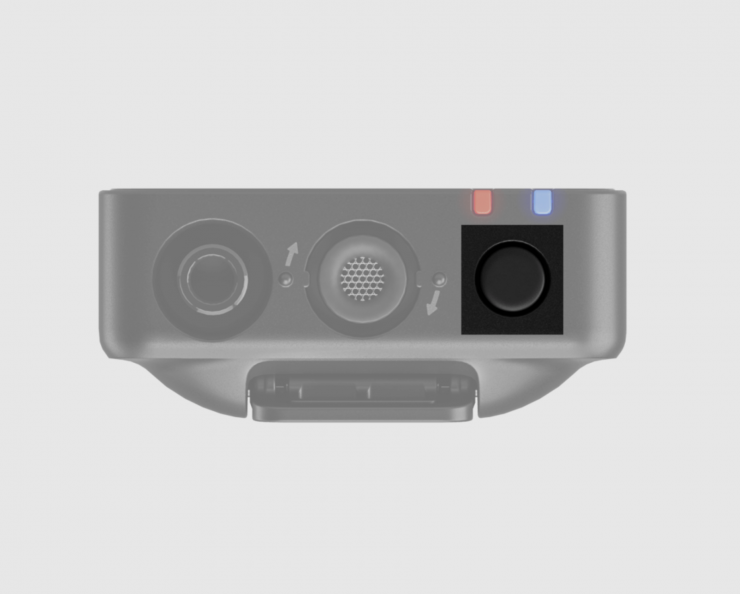
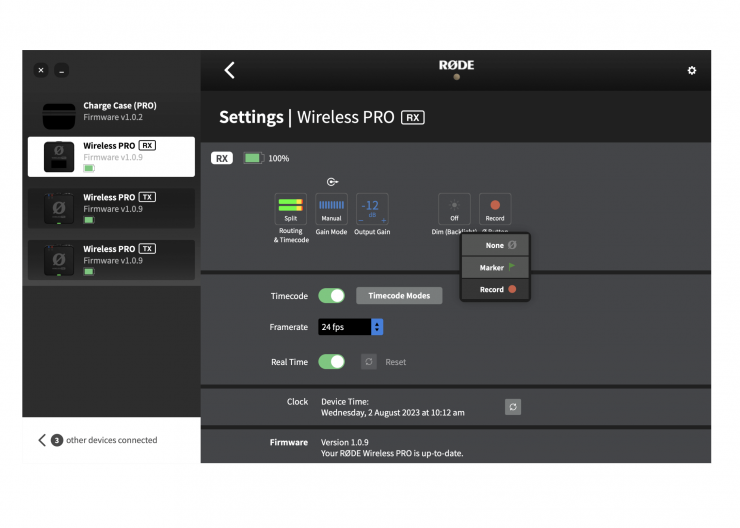
Configuring the Ø Button
Both the transmitters and receiver feature a Ø button, which when long-pressed functions as a power on and off for that unit, but you can also configure each button to perform a variety of short-press functions.
Receiver (RX)
Marker – places a marker in the on-board recordings of both transmitters.
Record – starts or stops on-board recording for both transmitters simultaneously.
Transmitter (TX)
Marker – places a marker in the on-board recording of just the transmitter on which you press the button.
Mute – mutes the signal being sent from the transmitter to the receiver (but doesn’t affect on-board recording).
Note: If a transmitter is unpaired, short-pressing the Ø button will enter pairing mode.
Updating Wireless PRO Firmware with RØDE Central
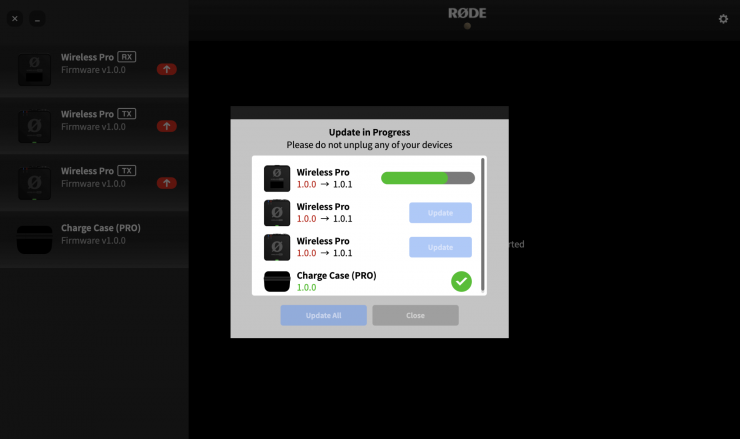
To update the firmware on your Wireless PRO, place the receiver and both transmitters in the charging case, connect it to your computer or phone, and open RØDE Central. If a new firmware version is available for your Wireless PRO or the charging case, you will be prompted to update. Simply click ‘Update All’ to begin the process and follow the prompts.
Note: The Wireless PRO transmitters and receiver will need to have at least 15% battery to initiate the update process. The charging case firmware can’t be updated using the mobile version of Central.
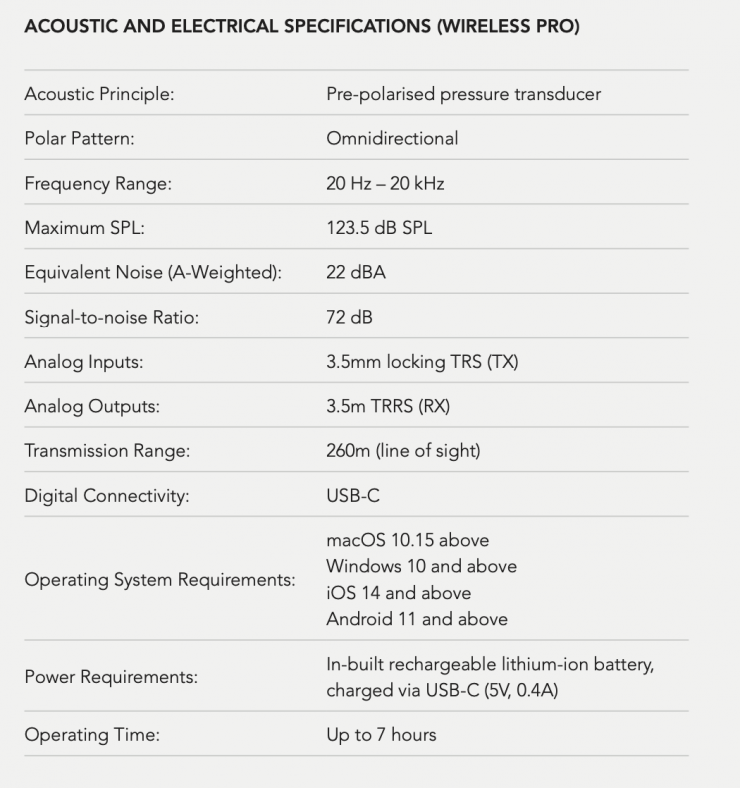
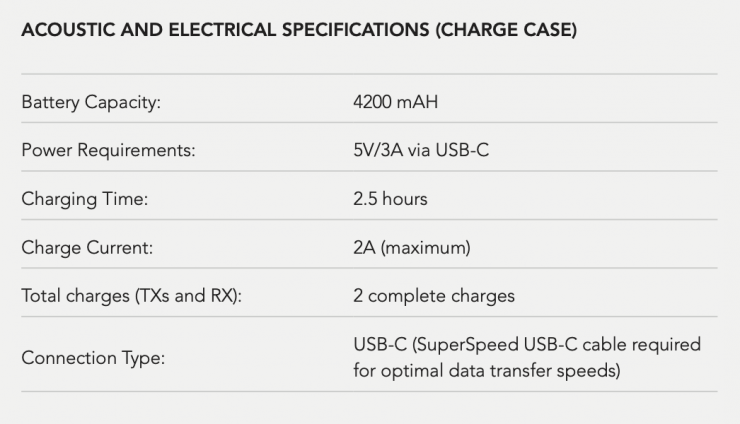
Specifications
Compatible RØDE Accessories
- Lavalier GO
- RØDELink Lav
- HS2
- Lavalier II
- DCS-1
- Interview GO
- MagClip GO
- FlexClip GO
Pricing and Availability
The RØDE Wireless PRO is US $399. That’s a great price for such a feature-rich product. The Wireless GO II retails for $299.
The new system should be hitting retailers worldwide this week.