EL Zone is an exposure tool that is based on stop values that relate one-to-one with lenses and light meters. It has been around for quite a while now, but I thought that it was worth looking into in more detail.
What is the EL Zone exposure system?
The EL Zone exposure system which was designed by cinematographer Ed Lachman, ASC, is an innovative tool for displaying exposure values using stops. EL Zone is similar to false color, however, it allows for higher precision, greater consistency, and more intuitive on-set communication.
EL Zone can be found in SmallHD monitors that are running the latest PageOS 5 operating system. EI Zone is only possible to use if you are feeding your SmallHD monitor a Log signal. It doesn’t work if you are inputting a signal with a LUT or Look enabled.
How is it different from False Color?
False color and waveform assist tools are based on IRE values, which track percentages in voltage. False color works by comparing the relative luminance values by sampling data on a colored scale. This colored scale represents IRE values from 0 to 100%. The IRE scale (false color) was developed way back in the 1950s by The Institute of Radio Engineers.
The problem with false color on most monitors is that it isn’t mapped to any particular camera and nothing is standardized. Different monitors and cameras show false color in different ways.
I have constantly complained about this for years. So many monitors that get released have false color as an assist tool, but they can be generic indicators at best and are not mapped specifically to individual cameras and everyone uses different colors and scales. Different cameras have different IRE values for various exposure points, especially middle grey. If false color isn’t mapped to the camera you are using, then making exposure choices based on false color may not be accurate. For a camera like the Alexa 35 where the IRE value for middle grey is 28%, you are not going to get an accurate false color display on most monitors because it is just assuming that middle grey should be somewhere around 45-52 IRE.
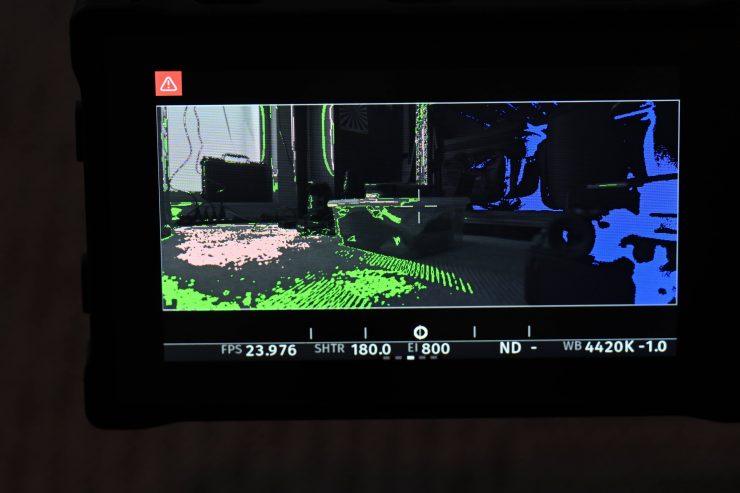
Alexa 35 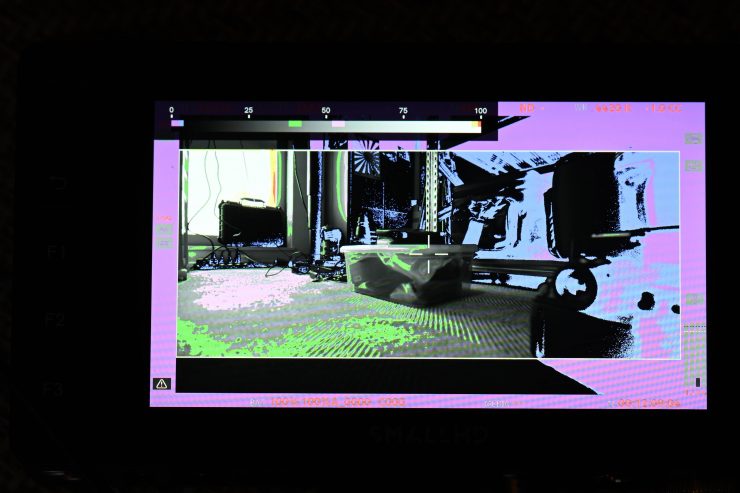
SmallHD Ultra 5 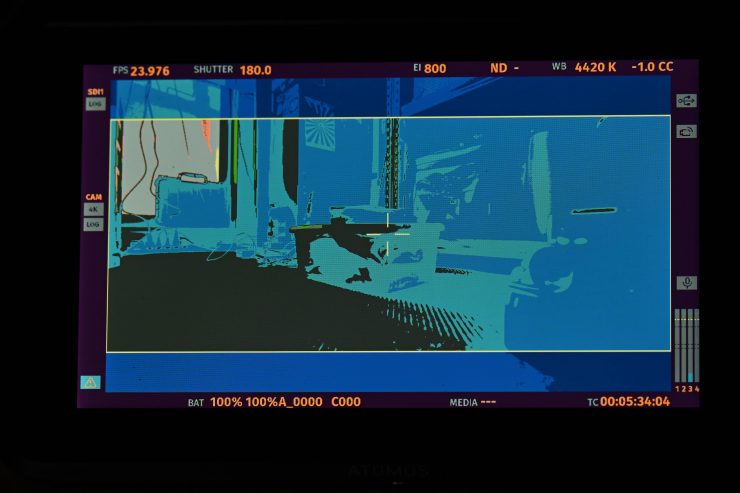
Atomos Ninja V
Above is a prime example of what I am talking about. Let’s compare the false color on the Alexa 35’s screen, a SmallHD Ultra 5, and an Atomos Ninja 5 when they are all being fed the exact same signal. As you can see, the SmallHD is very similar to the ARRI, but the Ninja V is showing me colors that are completely different. This is where consistency is key. Because false color is being displayed in so many different ways it becomes confusing for the end user. This is where you want the false color that you are seeing on your camera to match the false color you are seeing on your monitor.
To be fair, false color, regardless of how it is being displayed, is still going to get you in the ballpark, and for a lot of users, close enough is good enough. If you have a camera that has false color as one of its exposure tools, then you already have a leg up because it has been mapped to your camera.
At least on monitors from SmallHD, you can set up your own false color scale or you can use the pre-mapped ARRI one which is what I do. Using false color on any monitor that hasn’t been mapped to a particular camera is not ideal. If you own or use an ARRI, then great, false color works well when combined with a SmallHD monitor, but if you are using a lot of the cheaper monitors, then it won’t be as accurate as you think. In saying that it really does depend on the camera. Because a lot of cameras have IRE values for middle grey from around 45-52 IRE you will get a similar result regardless of what false color system is being used.
EL Zone is a system based on 18% gray, which is a universal standard for photography. This way your camera can be your lightmeter or you could also use an external lightmeter as they will be consistent with each other. One of the nice aspects of EL Zone is that you can take a frame grab of a scene to precisely match exposure and lighting later on if you need to do repeat lighting set-ups, maintain consistency, or even do re-shoots.
What cameras & equipment utilize EL Zone?
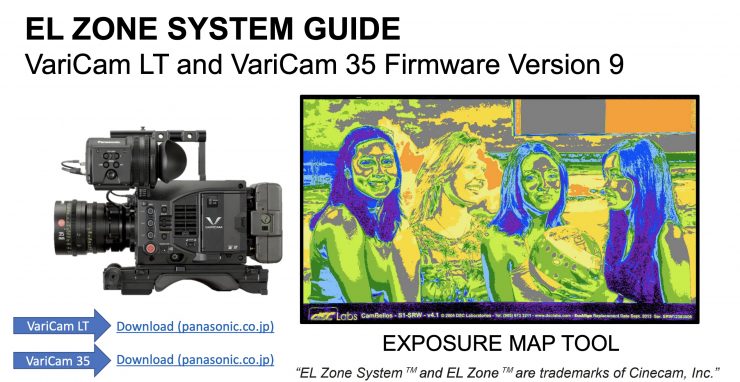
Maybe a lot of our readers won’t know this, but EL Zone was incorporated into the Panasonic VariCam LT and 35 via a firmware update that was released back in April 2021. To my knowledge, these are the only cameras that currently utilize EL Zone, apart from the Sigma fp and fp L which received the feature just recently in a firmware update. SmallHD PageOS 5, as I already mentioned, and Colourlab Ai also utilize EL Zone. I think that adoption is going to continue and I think we may well find more cameras and software starting to use it in the future.
So how do you use EL Zone?
EL Zone has 15 delineated zones in 1 stop increments plus + – ½ increments above and below 18% gray for setting precise skin tones and other exposure values. Seeing values in stops makes a lot more sense than seeing IRE values.
It is easy to use because 18% gray is gray, over-exposure is white, and under exposure is black. I like how this has been implemented because the values make sense. White for overexposure, black for under-exposure, and grey for 18% grey.
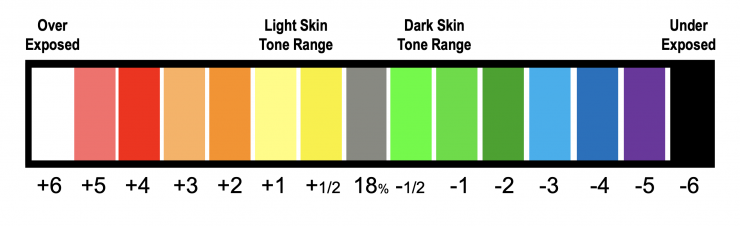
Each stop or zone is displayed as a solid color which makes it very easy to identify the exact stop value. This makes it more precise than false color because you are seeing accurate representations of stops above and below middle gray. While false color is a good tool for setting middle grey, skin tones, and displaying if anything is being clipped, it doesn’t offer as much information as EL Zone does.
Because EL Zone shows exposure values for an entire scene, it makes light level adjustments a lot easier. If you are communicating with a gaffer, this gives you precise readings that you can see directly from a monitor. While you could certainly still walk around with a light meter to get readings, with EL Zone a lot of the information for your scene is displayed straight in front of you on one screen.
So now that we know how it works, how do we set it up and use it?

As I mentioned earlier, on SmallHD monitors you have to send the monitor a Log image otherwise EL Zone will not work. This means that on your camera you need to make sure that the SDI or HDMI output is sending out a Log image.

The reason for this is that the EL Zone scale exceeds the steps (latitude) that Rec.709 LUTs or Looks can display. If you attempt to try and activate EL Zone on a SmallHD monitor and it hasn’t been configured properly you will get a visual message.
To set up a SmallHD monitor correctly you need to go into your Color Pipe settings and either create a new Color Pipe setting or select one if you have already done so prior.
So what steps do you need to take to set it up correctly?
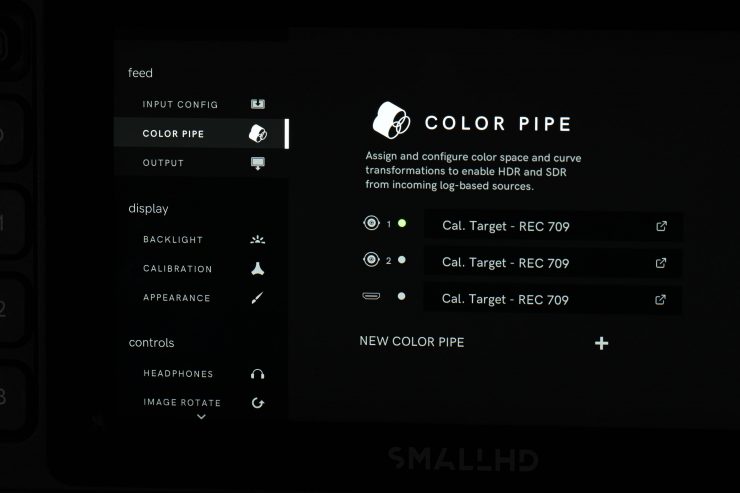
First, you need to create a new Color Pipe by clicking on New Color Pipe.
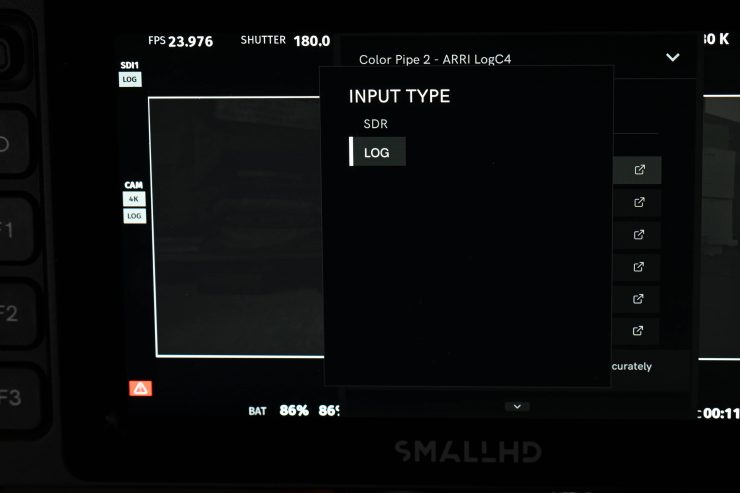
The next step is to set the Input Type to LOG.
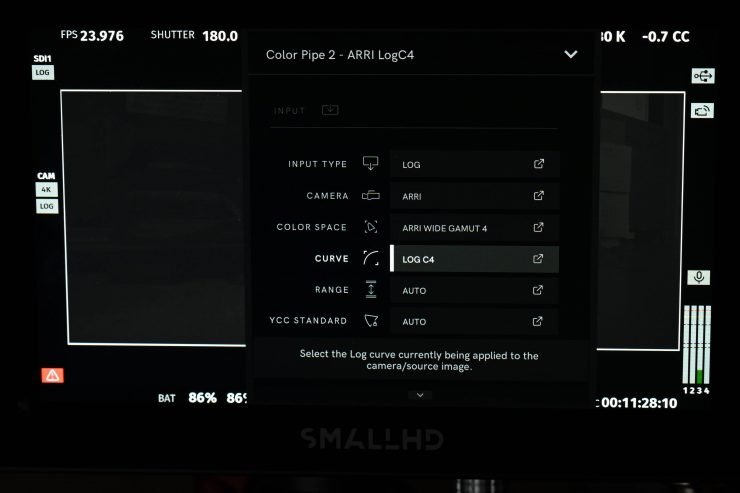
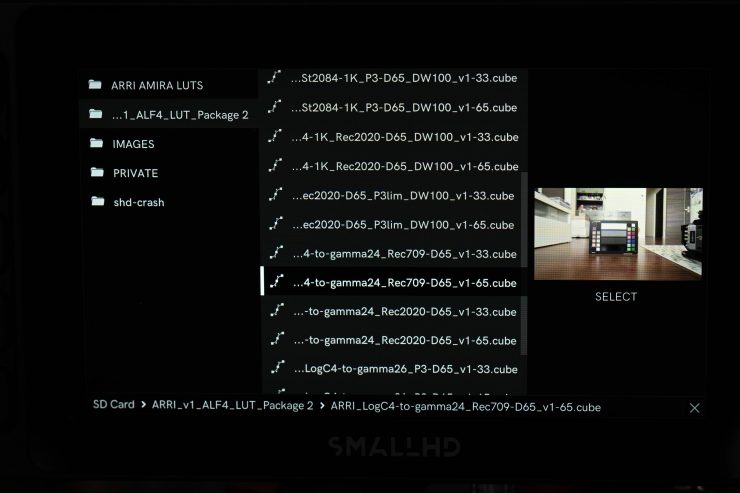
You then select the camera type you are using, in this case, because it is the Alexa 35 I select ARRI, and then I set the Color Space to ARRI Wide Gamut 4 and the Curve to Log C4.
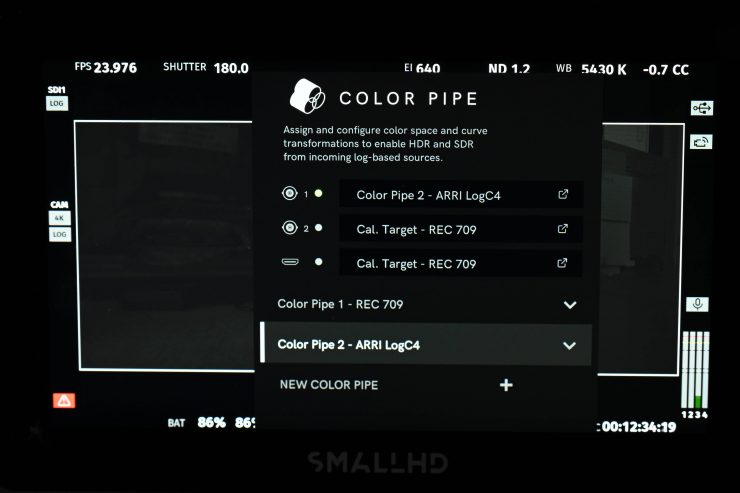
I have now set up my Color Pipe correctly to use my camera with EL Zone on a SmallHD monitor. Once the Color Pipe has been created it will be automatically saved on the monitor. You can save multiple Color Pipe settings and recall them depending on what camera you happen to be using.
The only slight caveat with this process is that you can’t just send a signal out from your camera that has a Look or LUT applied to it. For EL Zone to work, as I previously mentioned, it needs a Log image. What this essentially means is that you need to have the same LUT loaded up on the monitor that you are using in your camera when you are not using EL Zone.
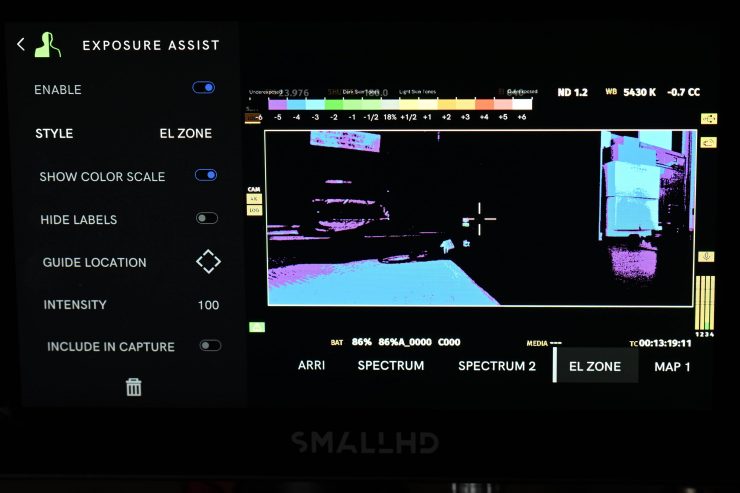
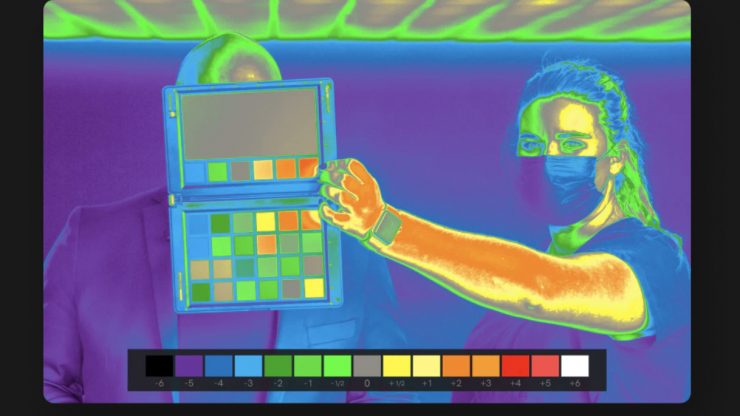
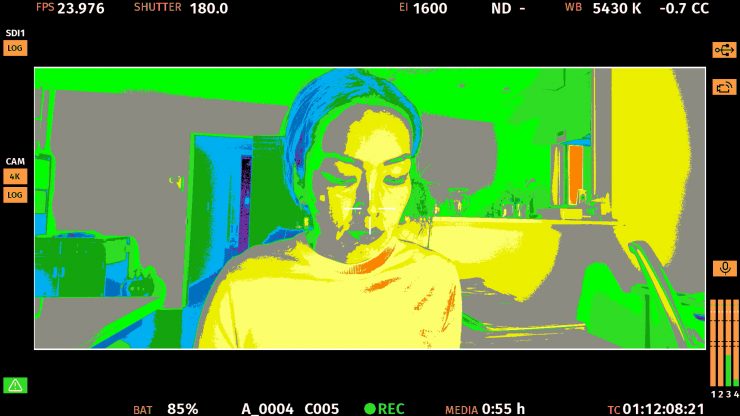
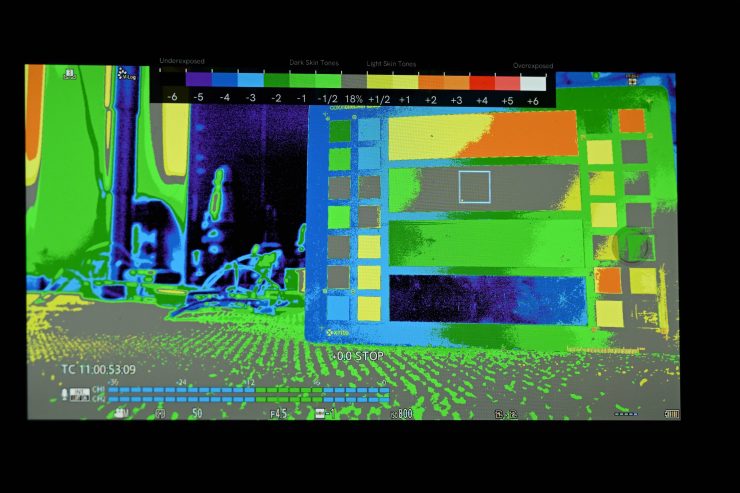
Now, when you activate your Exposure Assist on a SmallHD monitor and choose EL Zone you will see the screen that is above. On this screen, it is a good idea to select Show Color Scale so you get a clear reference for what you are seeing.
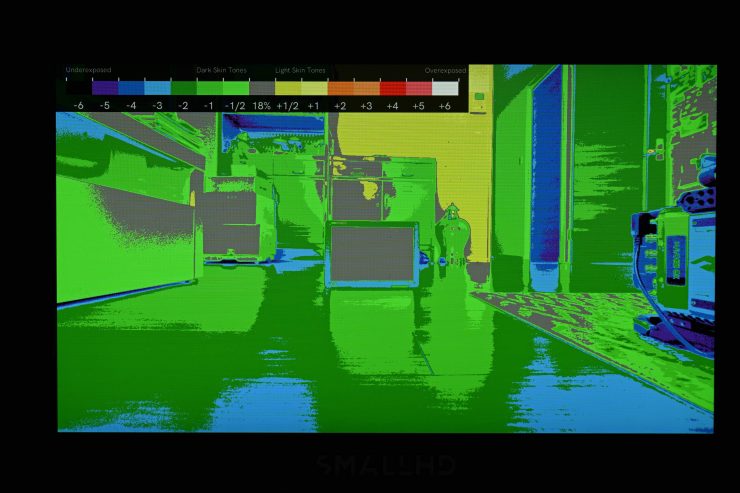
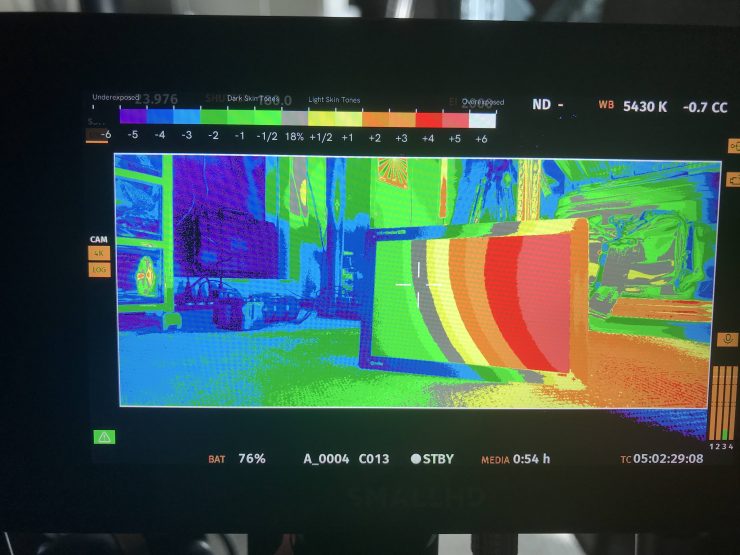
On your image, you will then be able to see the Color Scale and what the color values represent. In the example above you can see that in this shot there are about 10 stops of difference between the brightest and darkest parts of the image. Black being -6 stops below middle grey, and red being +4 stops above middle grey.
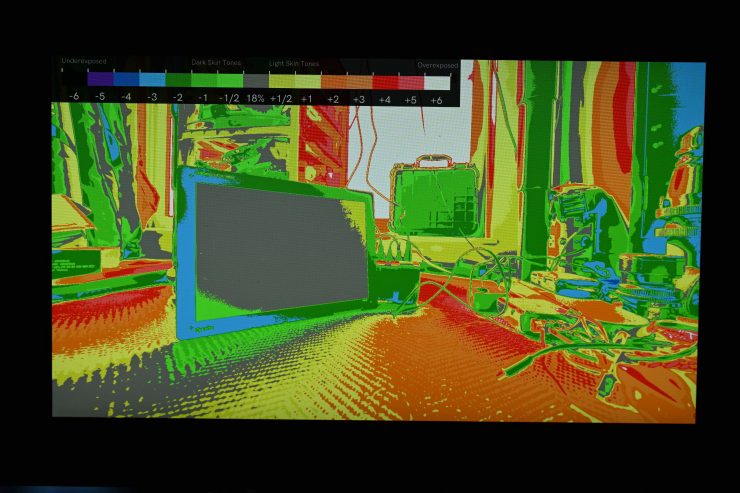
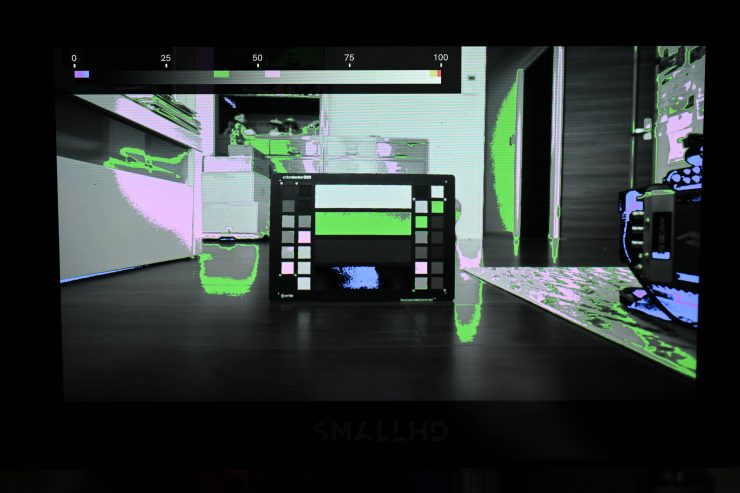
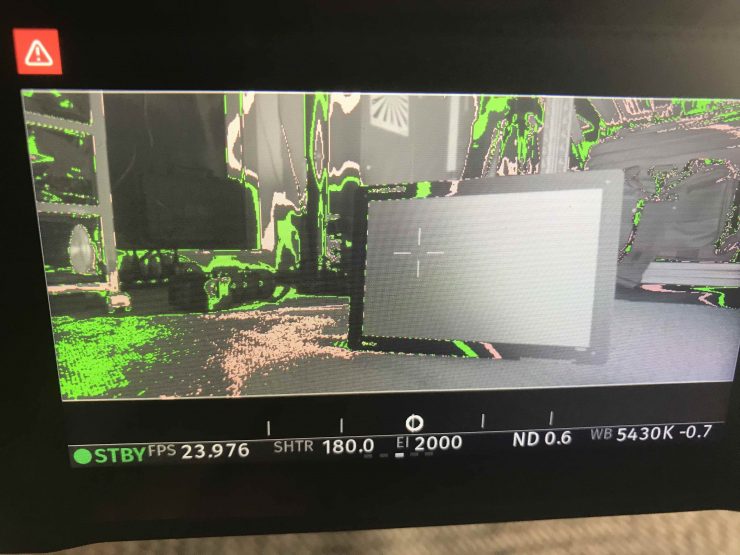
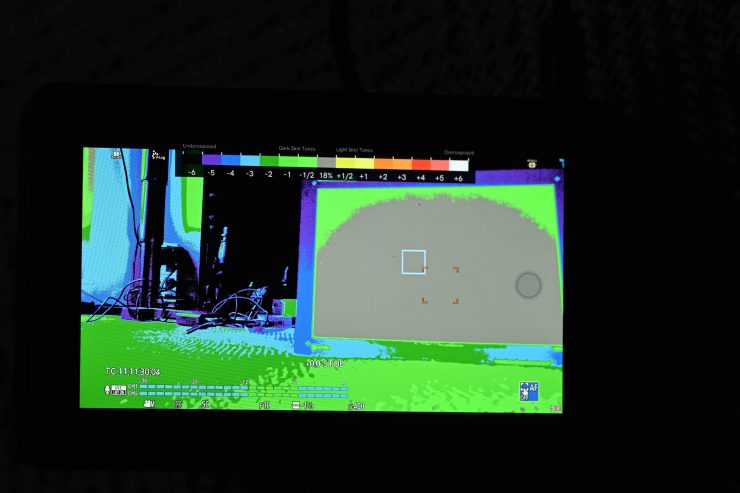
Above is a good example of how easy it is to see when something has clipped. I have placed a grey card and exposed for it, but as you can see, by exposing the grey card correctly I am going to overexpose the back window. It is completely white, indicating overexposure. Now, just a spoiler alert, this isn’t showing accurate overexposure for the camera I am using, but for the purposes of explaining how EL Zone works, let’s ignore that for now.
If I wanted to maintain exposure in the back window I could bring down my exposure until it was no longer clipping and then add the appropriate amount of light to expose the grey card correctly. For example, if I needed to bring my exposure down by 2 stops to prevent the window from clipping, I know that I would need to increase my light on the grey card by two stops to compensate. This is the beauty of EL Zone, everything has a direct reference and you can easily see where you need to make adjustments.
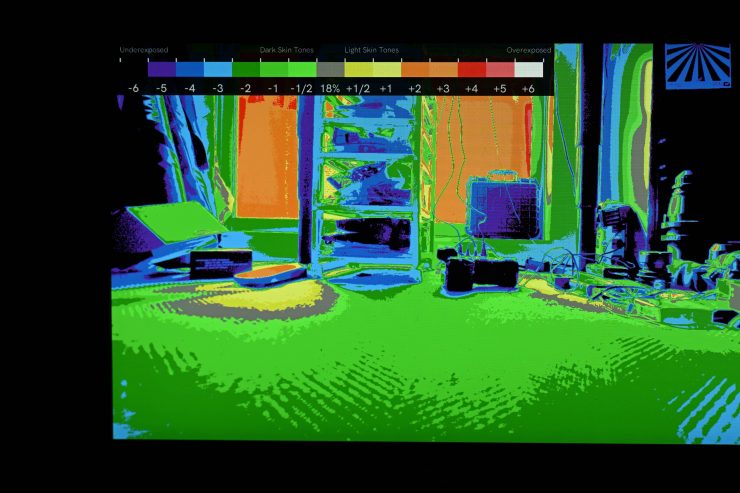
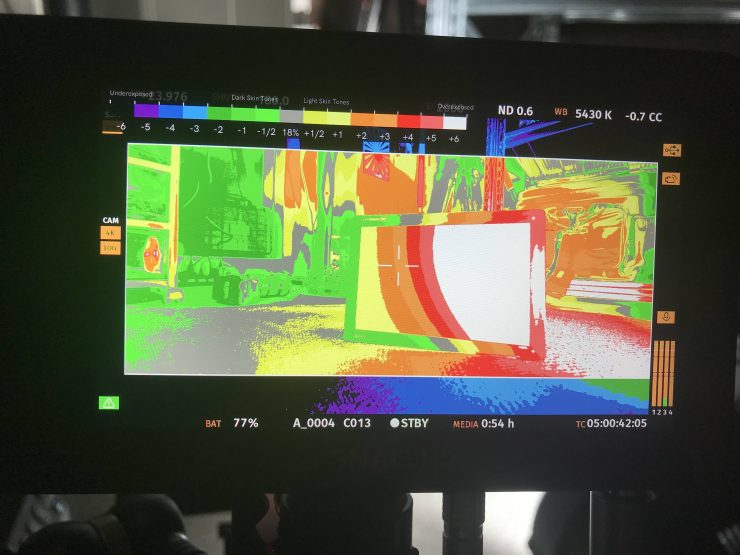
Above we can see another example of how useful EL Zone is. In this case, I have exposed for 18% grey, but you can see that this is a very low-contrast scene where there is only a difference of around 7-8 stops between the brightest and darkest parts of the scene. This is where EL Zone becomes very useful because it then allows me to look at what I need to do to my scene if I wanted to add more contrast.
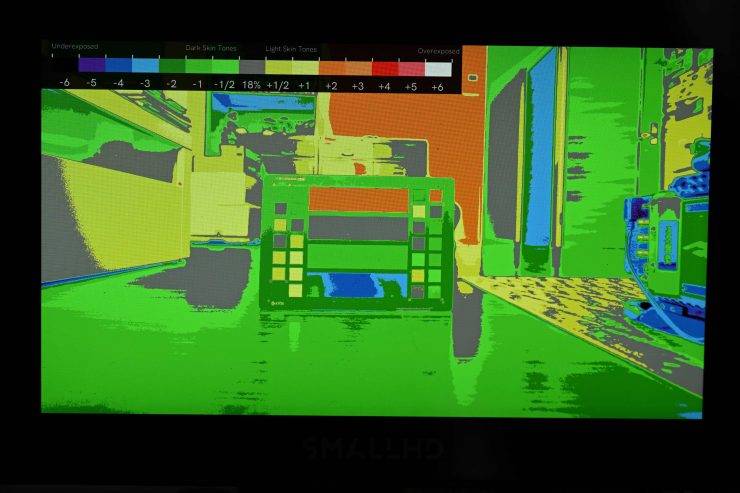
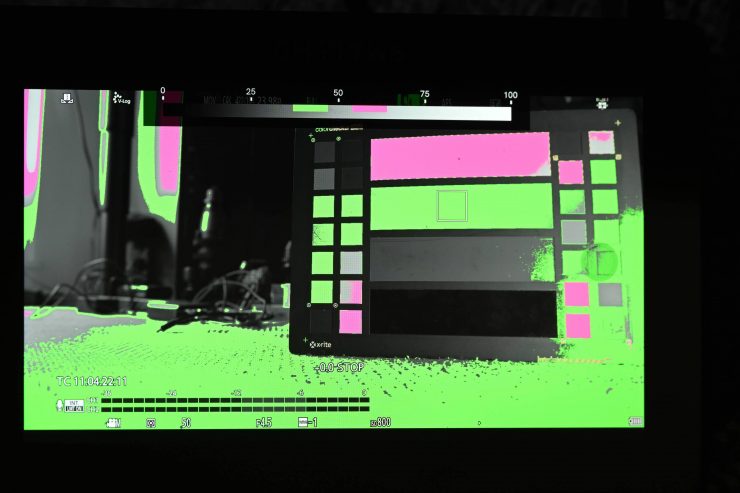
Above you can see a shot where I exposed a color checker chart so that 18% grey was correct. Now I can see what the values are for everything else that is in my scene.
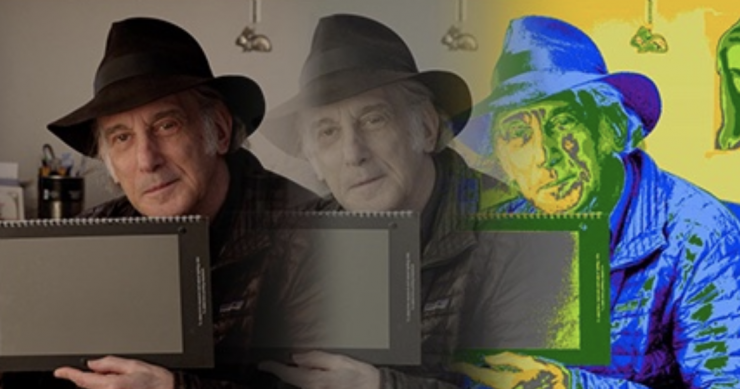
Now, to check how well using EL Zone is working, let’s turn it off after we have set our exposure and then added a LUT.
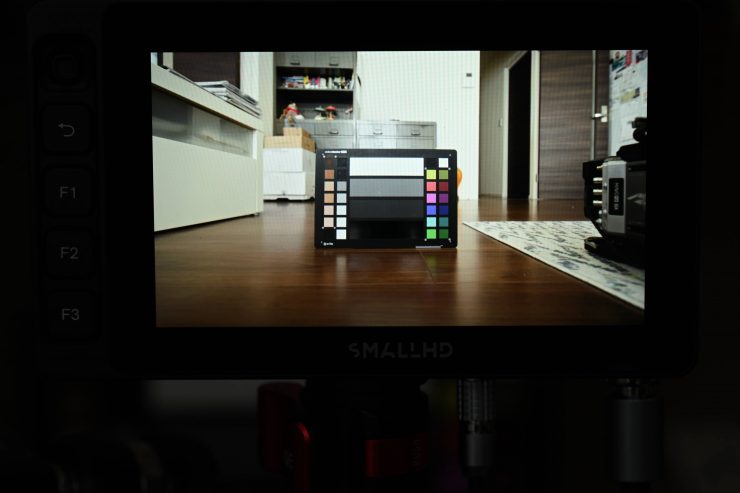
So what did we get? Well, as you can see, we got a well-exposed image.
So how do you accurately expose for skin tones?
Caucasian skin is represented by either medium yellow (+1/2 stop over 18% grey), or bright yellow (+1 above 18% grey).
Dark skin is represented by light green (-1/2 stop below 18% grey), or medium green (-1 stop below 18% grey).
Now, the only problem with EL Zone is that it does take a while to get your head around it if you are used to using false colors. As your brain gets pre-mapped with what false color values are indicated as you need to re-train it to use EL Zone.
How does it compare to using False Color?
I wanted to do some testing to see if there were exposure differences between using EL Zone and false color and if there were any caveats to using it.
Above you can see the images for a scene with a color checker chart where exposure was set using EL Zone.
Now, let’s expose the same exact same shot using false color.
El Zone 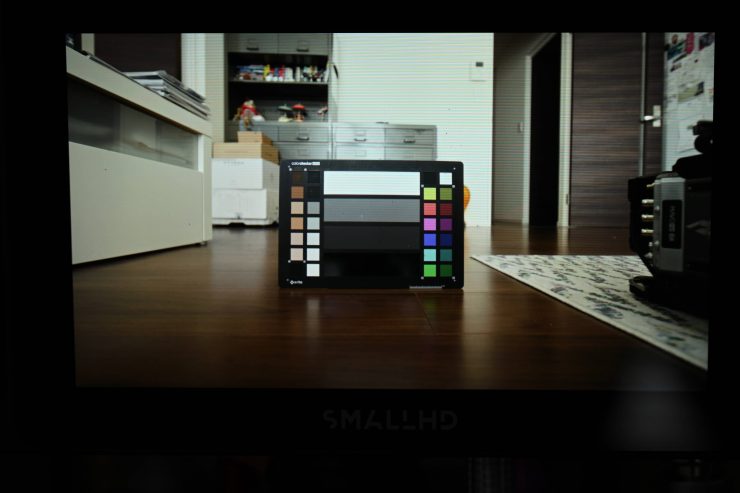
False Color
If we look at both images after exposure was set they are pretty close, although I think using the EL Zone method provided a slightly better result.
Now, the only problem with EL Zone is that it is limited to 12 stops, 6 above, and 6 below middle grey. With cameras that can capture large amounts of dynamic range, like the ARRI Alexa 35, you won’t be able to see an accurate representation of all of your stops. With false color in the camera, I can have it applied to a Log image so that when I activate false color it bypasses the Look. This then enables me to see how much I can push my exposure before I get any clipping. This is something I can’t do with EL Zone because it is going to show overexposure well before my image has actually clipped.
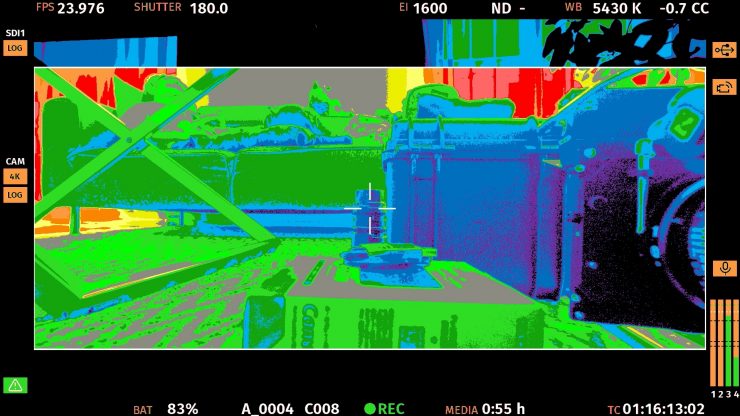
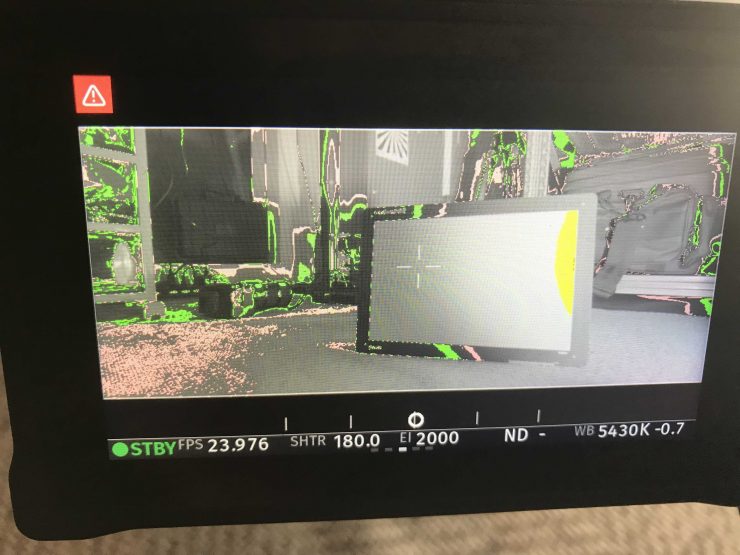
I will show you what I mean. Above is an image where EL Zone is showing overexposure in the scene.
However, if we use false color for the exact same image with the exact same exposure settings you can see a massive difference. There are no overexposed parts of the image, in fact, nothing comes even remotely close to clipping.
EL Zone has to be calibrated specifically to each specific camera sensor’s gamma and latitude. In the Panasonic Varicam and Varicam LT, as well as the Sigma fp and fp L it is, but if you use it with other cameras then it isn’t going to work as well.
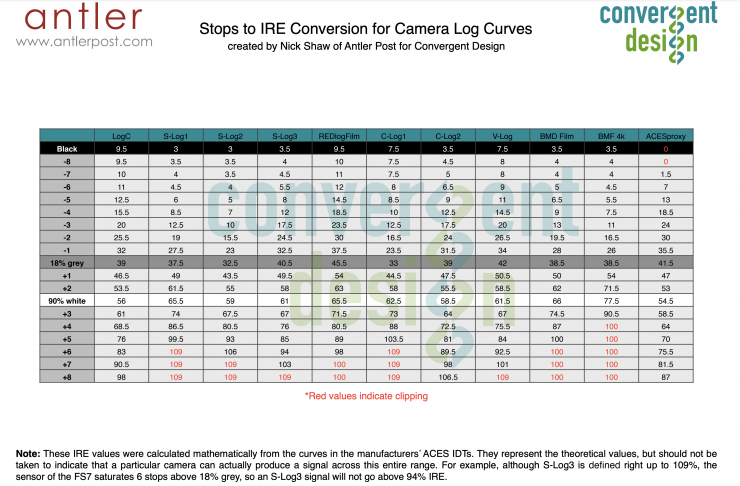
EL Zone could be mapped and implemented into cameras and monitors, but that would require some work. Above you can see mathematical calculations for various Log curves that were created by Nick Shaw of Antler Post for Convergent Design that show you the direct relationship between IRE levels and stops.
Ok, so back to the comparisons. If I expose based on EL Zone so that there is no overexposure in the scene, above is what I get. To do this I had to stop the lens down to T22 when the EI was set at 2000. This is not how I would normally expose this, but I am simply doing this to show you a clear comparison between EL Zone and false color.
If we now switch over to false color I could open the iris up to T2.8 with the EI still at 2000 and not get any overexposed or clipped parts of the image. This showed me that I had an additional 6 stops of latitude in the highlights available that weren’t being shown if I selected EL Zone.
EL Zone 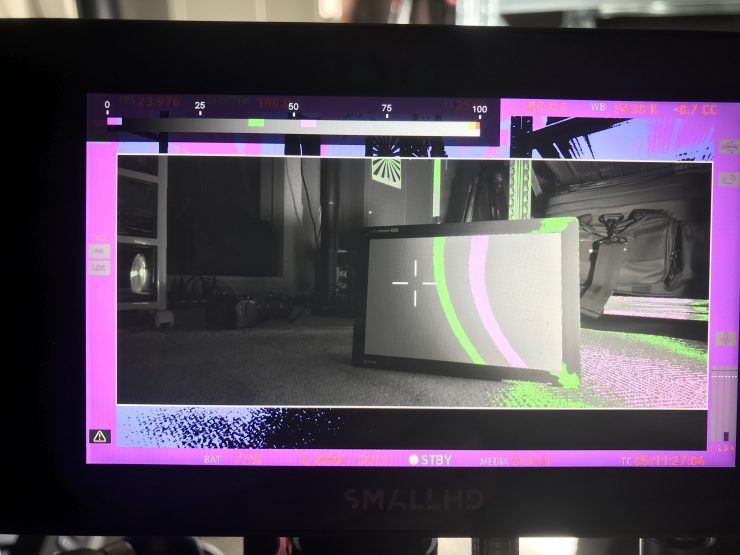
False Color
Conversely, if I swapped over to false color with the exact same EI and T stop being used you can also see the dramatic difference between EL Zone and false color. EL Zone was showing parts of the image were almost overexposed, while on false color it was showing values that were almost correct for middle grey.
Look, this isn’t going to be the case with a lot of cameras because if their actual dynamic range is closer to 12 stops, then EL Zone is a good option to use. But with cameras that are capable of displaying a lot more than 12 stops, it will indicate overexposure well before it should.
Just to be completely fair to EL Zone, let’s look at another camera with less dynamic range to see how it compares. For this example, I will use the Panasonic S1H.
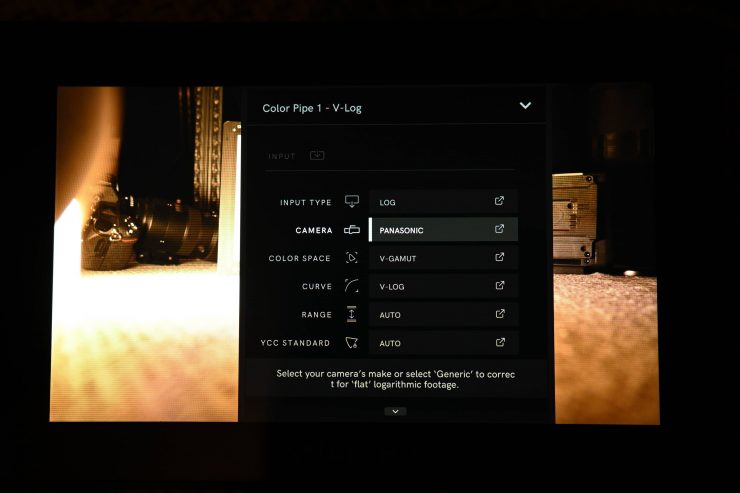
Just like with the ARRI, I have to change the Color Pipe settings to be able to use EL Zone with the Panasonic. In this case, it is V Gamut for the Color Space and V- Log for the Curve.
Once I have made these changes I can then go to my Exposure Assist setting and choose EL Zone.
Above you can see what it looks like if I set the exposure so that middle grey is correct using EL Zone.
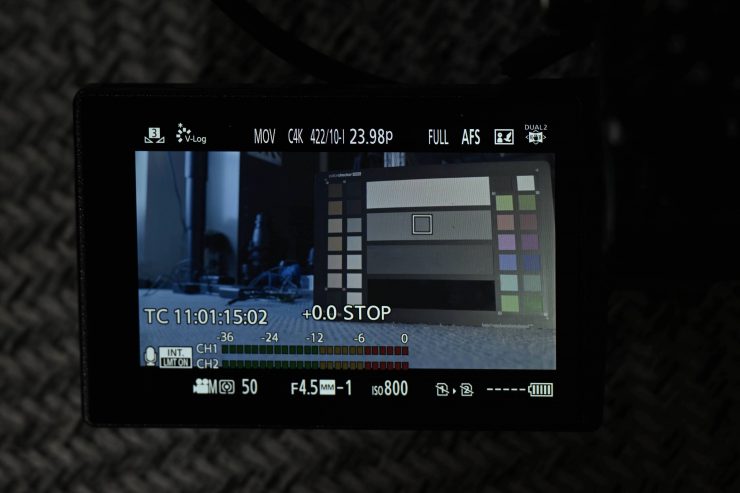
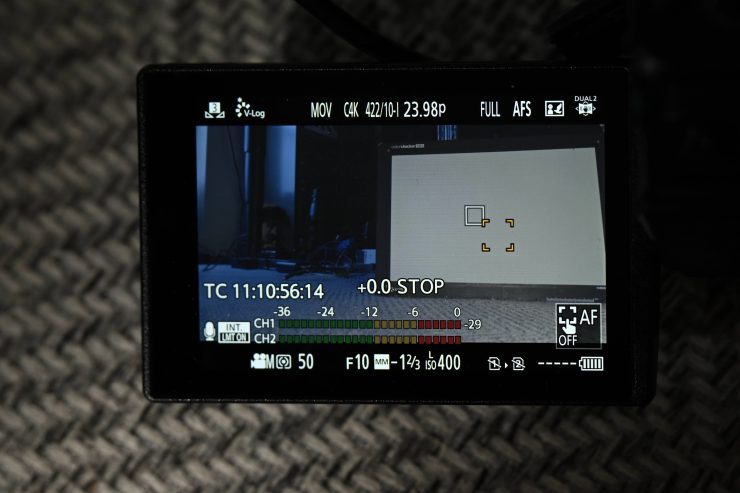
Ok, so now let’s have a look at the screen on the S1H with the luminance spot meter exposure tool activated. As you can see it is showing middle grey as being spot on. This is indicated by the +0.0 STOPS.
Above you can see the same image when false color is used instead of EL Zone. Now, please be aware that I have mapped false color on the SmallHD specifically for this camera so I would expect the results to be accurate. On most monitors, you can’t map false color and that is when you can run into inconsistencies.
Above you can see what it looks like if I set exposure correctly based on EL Zone for middle grey on an 18% grey card.
S1H 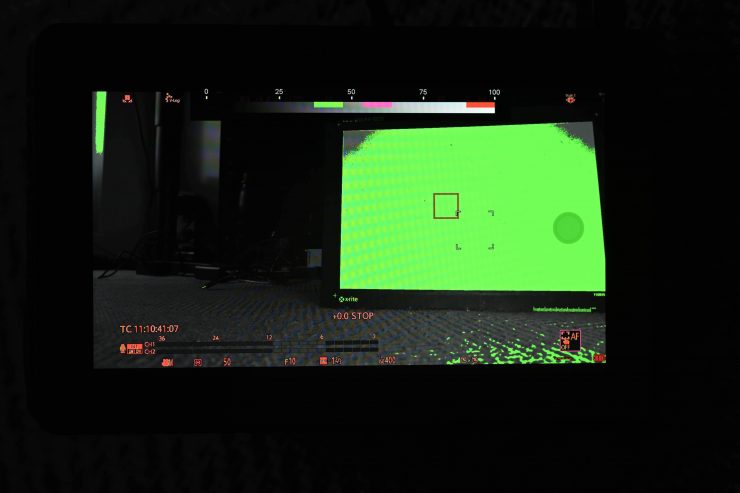
False Color
Let’s now check to see how that compares to what I am seeing on the S1H’s screen and if I switch the SmallHD Exposure Setting over to false color. As you can see, all three exposure methods are giving me almost the exact same result.
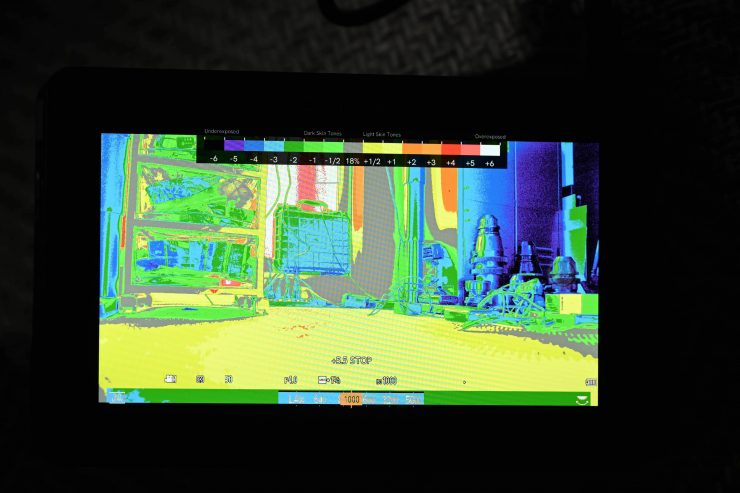
Ok, so now let’s have a look if I raise the exposure so that we get some overexposure in the image. We can see that overexposure is indicated by the color white.
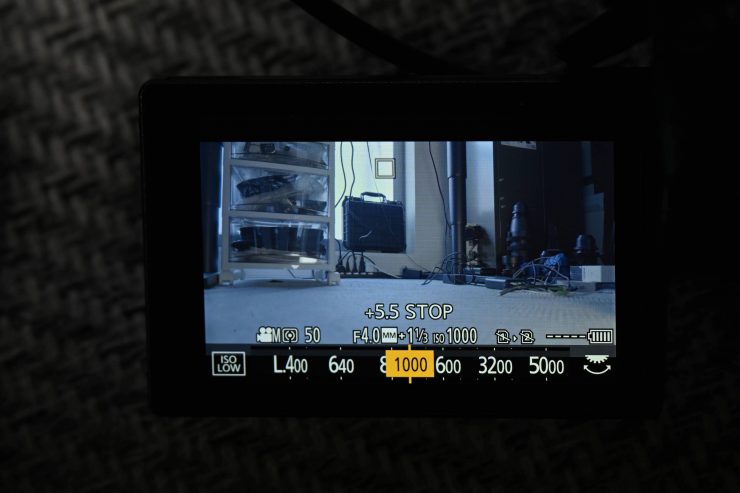
S1H 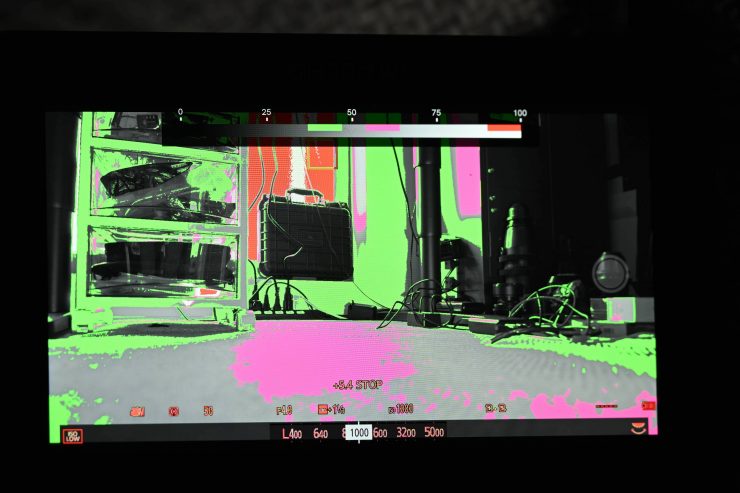
False Color
Again, let’s see how this compares to what I am seeing on the screen of the S1H and when I switch to false color on the Small HD. As you can see if I place the luminance spot meter on the same part of the image that is showing overexposure when EL Zone is used it tells me that it is 5.5 stops above middle grey. Having worked with the S1H, I know that 5.5 stops above middle grey are going to result in highlight clipping. On false color, it is displayed as red which is also indicating overexposure.
From my testing, I found that EL Zone works well with cameras that have dynamic range that is within the limits of what EL Zone is capable of displaying.
When setting exposure it really depends on what you are trying to achieve. In some cases, setting exposure so it looks good for the LUT or Look you are using will be perfectly fine, but in other instances, especially high dynamic range scenes, you may want to expose to the right to raise the exposure of areas below middle grey, while still not clipping your highlights.
Thoughts on EL Zone
I like the concept of EL Zone and in a lot of instances, it works really well. The biggest caveat is that it is limited to showing 12 stops and depending on the camera you are using, this can be an issue, especially when displaying accurate overexposure.
On the positive side, it is really nice to be able to see a visual indicator of exactly what stop value an object is in your scene. You can use EL Zone as a sort of defacto light meter and it allows you to see all the values in your scene on a single display. No, it isn’t going to give you T-stop or F-stop values based on a certain EI or ISO, but it will give you enough information that you can clearly converse with a gaffer so you can tell them to raise or lower the intensity of a light by a given number of stops. All you need to do is to look at your camera and call out a T-stop or F-stop. Because you have a reference on your screen, if you have your camera T-stop at say T5.6 and your EL Zone is showing you that the correct exposure is 2 stops under what it should be, you know that you will have to either open up the iris to T2.8 or add more light to compensate. For gaffers, they could also have a Small HD monitor with a wireless RX unit on it where they could be seeing the exact same image with the EL Zone applied as the DP was. This would also help with communication.
It is always great to see new ways of doing things. We have arguably become so used to older forms of technology when dealing with exposure, such as zebras, false color, and histograms. While all these tools certainly have their place, EL Zone adds another element that can be very useful when judging exposure. Hopefully, in the future, it gets implemented in more cameras and devices, but this will require it to be calibrated specifically to each specific camera sensor’s gamma and latitude.