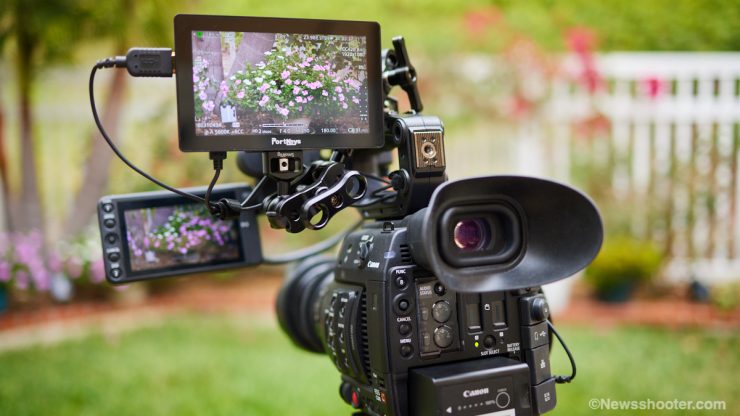
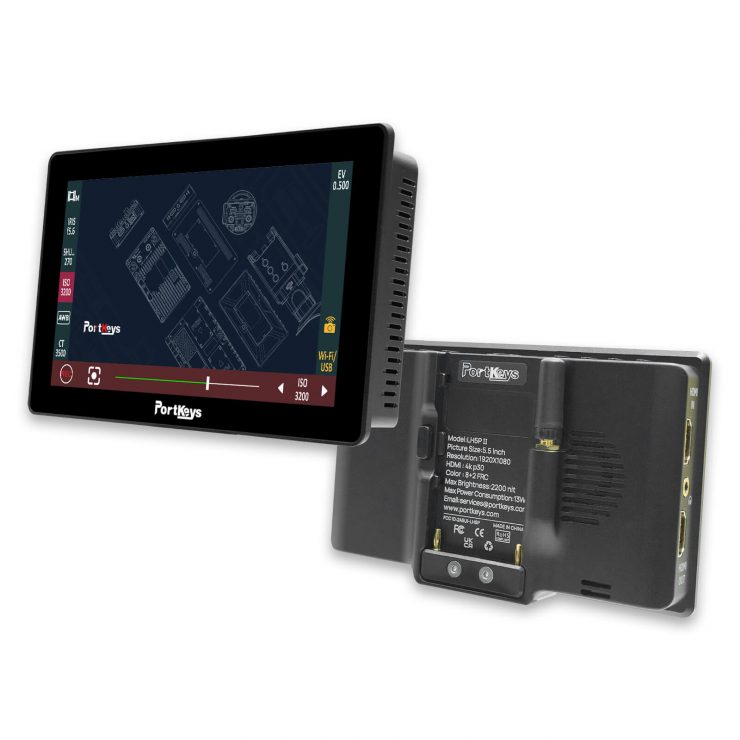
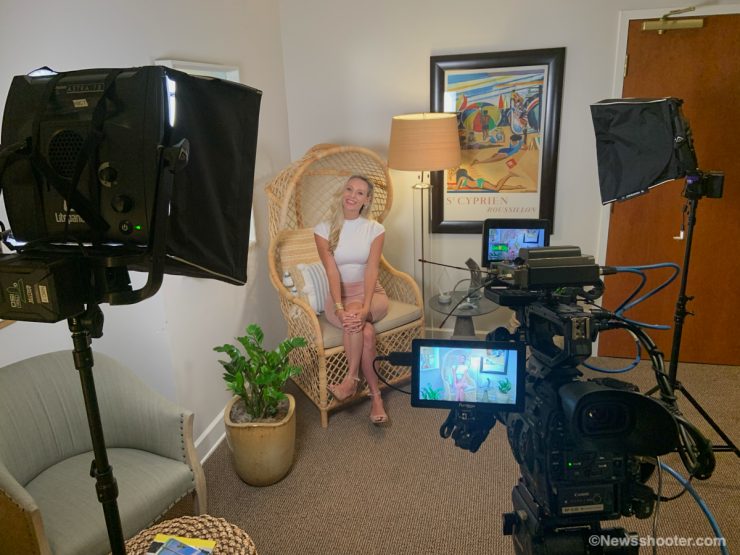
Bright and small monitors have come a long way in the past few years, and the PortKeys LH5P II packs a lot of features into an affordable 5.5″ monitor. It is bright at 2200 nits and has camera control features for several models, including touch focus for some Sony cameras.
Spoiler alert! I like this monitor. It’s not perfect, as nothing is, but it fills a significant need for me in my kit. The 2200 nit screen is a game changer for shooting outside. I live and work in San Diego, Ca, where it’s sunny most of the year, and monitors can’t handle it. The Portkeys LH5P II does, and it’s made my recent outdoor shoots very enjoyable.
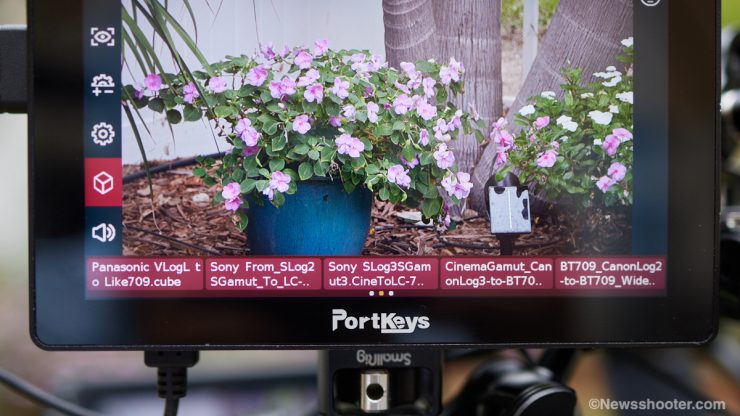
Another big plus is it handles LUTs very well. I shoot in Clog 2 Cinema Gammet in high-contrast situations. This means outside with the 2200 nits of brightness, I have a very viewable image with a great representation of what the image will look like when the LUT is applied. Yet another advantage is I can set the Waveform before the LUT is applied. This way, I know exactly what I’m shooting. All this and more for $399.
The LHP5 II isn’t a one-trick pony as it also includes camera control features. I like the idea a lot, but I used the controls on the camera more often. I can see this being extremely helpful if you use a camera on a rig/gimbal.
I like that I can access the camera’s menu and make setting changes. Outside it’s tough to see the camera’s LCD and the bright monitor makes it easy as pie!
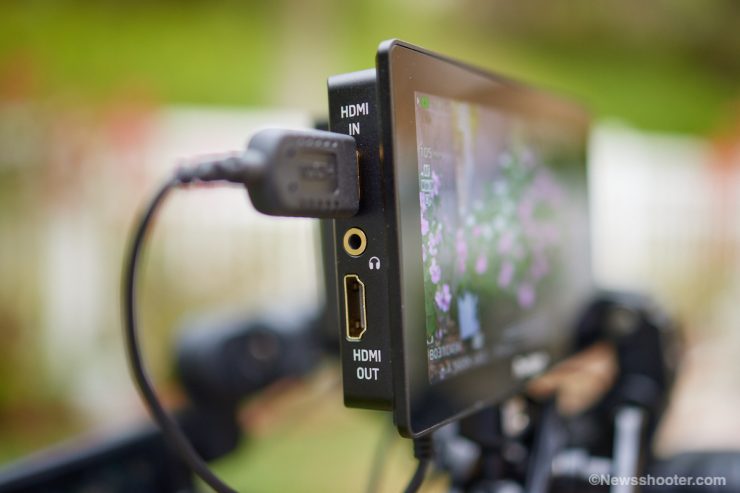
One downside, it’s an HDMI-only monitor, but has a loop-through. Yeah, you knew that was coming. If you want SDI, you will need to step up to the BM5 III WR. It has the same 2200 nit screen but with more options. The BM5 III WR retails for $749.
Specifications and Included Items
The kit comes with a hard case and several cables to connect with a compatible camera for control. If you want to check out the manual for the LH5P II and UI Tutorial, they are available for download by clicking on the links below.
LH5P II user manual
UI Firmware Update Tutorial
- Power Cord (Aviation Port to DC)
- 2.4G Straight Head Antenna
- LANC Control Cable
- TYPE-C Control Cable
- Case
- USB Drive with user manual and firmware and LUT installation
The LH5P II is available in five different models depending on the camera or devices you want to control. Each model comes with the proper cables for those specific cameras and devices.
PORTKEYS LH5P II -SLANC 5.5 Touchscreen Monitor with Camera Control for Sony FS5/FS7/FX6/FX9
PORTKEYS LH5P II -CLANC 5.5 Touchscreen Monitor with Camera Control for Canon C100/C200/C300/R5/R6/C70
PORTKEYS LH5P II -S 5.5 Touchscreen Monitor with Camera Control for Sony A6000/A7/A7R2/A7R3/A7S3
PORTKEYS LH5P II -T 5.5 Touchscreen Monitor with Camera Control for Tilta Nucleus N
PORTKEYS LH5P II -Z 5.5 Touchscreen Monitor with Camera Control for ZCAM E2 S6/F6
More on control features coming up in the review.
Specifications
| Size | 5.5″ |
| Screen | IPS touch screen |
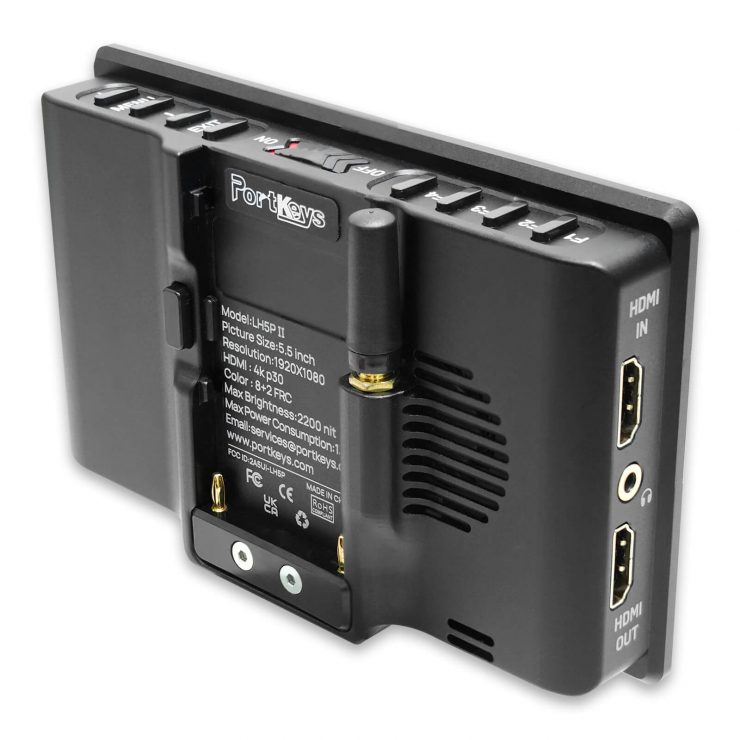
| Input | Full-Size HDMI in and out |
| Dimension | 144x90x30.8mm |
| Viewing Angle | 178°H/178°V |
| Brightness | 2200nits |
| Resolution | 1920×1080 |
| Contrast Ratio | 1000:1 |
| Weight | 285g |
| Color Depth: | 10bit(8+2 FRC) |
| Material | Aluminum Alloy+Toughened Glass |
| Input Voltage | DC 7~24V |
| Maximum Power | 13W |
| USB-A | Upgrade Firmware / Load 3D LUT |
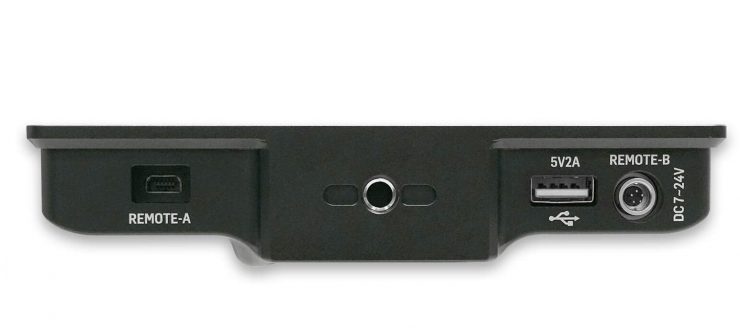
| REMOTE-A | Supports wired functions control of Z CAM, Canon, Sony, Panasonic, and BMD |
| REMOTE-B | Support wired control Tilta Nucleus-N/M |
| Battery | Sony NP-F970/F960/F750/F550 |
| Headphone | 3.5mm |
| Fan | low and high settings |
Supported input resolution and frame rate
- 4096×2160p@24Hz
- 3840×[email protected],24Hz,25Hz,29.97Hz,30Hz
- 1920×[email protected],24Hz,25Hz,29.97Hz,30Hz,50Hz,59.94Hz,60Hz
- 1920×[email protected],24Hz,25Hz,29.97Hz,30Hz
- 1920×1080i@50Hz,59.94Hz,60Hz
- 1280×720p@50Hz,59.94Hz,60Hz
- 720×576p@50Hz
- 720×576i@50Hz
- 720×480p@50Hz,59.94Hz,60Hz
- 720×480i@50Hz,59.94Hz,60Hz
Supported output resolution and frame rate
- 4096×2160p@24Hz
- 3840×[email protected],24Hz,25Hz,29.97Hz,30Hz
- 1920×[email protected],24Hz,25Hz,29.97Hz,30Hz,50Hz,59.94Hz,60Hz
- 1920×[email protected],24Hz,25Hz,29.97Hz,30Hz
- 1920×1080i@50Hz,59.94Hz,60Hz
- 1280×720p@50Hz,59.94Hz,60Hz
- 720×576p@50Hz
- 720×576i@50Hz
- 720×480p@50Hz,59.94Hz,60Hz
- 720×480i@50Hz,59.94Hz,60Hz
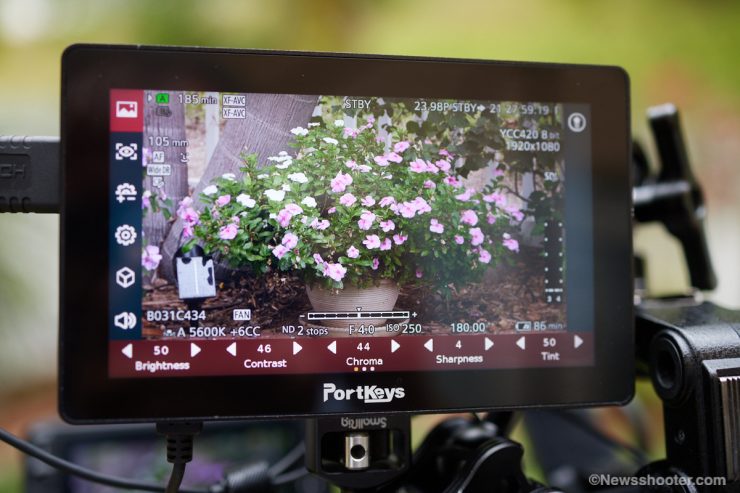
Functions and Tools
- 3D LUT
- RGB Waveform
- Luma Histogram
- Camera Control
- Peaking
- Zebra
- Check Field
- Audio Meters
- Chroma
- Display Flip
- New Peaking
- Peaking Frame
- Luma Waveform
- ARRI False Color
- Cross Hair
- Guides
- Grids
- Rectangle Crop
- HLG
- Custom RGB
- Tint
- Sharpness
- Backlight
- Contrast
- Color Temperature
- OSC Flip
- Anamorphic
Build Quality
I’m impressed with the build quality of the LH5P II. The frame is made of CNC aluminum alloy. It’s strong but light. A bit surprising for the price. Most affordable monitors are all plastic.
The battery plate holds the battery securely, and the Wi-Fi antenna is tucked into the back of the monitor so it’s not poking out the top. I like this design as it keeps it more compact. The antenna is removable, so if you don’t intend to use Wi-Fi, you don’t need to install it. The kit comes with a spare antenna.
Brightness

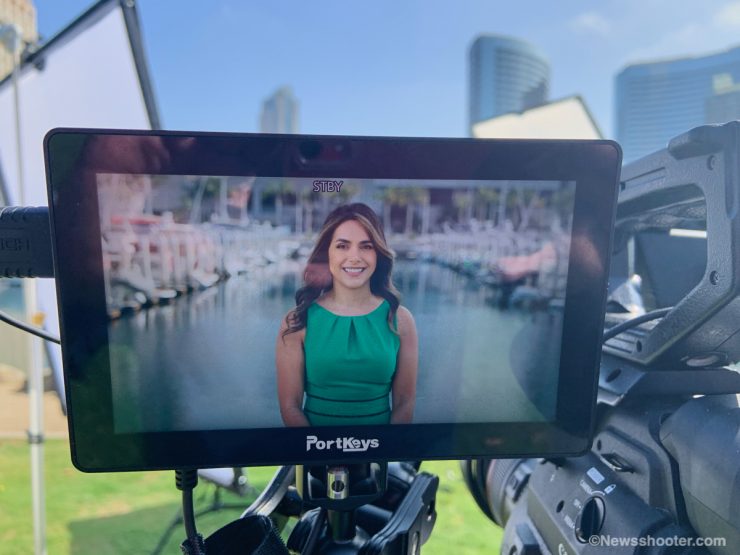
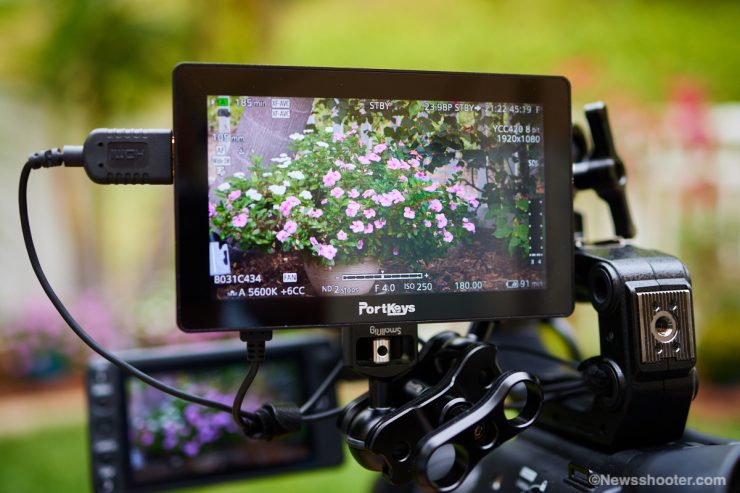
For me, the top feature is being daylight viewable. I live in San Diego and shoot in full sun a lot. Monitors struggle in the California sunshine. The image above shows how the C300 MKII LCD is almost unusable. Without the daylight viewable monitor, I would have to use the EVF.
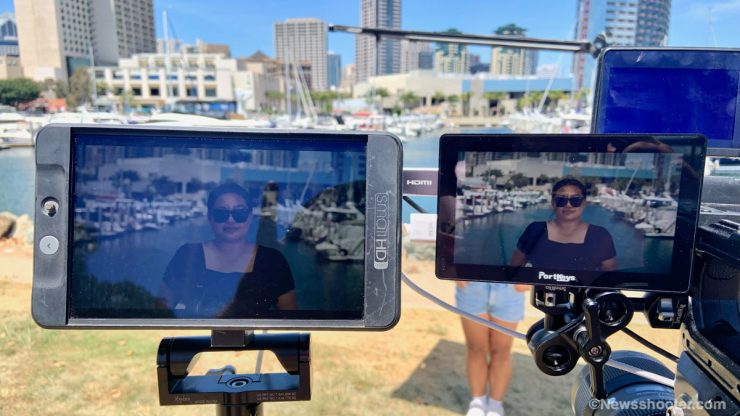
My primary field monitor is the SmallHD 702 Bright. I’ve been using that monitor for many years, and it still keeps going, but it’s showing its age. It has 1000 nits of brightness and is barely usable in full sun. It’s getting older, and I can tell it’s not as bright as it used to be, but it keeps on working. SmallHD makes solid monitors that last, but the high bright models are expensive. Check out the C300 MKII screen in the upper right corner. It’s almost black.
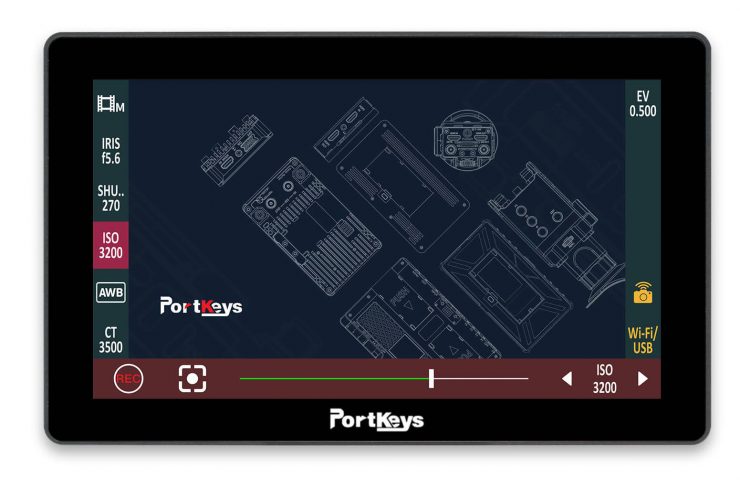
The PortKeys LH5P II, with its 2200 nits screen, is much more usable; it can be a little too bright at times, especially indoors. You have a backlight adjustment that makes it less bright without looking dull. I had it set to 6, 7, or 8 outside. Indoors five works well. I can change it with the top buttons or access the touchscreen.
Is it 2200 nits?
I tested the nits by cranking up the backlight and brightness to 100, feeding white video, exposing the image over 100 IRE, and metering the output. The reading was 2150 lux. I would say that’s close enough to 2200 nits. FYI nits and Lux can be interchangeable for testing purposes.
My primary camera is a Canon C300 MKII, and the LCD in the sun is borderline unusable, so I’m stuck with using the EVF. Unfortunately, like so many cinema cameras, the EVF is on the back top of the camera, making it tough to use when shooting people at eye level. I’m 5′ 9′, and when shooting a subject the same height as I am, I need to get on my toes to use the EVF. Okay, rant over! Having a 5.5″ 2200 nit monitor off to the side and lower is wonderful.
Keeping it Cool
The monitor does have a fan to keep it cool. All those nits can make the monitor toasty. The fan has two settings. I never needed to set it too high as it worked just fine in low, and the noise, while audible, didn’t bleed into microphones. I can safely say the fan is not an issue.
Color Accuracy
The screen is 10bit (8+2FRC) It’s crisp and has excellent detail. Out of the box, the monitor wasn’t to my liking. The colors seem a bit off. I like my monitors to match as closely as possible to what I see on the camera LCD/EVF. It gets confusing to have different looks. Depending on the camera LCD/EVF, I tend to trust them.
The good news here is the LH5P II can be corrected since it has RGB and tint adjustments, plus you can change the color temperature. These options make it easy to adjust. An added bonus is being able to adjust the Sharpness and Chroma. In the feature list, it states Color Calibration Switch. I couldn’t figure this one out. Maybe a feature that will be coming with an update.
You have to have basic knowledge of manually setting up color since no calibration tools are available. This isn’t a knock since the monitor is priced so low I expected some things like color accuracy out of the box to be slightly off. I could get a good picture from the low-budget $399 monitor with some tweaking. Paired with the super bright 2200 nits, I’m pleased with it.
One thing I noticed is hot spots turn slightly reddish when the the image exceeds 100% IRE. It’s a bit ugly but gets your attention. I’m sure this can be corrected with an update.
LUT Support
Luts loaded from USB 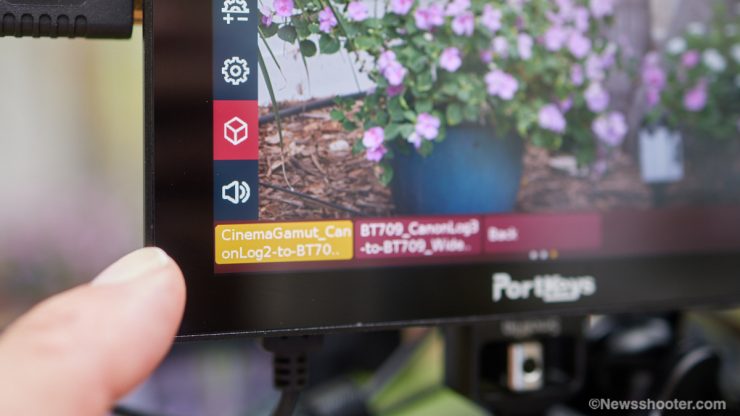
Canon Clog Cinema Gamut to Rec709 Lut
Shooting Clog 2 or any very flat log setting makes it difficult to focus, and viewing the image is rough. Here is where having Lut support saves the day! You can install Luts with the USB input and recall them quickly. They look great. I like that I can set the output of the Waveform either before or after the Lut. I don’t like to set exposure with the lut. I prefer to see precisely what I’m shooting before it is applied.
Powering Options
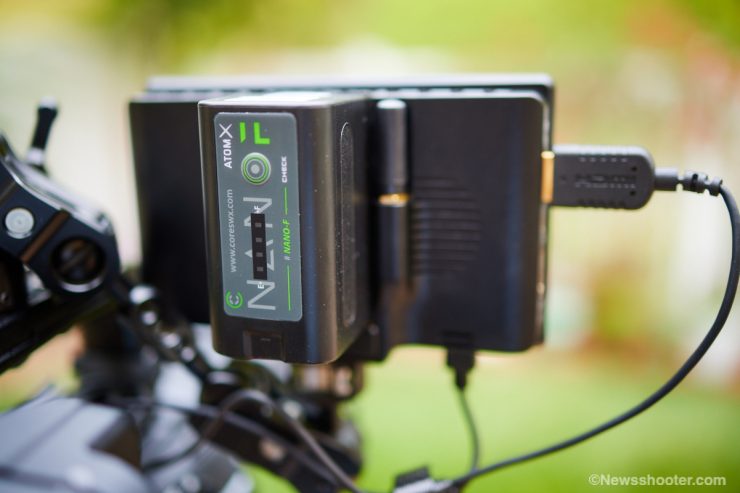
The monitor uses a single Sony NP-F L-style battery. I’m using the new Core SWX Nano F 6300mAH 47WH battery. Two of these last all day. The beauty of the NANO F is they pack the same power as the largest Sony NP-F970 versions but in a smaller form factor. I love fuel gauges on batteries. After a shoot, it’s nice to be able to quickly check the batteries that need to be charged and, of course, while using them.
It can also be powered with a 5-pin Lemo to D-tap. This cable isnt included, but Portkeys sells them for $19.
When purchasing power cables, make sure the polarity is correct. Portkeys offers two options. The Portkeys 5-pin Aviation Power Cable and Aviation Power Adaptor – US Standard.
Camera Control
Camera control is a feature we are seeing integrated into more monitors. I like the idea of a centralized way to change certain camera settings such as focus, iris, shutter, and record trigger, plus access to the main menu and making changes. It makes a 3rd party monitor feel more like an OEM product.
The list is long on what cameras and devices the monitor can control. Here is a road map with all the capabilities and screenshots below.
To access the Camera Control feature, you swipe down on the touchscreen, and the options appear. Swipe to the left or right, and the monitor options appear.
To have control, a cable, Bluetooth or Wi-Fi is used. When selecting an LH5P II, you need to know what camera/device you want to use it with. You can pick up different cables as the kits include only the cables for specific setups. The monitor itself is the same.
Sony A7 III
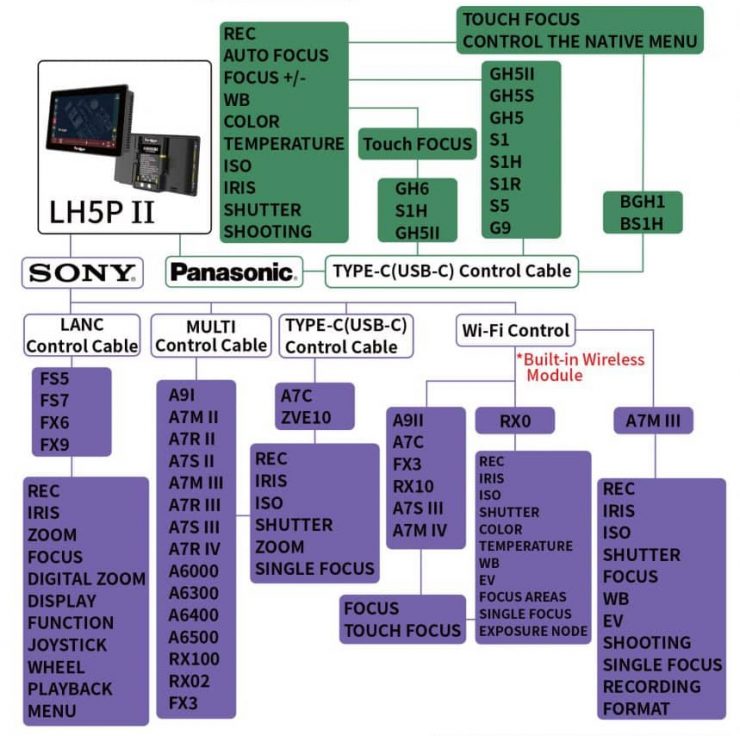
Unfortunately, I don’t have a Sony camera compatible with Touch Focus control. I think this is a big one for people with these cameras. The models that are compatible with Touch Focus are listed as such below.
- A9II
- A7C
- RX10
- A7S III
- A7 IV
Sony cameras have several options. LANC, Multi Control Cable, USB-C, and Wi-Fi Control. Below is a demo of how it works. As you can see, when you touch the monitor, it focuses the camera; however, you don’t see the focus box like you do on the camera’s LCD.
Canon C300 MKII, C200 LANC Control
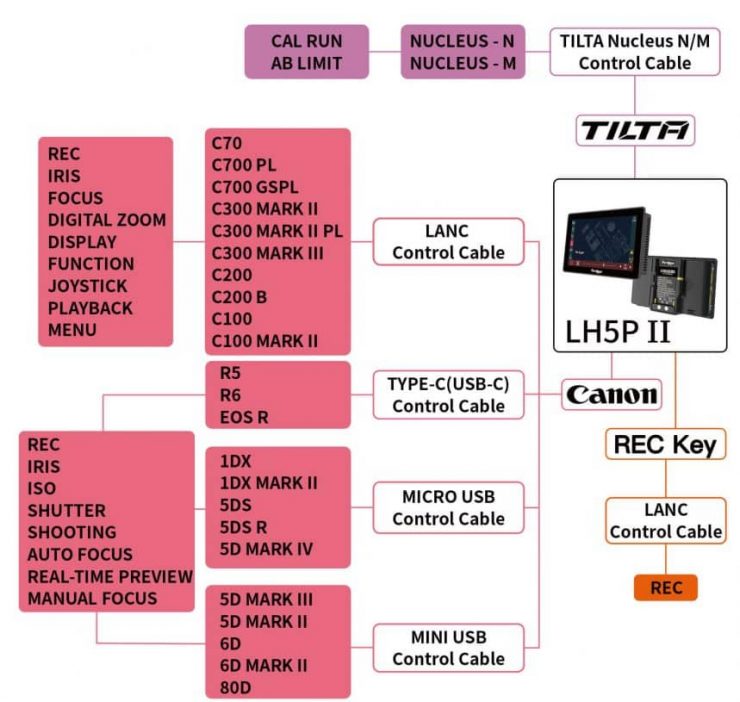
The C300 and C200 use the LANC input for remote connection to the camera. The kit comes with a USB to LANC cable. You plug it in, and the camera is ready. No setup is required on the camera end.
The included cable is a bit short at 15,” but it worked fine for my setup. I would like a longer cable for those odd angles where I need to get the monitor farther from the camera.
I was surprised by how well the controls work. The touchscreen is very responsive to commands. It feels like an OEM product with some limitations.
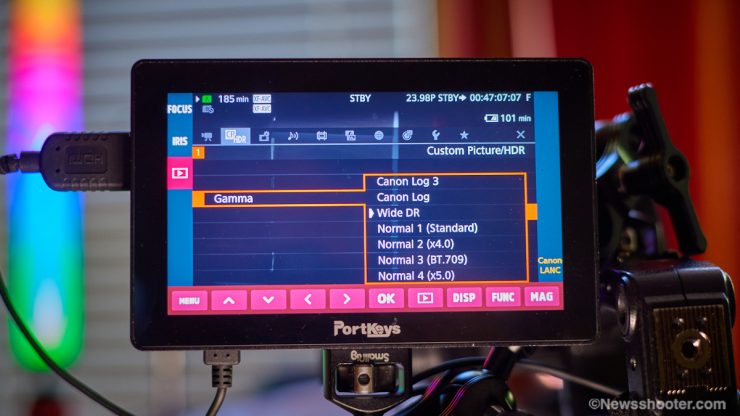
It’s nice to access the camera’s main menu and easily navigate it with the image of the menu on the screen. With a two-finger swipe down, it opens the camera control options. First, I had to select the Canon LANC option on the bottom right of the screen. On the left is what is available to control. To access the main camera menu, I tap on the play arrow icon and tap on MENU. Now I can navigate the camera’s menu with the left/right/up/down touch menu. It works very well and is very responsive.
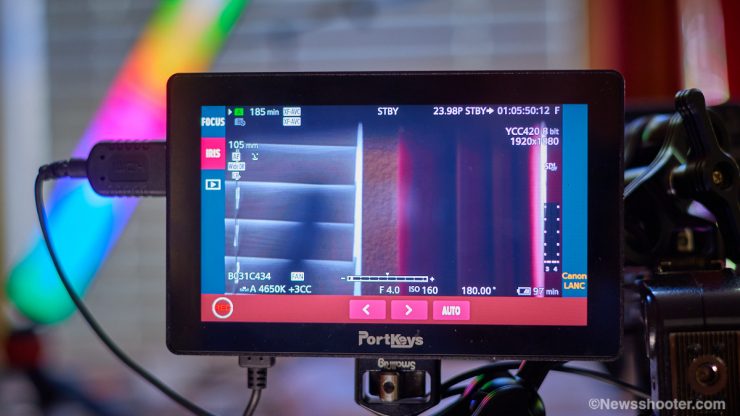
IRIS 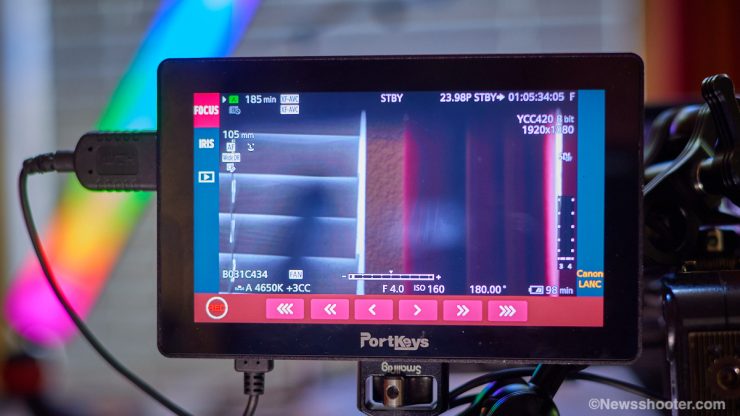
FOCUS
I can change the FOCUS and trigger record from the same screen. The iris adjustments follow the same steps as the camera is set for. Focus is not as useful since it’s slow to dial it in with the arrow buttons on the touchscreen. I can see it being helpful if you don’t have access to the lens or on a rig. I can focus, but it’s slow. A One-Shot AF option would be great. However, the limitations of the camera are most likely to blame.
I didn’t test the LK5P II with the Tilta Nucleus system, but I did on the BM5 a year or so ago. You can set AB points and calibrate the motor as well as change the focus manually. Similar to the FOCUS control, it’s a bit touchy and slow. Again if you don’t have access to the lens, it’s a great option to have.
Also available are the Display options. Tapping it changes the HUD on the monitor. Next is FUNC. This one I couldn’t figure out how I could change it as the default is White Balance. Handy if you want that, but I think it’s a setting I would rather not have. The last option is MAG which pops in for focus assistance.
The options are good, and I found myself getting used to using them over time. It adds usability to the C300 MKII I didn’t have with the stock LCD. Mainly daylight usability and tools that help get the shot. Impressive for a $399 monitor.
Z CAM
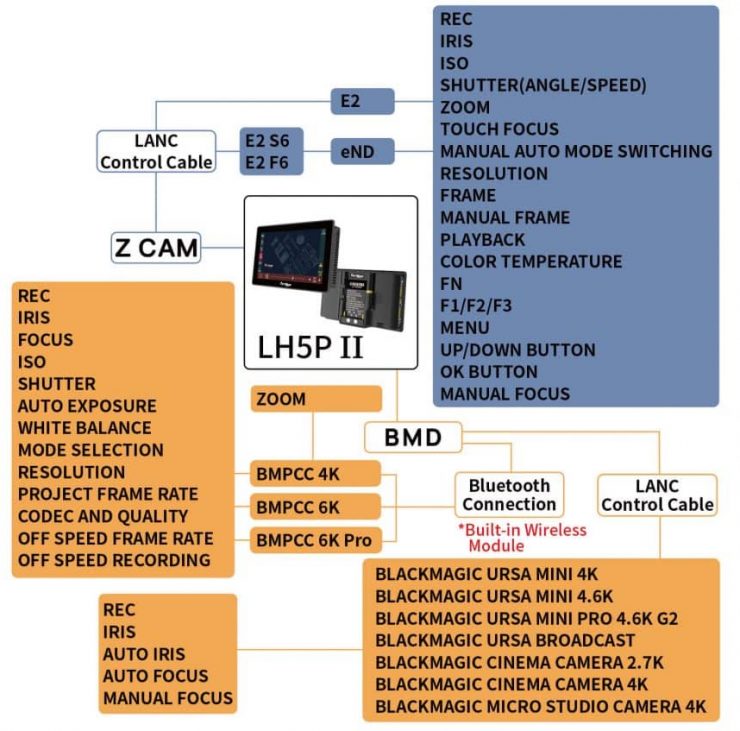
The Z CAM being a box camera with a small menu on top, is a prime candidate for a monitor that can access controls and functions. Just like with Canon, the Z CAM uses the LANC port. The functions are deeper with the Z Cam than with the C300/C200 cams. Check out the diagram for full feature controls.
Blackmagic URSA, Studio Camera, Micro Studio, and Pocket Cinema cameras can use the Wi-Fi option and LANC.
Menu

A lot of inexpensive monitors have terrible menu systems. The user experience is important. I dislike fumbling through multiple menu levels to make changes. This is where SmallHD has excelled at. The Page OS is one of my favorites. With the LH5P II, PortKeys has kept the menu system consistent with its other models. It’s not bad and better than most. Since it is a touchscreen and uses gestures and taps to navigate, you have to learn the system as there are a lot of swipes and taps. You do need to learn the gestures to see all the settings. Once you figure it out, it’s pretty simple to navigate, but muscle memory will help to remember where some settings are hiding.
Usability
Once you figure out how to navigate the menu, the monitor is straightforward to use. The HDMI I/O is on the left side, making it more compatible for operator monitoring on the camera. I do like inputs on the back, but I think the monitor is too thin for that position.
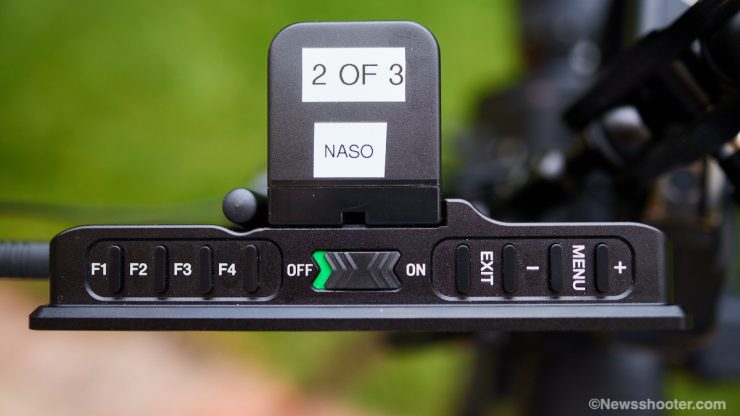
With the four programmable tools, I can, for the most part, not have to fiddle with the menu system while shooting. I think setting up the monitor with your favorite tools is important to avoid going into the menu. The touchscreen can get activated easily on accident while shooting or moving the camera. This is an issue I have had with all touchscreens. Best to turn it off when changing locations.
The + and – buttons are set for backlight adjustments. The Menu button accesses the menu, similar to tapping the screen.
So Many Options
Field monitors have been saturating the market lately at reasonable prices. It can make choosing the right one a bit confusing. I like monitors that are over 1500 nits as they can be used in the sun. If I were looking into buying, I would get one with at least 2000 nits. This option does thin the herd a lot as most are not that bright, but I’m seeing more of the high bright models as well at good prices. Brands like Feelworld, Osee, Desview, Lilliput, and Godox are all competing for your hard-earned cash in the budget space.
Final Thoughts
I can easily say the PortKeys LH5P II is the best $399 monitor I have used. It has a good build and is packed with useful features for several cameras. My only concern would be how long it will last. I think for an owner-operator who isn’t rough on gear, you can get your money’s worth and then some, but if you are hard on kit, maybe not so much. It does have a metal body, but I don’t know how well it’s built on the inside.
With the budget offer, build quality is only half of the equalization. The life span for budget gear will be less, but having a monitor in this price range with many useful tools opens up pro-level features to the masses. Just be nice to the little guy.