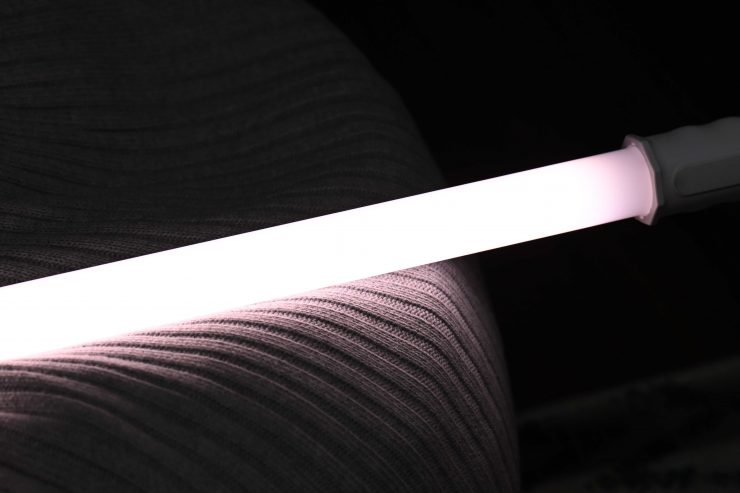
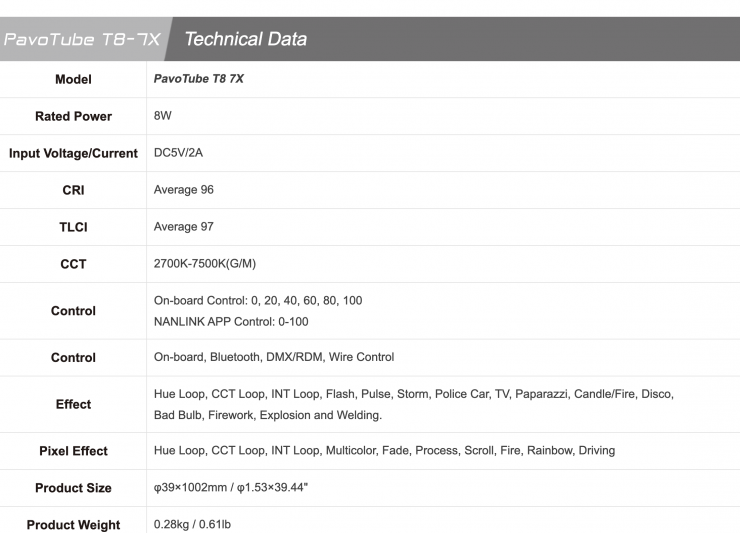
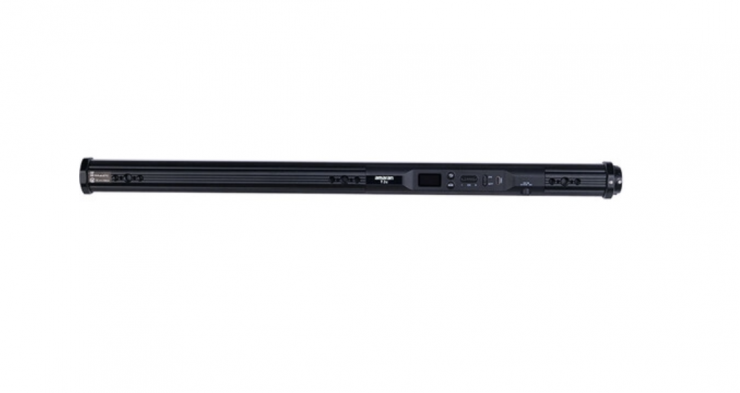
Nanlite’s new PavoTube T8-7X is a very affordable 1m / 3.3′ long LED pixel tube. I wanted to have a closer look at this product given its relatively low cost and feature set.
LED tube lights have become increasingly popular over the last few years and the market is now saturated with different options. Most of the options available tend to be quite expensive, but the PavoTube T8-7X bucks that trend by retailing for less than $100 USD.
For this review, I will be looking at their PavoTube T8-7X RGBWW LED Pixel Tube 4-Light Kit which retails for $389 USD.
Design & Concept
Tube lights are not a new concept. Fluorescent tubes have been around for a very long time, and in recent years we have seen quite a lot of RGB options coming to market.
The inherent problem with a tube light is you have to think carefully about how you are going to mount and power it.
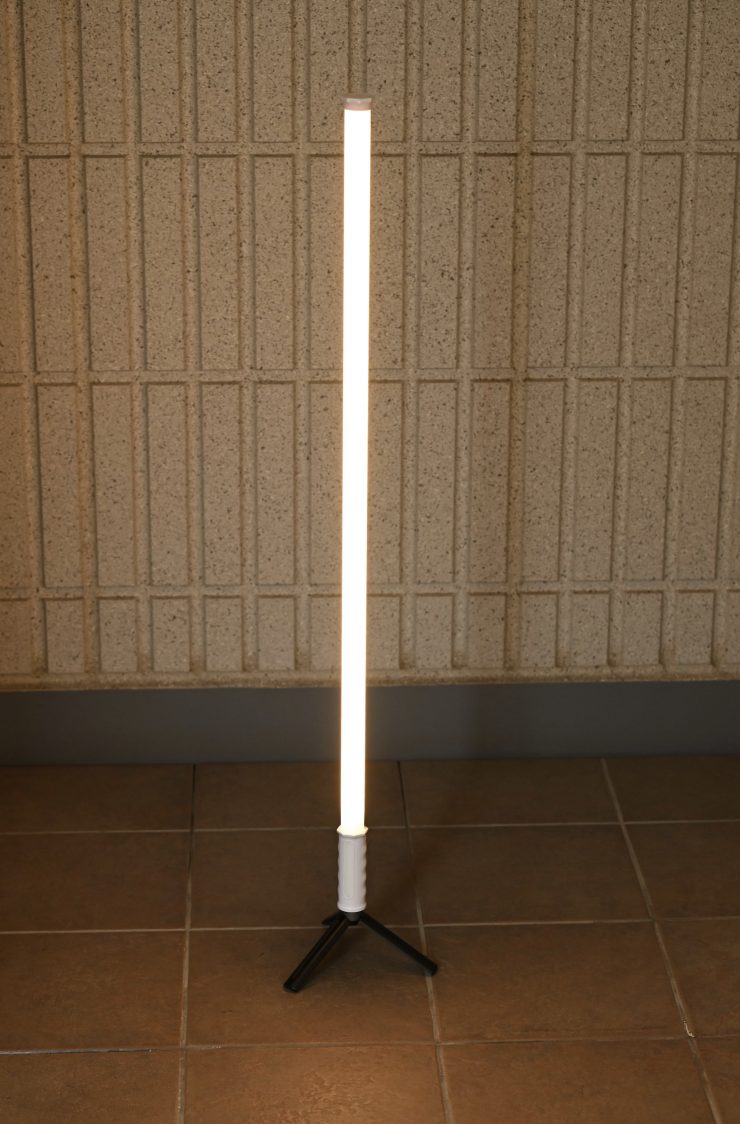
The PavoTube T8-7X has been designed to be an all-in-one unit, so you can run it from its built-in battery that can supply power for on-location shooting. This all-in-one design makes it relatively quick to set up and use.
The other problem with tube lights is when it comes to transportation and storage. Due to their length, they can be an awkward item to transport. With the PavoTube T8-7X RGBWW LED Pixel Tube 4-Light Kit Nanlite provides a pretty decent case. It is reasonably well-padded padding and re-enforced. You could potentially check this in as baggage on a plane. If it was me, I would put it into a harder case as I am overly cautious when it comes to protecting equipment.
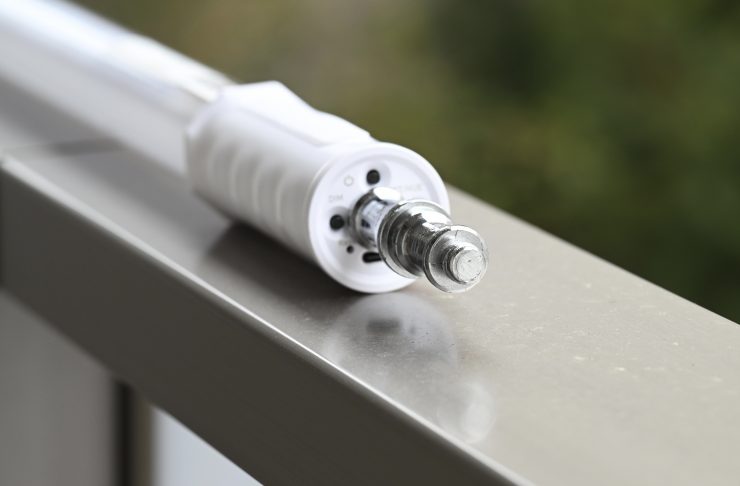
It is worth noting that the Nanlite PavoTube T8-7X is a T8 sized tube, which is smaller than the T12 sized tubes from Astera, Digital Sputnik, and Qusar Science.
Weight

The first thing that surprised me was how lightweight the PavoTube T8-7X tubes are. They tip the scales at just 0.62 lb / 280g. This is mainly because the housing is made out of plastic.
Build Quality
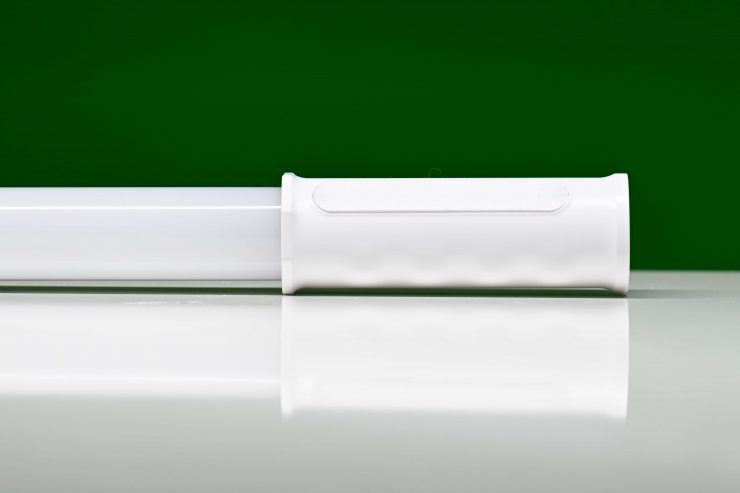
The build quality is ok, and what you would expect from a $95 USD light. The tubes feature a plastic housing and Nanlite obviously had to cut a few corners to keep the cost down. These tubes don’t use a metal housing like the more expensive PavoTube II 15/30/60X models.
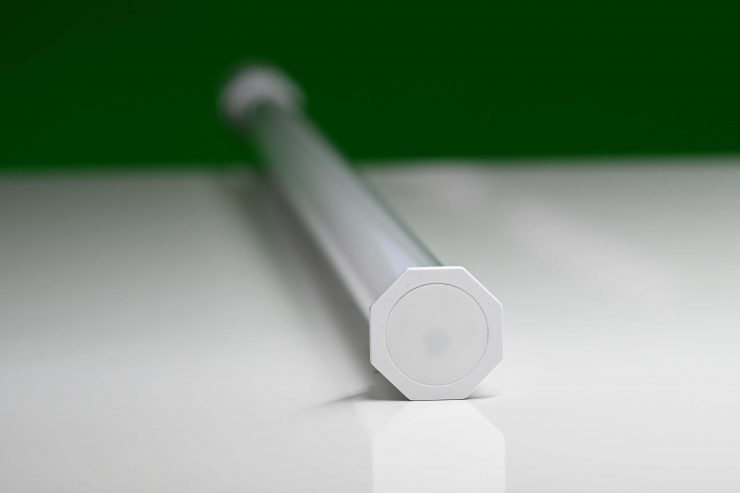
Everything is plastic, even the end housings and handle. When you first pick them up they feel more like a toy that you would give your kids than a robust product made for professionals.
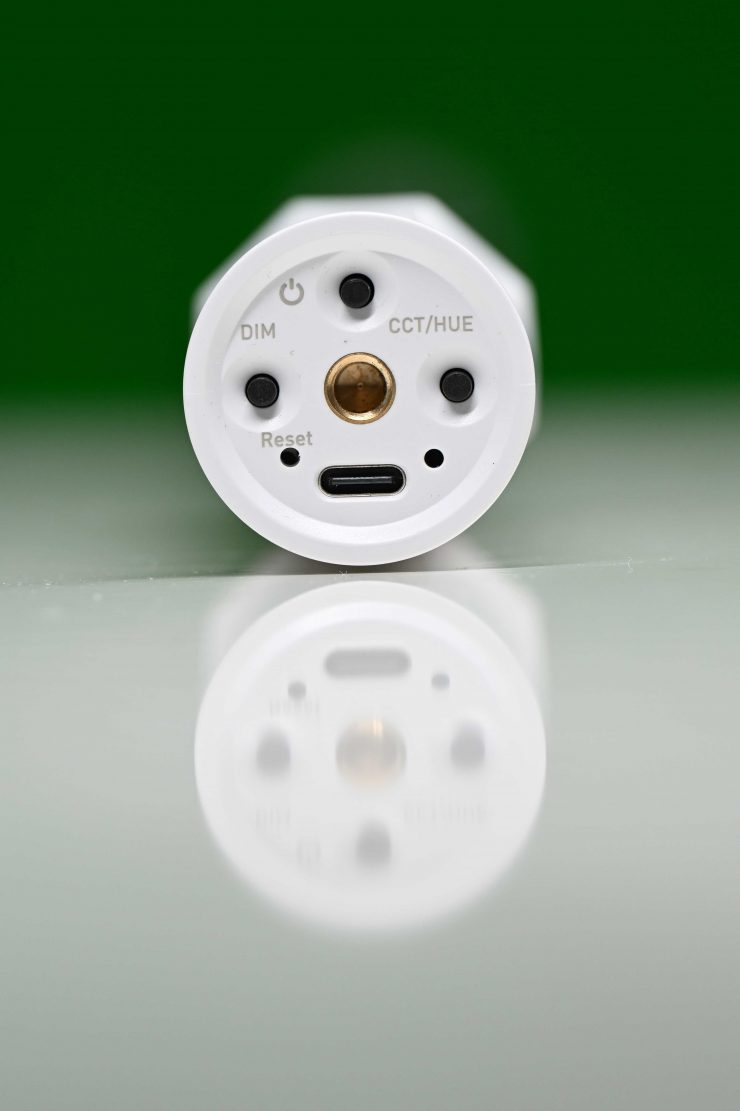
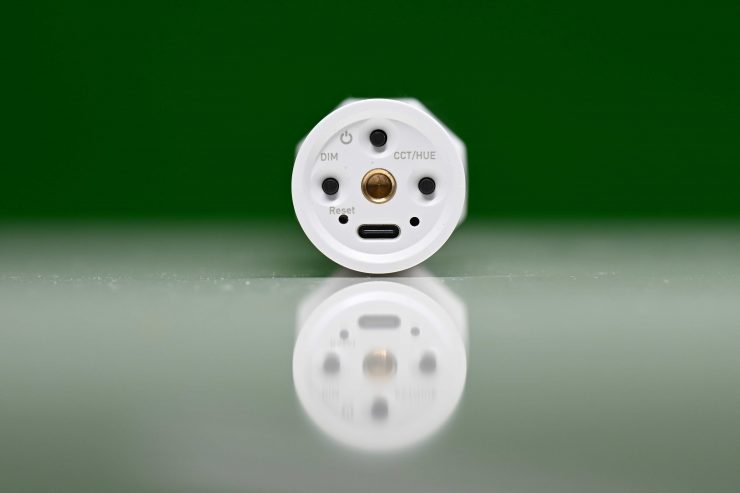
The on-light controls are just a series of three small recessed buttons. Despite being very small, they are actually quite tactile.
It is hard to judge just how robust these lights are and how they would hold up to extensive use. I wish I could be more specific than that, but I’m in no position to comment on longevity after only spending a few weeks with the lights. You do have to clearly remember that because they are made out of plastic they aren’t going to be as robust as a tube with a steel casing. I guess the good news is that if you do break one it won’t be the end of the world given you could buy another one for under $100 USD.
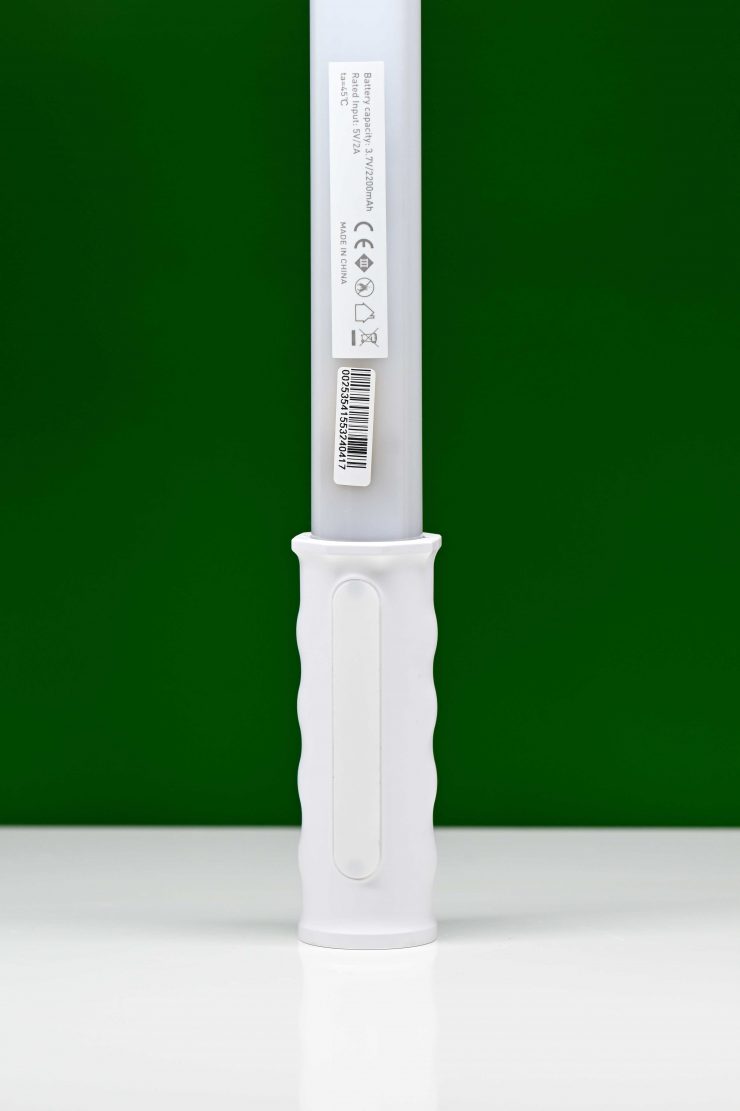
I’m not a big fan of having branding all over the lights and I’m glad that Nanlite hasn’t used any permanent branding on the tubes. The last thing a user wants is branding on the front of a fixture, especially since tube lights are often used as replacements for practicals. There are some small stickers on the backside of the tube, but you can easily remove those if you want.
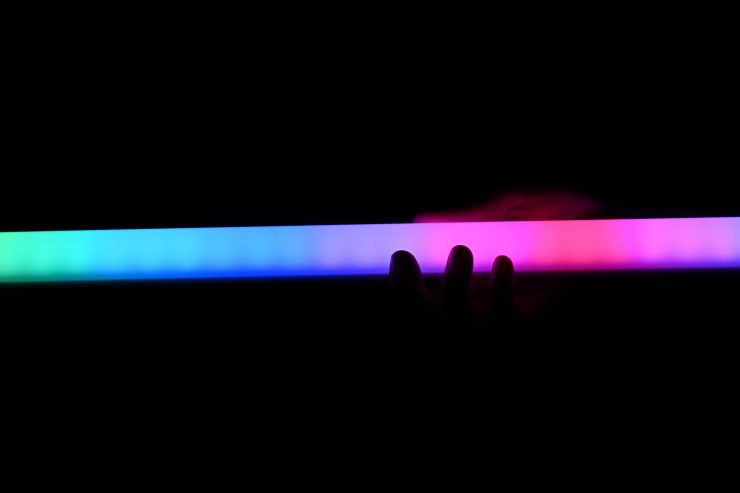
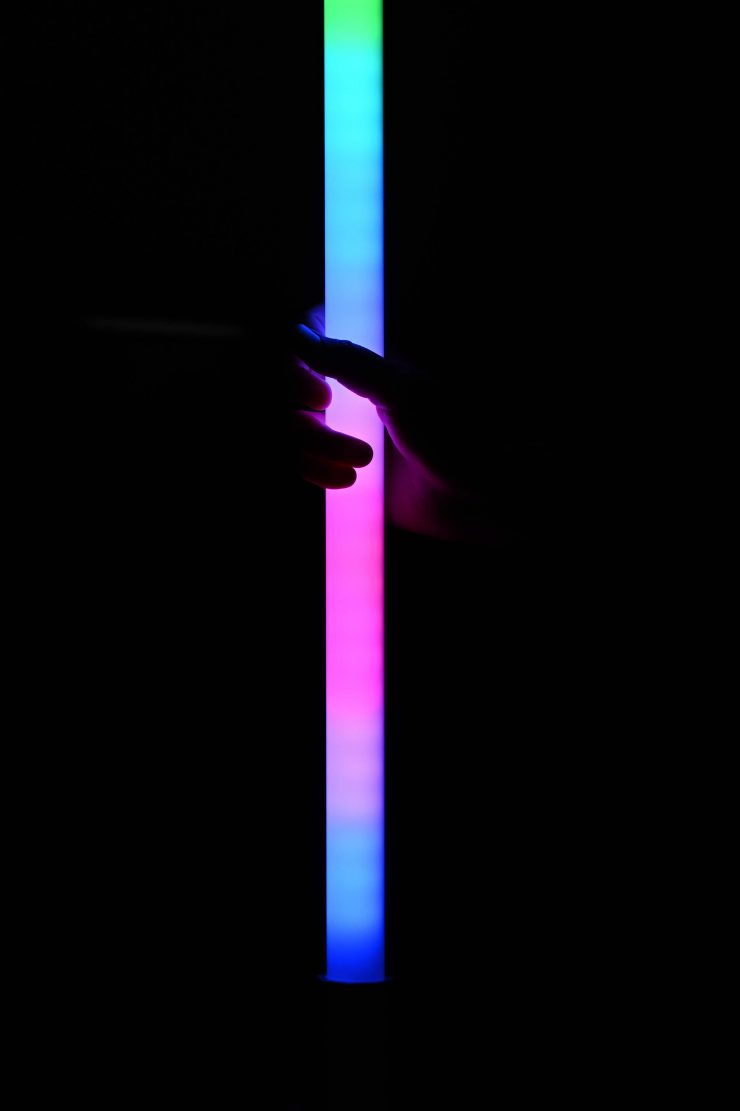
One word of warning, if you do have the tube dimmed down too much or your camera lens stopped down too much you can see the individual LEDs. This is slightly more evident when you use Pixel Mode.
Controls & Menu System
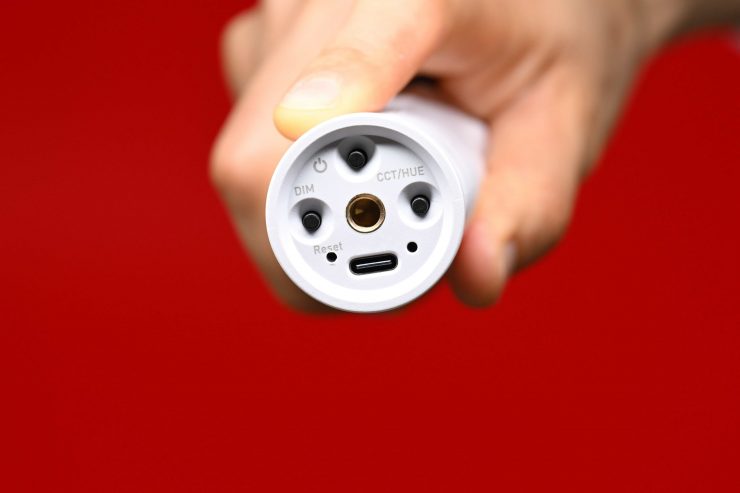
The light has some basic built-in controls on the bottom of the fixture. Here you can turn the light On/Off, change the dimming via a series of steps, and change between CCT/HUE. When you press the CCT/HUE button and the light is in the CCT mode you can cycle through various preset Kelvin color temperatures. The only issue with doing this directly on the fixture is that you have no idea what Kelvin color temperature you have actually selected.
The controls are very straightforward and the light is relatively easy to use. This is not a light you need to pull out an instruction manual with.
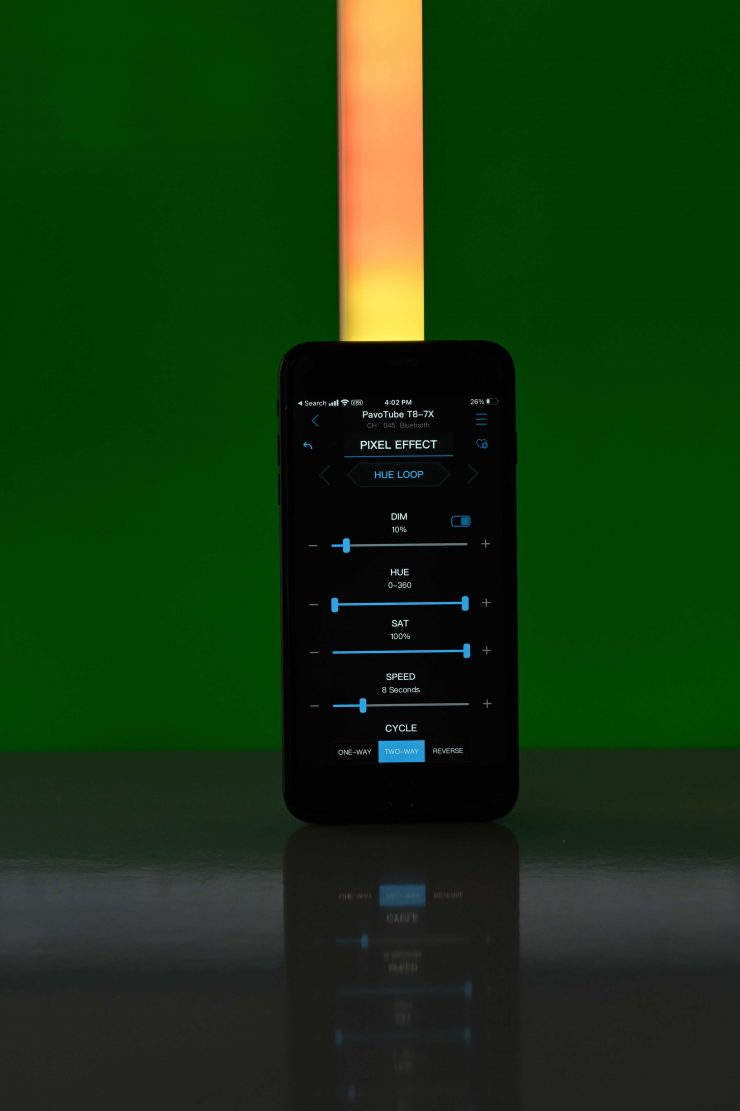
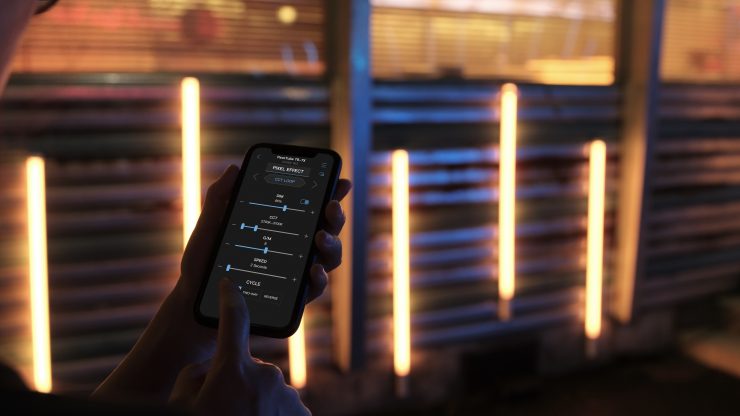
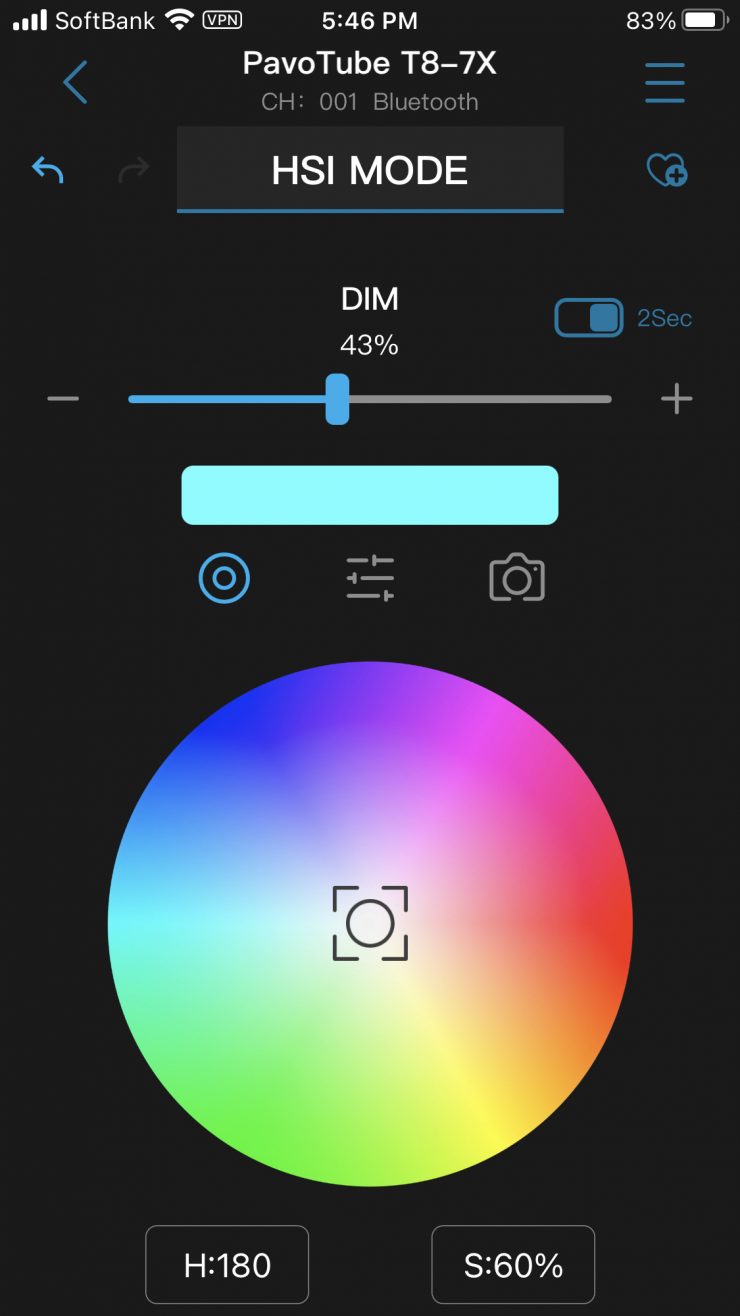
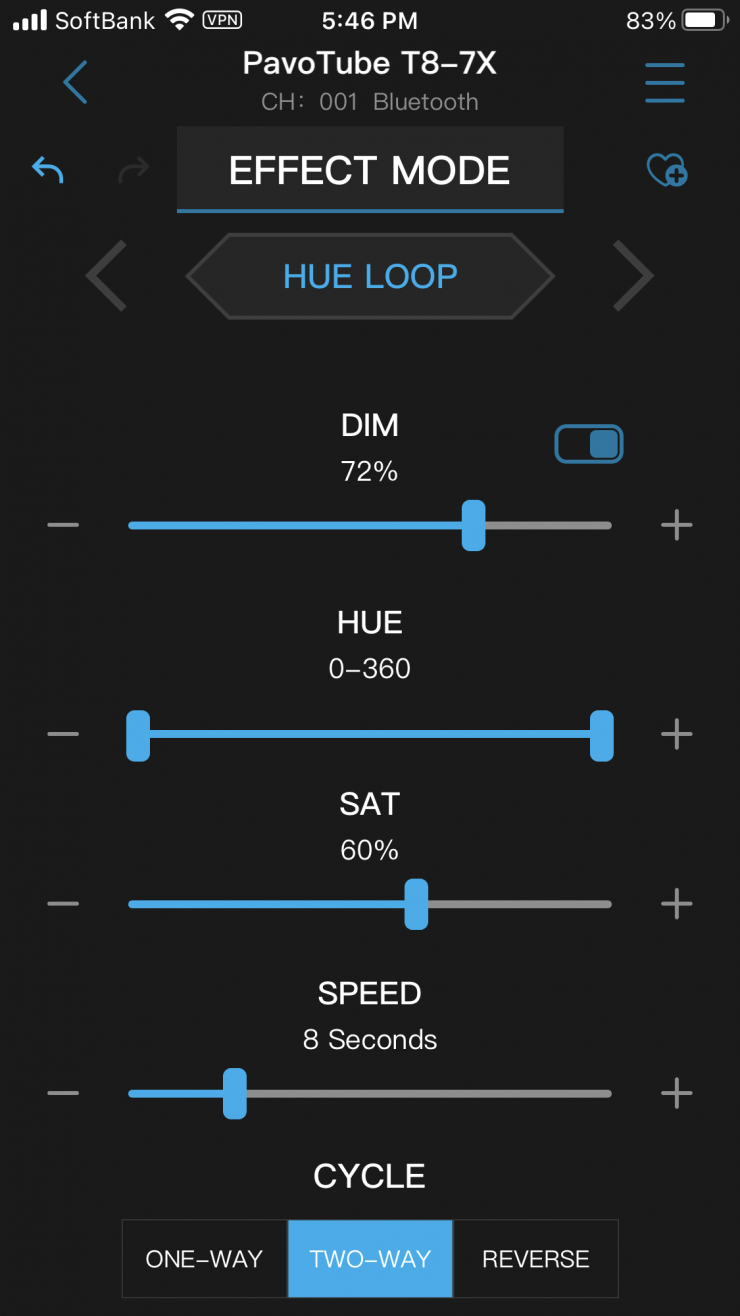
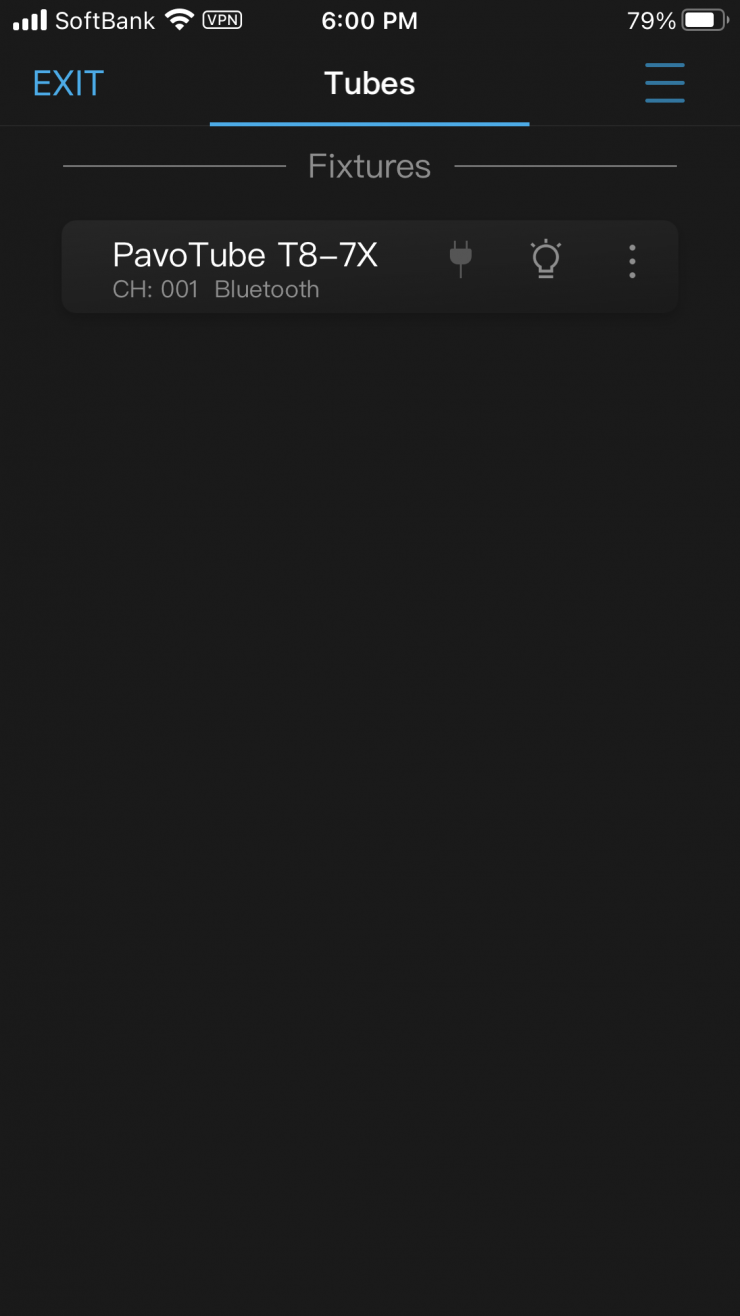
The best way to actually control the tube is via built-in Bluetooth control using the NANLINK mobile app. The app lets you customize and save effects, change modes, and adjust intensity, CCT, etc.

Connecting to the app is fairly straightforward. You just turn the light on, open the app, and then add a fixture. It will scan to see what lights are turned on and then you choose which ones you want to add.
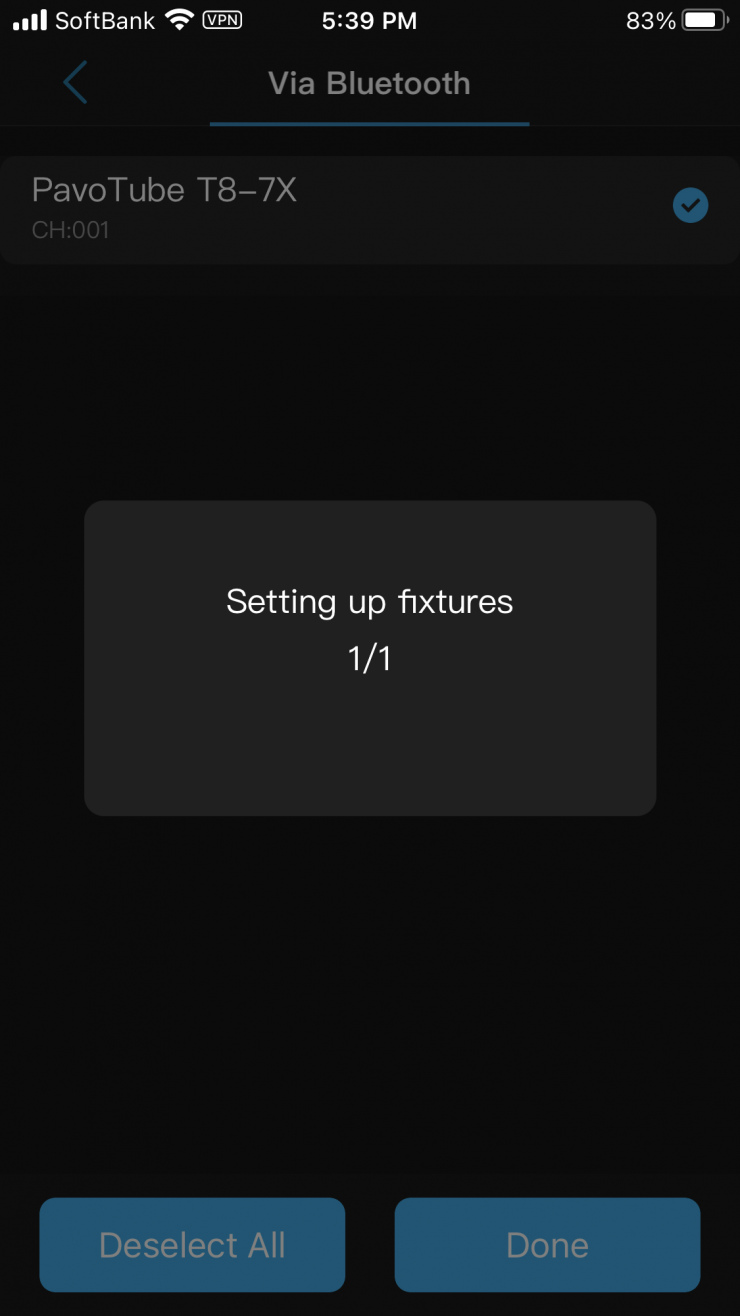
It takes about 30 seconds to set up the light and get it ready to use when you are adding a light for the first time. The lights will automatically appear next time you go to use them.
Once you have done that you enter a very easy-to-use interface.
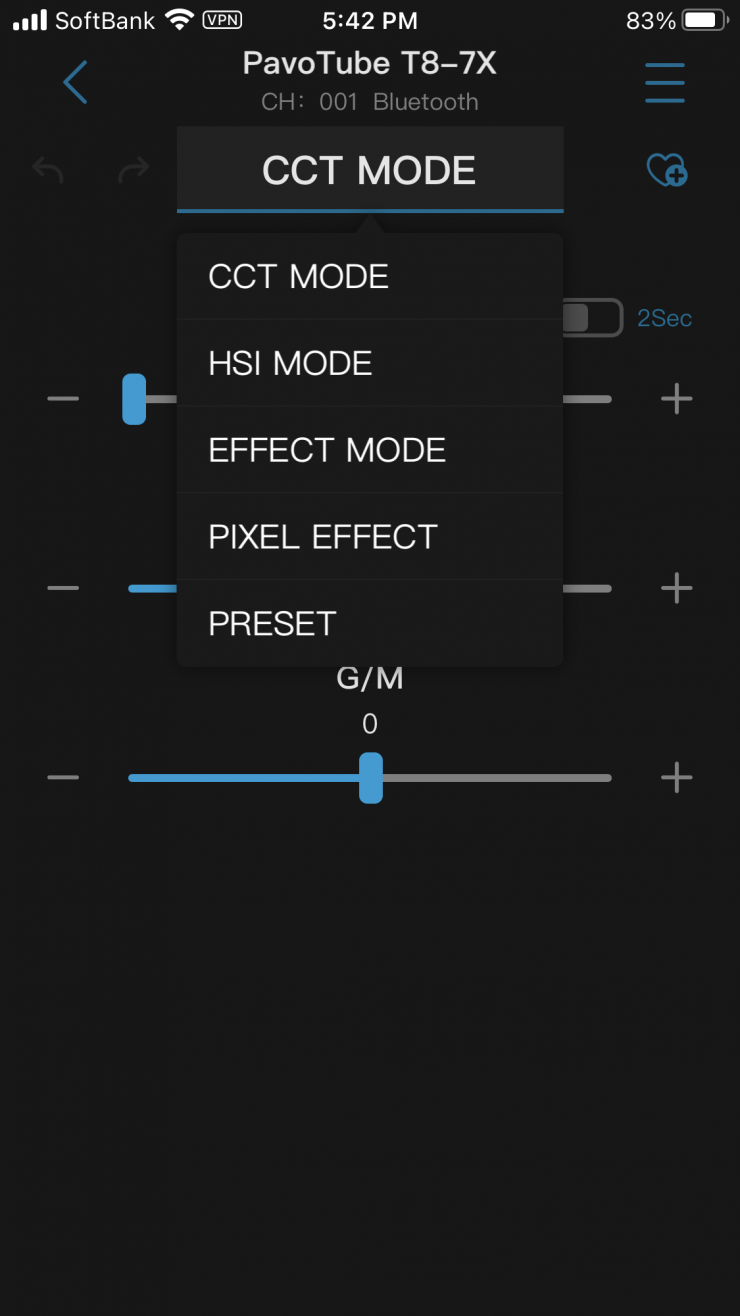
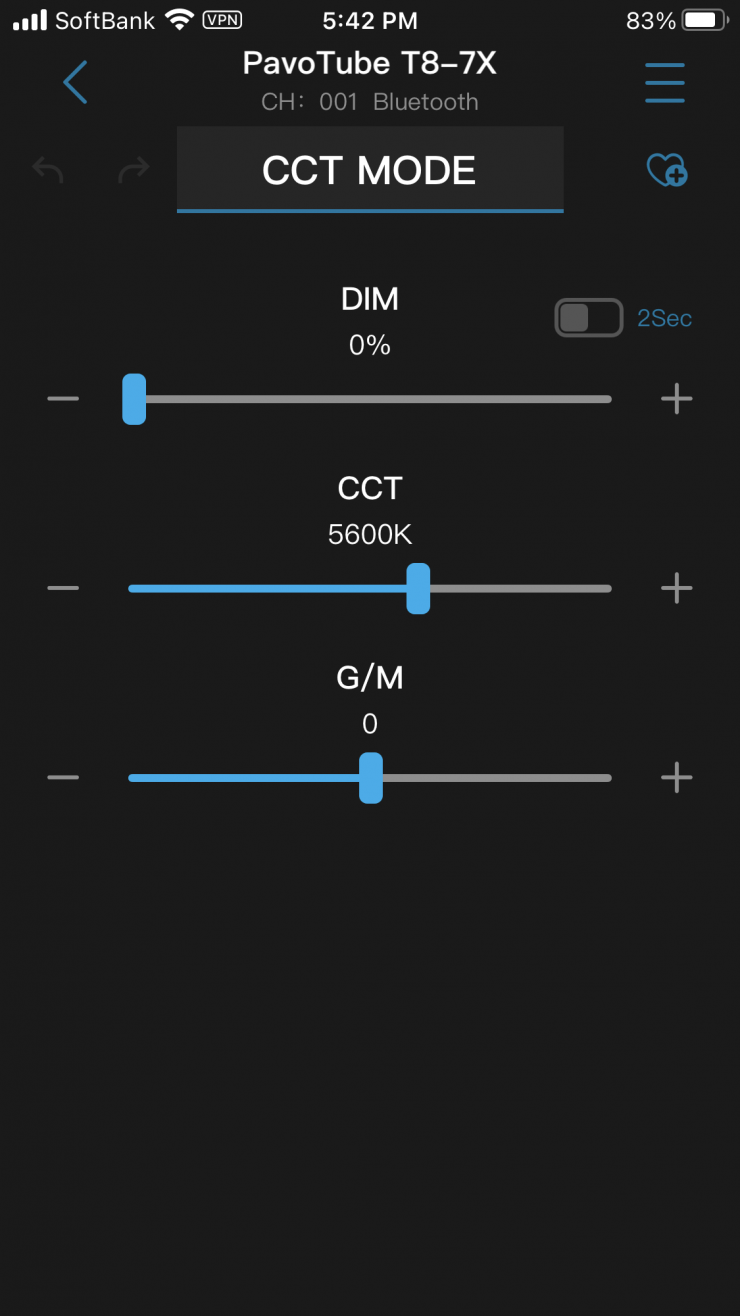
Here you can choose between CCT Mode, HSI Mode, Effect Mode, and Pixel Effect.
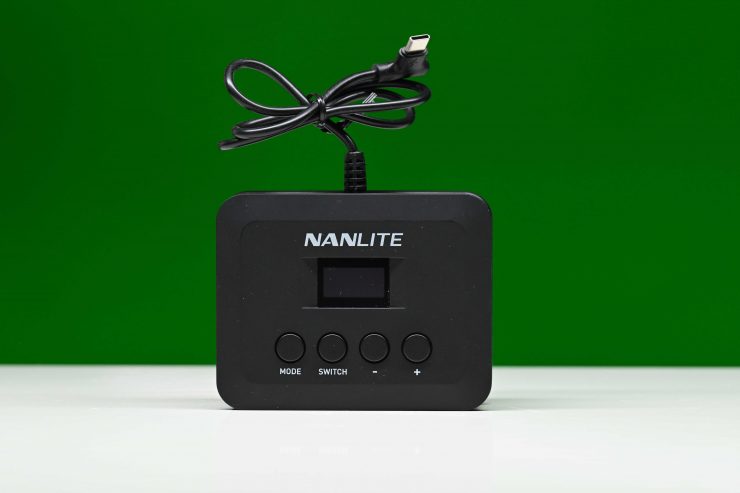
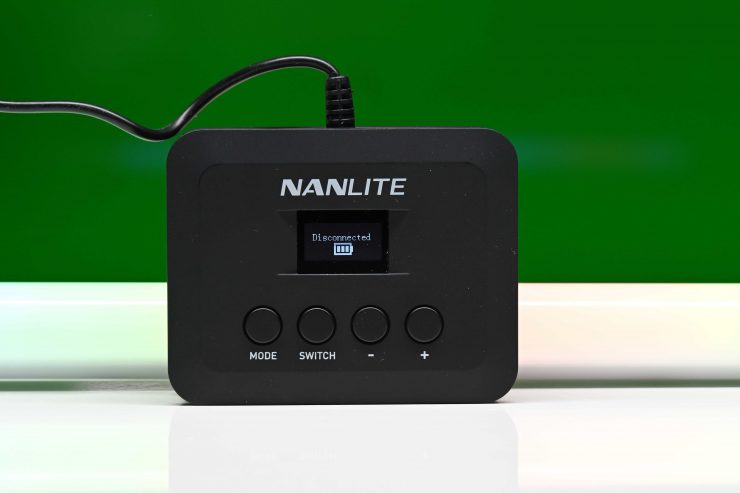
Nanlink also sells an optional Control Bank Li-Ion Battery Pack for PavoBulb and PavoTube ($79 USD). This provides advanced control and rechargeable battery power to select PavoTube LED Pixel tubes and PavoBulb LED light bulbs. The integrated USB Type-C cable plugs into the matching USB Type-C female port on the LED light. The bank provides four control buttons, and an LCD display for making adjustments to the settings, making it possible to change advanced parameters like green-to-magenta shift without needing to use the NANLINK mobile app.
The Control Bank also features a built-in 3.7V, 4400 mAh rechargeable lithium-ion battery that can operate a lamp at 100% output. Now, I couldn’t get this control bank to work even after updating the firmware. While it would power the PavoTube, it kept coming up as ‘Disconnected’, and I couldn’t use it to control the light. I reached out to Nanite and this appears to be a firmware issue that they will fix.
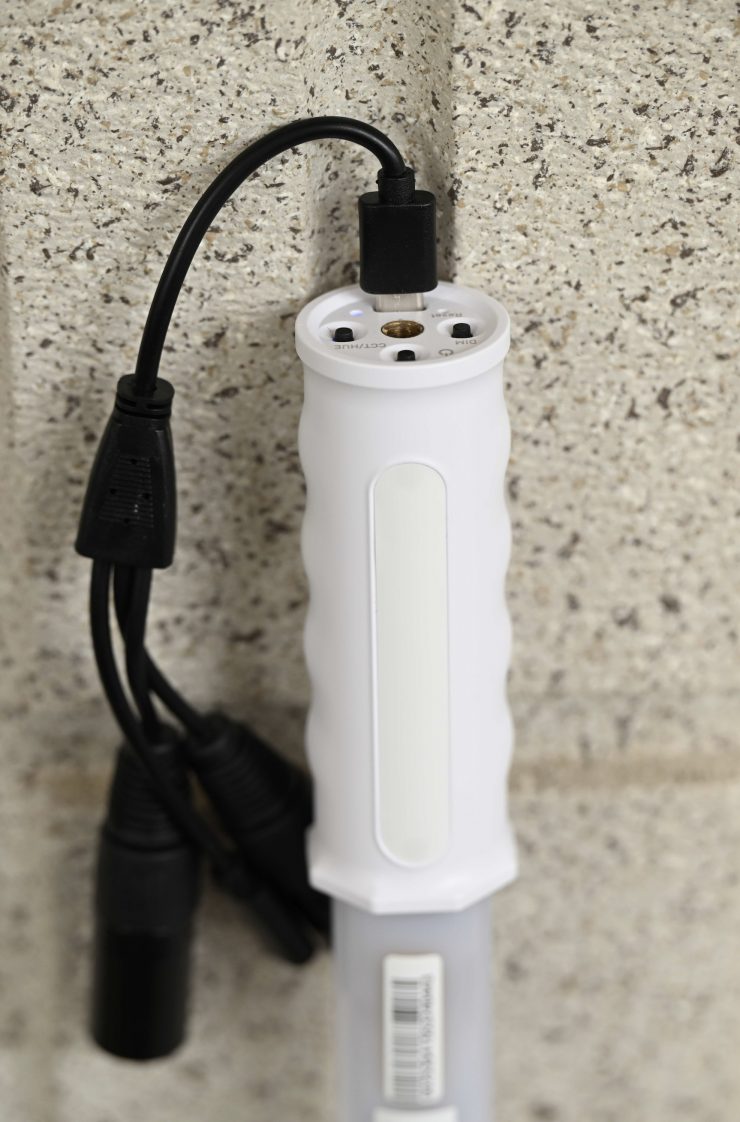
You can also control the light via DMX using a set of cables. This is a USB-C to breakout cable adapter. In my opinion, this hasn’t been well designed. USB-C is a consumer adapter and not overly strong. The cable pulls down and puts a lot of strain on the connector. I would recommend taping the cables to the bag of the fixture to alleviate the stress on the connector.
Operating Modes
Depending on what operating mode you are in, the light can be configured to work in a variety of ways:
- CCT Mode
- HSI Mode
- Effect Mode
- Pixel Effect
What you need to be very aware of is that the tube lights need to be controlled via the NANLITE app if you want to change modes other than CCT or HSI.
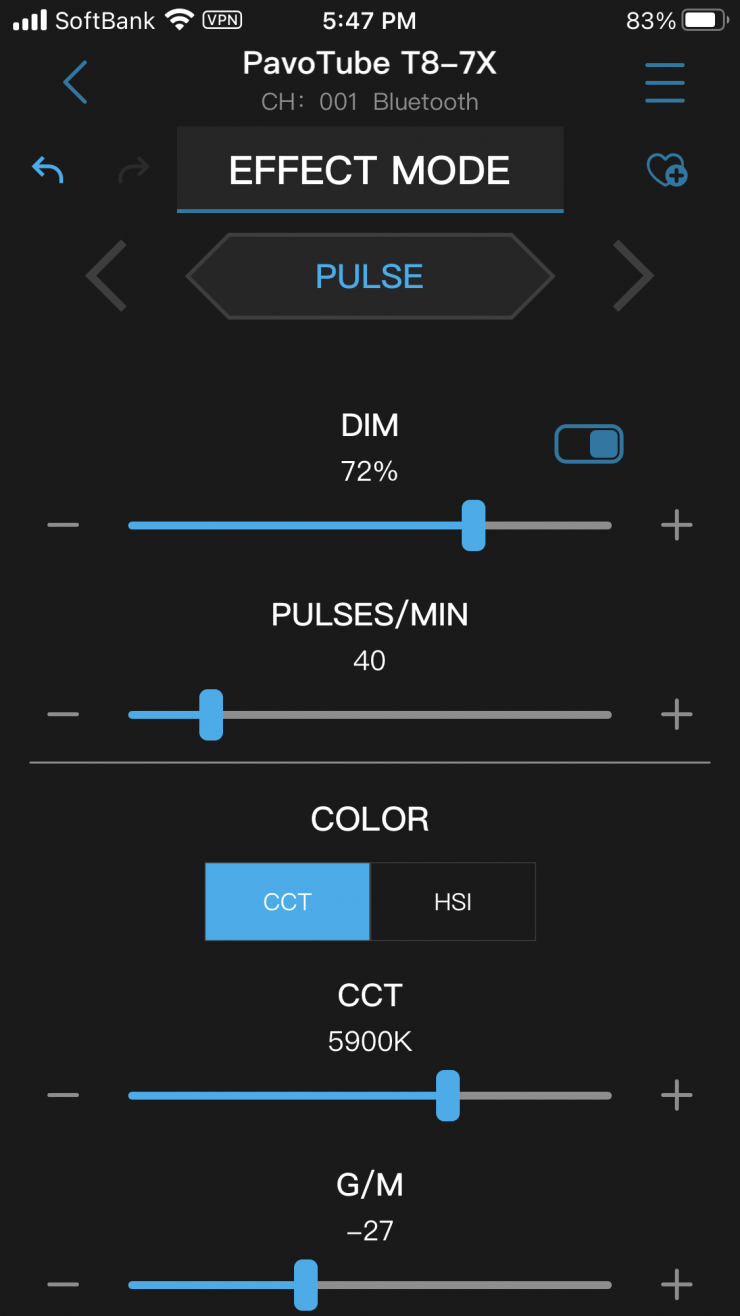
There is a normal CCT Mode where you can adjust the Kelvin color temperature between 2700K to 7500K. You also have the ability to make +/- G/M adjustments which is impressive for an affordable tube light.
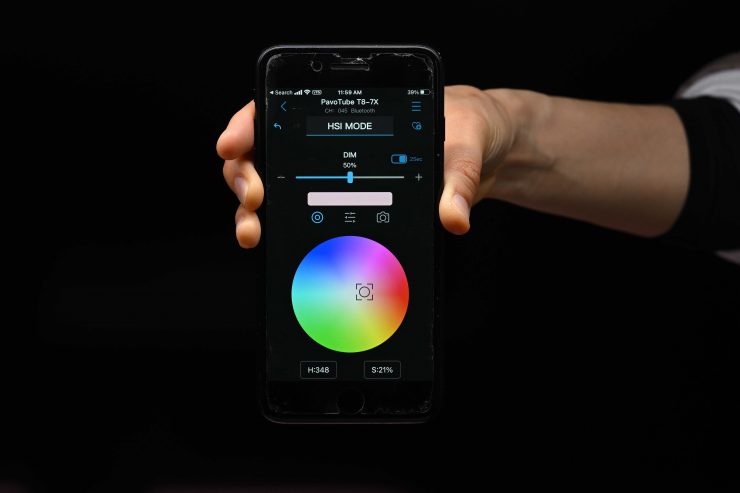
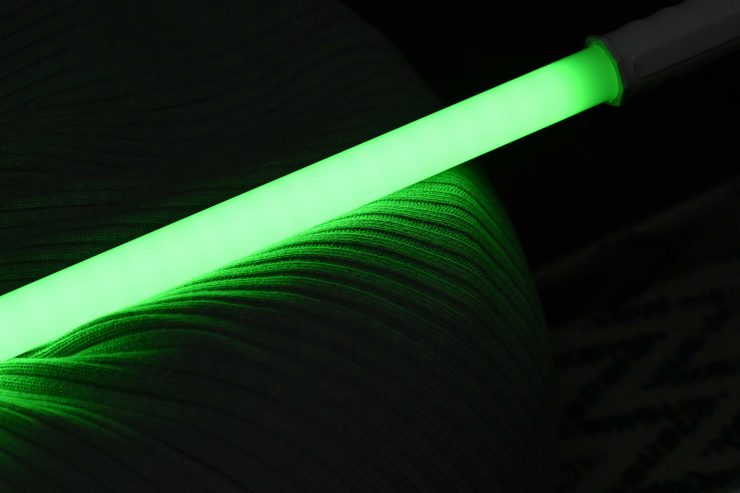
HSI Mode lets you adjust the hue, saturation, and intensity of the light. In this mode, you can create a multitude of different colors and looks.
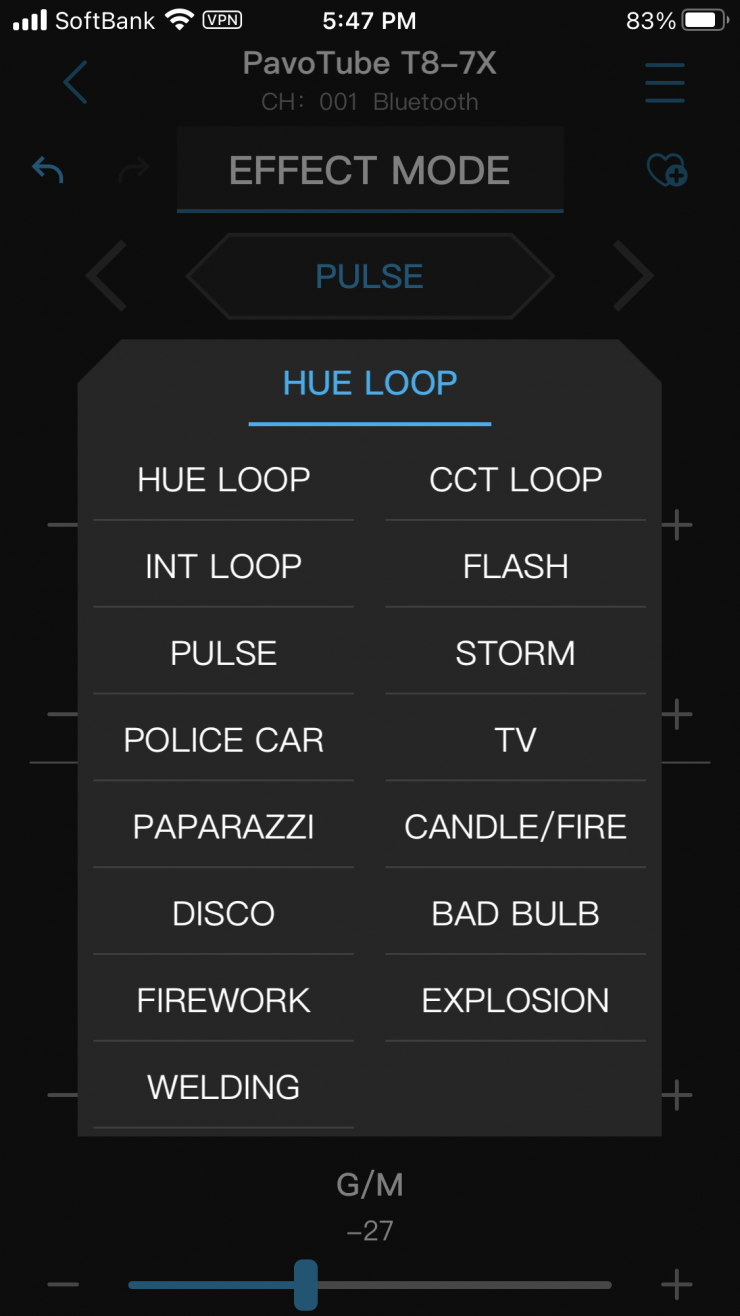
The Effects Mode as its name suggests, lets you create effects such as Hue Loop, CCT Loop, INT Loop, CCT Flash, HUE Flash, CCT Pulse, Hue Pulse, Storm Auto, Storm Manual, Police Car, TV, Paparazzi, Candle/Fire, Disco, Bad Bulb, Fireworks, Explosion, and Welding.
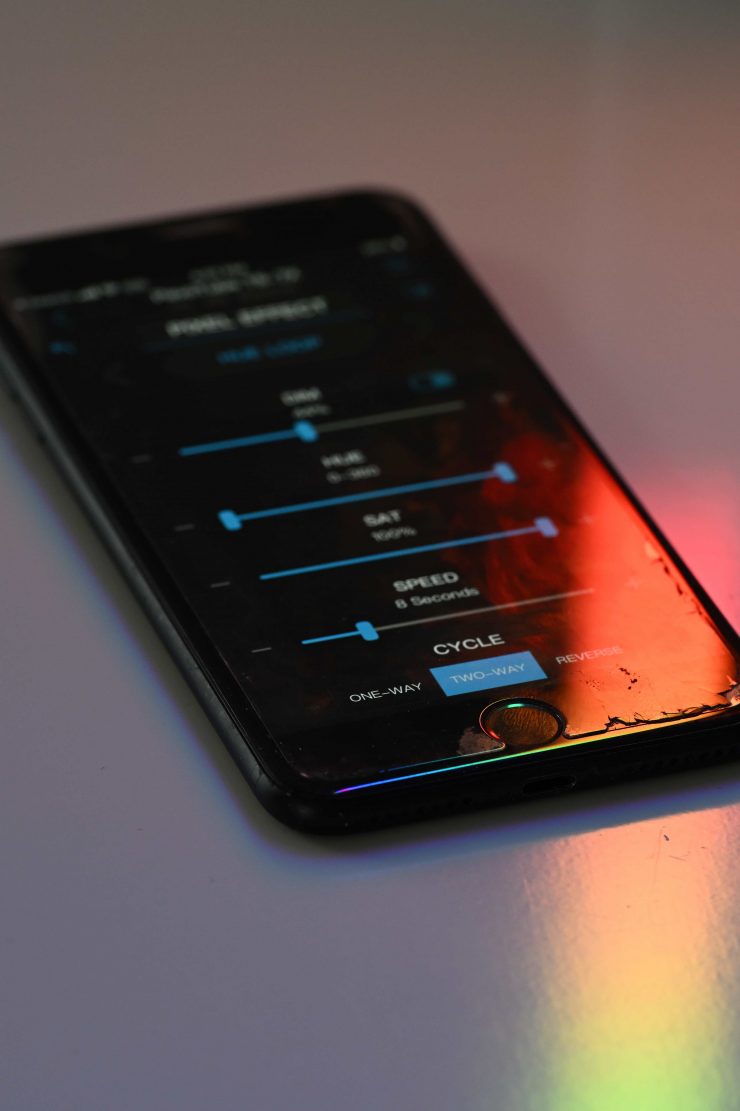
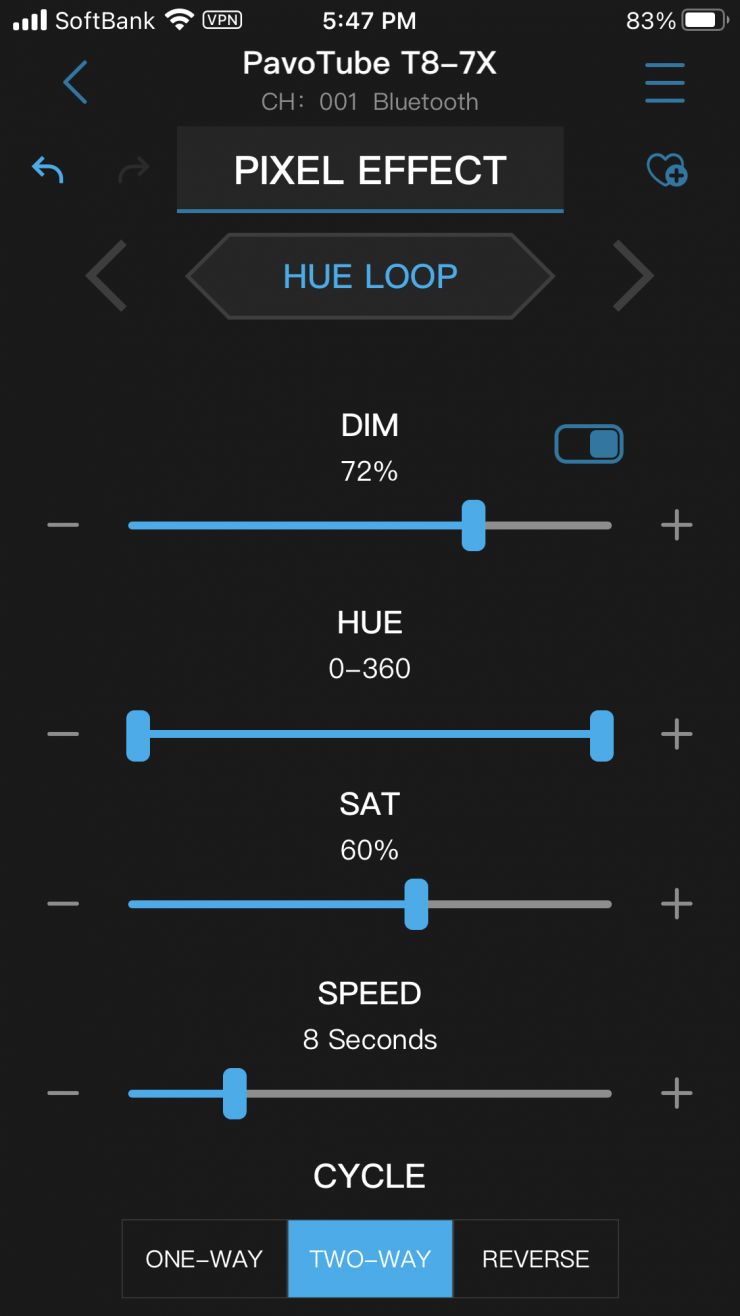
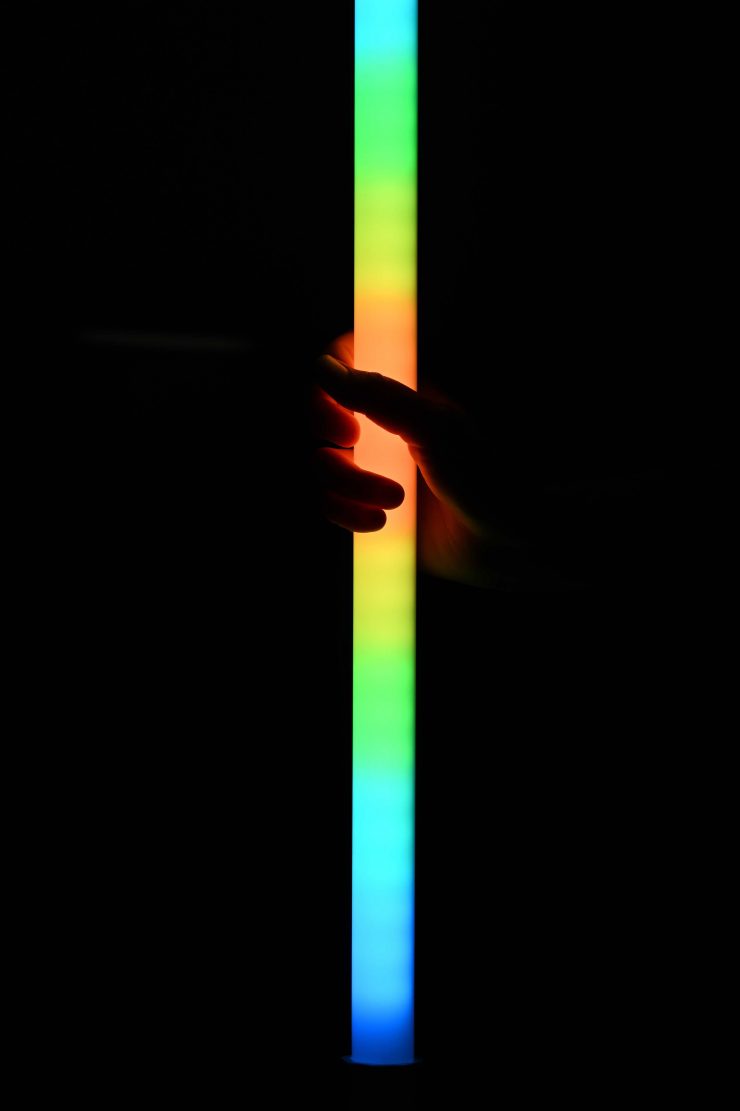
Pixel Effect Mode is a mode that lets you create multiple color patterns at once. There are options to set a Hue Loop, CCT Loop, INT Loop, Multi-Color Fade, Process, Scroll, Fire, Rainbow, and Driving effects.
The Pixel FX mode is a nice addition, but depending on what you are shooting you may never actually use it. For people shooting music videos, etc. it will probably be a popular mode.
Above you can see a quick example of Pixel FX mode.
Power Draw
The PavoTube T8-7X draws just 8W of power. This is not a high output source by any stretch of the imagination.
This is really a light that has been designed to be a practical source or a fixture that can be used when you just need a small amount of catch light in darker environments. If you are looking for a tube light that you could use for lighting interviews this isn’t it.
As I previously mentioned, the light can be powered via its in-built battery, or via a USB power bank. There is no mains power option available.
Tube lights are great as practical replacements, but if they are going to be visible in shot, a lot of times you will want to run them via the in-built battery.
Below you can see the claimed run times when using the light’s in-built battery:
- 1 Hour at Full Power
- 3.5 Hours at Low Power
This is not a ton of run time for an in-built battery. Usually with a lot of tube lights, if you are using them in shot as practical sources you won’t be running them at 100% brightness, however, because the PavoTube T8-7X isn’t overly bright you may well be running them at close to full output. From my testing, I found that I could generally get around 50-55 minutes of run time with the light set at 100%.
I did try to power the fixture from a camera battery using a USB-C cable and that worked without issue. I could run the light or charge it via USB-C. I couldn’t work out whether the light was charging or not while it was on and being powered.
External power 
Internal battery
On the Nanlite app you can see if the light is being run via the internal battery or via USB-C. Unfortunately, you have no idea how long the light has left to charge as it doesn’t get displayed anywhere. All you see is a small bar indicator in the app. On the actual tube, all you will see is a flashing blue light to indicate that it is charging.
You can also power it using the Control Bank Li-Ion Battery Pack for PavoBulb and PavoTube that I mentioned earlier in the review.
Silent Operation
The PavoTube T8-7X doesn’t feature any type of fan and it is passively cooled. This prevents any unwanted noise, and because the light has a relatively low power draw it doesn’t get hot.
Even though they are supposed to run silent, one of the lights I was testing did make a small humming sound.
Mounting
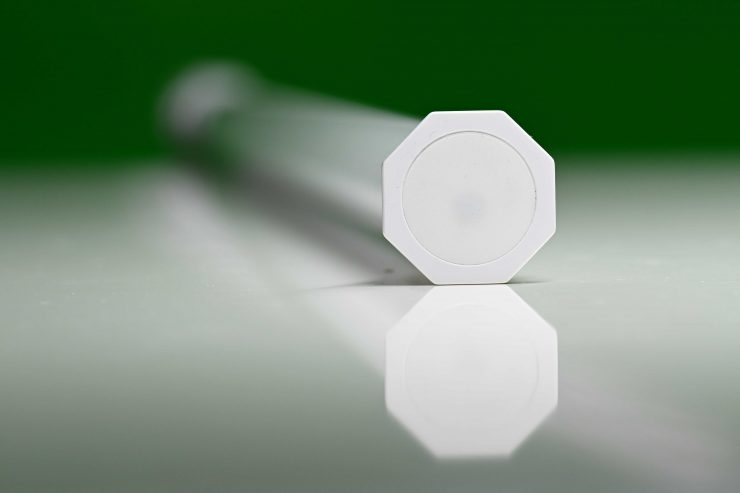
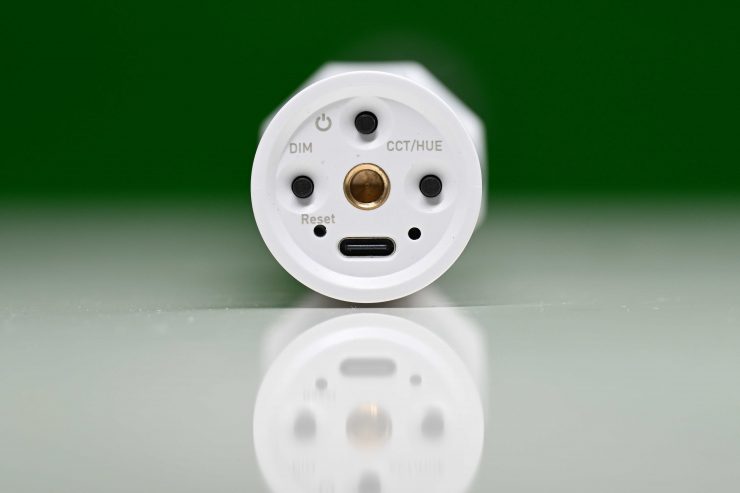
Mounting tube lights is always a little tricky. With the PavoTube T8-7X, you only have a single 1/4-20″ mounting point on one end of the fixture where the onboard controls and the USB-C input is located. This is a little strange and I am not sure why Nanlite didn’t at least put a 1/4-20″ thread on the opposite end.
The lack of mounting options is probably the Achilles Heel of this product. What is a little puzzling is that Nanlite doesn’t provide, nor sell any mounting adaptors or solutions for this tube light. Being a T8 sized tube you can’t just grab and use accessories you may already own if you have T12 sized tubes.
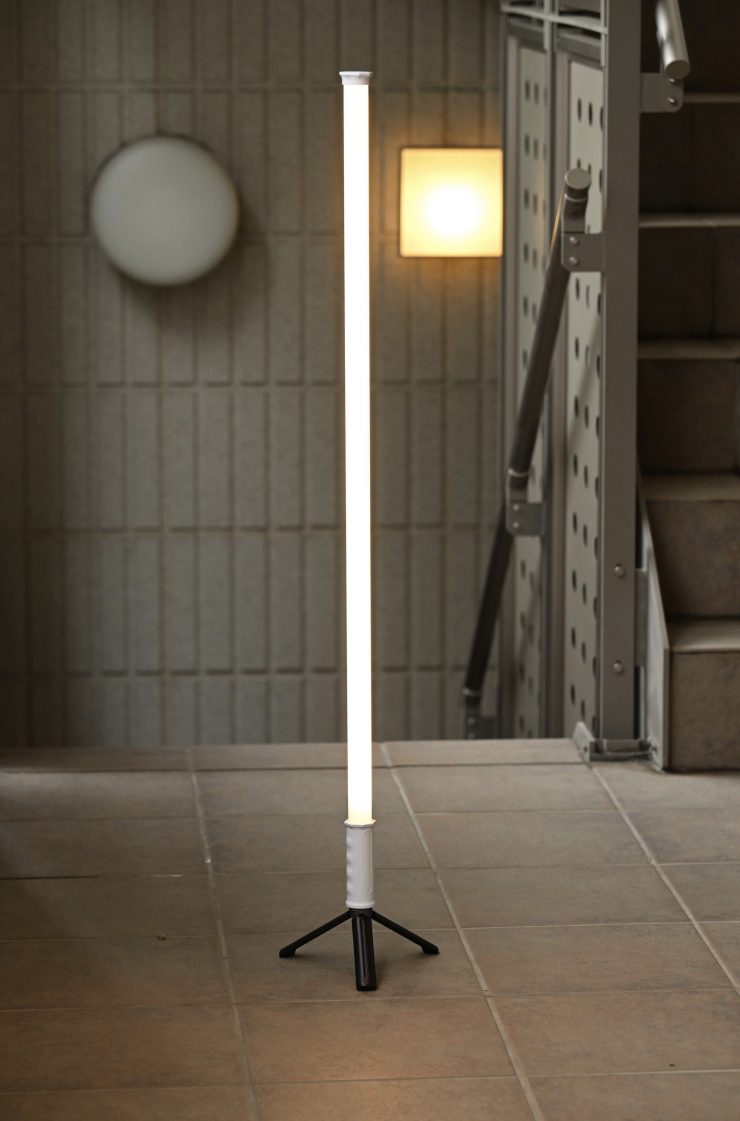
You are almost locked into using the 1/4-20″ mounting point on the bottom of the fixture and attaching a small stand that you may already have. The big glaring issue here is that you have no way of running an external power source because the USB-C input is completely covered.
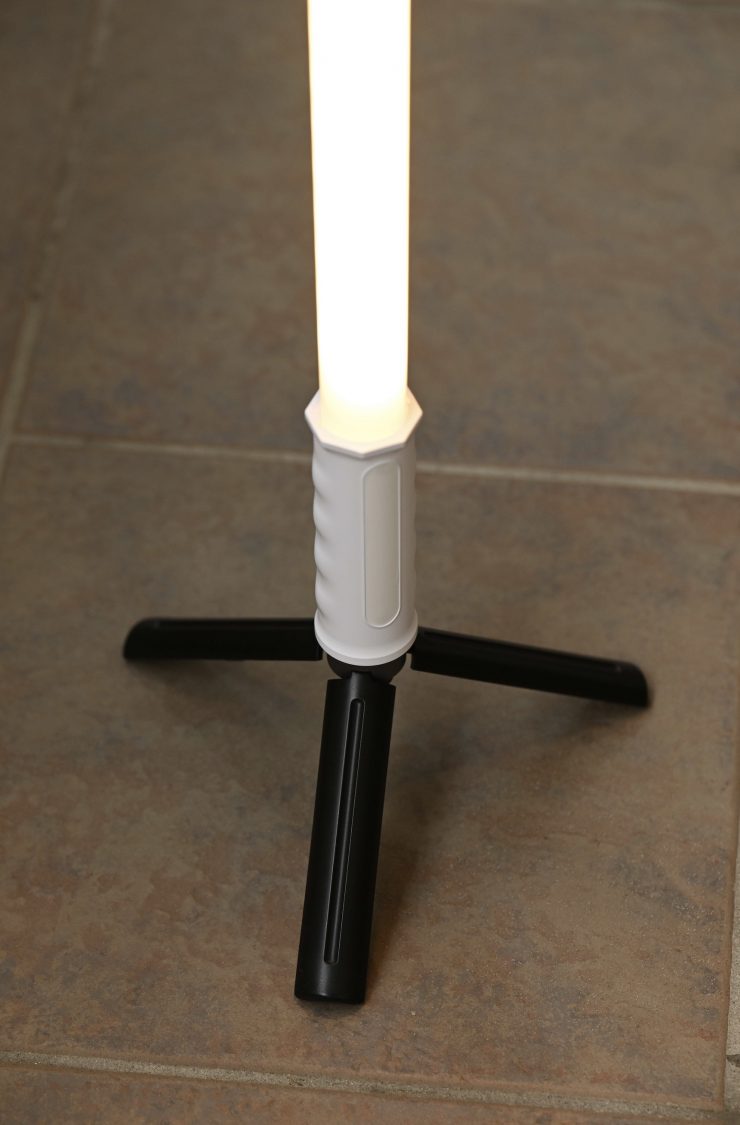
If you attach a small stand too securely it can end up activating the onboard controls and I found that on several occasions I would pick up the tube and it would start changing settings by itself.
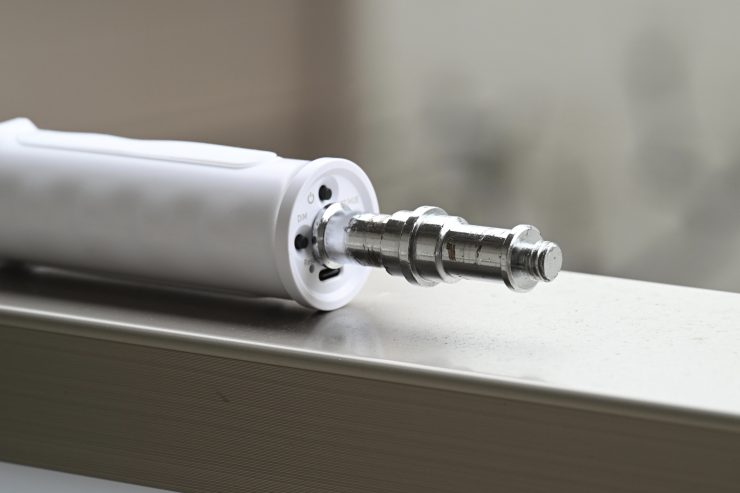
If you screw in a 1/4-20″ spigot then you can still access the controls.
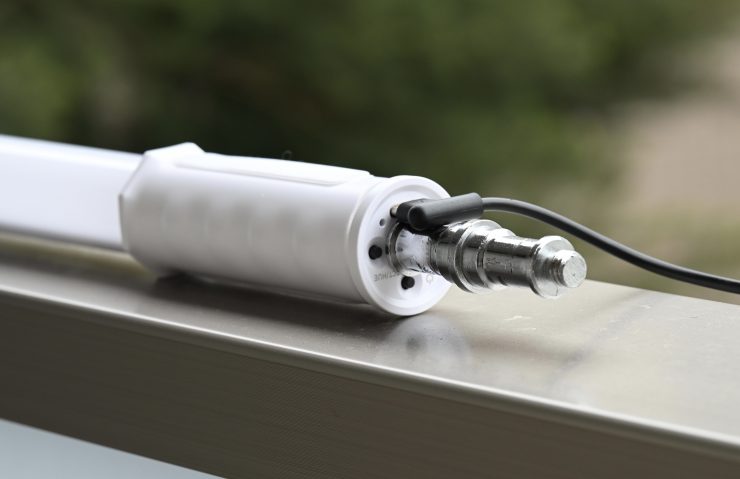
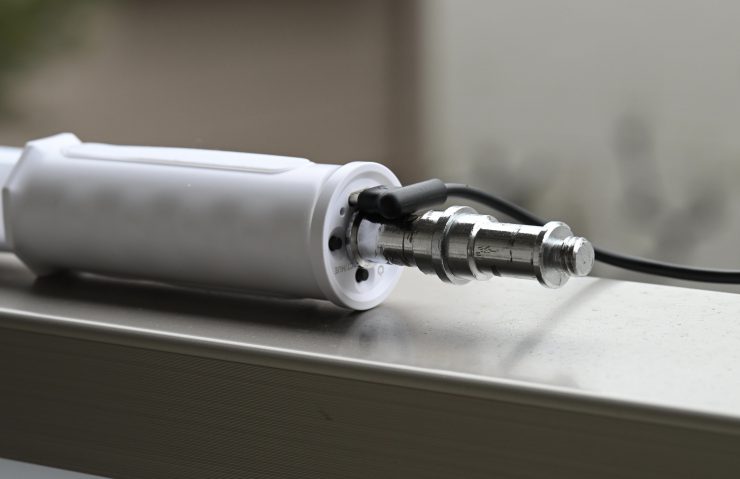
Once you plug a cable in via USB-C, it doesn’t go in properly because it ends up hitting the spigot. Yes, it still works, but it is far from ideal.
If you mount the tube out on a boom arm, you are putting a lot of stress on the 1/4-20″ connection point. I would be very reluctant to do this given the fact that the tube is made out of plastic.
At least, in my opinion, the design of this tube hasn’t been thought out that well. Putting the USB-C input and the only mounting thread on the same end of the tube makes little sense to me. I reached out to Nanlite about this issue and they said they are working on a small stand mount that essentially has a spigot between it and the tube so you can still run an external power source. I would have preferred to have seen them come up with some alternative mounting solutions like they have available for their other tube lights.

You are going to need to be creative when mounting or placing these tubes. Above you can see that I have just placed it across a door arch. If I was doing this on a real job, I would use some bungee cords or tie-downs to secure the light.
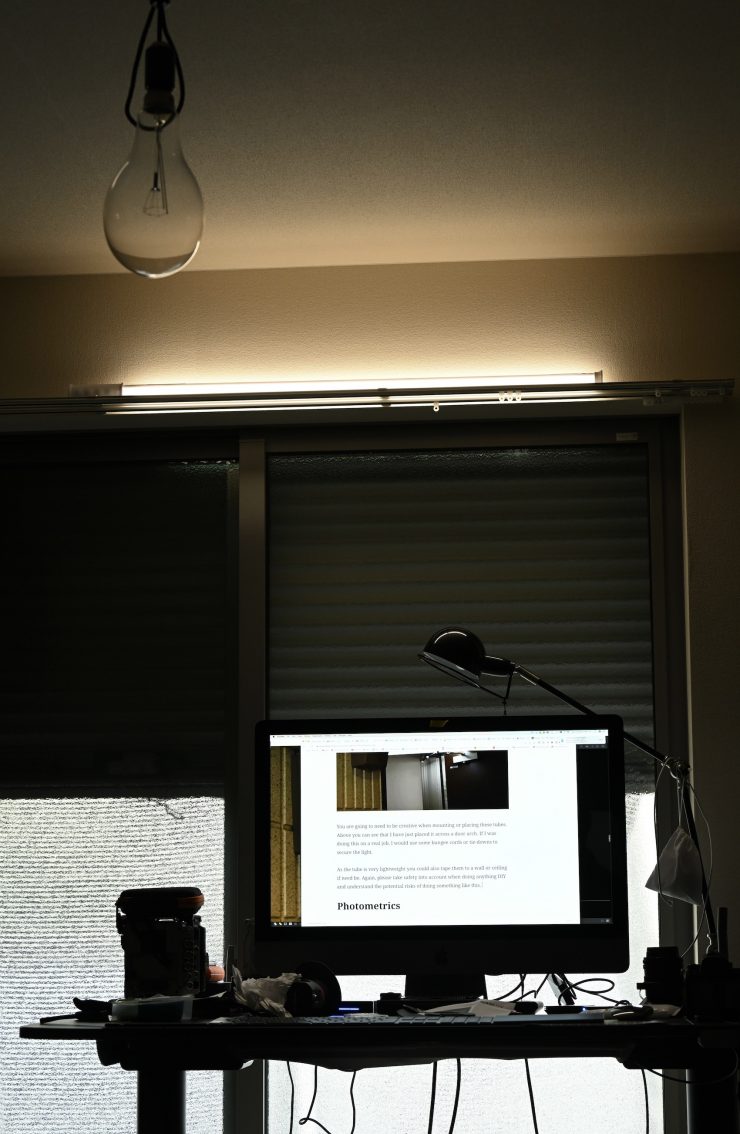
Above I have just placed one of the tubes on a curtain rail to provide a little bit of ambient fill.
As the tube is very lightweight you could also tape them to a wall or ceiling if need be. Again, please take safety into account when doing anything DIY and understand the potential risks of doing something like this.
Photometrics
So now let’s get to the photometric results. I always test lights in this way so that I get a reference to how they compare to other fixtures. Results only tell part of the story and should never be used alone to judge a light. I have found from extensive testing over the years that certain lights that have good photometric results don’t always look good, and lights that have worse photometric scores can sometimes look better than their results indicate.
You need to look at all of the photometric results to get an accurate assessment of a light. Looking at just one set of results is like reading one chapter in a book and skipping the rest.
Different lights can also look different depending on what camera and lens you happen to be using.
Output & Color Temperature Accuracy
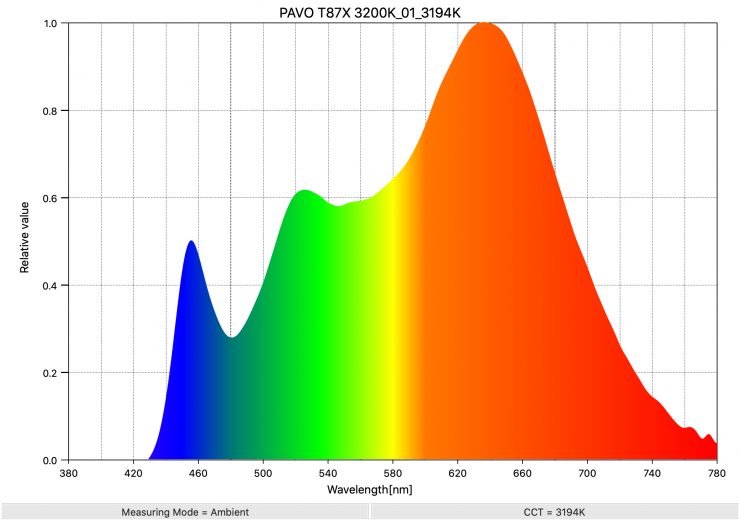
I tested the PavoTube T8-7X at a variety of Kelvin color temperatures with a Sekonic C-800 Spectrometer to find out how much output the light had and how accurate the Kelvin color temperature reproduction was. All readings are taken at a distance of 1m (3.28ft) in a controlled environment.
5600K
Above you can see the PavoTube T8-7X recorded an output of 105 lx (9.7 fc) when set at 5600K. This isn’t a lot of output, but you have to remember this light only draws 8W.

The fixture produced a Kelvin color temperature of 5712K which was more than 100K off being able to replicate an accurate 5600K source.
3200K
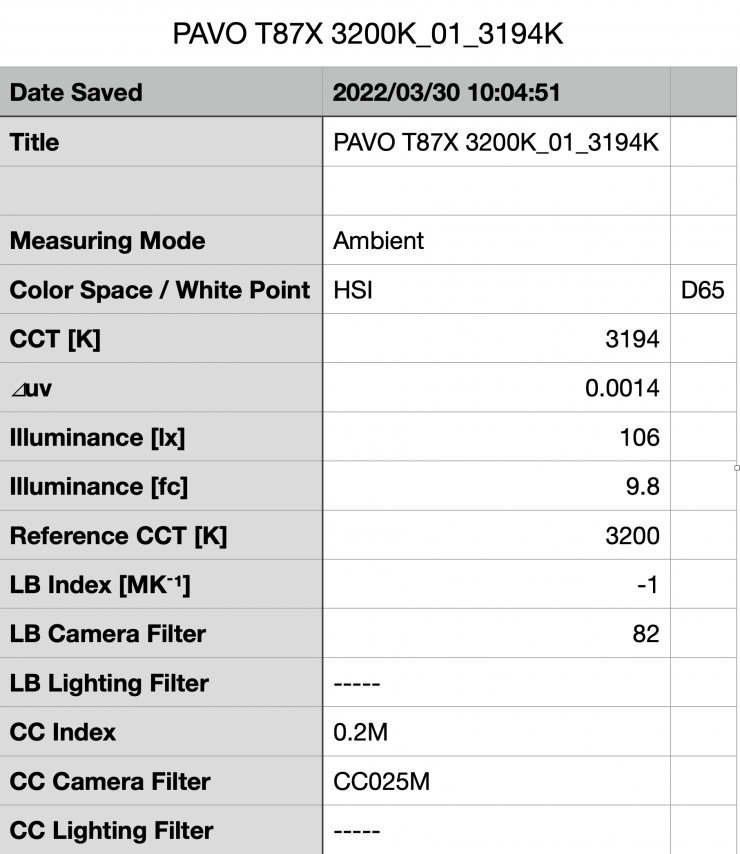
Above you can see the lights output when it was set at 3200K. It produced 106 lx (9.8 fc), which was almost identical to what it produced at 5600K.
As far as Kelvin color temperature accuracy goes, it recorded an extremely accurate reading of 3194K.
So how does it perform at various Kelvin color temperatures when it comes to output and Kelvin color temperatures? Well, below you can see.
| KELVIN SETTING | LUX | CCT READING |
| 2700K | 104 lx | 2549K |
| 3200K | 106 lx | 3194K |
| 4500K | 103 lx | 4567K |
| 5600K | 105 lx | 5712K |
| 6500K | 120 lx | 6681K |
| 7500K | 110 lx | 7646K |
These results tell me that the light retains reasonably good Kelvin color temperature accuracy across its range, however, it is at its most accurate when used at 3200K.
The output of the light is very consistent from 2700K to 5600K. The light has the most output when used at around 6500K. The output only varies by 13.3% from the highest to lowest scores that I recorded.
HSI Output

Above you can see that when set to a fully saturated red (360 degrees/ 100% saturation) the light recorded an output of 41.5 lx (3.9 fc).
Kelvin color consistency & linear output when dimming the light
Now, what you should always do when testing lights is to see if the Kelvin color temperature remains consistent when dimming the light. Just because you set a light at say 5600K, that doesn’t mean that the Kelvin color temperature will remain stable as you start dimming the fixture down. I also wanted to see how linear the dimming curve was.
I decided to do a series of tests at 100%/75%/50%/25%10% to see if the Kelvin color temperature being recorded changed. This was done at a distance of 1m using a Sekonic C-800.
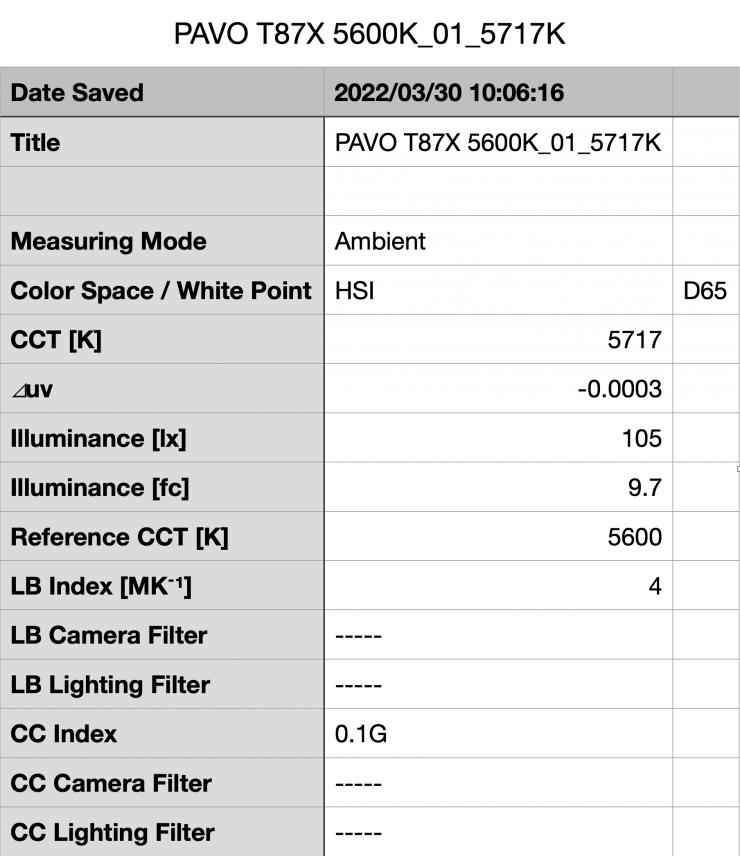
5600K
| CCT READING | OUTPUT | INTENSITY % |
| 5717K | 105 lx | 100 |
| 5693K | 71.2 lx | 75 |
| 5689K | 58.2 lx | 50 |
| 5538K | 19.4 lx | 25 |
| 5545K | 13 lx | 10 |
The PavoTube T8-7X is still able to maintain reasonable Kelvin color consistency as you start dimming the fixture. My testing showed that the Kelvin color temperature varied by 172K. These results were ok, but it does show me that when you dim this fixture down you do need to be aware of the slight Kelvin color temperature shift. In saying that, 172K isn’t a massive shift and a lot of users may not even notice the difference.
As far as how linear the output is when you start dimming the light, at 50% output it had 44.5% less output than when used at 100%. At 25% it had 71% less output than when used at 100%. At 10% output it had 81.5% less output than when used at 100%. This shows me that the light’s dimming curve is reasonably linear.
Color Rendering
So now that we have seen how much output the PavoTube T8-7X produces, how does it perform when it comes to replicating accurate colors.? Well, let’s find out.
5600K
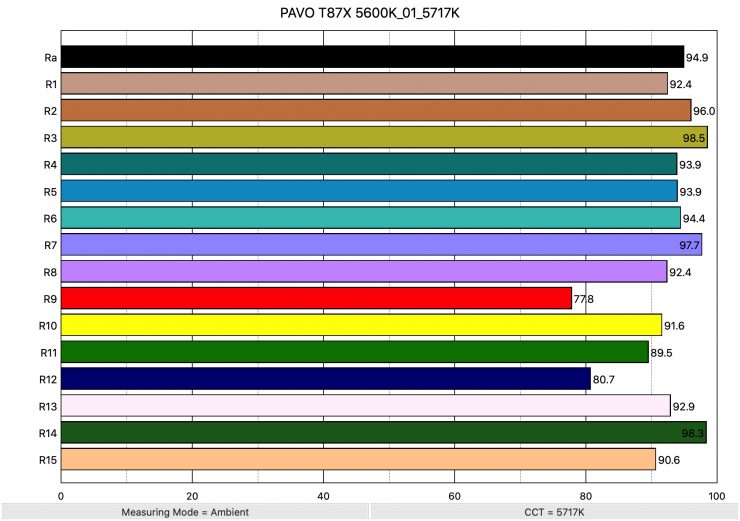
Above you can see that when the light was set at 5600K it recorded an average CRI (R1-R8) of 94.9 and an extended CRI (R1-R15) of 92.04. For replicating accurate skin tones it recorded 77.8 for R9 (red), 92.9 for R13 (closest to caucasian skin tones), and 90.6 for R15 (closest to Asian skin tones). These results were ok but not as good as you will find on more expensive tube lights. R9 was below 80 and R12 was just above it.
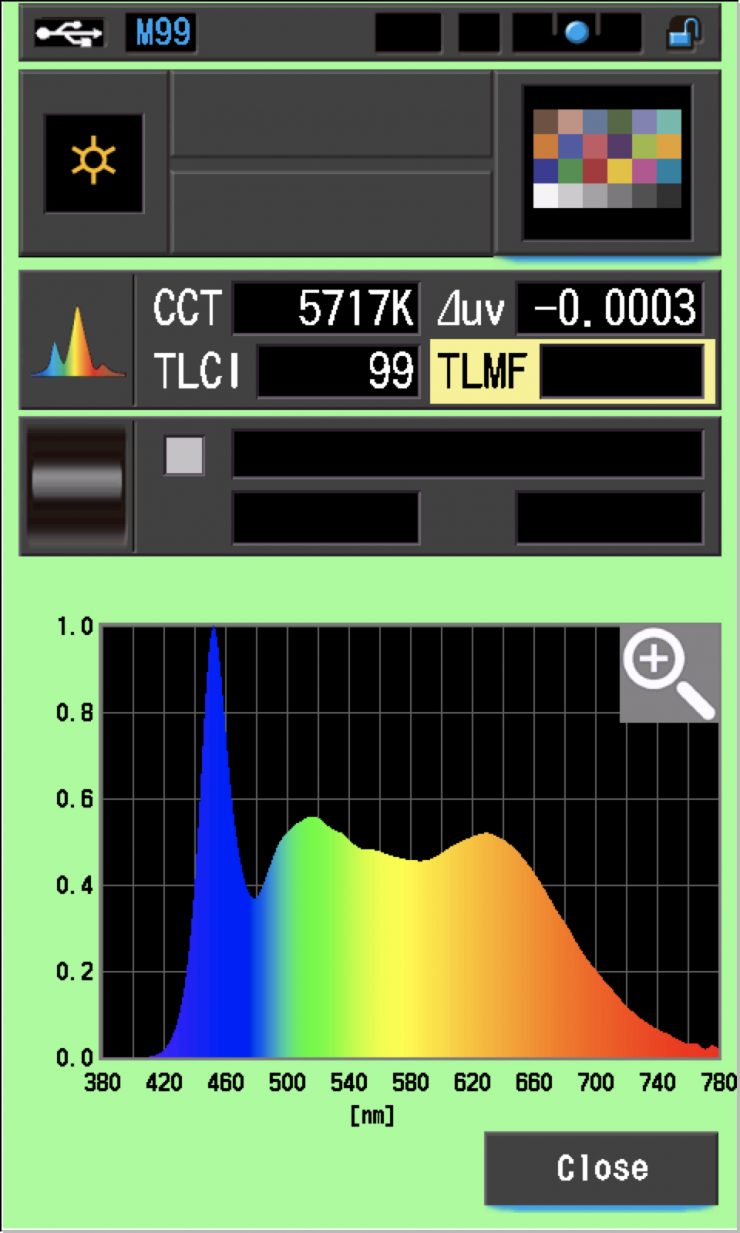
The light when set at 5600K also recorded a TLCI score of 99 which was excellent.
3200K
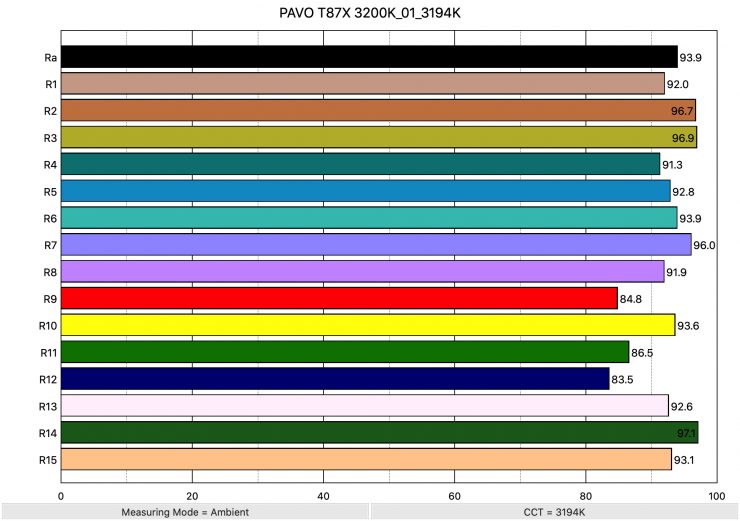
Above you can see the scores for when the light was used at 3200K. It recorded an average CRI (R1-R8) of 93.9 and an extended CRI (R1-R15) of 92.18. For replicating accurate skin tones it recorded 84.8 for R9 (red), 92.6 for R13 (closest to caucasian skin tones), and 93.1 for R15 (closest to Asian skin tones).
These results were very similar to when the light was used at 5600K.
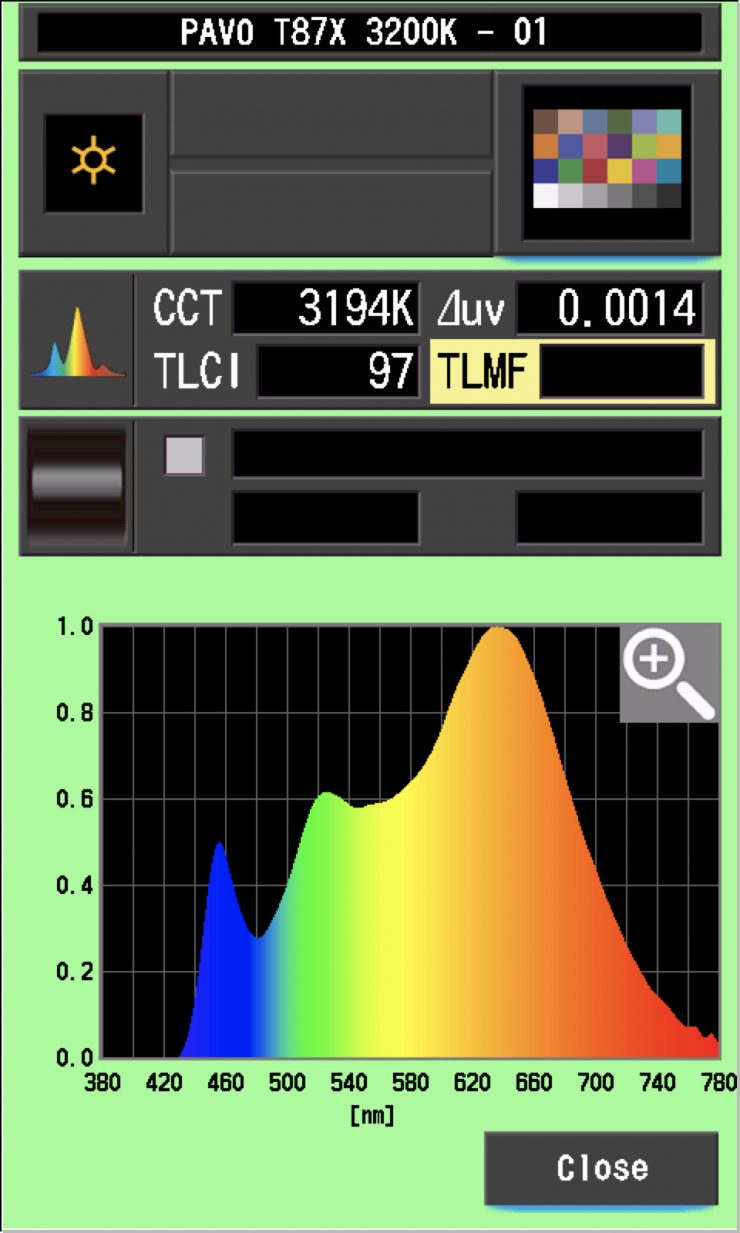
The light, when set at 3200K, recorded a TLCI score of 97.
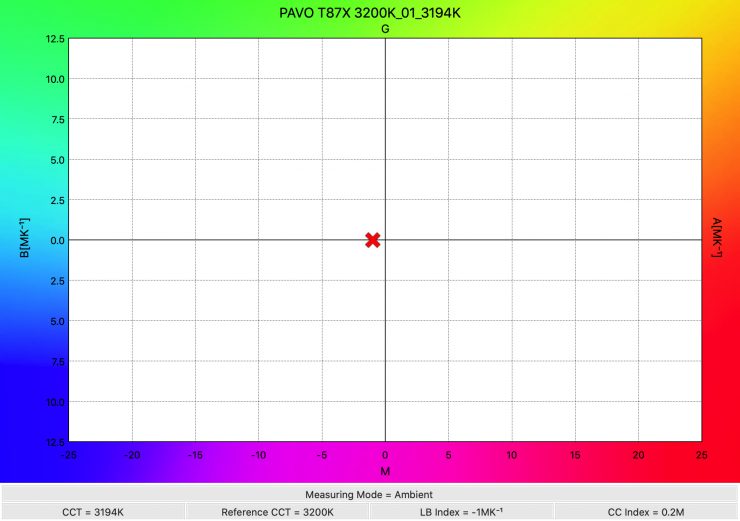
CC Index & ⊿uv
The CC Index displays the CC correction value and whether any magenta or green need to be added or subtracted. 1 CC corresponds to 035 Kodak CC values or 1/8 Rosco filter values. Any reading less than +1.00 or -1.00 and you’re probably not going to need to make any kind of adjustment. The ⊿uv is the value to show how much this light is away from being an ideal light source (black body radiation = incandescent lamp). As with the CC Index you want this number to theoretically be zero. Kelvin is not a linear value, so we need to convert from Kelvin to MK-1 to compare the values of color temperature. To calculate from Kelvin to Mired is MK-1= 1*1000000/Kelvin. While this may sound confusing, it is the only way of measuring if the Kelvin shift is significant enough to warrant having to use a filter for correction.
Kelvin Vs MK-1
| Kelvin | Difference in K | MK-1 | Difference in MK-1 | |
| SET VALUE | 2700K | 0 | 370.37 | 0 |
| ACTUAL READING | 2549K | 151 | 392.31 | -21.94 MK-1 |
| SET VALUE | 3200K | 0 | 312.5 | 0 |
| ACTUAL READING | 3194K | 6 | 313.08 | -0.58 MK-1 |
| SET VALUE | 4500K | 0 | 222.22 | 0 |
| ACTUAL READING | 4567K | 67 | 218.96 | 3.26 MK-1 |
| SET VALUE | 5600K | 0 | 178.57 | 0 |
| ACTUAL READING | 5717K | 117 | 174.91 | 3.66 MK-1 |
| SET VALUE | 6500K | 0 | 153.84 | 0 |
| ACTUAL READING | 6681K | 181 | 149.67 | 4.17 MK-1 |
| SET VALUE | 7500K | 0 | 133.33 | 0 |
| ACTUAL READING | 7646K | 146 | 130.78 | 2.55 MK-1 |
These figures might look confusing, but what it tells me is that the light is very Kelvin color accurate at most temperatures. Any MK-1 score that is under -9/9 means you wouldn’t have to use any color correction gels. The MK-1 scores for this light were very good, except for when it is being used at 2700K. In saying that, these are just technical scores and technical data doesn’t always reflect real-world performance.
CC INDEX & ⊿uv
| CC INDEX | ⊿uv | |
| 2700K | 0.1G | -0.0004 |
| 3200K | 0.2M | 0.0014 |
| 4500K | 0 | -0.0000 |
| 5600K | 0.1G | -0.0003 |
| 6500K | 0.3G | -0.0004 |
| 7500K | 0.5G | -0.0001 |
The ⊿uv scores were exceptionally good for this light and the best I have seen from any LED light, period. Only the Rotolight Titan X2, Luxli Fiddle Pocket, Creamsource Vortex8, and now the Nanlite PavoTube T8-7X have ever recorded a perfect ⊿uv at any Kelvin color temperature.
TM-30
TM-30 is a relatively new color rendering standard that was developed to deal with the limitations of CRI. TM-30 looks at 99 individual colors. These 99 colors are categorized into seven groups: nature, skin color, textiles, paints, plastics, printed material, and color systems.
TM-30 scores go from 0 – 100. The higher the score, the more accurate a light is at producing colors. Any TM-30 Rf score in the ’90s is considered to be good. What is interesting and something that you need to be very aware of is that two separate light sources with the exact same CRI scores can render colors very differently. A light with a high CRI rating could have a low TM-30 score. Conversely, a light with a good TM-30 score could have a bad CRI score.
Now, there are two measurements associated with TM-30, Rf and Rg.
Rf (Color Fidelity)
Rg (Color Gamut)
With Rf value, ideally, you want a score in the 90’s.
With Rg value, a score below 100 indicates that the light source renders colors with less saturation than the reference source. So ideally you want this score to be above 100.

2700K 
3200K 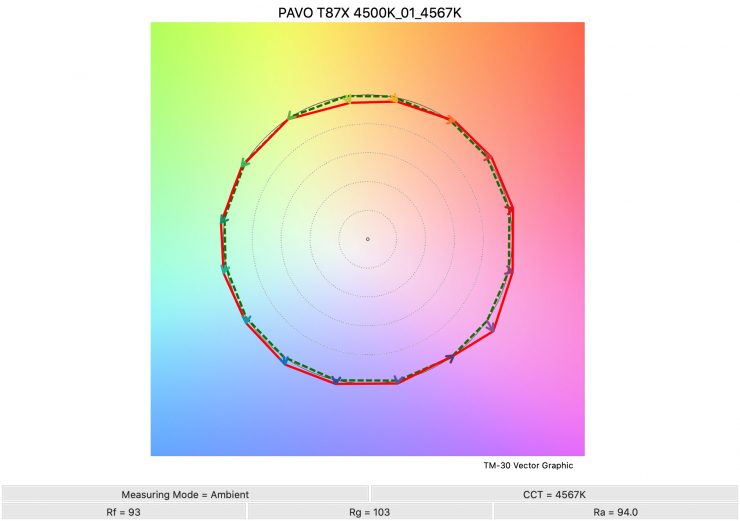
4500K 
5600K 
6500K 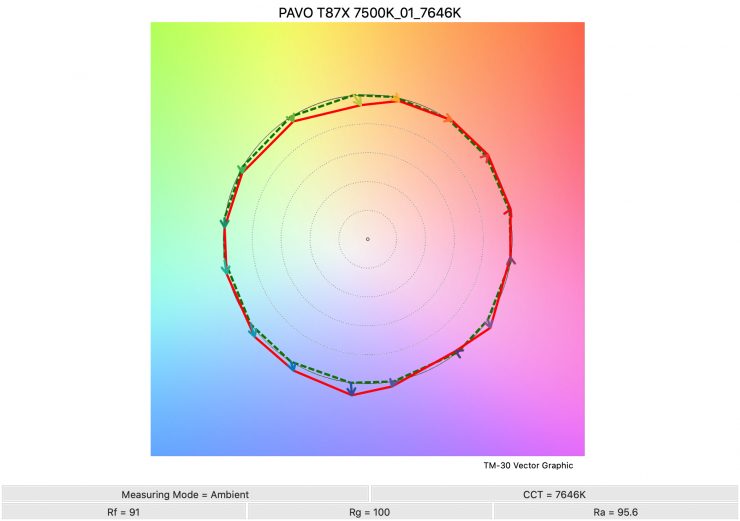
7500K
Above you can see the scores for the PavoTube T8-7X at various Kelvin color temperatures. Below I have listed the figures as well.
| Rf | Rg | |
| 2700K | 91 | 98 |
| 3200K | 92 | 101 |
| 4500K | 93 | 103 |
| 5600K | 93 | 102 |
| 6500K | 92 | 101 |
| 7500K | 91 | 100 |
The TM-30 scores are all good and it shows me that the light is pretty consistent at replicating accurate colors with full saturation.
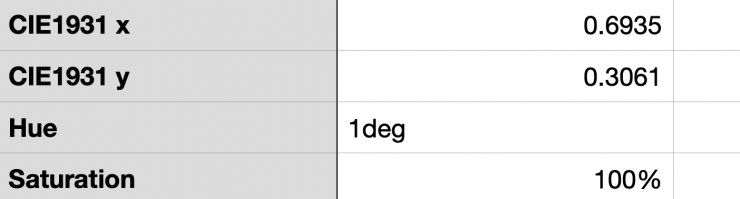
If we look at how well the light replicates a fully saturated Red, you can see above that it is able to produce 100% saturation, but the Hue did shift by 1-degree.
SSI
SSI (Spectral Similarity Index) was developed by the Sci-Tech Council of the Academy. SSI gives me the ability to set any light as a standard, or use predefined standards (such as CIE D55), and then give other lights an SSI score based upon how well they will match standards such as CIE D55 measure spectral response and compare it directly against an ideal light source.
3200K
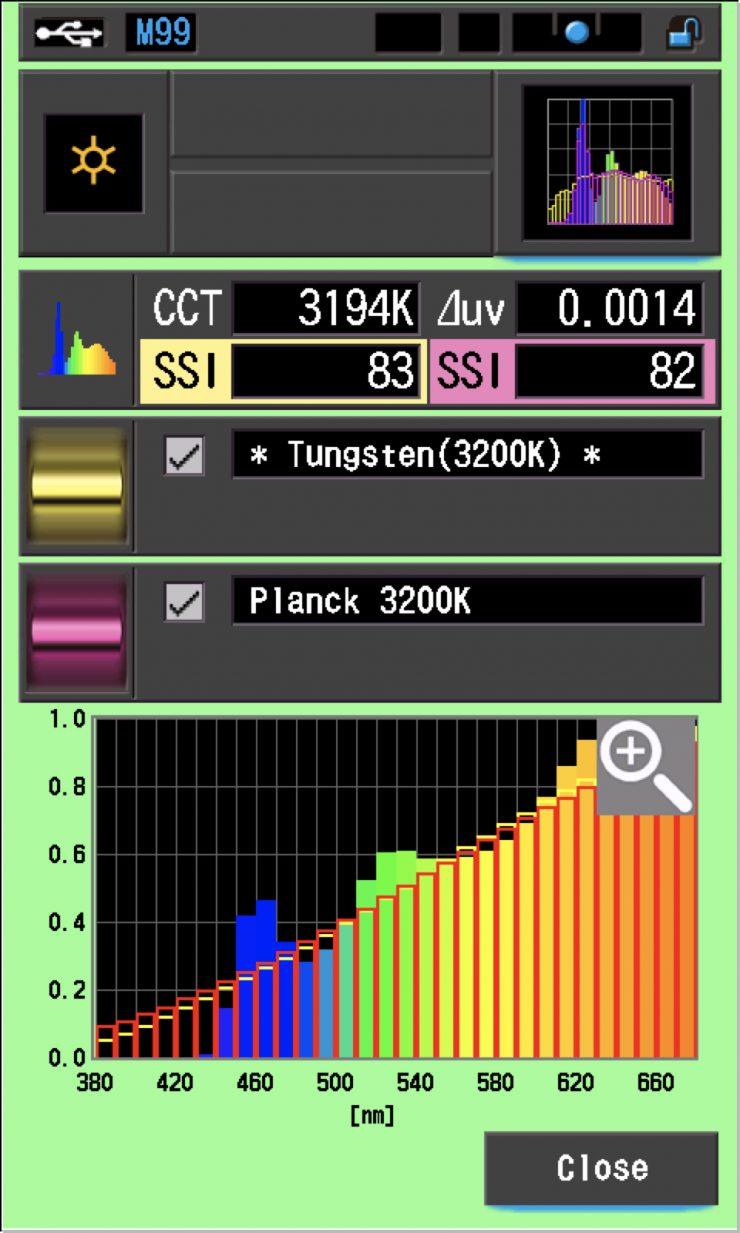
In this graph, the red bars indicate a perfect 3200K Tungsten source. The Red bars indicate a Planck 3200K source. This lets us compare how close to a perfect 3200K lighting source the Nanlite PavoTube T8-7X is. A score in the low to mid-’80s is very good for a LED light trying to replicate a 3200K source.
5600K
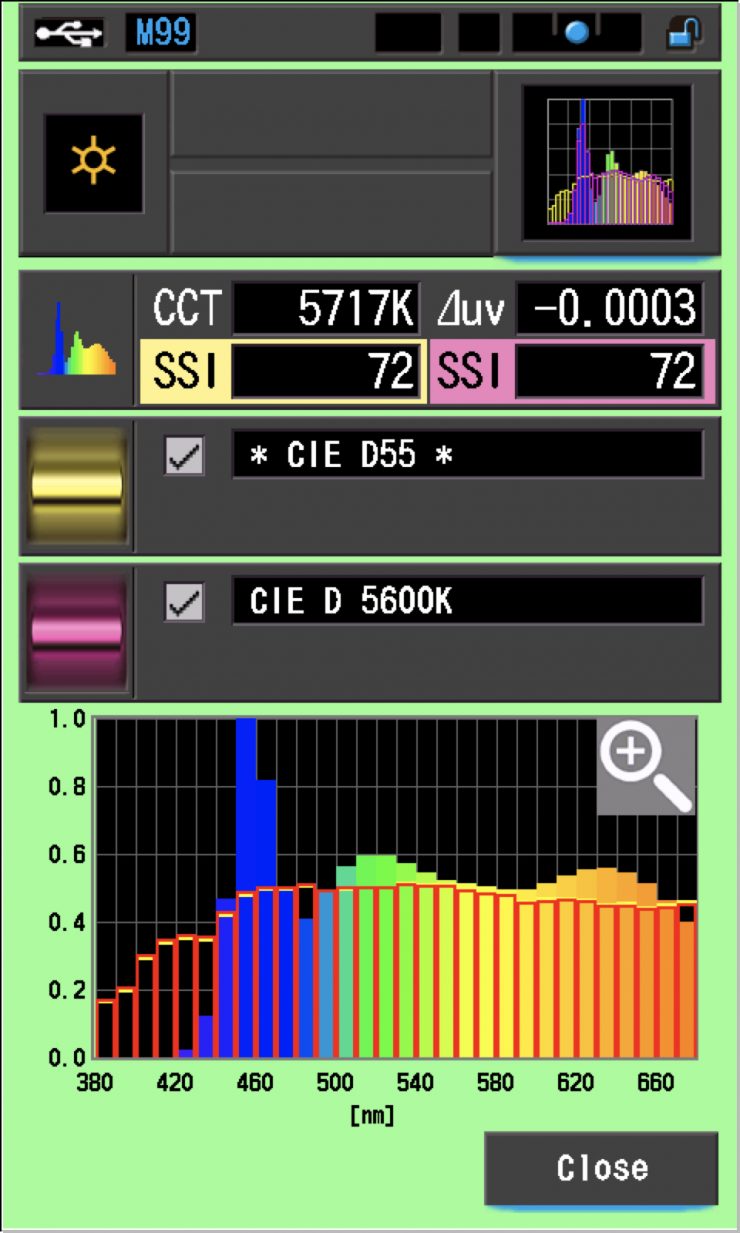
In the graph above, the red bars indicate a perfect CIE D 5600K source. The Red bars indicate a perfect CIE D55 source. This lets us compare how close to a perfect 5600K lighting source the PavoTube T8-7X is.
Most LED lights only record SSI scores in the low 70s when they are used at 5600K.

The main reason we want to record SSI scores is so we can see how well they match with other lights. As an example, let’s see how well the Nanlite matches the ARRI Orbiter and the Rotolight AEOS 2 when used at 5600K. As you can see, the Nanlite is a better match with the Rotolight than the ARRI. In a perfect world, you would want the lights you are using to have a score of 100 if they were all being used at the same Kelvin color temperature. That is rarely ever going to be the case unless you are using the exact same lights from the same manufacturer, however, any score in the 90s should in theory provide a very decent match.

Just as another comparison, above you can see how all of those same lights match when used at 3200K. As you can see, the Nanlite matches the Rotolight extremely well, but it doesn’t match as well with the ARRI when used at 3200K.
Spectral Distribution
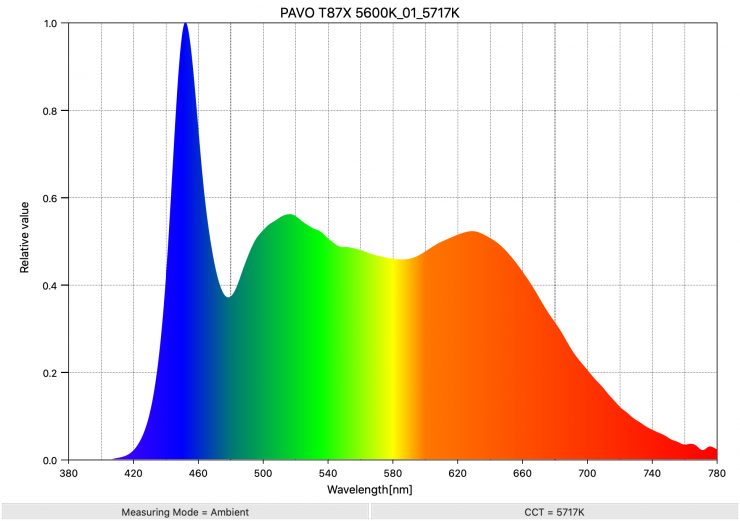
Above you can see the spectral distribution of the PavoTube T8-7X when it is set at 5600K. The spectral distribution is not overly full and there are a few small bumps, but generally, it is pretty decent.
Above you can see the spectral distribution when it is set at 3200K. The spectral distribution is pretty good for a LED light being used at 3200K, but there is a bump in green.
Real-World Performance & Quality of Light
I might sound like a broken record, but as I always say in lighting reviews, photometric scores only tell you part of the story. LED lighting technology has gotten to a point where almost all of the lights that are being released score well in photometric tests. What you should be focussing on, and this goes for just about any product, is usability. How will this product fit into the way I like to work.
The Nanlite PavoTube T8-7X is quick to get up and running, and you could use the light for lots of different applications. However, the lack of mounting points and mounting accessories does somewhat limit how they can be used, unless you do some DIY work.
Tube lights such as this are fairly versatile and can be used as ascent lights, replacements for practicals, etc, etc.
Yes, I would have liked to have seen a slightly longer run time when using the built-in battery, but on the other hand, you get a product that you can just pull out and turn on. I don’t like separate battery systems, but I do want the option to be able to use one if need be.
As far as output is concerned, the light isn’t overly bright, but for a lot of scenarios where it will be used as a practical or placed in shot on purpose, it doesn’t need to be too bright.
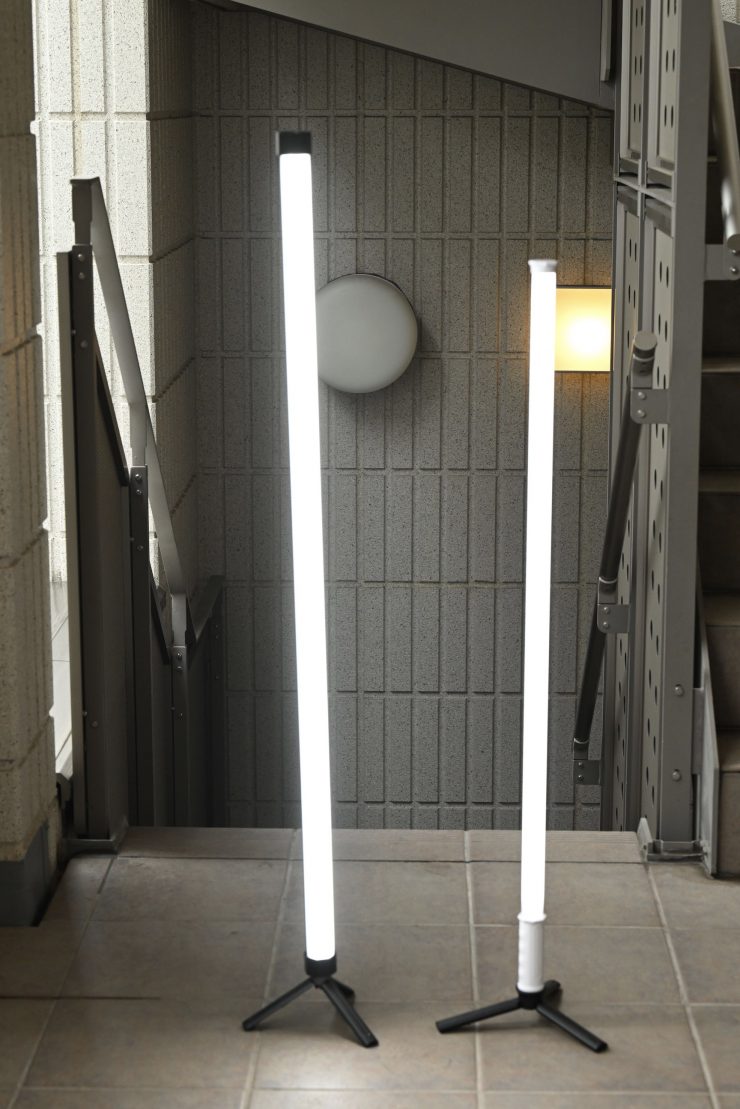
Just as a reference, above you can see the Nanlite PavoTube T8-7X set at 5600K and 100% next to the PavoTube 30X set at 5600K and 100% output.
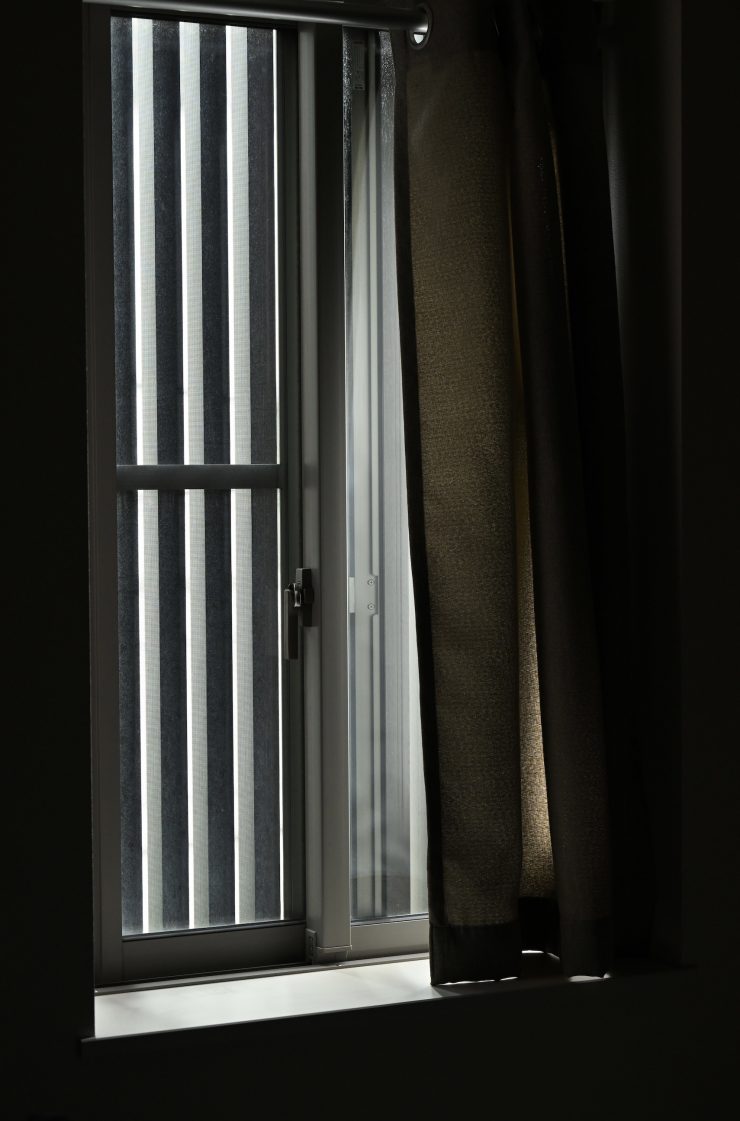
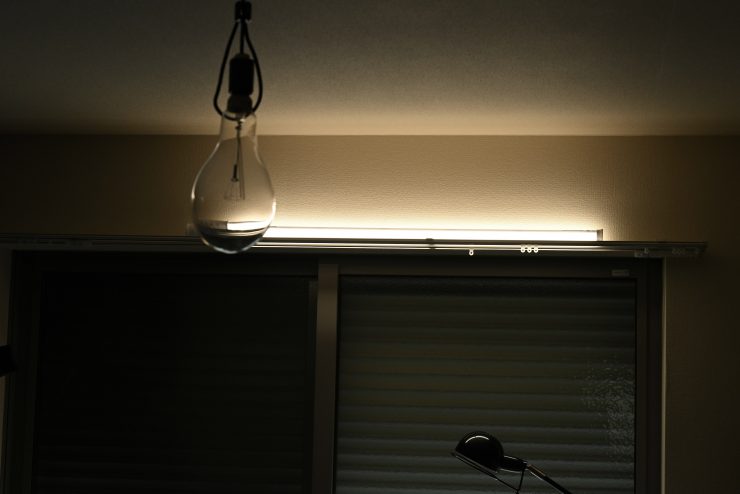
Nanlite PavoTube T8-7X behind the curtain 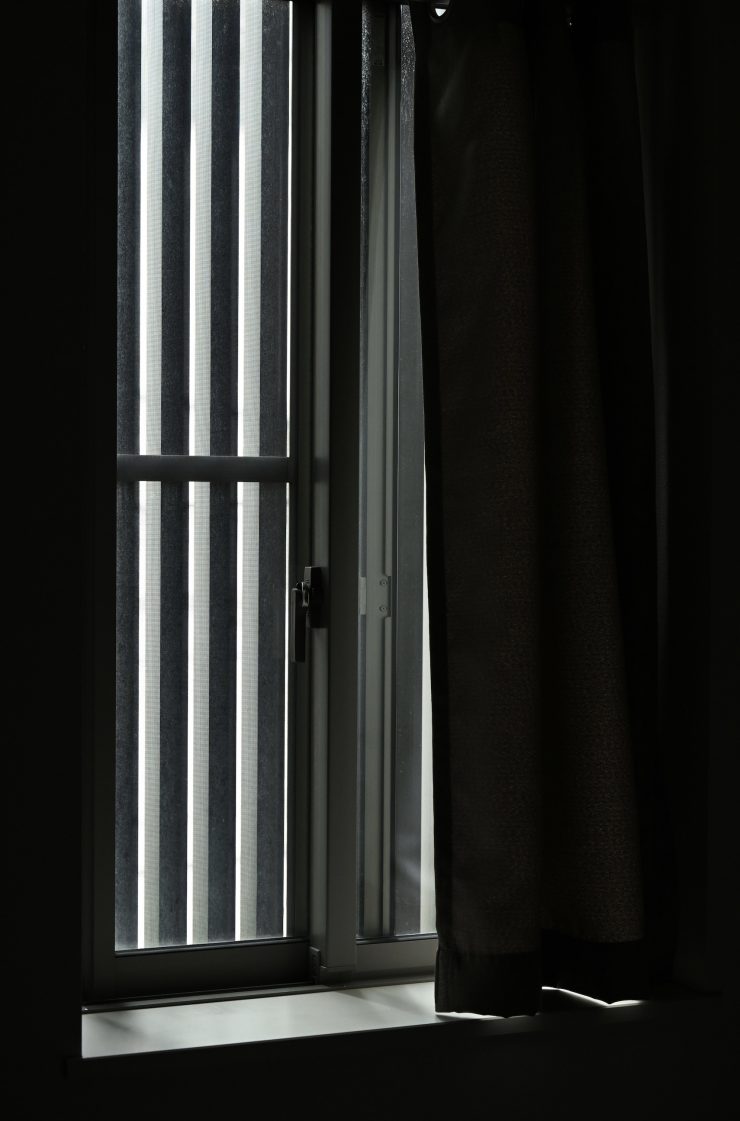
No light
Above you can see a quick example of just placing a single tube behind a curtain on a window ledge to help lift the light levels. This is where small sources like tube lights can help you out.

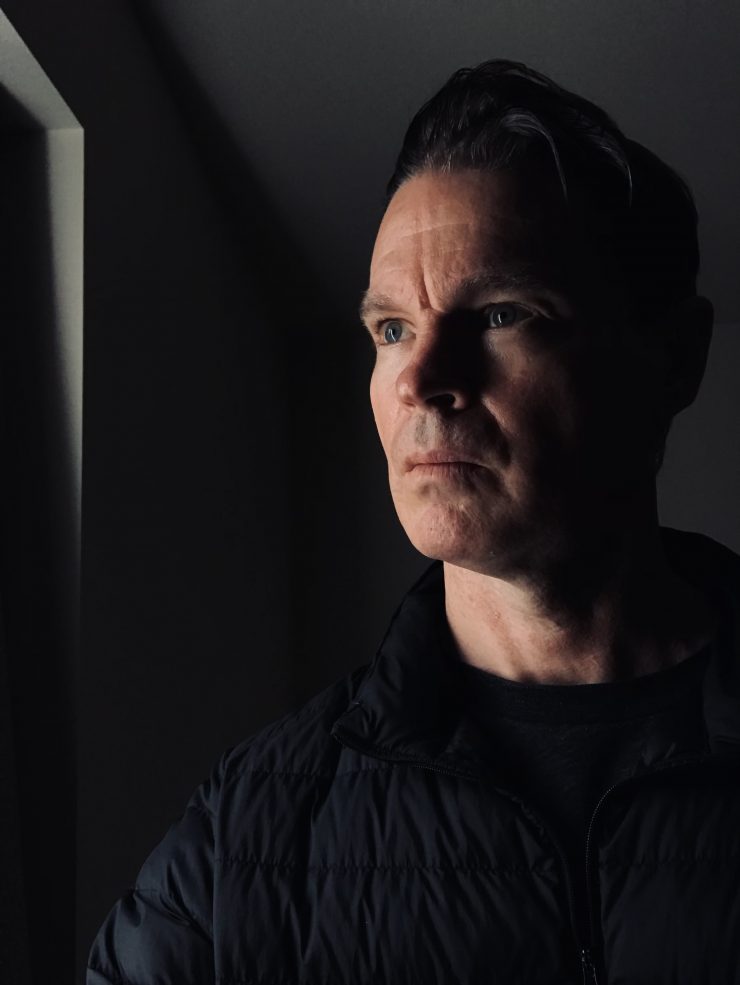


Above you can see a couple of example frames I took just shooting myself with an iPhone where I placed the Nanlite PavoTube T8-7X on the window ledge to replicate light coming through the window. Tube lights can be create when you want to create some quick dramatic lighting in darker environments.
For me personally, I originally thought that a tube light is probably not something that I would tend to use that often. While it is reasonably versatile, the physical size and difficulty of transportation probably outweigh its benefits for the style of work I do. However, in the last few years, I have found myself using them more often on select jobs.
If you are shooting music videos or other content where you need a light to be able to create colors or effects that can be discreetly placed in a scene then tube lights make a lot of sense. For a lot of other applications, there are better options available than using a tube light.
Price & Availability
The Nanlite PavoTube T8-7X is now available for $95 USD. A four light kit is also available for $389 USD.

Competition
I don’t think there is much in the way of competition for the PavoTube T8-7X. At its price point, there really aren’t any other decent options out there, especially those that feature a Pixel mode. If you want to pay more money, then the next step up would be Nanlite’s own PavoTube 15C and 30C, or the amaran T2c or T4c, however, both of those options provide far better mounting solutions and they are way brighter.
Conclusion
There is no such thing as a perfect light, and tube lights, in general, are filled with compromises that you need to be willing to accept. While you could use them for a whole range of different applications, they are clearly more suited to certain lighting requirements than others.
The Nanlite PavoTube T8-7X has good Kelvin color accuracy, a nice range of features and capabilities, and it is very, very affordable. The light is easy to control via the app and it is nice that you can power the light via a USB-C power bank or similar.
On the negative side, the internal battery run time could perhaps be longer, the output isn’t very high, and the lack of mounting points will be a dealbreaker for a lot of potential buyers.
All in all, the PavoTube T8-7X is a good offering considering it retails for less than $100 USD, however, with very few ways of mounting or rigging the tube, the applications for what you could use it for are somewhat limiting. As a practical replacement or a light that can be used in shot it is going to work well if you can DIY a rigging solution. Yes, it doesn’t have a ton of output, however, it does have enough when being used as a practical in controlled environments.


