When ARRI announced the ALEXA MINI LF it didn’t come as a shock to anyone. I don’t think there was ever any doubt that ARRI was going to announce a Mini LF, it was always just a question of when.
With the success of the original ALEXA Mini, the Mini LF was the next logical step for ARRI in the evolution of the ALEXA family.
Small things come from big beginnings?
ARRI launched the ALEXA LF back in early 2017 and at the time they hinted that they were looking into the feasibility of building a Mini version but nothing had been decided.
Evolution rather than a revolution
The ALEXA Mini LF is more of an evolution than a revolution. It is not a camera whose specifications tell its full story.
With the popularity of the ALEXA MINI, it was only natural that ARRI went with the strategy, ‘If it ain’t broke, don’t fix it’. All ARRI basically did was make a large format version of a camera everyone already loved. I’m totally oversimplifying things by saying that, but that’s essentially what they did.
You don’t mess with something people already like, you just improve on it. If there is one thing ARRI does well, it is listening to the end-user. By getting feedback on what MINI owners and users liked and didn’t like, ARRI was able to come up with a camera that based on its popularity, is exactly what most people wanted. No camera is ever going to be exactly what every user wants, but if you can get close (based on existing available technology) then you are doing pretty well.
Was the ALEXA MINI LF made primarily so ARRI had a purchasable camera that could be used for Netflix originals? I don’t think so, but there is no doubt that it was certainly one of the considerations.
Interestingly enough, the Signature Prime lenses were in development for years before the LF and Mini LF came along, so while Netflix certification was a priority, it wasn’t the driving force behind the camera. And really it was the LF that people thought was a reaction to Netflix, not necessarily the Mini LF.
Hands On
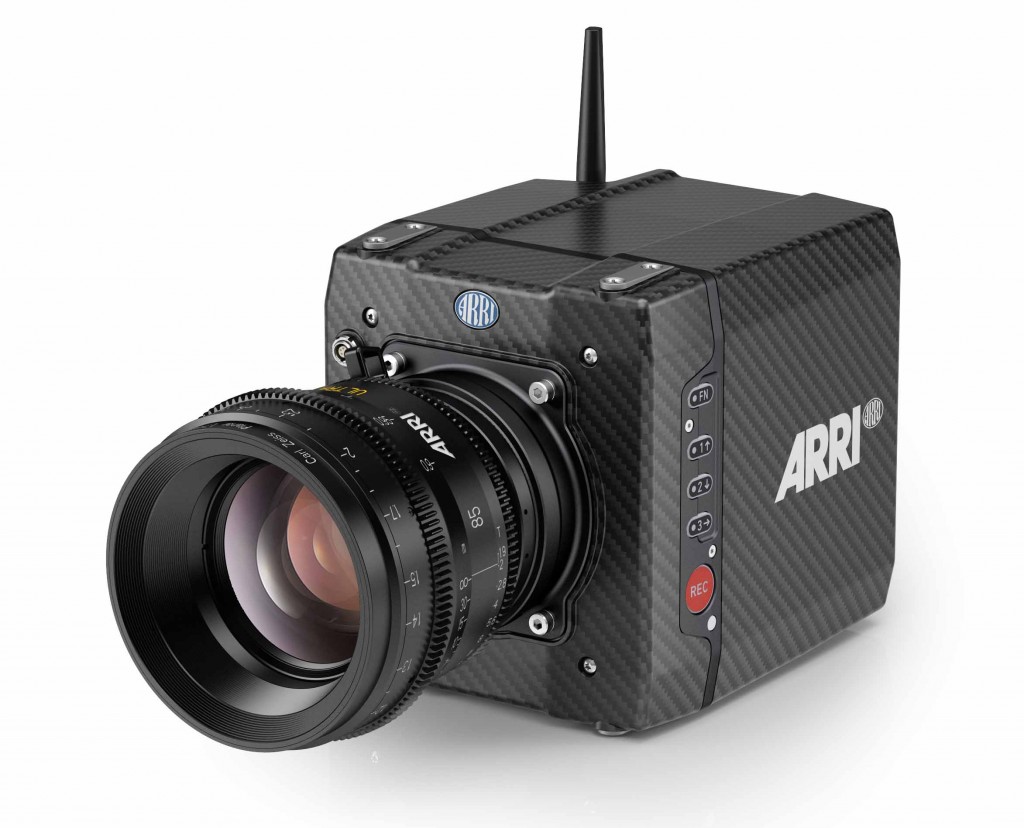
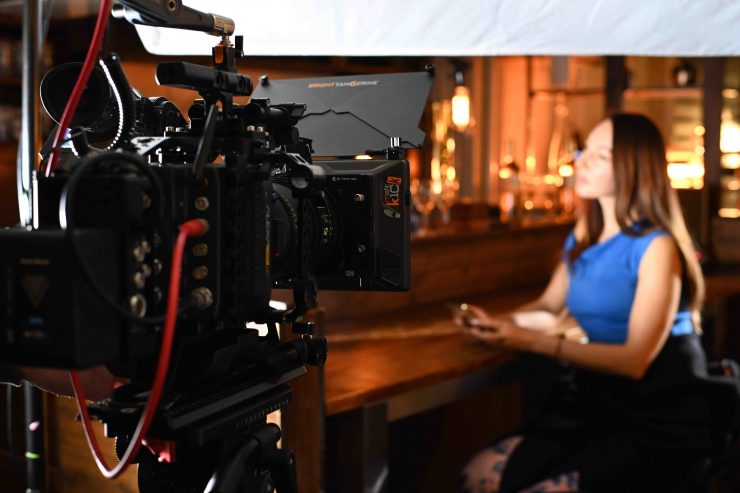
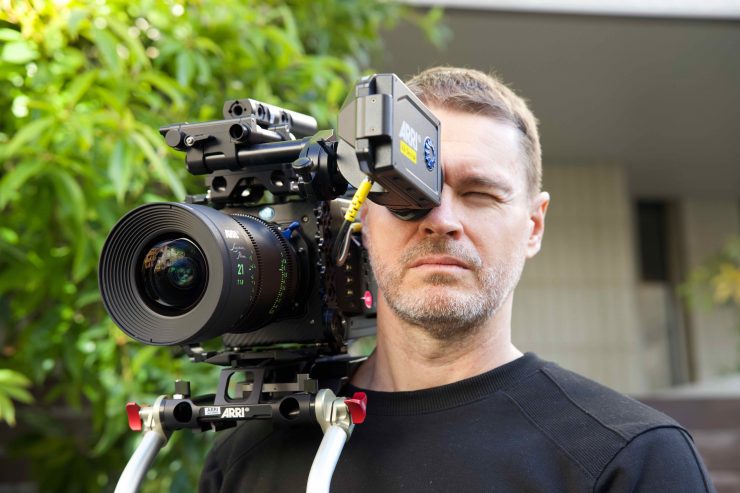
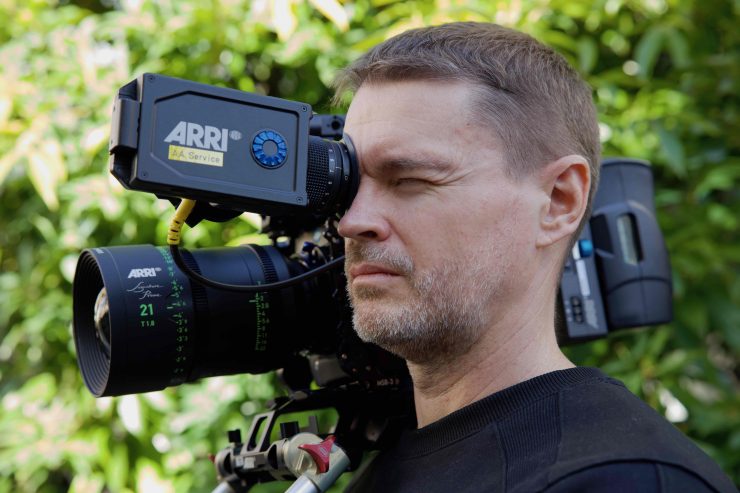
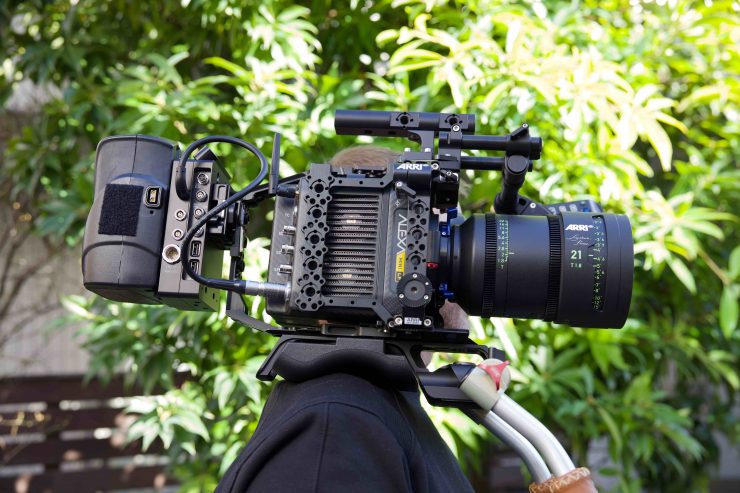
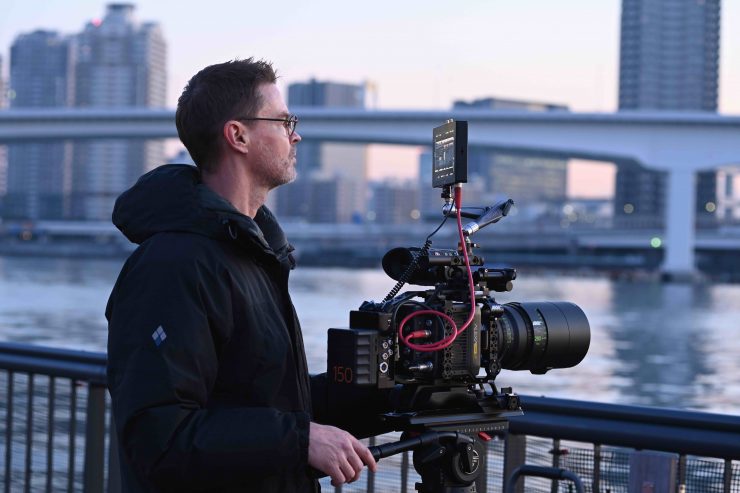
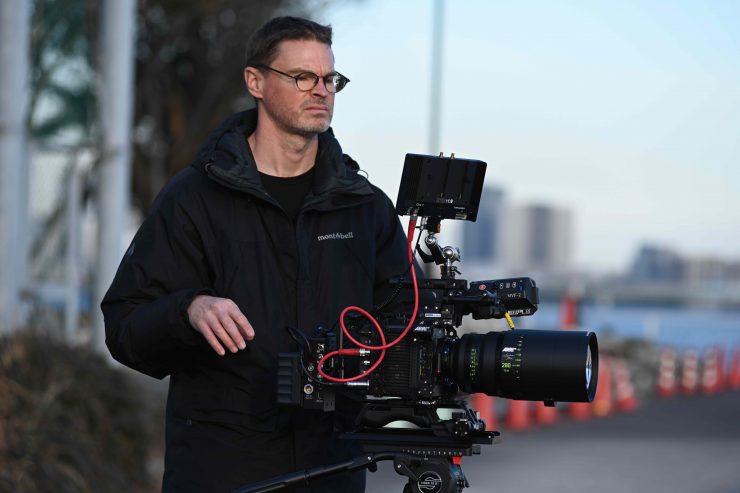
Now that the camera is finally shipping in larger numbers I have been lucky enough to get hold of an ALEXA MINI LF and a range of Signature Primes for a review.
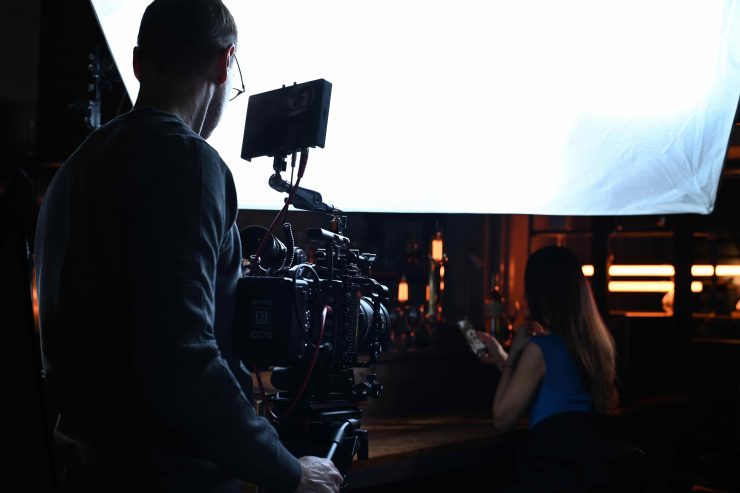
This is not really going to be the same as a lot of my other camera reviews. This is a top tier high-end digital cinema camera that is used on major Hollywood theatrical releases and episodic television. For this review, apart from testing all of the features and telling you what the camera can and can’t do, from an operational perspective, I’m primarily interested in seeing how the ALEXA MINI LF fares when used by a single shooter or small crew. I wasn’t interested in shooting in super controlled environments because there are already countless examples out there of how the camera performs in those conditions.
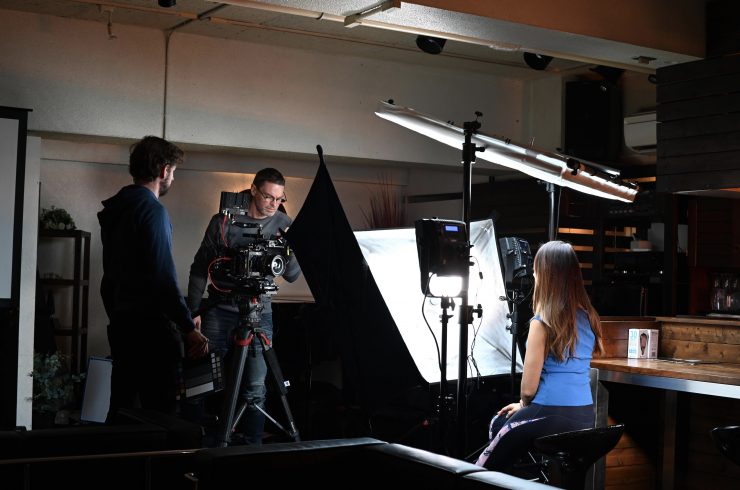
The Mini LF is not necessarily going to be a camera that a lot of owner/operators are going to buy. For a lot of us, it is going to be a camera that you will rent. Although, this camera had far more owner-operator preorder customers worldwide compared to rental houses than the Mini did.
If you ever plan on renting an ALEXA Mini LF then this review will give you a good insight into how to use the camera and what its strengths and weaknesses are.
Key features
- Large Format ALEXA LF sensor in an ALEXA Mini body
- Netflix Approved UHD up to 60fps.
- New, cost-efficient Codex Compact Drive for fast and open workflows
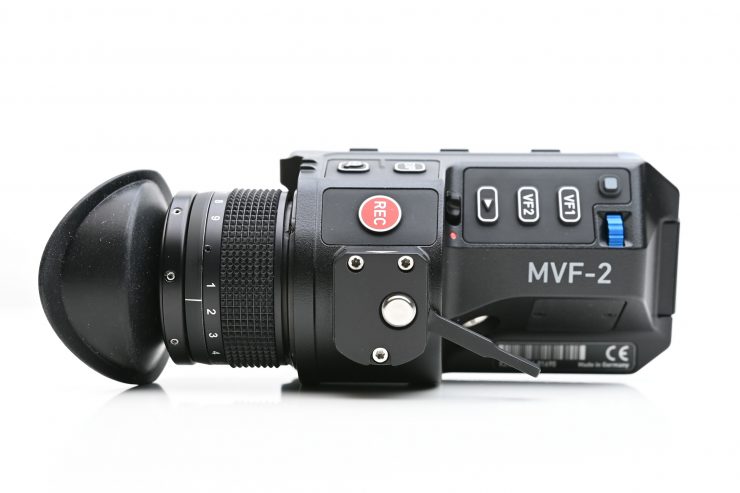
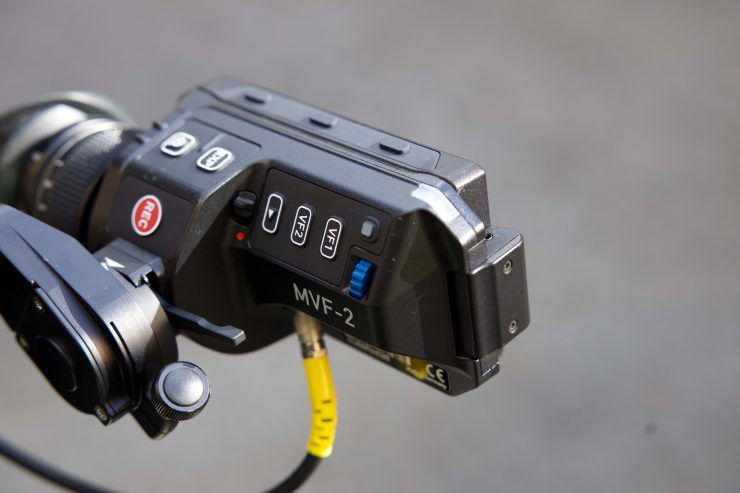
- New MVF-2 high resolution, high contrast viewfinder
- Internal motorized FSND filters, extra connectors, and user buttons
- Industry-leading image quality with much higher usable sensitivity
- Wide input voltage range for operation with standard 12V V-Lock and Gold Mount batteries
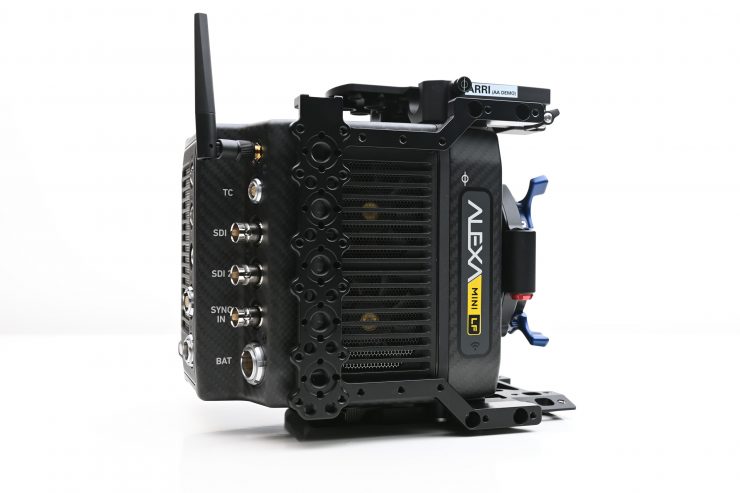
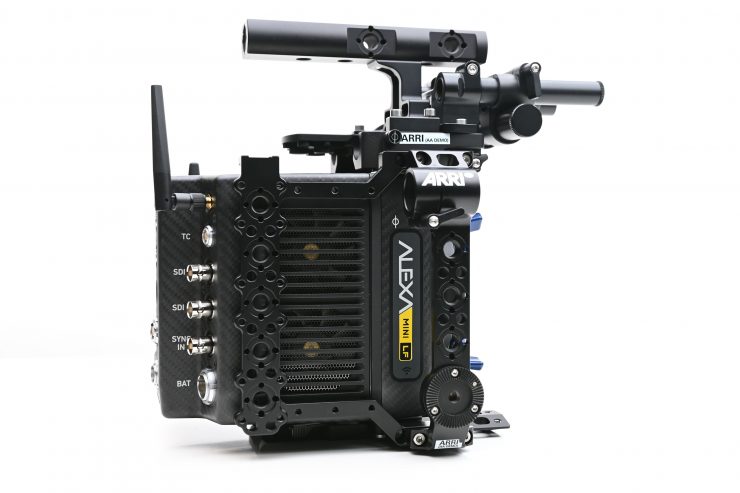
Same basic size
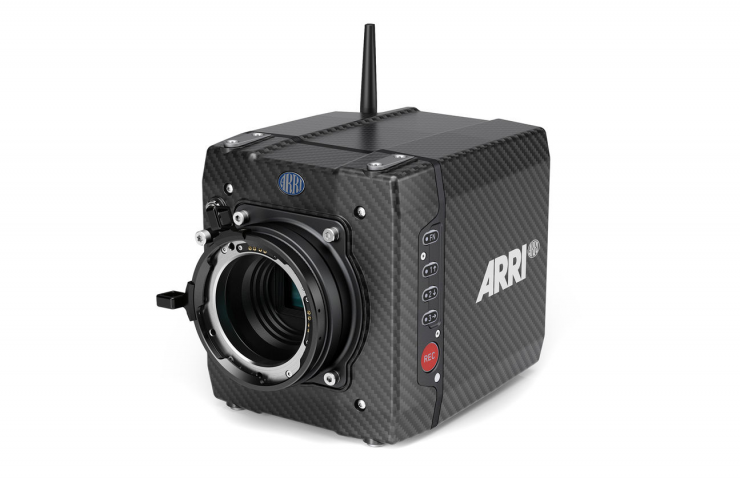
ALEXA Mini 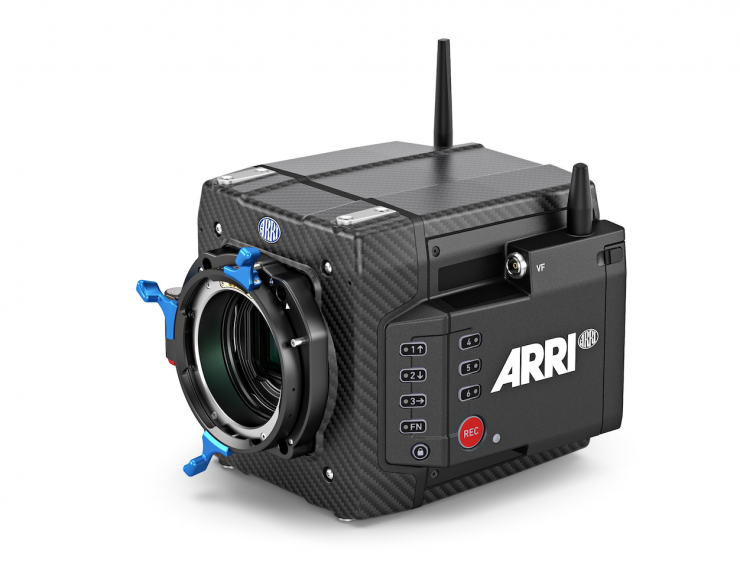
ALEXA Mini LF
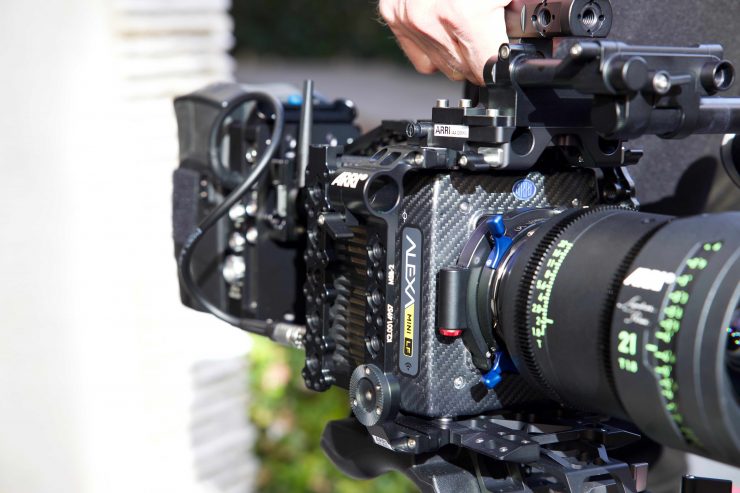
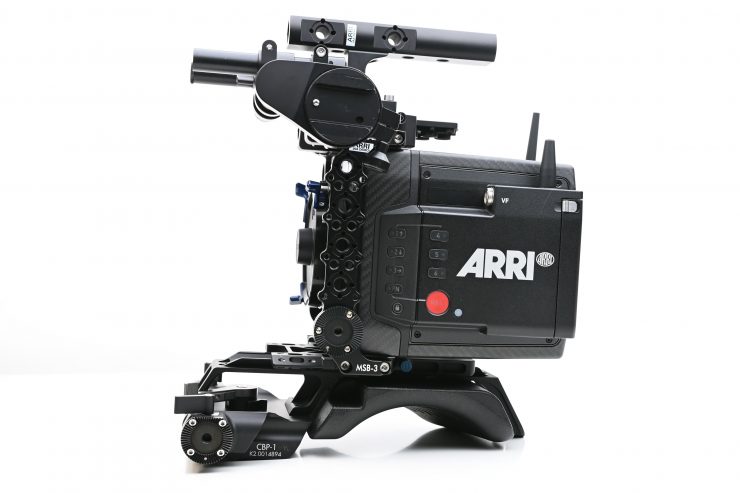
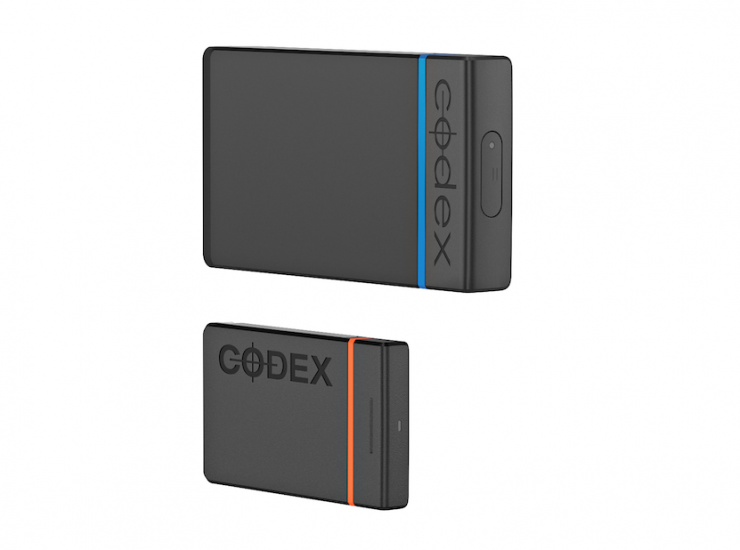
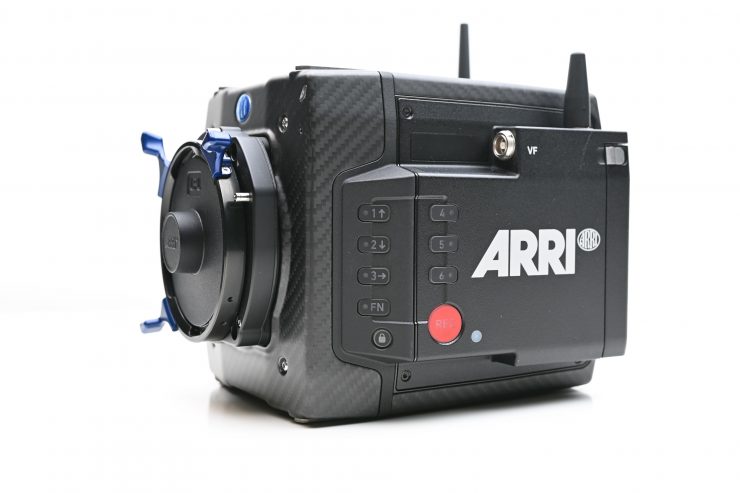
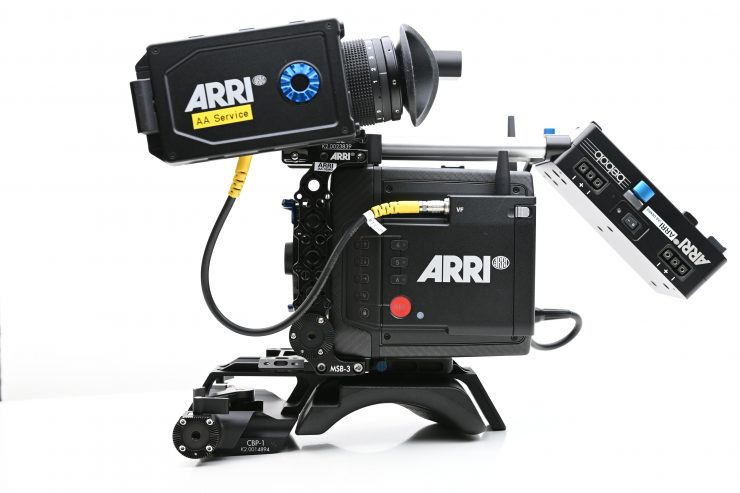
While not identical to the current ALEXA Mini in terms of size, it is very close. The Mini LF still shares the same basic design and form factor that users liked
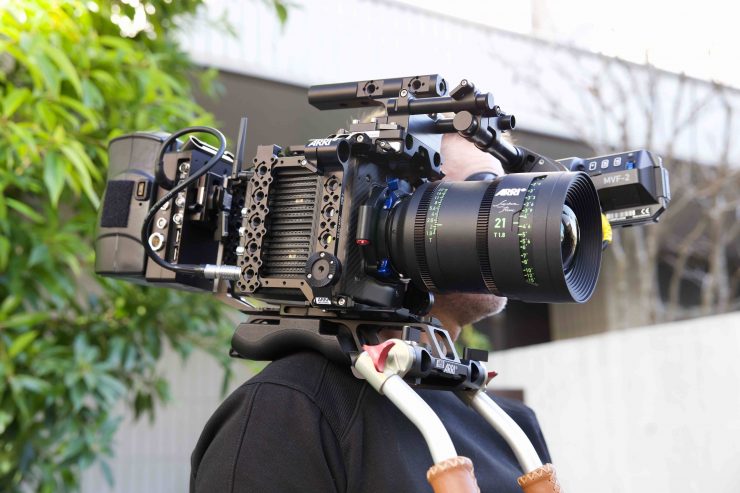
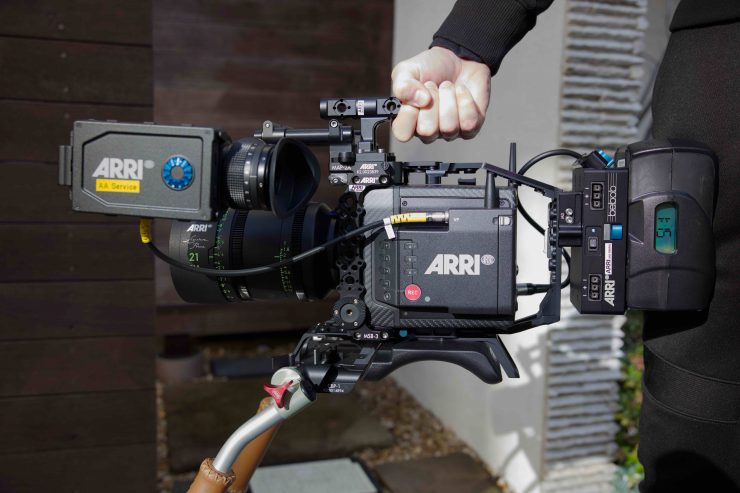
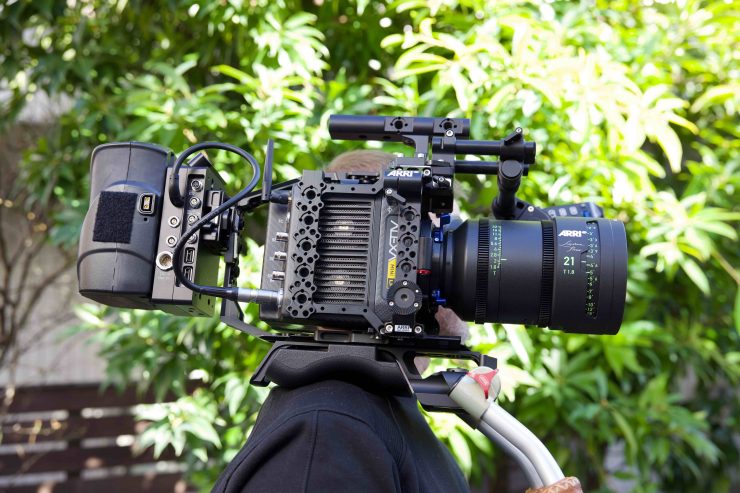
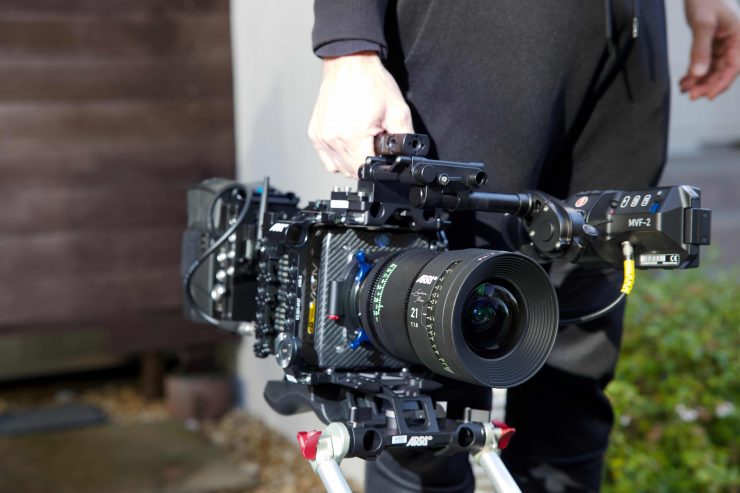
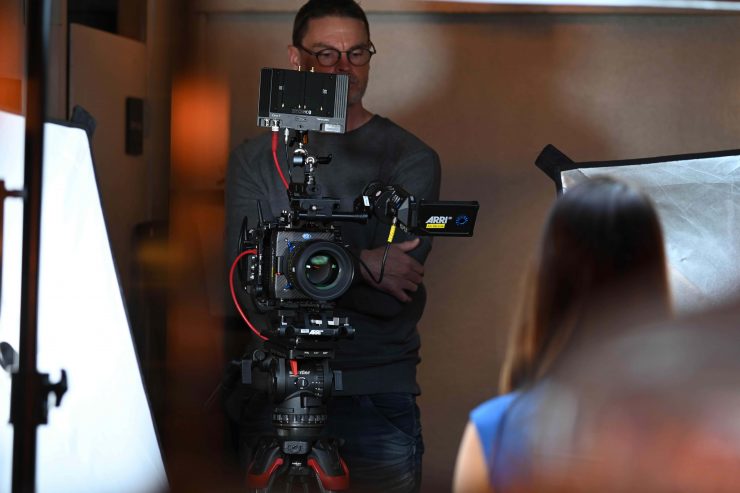
The camera itself is pretty small, but like any camera that comes in this form factor, you have to add quite a few parts to make it usable.

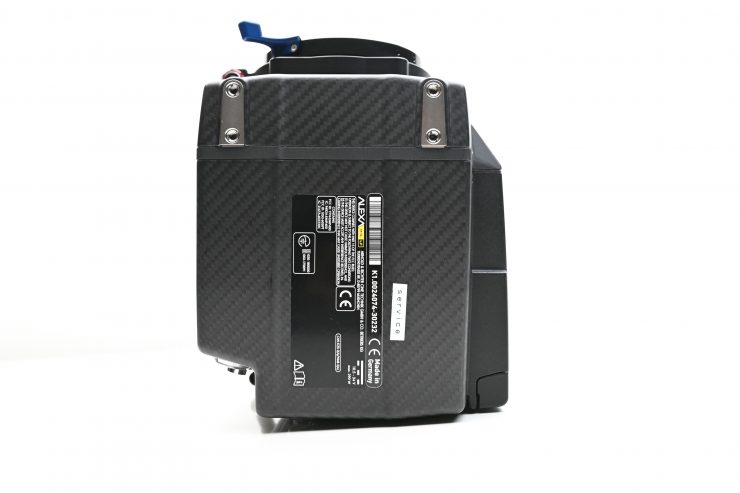
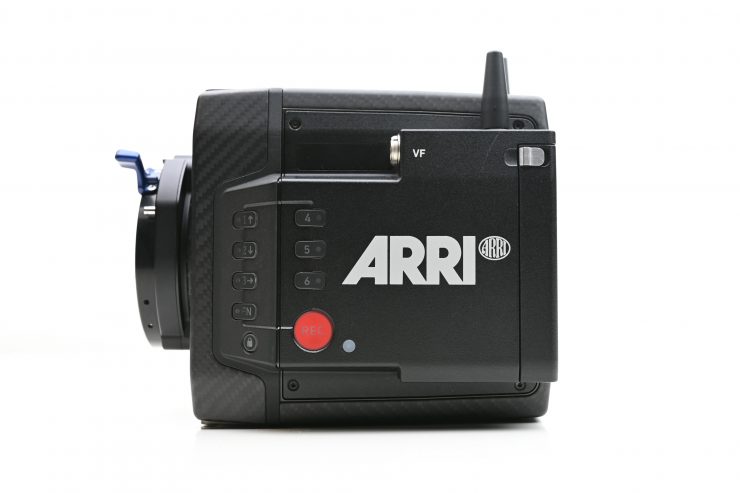
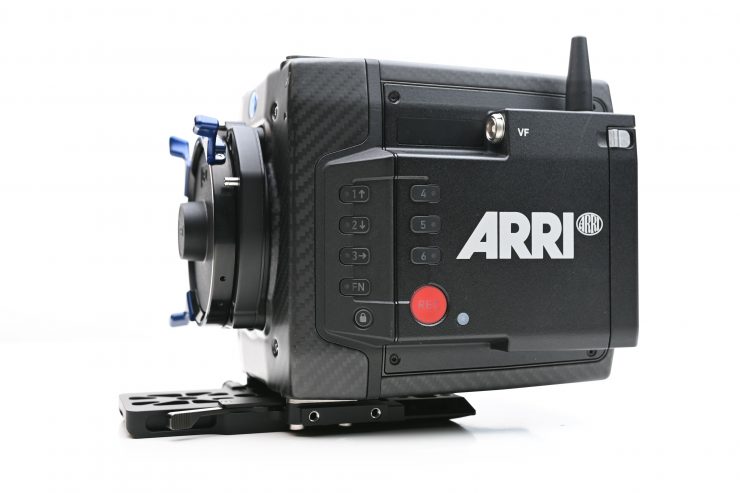
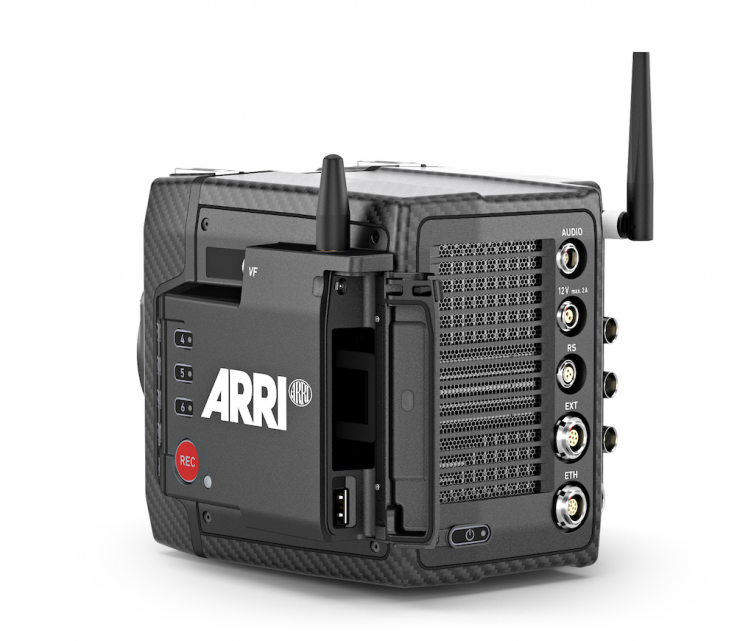
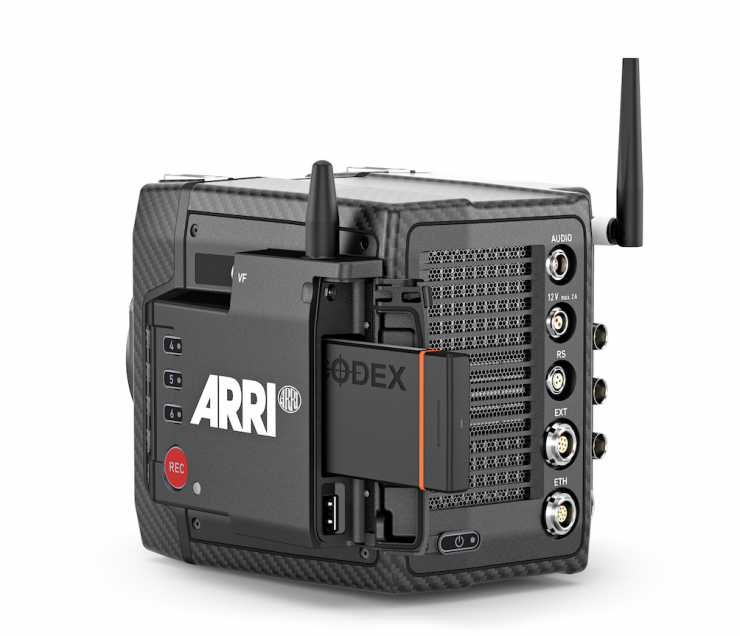
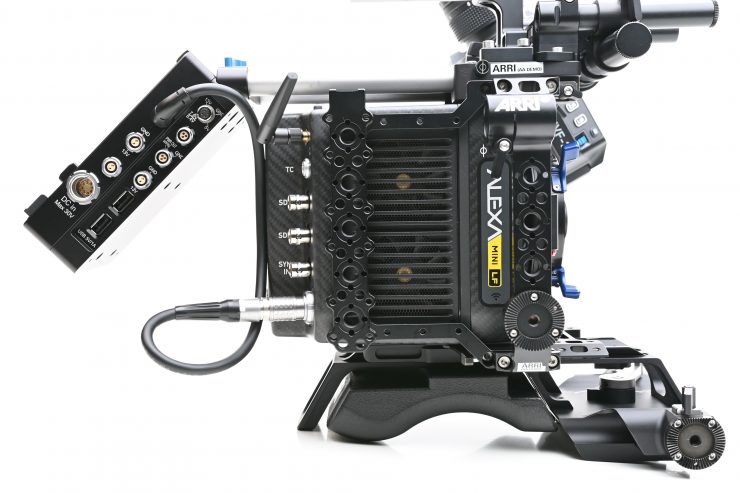
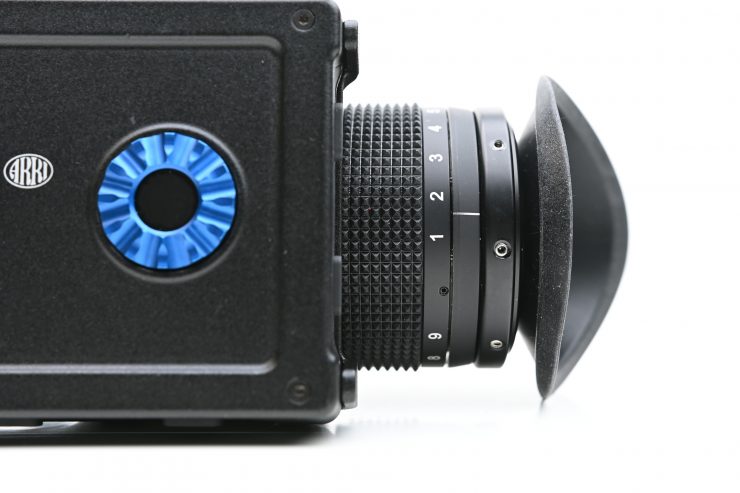
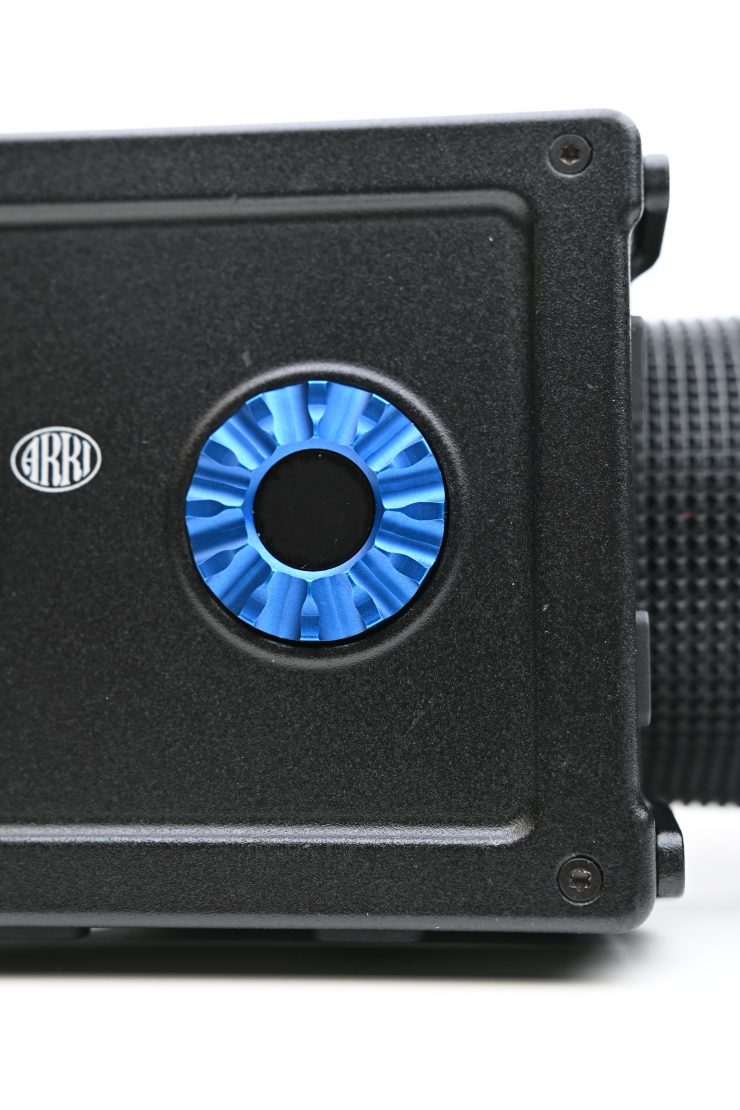
Even though the form factor is similar to the original ALEXA Mini, the biggest physical difference is that the Mini LF has a module on the left-hand side of the body.

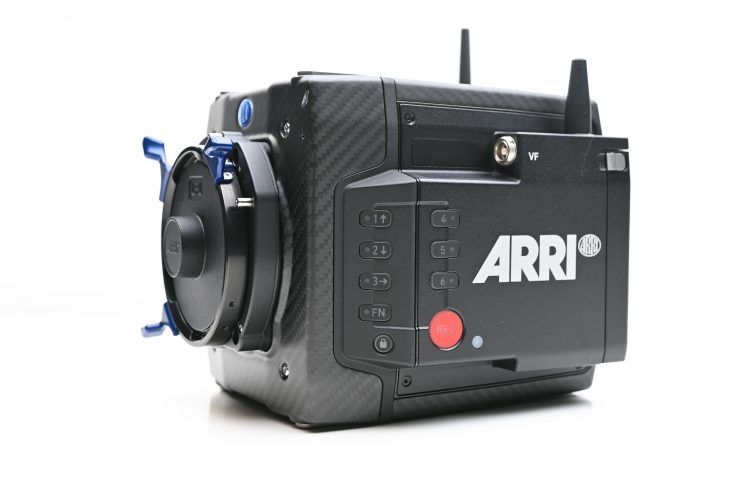
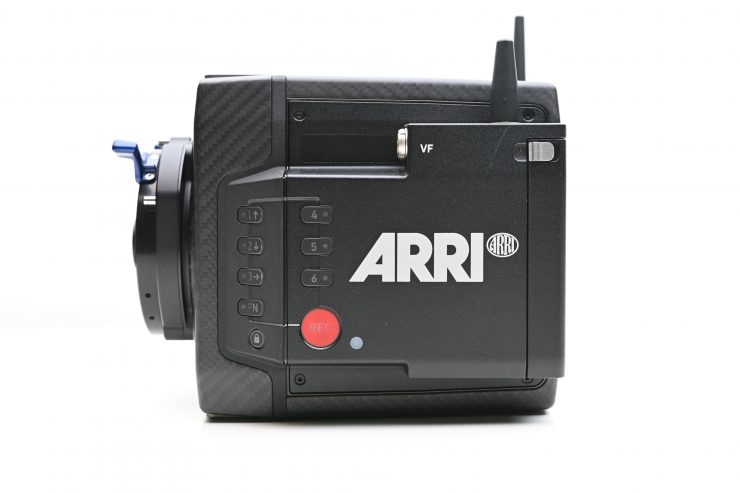
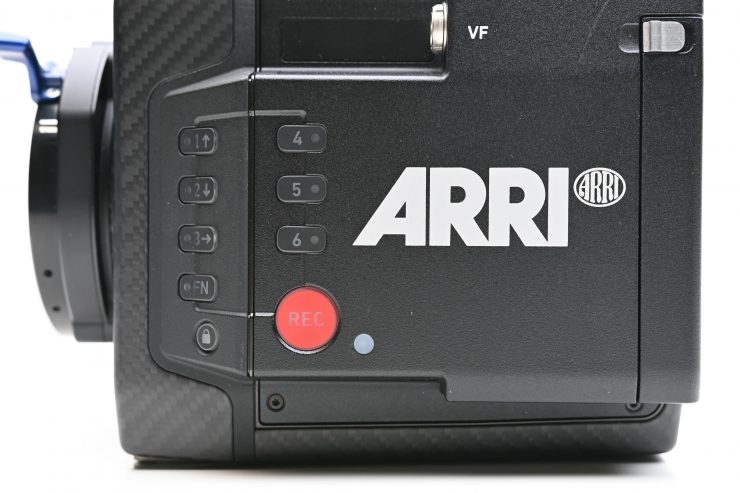
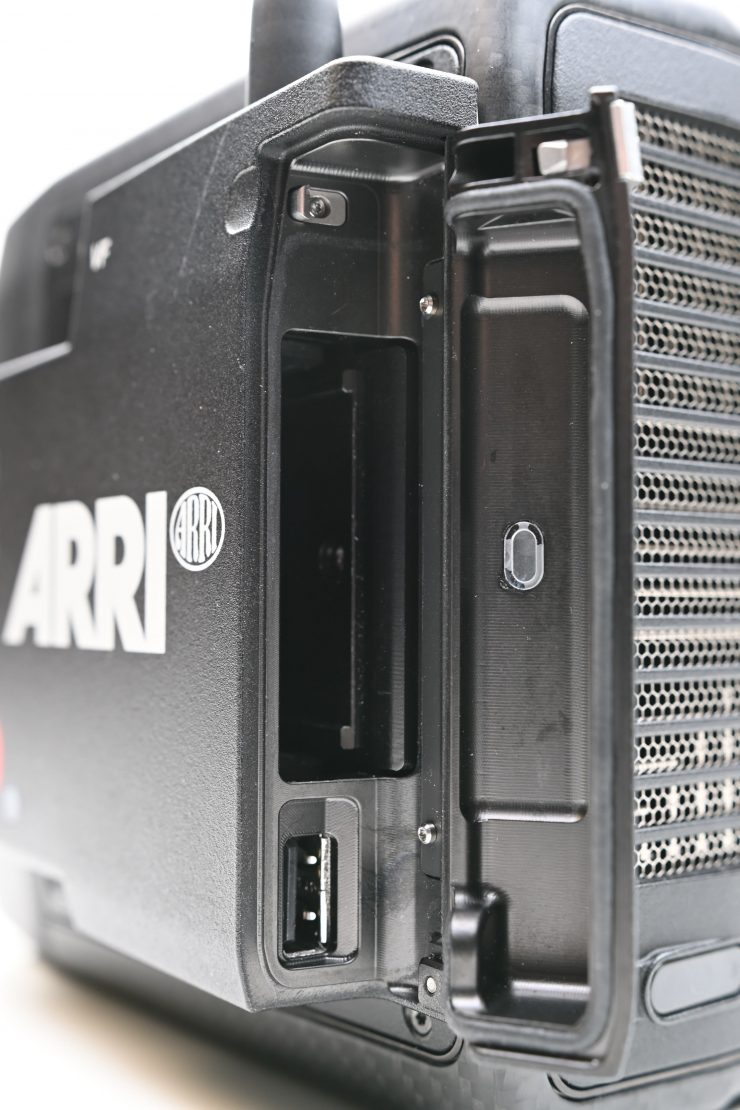
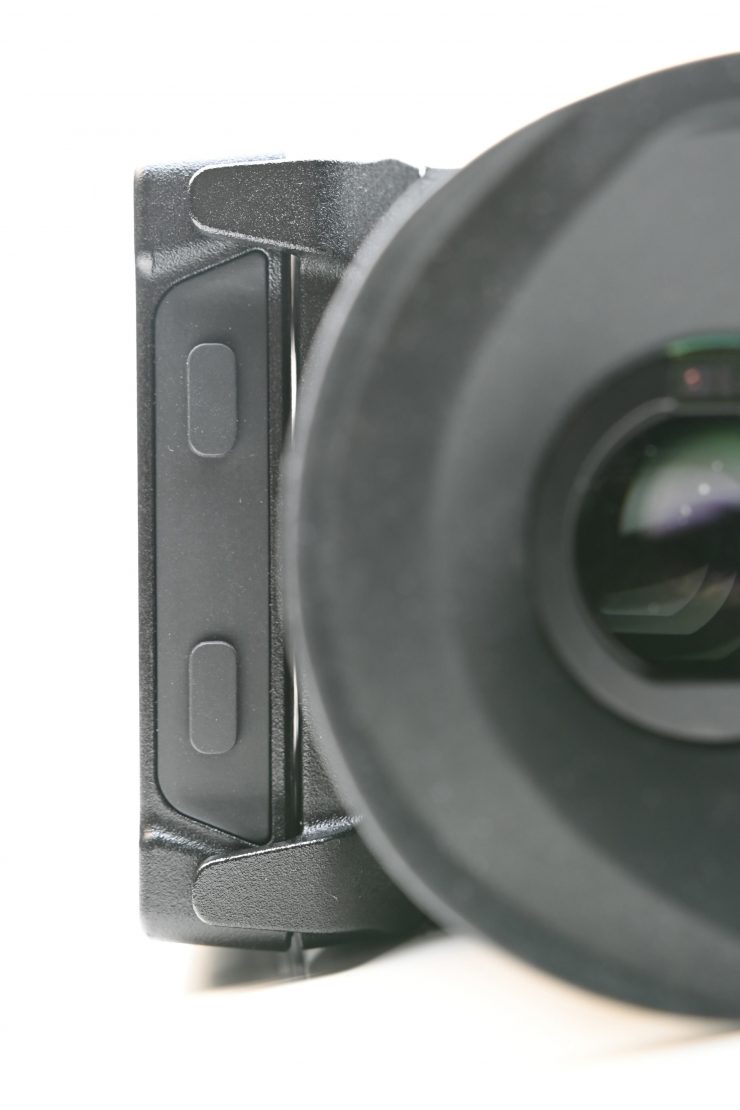
This module is where the recording media goes and where you will find the three new camera user buttons, for a total of six, as well as the record button and function lock button. These new additional user buttons are certainly a welcome addition and an improvement over the original Mini.
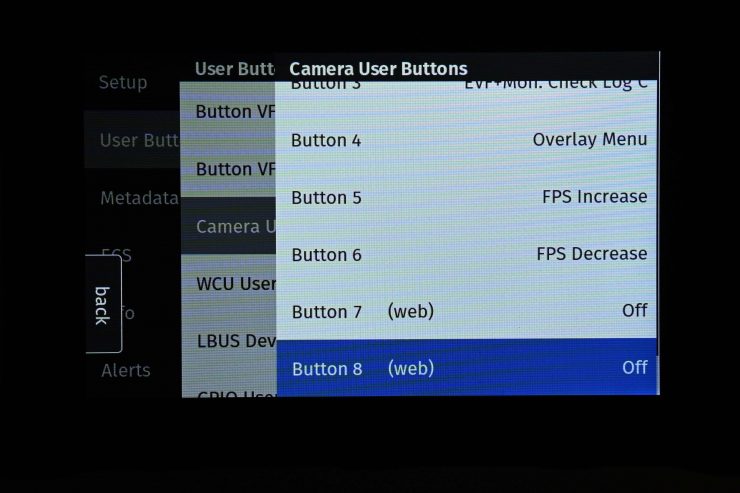
There are two additional user buttons that can be programmed and used through the web browser or compatible apps.
The user buttons can be set to do just about anything you like. I love this aspect of ARRI cameras. It gives you the ability to customize how you like to work and operate. You don’t have locked in buttons like so many other cameras do. If you add an OCU-1 or Master Grips to the camera, you can add even more custom user buttons to your set up.
You can literally set up the Mini LF so you don’t have to go into the menu to make the main operational changes. This vastly speeds up productivity when you are shooting.
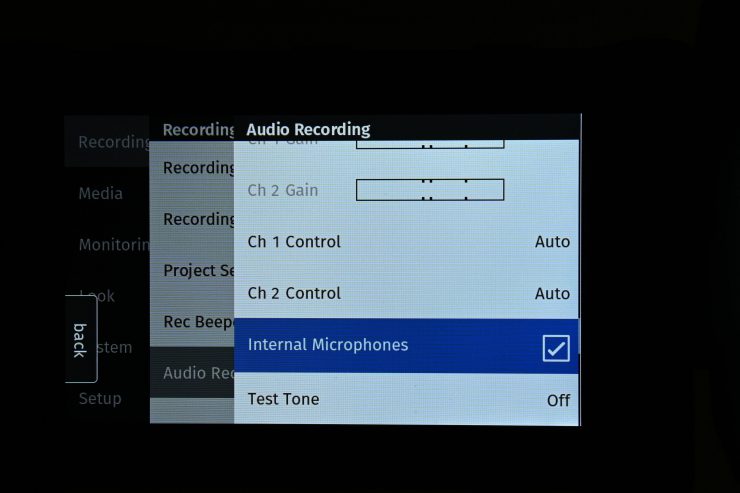
The camera also has built-in microphones so there is no need to attach an additional scratch microphone. The microphones are dual-mono and they record at different fixed gains.
The audio recording level of the internal microphones is fixed, with the left microphone (channel 3) using a +18dB higher gain than the right microphone in order to cover a wide range of audio levels.
This microphone quality is ok, but it is not a substitute for having a decent on-camera microphone. In ARRI’s defense, they were designed as a scratch recording device for syncing only.
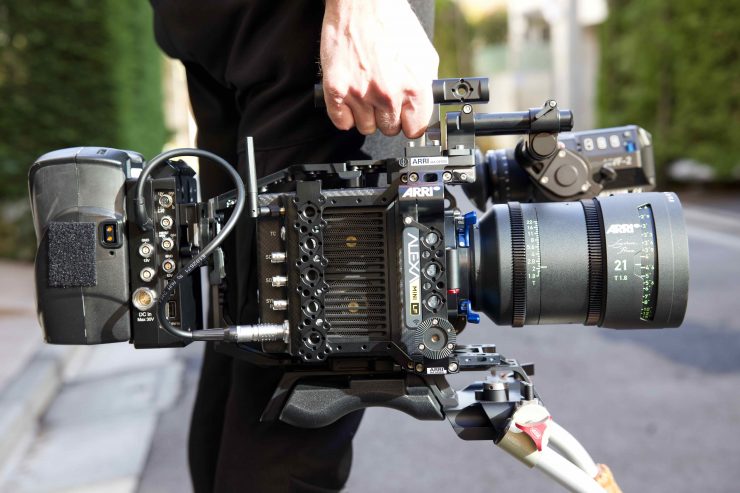
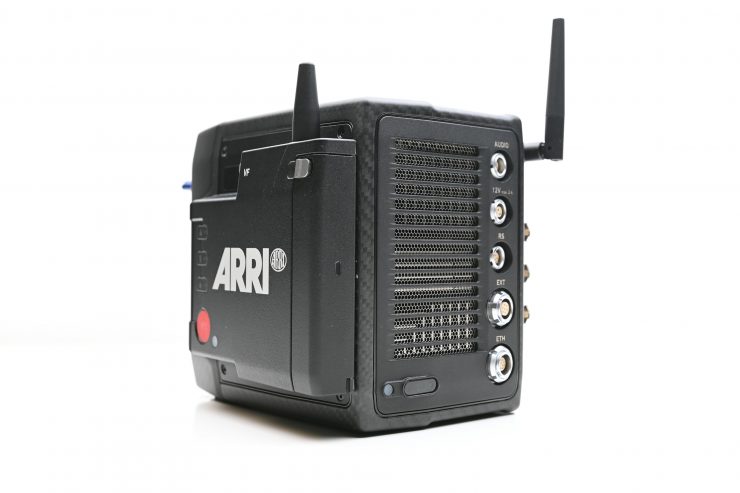
Notice the two large fans 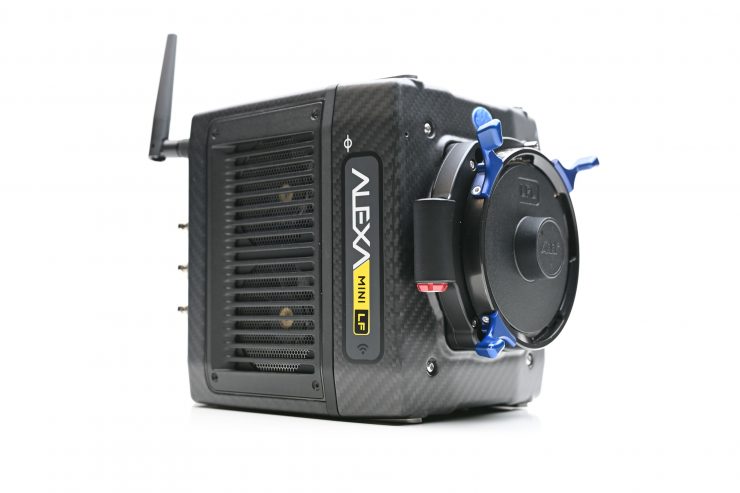
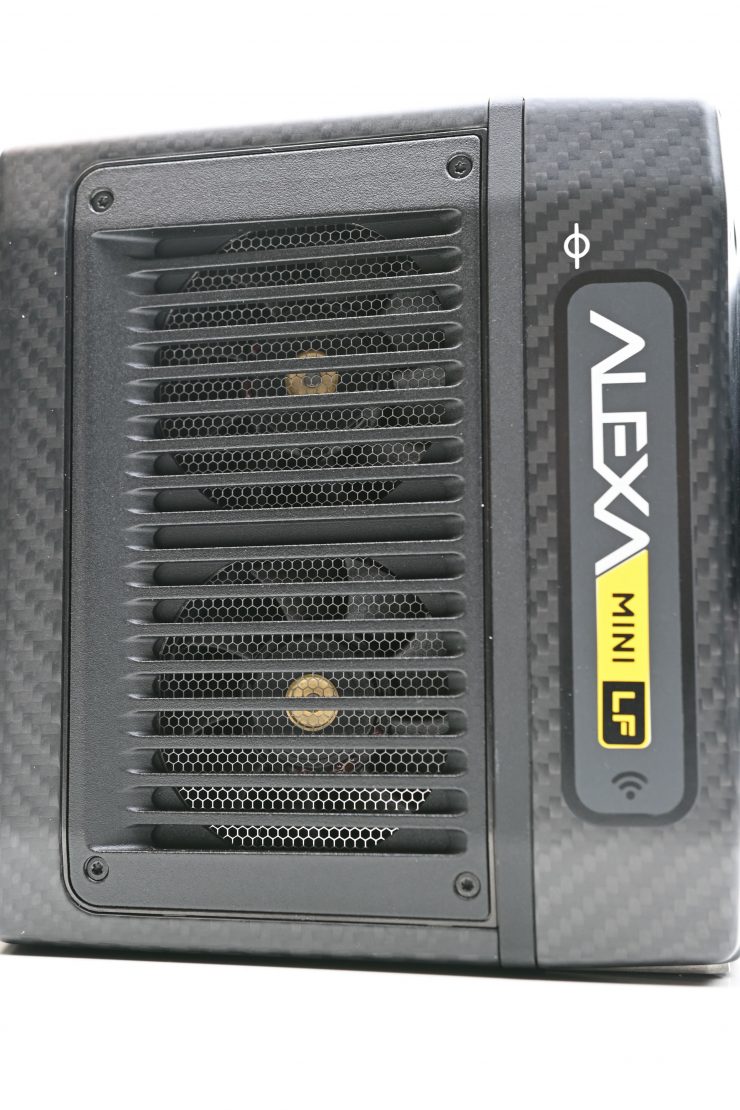
You will also notice that the camera has two large cooling fans that are visible on the right-hand side of the body. ARRI managed to optimize the cooling by placing a larger internal cooling vent in the space where the CFast 2.0 card slot was on the original ALEXA Mini.
ARRI cameras are stabilized at exactly 40 degrees and because of this they never require black shading. I’m pretty sure this is unique amongst cameras. Every camera must pass a full image quality test at -20 and +45 degrees celsius before it ships.
The ALEXA Mini LF uses a Peltier element that keeps the image sensor at a stable temperature. Keeping the image sensor at a stable temperature is key to maintaining constant image quality. There is a reason digital cinema cameras use very large cooling systems and fans! The warmer the sensor, analog amplifiers, and digital processing units get, the more dark current they will generate. The more dark current generated, the more recorded image noise you will see.

ARRI has also been careful to make accessories that don’t obstruct the airflow.
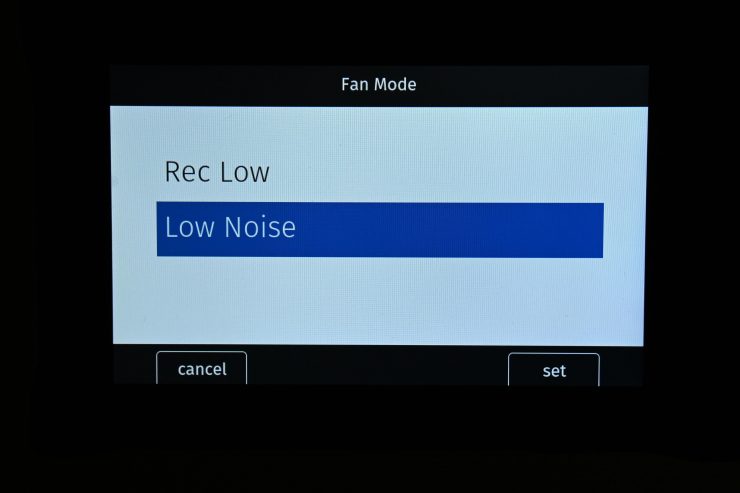
You can choose in the menu settings to set the fan to Rec Low or Low Noise.
Rec Low Increases fan speed during standby to cool the camera. Minimizes fan speed/noise during recording.
Note: Ideal in an environment warmer than 30 °C (86 °F).
Low Noise Minimizes fan noise during standby and recording.
Note: With data rates above 100 MB/s (due to fps/codec setting), the fan
speed automatically increases to prevent the recording media from overheating.

The back of the camera also has a large exhaust vent. Again, ARRI has been careful to make accessories that don’t block or interfere with where the heat escapes. This is also one of the reasons why the battery mounts and plates that work with the camera are offset behind the camera. More on that later.
The fans are relatively quiet and I don’t think they will be of much concern to most users. They certainly work well and you can feel the air getting exhausted out of the rear vent.
Some things it can’t do that the ALEXA Mini & ALEXA LF can

- You can’t burn in a ‘Look” into your ProRes Files
- No Pre-record functionality
- No Interval record
- No high frame rates
As ARRI had to fit a lot of the same functionality as the ALEXA LF into the Mini LF, they did have to compromise on a few things. The Mini LF cant do 150 fps like its larger sibling, and it doesn’t have space for three independent SDI outputs.
The ALEXA LF and ALEXA Mini LF have different hardware and software architectures, and the maximum frame rate of each recording format is determined by different components. In contrast to the ALEXA LF, the ALEXA Mini LF has an adaptable compression implementation, which can process Apple ProRes at frame rates of 40 to 90 fps, depending on the amount of data that has to be processed for the different recording formats.
The ALEXA Mini LF also doesn’t support Broadcast-style multi-cam applications like the AMIRA or the ALEXA Mini. However, for cine-style applications where multiple cameras need to be synchronized (bullet-time, rear-screen projectors, multi-camera rigs, etc.), the ALEXA Mini LF has a new BNC connector for Genlock (black burst and tri-level sync) called SYNC IN.
New features that the Mini LF has that the MINI Doesn’t
- New dedicated, regulated 12V and 24V accessory power outputs
- New SYNC IN and improved audio connectors
- 6 user buttons on the camera’s left-hand side
- One LOCK button each for the camera and viewfinder
- Additional external WiFi antenna
- Easier access for media, VF and TC connections
- Headphone jack on the viewfinder
- Internal scratch microphones
It’s been five years since the original Alexa Mini was introduced
On 24 February 2015 Arri announced the original ALEXA MINI. It had the same sensor as the other Alexa cameras but was a shrunken down version of the larger ALEXAs that was meant to be for drones, gimbals and crane use. Little did ARRI know at the time, that the MINI has gone on to become the most widely used of all the ALEXA cameras. The MINI features in-camera recording to CFast 2.0 cards, the ability to record up to 200 FPS and 4K UHD in-camera upscaling. It can also shoot at various resolutions, and in 4:3 and Open Gate.
Build Quality
As you would expect, the build quality of the ALEXA MINI LF is first class. When you pick up an ARRI camera there isn’t any plastic, there aren’t any flimsy parts, there aren’t dials and buttons that feel like they may break.
There is nothing in particular that stands out, and that is a good thing. ARRI is more interested in functionality and reliability than they are in style. You won’t see any skulls or Eject switches on the Mini LF ;).
ARRI cameras are designed to be as robust as possible. The entire ALEXA Mini LF is spray and dust-proof.
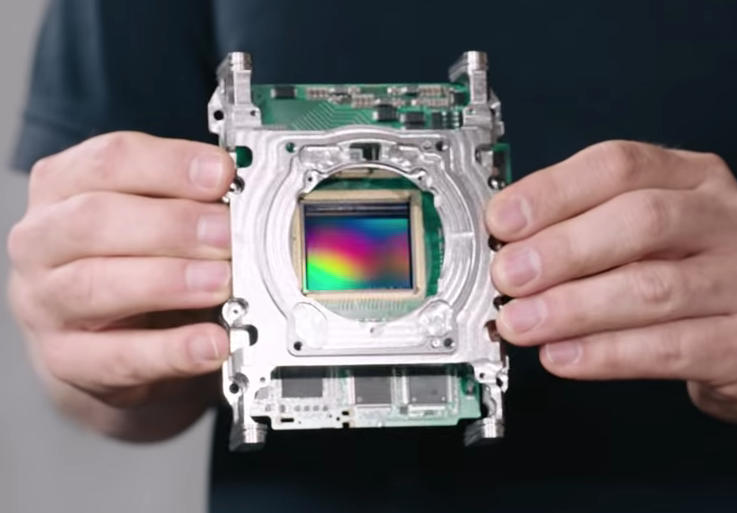
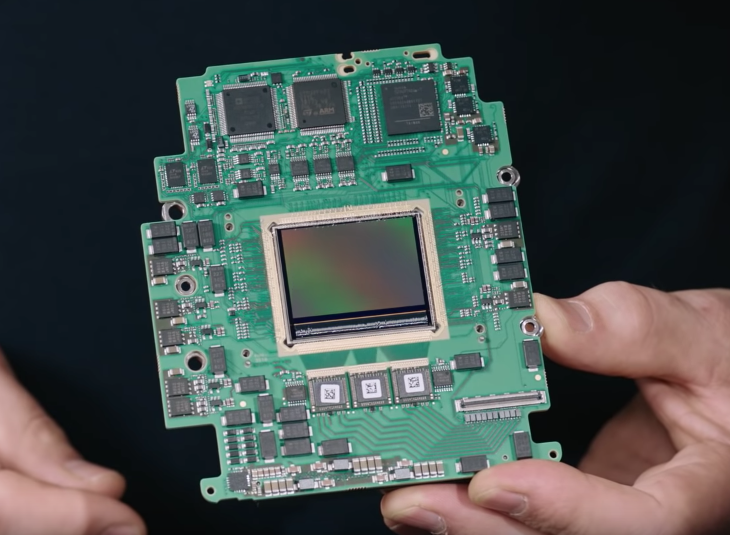
The electronic boards are made by third party suppliers to ARRI’s specs under very tight quality control. The sensor bonding (the high-tech and tricky marrying of the sensor to the sensor board) is actually done in-house in a super clean room. This allows ARRI to also repair sensors in-house and to deal with any sensor related manufacturing issues in-house.
The camera assembly is a modern process done in house. ARRI has designed its assembly process to be very flexible, so the same people can build the ALEXA Mini LF, ALEXA LF, AMIRA or ALEXA Mini cameras. That way ARRI can quickly react to changes in customer demand.
ARRI has just moved into a new, modern building and they now have their very own, Amazon-style automated robotic parts warehouse.
ARRI cameras undergo an extensive testing and burn-in phase, that includes frequent image quality and camera functioning checks including a “shake and bake”, where the camera is put in different temperature environments and is shaken by an industrial shaker. What ARRI is doing here, is essentially simulating one week of rough use on the set. ARRI has learned that most things that fail tend to fail in that first week, so they simulate it to catch these things before a customer has an issue on set.
To my knowledge, no other camera company does this.
Design
Like so many of today’s digital cinema cameras, the Mini LF is a square box. I have a love/hate relationship with this type of camera design. I love how you can break the camera down and just use it in a small configuration, but I hate how you have to build it up to the point where it increases in size and weight immensely if you want to shoulder mount it.
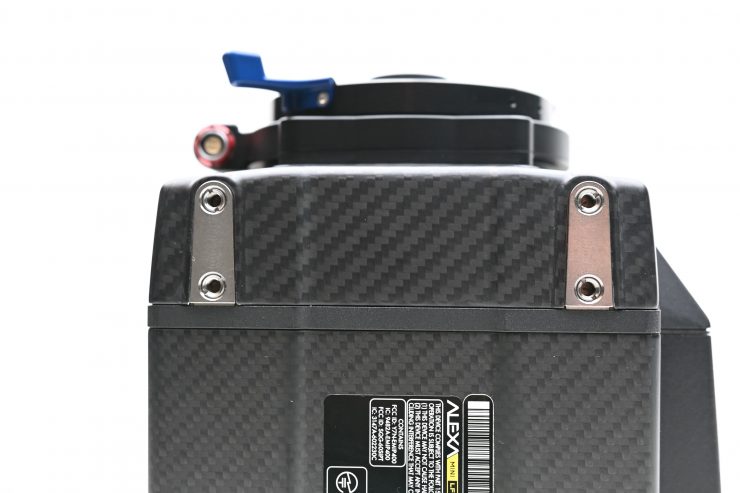
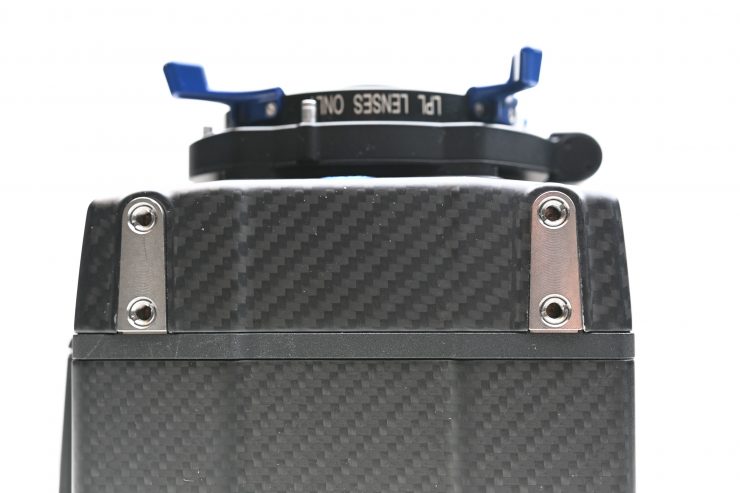
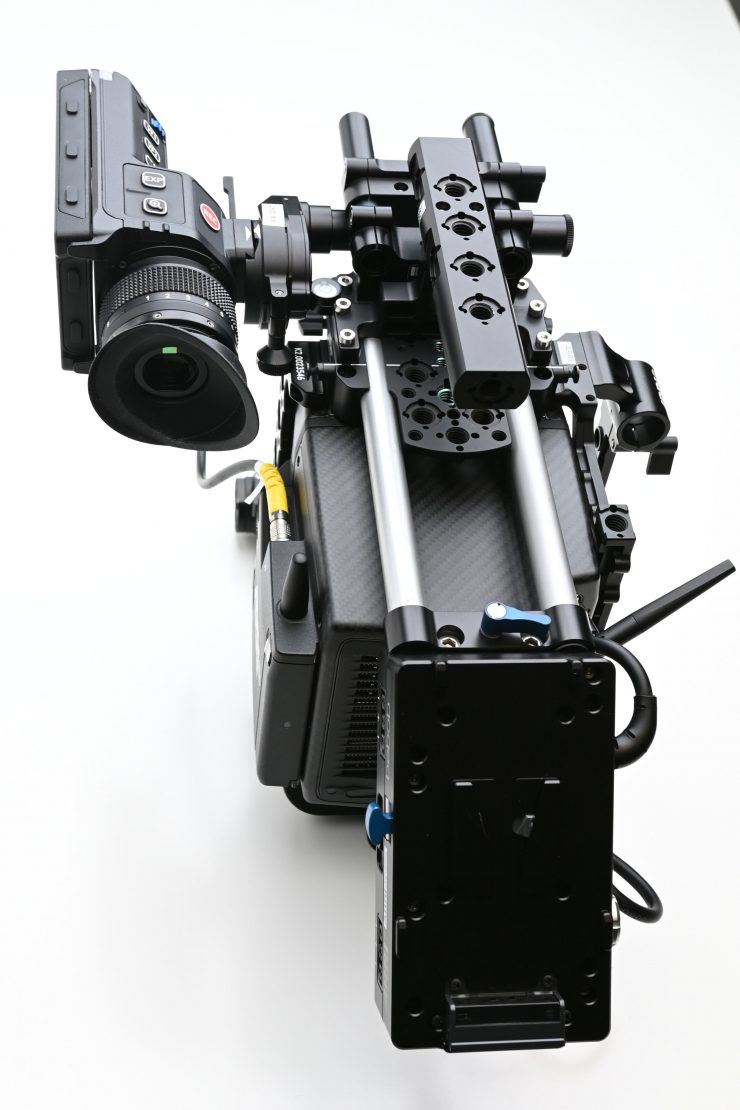
As you can see, the Mini LF only has a few small mounting holes on the top and bottom of the camera body. It is here that all of the building blocks for attaching accessories begins.
ARRI really has done a great job of making accessories for their cameras. It is amazing to think that there are only a few mounting points on the body, yet you can build up whole systems depending on what you are doing.

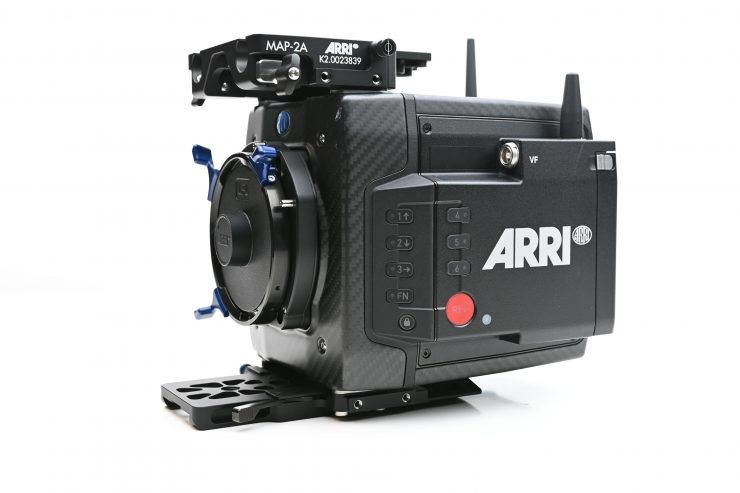
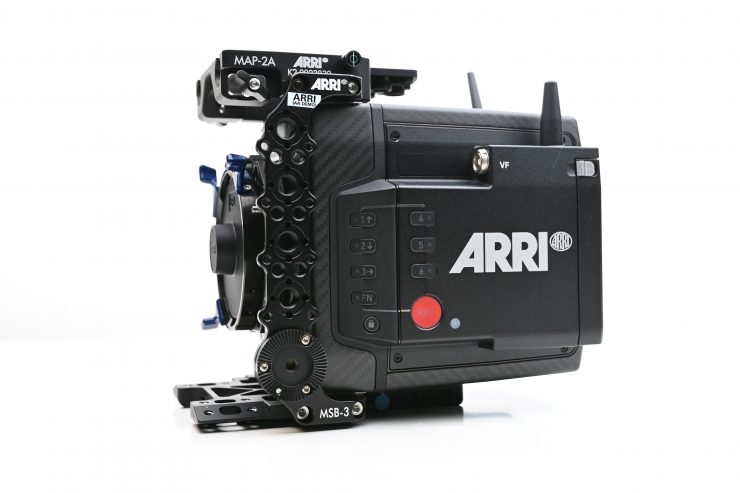
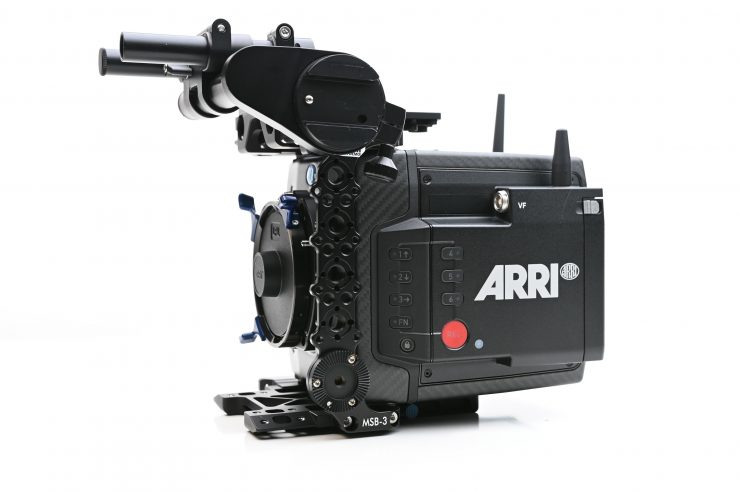
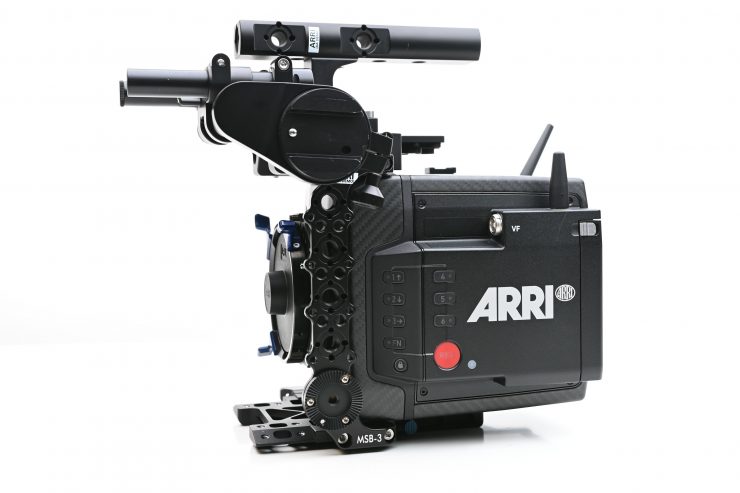
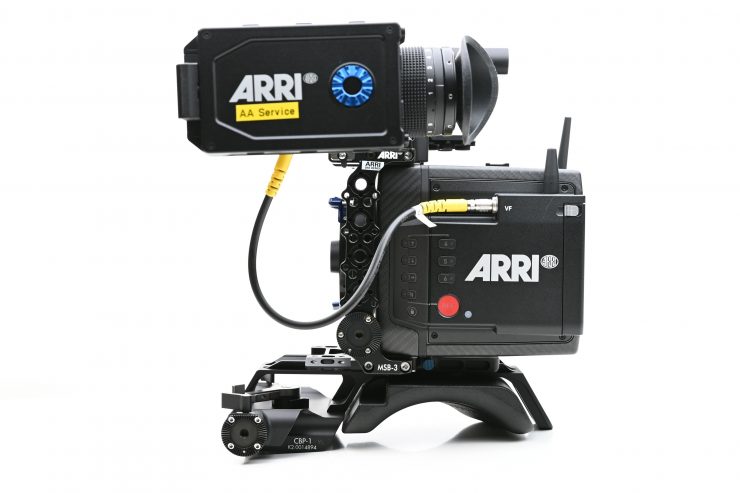
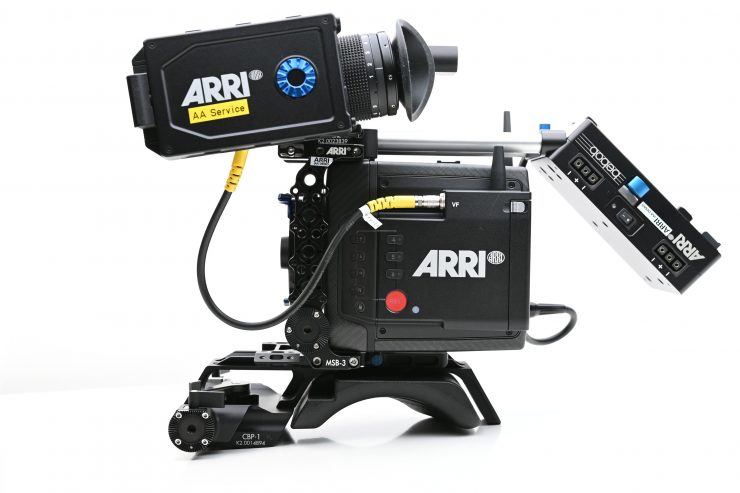
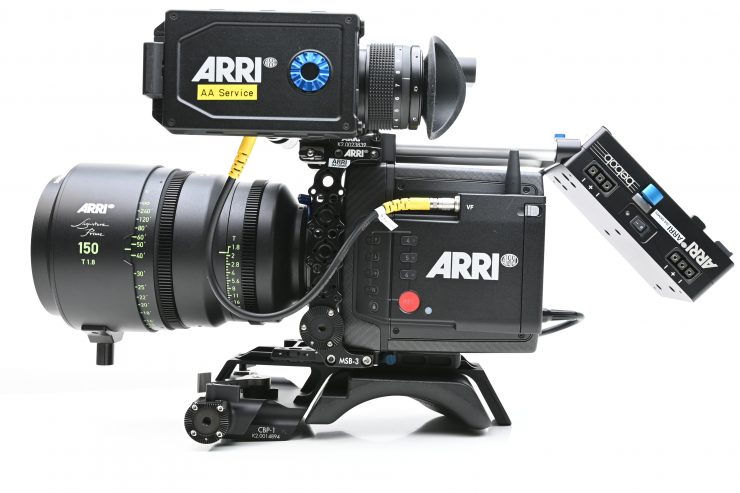
Above you can see a photo gallery showing the base camera being built up into a workable system.
Once you have constructed everything you don’t need any tools to make adjustments.
If you are going to shoulder mount the Mini LF you need a lot of additional accessories to make that work. I would highly recommend the OCU-1 or the Mastergrips if you plan on using this camera in any type of one-man band scenario where you need to do your own focus, camera control, etc.
Given this camera is being targeted as a high-end digital cinema camera, it makes sense that it is in this form factor. Just look at 1917 for example, the Mini LF allowed Deakins to configure the camera so that it could be used in small spaces and also placed on large techno cranes. It is this type of versatility that cinematographers want.
Even though the camera wasn’t designed for solo operators, ARRI has made a lot of accessories that do make it easy to use it for that exact purpose (except when it comes to audio).
LF Sensor
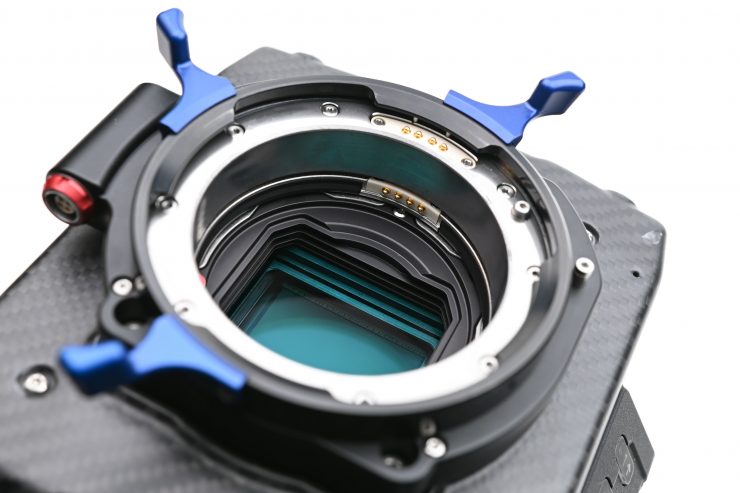
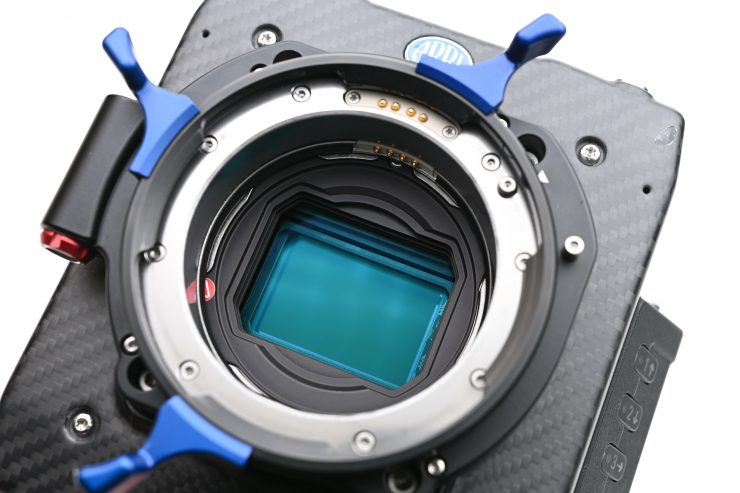

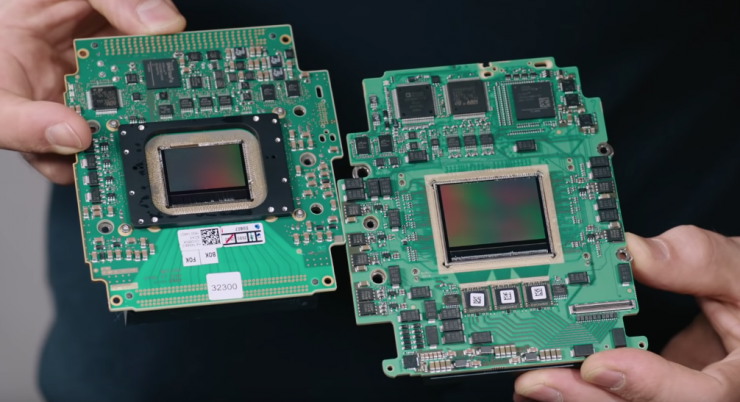
The ALEXA Mini LF uses the same identical sensor that is found in the ALEXA LF. This is a 36.7mm x 25.54mm sensor that is slightly larger than full frame. It has a 2x larger sensor area than the ALEXA SXT, and the ALEXA 65 has a 2x larger sensor area than the ALEXA Mini LF.
The ALEXA LF and ALEXA Mini LF have the biggest sensor area of any cinema camera on the market, second only to ARRI Rental’s ALEXA 65.
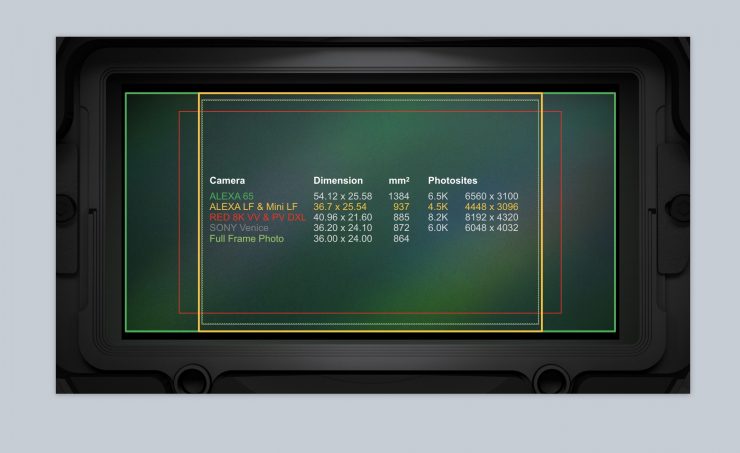
To put the sensor size in perspective, the Sony VENICE uses a 36.2 x 24.1mm sensor. The MONSTRO 8K VV sensor that can be found in the RED WEAPON and Panavision Millennium DXL2 use a 40.96mm x 21.60mm sized sensor, and ARRI’s own ALEXA 65 has a whopping 54.12mm x 25.58mm (active image area) sensor.
The ALEXA Mini LF’s A2X sensor isn’t really new per se, it’s based on two vertical ALEV-III sensors, which are stitched together to create a seamless large format image. This is the same principle of how they created the ALEXA 65, which uses three ALEXA sensors that are arranged vertically.
ARRI does this by placing two Super 35 sensor structures side by side onto a silicon wafer. This process is, somewhat misleadingly, called “stitching”. As is common with stitched large format sensors in our industry, in rare situations it is possible to notice the boundary between the left and right image halves. In saying that, I haven’t encountered any shot or situation where I have been able to see any boundary.
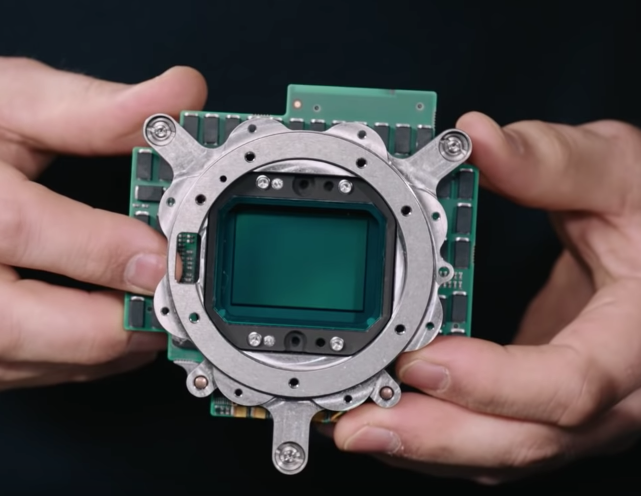
ARRI had to work very hard to not only fit the LF sensor into a smaller body but to also work out how to solve the associated heat problems.
It’s no surprise that the Mini LF shares the same sensor as the Alexa LF. The ALEV-III sensor is now more than 10 years old, and I have a feeling that ARRI got it so right back then that they haven’t been able to improve on it.
In a lot of ways the original ALEXA and its sensor were a make or break moment for ARRI. If they hadn’t of gotten it right, who knows where they would be today. The fact that a sensor that is more than 10 years old and it is still considered by many to be the best on the market is testament to just how right they did get it back in 2009. ALEXA cameras have now been on sale for 10 years. I don’t think you would be able to find any modern-day camera that is utilizing the same senor, or variation of that sensor 10 years later.
This is just the second camera (if you don’t count the ALEXA 65) that ARRI has released with a sensor that is capable of recording 4K images without the need for upscaling.
Why only 4.5K?
It’s still interesting to note, that in 2020, ARRI’s flagship camera (I’m not counting the ALEXA 65 because it is rental only) is only using a slightly larger than
ARRI has never been about more pixels, they have always strived for better pixels. The only reason I can think of is that ARRI believes that 4K is enough for the foreseeable future is that if you need higher resolutions they already have the ALEXA 65. Plus it’s still the camera with the most useable dynamic range, which can’t yet be conquered with smaller photosites 😉
You might have also heard that ARRI is making an S35 4K camera. In order to implement additional ALEXA Mini LF features and to deliver software updates for their existing customers, the launch of the S35 4K camera will not take place in 2020, as originally announced.
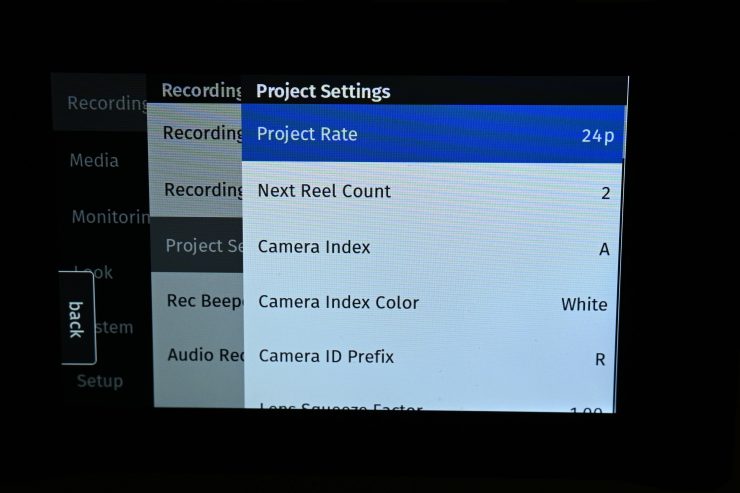
Three Sensor modes

Just like the Sony VENICE’s aspect ratio-agnostic sensor, the ALEXA Mini LF has the ability to be used in three different sensor modes. All features, resolutions and frame rates were available at launch.
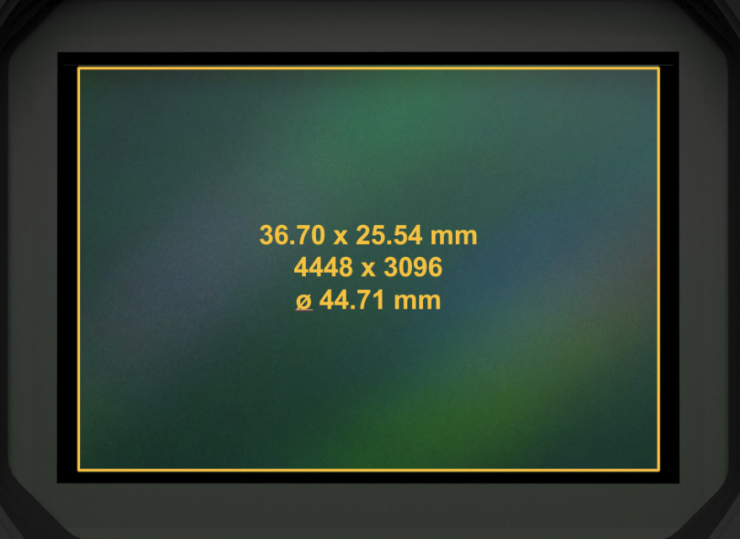
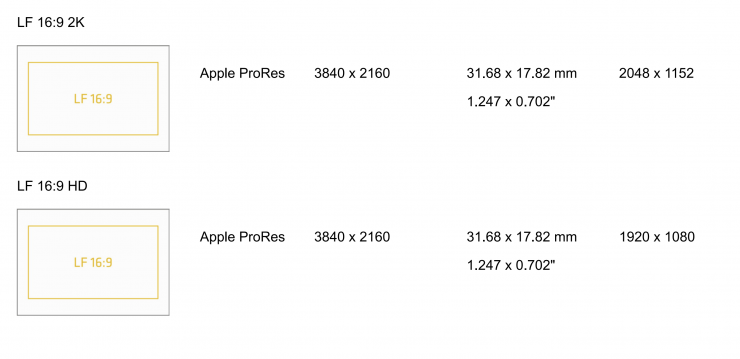
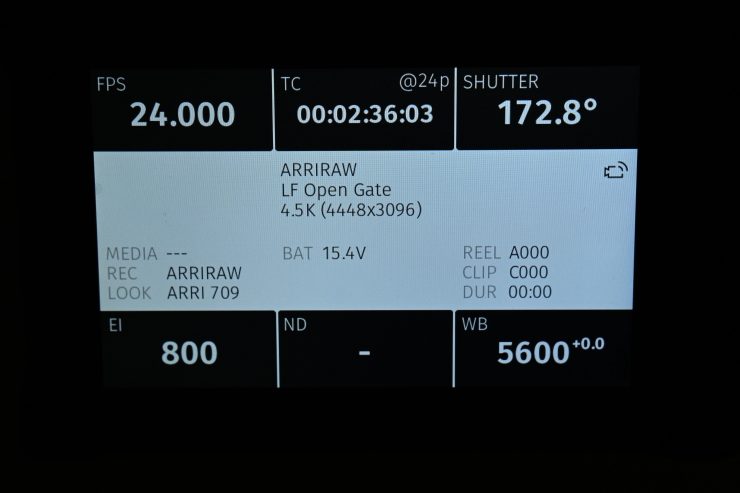
- LF Open Gate – 36.70 x 25.54 mm with (4448 x 3096) @ 44.71mm image circle. Delivers the ALEXA family’s optimal pixel size for highest overall image quality results in a 4448 x 3096 picture
- LF 16:9 – 31.68 x 1782 mm with (3840 x 2160) @ 36.35mm image circle Maximises lens options while meeting 4K deliverable standards. Max 60fps. A 20mm Ultra prime will cover as an example. Also available as internal downscale to HD at 90fps
- LF 2.39:1 – 36.70 x 15.31 mm with (4448 x 1856 photo sites) @ 39.76 mm image circle. Combines a cinematic widescreen image with high frame rates up to 60fps.
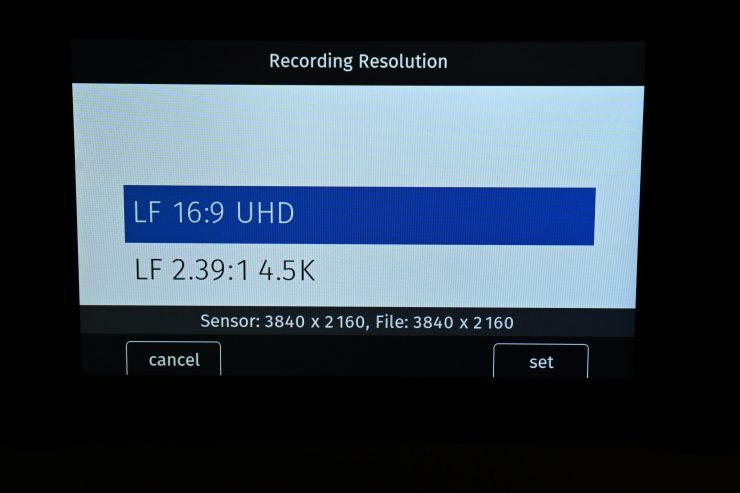
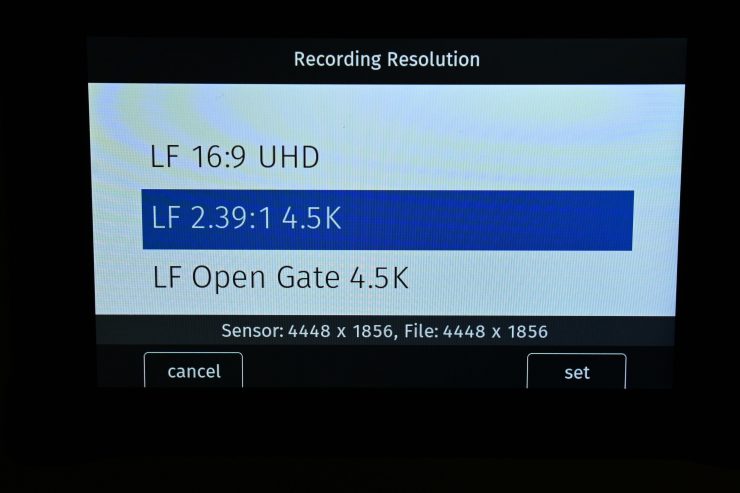
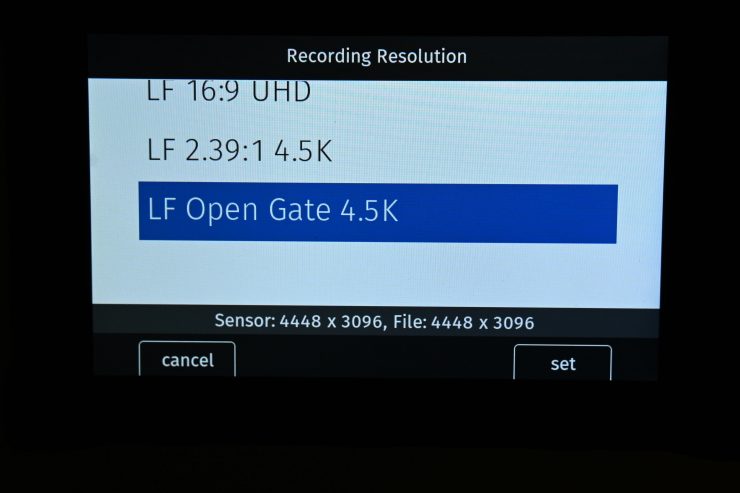
What is nice is that when you are selecting the recording mode in the menu it tells you exactly how much of the sensor it is using and what the recording file will be. This may be a small detail, but details are important.
All sensor modes offer true 800 ASA sensitivity, as well as reduced noise. The EI values are between 160-3200.
ARRI knows that its customers also want Super 35 recording formats cropped from the LF frame. ARRI has said that they will add a set of Super 35 recording formats with a future Software Update Package. As always, with ARRI cameras, these SUP updates are always free of charge.
At the moment the recording modes, while great, are quite limiting. I would like to see some more modes added in the future. Who knows, maybe we will see some sort of 5K upscale mode being implemented.
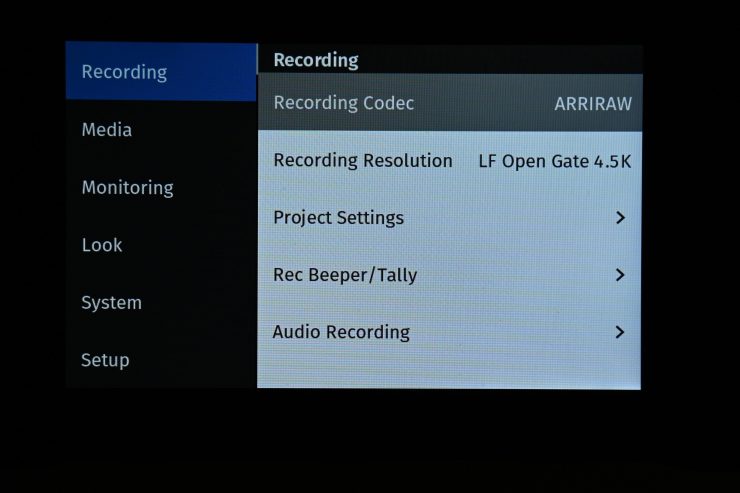
Recording Resolutions
On paper, there is nothing that jumps out at you as far as recording resolutions and frame rates are concerned. There is a huge range of much more affordable cameras out there that have far better specifications on paper. This is the problem with specifications, they rarely tell you the true story about any camera.
With ARRI, it is never about the specifications, it is about usability, reliability, image quality, and creating a whole ecosystem.
The ALEXA Mini LF offers the same proven, versatile workflows as other ALEXA cameras. Recording at various resolutions is possible in uncompressed, unencrypted ARRIRAW up to 60 fps or in fast, efficient
Apple ProRes up to 90 fps. Lens metadata can be recorded from LDS-1, LDS-2 or Cooke /i capable lenses. Existing ARRI Look Files (ALF-2) can be used with ALEXA Mini LF and the entire range of ARRI workflow software tools has been reworked to support ALEXA large-format images.
- 4.5K in LF Open Gate and LF 2.39:1
- UHD in LF 16:9
- 2K 16:9 with in-camera downscale in LF 16:9
- HD 16:9 with in-camera downscale in LF 16:9
- Provides Anamorphic de-squeeze for 1.25x, 1.3x, 1.5x, 2x lens squeeze ratios.
As far as recording resolutions go, you can record in all flavors of ProRes as well as ARRIRAW. The Mini LF can record ARRIRAW in all three sensor modes.
The Mini LF can take advantage of full-frame lenses, but you can also use some Super 35 glass if you shoot in the LF 16:9 mode which uses the smallest area of the sensor. This LF 16:9 mode is also Netflix approved.
What you have to remember is you don’t need a camera that can record 6K or 8K to produce fantastic imagery. Nobody goes to watch a movie in the cinema and complains that it wasn’t shot in 4K, 6K or 8K.
Higher Frame Rates

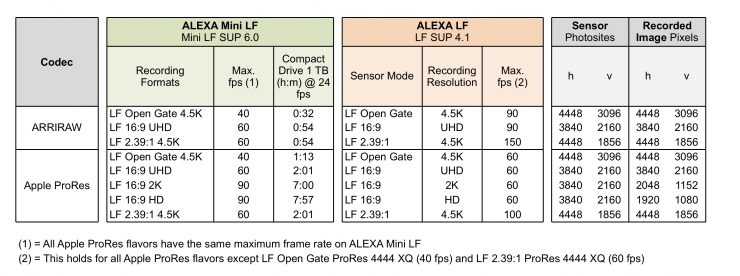
The ALEXA Mini LF is not a high-speed camera. It can’t record up to 200fps like the original ALEXA Mini. Even when shooting LF 16:9 HD or 2K you are limited to just 90fps.
The Mini LF can only record up to 90fps in LF 16:9 HD and LF 16:9 HD. Once you go to LF 16:9 UHD and LF 2.39:1 4.5K you are limited to 60fps.
In LF Open Gate 4.5K you are limited to 40fps.
LF Open Gate 4.5K up to 40fps, LF 2.39:1 4.5K up to 60fps, and LF 16:9 UHD up to 60fps can be recorded in ARRIRAW.
If you are after a full-frame digital cinema camera that can record very high frame rates then this isn’t the camera for you.
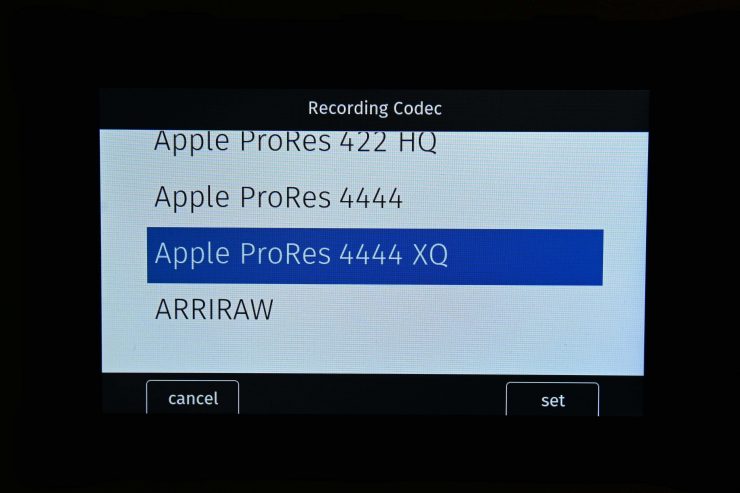
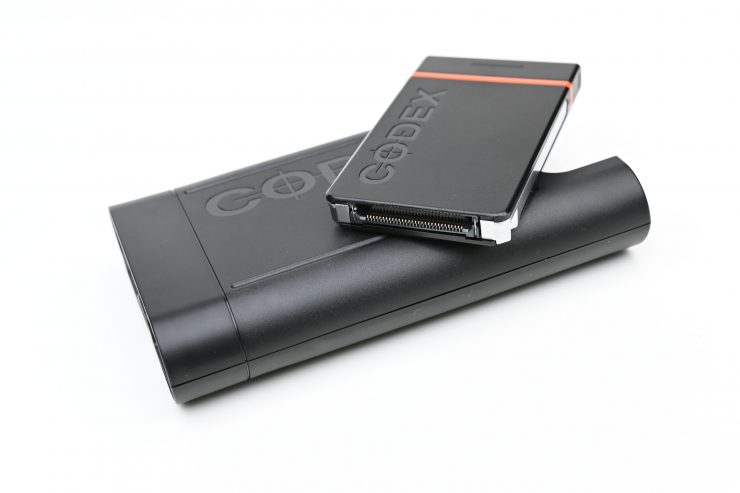
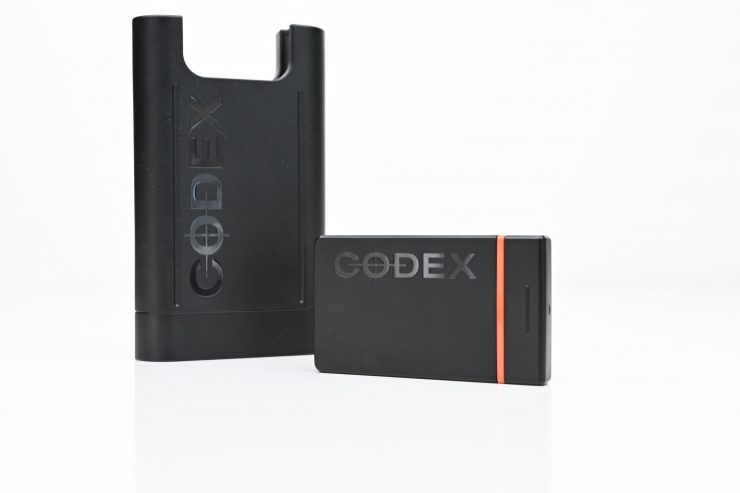
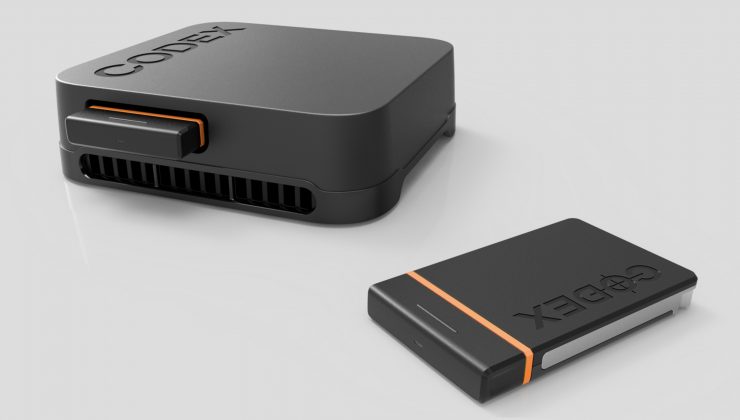
Codex Compact Drives
Unlike the ALEXA LF which uses SXR Capture Drives or SxS PRO+ Cards, the ALEXA Mini LF records to new Codex Compact Drives. The drives are formatted by the ALEXA Mini LF in the UDF format for ARRIRAW and ProRes. Therefore, both ARRIRAW and ProRes can be recorded onto the same media without reformatting or switching drives. ARRI will also use this media for future cameras. This is another aspect of ARRI cameras that I like. You can switch between RAW and ProRes or change your project base settings and you don’t need to reformat or change cards.
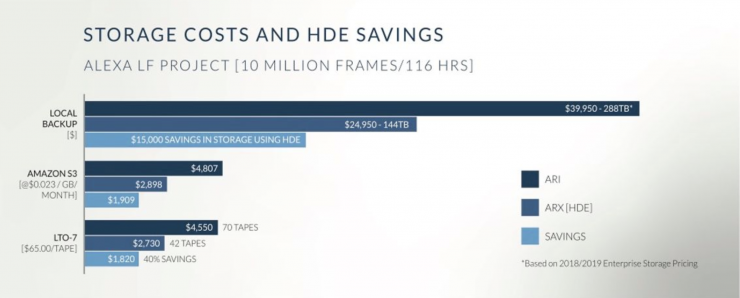
Codex High Density Encoding (HDE) uses sophisticated, loss-less encoding to reduce ARRIRAW file sizes by around 40% during downloading or later in the workflow. This lowers storage costs, shortens transfer times, and speeds up workflows, which translates to a direct 40% saving in time and money. HDE is free-of-charge for use with Codex Capture or Compact Drives, openly shared, and fast: ARRIRAW Open Gate 4.5K can be encoded at 24 fps on a modern MacBook Pro.
CFast 2.0 cards wouldn’t have been fast enough to use for some of the resolutions and frame rates that the Mini LF can record in. SXR Capture Drives were too large and require too much power.
These new drives are seen by ARRI as an upgrade to a more professional, robust recording media. The Codex Compact Drives are enclosed in a rugged aluminum housing. The drives are well made and feel a lot more robust than most other media.
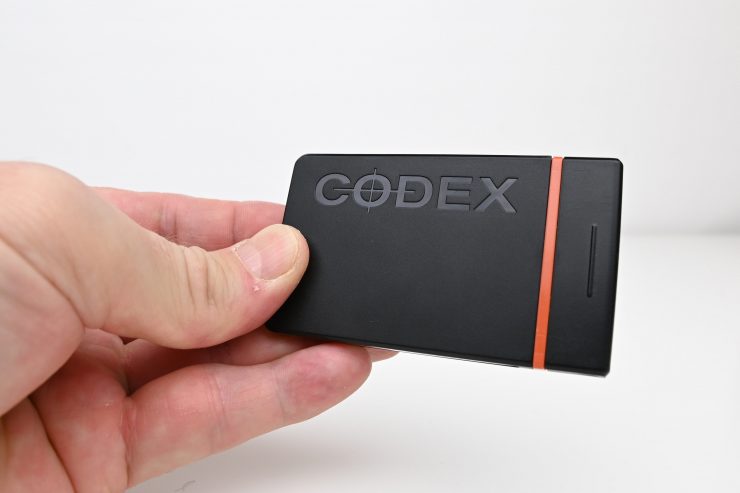
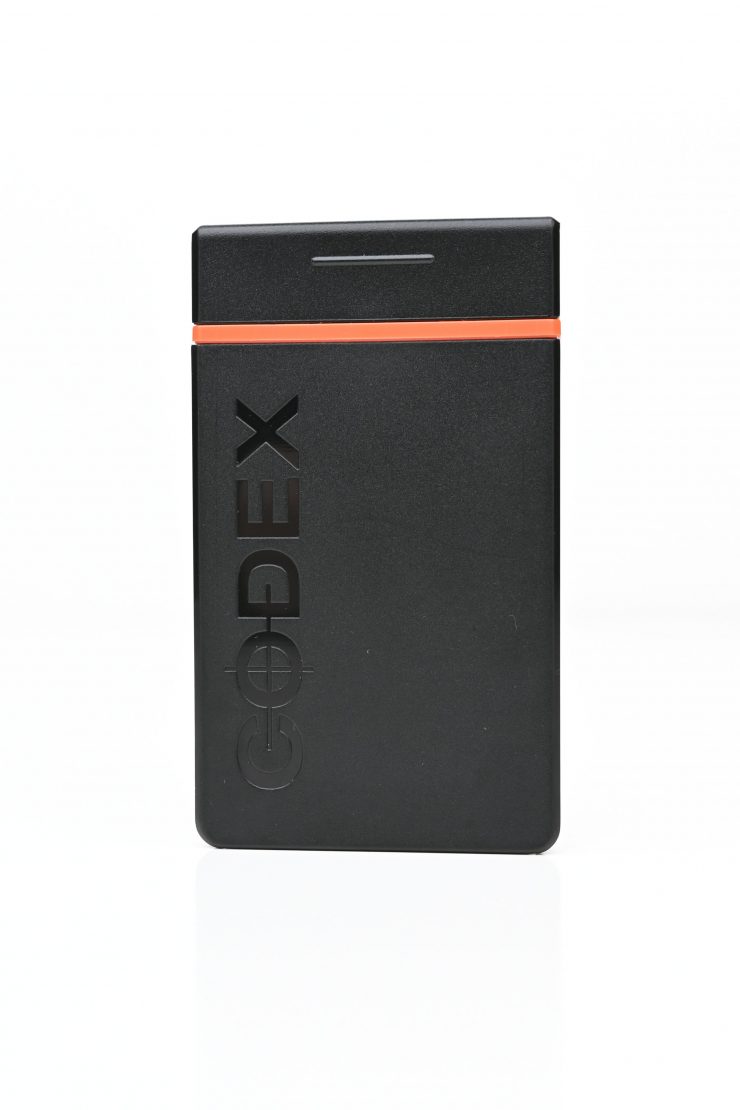
The Codex Compact Drives were only available in 1TB sizes at launch. In fact, they are still only available in sizes of 1TB. It would be nice to see some larger sized drives in the future.
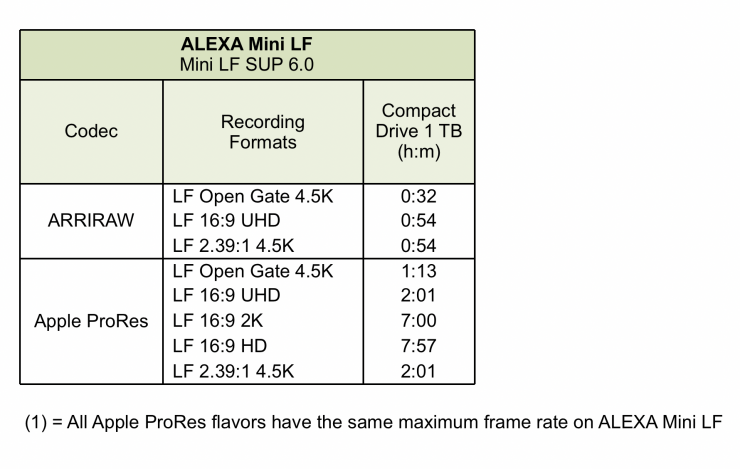
The drives have transfer speeds of 8Gbps and a 1TB Drive can capture approx. 32 minutes of 4.5K ARRIRAW in LF Open Gate and LF 2.39:1. They are expensive. A 1TB Codex Compact Drive costs $2,380 USD. If you want to record 3 hours of 4.5K ARRIRAW in LF Open Gate without having to back up any cards, you have to spend a whopping $13,440 USD on media.
In saying that, a 512GB CFast 2.0 for my AMIRA cost more than a $1,000 USD a few years ago. The Angelbird 256GB cards that are certified for the Mini and AMIRA are $610 USD each, so the compact drives are actually cheaper per GB.
You don’t need any software or drivers to read the footage from the Codex Compact Drive Reader.
The Drive Reader does make quite a lot of noise, especially when you are reading from a card.
There are two options for downloading data from the Compact Drive
- The new Compact Drive Reader (USB-C) is an affordable reader that works with MacOS or Windows without extra software or licenses. Use your preferred data management application to copy data from the drives. To add HDE capability, use the free-of-charge and license-free Codex Device Manager software. The Compact Drive Reader offers download speeds of up to 8 Gb/s. The Compact Drive Reader uses the USB 3.1 Gen 2 interface (backwards compatible) and is powered via the USB-C connector.
- For MacOS users, the new Compact Drive Adapter accepts the Compact Drive and fits in all SXR Capture Drive Docks (Thunderbolt 2 or 3). The Compact Drive Adapter maximizes download speed for Compact Drives up to 15 Gb/s. The host computer must have the free-of-charge Codex Device Manager software installed, which will also provide HDE capabilities.
Just to clarify, the Codex software just works in the background, you still use your normal offload software to copy footage off with HDE, you don’t have to use Codex offload software.
The Codex Reader is very fast and I was able to copy 130GB of material from the card to my hard drive in under 90 seconds. With that speed, I could copy an entire 1TB card in under 12 minutes.
ARRI will be coming out with a faster version of the Compact Drive Reader this year. The new one will be called “Compact Drive Dock” and it will interface through Thunderbolt 3.
Why does the Mini LF record MXF/Apple ProRes instead of QuickTime/Apple ProRes?
ARRI is switching all recording formats to the MXF (Material eXchange Format) container because MXF is an open standard that is widely supported and allows for more flexible access to metadata. Using the same container also allows ARRI to record ARRIRAW and Apple ProRes to the same drive without reformatting.
Apple is supporting MXF/Apple ProRes and they have published the “SMPTE RDD 44: Mapping of ProRes into MXF”. ARRI cameras that currently support QuickTime/Apple ProRes will continue to use QuickTime.
Apple already has an MXF plug-in available for MacOS X 10.14.3 or later that you can download as part of Apple’s “Pro Video Formats 2.1”. This allows the MacOS QuickTime Player, FCPX, Motion, Compressor, VLC and ARRI Color Tool to play MXF/Apple ProRes, with many more in the works. On Windows machines you can currently use the ARRI Color Tool or VLC, with other programs in preparation.
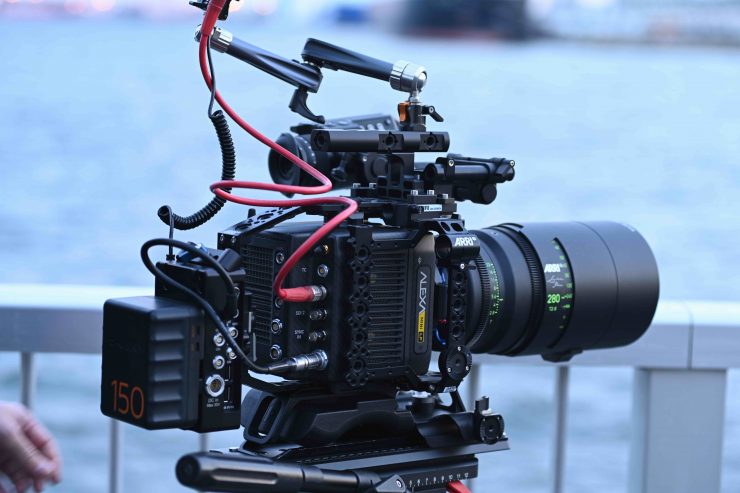
Power Draw
The ALEXA Mini LF has a voltage input range from 11 V to 34 V. Therefore, it can be easily powered by any 14.4 V on-board battery as well as by 24 V on-board batteries.
The ALEXA Mini LF has a power draw slightly higher than the ALEXA Mini. In order to process the increased pixel count while still maintaining ALEXA image quality, the ALEXA Mini LF draws between 69 W and 89 W while recording, with the MVF-2 connected, but no further accessories attached. 69 W has been measured while recording MXF/ARRIRAW in recording resolution LF 16:9 UHD at 24 fps. 89 W has been measured while recording MXF/Apple ProRes in recording resolution LF 16:9 2K at 90 fps. Electronic accessories will increase power draw based on the accessories’ draw.
The Mini LF uses quite a lot of power and you need to factor this in when shooting so you know how many batteries you need. As an AMIRA owner, I found that I was carrying around the same amount of batteries I usually do to use with the Mini LF.
In a nice touch, if the power supply is interrupted with the camera switched on, the camera will automatically repower and boot-up on reconnection.
I’ thought it would be nice if there was some sort of small clip-on mini v-lock plate that could attach directly to the camera for those times when you need to go super small. As soon as you add a V-lock or AB Gold mount plate to the camera it greatly increases its length. Well, apparently there is.
ARRI has a battery mounting plate that can attach to the camera left side, for those cases where you need the whole set up to be small and compact and where on-axis symmetry is not important (as it is on so many rigs these days). This plate is called the “Battery Adapter Plate BAP-2A”. It also has proper attachment points for Bebob micro battery adapters.
In saying that, the ARRI/bebob v-lock mount battery power supply and RAB-1 bracket let you better achieve camera balance when you are shooting on the shoulder.
The design of the RAB-1 bracket and the quick release bracket means you can quickly remove the battery and battery plate. This is one of the best-designed systems I have seen.
If you don’t want to use the RAB-1 bracket, you can also run rods out the back and attach the v-lock plate/power supply that way.
Internal ND Filters
The Mini LF has three internal motorized large-format FSND filters. It must have been a very difficult design challenge for ARRI to try and fit these large-format ND filters into the small body of the Mini LF. Here are the filters the Mini LF has:
- 0.6
- 1.2
- 1.8
The FSND filters work really well and it is easy to activate them. I had them set up on User Buttons 1 and 2.
It would have been nice to see even stronger internal ND implemented into the camera. 1.8 is not enough on a large sensor if you are shooting in bright conditions and you want a very shallow depth of field. I constantly found myself having to add additional ND.
What I didn’t know, is that every Mini LF ships with a free of charge 4×5.65 FSND 0.3 that matches with the internal filters and allows you to get to every stop from 0.3 to 2.1 with one external filter.
What is nice about the ARRI FSND filters is that they use the exact same glass as the internal filters, so you won’t get any color shifts. I don’t know of any other camera company that has its own ND filters that were made to specifically match the internal ND.
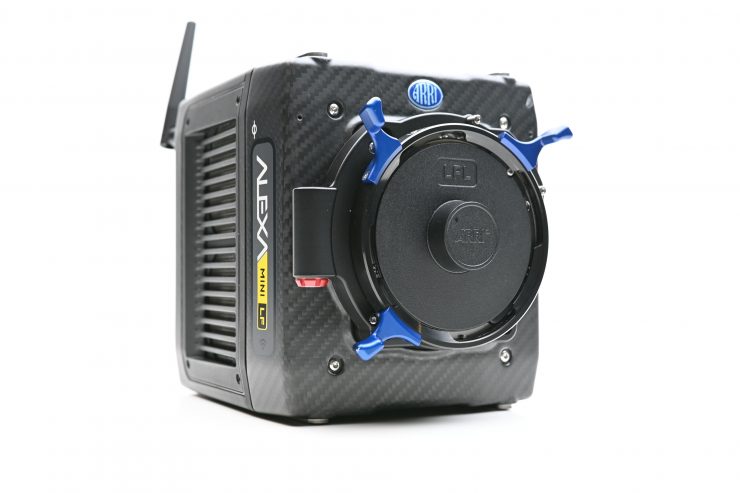
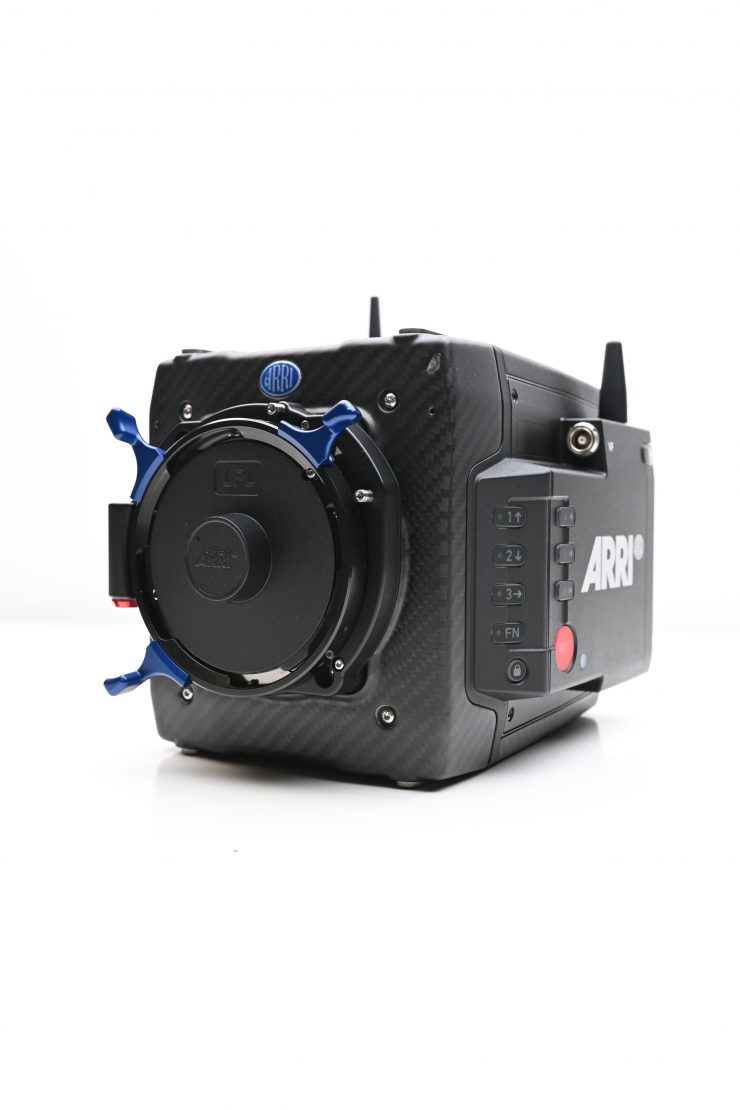
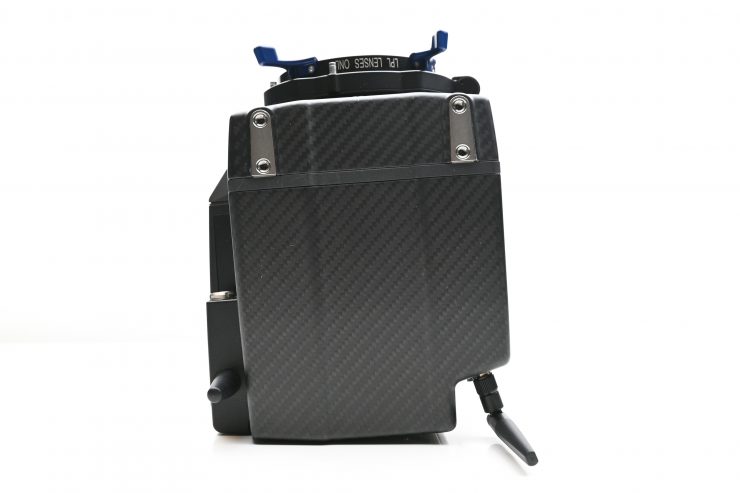
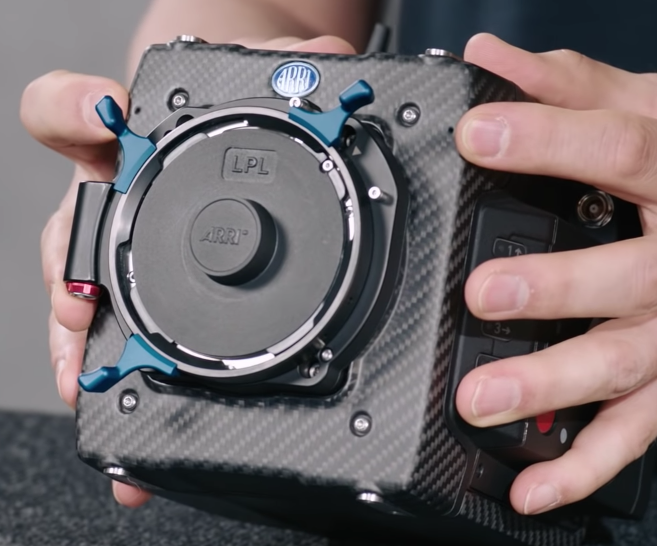
LPL Mount
Just like the ALEXA LF, the ALEXA Mini LF comes with
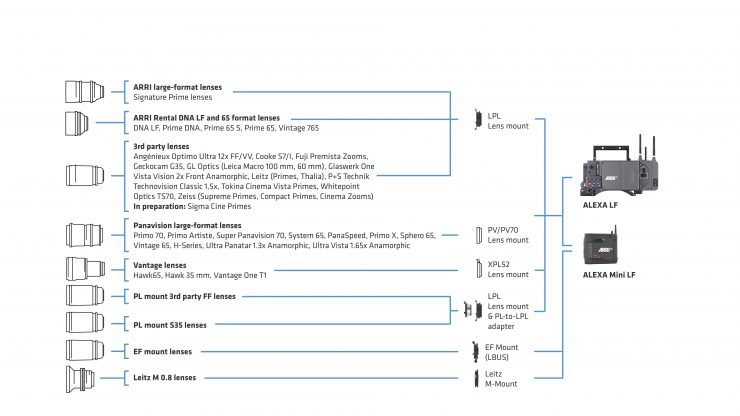
Above you can see what lenses and what lens mounts can be used with the ALEXA Mini LF and ALEXA LF.
PL-to-LPL Adapter
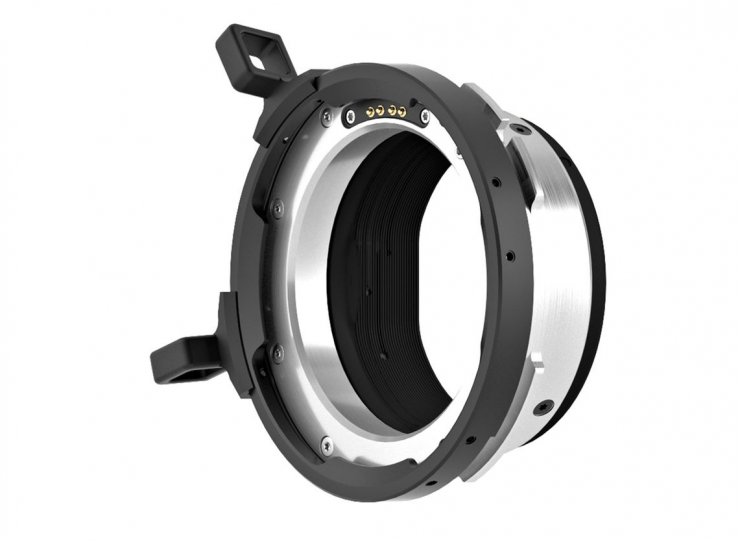
The ALEXA Mini LF doesn’t ship with a PL-to-LPL Adapter, it is an optional extra, but you can purchase it as part of an ALEXI Mini LF package. The adapter features black earlobes, while the LPL mount includes blue earlobes. You can set the mount and adapter to 12:00 or 3:00 to accommodate either LDS or /i lens data. The adapter passes LDS protocol and is LDS-2 compatible.
Interestingly enough, 85% of mini LFs (100% in Australia) are sold as Ready To Shoot sets which include the adapter.
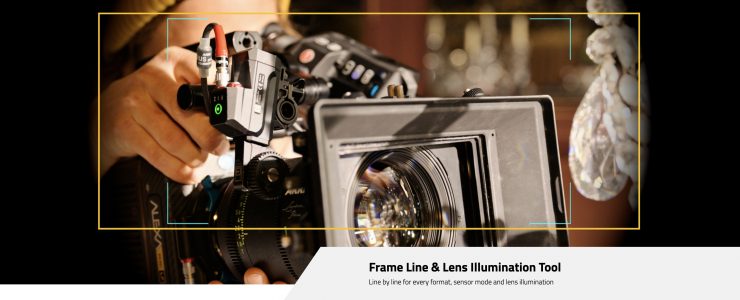
The best way to see if any of your existing lenses will work on the Mini LF is to use the Frame Line & lens Illumination Tool.
The three most common uses of Super 35 PL lenses on the ALEXA Mini LF are:
- Using an image expander.
- Cropping the Super 35 area in post.
- Using the large illumination circle of Ultra Primes, Master Primes or Ultra Wide Zoom (UWZ).
As there aren’t currently any Super 35 shooting modes you need to either use an image expander when working with a lot of S35 glass, or you need to crop in post. Because of the large size of the sensor, even to shoot UHD 3840 x 2160, your lens still needs to cover a 36.35mm image circle.
As a test, I put an Angenieux Optimo Style 16-40mm T2.8 lens that only covers a 31.4 mm image circle onto the camera. Even in the MINI LF’s UHD mode, as expected, I got serious vignetting.
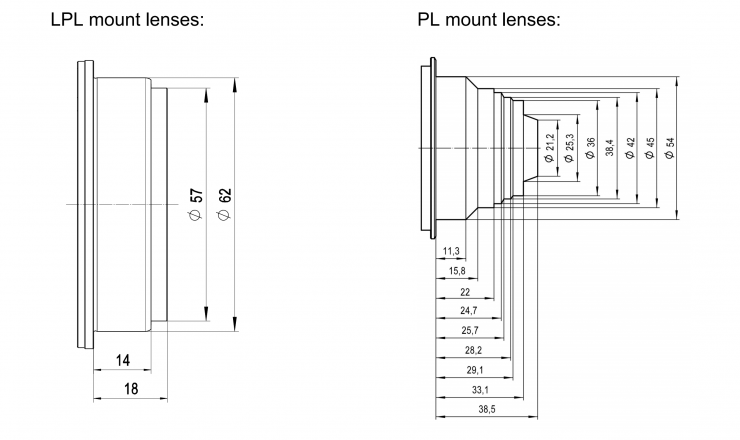
To avoid damage or injury when using LPL mount lenses or PL mount lenses (with PL adapter on LPL mount), ARRI recommends that you only use lenses that do not exceed the following dimensions:
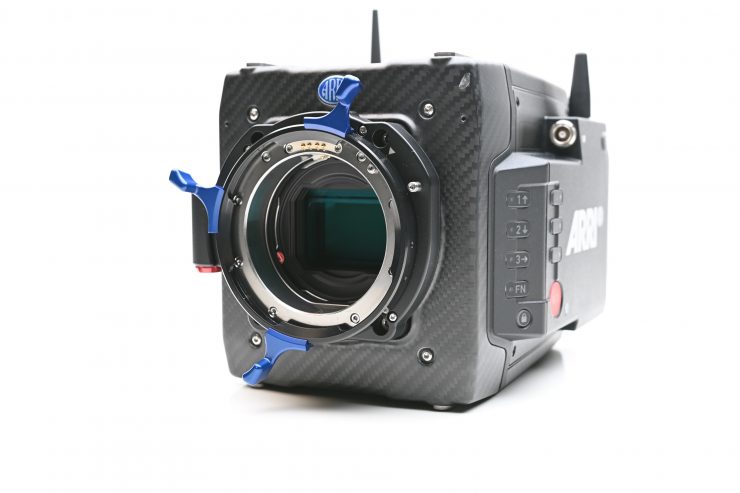
Changing the lens mount
The ALEXA Mini LF is equipped with a universal lens mount base that uses the same camera to lens mount interface as used on the ALEXA Mini and AMIRA, so all lens mounts that fit on ALEXA Mini and AMIRA will physically also fit on the ALEXA Mini LF. However, since most of those lens mounts have been designed for a Super 35 sensor, they will show vignetting in a larger format.
Required Tools and Precautions
- 3.0 mm Allen key
- Camera switched off and power source disconnected
- Lens removed and properly stored
- Make sure to protect all optical surfaces when changing a lens mount
Audio
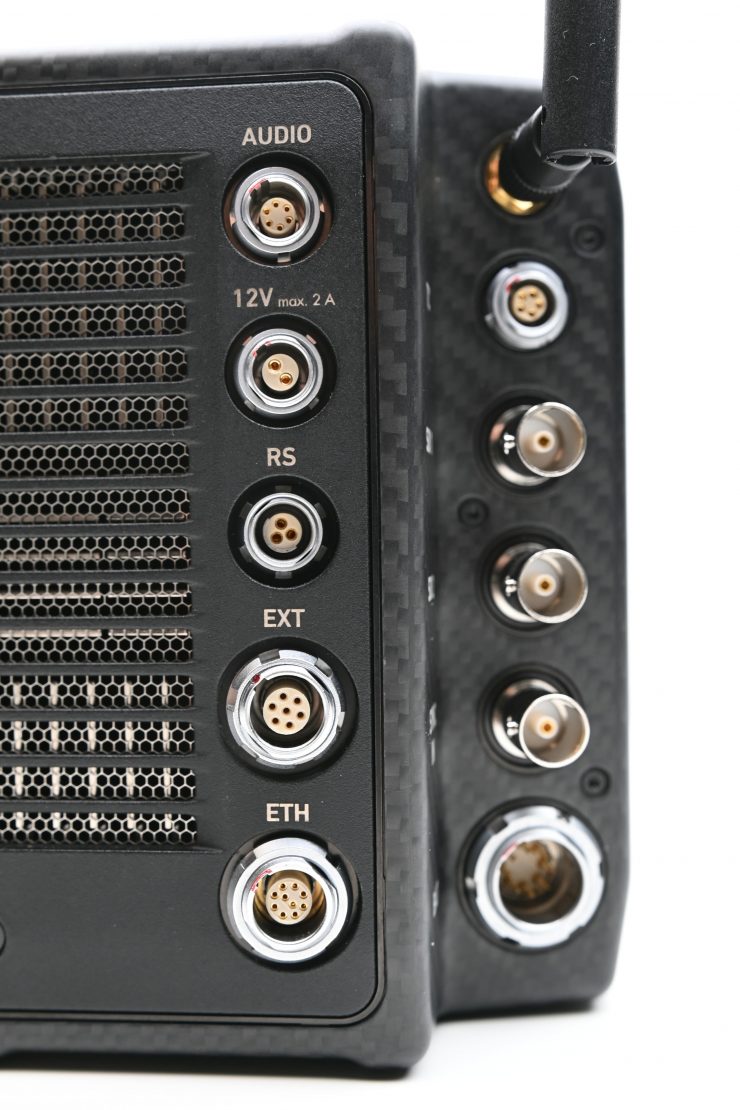
The ALEXA Mini LF, has a single 6-pin AUDIO connector. Why is this different from the Mini Audio connector on the ALEXA Mini?
The reason for this is to prevent accidentally plugging the Mini LF audio cable into the TC connector (also 5 pins) and, more importantly, the extra connector allows the Mini LF AUDIO connector to provide 12V accessory power to external pre-amplifiers or wireless audio receivers. Those accessories can now use just one cable to transport audio and power, leaving the other accessory power outputs on the camera still available for other uses.
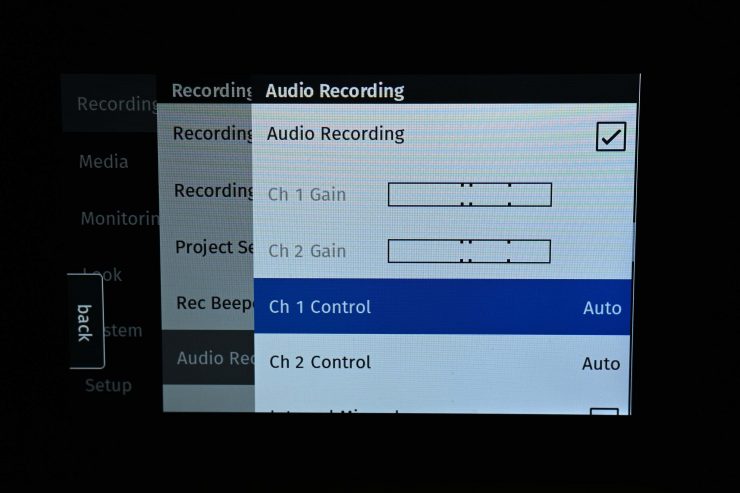
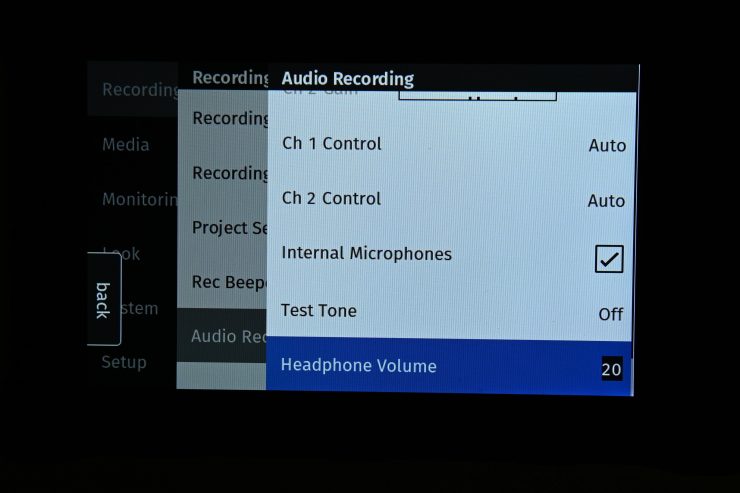
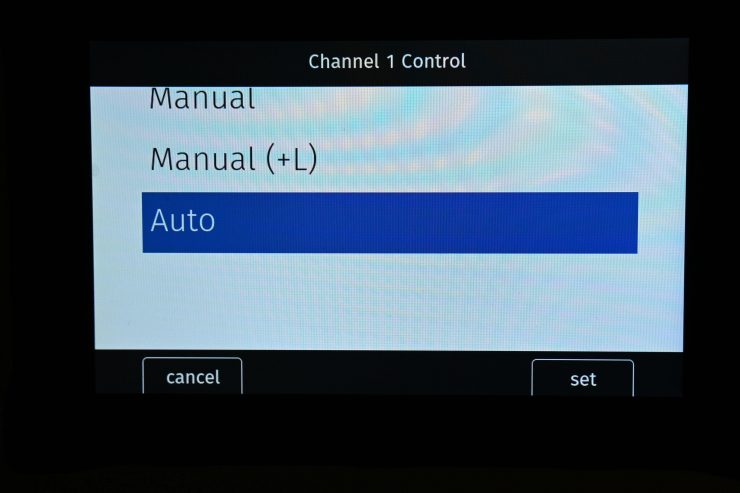
The ALEXA Mini LF can record up to four audio channels. Channels 1 and 2 are always the LINE IN from the AUDIO connector, and channels 3 and 4 are always the two internal microphones (when turned on; they are off by default). What I didn’t like is that the camera only displays two channels of audio, and those channels are 1 and 2. You can’t see channels 3 and 4. Yes, I know they are only the scratch mics, but it would be nice to see a visual reference.
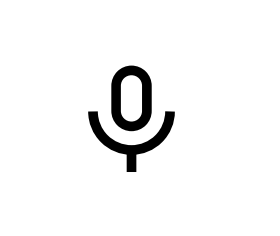
ARRI does have a little microphone icon that you will see in the viewfinder if the internal scratch microphones have been activated.
The ALEXA Mini LF isn’t the greatest camera if you need to record your own audio, but that is true of most high-end digital cinema cameras. As an AMIRA owner, it is very easy to capture your own audio in-camera. While it can still be done on the Mini LF it requires additional hardware and you need to go into the menus to make changes to audio settings.
In saying that, you can assign Audio Increase and Audio Decrease to User Buttons.
I would have liked to have seen ARRI make their own XLR audio module in the same way that companies such as RED and Kinefinity have.
Built-in Microphones
As I mentioned earlier, the ALEXA Mini LF has two built-in microphones for capturing scratch audio. It is nice to have scratch microphones built-into the camera, as the majority of users will be recording sound separately when using this camera.
The two microphones in the front are protected by Gore-Tex membranes that let sound in but protect from water ingression.
WiFi
The ALEXA Mini LF features a dedicated onboard WiFi radio which offers wireless camera remote control via the ALEXA Web Remote. It also can handle color management. There is also a new external WiFi antenna for improved range.
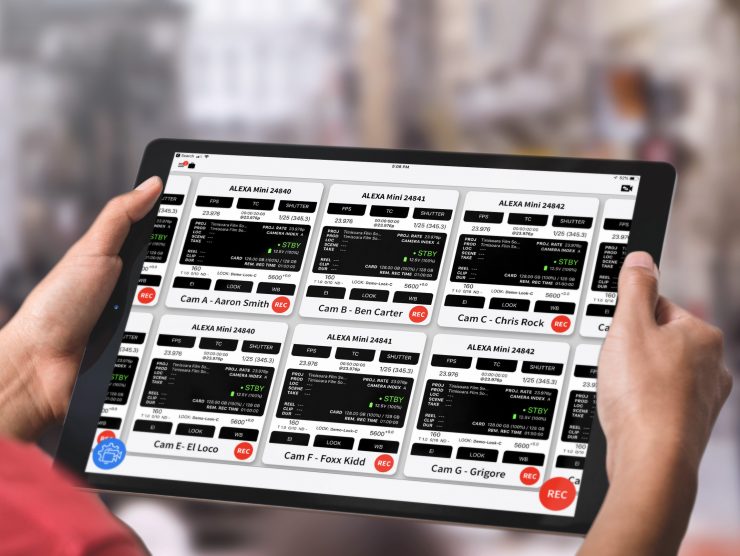
The Mini LF is compatible with ARRI’s Web Browser, Pomfort’s Pocket Control, and CineGizmo’s Camera Control Apps. I tried the Mini LF with all three of these methods and they all worked without a problem.
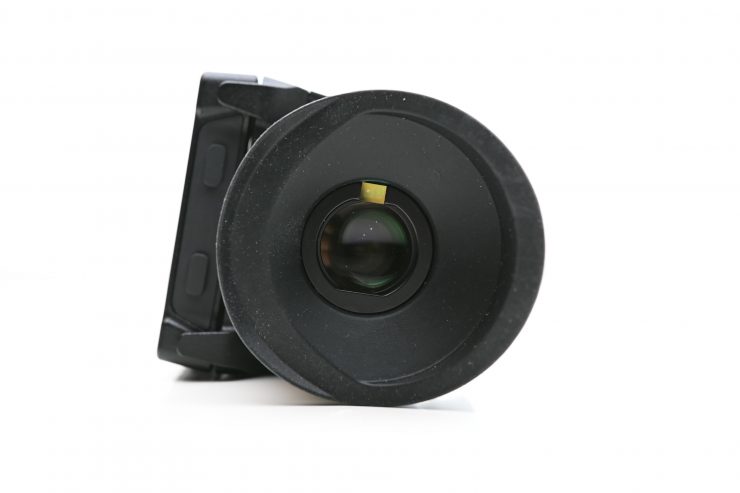
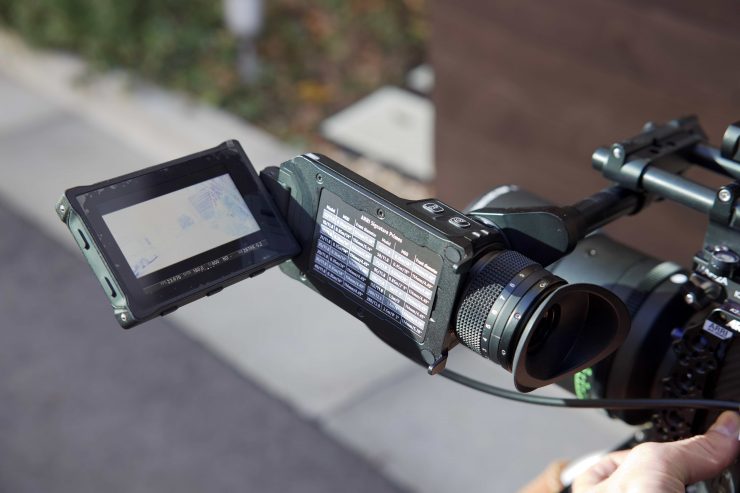
Viewfinder


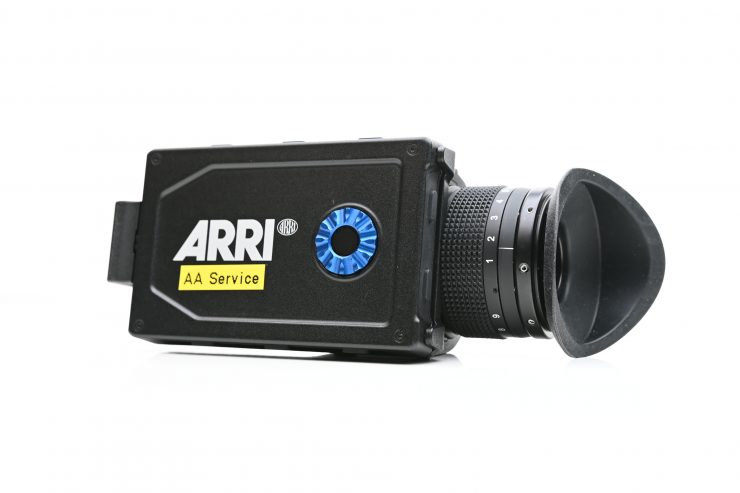
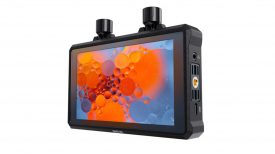
The ARRI ALEXA Mini LF uses an all-new viewfinder. The new viewfinder called the
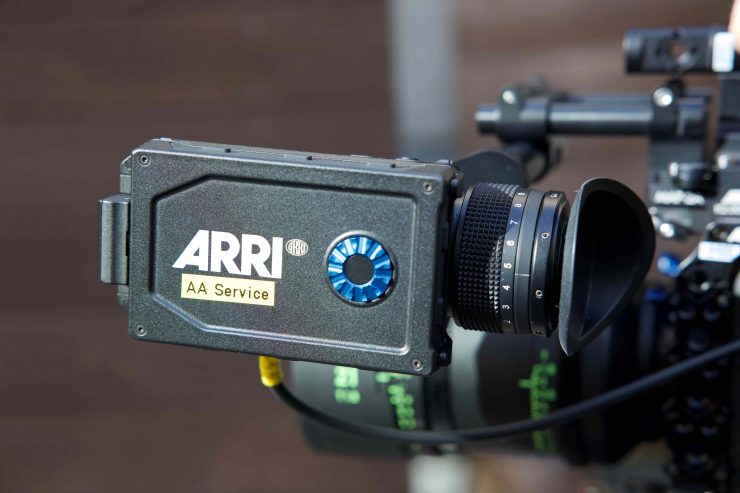
While it does look similar, it is a completely new design and a lot higher quality than the previous ALEXA Mini viewfinder. It also features a 4″ instead of a 3″ LCD screen. I found the extra inch to be a welcome addition, and in my opinion, this increase in size makes it a lot more usable.
It’s interesting to see that the connector that runs from the camera body to the MVF-2, is located on the
The eyepiece is based on the ARRICAM design and according to ARRI, it offers high contrast, low distortion, and an evenly illuminated viewing area for a clean image and a wide exit pupil for greater freedom of movement for the operator.
The eyepiece has a diopter that has a really nice range. My eyes are not so great these days and with a lot of other EVFs, I find that I already have the diopter at its maximum range.
The MVF-2 is a low latency (≤1 frame delay) electronic color viewfinder with 1920 x 1080 high contrast OLED display and 4″ IPS/LCD flip-out monitor. The image is claimed to exhibit high resolution, high contrast, low distortion, and an evenly illuminated viewing area. It includes a state-of-the-art OLED engine, which has a high screen refresh rate, plus an ARRI optical design that employs the highest quality coated glass optics. Reliable color reproduction at all temperatures is assured through the auto-calibrating, temperature controlled ARRI LED light engine.

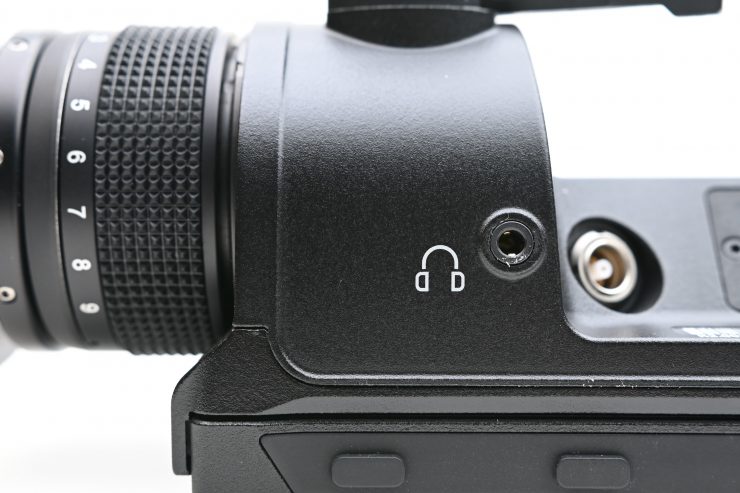

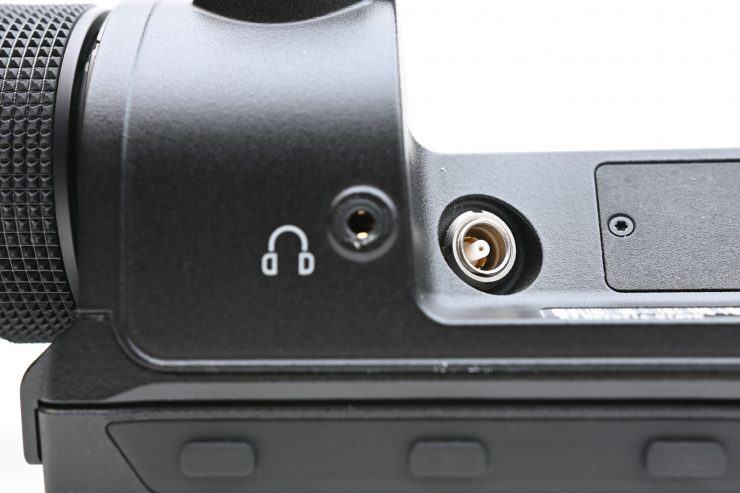
The MVF-2 uses new, reliable and flexible VF cables, features a built-in eyepiece lens heater for de-fogging and a built-in 3.5mm headphone connector.
The headphones out is a 3.5 mm TRS connector (headphone jack), which outputs all four audio channels with a maximum power of 2.5 dBm.
The built-in eyepiece heater prevents fogging of the eyepiece when shooting in cold environments. The eyepiece heater can be activated in the camera menu and only becomes active when the eyepiece has a temperature of 15 °C (59 °F) or below. In extremely cold environments ARRI recommends the use the Heated Eyecup HE-7

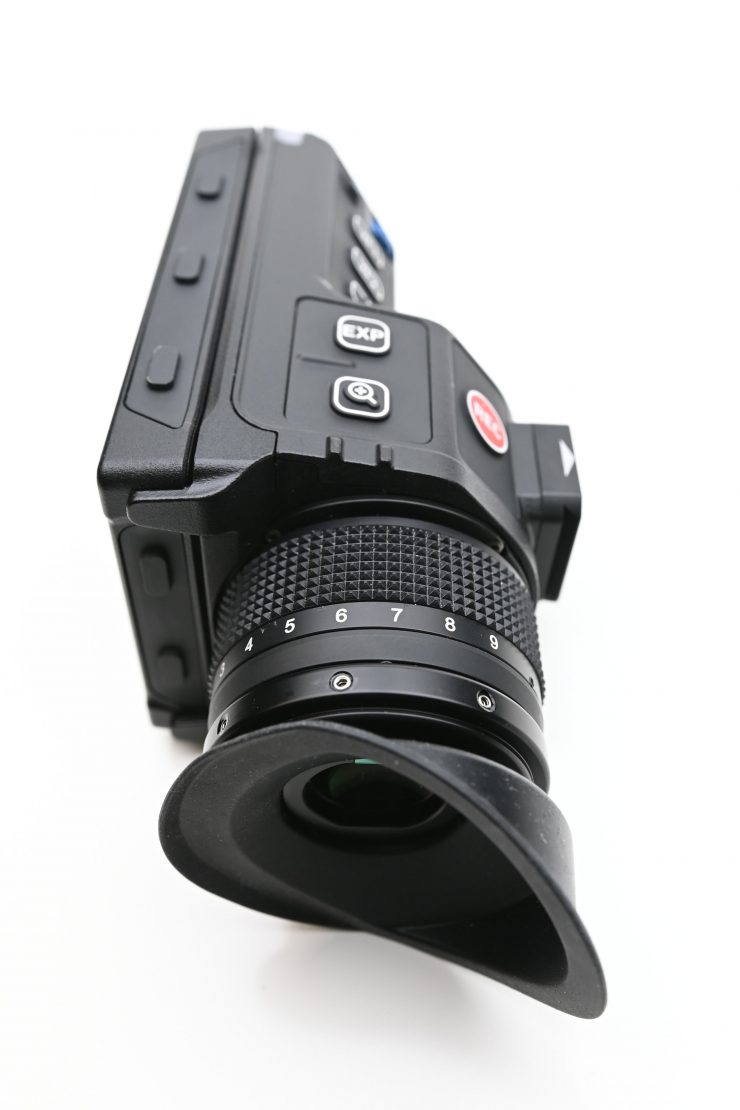
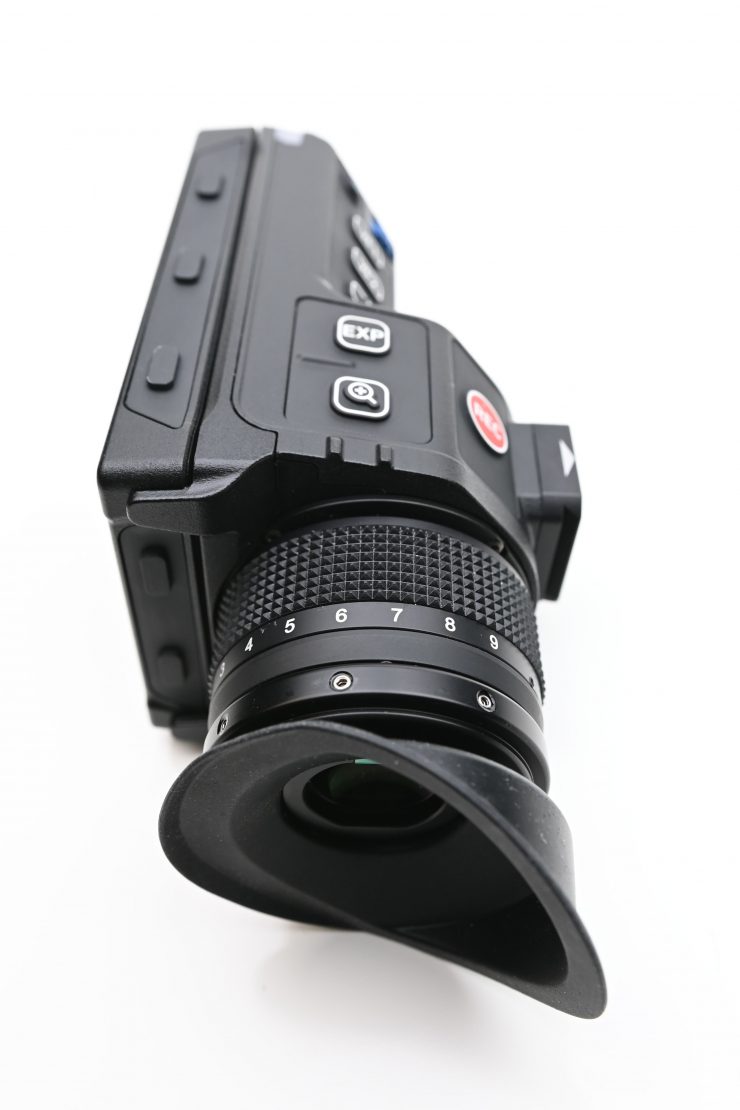
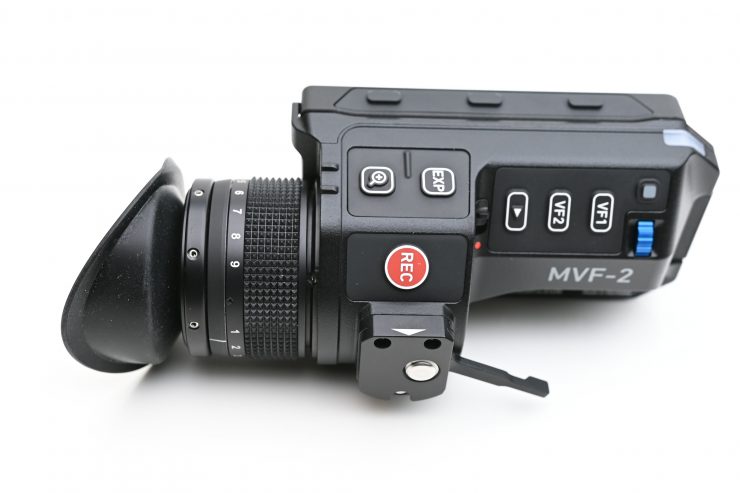
There are a ton of buttons on the MVF-2. You have 8 buttons (3 on the top, 3 on the bottom. and two on the side) of the flip-out screen.


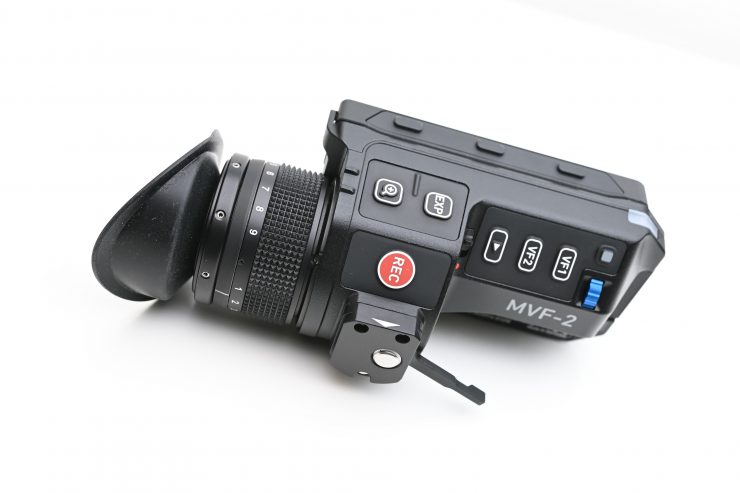
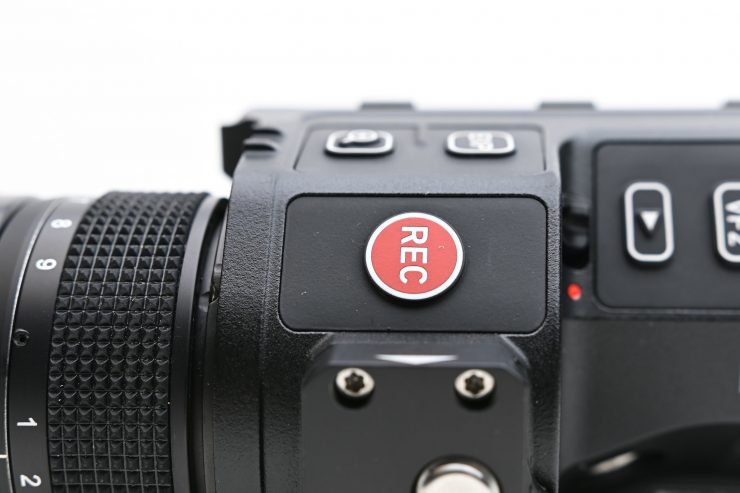

On the actual EVF you have an Image Zoom button, EXP button (this can be set to False Color or Zebras), REC button, Playback button, VF1 and VF2 buttons (these can be set to do a variety of things), and 2nd Control Dial.
I’m not sure if I like the placement of where ARRI has put the main jog wheel on the MVF-2. It did take me a little bit of time to get used to the changed location.
ARRI has made the MVF-2 HDR compatible so once a higher demand for HDR monitoring occurs they can implement a software update so you will be able to monitor your images in HDR.
One thing that is nice is that you can take the MVF-2 off the camera and then use a 10-meter extension cable if you want to control the camera via a hard-wired connection.

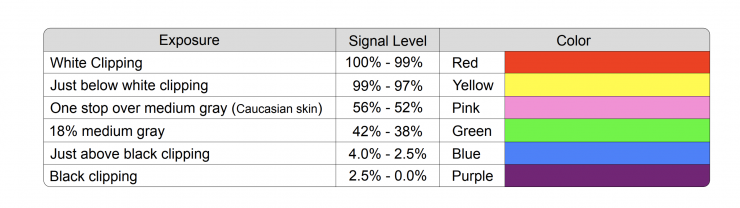
You may have also noticed that there is a strange area on the inside of the MVF-2. What is this for? Well, ARRI noticed that crews like to tape critical information, like the lens’ close focus distance or the names of actors and characters, to the side of their cameras. So, on the MVF-2 there is an empty space with a slot for a business size card.
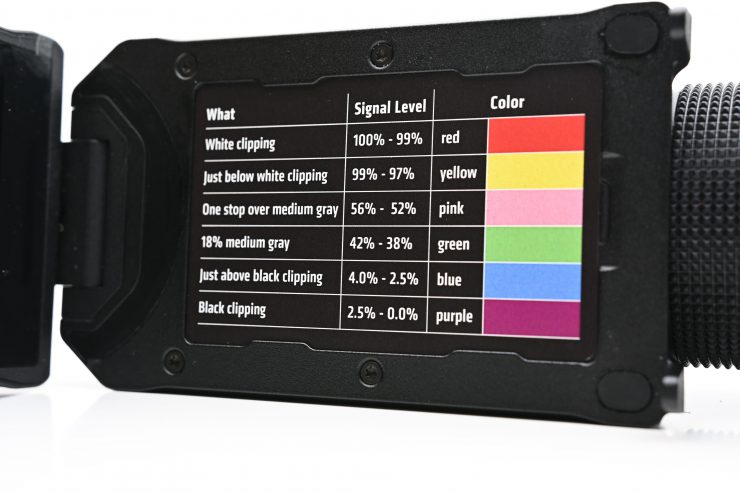
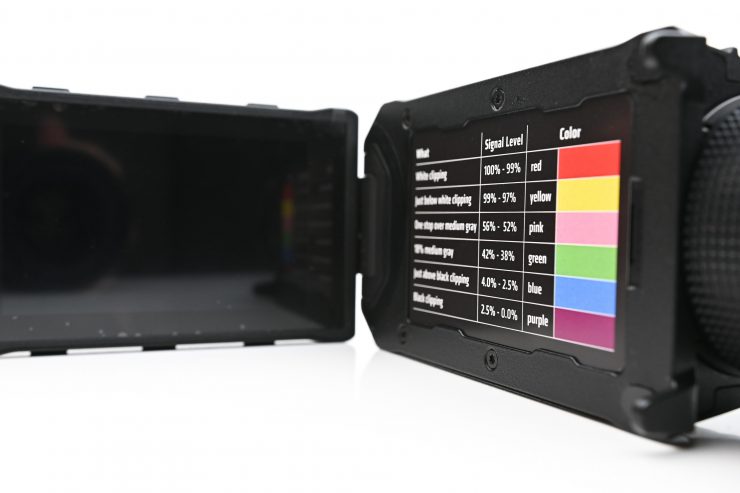
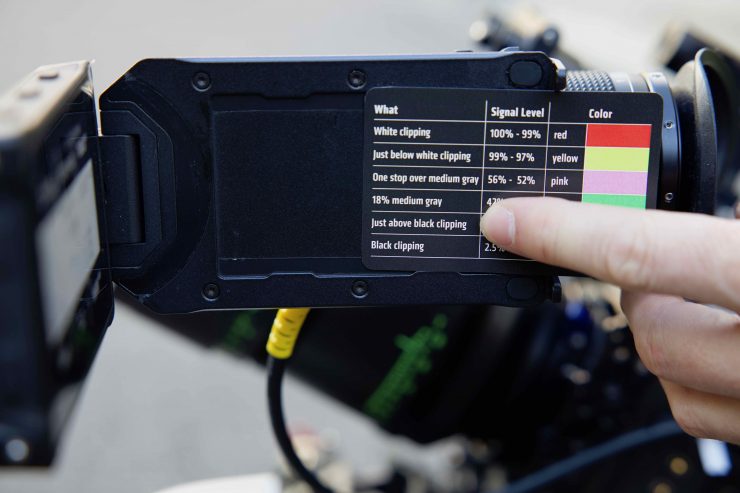
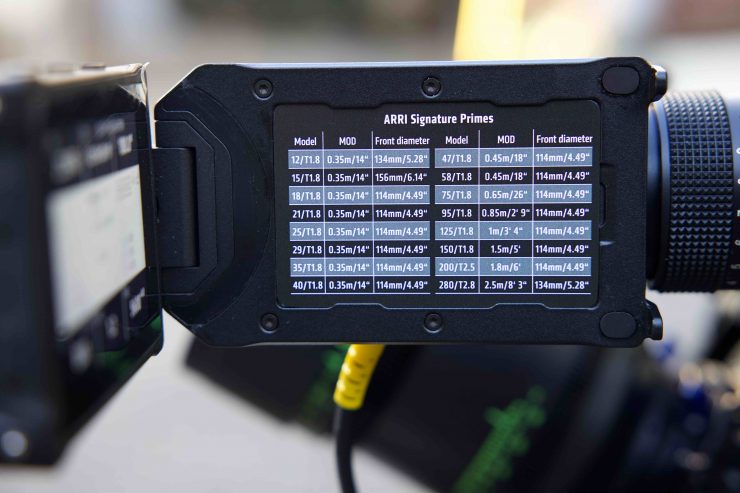
The camera comes with a card illustrating the false color system on one side and the Signature Prime information on the other. Templates for making your own (DIN A-4 and US Letter/8.5 x 11) can be downloaded below:
This may be a small thing, but what other camera manufacturer has thought about doing this?
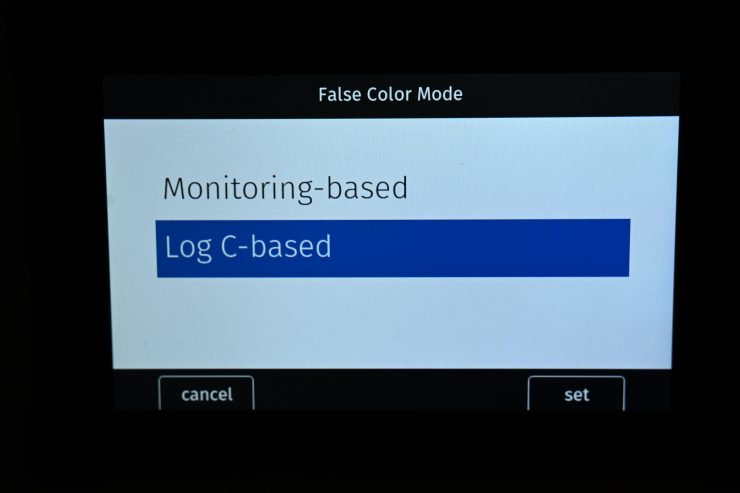
With the False Color, you can choose in the menu to view it as either Monitor based or Log-C based. I like this option because you can use False Color when monitoring with a LUT, but you can still see the False Color information for the recorded Log-C image. Again, this is a small thing, but not many camera companies do this.
When an HDR ALF-2 look file is loaded and activated in the camera, false color mode automatically switches to ‘Log C-based’. This is because HDR look files do not generate video signals over 75%, which means that overexposure might not be indicated correctly in ‘Monitoring-based false color’ mode.
When you are using a look file that does not utilize the full signal level range and you activate false color on a monitoring path where Look processing is active, false color will not indicate over- or underexposure. This specifically applies to Rec 2100 PQ Look files, as they level out at a maximum signal level of 75%.
When using look files with extreme color grading, it is possible for ‘Monitoring-based’ false color to show an inaccurate result.

I found the MFV-2 to be really nice to use. The flip out LCD screen is a massive improvement over the one that was on the AMIRA and ALEXA Mini. The EVF itself is sharp and easy to see and I like the new button positions.
The glaring issue I have with the MFV-2 is that you seem to get image judder when you are doing pans or tilts, even at low speeds. This is something you should not be seeing on a very expensive EVF. If you are running a 25p project rate for example and you are shooting at 50fps the issue isn’t there.
I reached out to Marc Shipman-Mueller who is the Product Manager for the ARRI ALEXA Mini and Mini LF to find out if ARRI were aware of this problem and if they were coming up with a fix. Here is what Marc told me:
“I have had a number of people mention judder to me. That is a general issue with all bright and contrasty displays. All other high-end viewfinders look the same or worse.”
Marc Shipman-Mueller Product Manager for the ARRI ALEXA Mini and Mini LF
I don’t have this problem with the viewfinder on my AMIRA and if I hook up a Zacuto Gratical to the ALEXA Mini LF I didn’t see the same issue.
Just like the menu dial, I did find the location of the buttons took some getting used to after years of knowing exactly where my fingers needed to go to make changes.
One thing to note about the new MVF-2 Viewfinder is that it cannot be used on other ARRI cameras such as the original ALEXA Mini, or AMIRA. In saying that, ARRI has said that the MVF-2 will be the viewfinder they will use for all future cameras to come.
Menu System

After almost a decade of the ALEXA user interface, ARRI has come up with an improved fresh look and better functionality for the menu and operating system.
Although it is new, it will still feel familiar to anyone who has used an ARRI camera before. Ironically you could teach someone how to use an ARRI digital cinema camera in far less time than most other cameras that are on the market.
The camera’s HOME screen and menus can be accessed through the flip out monitor on the MVF-2 viewfinder, which is larger and has a higher resolution than all previous menu displays on ARRI cameras.
Important settings can be quickly seen on the clearly structured new home screen:
- The location of a menu can be easily seen through overlapping menu levels
- Expanded and improved notifications and alerts
- Easier and faster text entry and list selection
I like the addition of the ND position to the home screen instead of in the EI section in the Mini. ARRI has also put the look settings in the menu instead.
I like the menu system on the MINI LF, it is very easy and quick to make changes. There aren’t countless menu pages that you have to navigate through. Menus don’t need to be complicated and that is something ARRI worked out a long time ago.
Having a simplified menu structure means you can make changes without having to scroll through endless pages or consult a menu.
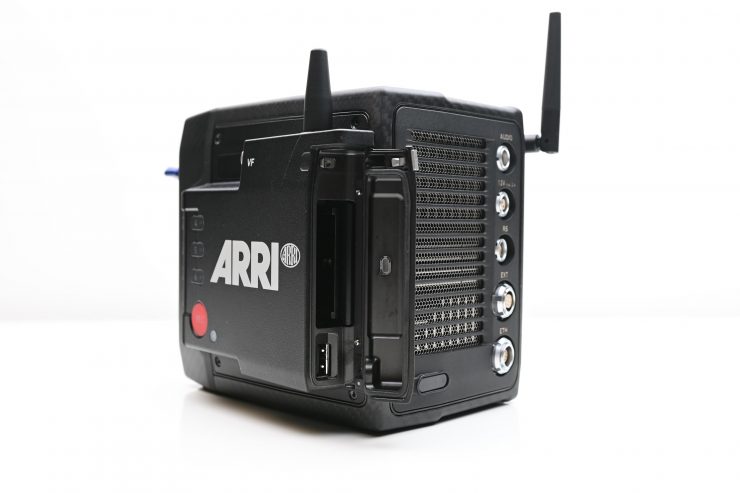
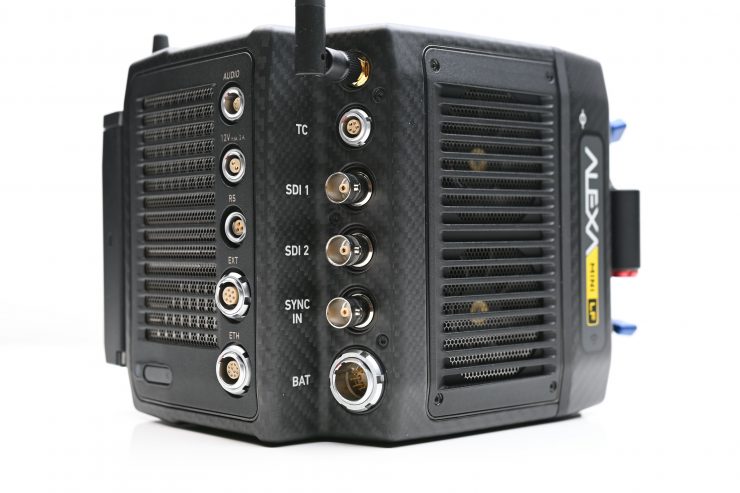
Ins & Outs
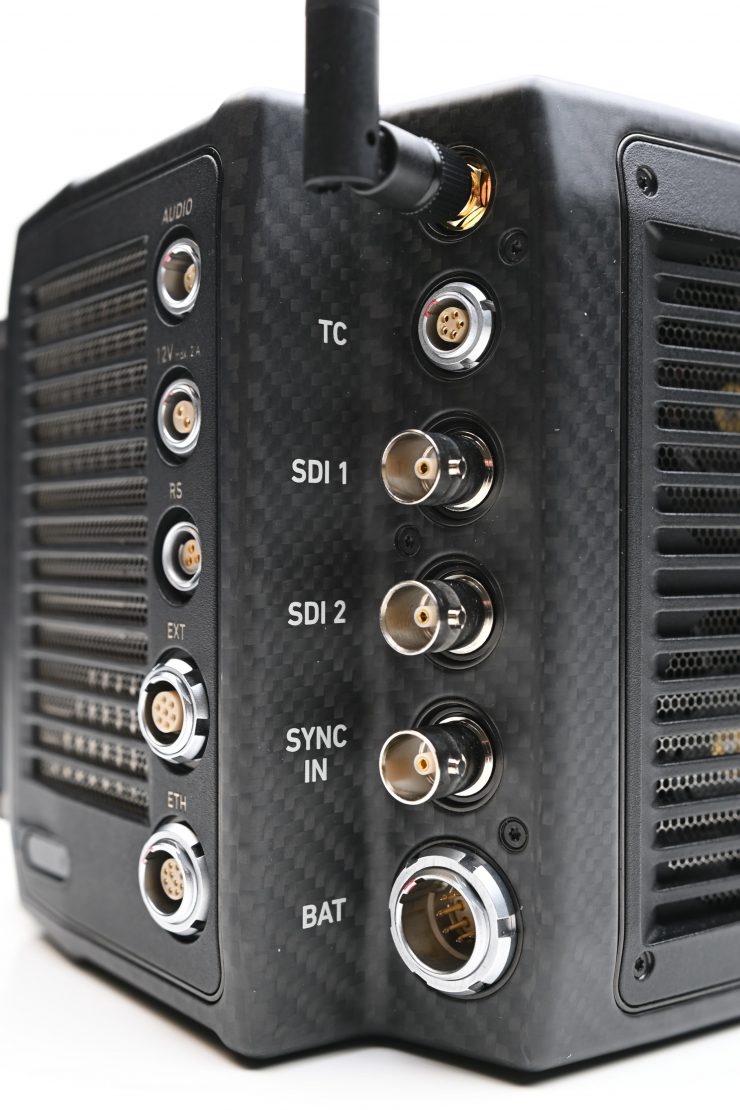
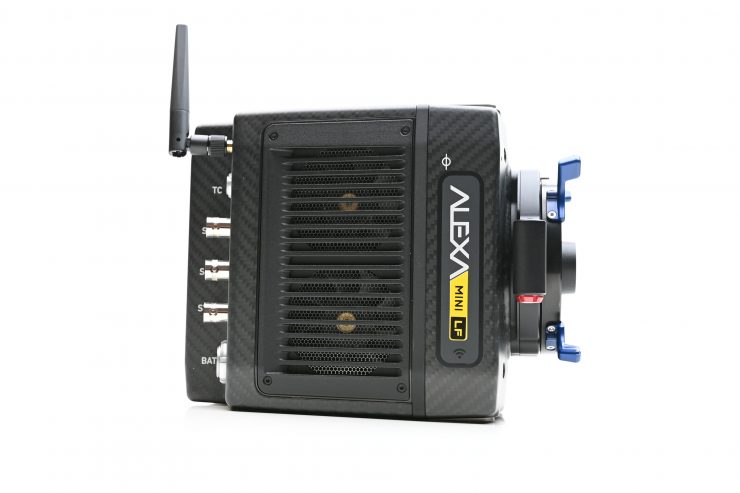
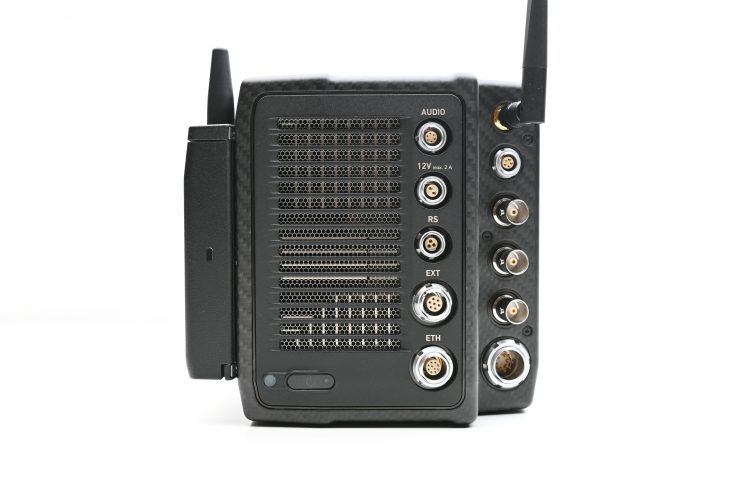
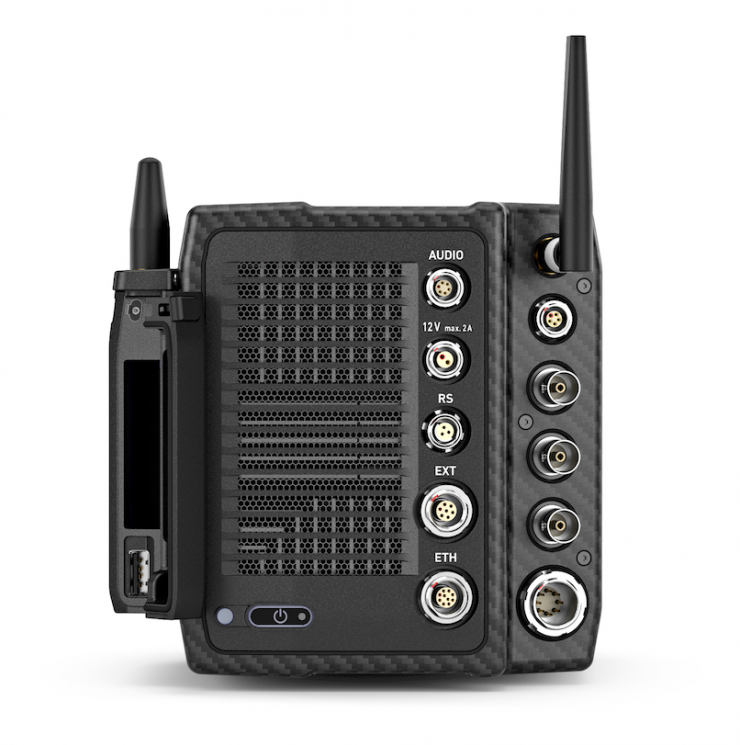
Despite having a relatively small body, ARRI has still managed to pack a lot of connectivity into the Mini LF. Connectivity needs to be good on any high-end cinema camera.
The camera has the following:
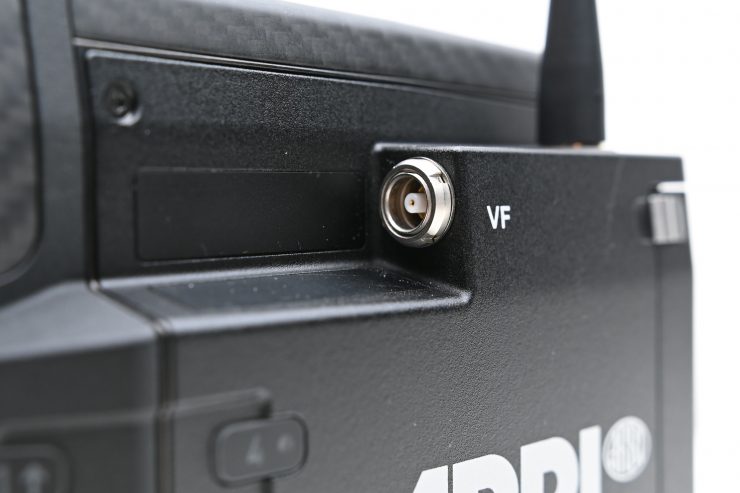
- 1x proprietary signal output for MVF-2 viewfinder on VF CoaXPress connector (video, audio, power, control signals)
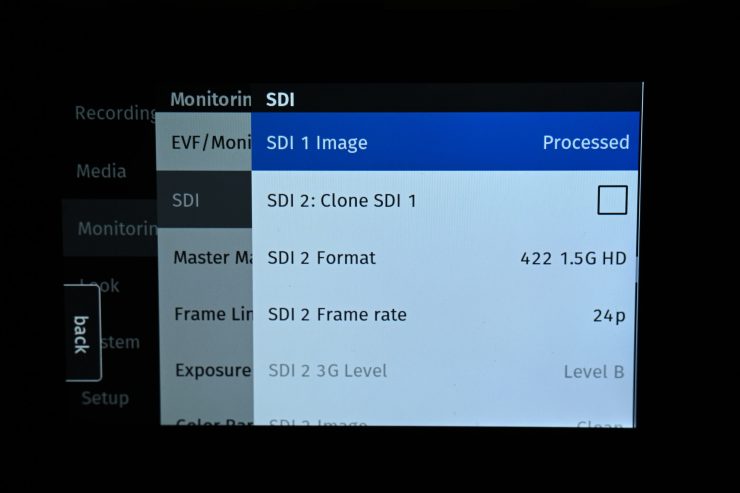
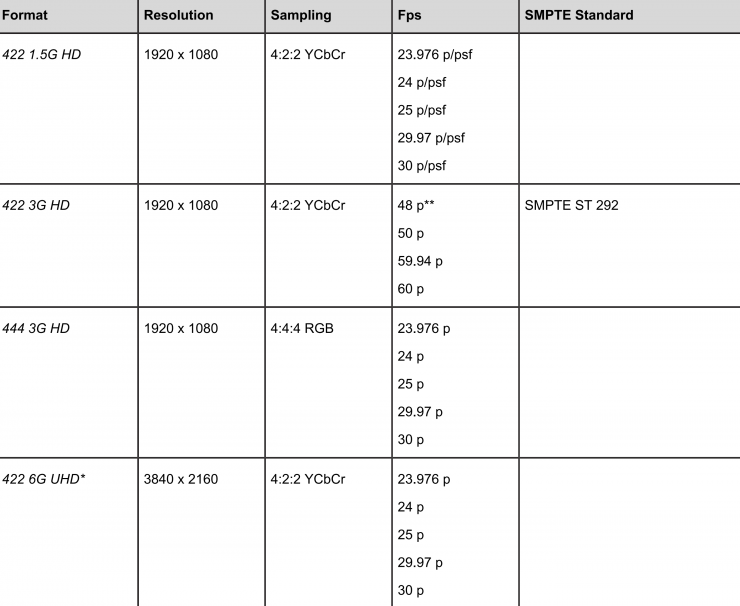
- SDI 1: HD only, Processed or Clean, with or without a look file applied
- 1.5G 422 HD (SMPTE ST292-1, up to 30 fps, progressive (p) or progressive segmented frame (psf))
- 3G 422 HD (SMPTE ST425-1, up to 60 fps, p)
- 3G 444 HD (SMPTE ST425-3, up to 30 fps, p)
- SDI 2: HD or UHD, Clean only, with or without a look file applied, or SDI 1 clone
- 1.5G 422 HD (SMPTE ST292-1, up to 30 fps, p or psf)
- 3G 422 HD (SMPTE ST425-1, up to 60 fps, p)
- 3G 444 HD (SMPTE ST425-3, up to 30 fps, p)
- 6G 422 UHD (SMPTE ST2081-10, up to 30 fps, p)
- 1x LEMO 6pin balanced stereo line in with 12V power output (Line input max. level +24dBu correlating to 0dBFS)
- 3,5mm stereo headphone jack (on MVF-2)
- 1x LEMO 5pin LTC Timecode In/Out
- 1x LEMO 10pin Ethernet for remote control and service
- 1x BNC SYNC IN
- 1x LEMO 7pin EXT multi-purpose accessory interface w. RS pin and 24V power output
- 1x LEMO 4pin LBUS (on lens mount) for lens motors, daisy-chainable
- 1x USB 2.0 in media bay (for user setups, look files etc)
- 1x LEMO 8pin (11-34 V DC)
- 1x Fischer 3pin 24V RS
- 1x LEMO 2pin 12V
- 1x LEMO 7pin EXT 24V power output
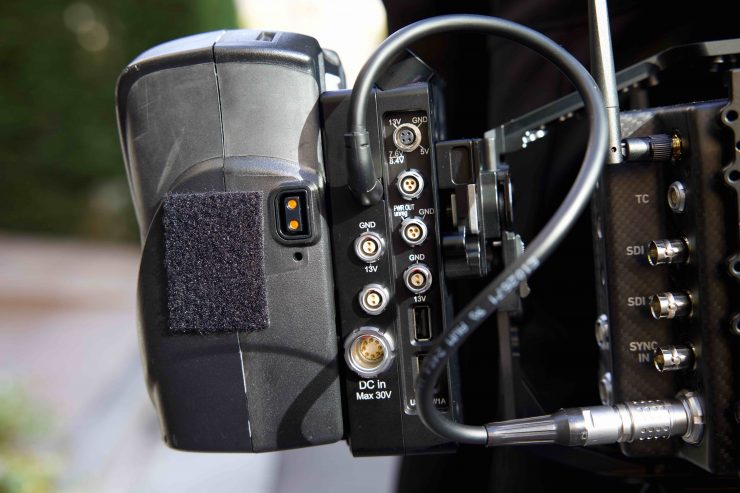
ETH (10-pin LEMO)
The Ethernet connector is used for camera remote control and service purposes. It supplies regulated 24 V with a current of 0.5 A. Use the ALEXA Ethernet Cable KC 153-S (K2.72021.0) to connect the camera to a standard RJ-45 Ethernet port.
Note: The ALEXA Remote Control Unit RCU-4 cannot be used with the Ethernet connector of the ALEXA Mini LF.
EXT (7-pin LEMO)
The EXT connector is a multi-pin accessory connector for camera synchronization and communication with various accessories, carrying two CAN buses and supplying regulated 24 V accessory power with a current of 1.0 A. With external adapter EXT-RS (K2.0006170), RS functionality (remote start/stop) is supported.
RS (3-pin Fischer)
The RS connector outputs regulated 24 V accessory power and can supply external devices with a load of up to 3.0 A. Besides powering accessories, the RS connector also carries a shutter pulse signal and can be used to send a remote start/stop signal to the camera.
12V (2-pin LEMO)
The 12 V output with a 2-pin LEMO connector supplies accessories with regulated 12 V with a current of 1.0 A.
AUDIO (6-pin LEMO)
The audio connector is a 2-channel +24 dBu line level audio input with an additional regulated 12 V power output with a current of 0.5 A. Use the ALEXA Mini LF Audio connector with cable (K2.0023988) to connect audio sources.
White Radio Antenna Connector (Female RP-SMA)
White radio allows for wireless lens control, lens data communication and remote control of basic camera functions using the wireless hand units of the ARRI Electronic Control System.
TC (5-pin LEMO)
The TC connector is a 5-pin LEMO socket. It accepts and distributes LTC (Longitudinal Timecode) signals. It can be used to jam-sync the camera timecode to a timecode generator or another camera to transmit the camera timecode to a timecode generator or another camera.
SDI 1&2 (BNC)
Besides the viewfinder output, SDI 1&2 are the main monitoring outputs of the camera. The camera menu offers various settings to configure the outputs such as surround view, status information or frame lines. Both SDI BNC connectors output SDI signals in 1920 x 1080 (422 1.5G, 422 3G, 444 3G)
3840 x 2160 (422 6G) according to SMPTE standards 292M, ST 424:2012 and ST 2081.
SYNC IN (BNC)
A BNC socket for reference signal input, the SYNC IN connector accepts analog Black Burst signals and Tri-Level HD signals.
BAT (8-pin LEMO)
The BAT connector is the main power input of the ALEXA Mini LF and accepts an input voltage range from 11.0 to 34.0 V DC. You can use power cables KC50-S (K2.75007.0) or KC50-SP-S (K2.0001275) or one of the various on-board adapter plates for V-Mount and Gold Mount batteries to supply the camera with power.
That is a lot of functionality. The only thing really missing is a third SDI port. That is something the ALEXA LF has.
Having the ability to completely customize what goes out over your SDI outputs is paramount.
What can the camera output?
LUTS
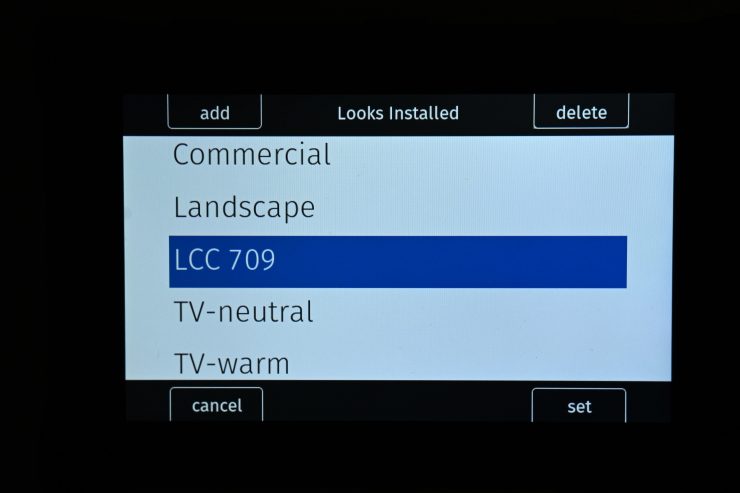
The Mini LF, comes loaded with the same LUTs you will find in the AMIRA and ALEXA Mini.
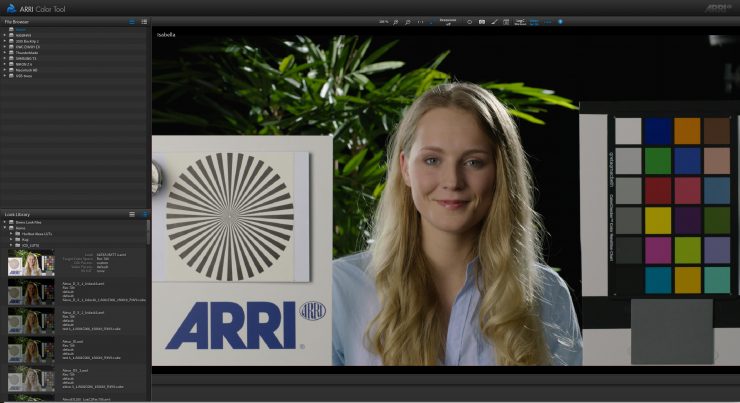
You can load up your own LUTS as well as LUTS from the ARRI LUT Library. If you want to create your own LUTs you can use the ARRI Color Tool.
It is super easy to use, create, and load up LUTs on the Mini LF. Unlike some camera systems, there are no limitations when using a LUT. They work in all modes and all frame rates.
Anamorphic De-Squeeze
The lens squeeze factor determines the factor that is used for anamorphic de-squeeze on EVF/Monitor and SDI. This value is also written into the metadata of the clip and allows video players and editing software to automatically de-squeeze clips that have been shot with anamorphic lenses.
The Mini LF supports a wide variety of squeeze factors.
The following lens squeeze factors are available:
- 1.00 for all spherical lenses
- 1.25 e.g. Ultra Panavision 70 Lenses
- 1.30 e.g. Vantage Hawk Lenses
- 1.50 e.g. P+S Technovision, Iscorama, Kowa
- 1.65 e.g Panavision Ultra Vista Anamorphic lenses
- 1.80 e.g Cooke Anamorphic/i Full Frame Plus lenses
- 2.00 for classic 2x squeeze CinemaScope S35 lenses
Attention to detail
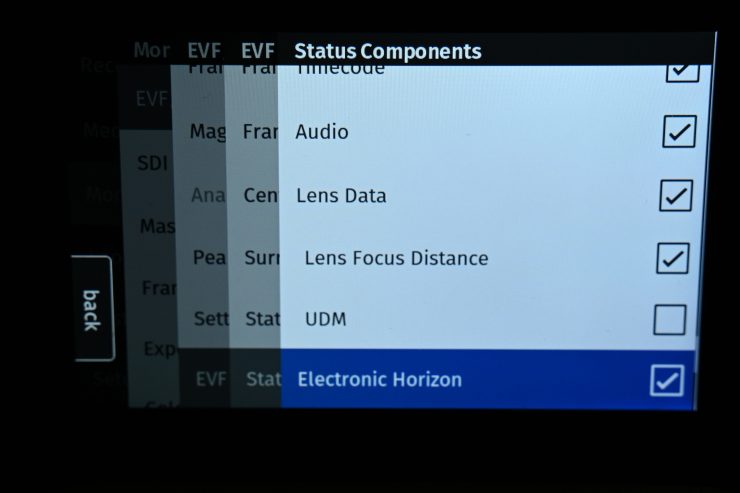
One of the nice things I came across with the Mini LF was a function called Horizon Level. It displays a horizon overlay representing the roll and tilt of the camera measured by the camera’s position sensor. This sensor can be
reset, if it appears to have an offset.
There is also a Show Numeric Values Sub-option of the electronic horizon. This shows the tilt and roll of the camera in degrees as measured by the camera’s position sensor
This Horizon Level doesn’t cover up your image, it is displayed on the outside. It is really quick to reference and you can tell instantly if your horizon is off. This works really well if you are shooting handheld. I found this feature to be incredibly useful. Again, it is a small detail, but this is why ARRI cameras stand out. Paying attention to details.
Another nice feature (and this is something that is available on the AMIRA and ALEXA Mini) is that the Overlay Menu can be assigned to a User button or one of the VF buttons. This allows you to press a single button and then scroll through and make changes to all of your key components right from the viewfinder without having to go into any menu.
There are also some user button functions that support smart behavior. For these, a short press (i.e. less than half a second) toggles the function, while a long press (i.e. longer than half a second) activates the function only temporarily, as long as the user button is pressed. This is good for items like image zoom, peaking or false color.
For example, assume a user button is configured with EVF Zoom:
Short press of user button: EVF zoom is activated and stays activated. Press again to deactivate.
Long press of user button: EVF zoom function is activated while you are pressing the button, the release of the button deactivates EVF zoom.
Here are two other nice little features that are available.
Export Logfiles
Logfiles help camera service to analyze potential problems. In normal circumstances, logfile export is not required. Logfiles will be exported to the USB medium in the ARRI/A-MINI-LF/LOG folder.
Export Update Logfiles
Similar to regular logfiles, update logfiles help camera service to analyze problems that occurred during the update process. In normal circumstances, exporting update logfiles is not required. Update logfiles will be exported to the USB medium in the ARRI/A-MINI-LF/LOG folder.
Mirroring the Sensor Image
You can mirror the sensor image in horizontal and vertical directions. This is a very handy function to have, especially if you are using the camera upside down on say a dolly or crane.
You have the following options on the Mini LF:
- Off Mirroring is inactive.
- V The sensor image is vertically mirrored.
- H The sensor image is horizontally mirrored.
- V+H The sensor image is vertically and horizontally mirrored (rotated by 180°).
Horizontal mirroring is applied to all output paths and internally recorded material. Vertical mirroring is only applied to output paths; internally recorded material is not rotated, but rotation information is written into metadata. Frame grabs of rotated images will be displayed upside down on a computer.
Electronic Control System (ECS)
The camera contains a radio unit that allows for wireless lens control, lens data communication and remote control of basic camera functions in combination with the ARRI Wireless Compact Unit WCU-4 or ARRI Single Axis Unit SXU-1. The radio system is called white radio. The white radio antenna connector is located at the camera rear.
Lens Motors
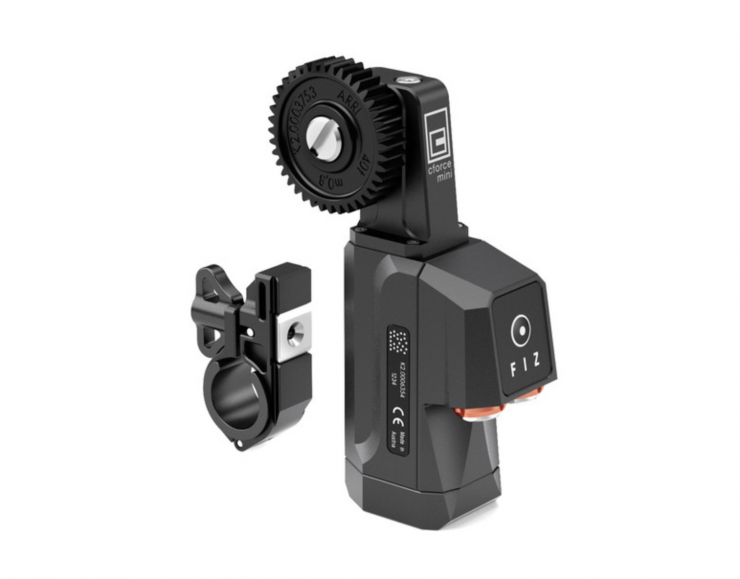
The ALEXA Mini LF supports the use of cforce mini and cforce plus lens motors. Lens motors can be directly connected to the LBUS on the lens mount and can be daisy-chained. The motors can be hot-plugged, no need to switch off the camera.
When connecting a cforce plus motor to the camera you need to make
sure that the LBUS connector(s) on both motor and lens mount are equipped with a silver washer placed below the red nut of the connector. If the LBUS connectors on either cforce plus motor or lens mount (or both miss the silver washer, the cforce plus motor needs to be supplied with external power (e.g. D-Tap from a battery adapter plate) in order to ensure proper performance.
Dynamic Range
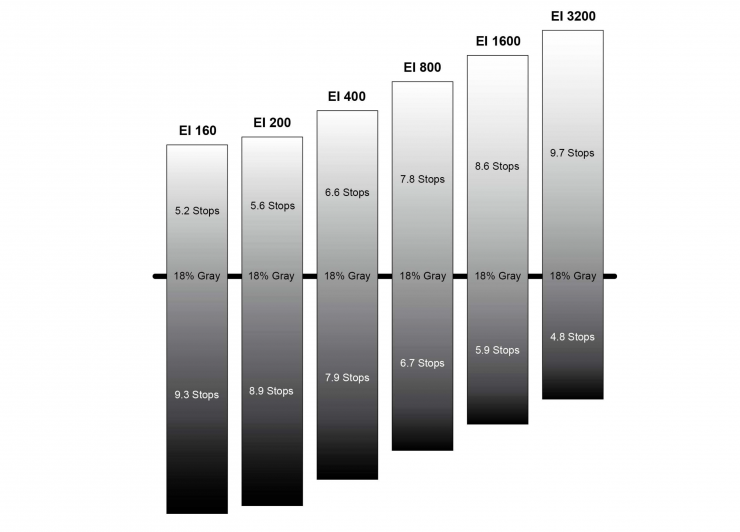
The ALEXA Mini LF offers a claimed 14.5 stops of dynamic range. At EI 800 and above the camera offers an amazing amount of stops above 18% grey.

Above you can see the same chart for the ALEXA Mini. The ALEXA Mini LF has about half a stop of dynamic range more than the regular ALEXA MINI.
The Exposure Index (EI) is the applied sensitivity of the camera. The ALEXA Mini LF has a base sensitivity of 800 ASA. This means that the dynamic range is almost evenly distributed above and below neutral gray. This, in theory, should provide low noise in the shadows and clean, smooth clipping behavior in the highlights.
Due to its high dynamic range, the camera’s sensitivity can be set from 160 to 3200 ASA in steps of 1/3 stops while maintaining high image quality.
Applying the exposure indexes at the extremes of the range will nonetheless have an influence on the images. At low exposure indexes, such as 160 ASA, the dynamic range below neutral gray increases, reducing noise even further. At the same time, the dynamic range above neutral gray is slightly reduced. Highlight clipping itself is not influenced by this, but the shoulder of the gamma curve will get slightly steeper, reducing the smoothness of the change from almost overexposed to overexposed. At high exposure indexes, such as 1600 ASA, the images behave in the opposite way. Noise is increased, which makes it important to judge shadow detail, while there will be even more headroom in the highlights.
ARRI is perhaps the most conservative camera company when it comes to quoting dynamic range.
It was very evident to me from just looking at some images from the camera that the amount of highlight retention is better than any camera I have ever used or seen. I could see details in the highlights that I couldn’t see with other cameras. The usable latitude that the camera has is extremely impressive.
Above you can see a quick under/over exposure test that I did. The whole purpose of a test like this is to see how much flexibility we have with various exposures. If you are shooting something that is 5 stops under or overexposed you have probably chosen the wrong occupation!
Tests like these have nothing to do with total dynamic range because we are testing to see the camera’s Useable Exposure Lattitude. There is a big difference between the two. We will have another post soon that will be entitled Understanding Exposure Tests.
Example Footage
Doing camera tests is all good and well, but I’m more interested in what real world footage actually looks like. I didn’t have as much time to shoot with the camera as I would have liked, but I wanted to put it in a few different scenarios to see how it performed. These included:
- Very bright conditions where highlight retention is critical
- Low light
- Wildlife & nature
- Mixed, uncontrolled lighting scenario
- Higher frame rates
Any camera can look good in heavily controlled conditions, for me, the mark of a great camera is one where it can look good in any conditions, regardless of how much control you have. 1917 is a prime example of a movie where they relied very heavily on natural lighting and shooting in conditions that weren’t always ideal. With the camera spending a lot of time moving and covering large distances in a single shot, you are not going to be able to control the conditions regardless of the budget or the size of the crew.
I wanted to take everything out of the equation when evaluating the camera. I didn’t want to shoot in controlled environments. I didn’t want to use lots of lighting, and I didn’t want to shoot with a ton of equipment and plenty of people to help me out. To test a camera I like to strip it down to the basics. Just me, a tripod, some lenses and that is it. In controlled environments, you can tailor the conditions to the camera you are using, but in uncontrolled conditions, the camera has to be able to perform no matter what you throw at it.
Please note that all of the vision you will be seeing from these tests shoots can be taken in any direction you please. I have purposely included different grades, done by different people. I also have included both YouTube and Vimeo versions of some of the clips. I did my own grades because I wanted to show how easy the footage is to grade for anyone.
I wanted to show you some HDR grades that were also done, but neither YouTube or Vimeo would work for us. No matter what we tried or what instructions we followed we couldn’t get it to work correctly. Vimeo would see the file and list it as HDR, but it wouldn’t playback as HDR.
I only had one media card to shoot with, so I chose to capture in ProRes 4444XQ as shooting ARRI RAW wasn’t really feasible.
Highlight Retention
The Mini LFs highlight retention is the best I have seen from any camera I have ever used. You can see such much detail and it is very hard to clip highlights. Above you can see my graded version. I have included uploads to both YouTube and Vimeo.
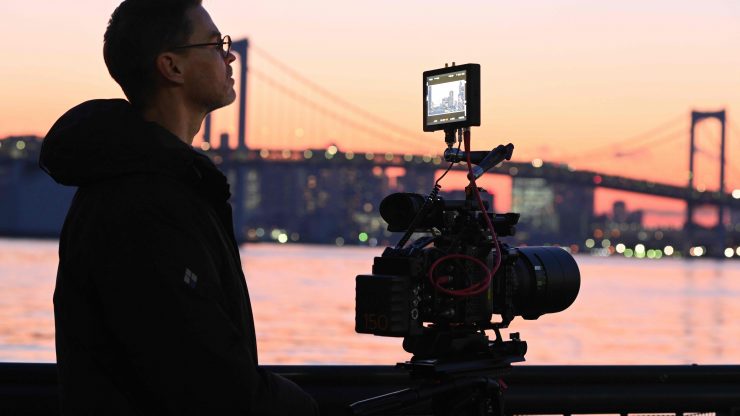
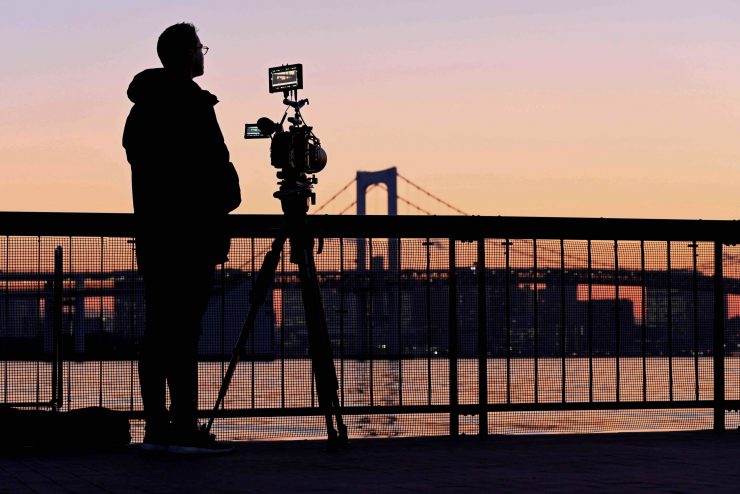
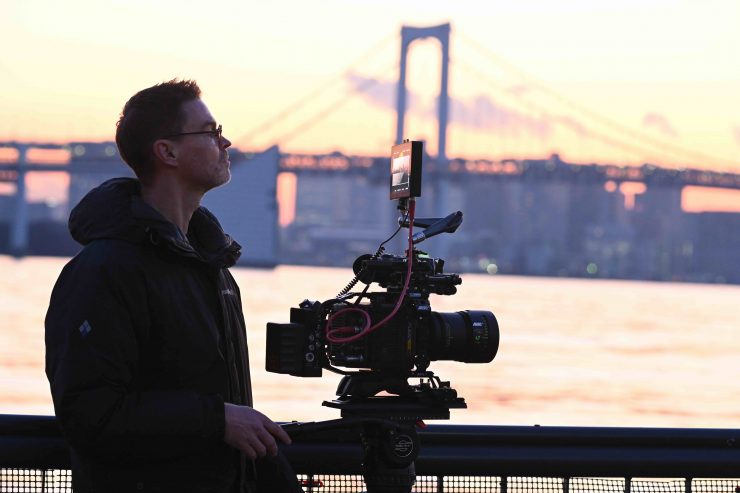
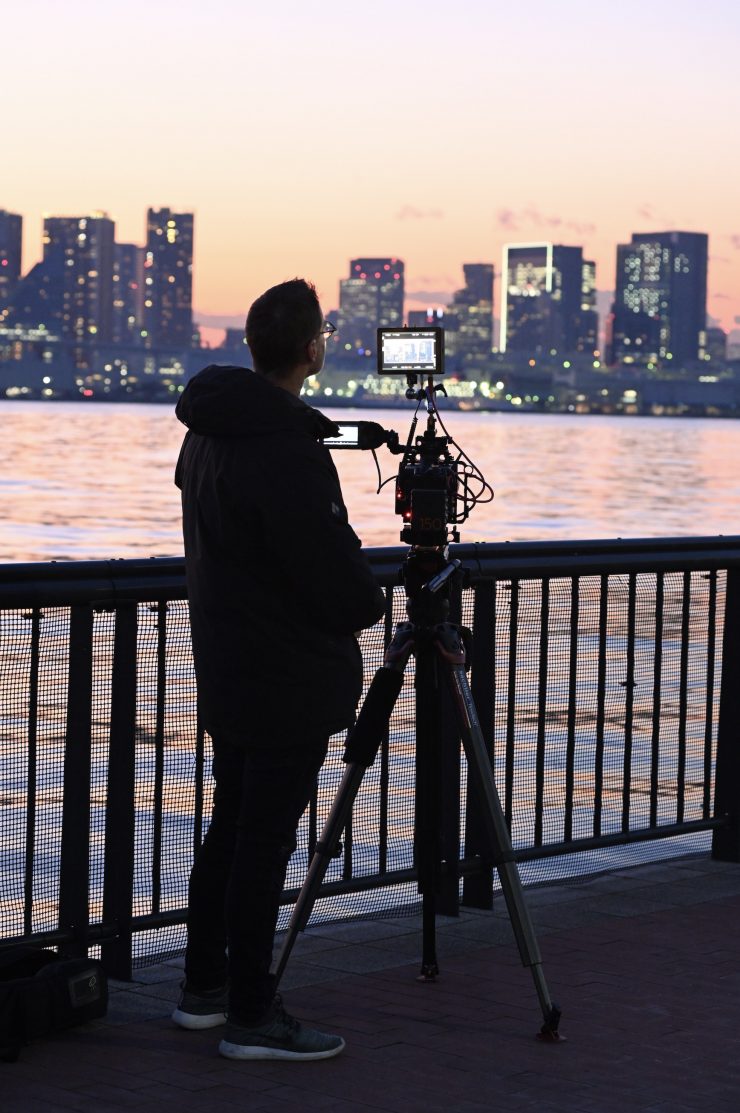
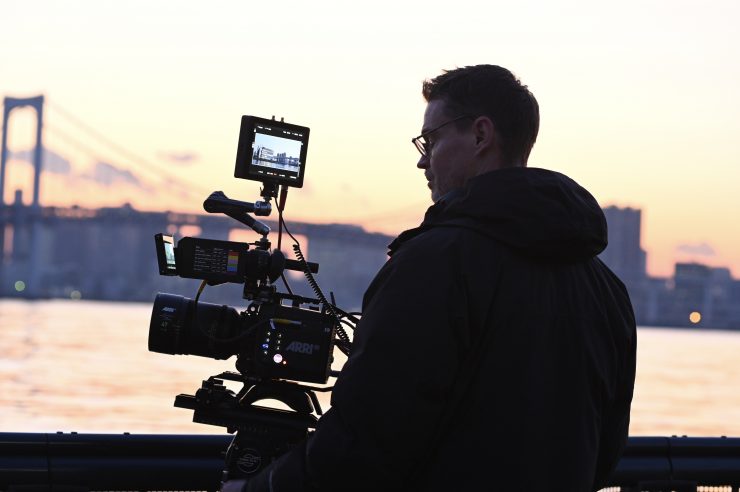
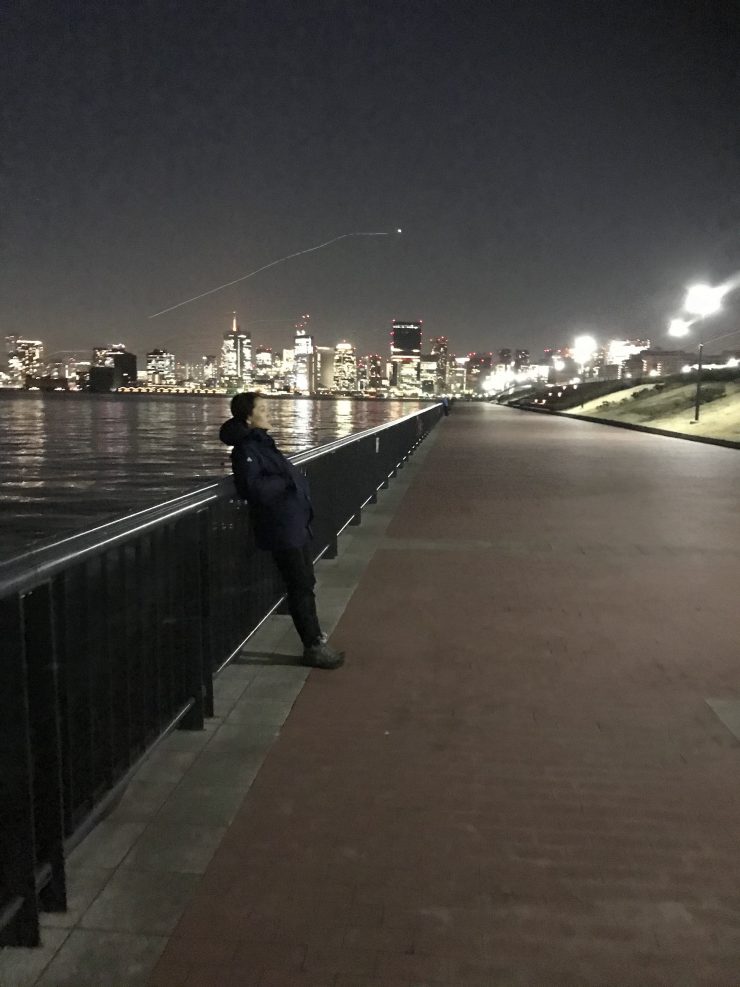
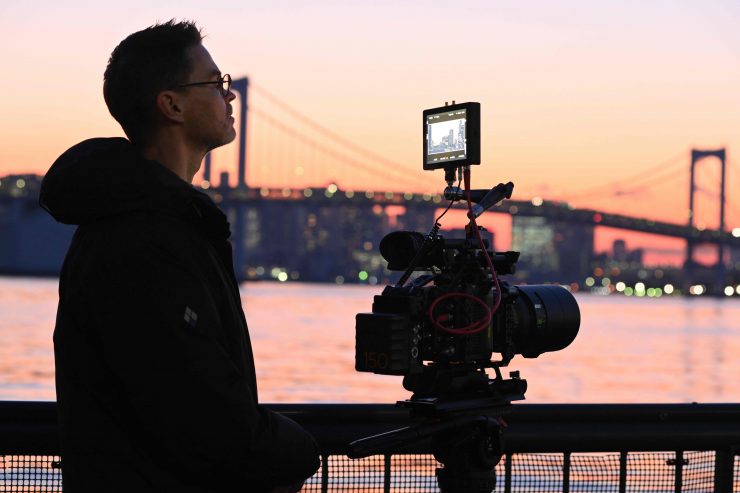
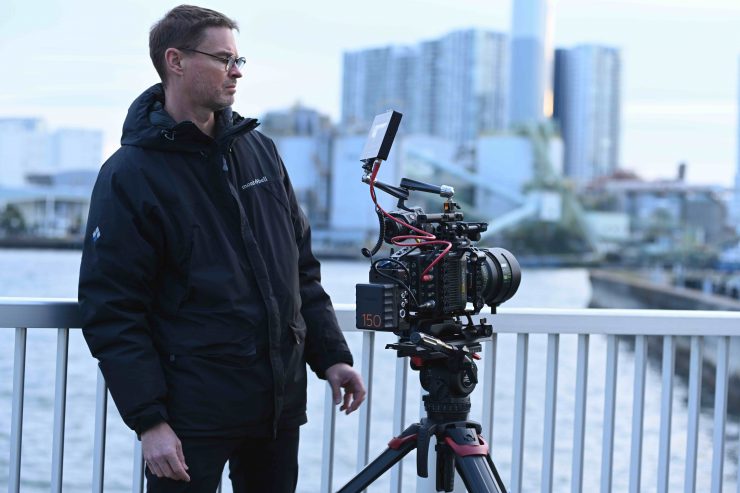
I went out and shot around Tokyo Harbor at sunset to see how well the camera handled the setting sun and high dynamic range scenes.
Above you can see an alternate grade done by Ben Allan ACS CSI.
I was impressed with the performance. It gives the user the ability to shoot in situations where highlight retention is critical.
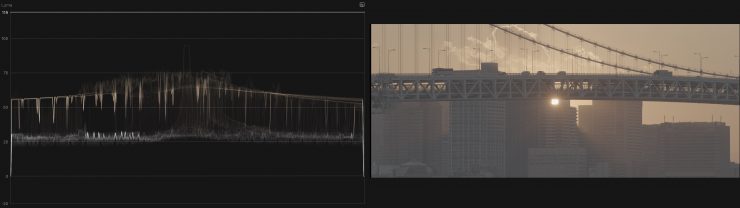
Above you can see some C-Log shots next to the waveform to gauge how well it is performing in regards to highlight retention and dynamic range. The highlight roll-off is extremely impressive.
I’m no colorist, with the version I did I tried to not crush the shadows down so you can see what the camera is capable of.
Low Light Performance
ARRI cameras have never been known as low light cameras and the Mini LF is no exception. Considering the base sensor being used is 10 years old, ARRI is probably limited as far as what they can do.
The Mini LF, just like the AMIRA, ALEXA Mini and the ALEXA LF can only shoot at up to 3200 ISO. In 2020, that is a very low ISO number and most other cameras can go far beyond 3200 ISO while still producing a limited amount of noise.
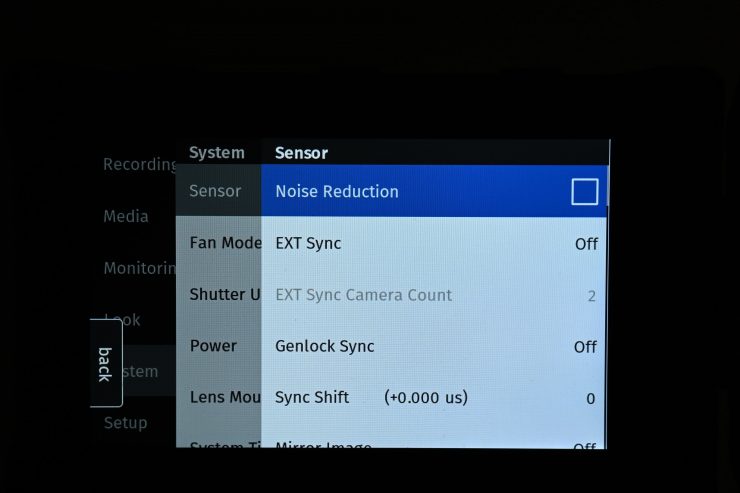
You can activate Noise Reduction in the menu system. On the AMIRA and ALEXA Mini you could only choose noise reduction when shooting in the UHD mode. With the Mini LF, you can activate it in any shooting mode or resolution.
Here is what ARRI says about the Noise Reduction feature:
ARRI Noise Reduction ANR-1 is implemented in most modern ARRI camera models and can be used for monitoring purposes on set, recording to MXF/Apple ProRes files (baked in) or as metadata of MXF/ARRIRAW recordings with full flexibility to change the parameter in postproduction.
ARRI Noise Reduction ANR-1 can be helpful in low light situations to reduce noise in the images. While it is commonly available in postproduction tools, two reasons drove us towards creating a new, in-camera ARRI noise reduction: we enable fast, in-camera noise reduction and we provide a noise reduction method that retains the grain texture and natural looks that ARRI customers like.
Using ARRI Noise Reduction ANR-1 enables you to use noise reduction on set in the camera. This can be helpful for low light shots, where an in-camera noise reduction is a very fast solution. Furthermore, ARRI Noise Reduction ANR-1 gives you the possibility to combine the amount of grain with your sharpness and detail settings for the chosen exposure directly on set.
You can store your decision either in the metadata, when recording MXF/ARRIRAW or bake it into Apple ProRes files. In contrast to general postproduction tools, the ARRI Noise Reduction ANR-1 is optimized for the sensor noise characteristics and therefore can achieve a very natural noise reduction without any image blurring. This noise reduction, optimized for the ARRI sensors is available for ARRIRAW recordings by using the ARRIRAW Converter or a post-processing software that incorporates the ARRIRAW SDK. The film grain-like texture of ARRI cameras is highly appreciated by cinematographers around the world and therefore ARRI Noise Reduction ANR-1 is moderate and does not affect the grainy structure of the noise. The ARRI Noise Reduction ANR-1 just reduces it, nothing more.
While recording MXF/Apple ProRes files, noise reduction will be baked into the footage and therefore MXF/Apple ProRes files cannot be opened and altered in the ARRIRAW Converter (ARC). When recording MXF/ARRIRAW files, the ARRI Noise Reduction ANR-1 is applied for preview (viewfinder and SDI outputs) but not baked into the footage, instead, it will be stored in metadata.
Above you can see some vision I shot with the camera at 1600, 2000, 2500, and 3200 ISO. There is certainly noise in the images once you start shooting at 2000 ISO and above, but in saying that, they clean up very nicely with a bit of noise reduction in post. The noise is also not nasty block noise that you see with some cameras.
Above is an alternative SDR grade an HDR grade done by Ben Allan ACS CSI.
If you want to see just how bad the light actually was where I was shooting, here is a shot on an iPhone. You can see how grainy and blocky the image is.
Because of the size of the sensor, and its latitude, you don’t have to push the ISO on the Mini LF to shoot in lower lighting conditions.
This is why I like ARRI cameras so much. You can put them into situations where most other cameras would look horrible in these type of lighting conditions. You can shoot in very mixed lighting conditions and still get nice skin tones and color rendition.
Would I like to have higher ISO capabilities and cleaner images? Of course, however, I didn’t really feel that any stage the camera was holding me back from shooting in low light conditions.
Wildlife & nature

I primarily film documentaries, wildlife, and nature, so I wanted to see how suitable the camera was for those applications.
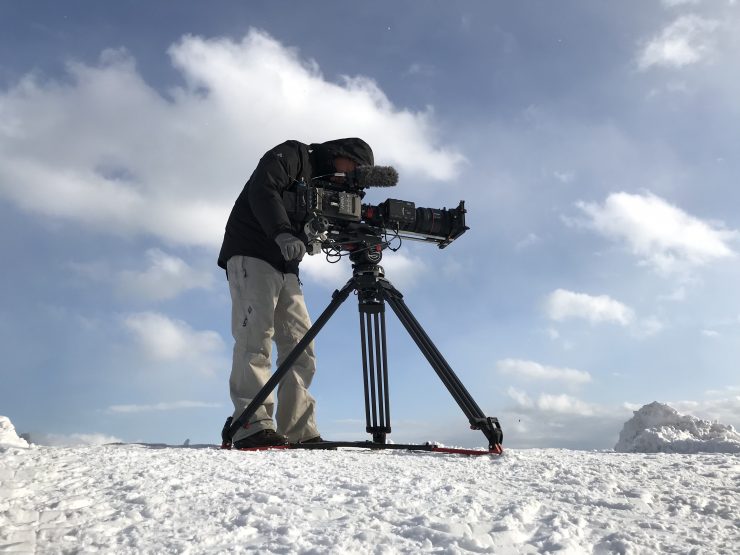
I went and shot in the mountains north of Nagano in Japan to find out. It was freezing cold and snowing heavily and this would not only test out durability but also how easy it was to operate the camera in conditions such as these.
Shooting with a long, fixed focal length lens is hardly ideal for wildlife capture, especially on a camera with a large sensor. I was shooting in heavy snow and across hot springs, so getting and keeping focus on a moving subject was tricky, to say the least. Also, I missed not having the ability to use a Pre-record setting which is especially handy when shooting wildlife.
Above you can see an alternative SDR grade that Ben Allan ACS CSI did.
Despite the shooting difficulties I will still reasonably pleased with the vision I was able to obtain.
Above you can see some more shots I took in the mountains. This version was graded by me.
Above you can see a grade done by Ben Allan ACS CSI.
Mixed, uncontrolled lighting scenario
I went and shot some dancers during a live performance where I had no control over the environment. I wanted to see how the camera performed in a situation like this. This was an interesting test for the camera as it was a mix of different lighting sources and colors. There is no other way to describe the lighting than horrible, this made it a great environment for doing a test like this.
The Mini LF needed to cope with continuously changing lighting, lasers, and drastic exposure changes. I shot the majority of this test at 60fps so you can clearly see how it copes with these changes.
The camera still manages to do a great job in these type of conditions. A lot of cameras fall over in lighting conditions such as these.
90fps
The ALEXA Mini LF is hardly what you would call a high speed camera. It is limited to 90fps in HD or 2K, but you can record those frame rates in ARRIRAW or any of the ProRes options.
As an AMIRA owner, I am well versed with just how good the slow-motion capture is on that camera. I was expecting that the Mini LF would also look good, so did it?
It was no surprise that the 2K footage at 90fps looks really good. From my experience, you don’t lose anything by shooting in higher frame rates on an ARRI camera. There isn’t any loss of sharpness, moire or any degradation in image quality.
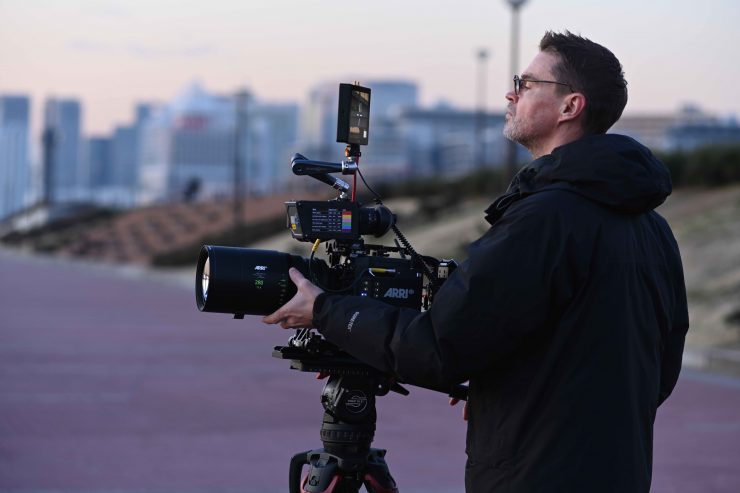
At the top of this section, you can see some footage taken at 90fps in 2K. This was all shot on a 280mm prime lens in difficult conditions.
Usability
The Mini LF is very easy to use. Once it is set up, making changes can be done very quickly.
The camera balances well on the shoulder, and I think this mainly has to do with the position of the power supply. By using the RAB-1 bracket and the bebob power supply, the weight gets evenly distributed between the front and the back of the camera.
The camera was a joy to use and because it isn’t complicated to operate you can get on with shooting instead of wasting time in endless menus.
The great thing about ARRI cameras is there isn’t any big learning curve and you don’t have to spend very long with one to be completely comfortable with how to use and operate it. With a lot of other cameras, this isn’t the case.
ARRI Signature Primes
A big part of the ARRI LF ecosystem is the Signature Primes that were announced back in early 2018.
The Signature Prime lenses use the new LPL mount designed for large format digital sensors, such as the Mini LF.
By using a magnesium construction, ARRI was able to make the lenses around 2lb lighter than the Master Primes.
The Signature Primes have garnered a reputation for capturing warm, smooth skin tones, with exceptionally soft bokeh and delicate flares. They are currently the broadest range of large-format lenses available, with 16 focal lengths ranging from 12 mm to 280 mm.

The Signature Primes cover all image circles, up to 46 mm, making them compatible with any ARRI or third-party camera with an LPL mount.
In a recent interview with ARRI, award-winning cinematographer Roger Deakins CBE, ASC, BSC explained, “The image that the ALEXA LF and the Signature Primes produces, seems to me, more like what my eyes see than anything else I have experienced so far.”
The Signature Primes talk to the LPL mount using LDS-2. LDS-2 is the next evolution of ARRI’s Lens Data System for ARRI’s Electronic Control System and a new generation of lenses. LDS-2 delivers more accurate and faster lens data. Compared to LDS-1 it eliminates the need for initial calibration through absolute encoders which cuts time on set when changing lenses. The new system uses an 8.7x faster interface that enables lens manufacturers to send more data to the camera than before. LDS-2 extends the possibilities of lens data and is being licensed to other lens and camera manufacturers.
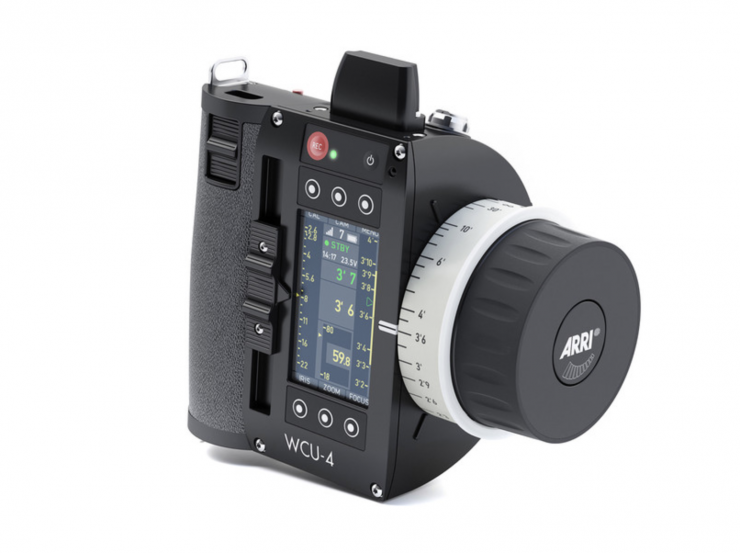
Lenses without LDS can be integrated into the system via the Lens Data Archive (LDA). By mapping a lens, all information about the lens, its scales, name, and serial number can be transferred into a lens archive. When using the lens the next time all that has to be done is to load the lens file for that lens from the Lens Data Archive and calibrate the motors. It takes about 5 minutes to map a lens: after attaching the lens and connecting and calibrating motors (or Lens Data Encoders) on each axis of the lens, the mapping can be done with the Wireless Compact Unit (WCU-4). These lens files can be loaded to the camera.
I got a chance to test out the Signature Primes with the Mini LF. The lenses are beautifully made and easy to use and operate. Even though they look large and heavy, the weight isn’t too bad. For example, the 25mm T1.8 weighs in at 1.9 kg (4.19 lb).

What amazed me was just how sharp they are, even when used wide open. They are just as sharp out on the edges as they are in the middle. They also don’t have that jarring ultra-sharp appearance.
They have a really nice fall off and round bokeh. The color rendition is absolutely spot on. The colors and tonality that you see when using the Signature Primes with the Mini LF are very lifelike.
Using the Signature Primes on an ARRI camera will inevitably give you the best results. Why? Because ARRI has designed the lenses to match and compliment ARRI sensors and ARRI color science. This is very evident when you shoot with the lenses. I was constantly amazed by how good the lenses look on the Mini LF. There is something to be said for using lenses that were designed to be used with a particular camera system.
The lenses while clinical in some ways, do have their own personality. It is hard to explain, but they have a ‘look’ that really seems to suit the MINI LF. They are ultra-sharp, but have a delicate way of dealing with flares and focus fall off. It is almost as if ARRI managed to come up with a very good recipe for the Signature Primes. All the ingredients that make up how they look and perform seem to compliment each other.
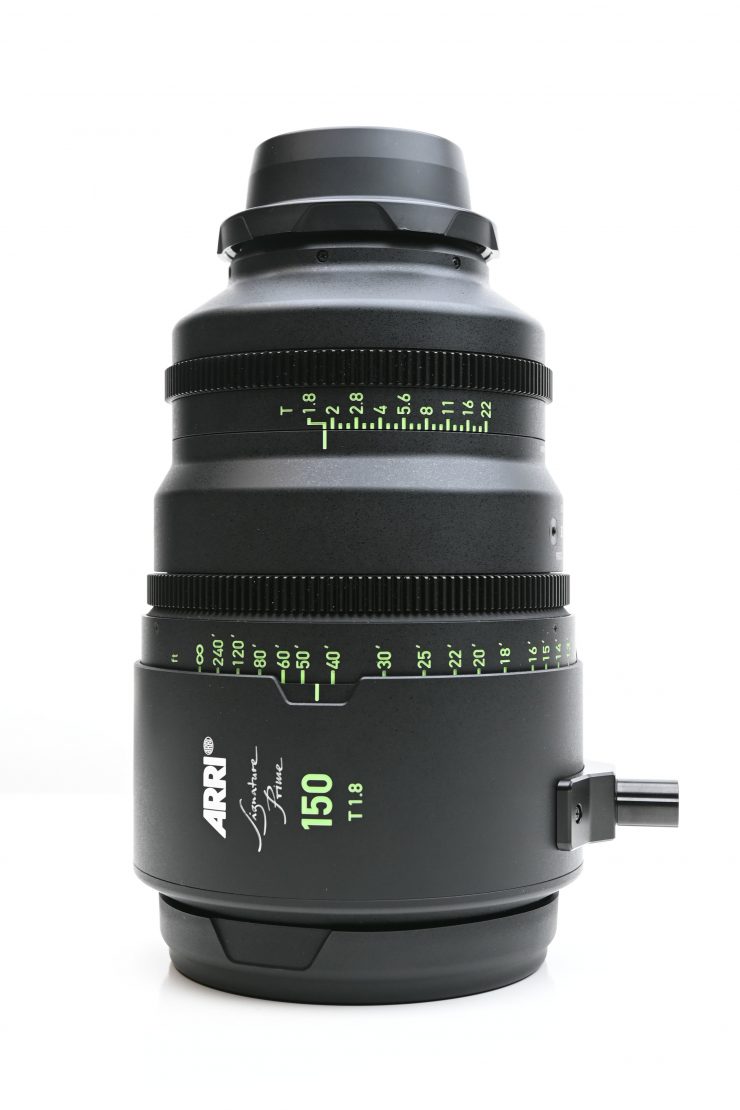
I particularly liked the 150mm and 280mm Signature Primes. Being primarily a documentary shooter I like longer focal length lenses. The 150 and 280mm Signature Prime lenses are phenomenal pieces of glass.
The Signature Primes are extraordinarily good lenses, but so they should be given their price.
Real World Performance
There is no other way to put it, the Mini LF is an extraordinarily good camera. Is it the perfect camera, of course not. This is not a camera that is going to suit everyone. At the end of the day, it up to the person using the camera to take the pictures. You could buy a race car, but if you’re not a race car driver you are not going to be able to win any races. A camera is just a tool. Having a good tool is always helpful, but it is still just a tool.

As an AMIRA owner, I think I had a preconceived idea that the ALEXA Mini LF was going to just be a full-frame version of the ALEXA Mini. I have used the ALEXA Mini and while there are some similarities, the Mini LF, at least in my opinion, takes things up a notch.
The additional latitude you get over the original Mini, coupled with a better design, more user buttons, and a larger sensor, shows just what a few years of R&D can do. Anyone who thinks this is just a mildly updated ALEXA Mini is severely underestimating just how good the improvements are.
The Mini LF is very easy to use and the results you get are impressive. It is far and away the best camera I have ever used when it comes to straight image quality. No matter what you throw at it, the footage always seems to look good. It is also so easy to grade and deal with the footage after you have finished shooting.
It is not the perfect camera and I very much doubt there will ever be such a thing. If you can’t produce good results with any of today’s digital cinema cameras then you are probably in the wrong occupation.
At the end of the day, a camera is just a tool, and it is up to the user to get the best results out of it. The camera doesn’t frame up a shot or capture material for you. Without having someone who knows how to use it, it is just an expensive doorstop.
Buying an ALEXA Mini LF isn’t suddenly going to make you a top tier cinematographer.
Is shooting full-frame a benefit or a hindrance?
Well, it’s both. It really depends on what you are shooting. I love the ability to get ultra-wide, undistorted shots. Even a 35mm will get you a reasonably wide field of view. I also love the aesthetic of full frame. There is just something about it that is more pleasing to the eye. That’s not to say full frame is the perfect choice for all applications, because it clearly isn’t.
The negatives for me are when it comes to using zoom lenses and getting shots at any type of distance. There really aren’t that many full-frame cinema zoom lenses out there on the market. If you are shooting documentaries or wildlife on a full-frame sensor you are going to lose that added length you get when shooting S35.
For instance, I can’t use the Canon Canon CINE-SERVO 50-1000mm without using some sort of adaptor or cropping the image in post. With some dedicated S35 shooting modes you could get the best of both worlds.
You can, of course, drop down to UHD or HD/2K and use a smaller area of the sensor with certain S35 lenses if you need too, but the majority of S35 glass won’t cover the sensor. I would like to see ARRI introduce some S35 shooting modes to rectify this.
The other problem with full-frame and shooting in 4K and above resolutions is your focus has to be spot on, otherwise, it looks horrible. It is very easy, especially if you want to shoot fairly wide open, to mess up the focus if you are not careful. I found that on occasion I was getting images that were a little soft because I wasn’t checking the focus closely enough.
Even when shooting the monkeys on a 280mm prime lens at T8, I was struggling at times with focus.
Remote Control
The ALEXA Mini LF can be remotely controlled in a variety of ways:
- The Wireless Compact Unit WCU-4 is a sophisticated, feature-rich and user-friendly 3-axis hand unit for wireless remote lens and camera control. It includes an integrated lens data display and offers extended ALEXA camera control.
- The Single Axis Unit SXU-1 controls a single lens axis. On set the SXU-1 perfectly complements the 3-axis WCU-4 as a separate iris control unit, or it can be used on its own, offering a low cost option to productions that do not need multi-axis wireless lens control.
- By connecting the Multi Viewfinder MVF-2 with a 10 m/33 ft VF cable to the ALEXA Mini LF, the viewfinder becomes a handy remote control for all camera functions as well as a monitor for the live image the camera is capturing.
- The ALEXA Mini LF can be controlled wirelessly (over WiFi) or by cable (ETH connector) from a computer, tablet or smart phone running a web browser with the web remote. Please note that the ALEXA Mini LF web remote capabilities will be in the beta test stage when the camera ships first and will be updated with the next Software Update Package.
- The Operator Control Unit OCU-1 is an addition to the WCU-4 lens control system on ALEXA Mini, ALEXA LF and ALEXA Mini LF that connects to the camera via an LBUS cable. The OCU-1 enables operators to over-ride and return focus, iris, and zoom controls at the touch of a button.
- The Master Grips combine effective camera stabilization with comprehensive lens and camera control. They connect to the camera via LBUS cables.
- The General Purpose IO Box GBP-1 is a break-out box that works with ALEXA Mini, ALEXA Mini LF and AMIRA. It allows users to build custom button interfaces and electronic controls. The box can be connected to the camera EXT port which it also replicates. It provides protected input channels that can be flexibly mapped to various functions.
Tools
ARRI has a range of tools to assist you that are free to download and use. These include the ARRI online Frame Line & Lens Illumination Tool, the Formats & Data Rate Calculator, the LUT Generator, and Camera Simulators.
ARRI also has three free-of-charge apps for download: ARRIRAW Converter (ARC), ARRI Color Tool (ACT) and ARRI Meta Extract (AME), all available as an app but also as a command-line tool so big post houses can integrate them into their own workflows.
You can find all of these tools here.
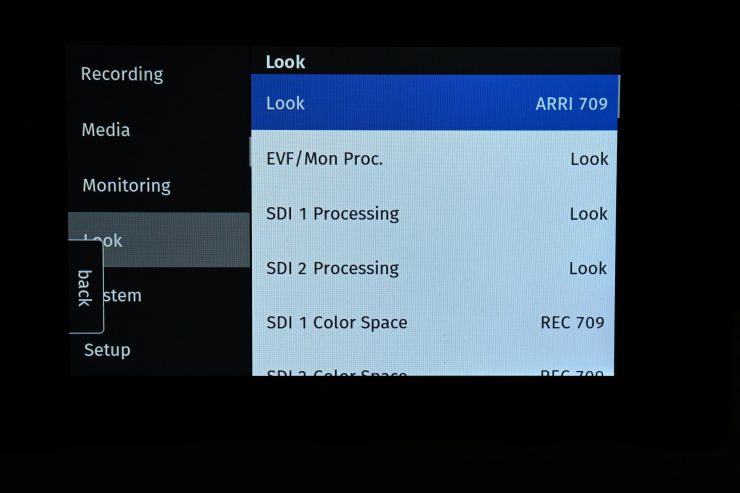
Color Management and Image Processing
The camera supports ARRI Look Files available for SDR, HDR PQ, and HDR HLG. ARRI ALEXA Mini offers 16-bit linear in ALEXA Wide Gamut/Log C color space. It includes Target output color spaces: Log C, Rec 709, Rec 2020. You can also obtain a free color tool from ARRI, their ARRI Color Tool (ACT).
ARRIRAW and ProRes files are very straight forward and easy to use.
For ARRIRAW files you simply import them into ARRIRAW Converter, or you can use other compatible software such as Davinci Resolve.
The footage the camera produces is so easy to work with. I would go as far as to say that a Mini LF file is incredibly easy to grade.
With the majority of footage I took, if I wanted to, I could literally just place the same viewing LUT I was using on the footage and it looks great. This is nice to be able to do if you need to turn material around quickly and it isn’t going to be graded by anyone.
I got Ben Allan ACS CSI to grade up material from the camera, so I thought I would ask him how he dealt with the footage and what his impressions were. Here are the questions I asked Ben:
Q. How did you find the material from the ALEXA Mini LF to grade and work with?
The Mini LF footage is very easy to work with, whether it’s RAW or ProRes even on a 16” MacBook Pro it is seamless. The format is very robust as well, with a lot of data density so when you start stretching it out and moving things around, there’s so much detail to work with.
Q. What were your impressions of the footage?
The footage covered very different scenarios, from mountains covered in snow to Tokyo Bay at night, so there were plenty of things that could trip up a camera and the Mini LF really handled all of them beautifully, especially skin tones in low light.
Q. Was there anything specific you noticed from the footage?
It’s become a cliché to say ARRI’s color is great but it really does have a very solid starting point and a lot of flexibility with where you take it from there. With skin tones, it’s amazing how much you stylize the look and still have the skin tones looking natural and flattering.
Q. How did you find the noise from the low light shots?
There is some noise in the low light footage, especially when I started dragging color and detail out of the shadows. It’s amazing how much information is in there and there’s some noise as well when you really dig down but with only a little bit of NR in Resolve it completely disappears.
Q. You graded some of the material in HDR. How suitable was it for HDR delivery?
It’s an ideal camera for HDR because of the quality of the recordings combined with the broad color response, it fills the HDR space effortlessly. There were scenes in the landscape footage where I took it right up to 1000 nits and there was still incredible subtlety in the different shades of white in the snow. In the night footage, it was equally easy to get a lot of differentiation in the darker colors.
Is there anything else you think you should mention?
The footage from the Mini LF is an absolute pleasure to grade. It responds easily to all the controls in Resolve and gives you a huge amount of freedom to craft the look while also being extremely simple to keep looking natural. Especially in HDR, it is a lot of fun to work with.
This is not an Alexa Mini replacement
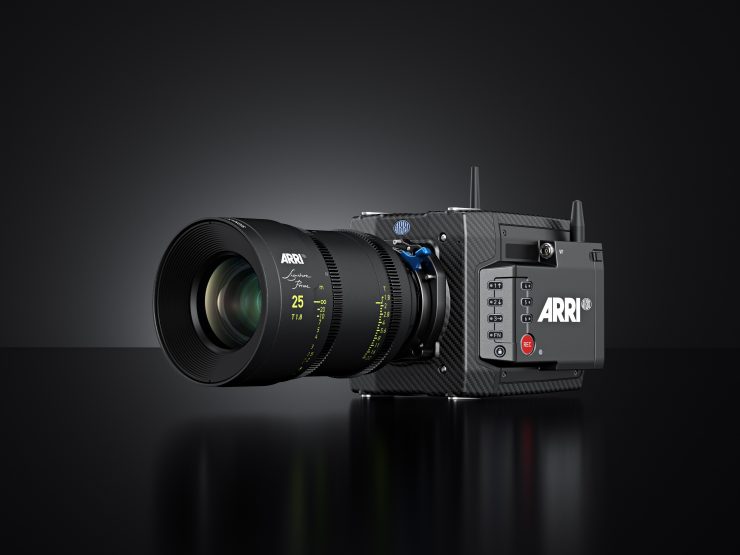
The Alexa Mini LF is just another camera in ARRI’s lineup and it will still continue to manufacture and sell the current Alexa Mini.
“The ALEXA Mini LF is a fantastic addition to our large-format system and will complement the ALEXA LF, rather than replace it. The ALEXA LF is a great camera capable of high-speed, which is especially important for commercials where 150 fps in 4.5K resolution and full image quality is important. It is, in fact, how an ARRIFLEX 435 still complements an ARRICAM on set. With the addition of the Mini LF we now have an answer for all shooting requirements.”
Stephan Schenk, Managing Director of ARRI Cine Technik
ARRI is smart enough to realize that not everyone needs or wants to shoot with a full-frame sensor camera. Given that a lot of potential customers of the Mini LF will still want to shoot Super 35 material, ARRI has said that they are looking into adding Super 35 recording formats in the form of a future Software Update Package.
Do existing ALEXA Mini accessories still work?
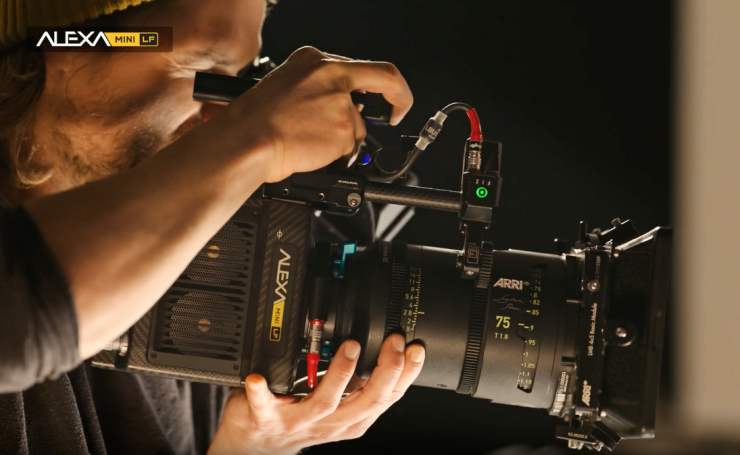
In short yes. Most existing ALEXA Mini accessories still fit and work on the Mini LF. The only items that won’t are brackets that were designed to go down the left-hand side of the body. As there is now a module sticking out that wasn’t found on the original ALEXA Mini.
Price & Availability
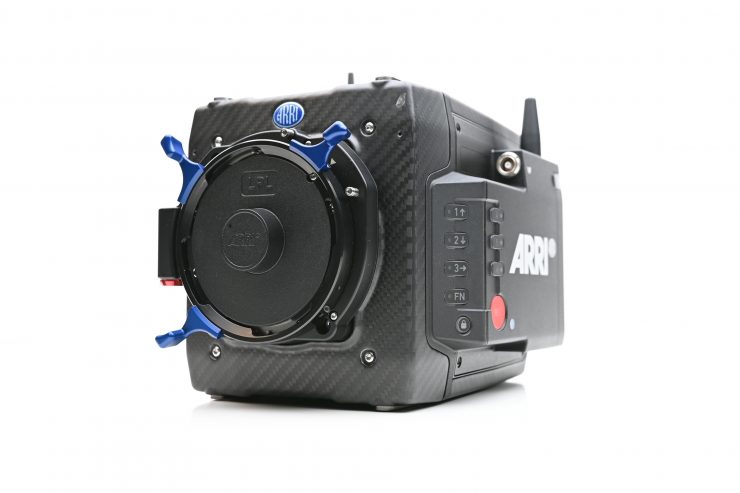
The price of the ALEXA Mini LF is not for the faint-hearted. Here are the prices:
- The ARRI ALEXA Mini LF Digital Cinema Camera Body $58,760.00 USD
- ARRI ALEXA Mini LF Camera & Lens Mount Set $58,890 USD
There are bunch of accessory sets (called Ready To Shoot Sets) that include the Mini LF with LPL mount and LPL-PL adapter, or you have the opportunity to just purchase every item individually.
While this is still serious money, it’s not nearly as expensive as the ALEXA LF. At $58K it is still competitively priced when you look at its main competition.
As a comparison, the existing ALEX Mini sells for $47,800.00 USD, and the ALEXA Mini with 4:3 and ARRIRAW License Keys is $54,870.00 USD.
Accessory Costs
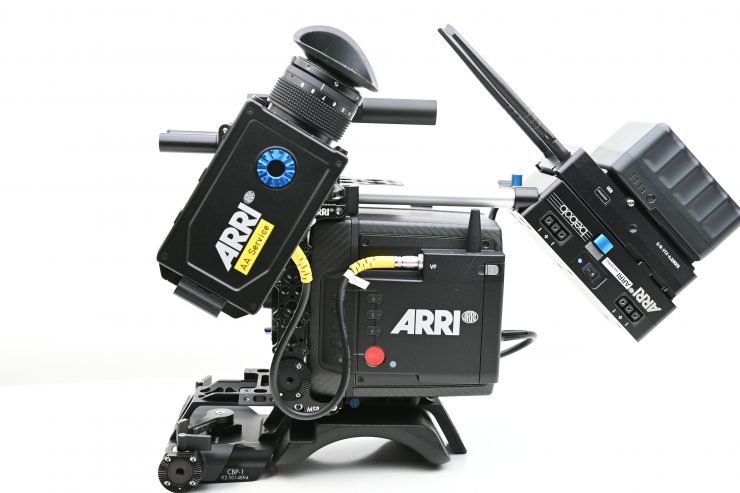
- The MVF-2 EVF costs $7,060 USD
- A 1TB Codex Compact Drive costs $2,380 USD
- Codex Compact Drive Reader (USB-C) $690 USD
- Codex Compact Drive Adapter $550 USD
No matter which way you look at these prices, it’s still a lot of money. A workable ALEXA Mini LF package is probably going to set you back at least $70-80K US.
Competition
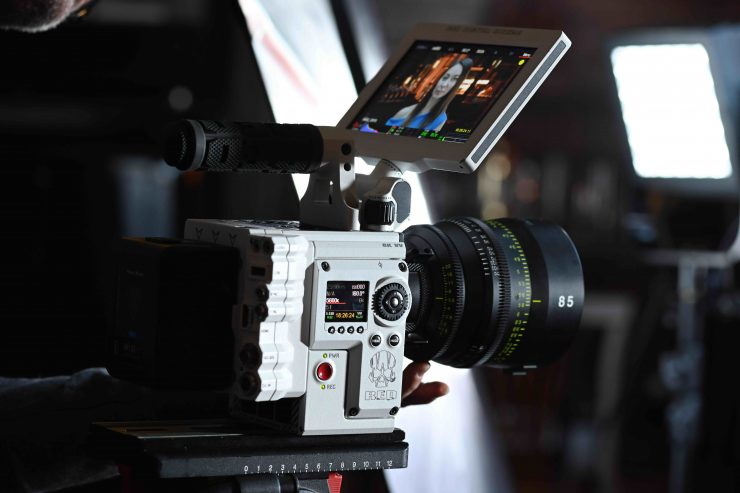
As a competition comparison, the Sony VENICE can be purchased for $42,000US (body only). Unlike the Sony VENICE, with the ALEXI Mini LF you don’t have to purchase any licenses to unlock features.
The RED WEAPON MONSTRO 8K VV is $54,500 USD body only. Despite the high price of the ALEXA Mini LF, they have already been snapped up by rental houses everywhere. When we are talking about movies or episodic television with huge budgets, productions won’t even blink when it comes to hiring this camera.
Camera choice comes down to using the right tool for the right job. A VENICE might be the right choice for one project and a RED MONSTRO could be the right choice for another. There is no such thing as the perfect camera and there is not one camera system that is perfect for every scenario.
ALEXA Mini LF Ready to Shoot Set $75,000 USD
ALEXA Mini LF Ready to Shoot sets contains an ALEXA Mini LF camera with LPL Mount, MVF-2 viewfinder, recording media and a number of must-have accessories to get you up and shooting quickly.
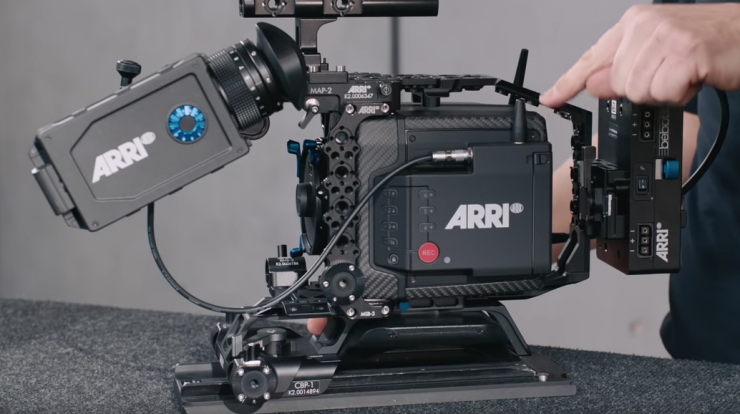
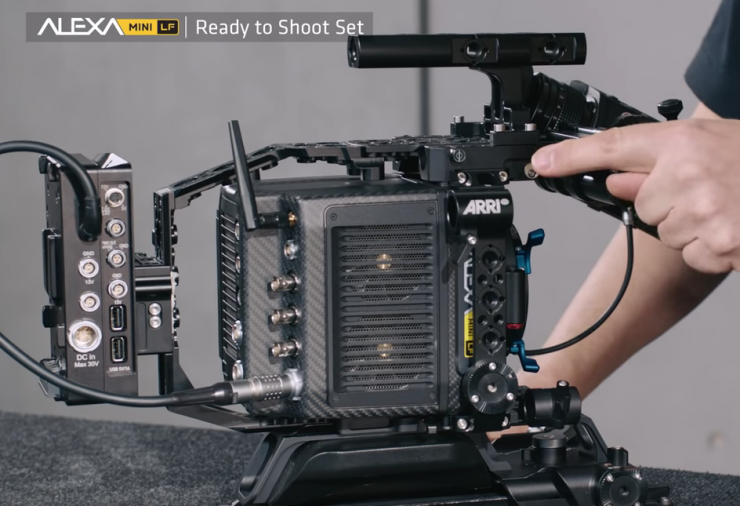
Includes:
1 x K1.0024074 ALEXA Mini LF camera body
1 x K2.0018983 ARRI LPL Lens Mount ALEXA Mini/AMIRA
1 x K2.0016936 PL-to-LPL-Adapter
2 x K2.0024130 Codex Compact Drive 1TB (CA08-1024)
1 x K2.0020916 ALEXA Mini LF Multi Viewfinder MVF-2
1 x K2.0023915 Cable VF (0.35m/1.15ft)
1 x K2.0023943 Cable VF (0.5m/1.5ft)
1 x K2.0023839 Mini Adapter Plate MAP-2A
1 x K2.0006140 Mini Viewfinder Bracket MVB-1
1 x K2.73002.0 Center Camera Handle CCH-2
1 x K2.0023546 Mini Side Bracket MSB-3
1 x K2.0014957 Mini Side Bracket MSB-2
1 x K2.0014894 Compact Bridge Plate CBP-1
1 x K2.0013937 Rear Accessory Bracket RAB-1
1 x K2.0023406 RAB-1 Clamp 2
1 x K2.0006186 Rod Mounting Bracket RMB-3
1 x K2.66255.0 15mm Reduction Insert
1 x K2.0014532 Gold Mount Power Splitting Box Mk II
1 x K2.0015896 Bottom Plate 300mm/12″
1 x K2.75007.0 Power Cable Straight KC-50 2m
The ALEXA MINI LF is already selling well
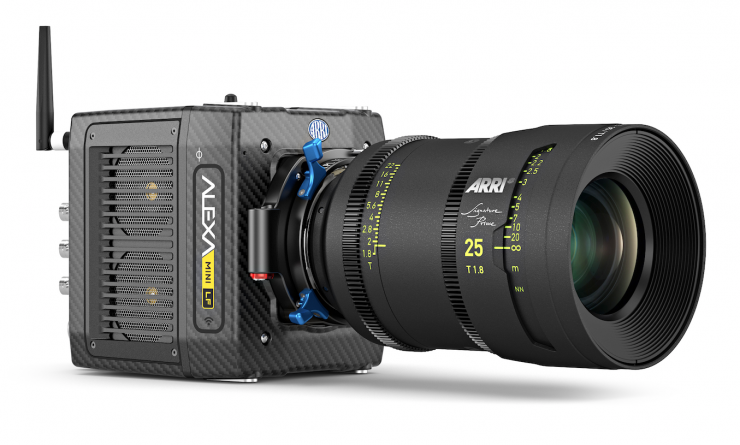
Maybe we all expect more, but as I said earlier, if it ain’t broke, don’t fix it. Everyone loves the image, reliability and simplified operation of the ALEXA Mini, so all ARRI really had to do was take all of that and put it into a new camera that was capable of meeting proper 4K requirements. Could they have gone further? Possibly. Should they have made a camera with an even larger resolution? Maybe.
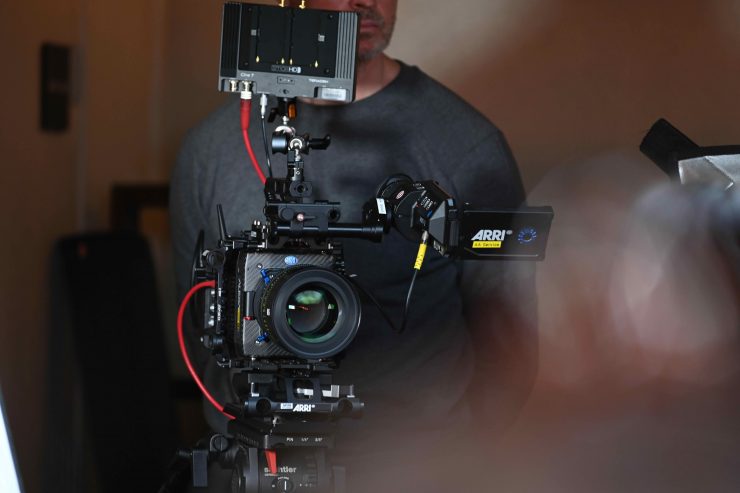
While a lot of people are going to complain about the incremental improvement in resolution and the high asking price, the actual cinematographers and camera operators that will be using this camera probably won’t. ARRI has been successful because they know the market and they know what their users want. There is a reason the ALEXA Mini is such a popular camera and why ARRI dominates the high-end rental market. They don’t buy into the marketing BS, and they aren’t going to start following companies down the never-ending resolution road. As ARRI has always said, it’s about better pixels, not bigger pixels.
ARRI doesn’t publically disclose sales figures but they told me that they are well into four-digit numbers and orders still keep coming in. In fact, In January 2020 ARRI had the second-highest order intake since the announcement of the ALEXA Mini LF, and, I think, that does not even include the “Deakins- 1917-effect” yet. The camera is VERY popular and doing great.
ALEXA Mini LF Specifications
| Sensor Type | Large Format ARRI ALEV III (A2X) CMOS sensor with Bayer pattern color filter array |
| Sensor Size | 36.70 x 25.54 mm / 1.444 x 1.005″ ⌀ 44.71 mm / 1.760″ |
| Photosite Pitch | 8.25 μm |
| Sensor Frame Rates | 0.75 – 90 fps |
| Sensor Active Image Area (photosites) | LF Open Gate ProRes 4.5K: 4448 x 3096 LF Open Gate ARRIRAW 4.5K: 4448 x 3096 LF 16:9 ProRes HD: 3840 x 2160 LF 16:9 ProRes 2K: 3840 x 2160 LF 16:9 ProRes UHD: 3840 x 2160 LF 16:9 ARRIRAW UHD: 3840 x 2160 LF 2.39:1 ProRes 4.5K: 4448 x 1856 LF 2.39:1 ARRIRAW 4.5K: 4448 x 1856 |
| Sensor Active Image Area (dimensions) | LF Open Gate ProRes 4.5K: 36.70 x 25.54 mm / 1.445 x 1.006″ LF Open Gate ARRIRAW 4.5K: 36.70 x 25.54 mm / 1.445 x 1.006″ LF 16:9 ProRes HD: 31.68 x 17.82 mm / 1.247 x 0.702″ LF 16:9 ProRes 2K: 31.68 x 17.82 mm / 1.247 x 0.702″ LF 16:9 ProRes UHD: 31.68 x 17.82 mm / 1.247 x 0.702″ LF 16:9 ARRIRAW UHD: 31.68 x 17.82 mm / 1.247 x 0.702″ LF 2.39:1 ProRes 4.5K: 36.70 x 15.31 mm / 1.445 x 0.603″ LF 2.39:1 ARRIRAW 4.5K: 36.70 x 15.31 mm / 1.445 x 0.603″ |
| Recording File Container Size (pixel) | LF Open Gate ProRes 4.5K: 4480 x 3096 LF Open Gate ARRIRAW 4.5K: 4448 x 3096 LF 16:9 ProRes HD: 1920 x 1080 LF 16:9 ProRes 2K: 2048 x 1152 LF 16:9 ProRes UHD: 3840 x 2160 LF 16:9 ARRIRAW UHD: 3840 x 2160 LF 2.39:1 ProRes 4.5K: 4480 x 1856 LF 2.39:1 ARRIRAW 4.5K: 4448 x 1856 |
| Recording File Image Content (pixel) | LF Open Gate ProRes 4.5K: 4448 x 3096 LF Open Gate ARRIRAW 4.5K: 4448 x 3096 LF 16:9 ProRes HD: 1920 x 1080 LF 16:9 ProRes 2K: 2048 x 1152 LF 16:9 ProRes UHD: 3840 x 2160 LF 16:9 ARRIRAW UHD: 3840 x 2160 LF 2.39:1 ProRes 4.5K: 4448 x 1856 LF 2.39:1 ARRIRAW 4.5K: 4448 x 1856 |
| Exposure Latitude | 14+ stops over the entire sensitivity range from EI 160 to EI 3200 as measured with the ARRI Dynamic Range Test Chart (DRTC-1) |
| Exposure Index | Adjustable from EI 160-3200 in 1/3 stops EI 800 base sensitivity |
| Shutter | Electronic shutter, 5.0°- 356° or 1s – 1/8000s |
| Recording Formats | MXF/ARRIRAW MXF/Apple ProRes 4444 XQ MXF/Apple ProRes 4444 MXF/Apple ProRes 422 (HQ) MXF/Apple ProRes 422 |
| Recording Media | Codex Compact Drives |
| Recording Frame Rates | LF Open Gate ProRes 4.5K: 0.75 – 40 fps LF Open Gate ARRIRAW 4.5K: 0.75 – 40 fps LF 16:9 ProRes HD: 0.75 – 90 fps LF 16:9 ProRes 2K: 0.75 – 90 fps LF 16:9 ProRes UHD: 0.75 – 60 fps LF 16:9 ARRIRAW UHD: 0.75 – 60 fps LF 2.39:1 ProRes 4.5K: 0.75 – 60 fps LF 2.39:1 ARRIRAW 4.5K: 0.75 – 60 fps Note: maximum fps values are preliminary information |
| Recording Modes | Standard real-time recording No Pre-recording No Intervalometer |
| Viewfinder Type | Multi Viewfinder MVF-2 with 4″ flip-out monitor |
| Viewfinder Technology | OLED viewfinder display LCD fold out monitor |
| Viewfinder Diopter | Adjustable from -5 to +5 diopters |
| Viewfinder Resolution | 1920×1080 |
| Color Output | Rec 709 Rec 2020 Log C Custom Look (ARRI Look File ALF-2) |
| Look Control | Import of custom 3D LUT ASC CDL parameters (slope, offset, power, saturation |
| White Balance | Manual and auto white balance, adjustable from 2000K to 11000K in 10K steps Color correction adjustable range from -16 to +16 CC 1 CC corresponds to 035 Kodak CC values or 1/8 Rosco values |
| Filters | Built-in motorized ND filters 0.6, 1.2, 1.8 Fixed optical low pass, UV, IR filter |
| Image Outputs | 1x proprietary signal output for MVF-2 viewfinder 2x SDI Out: 1,5G (SMPTE ST292-1), 3G (SMPTE ST425-1, ST425-3), 6G (SMPTE ST2081-10) uncompressed video with embedded audio and metadata |
| Lens Squeeze Factors | 1.00 1.25 1.30 1.50 1.65 1.80 2.00 |
| Exposure and Focus Toolsr | False Color Zebra Zoom Aperture and Color Peaking |
| Audio Input | 1x LEMO 6pin balanced stereo line in with 12V power output (Line input max. level +24dBu correlating to 0dBFS) |
| Audio Output | SDI (embedded) 3,5mm stereo headphone jack (on MVF-2) |
| Audio Recording | 2 channel linear PCM, 24 bit 48 kHz |
| Remote Control Options | MVF-2 viewfinder can act as wired remote control with 10m/33ft cable Web-based remote control from smart phones, tablets and laptops via WiFi & Ethernet Camera Access Protocol (CAP) via Ethernet & WiFi GPIO interface for integration with custom control interfaces WCU-4 hand-unit with control over lens motors and operational parameters via built-in white radio SXU-1 hand-unit with control over one lens channel OCU-1 and Master Grip control of lens and user buttons |
| Interfaces | 1x LEMO 5pin LTC Timecode In/Out 1x LEMO 10pin Ethernet for remote control and service 1x BNC SYNC IN 1x LEMO 7pin EXT multi purpose accessory interface w. RS pin and 24V power output 1x LEMO 4pin LBUS (on lens mount) for lens motors, daisy chainable 1x USB 2.0 in media bay (for user setups, look files etc) |
| Wireless Interfaces | Built-in WiFi module (IEEE 802.11b/g) Built-in White Radio for ARRI lens and camera remote control |
| Lens Mounts | LPL lens mount with LBUS connector PL-to-LPL adapter Leitz M mount (availbale from Leitz) |
| Flange Focal Depth | LPL mount: 44 mm with PL-to-LPL adapter: 52 mm |
| New Header | New Body |
| New Header | New Body |
| Power Input | 1x LEMO 8pin (10.5-34 V DC) |
| Measurements (HxWxL) | 140 x 143 x 188 mm / 5.5 x 5.6 x 7.4″ (camera body with LPL lens mount) |
| Weight | ~ 2.7 kg / ~ 6.0 lbs (camera body with LPL lens mount) |
| Operating Temperature | -20° C to +45° C / -4° F to +113° F @ 95% relative humidity max, non condensing, splash and dust proof through sealed electronics |
Learning about the ALEXA Mini LF
If you’re planning to rent the Mini LF and would like to get familiar with it and ARRI’s Large-Format eco-system before getting your hands on the camera, online training company MZed offers an official ARRI Academy course, presented by Senior Trainer Florian Rettich.
The eight-hour training series covers operation of the ALEXA LF and Mini LF, the Signature Primes lenses, the various lens mounts as well as workflows for different productions, and offers an official ARRI certificate upon completion of the training.
Perspective from someone who bought a Mini LF
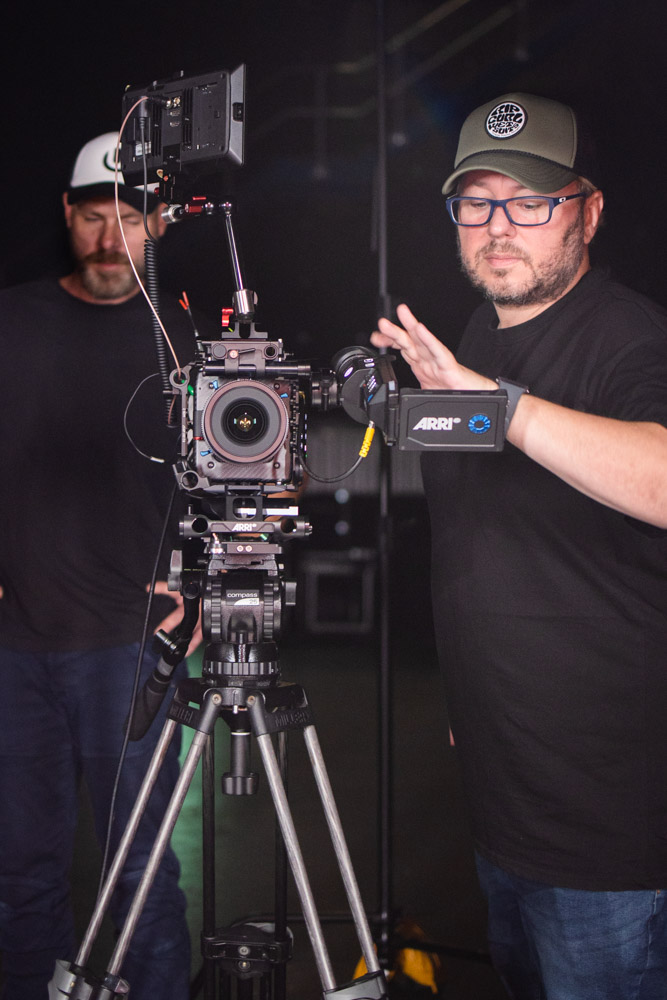
I thought it was a good idea to get an additional perspective from someone who bought a Mini LF. Mick Jones is a DP in Sydney and he previously was an owner/operator of a Sony F55.
I reached out to Mick to ask him why he chose to replace his F55 with a Mini LF and what his impressions of the camera were so far.
Q. Please give us a little bit of background about yourself and what type of work you do.
I’m a Director/DP and I’ve been in the media production industry for over 20 years with my early career beginning in cable and broadcast TV. From there I went out on my own shooting and editing for action sports TV shows and over the years I have worked on a wide variety of productions.
From kids’ television series for the BBC and Nickelodeon to Directing and shooting Music Videos for Universal Music and Sony Records and also commercials, brand films, fashion films, network promos, and documentary work.
I recently shot the launch promo for the Virgin Australia Supercars Championship for Fox Sports with the ARRI ALEXA Mini LF.
Q. As a long time Sony F55 owner, why did you choose to sell that camera and purchase a Mini LF?
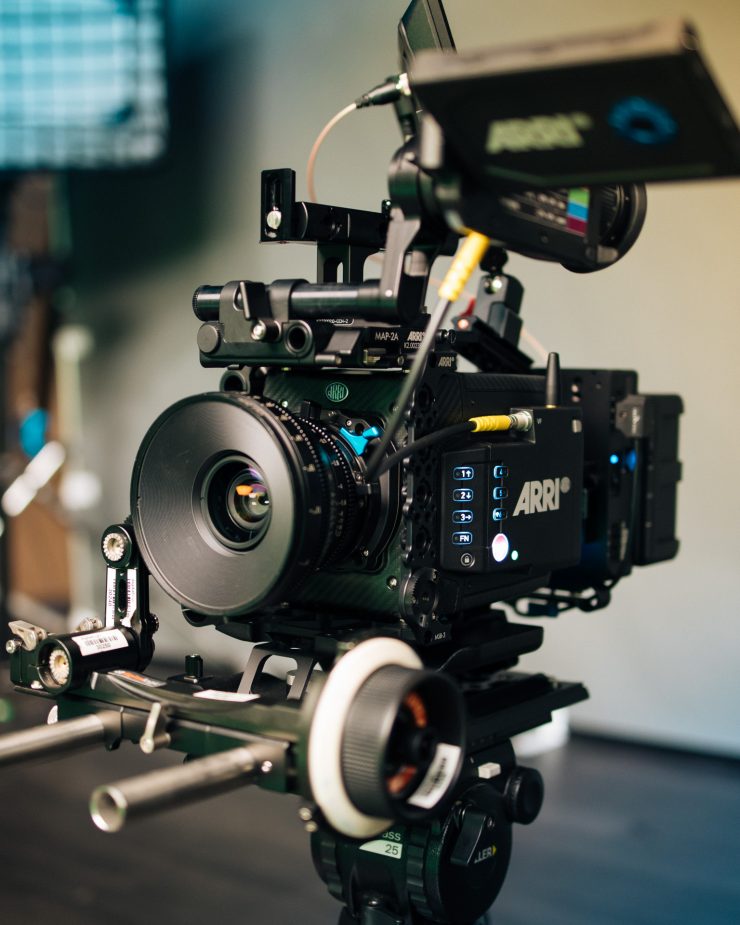
I’ve always thought that the ARRI digital cinema cameras have been the holy grail of image quality and ease of workflow. And I love full-frame imagery. When shooting stills I would always get jealous that I couldn’t get the same look out of my cinema cameras, sure you could get it with DSLRs and the mirrorless cameras but not really to the level of quality and range, etc that this camera can do. But yeah, full-frame was a big reason for looking to get a new camera.
I bought the Sony F55 as soon as it came out and it was put to use on a specific production, which was a kid’s TV series I was DP’ing. It was a live action/animation shoot that required 4K acquisition for a high definition distribution. It was the perfect camera for the job as the XAVC codec was very efficient and for the sheer volume of footage being shot (40-day shoot schedule) and the compositors found it easy to work with.
That said I decided to sell the camera after 7 years of being a workhorse and move to the ARRI ALEXA Mini LF. There is a multitude of reasons for this. Although a very capable camera I had my frustrations with the F55. I could get really great imagery out of it but I always felt it was a little un-intuitive to use, often I felt like I was “battling” with the camera to get the most out of it. The menu system was frustrating and the complexity of the different shooting picture styles was also a turn-off. I think once they moved that camera into S-Log 3 territory I was ready to move on. I personally didn’t like the images as much with the new gamma. I also found the lack of LUT support in the camera problematic, and the standard LUTS for it wasn’t a very appealing look to send to a client monitor, in my opinion. The two-stage ND wheel was also a bit lacking… really would have just liked 2, 4 and 6 stop ND wheel The two-stage (0.9/1.8) made it hard to maintain your stop through different shooting conditions.
Q. What made you choose the Mini LF over other digital cinema cameras?
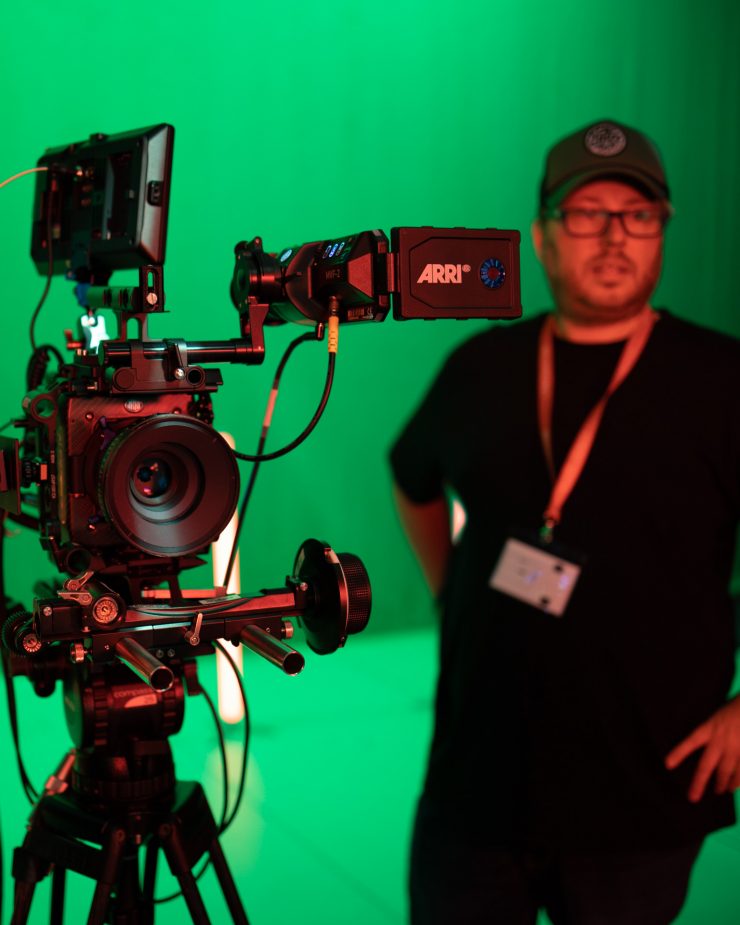
Choosing the ARRI over other digital cinema cameras was down to my personal taste of loving every bit of working with ARRI gear in general as well as the versatile feature set of the Mini LF. It had everything I wanted in a camera in terms of features, with no compromises on how I like to work in terms of lighting, picture quality or form factor. The large-format sensor means I can shoot with such a variety of lenses from full-frame cine lenses, anamorphics, full-frame stills lenses (EF mount), classic super 35 cine lenses and I can shoot Full Frame or super 35 or open gate and basically have all the format options I want. Obviously there are cameras with similar high-end features like the VENICE and RED MONSTRO, but I find the ARRI cameras are technically so easy to use and operate. The picture quality was also a big factor in my decision.
The menus are so streamlined and basic and there aren’t dozens of combinations of gamma and color matrix options to bog you down. And I’ve always found the image I am sending to video village or client monitor looks amazing out of the box and that can be a great confidence boost to clients viewing the live pictures.
This particular camera also doesn’t need licenses to unlock certain features like full frame, anamorphic or RAW, nor does it need an external recorder to record RAW. It is a small camera that can do all of that without any add ons either physically or in software.
Another factor for choosing ARRI for me was the level of customer service. It’s second to none and I’ve dealt with all the other major brands. Sean, Brett and the team at ARRI Australia have just been so good to deal with. They really go the extra mile and are all ears with feedback, questions or concerns. The best customer experience yet for me by a long shot.
Q. The Mini LF is limited to 4.5K resolution. With the push by certain manufacturers towards 6K and 8K, was purchasing a camera that is limited to 4.5K a concern?
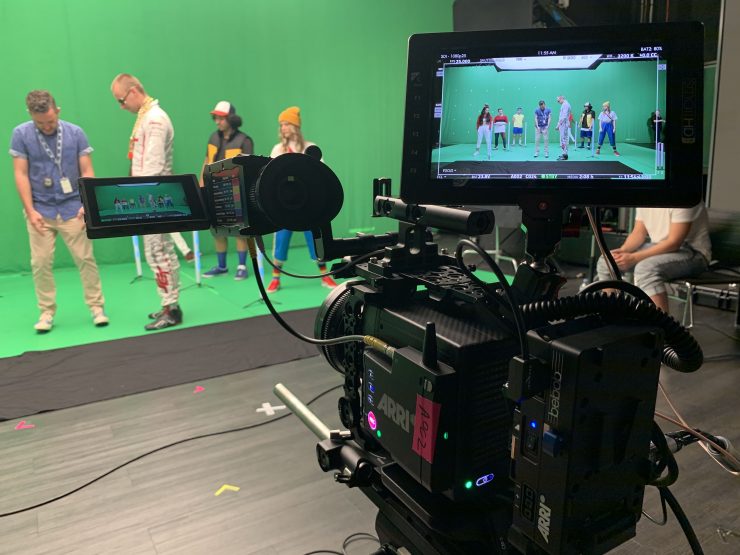
In a word. No. Personally I consider other factors significantly more important than resolution such as dynamic range, exposure latitude, noise pattern, workflow and the actual user experience of working with a camera day in day out. I think 4.5K and also the 4K UHD option in the camera is a real sweet spot for resolution and ease of post workflow.
Q. What are your impressions of the Mini LF so far?
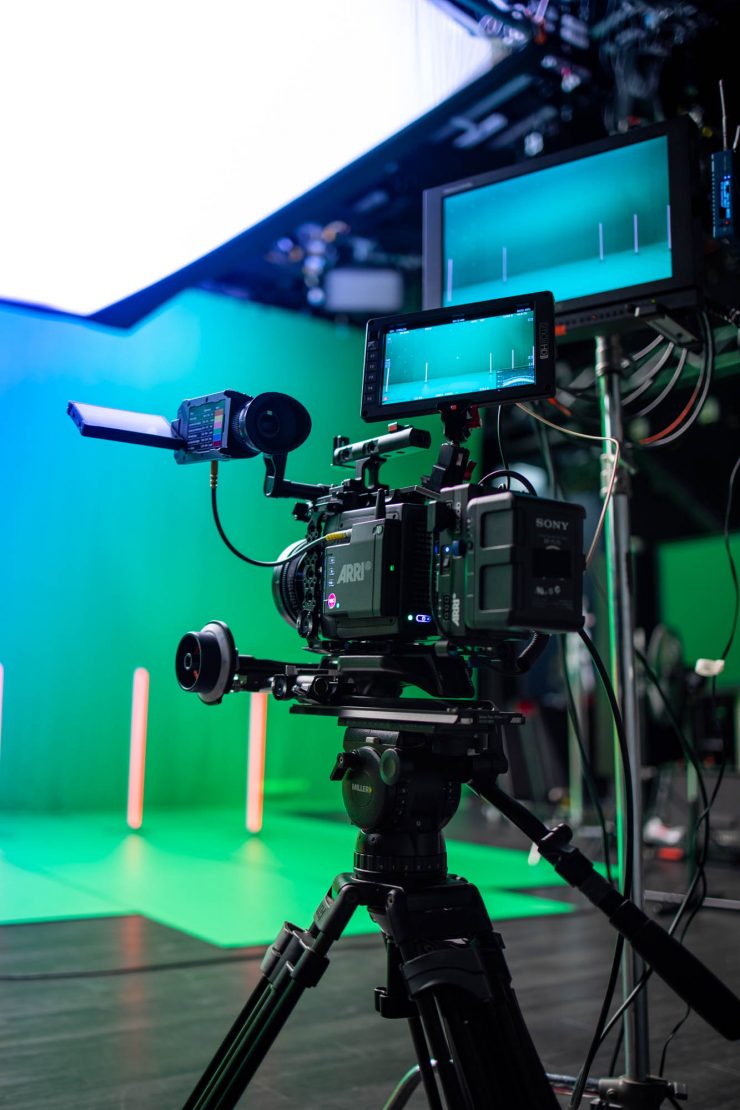
As I touched on before, the ease of user experience is like nothing else. No manual required. The setup of the camera through the menus is so intuitive. The dynamic range, low noise, and highlight response is beyond amazing. I love the texture of the image and particularly the color! Log C is the most forgiving and versatile curve I’ve used and people/skin tone just looks so good with it.
Q. What are the camera’s biggest strengths?
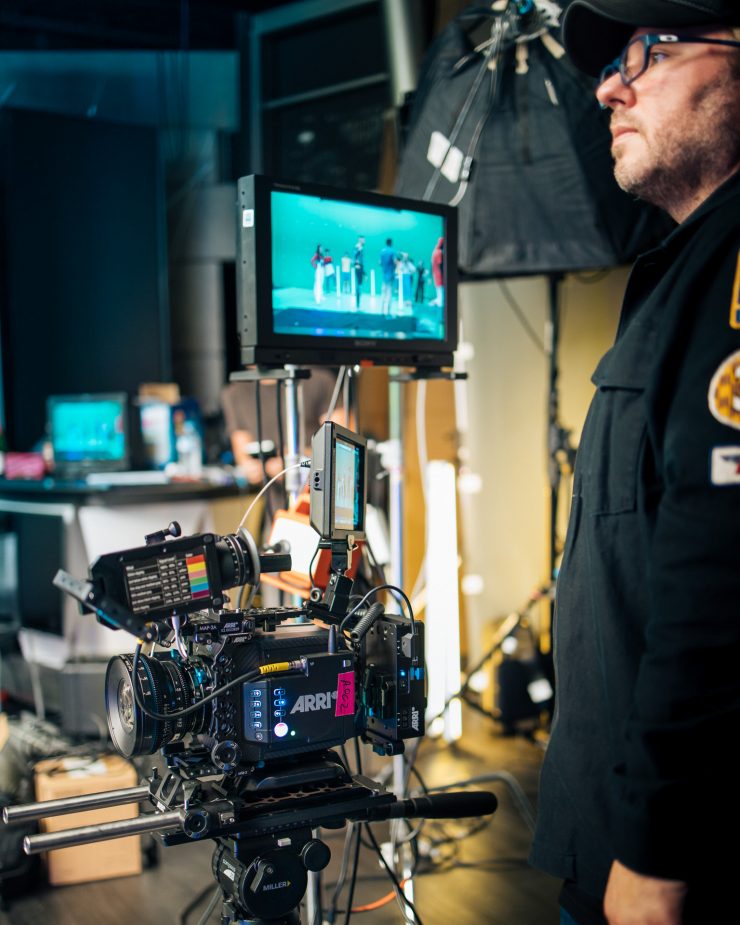
Big strengths for me are dynamic range and exposure latitude. I feel like I have more flexibility to expose skin tones higher or lower than “ideal” according to my taste and don’t get punished by not having skin tones where the gamma curve wants you to exactly put them on other cameras. Everyone works differently and I like the freedom this camera gives me in lighting.
The size and form factor of the camera is also a big plus. It is so small for what is packed inside. It doesn’t require huge camera support, it can go easily on gimbals, in a vehicle, etc and on a lightweight tripod. It can be stripped back a lot to be a very basic and highly functional handheld unit or built up a little for shoulder work and of course easy to rig for bigger studio setups. In one word it is ‘versatile’.
The out of the box picture quality is stunning. You can damn near stick the waveform anywhere and you’re looking at a nice image! Oh and that HUGE sensor! It delivers a glorious large-format look.
Q. Does it have any weaknesses or are there any aspects of the camera that you would like to see improved?
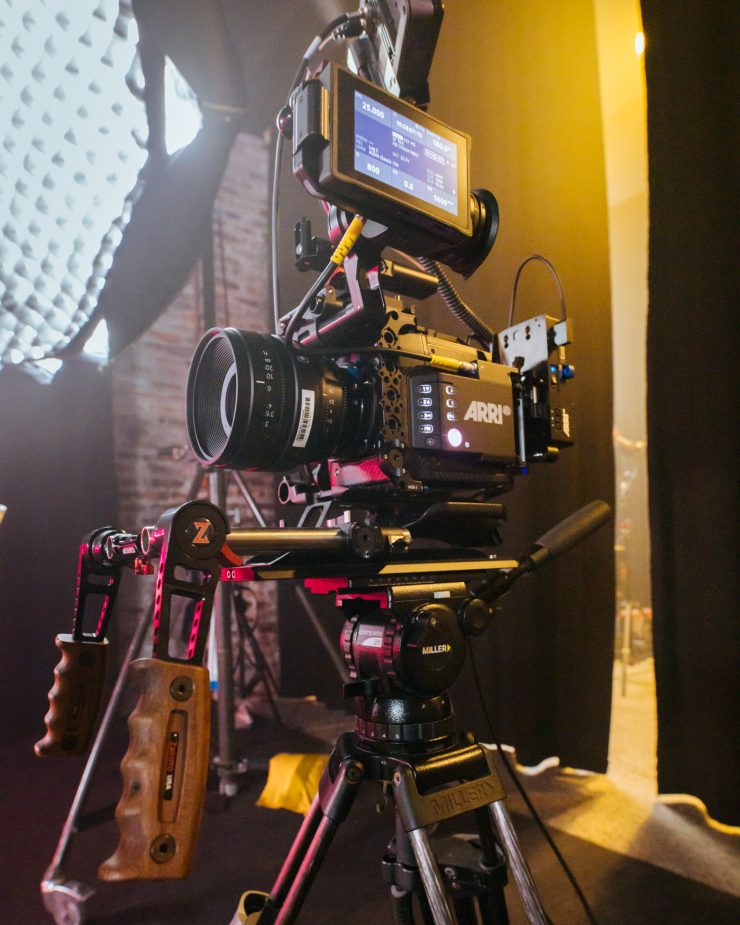
I don’t know if I’d call it a weakness. I’d say it is what it is, but like other hi res full-frame cinema cameras out there at the moment they chew through the batteries! Power requirements are pretty big compared to what I’m used to, but hey there’s a lot going on in that little camera body. Currently, there is no built-in waveform but I’ve been told this is on a firmware update list so hopefully, with the next SUP there will be waveform and some added sensor recording modes that I’d like to see such as 16:9 full-width sensor downsample to UHD res for ProRes Recording.
Conclusion
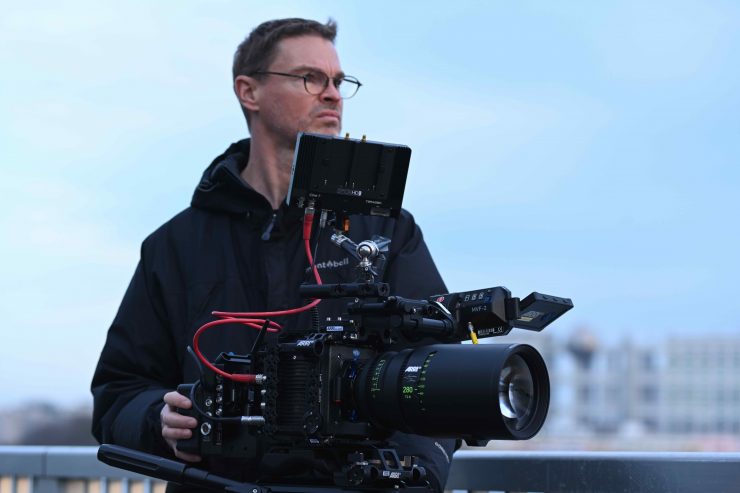
The ALEXA Mini LF is a prime example of why you should never judge a camera from specifications alone. There are plenty of cameras out there that cost considerably less money than have far better specifications. While specifications are all good and well, they very rarely tell you the full story about any camera.
There are plenty of great cameras out there, and yes, in a lot of controlled conditions, you can make just about any camera look good. Image quality alone is not what makes a great camera, it’s those intangibles that working professionals rely on that set the great cameras apart from the good ones.
Usability, reliability, customization, workflow, ease of use; these are all things you rarely hear people talking about, but these are the things that ARRI cameras excel at.
The color tonality and highlight rendition are at another level from any camera I have ever used or seen. There is no other camera (that you can purchase) I have ever seen or used that deals with highlights as well as the Mini LF does, or produces accurate colors in any environment.
ARRI cameras also have really nice motion cadence. This is probably due to the fast sensor readout. I have used plenty of cameras where the motion cadence never quite looks right.
My biggest take away from using the camera is that it just looks good no matter what you throw at it. The camera produces such good results that you don’t need to spend much time in post fiddling with the image to try and get it to look nice. This alone is a huge time saver. It doesn’t matter what the lighting conditions are, it just looks good.
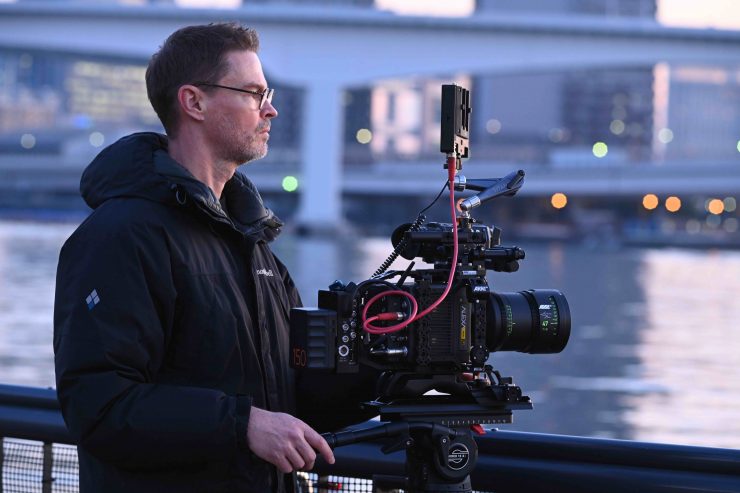
Everybody loves to harp on about the ARRI look, and yes, while that is a huge reason why cinematographers choose ARRI cameras, they also choose them for a host of other reasons.
Cinematographers working on episodic television and feature films can usually choose to use any camera they like, so why do so many end up choosing ARRI? Well, probably for all of the reasons I have mentioned. Roger Deakins CBE, ASC, BSC used the Alexa Mini LF and Signature Primes to film 1917, he also won an Oscar for it.
When Deakins heard that ARRI was working on a smaller large-format camera, the ALEXA Mini LF, he thought it would be the perfect camera for the visual approach Mendes wanted to pursue with 1917. At this stage, the camera wasn’t even ready for use so ARRI accelerated its development process to make sure that prototype cameras would be ready for the first day of filming. The rest, as they say, is history.
Roger has said that the combination of the Mini LF and Signature Primes created images that were very close to what his eyes actually see, more so than any other lens and camera combination he has previously used. Now, Roger will also tell you that any camera is just a tool and it is how you use that tool that determines the results you get.
In a world where marketing hype runs rampant and everyone wants to try and blind you with 8K and big specifications, the ALEXA Mini LF is a testament to what ARRI has always been about.
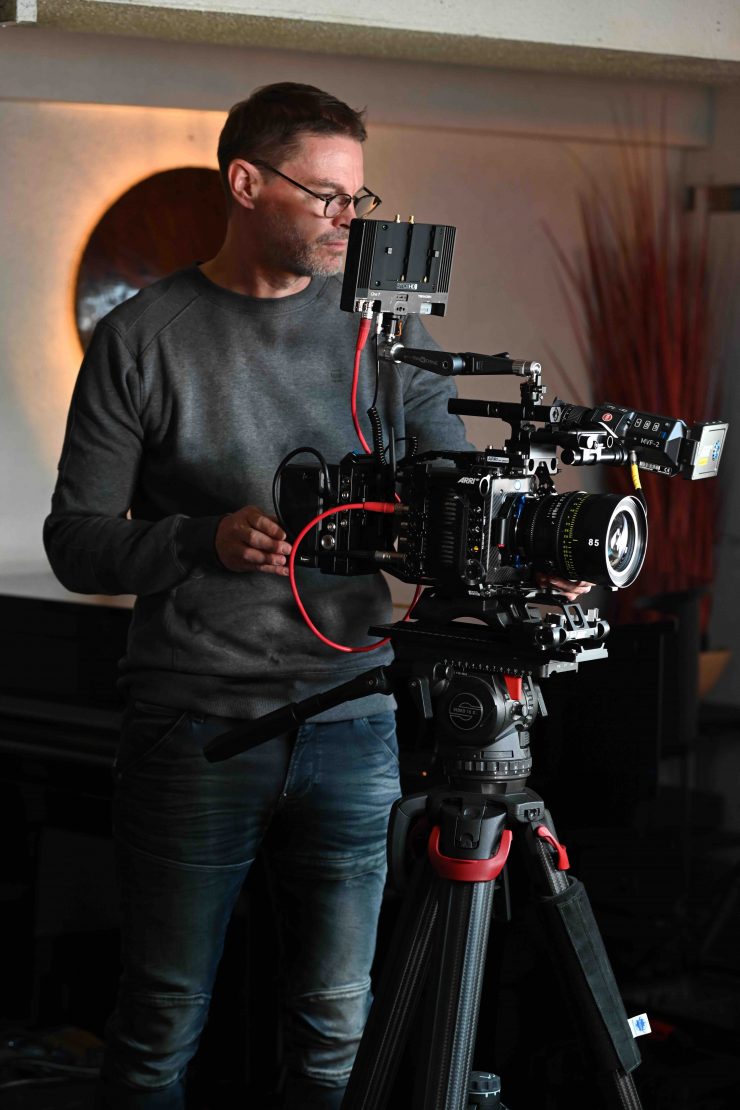
Could you argue that ARRI was perhaps a little complacent and only did what they needed to do with the release of the Mini LF? Yes, I think you certainly could. It is fairly easy to rest on your laurels when you are the predominant camera system being used on high-end episodic TV, commercials, and feature films. In some ways, you could argue that ARRI is only innovating at their own pace, however, it is up to ARRI’s competition to come up with better alternatives, and so far it is arguable that they haven’t done that. Surely if there were a lot better options out there people would be using them right? For ARRI to lose its position as the predominant high-end digital cinema camera choice competing companies can’t just make a camera that is close or just as good as an ARRI, it needs to be a lot better. Like it or not, that is the reality.
Again there is no such thing as a perfect camera and what camera you use is often determined by the type of work you do and what the project entails. Just because the Mini LF is a great camera, doesn’t mean it is a suitable tool for everyone or every job.
ARRI is in a good position because once your camera’s become a de-facto industry standard, everyone is familiar with how they work, how to use them, and what results they are going to get. There will always be a subconscious urge to use tools that we are familiar with and comfortable with. In saying that, DPs who choose to use ARRI cameras usually have the option to choose any camera system they want.
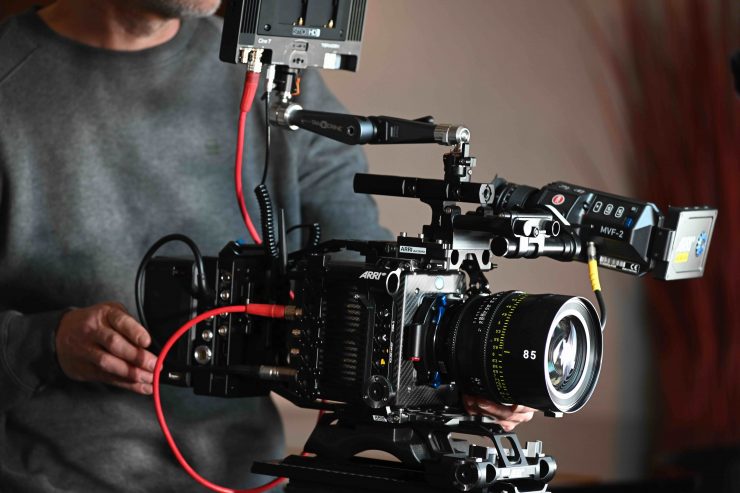
Is it the perfect camera? Of course not. There is no such thing. It can’t shoot over 3200 ISO, it doesn’t have particularly high frame rates, and it is expensive.
It has its flaws and faults like any camera, but it offers those intangible elements that very few other cameras can. The user experience, image quality, and total ecosystem that ARRI provides make the Mini LF a compelling option.
Having spent time with the Mini LF, it is easy to see why so many cinematographers choose ARRI cameras. It is the best camera I have ever used.
Like what we do and want to support Newsshooter? Consider becoming a Patreon supporter and help us to continue being the best source of news and reviews for professional tools for the independent filmmaker.
Special thanks to Aya Asakura for the BTS photos, Ben Allan ACS CSI for grading up the material, Mick Jones for his time, and Tanya Lyon and Carlos Chu from ARRI.