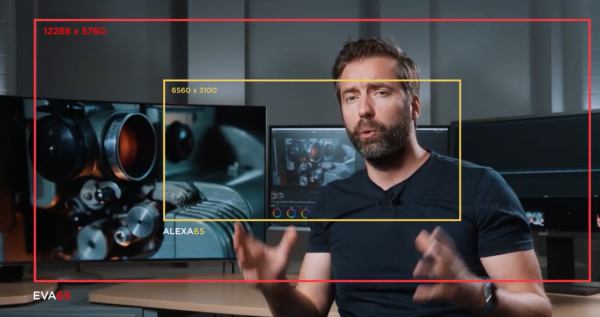
Have you ever wondered what footage from a Panasonic EVA 65 might look like? Well, Nikolas Moldenhauer came up with a test to produce a 12K (12288 x 5760) image from a Panasonic EVA1 using a medium format lens. Before you say, “That’s impossible, how can a camera with a 5.7K sensor produce a 12K image?” let’s have a look at what he actually did.
Nikolas set out to emulate the large format look of films like “The Revenant“, “Rogue One“, “The Hateful 8“, and “2001” by using some cheap gear and a camera that he already owns, in the case, the Panasonic EVA1.
So he did a little math and built a crazy rig that allowed him to reposition a smaller sensor behind a medium format lens so he could capture an Alexa65 equivalent sensor size image.
What Nikolas managed to do was impressive, if not entirely impractical. I got in touch with Nikolas to ask him some questions about why, how and what gave him the inspiration to come up with such an idea.
How did you come up with the idea for this concept in the first place?
What can I say… I am a nerd.
I always loved the look of large format film, both in the past and now in the present. The large format look just adds that bit of cinematic fairy dust that can make an image magical. Unfortunately, and like for most of us, a true large format cinema camera like the ARRI ALEXA 65 is way out of our price range. So this got me thinking if there was some kind of workaround to see how different my camera would look if it had a sensor as large as an ALEXA 65.
Stitching images together is nothing new and every iPhone does it for a panoramic shot. The only difference with my test is that we are stitching segments of the same lens projection. The end result if effectively identical to a large format sensor, minus the temporal difference between the recorded segments, which of course limits the choice of motive drastically. Still, as a proof of concept, I found it interesting and entertaining enough to give it a try.
Did you have to do a lot of research to work out if it was even possible?
Actually, not that much. This was more of a “just do it“ approach as the armchair planning was pretty straightforward. What could possibly go wrong! Well, as always the devil is in the details and I had to overcome some problems such as getting past obstacles on the EVA1 body that was in the way or simple things like finding an extremely light way to mount the camera vertically. There are other experiments on my channel that require way more research and fiddling to get it right, such as the recreation of the glowing Blade Runner Replicant eyes just like they did in the original movie, that was painful, but that is another story.
How long did it take you to do all of the research and calculations before you were able to perform the test?
If you add everything up, I would say it was spread out over 10 days (waiting for the macro mount to get delivered etc.) Of course, as I was doing the filming for my YouTube channel alongside the test, the execution took a bit longer than that.
Did you have any idea that your concept would actually work?
I didn’t see any reason why it wouldn’t. Being naive can be a blessing!
Can you explain the methodology behind your test and what equipment you ended up using to make it all possible?
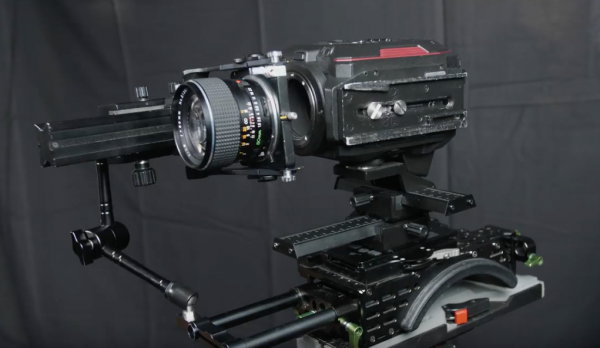
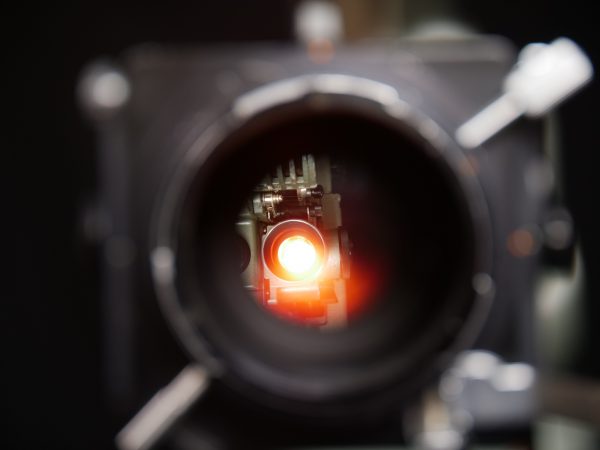
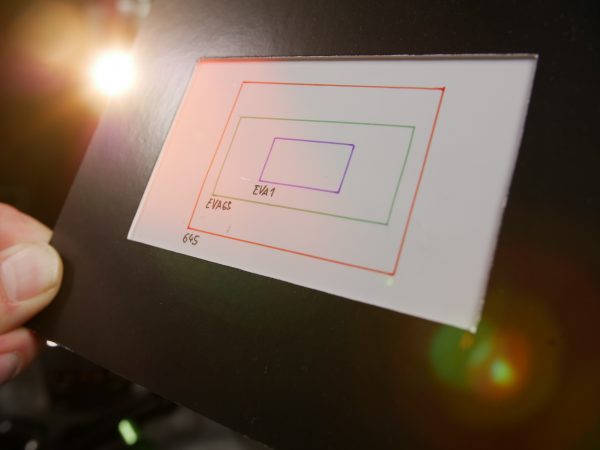
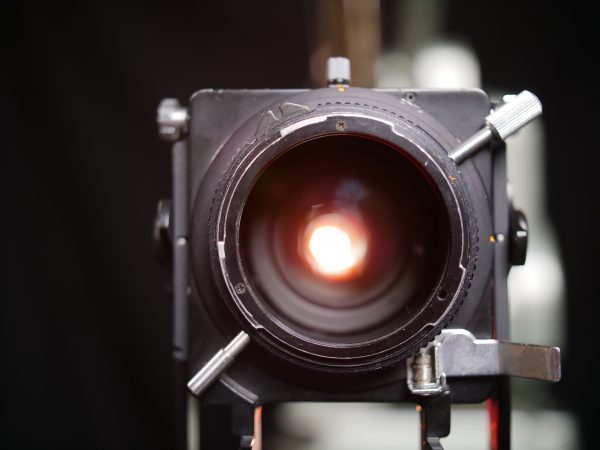
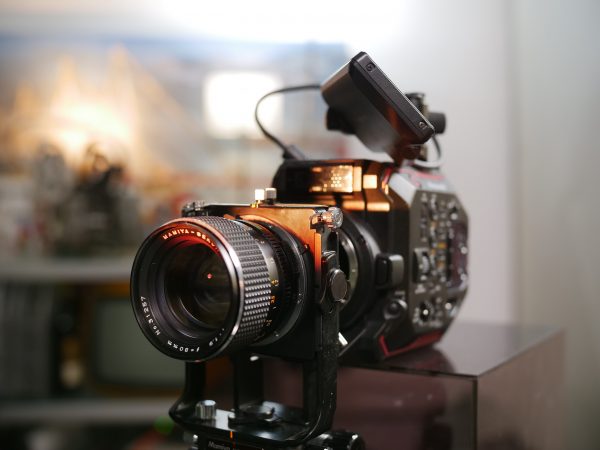
You need to move the sensor to get the desired portion of the large image circle of a 645 medium format lens, and this can be done with any camera. The larger the sensor of your camera, the fewer segments you are going to need. You could even do it with a GoPro if you could remove the lens, but it would be a very painful process. The advantage of an S35 or larger sensor is that you don’t have to control the x-axis, only the y-axis. This greatly simplifies the whole process. A macro mount will do that perfectly and it was the only piece of gear I needed to buy to build my rig. Everything else was already in my closet. The real beauty of these kinds of projects is, that it is about the method and not about specific gear. You could do the exact same thing with a completely different camera and rig.
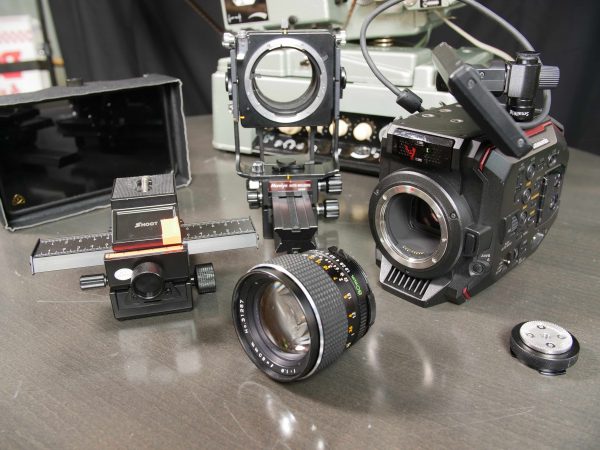
For my test, I used a Panasonic AU-EVA1, an Atomos Shogun Inferno (for RAW recording), a Mamiya Sekor c 80mm f1.9 lens, a generic 4-way macro focusing rail from Amazon, a Lanparte rig, and a Lanparte handgrip adapter for vertical mounting.
Were you surprised by the results?
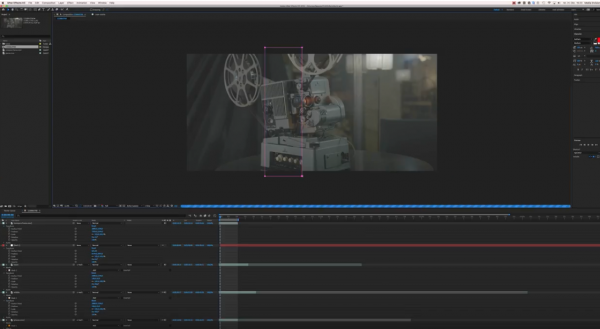
Image-wise, it was pretty much what I expected and I love the look. The medium format lens gives you an extra creaminess even with the massive amount of detail. I would buy an EVA1 LF in a heartbeat… Panasonic, are you listening?
What did surprise me was the computing power that was required. With 12K the render times in Adobe After Effects exploded. The 10-second scene took about an hour to render on a 2013 MacPro.
What was your ultimate aim for doing the tests?
Quite frankly I do these kinds of experiments and tests just for the fun and love of the craft. I think it is a good exercise to loosen up after shooting three events in a row and to stay creative as a filmmaker. I totally enjoy if others are entertained by what I do and I love to engage with those who share my passion.
Full list of equipment used for the test:
– Panasonic AU-EVA1
– Atomos Shogun Inferno
– Mamiya Sekor c 80mm f1.9
– 4 Way Macro Focusing Rail (https://www.amazon.de/gp/product/B01N)
– Lanparte rig and handgrip adapter for vertical mounting
If you are feeling brave and have a powerful computer you can download the whole original EVA65 12K ProRes 444 LOG film here. Be warned the clip is 11GB!
If you want to download a single one graded 12K frame as a JPG (47MB) you can download that here.