There are certain elements of video production that just aren’t sexy, and syncing timecode is one of them. If you are working in multi-camera environments making sure that all the cameras and sound equipment are timecode synched is imperative.
While it has become easier to sync audio and video through programs like Pluraleyes, and even inside NLEs like FCPX, neither option is full proof. The only way the guarantee frame accurate timecode on all your devices is to use a dedicated timecode sync system.
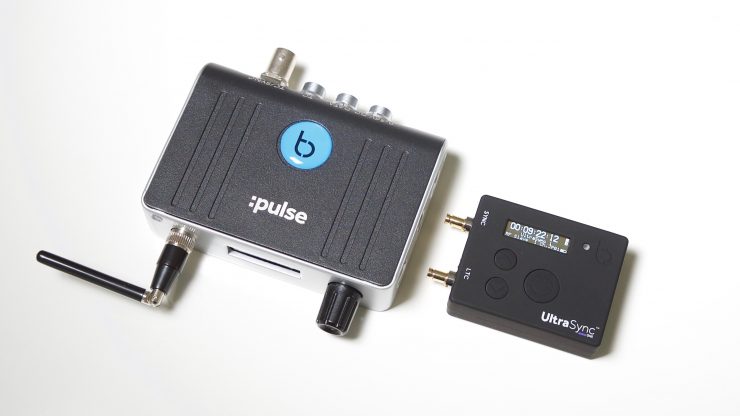
UltraSync ONE

The UltraSync ONE has been specifically designed to be a small, lightweight and accurate way of syncing timecode between your devices. The UltraSync ONE can be configured as a timecode master, timecode slave or timecode LTC slave. This is great because it can be used to either generate timecode or receive it.
Key features
- 25 hours+ battery life from a single charge
- All sync modes – timecode, genlock & word clock
- Generator and transceiver: generate master timecode or configure as a slave
- Jam or slave to an external LTC source
- Sync over long range, bi-directional BLINK RF
- Connect to BLINK Hub via a :pulse or :wave
- Perfect for multicamera sync, professional VR rigs & DSLR shoots
The UltraSync ONE has many uses and can be used for everything from timecode syncing high-end professional cameras down to providing timecode to DSLR and mirrorless cameras.
Build Quality
Small timecode sync devices such as the UltraSync ONE have to walk a fine line between being robust enough to be used out in the field in harsh environments, but not being too heavy or large that they get in your way.
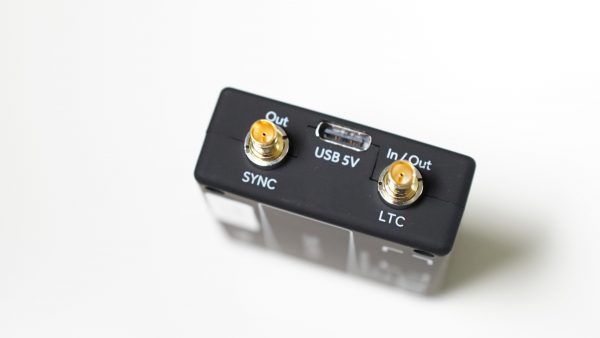
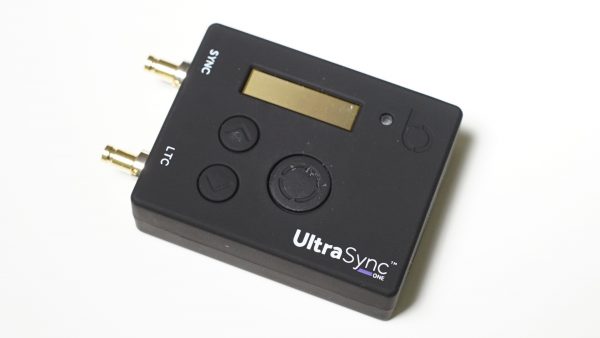
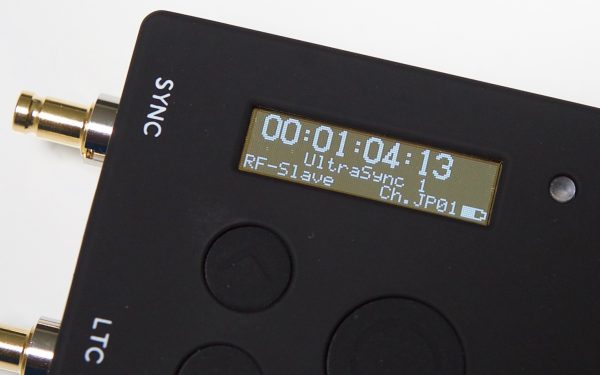
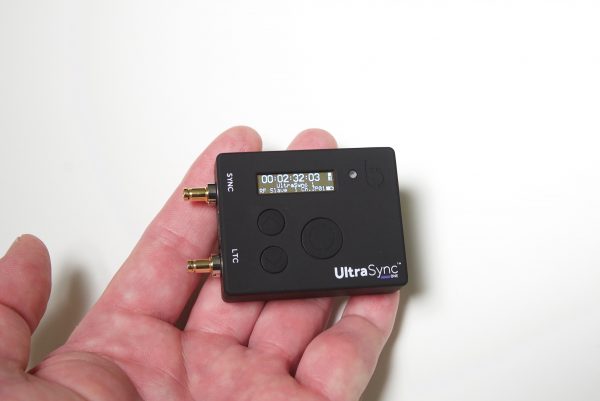
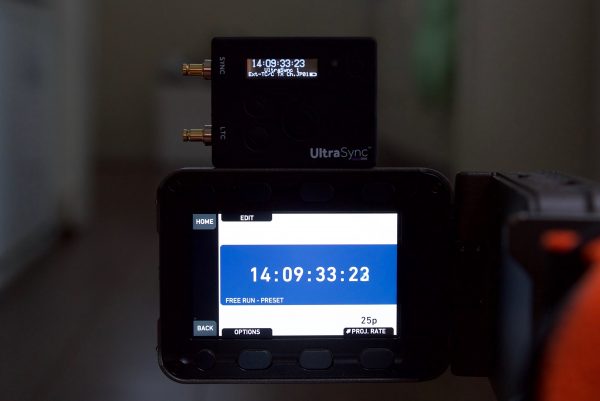
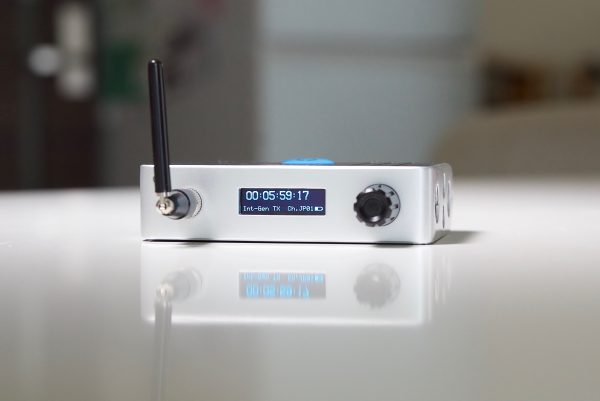
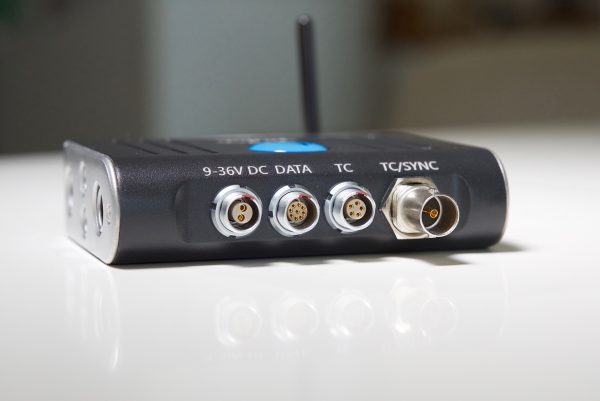
The UltraSync ONE has dimensions of 55mm x 44mm x 17mm (2.2″ x 1.7″ x 0.7″) and weighs in at 39g (1.38oz). At this weight, you wouldn’t expect it to feel very robust but at first glance, it seems like Timecode Systems have done a good job with the UltraSync ONE. The Mini-DIN LTC input/output connectors are solid and ensure that your cables won’t pop out or come loose and the 128 x 32-pixel resolution OLED screen is easy to see.
Unfortunately, I ran into a problem the first time I attempted to turn the UltraSync ONE on. As soon as I pressed down on the select button, the button went down, jammed, and didn’t come back up. This certainly wasn’t a good start and didn’t fill me with much confidence. I contacted Timecode Systems and explained what had happened and from what I was told it wasn’t something I could fix by myself. To their credit Timecode Systems did immediately ship out another loan unit, but the fact that the problem occurred in the first place was alarming. Of course, it is impossible to tell whether this was simply just a one-off problem with that particular UltraSync ONE or a design flaw.
The replacement unit I received was fine and I didn’t experience any problems with the button.
Mounting Options
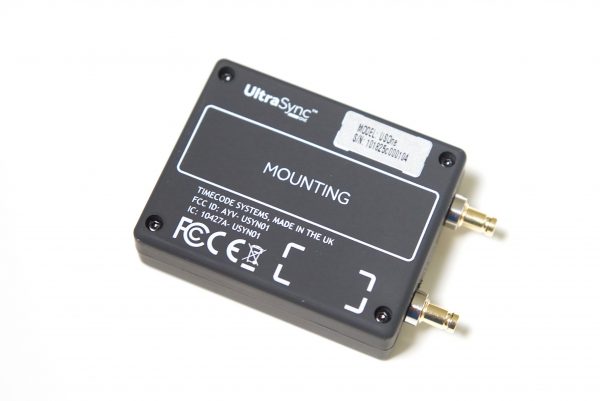
The UltraSync One doesn’t have any physical mounting points at all. Instead, it has a place to put velcro on the bottom of the unit. In all honesty, I would have preferred to have seen at least a single 1/4-20″ mounting hole. While it is fine to use velcro, there isn’t always a place on some cameras where you can easily put velcro.

I normally just mount timecode sync devices either to the top of my camera using velcro or on the side of a v-lock battery. I have found this works well, but if you are using smaller cameras there really isn’t much space to do this. You may find using a bungee style cable does the trick.
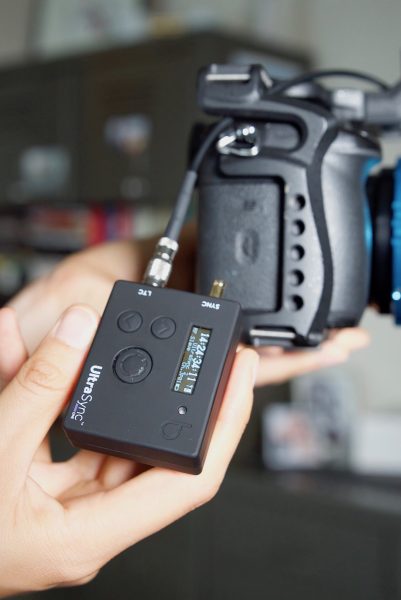
The other option I found (and this may not be suitable for everyone) is that the UltraSync ONE is so light that you can just let it dangle off your camera. This is fine when using a short cable and if you are using a small camera or a camera that has a lot of other accessories attached to it. This may or may not be a good idea, but I have seen a lot of operators do this with the Tentacle Sync.
Battery
The UltraSync ONE uses a built-in Li-Polymer (3.7V battery 800mAh 2.96Wh) battery. The battery life is around 24 hours (in full working mode) and the battery takes around 3 hours to recharge. 24 hours of run time is a nice amount. If you are working for more than 24 hours continually then you are probably working on a bad job! You can also charge and power the UltraSync ONE using the USB-C (5V DC) input. You can use the USB port to charge the UltraSync ONE, while it is up and running. The unit will run from its internal battery, which will be charged by the external power.
Range and Frequency
The UltraSync ONE works in the 865.050MHz to 923.200MHz frequency range and the typical range for synchronization with a master is approximately 200m (656ft). This range is based on an uninterrupted line of sight. If there are obstacles between a slave and master, the range will be reduced.
Zero Drift?
Timecode Systems claims that the UltraSync ONE has approximately 1 frame drift in 24 hours. This makes it very accurate. From my time using the system, I didn’t find there to be any drift at all.
Supported FPS
Frame rates that are supported are:
23.98
24.00
25.00
30.0D (drop frame)
30.00
29.97D (drop frame)
29.97
Ease of use
Timecode sync devices need to be straightforward and easy to use. Nobody wants to go through countless menus and combinations of pressing buttons to get up and running.
Initial setup is always going to take a bit longer and users should be prepared to read the manual (yes, some people do actually read the manual). I did find that once I went through the initial set up the UltraSync ONE was fairly easy to use and operate.
The nice thing about the UltraSync ONE is the display screen. Some small timecode sync devices don’t have a screen and having one certainly makes it a lot easier to monitor and make sure everything is correct. I like being able to physically see the timecode and status information. You can also bring up a Synchronisation Status screen so you easily check that all your devices are synchronizing correctly.
I also like that the UltraSync ONE has a blinking LED light that changes colors so you can instantly identify what is happening. The UltraSync ONE has three different LED color indicators:
The most important element when setting up the UltraSync ONE is choosing the type of timecode setting you want to use. This can be confusing if you aren’t familiar with timecode sync devices. There are four options:
RF Slave
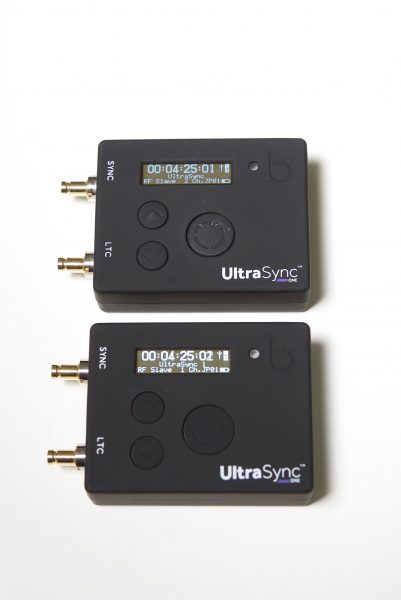
This is the option to choose if you want your UltraSync ONE to receive its timecode from another Timecode Systems device. It will then try to connect with the master device in the network. You use the RF Slave mode if you want your UltraSync ONEs to synchronize with the timecode of the master device in the network. In RF Slave mode slave, your UltraSync ONE will receive its timecode from the master device, as long as the master is in range and is communicating on the same RF channel as your UltraSync ONE.
The master sends the following data to the slaves via RF:
Timecode
Frames-Per-Second
User bits (metadata)
When a slave receives this data, it updates its own internal settings to match, so that it is synchronized with the master.
Int-Gen TX (Master)
The Int-GenMaster TX mode is the right choice if you want to use your UltraSync ONE independently. In this mode, your UltraSync ONE will provide timecode to a connected device, but will not synchronize with other Timecode Systems products.
If you want your UltraSync ONE to only provide timecode to devices that are wired to the UltraSync ONE such as a camera or mixer this is the mode to use.
Free Run/Jam-Ext
The UltraSync ONE has a Free Run/Jam-Ext mode, which can be used for two different purposes. You should use this mode if you want to use your UltraSync ONE to:
- Run as a standalone unit and provide its timecode to an external device.
- Synchronise with external devices in a third-party system rather than a Timecode Systems network Free Running.
UltraSync ONEs are most commonly used in a network, where they will synchronize with a master device. But you do not have to use your UltraSync ONE in a network – if you prefer, you can use it as a standalone device.
When an UltraSync ONE is used as a standalone device, it is ‘free-running’. This means that the UltraSync ONE uses its own internal timecode settings and does not receive timecode from other devices. It can output its timecode to other devices via the SYNC or LTC ports so that the other devices synchronize with the UltraSync ONE.
EXT LTC Input
This is the mode to use if you need your UltraSync ONE to receive timecode from a device that is connected to the LTC port. The timecode can then be used by your UltraSync ONE, and passed on to other devices, including any slave UltraSync ONEs in the network.
The most common way of using EXT LTC Input mode is to set your UltraSync ONE to receive timecode from an external device, and then send it to slaves via RF.
As an example, if I had a sound mixer that was sending timecode to a connected UltraSync ONE, if I set that UltraSync ONE to EXT LTC Input, the other UltraSync ONE’s on my network would receive the same timecode being generated from the mixer.
Firmware Updates
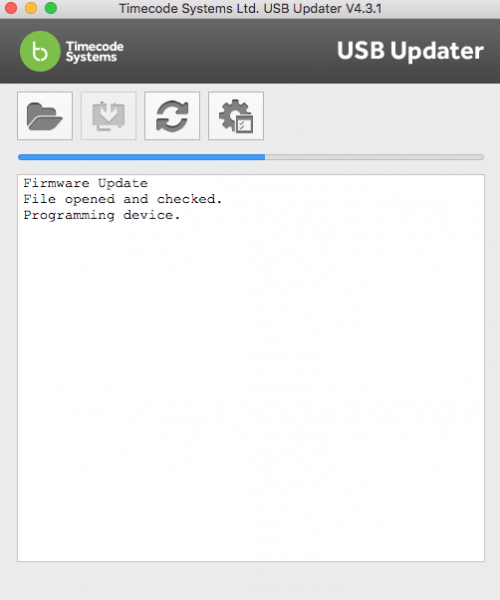
Timecode Systems have a nice app called Updater that allows you to easily update the firmware on any of their products. It is super easy to use. All you do is plug your device via USB into a computer, launch the app and then it automatically tells you if you need to update the firmware. With one click of a button, it’s done. Too many companies make firmware updates difficult and confusing, but Timecode Systems nailed it here.
Accessories
Timecode Systems sells a wide range of cables for the UltraSync ONE as well as a silicone case for £11.50. I would probably be inclined to get the silicon case as you can never have enough protection.
Timecode Syncing a DSLR/Mirrorless camera or a camera with no timecode input
Syncing timecode to devices that have timecode In/Outvia a SDI is very straightforward, but what about if you want to add timecode to a DSLR/mirrorless camera or any other camera such as a Sony FS7/Canon C100 that doesn’t have a timecode input?
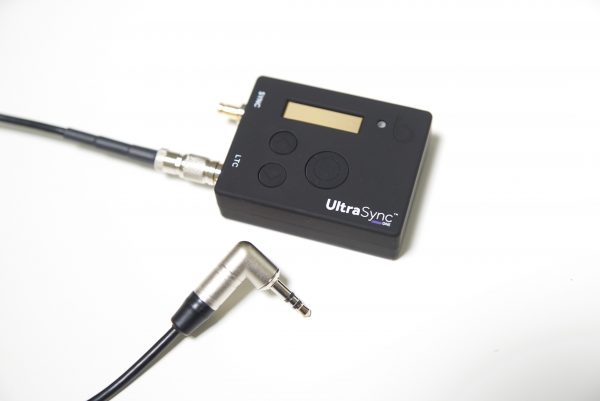
Well, the UltraSync ONE can be used to send timecode to one of these cameras through the use of an optional Mini-DIN to 3.5mm cable. Now to set up your UltraSync ONE to do this you do need to make some changes. Firstly you need to go to System Settings and then make sure the LTC Output is set to mic level. Most DSLR or Mirrorless cameras don’t have line level in so you need to set it to Mic level for it to work.
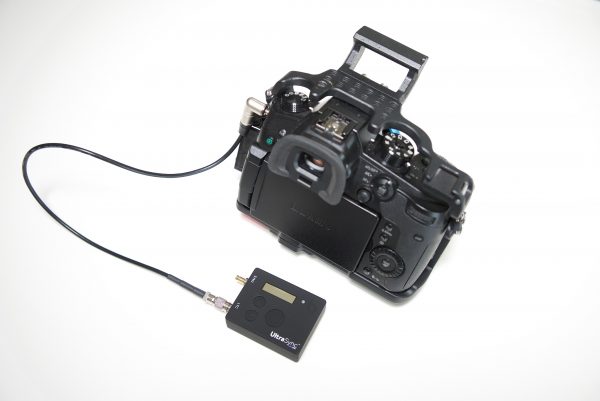
Once you have done this, you plug the Mini-DIN to 3.5mm cable into the LTC In/Out port on the UltraSync ONE and then attach the 3.5mm jack to your cameras Mic input. The only downside to doing this is you will lose the audio inputs going into your camera. Unlike the Tentacle Sync, the UltraSync ONE doesn’t have a built-in scratch microphone. If you do however, have a DSLR/Mirrorless camera and are using an XLR module you can still have one active track of audio (you will need to use an optiional mini DIN to XLR cable). This is the same case if you want to use the UltraSync ONE with a camera such as the Sont FS7 or say a Canon C100 that don’t have timecode In/OUT.
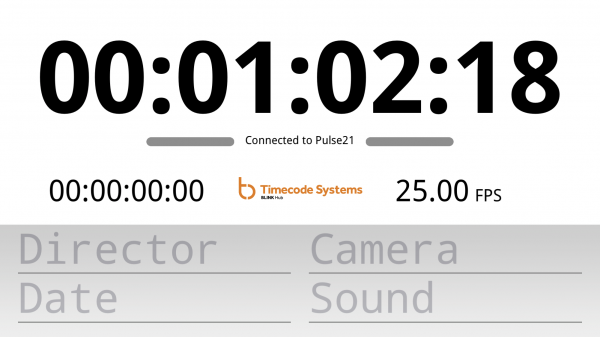
To synchronize DSLR cameras using UltraSync ONE, timecode is recorded to one of the camera’s audio tracks. This is known as AUX timecode. So what the UltraSync ONE is effectively doing is putting an audio signal onto the audio track of your DSLR/Mirrorless camera. After you finished shooting this audio signal that contains the timecode you were outputting from the UltraSync ONE needs to be converted to be used before you can see that timecode.
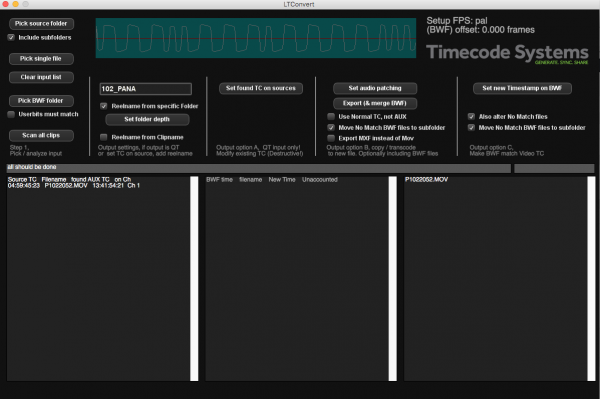
It all does sound a bit confusing, but VideoToolShed’s LTC Convert software makes this timecode easy to use in the edit suite. The LTC Convert application reads the LTC timecode inside a DSLR’s audio file. This, among other things, converts AUX timecode into usable timecode for post-production. Although if you have Avid or DavInci Resolve they are both able to read AUX timecode natively.
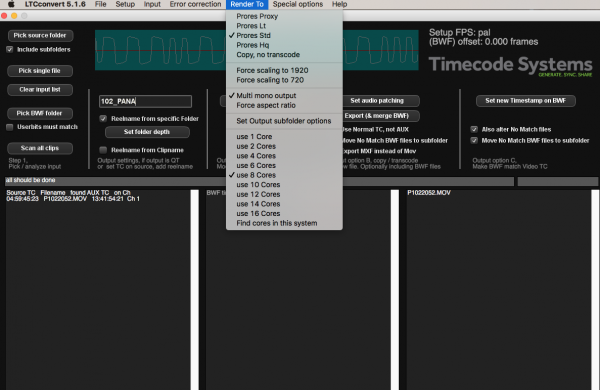
The LTC Convert application is reasonably straightforward to use and I like that there is also an option to transcode your original material into four different flavours of ProRes.
When using the UltraSync ONE with a DSLR/Mirrorless or any other camera that doesn’t have a timecode input you have to factor in these additional steps you need to take to get the correct timecode embedded on your clips. If you are working by yourself in a small production team it’s fine to be doing this, but if you need to send or give your material off to a client or production house straight away they are going to have to use the LTC Convert application to convert the clips, or be using Davinci Resolve or Avid. This may not go down to well with some clients.
The thing you also need to be aware of is this program costs £89.00 (excl. VAT), it is not free. So if you do have to get a client or production house to convert your material they are going to have to buy this program, or have access to Avid or Davinci Resolve.
Real world use
Once you get your head around the different ways of jamming timecode and setting up the UltraSync ONE it is very easy to use. In a lot of cases, if you own your own equipment or use the same sound recordist you aren’t going to have to make many changes at all when using the UltraSync ONE. This is exactly how it should be because even though timecode syncing is a crucial element when recording sound separately or using multiple cameras, it shouldn’t get in the way of you doing your job. It should be seen and not heard so to speak. A product that continually needs to be checked or fixed during shooting is not a product I want to use.
You need to have complete faith in a timecode syncing product that it is going to do the job properly without you needing to continually monitor it. From my time using the UltraSync ONE, I found it did its job without any problems.
It’s small, lightweight and I love having a clear display that allows me to quickly see that everything is working as it is supposed to be. The mini-DIN connectors are solid and robust, but my only lingering concern was with the buttons on the UltraSync ONE. As I mentioned earlier they are recessed slightly so they won’t get knocked when you are using the device. Although the replacement loan unit that was sent out was fine, the original one I was reviewing did have the main select button fail the first time I pressed it.
Direct Competition

While there are quite a few timecode sync products on the market, one of the UltraSync ONE’s main competitors probably comes in the form of the Tentacle Sync E. So let’s see what some of the key differences are:
| UltraSync ONE | Tentacle Sync E | |
|---|---|---|
| Weight: | 39g (1.38oz) | 30g (1oz) |
| Battery Life: | 24 housr | 35 hours |
| Timecode In/Out | Mini-DIN 1.0/2.3 | Mini Jack Socket |
| Display Screen: | Yes | No |
| Scratch Mic: | No | Yes |
| AUX Timecode Software: | £89 | Yes, Free |
| Mobile Device app control: | Yes, with a :pulse | Yes |
| Warranty: | 12 months, additional 6 months on registration | 24 months |
As you can see both the UltraSync ONE and the Tentacle Sync E offer different forms of functionality and features. It’s hard to say which one is better than the other as it really depends on your needs for syncing timecode. While the UltraSync ONE has a display screen, the Tentacle Sync E has a built-in scratch mic. The UltraSync ONE has Mini DIN inputs, but you have to buy a Mini-DIN to 3.5mm cable for an additional £42.50 if you want to use it with a DSLR or Mirrorless camera. You then have to factor in the cost of the LTC Convert application (£89.00). With the Tentacle Sync E that cable is included and the software is free.
The main benefits the UltraSync ONE has over the Tentacle Sync E are:
- The UltraSync ONE uses a long-range RF network, rather than Bluetooth or 2.4GHz wifi to communicate timecode between master transmitting and receiving units, allowing for reliability over a wider area.
- With two connectors on the unit, the UltraSync ONE offers not only timecode, but genlock and wordclock as standard, as well as the option to alter the output levels to include DSLRs in your workflow. You also have the option to configure the unit to output LTC from both ports simultaneously.
- The UltraSync ONE can receive and retransmit external timecode, as well as generate its own.
- The UltraSync ONE has a screen, to not only display the running timecode but to make it easy to set up your workflow. The blinking lights also show that all units in the workflow are synced up
If you compare the UltraSync ONE to the other competitors as well as the Tentacle Sync E, these are the main differences:
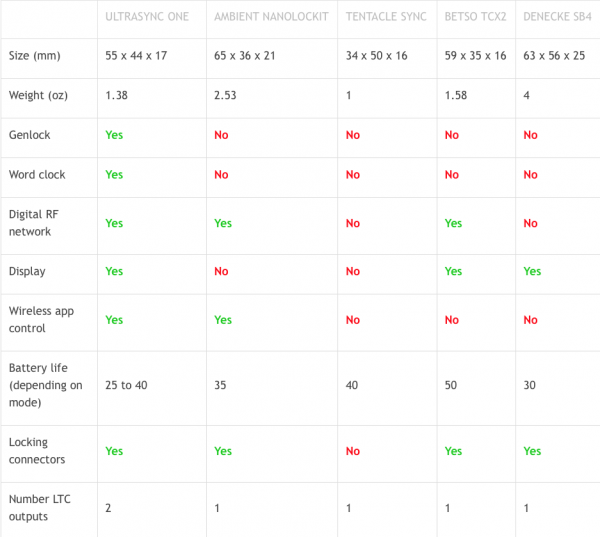
Here are the prices of the other competition:
Ambient Recording NanoLockit Wireless Timecode Generator: $299 USD
Betso TCX2: $404.10 USD
Denecke SB4: $425.95 USD
Conclusion
The Timecode Systems UltraSync ONE is a good option if you are looking for a small, lightweight timecode sync system that won’t break the bank. At £240 (exc. VAT) ($317 USD) it is only slightly more expensive than the competing Tentacle Sync E (249.00 €/$290 USD). Timecode Systems does sell a twin pack of UltraSync ONES’s for £375 (exc. VAT) ($496 USD), which is slightly cheaper than the Tentacle Sync E Standard Set (449.00 €/$524 USD).
The UltraSync ONE certainly offers a lot of functionality and features at a very reasonable price. I love the screen as it makes it easy to see the timecode and that everything is working correctly. For me, this is one of the UltraSync ONE’s biggest drawcards.
If you are strictly needing to sync timecode to DSLR and Mirrorless cameras then the Tentacle Sync E might be a better option, but if you are working on bigger productions in multi-camera scenarios and need to create a whole timecode sync ecosystem, then the UltraSync ONE is the better option. The UltraSync ONE also has a lot more options when it comes to what type of timecode you can use. It really is a fully fledged timecode sync system that has all the bells and whistles.
Whether you actually need any form of timecode sync system really depends on the type of work you do. If you are a solo operator and you occasionally just use a second camera such as a DSLR for an interview then you may well just find it easy enough to just do a simple clap for syncing purposes. If you are, however, working with a sound recordist who is recording audio separately to their mixer than having a dedicated timecode syncing system is a must.
At the end of the day, a timecode sync product should be reliable, robust and keep out of your way. The UltraSync ONE does just that, and that’s all you can ask for. As a timecode sync solution, the UltraSync ONE is right at home being used with anything from a simple DSLR all the way up to a major multi-camera production using ARRI Alexas.
:pulse
The :pulse is a multi-functional timecode & metadata hub & device control center designed for multi-camera setups that allow you to view, monitor, and control any BLINK enabled device and compatible camera or audio device from a smartphone, tablet or computer. It can be used to provide a zero drift timecode and genlock sync for video and film applications.
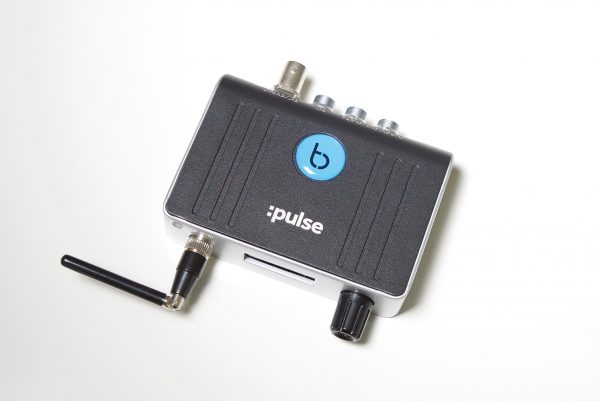
It has UART, RS232/RS422 connectivity, Ethernet connectivity, Wi-Fi connectivity, USB connectivity, and simultaneous long-range RF sync and BLINK networking features.
Key features
- Highly accurate timecode, genlock and word clock generator
- A powerful hub for metadata exchange
- Introduce the pulse as a master to unlock wireless control features
- Provides a robust gateway to the BLINK Hub app (WiFi and Ethernet)
- Data port enables advanced timecode and metadata exchange with Sound Devices 6-Series products
- Use alongside the SyncBac PRO to remotely control GoPro cameras
Zero drift?
When configured as an RF slave device, the :pulse’s timecode and sync generator are soft jammed twice a second via the long-range robust ISM band RF, which means there won’t be any drift between units. The BLINK network allows the :pulse to either operate as a BLINK master device or a BLINK slave device.
Build Quality
The :pulse has physical dimensions of 94mm x 67mm x 23mm (3.7″ x 2.6″ x 0.91″) and weighs in at 230g (8.1 oz). It has a solid aluminum casing and feels very robust and solidly made. The connections and switches are also well made.
Battery

The :pulse comes with a Li-Polymer internal battery that can constantly be charged from any of the power inputs and will run the unit for around 3-4 hours with RF, Wi-Fi and Ethernet switched on. With such a limited runtime from the internal battery, you really do need to have it hooked up to mains power or run it through a 5V micro USB connector or via the 2 pin Lemo 9-36 VDC input.
While the :pulse does offer these three powering options you do need to keep in mind that if you don’t have any of these options available the run time of the device will be limited to 3-4 hours.
Mounting options

The :pulse has two 1/4 20″ and two 3/8″ mounting points on the side of the unit. This makes it relatively easy to mount to a camera, light stand or any other place you may want to put it.
Range and frequency
The :pulse has a range of up to 200m (656ft) and works in the 865.050MHz to 923.200MHz frequency range.
Ease of use

The :pulse is very easy to setup and configure and I found it a lot easier to use than the UltraSync ONE. In saying that, most larger devices are easier to use and operate than smaller ones where manufacturers are limited to the controls they can physically fit on a product.
Price
At the moment Timecode Systems has the :pulse on sale for £445.00 Excl. VAT ($588 USD). Which is a big reduction from its usual £799 price.
BLINK Hub app
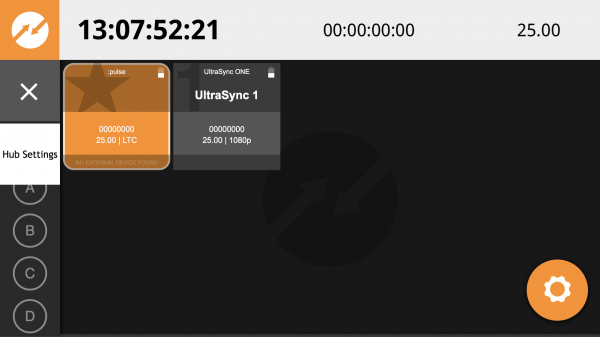
Just like radio mics I find that having an app to use with timecode sync devices is a far easier way of configuring and making changes. Using UltraSync ONE’s along with a :pulse is super simple. Once you have the :pulse set up, all you need to do is turn on the UltraSync ONE and set it to RF Slave. As long as it is on the same Wi-fi channel it will automatically receive the timecode from the :pulse.
The great thing is, once it has been set up, anytime you turn the UltraSync ONE back on, it automatically receives the timecode signal from the :pulse without you having to do anything. This is really nice because it means you don’t have to stuff around with settings and synchronization and you can get on with making content.
The BLINK app is easy and straightforward to use. It’s not confusing and it allows you to monitor your devices and make quick changes if need be. It’s just a pity that it doesn’t work with just UltraSync ONES’s. When I asked Timecode Systems about this I was told “The UltraSync ONE can’t be used to connect directly to the BLINK Hub app, as it has neither built-in WiFi nor an Ethernet port for access to the app. One of our main priorities was to keep the unit small, whilst still offering rock solid timecode, genlock and word clock options and a screen for user-friendliness, which simply left no space for the components needed to connect to the BLINK Hub!”
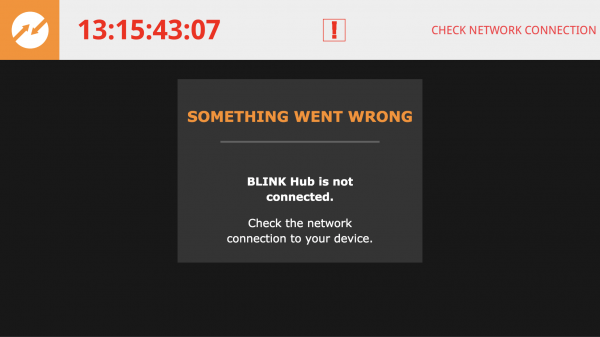
It is easy to see when there are problems and the interface lets you know what the particular problem happens to be if it occurs.