Digital Anarchy’s Flicker Free is a plug-in that fixes flicker problems that occur from shooting time-lapse, slow-motion video, drone footage, or under certain LED or fluorescent lights. It works in most video editing applications, such as Adobe After Effects, Premiere Pro, FCP X, Avid, Resolve and Vegas.

Now, this isn’t a new product, it’s actually been out for four years, but with more and more cameras now capable of shooting in high frame rates and capturing in-camera time-lapses, I thought it was a good time to look at it in more detail.
There is nothing worse than having nasty flicker on your images, and I think a lot of people are unaware that there are ways of reducing it, or in a lot of cases getting rid of it entirely. Flicker Free from Digital Anarchy was originally designed for de-flickering time-lapse shots, but the company actually found it worked really well for getting rid of flicker that occurs in many other forms.
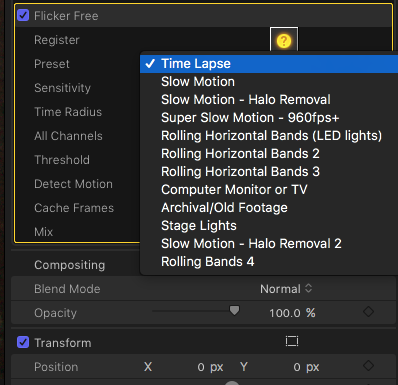
Sometimes plug-ins can be complicated to understand and use. And if you are like me, you only want to consult the manual if you have to (stupid, I know!) Digital Anarchy has made Flicker Free really easy to use and they provide a bunch of presets that a lot of times solve the problem straight away. If they don’t there are a number of parameters you can change to fine tune what the plug-in is doing.
Flicker Free Basic Parameter Overview
Sensitivity
This affects how much of the image Flicker Free is looking at. Usually set this between 10 and 30. If the flicker is affecting the whole frame, higher values are required. For smaller areas, set to a low value.
Time Radius
Determines the number of frames over time that Flicker Free is looking at. The higher the value, the better it’ll remove flicker, but the longer the render times.
Type
The three different algorithms available in Flicker Free. Time Lapse is appropriate for footage shot over long intervals. The Slow/Regular Motion algorithms are more appropriate for high frame rate video and footage shot at the normal 24/30 fps.
All Channels
This can produce much better de-flickering as each channel is processed independently. However, it can result in more artefacts.
Threshold
Only the Slow/Regular Motion – Alternate algorithm uses this parameter. Set between 5 and 20 for best results.
Detect Motion
Flicker Free will analyze the footage and try to account for fast moving elements in the scene. This usually will reduce any artefacts. However, with some footage, it can cause problems. So if adjusting the Time Radius and Type doesn’t solve your issues, try turning this off. Usually, it should be left on.
If you do need help, Digital Anarchy has a ton of tutorial videos on their site that guides you through each step on how to use Flicker Free.
I use Flicker Free in FCP X and it’s just a simple case of dragging the effect onto a clip. Flicker Free doesn’t require any ‘pre-analysis’ to work. I found the best way to use it was to just apply it to a few seconds of a clip and then render it so I could see the results. If I was happy with the result I would then just apply the same effect to the rest of the clip. In my opinion, it doesn’t make any sense to apply it to your whole clip and then render it out only to find that the result wasn’t what you were after.
Different types of flicker
As I mentioned earlier, flicker can occur from a wide array of shooting scenarios. Flicker is sometimes very obvious and easy to see, but if you happen to be shooting in say 25p 1/50th shutter in a country that is 60Hz, you can get flicker in your images that is not evident on your monitor or viewfinder at the time of shooting. Flicker Free can get rid of this very easily.
Time Lapse Footage
A time-lapse video requires taking a photo or a video frame at set intervals (eg. 1 sec., 10sec. 1min etc) and combining them to make a video. The biggest problem with doing this is that the exposure tends to change between frames. When played back this exposure change shows up as a kind of flicker in your final result.
Slow Motion Footage
There are plenty of lights these days that are flicker free, but there are still a lot of situations where you will be shooting under lights that aren’t. These include certain fluorescent lights inside buildings, sporting venue, and even street lights. A lot of these lights cause flicker when shooting slow-motion footage at 120fps or higher. This flicker occurs because the AC can fluctuate in brightness as the electricity fluctuates (the ‘alternating’ in AC). The higher the frame rate you are shooting at, the more apparent it becomes. Flicker Free uses some clever software to smooth out the fluctuations to make the brightness consistent throughout the clip. It sounds a bit like a parlour trick, but it’s more of a clever algorithm than magic.
Archival Footage
If you work in news or a documentary environment there are always going to be times when you have to incorporate old file footage into your story. Sometimes this old archival material will produce flicker. This can be because the film has degraded over time, it was shot under an old light that used to flicker, or the camera’s exposure was changing due to the fact it was being hand cranked.
Aerial Drone Flicker
This is probably something you have seen before if you have ever used a drone or watched drone footage. Drone flicker can be caused by a couple of things. The first is from the sun coming through moving propellors which ends up casting a shadow on the lens that results in flickering bands. The second is flickering caused by GOP compression artefacts. GOP stands for ‘Group of Pictures’ and is a common compression method. It groups multiple frames together to help get better compression rates. Typically this is 7 or 15 frames. In the case of the DJI Phantom drone, it uses a 7 frame GOP. This causes a shift in pixels every 8 frames. In some video footage, this is very noticeable as it’s rhythmic pattern and creates a shimmering type of effect. This is very noticeable in most of the DJI drones, especially those using low bitrate codecs.
Flicker Free can be used to lessen or eliminate prop flicker or the GOP compression problems. It uses a two-pass method to try and eliminate this flicker. From my experience, it doesn’t always work, but I have saved quite a lot of drone shots by using Flicker Free.
Processor hungry
The only caveat when using Flicker Free is that it requires a lot of processing power, although it doesn’t use the GPU on your video card. In FCP X it can take quite a long time to render the effect out. Digital Anarchy recommends that Background Rendering and Timeline Scrubbing are turned OFF.
I’ll give you an example as to why it is slow. If for example, you have Time Radius set to 10, Flicker Free is asking the host app to render 21 frames at once (the current frame, 10 before, 10 after) when processing a single frame. It then has to analyze all the colour information in those frames.
With 4K or larger resolution material, it can take a minute or two to render a single frame. If background rendering is on or scrubbing is active, FCPX will start trying to request all those frames for multiple frames at once. This can bring FCP X to a crawl or even crash it. Digital Anarchy recommends that you move to a point on the timeline, let it render, then make adjustments. Clicking around on the timeline without letting the current frame render will just slow things down even more.
Dropping the 4K sequence into a 1080p timeline doesn’t make a difference in render speed. It still has to access the 4K source file. However, rendering a 4K file out to a 1080p file and then re-importing it will make a difference. Now FCP X will just be dealing with HD frames and it makes a huge difference. If your final delivery is to 1080p or 720p, consider rendering out an intermediary file at that resolution. It’ll work much faster.
At the end of the day, it gets the job done, but if you are using an older computer or one that isn’t particularly powerful be prepared to go and make yourself a coffee because you will be waiting around, particularly if you are using Flicker Free on a long clip. For example, a 30 sec clip in a 1080p project should take about 4-6 minutes to render, but this will depend on the speed of the computer, how many cores you have/are using, the host application, and the settings within Flicker Free. If you have a 4K clip then it’s going to take a lot longer.
Where in the chain should you place Flicker Free
If you have other filters applied to your clip, it’s best to apply Flicker Free as the first effect in the effect chain. Often, the render can be dramatically increased when video effects are applied to a clip before Flicker Free does its flicker correction. The host app and type of filter will change the degree to which the render time will be increased. You can avoid this altogether by making sure Flicker Free is applied in your effect chain before any other filters that might change the way your footage appears.
Potential problems
Flicker Free isn’t going to work perfectly on every single occasion. It’s not a miracle worker and sometimes there will be cases where it’s not going to help you out. Occasionally you may see what appears to be shading on your footage after you apply Flicker Free. This is because Flicker Free is trying to blend multiple frames. This can be evident when there are high contrast areas and the camera is moving quickly. This may result in a phenomenon where the lighter areas are being affected by the darker areas. This causes something that looks like a shadow or shading. To try and fix this you can reduce the time radius, and/or try adjusting the threshold to a lower value.
Ghosting can also happen (although it is rare) when you apply the plug-in to fast moving objects. Again, it’s more of an issue with high contrast areas of the scene (e.g. a bright objects moving across a dark background). That object can appear in a frame with a type of ghosting effect of itself. Again, reducing the time radius and/or adjusting the threshold to a lower value can help.
Conclusion
As I mentioned in the article, Flicker Free isn’t a miracle worker and it can’t solve every problem you may encounter, but it does effectively and easily remove flicker in most scenarios. Being able to correct and save footage that suffers from flickering can be a lifesaver. Flicker Free is one of those plug-in-ins that once you start using it, you wonder how you ever lived without it.
Flicker Free retails for $149 USD, but you can download a free trial to see how well it works without needing to purchase.