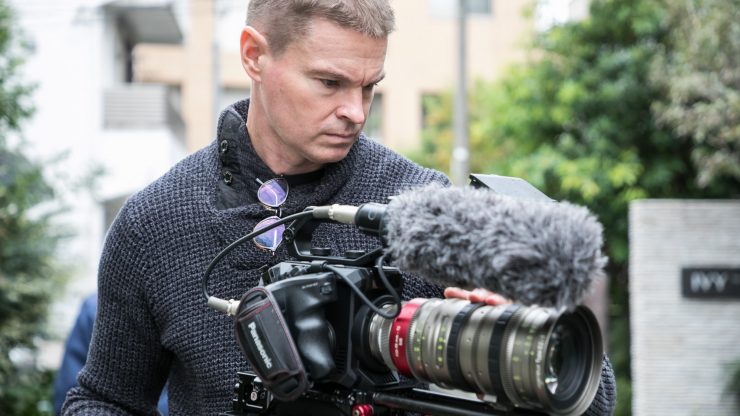
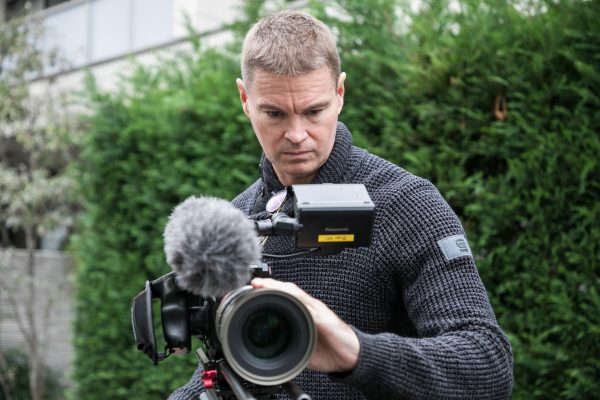
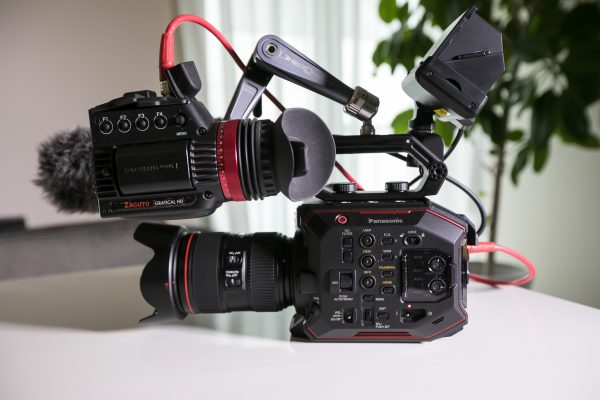
The Panasonic AU-EVA1 has just started shipping and here at Newsshooter, we’ve been lucky enough to have an exclusive opportunity to put the camera through its paces.
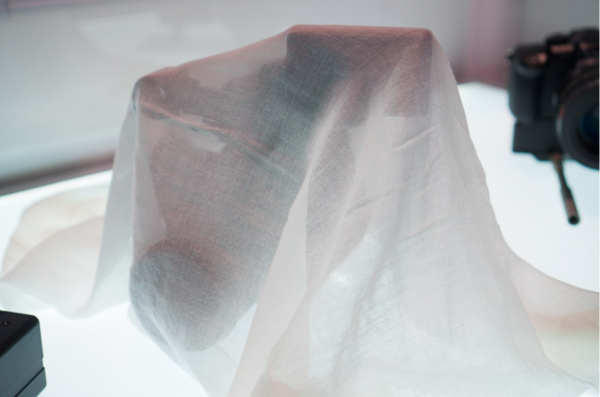 There has been a lot of hype and build-up with the EVA1 ever since a mystery camera under a sheet was shown at NAB. In some ways, I think the build-up has put a lot of pressure on Panasonic and probably created high expectations that the camera now has to live up to.
Panasonic EVA1 Overview and Footage
This review won’t be nearly as detailed as I would have liked, because I only had access to the camera for a few days. It is impossible to fully review a camera in a short period of time as you really do need to spend significant time with it over many weeks, if not months, to fully appreciate its strengths and weaknesses. I am, however, going to give you as much information and detail as I was able to get with my time with the camera. My review is based on using the camera in a news, documentary environment, but most of what I say is going to be relevant to anyone else using the camera for other purposes.
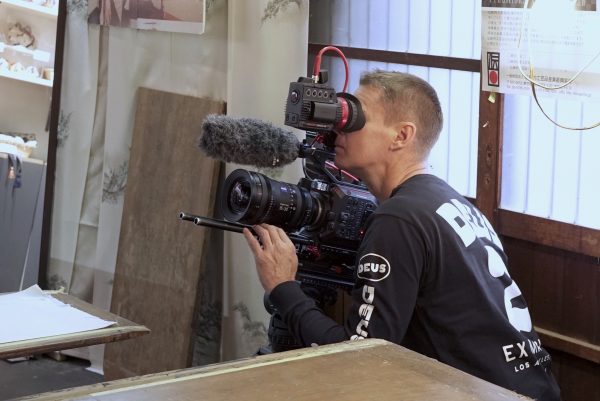
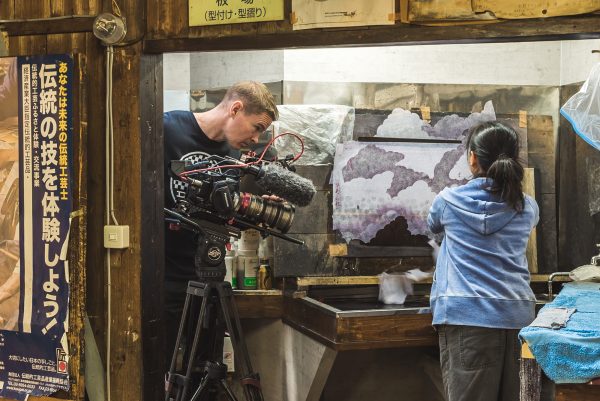
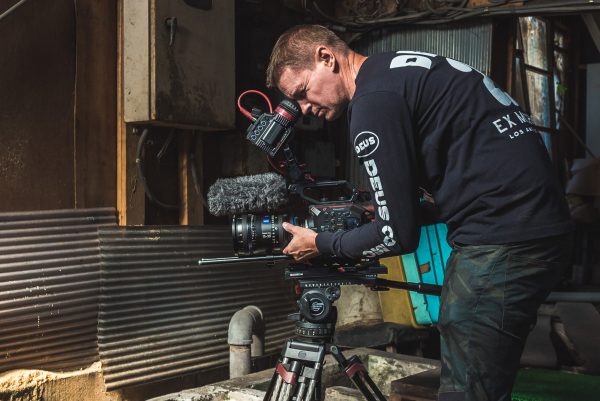
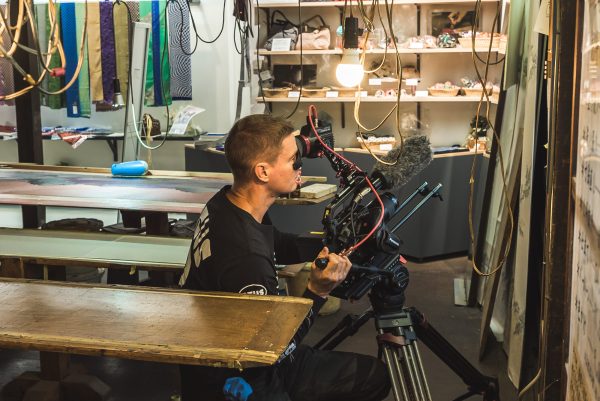
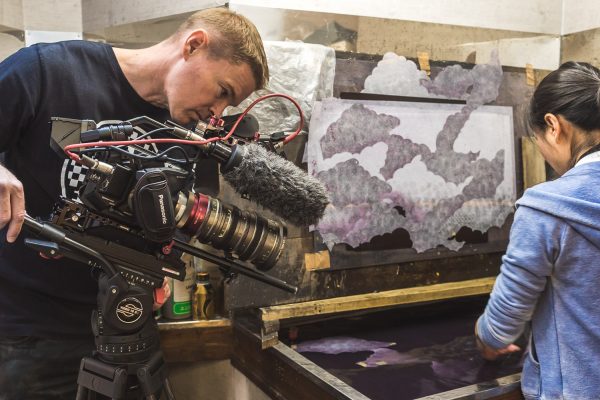
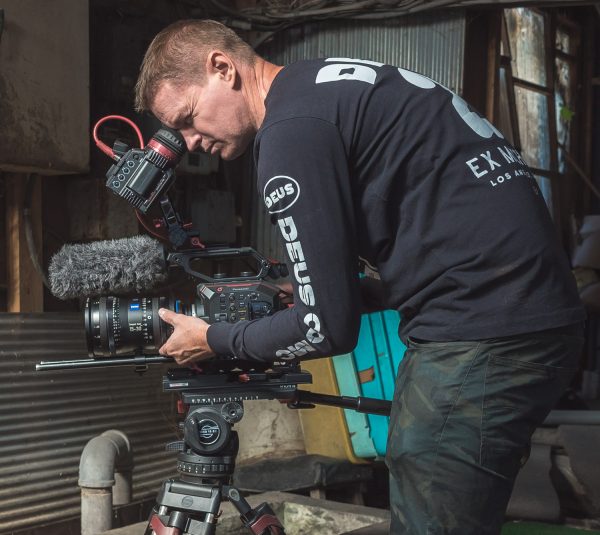
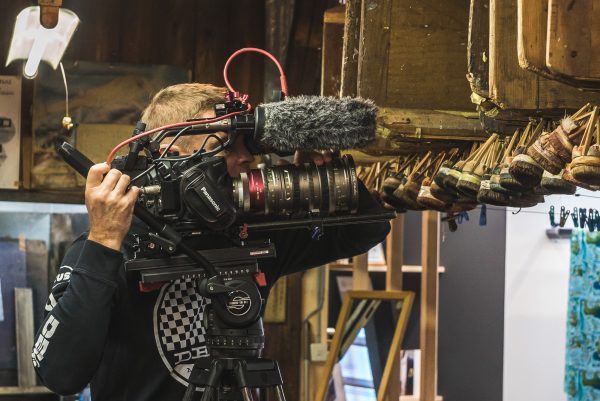
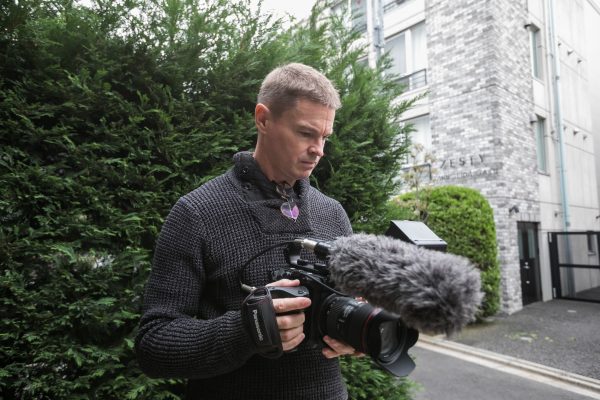
On the last day I had the camera I went out and shot a proper story, as it was important for me to see just how well the EVA1 performed in a real-world shooting scenario. Testing a camera under completely controlled conditions is never going to show its true strengths and weaknesses.
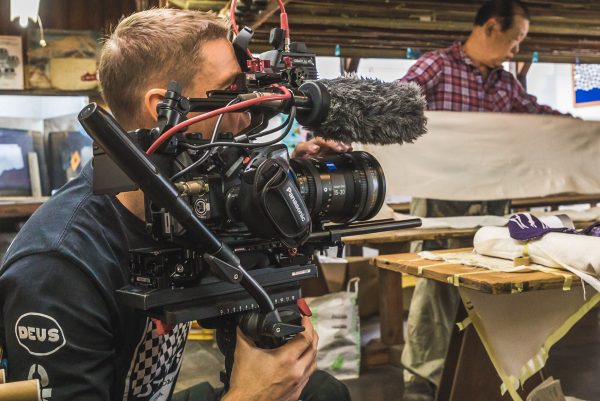
I had no idea what the location was going to look like or what I would be able to film before I headed out for the shoot. In a documentary or news situation this is often the case, and you need a camera that can adapt to any type of lighting conditions. When you are working by yourself you need to be able to work quickly and efficiently. You can’t waste time trying to light up every room you walk into.
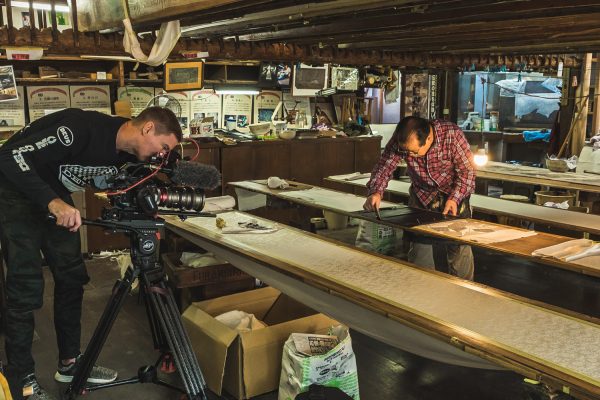
The location I was shooting in was a mixture of natural light, tungsten bulbs, and fluorescent LEDs. Not only was the mixed lighting going to test the EVA1, but most of the areas I was filming in would also push the cameras low-light abilities, as well as dynamic range.
Above is the finished piece. It was all done as a one man band and everything was captured under available light, except for the interview, all in 3 hours. I shot in the 800 and 2500 native ISO settings in 4K DCI at 25p in V-Log. All I have done is add a LUT and do a couple of minor adjustments to a few shots. It was important for me to see how the EVA1 performed if I had to turn the material around quickly. If you have any particular questions about my shoot please feel free to ask in the comments section at the bottom of the review. If you prefer to watch it on YouTube then you can go to https://www.youtube.com/watch?v=nCNn_QNan_g
Before I tell you how I found the camera to use on a real job, you are going to have to read the rest of the review. I can’t give everything away right at the top of the article! I will warn you in advance that it’s long, so feel free to skip over any sections that you aren’t interested in. A lot of the topics covered are also accompanied by a video with example footage. Below is some extra footage I managed to take on the first afternoon I had the camera.
Panasonic EVA1 Basic Specs
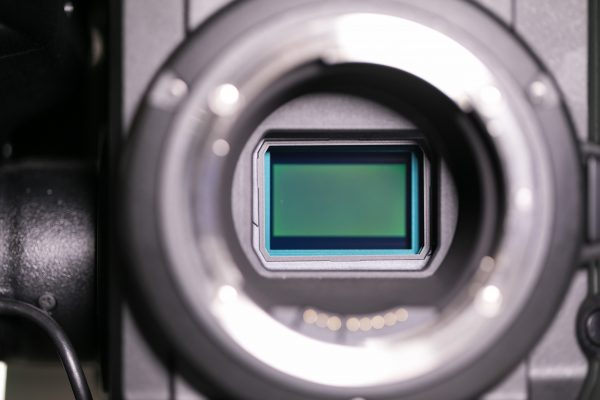
The EVA1 uses an all-new 5.7K Super 35mm sensor that downsamples to 4K, UHD, 2K and even 720p. Having a large sensor increases the amount of color information and results in a finer, more accurate image. We have seen this in action on other cameras and it’s a proven way to deliver a more detailed image overall as well as increase the camera’s sensitivity.
The camera can record in 4K, UHD and HD at up to 60p in a 4:2:2 10-bit codec and up to 240 frames per second in 2K and HD (with a sensor crop). It has a native EF-mount, Electronic Image Stabilization (EIS), built-in ND with 2, 4, and 6 stops plus an IR filter, and a dual native ISO of 800 and 2500. V-Log/V-Gamut capture are also on board to deliver high dynamic range.
In a future update, the EVA1 will be able to output 5.7K external RAW recording along with ALL Intra compression (400Mbps) for in-camera recording.
Who is the Panasonic EVA1 aimed at?
At $7,345.00US the EVA1 is being squarely targeted at the same shooters who are looking at cameras such as the Sony FS5, FS7, Canon C200, C300 Mark II, and the Blackmagic URSA Mini Pro. The sub-$10,000 (USD) market is where the majority of sales are for companies trying to sell professional digital cinema cameras. The EVA1 sits squarely in this realm, and I can see it being used by a vast range of shooters covering everything from documentary, run and gun news, events and weddings, all the way up to indie and short films. The EVA1 also looks to be a good option to use along with either the GH5 or Varicam LT if you already own one of those cameras.
For documentary and news shooters the EVA1 ticks a lot of boxes, but it does have some caveats that I will go into later in my review. Its small weight and size make it ideal for a lot of shooting scenarios, and most importantly it shoots in a broadcast friendly 4:2:2 10-bit codec in HD, 2K, UHD, and 4K. This is a big deal if you work in broadcast or for any production that requires deliverables to be in 4:2:2 10-bit. Unlike the Canon C200 you don’t need an external recorder to provide broadcast quality deliverables. In my opinion, there is zero point to adding a large external recorder to a small camera, especially for run and gun news gathering or documentary work. Whether 4:2:2 10-bit or 4:2:0 8-bit images look the same is a pointless argument if you are working for a production or broadcaster that requires 4:2:2 10-bit.
A Tough Sell

One of the biggest hurdles Panasonic has had to overcome is that they haven’t had an “affordable” digital cinema camera since the AF101. This creates a problem because unlike Sony, Canon, and Blackmagic, there hasn’t been anything to upgrade from. For instance, if you were a Sony FS700 owner you may have upgraded to an FS7, if you were a Canon C100 user you might have upgraded to a C300, and so on. These companies have always had a camera you could upgrade to as you potentially evolve in your career. With Panasonic it’s almost like they have had to start from scratch. You could argue that they have had the GH4 and GH5, but realistically upgrading to an EVA1 is a massive step up when it comes to price.
Panasonic’s big dilemma is not just how to attract new buyers but also how to lure away loyal users of Canon, Sony, and Blackmagic cameras. When you start talking about cameras in the EVA1 price range, shooters generally are not likely to replace their camera every time a new model comes out (especially with the rate at which Sony releases new models!). If you are an owner/operator you want to try and get the most out of your investment as possible, especially if you are spending significant money. If you have bought a camera in the last two years you are unlikely to be upgrading to something new unless that camera offers key features you didn’t previously have, and now need.
For the EVA1 to gain traction in the market it really can’t just be another camera that is as good as its competition, it needs to be better. This is the harsh reality because you need to convince potential buyers that the camera is either substantially better than what they already have or better than the existing competition. In the case of the C200, Canon already had a substantial base of C100 and C300 owners who were looking to upgrade. Introducing a new camera in the Cinema EOS series that is already familiar to your customer base is a far easier sell.
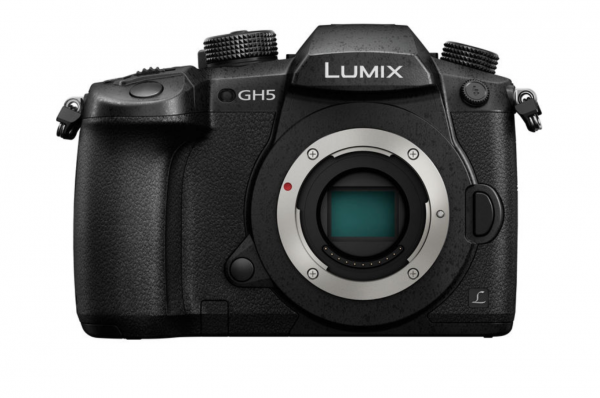
The other problem Panasonic faces is potentially from its own GH5. With good onboard recording options and a 6K anamorphic mode, the GH5 is a very capable camera. Trying to convince GH5 owners that they should upgrade to the EVA1 given the massive price difference may also be an uphill battle.
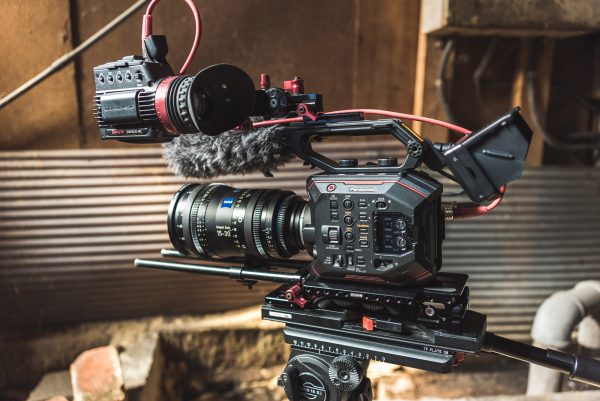
EVA1 Size and Weight
The first thing that strikes you about the EVA1 is its small size and weight. Without any of the accessories the camera weighs in at 1.2kg (2.6 lb), that’s only 475g (0.93lb) heavier than a GH5 with battery and memory card. With all of the accessories on, the EVA1 weighs 2.1kg (4.5lb).
To put those figures in perspective here is what some of the direct competition weighs (body only):
Sony FS5 – 827.8g (1.82lb)
Sony FS7 – 2.0kg (4.4lb)
Canon C200 – 1.5 kg (3.2 lb)
Canon C300 Mark II – 1.77kg (3.9lb)
Blackmagic URSA Mini Pro – 2.3kg (5.1lb)
The compact size and weight of the EVA1 make it a very portable and convenient camera for those shooters who travel a lot and like to operate with a camera package that is as small as possible.
For me personally, small sized cameras can be both a blessing and a curse. The positive aspect is you can just hand-hold the camera by supporting it against your chest in front of you and use the LCD screen. While there is nothing wrong with this approach, if you aren’t particularly tall you will find yourself having to angle the camera up to shoot anyone who happens to be standing. The other downside is if you are using the camera outdoors in bright sunny conditions you are going to struggle to see the screen.
Everyone’s shooting style is different, but for me, I like to be able to put a camera on my shoulder and use an EVF. Unfortunately just like a lot of other modern day cameras, if you want to do this with the EVA1, you need to add some sort of shoulder support system and EVF. The stock EVA1 handle doesn’t move backward or forwards, and the mount that supports the LCD screen doesn’t have much in the way of movement, so if you just want to put the camera on your shoulder and not use an EVF you are going to struggle. Third-party vendors have already made accessories for the EVA1 that include ways of pushing the LCD screen, or an EVF further away from the camera body for handheld use.
The other positive aspect of the camera being so light is it’s easy to switch it from a tripod to a gimbal or even a drone (but you will need a large drone). This flexibility is what a lot of shooters are looking for in a camera, and it’s why we are now seeing so many cameras coming to market that have been designed with this in mind.
EVA1 Build quality
To me, the EVA1 looks like a cross between a Sony FS5 and a Panasonic DVX200. Like a lot of other cameras, it is basically a box with buttons on it. As I mentioned earlier, it’s incredibly lightweight and a lot of this has to do with the materials used to construct the camera. For Panasonic to make the camera this light they obviously had to make some compromises. It does feel a little on the plastic side and it doesn’t have anywhere near the build quality of say a Varicam LT. In saying that, everything such as the top handle and LCD bracket mounts all lock-off securely and feel solid enough. The quality of the buttons and dials are ok, but again they don’t have the feel of a Varicam LT.
All this may sound a bit harsh towards Panasonic, but in terms of build quality the EVA1 is not too different from say a Sony FS5 or Canon C100.
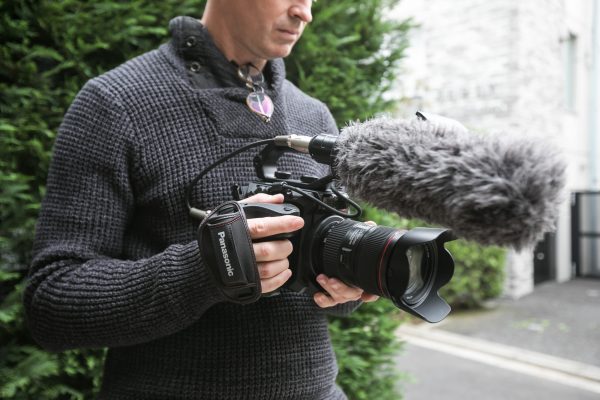
Detachable & Rotatable Handgrip
The handgrip that comes with the EVA1 is very reminiscent of other handgrips on cameras from Sony and Canon. It is rotatable and detachable and it allows you to control record start/stop, the iris or menu, as well as the ability to program two other USER buttons. It is very ergonomically designed and nice to hold onto.
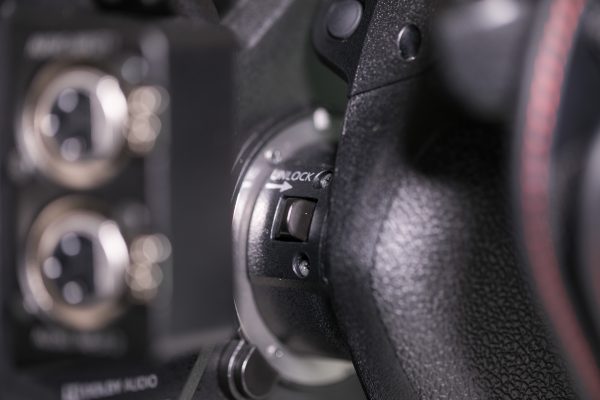
In a nice touch, you can use your thumb to slide across a lock/unlock lever that allows you to rotate the grip into a variety of positions. Once you get it in the position you like you just release the switch and it locks back into place. It’s a much better design in many ways than the competition, as it’s adjustable on the fly. This adjustability allows you to go from chest height to knees or high overhead, and adjust the handgrip to the correct position. There are eight positions for rotation.
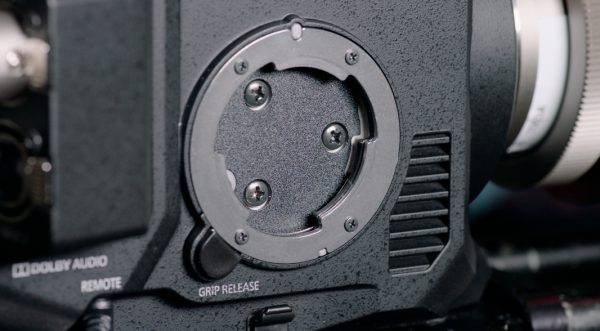
The handgrip mount isn’t an Arri rosette but a proprietary Panasonic design. You can release it with another switch and take it off the camera very quickly. The standard remote cable that comes with the camera is very short and there is no other place to relocate the handgrip to. When using the camera in a shoulder mount position, the handgrip is totally in the wrong position. To relocate the handgrip you are going to have to use a third party accessory to do so. A standard LANC extension cable will allow you to extend the remote cable.

The buttons are fairly easy to reach, except for the USER button 8, and if you are looking for USER button 9 it’s on the backside of the handgrip. The handgrip isn’t the same as the one that comes with the Varicam LT, but is very similar.
I found the handgrip nice to use and it’s easy to do your focus punch in, adjust your iris and quickly go into the menu to make changes. If you are just hand-holding the camera without a shoulder rig the handgrip works really well.
Canon EF mount on a Panasonic Camera
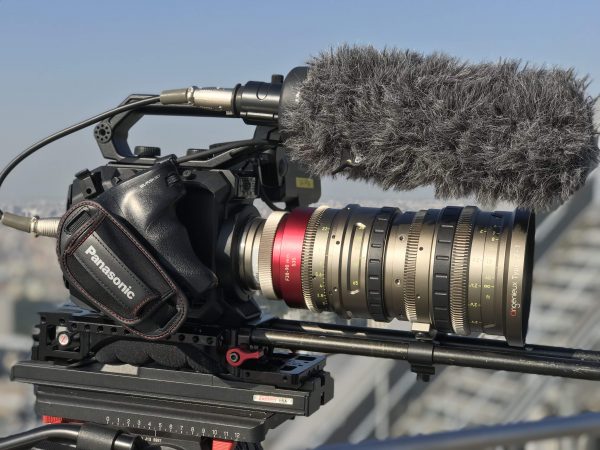
Panasonic’s choice to go with a Canon EF mount is a little limiting in my opinion. While not as versatile as the Micro 4/3 or Sony E-mount, Canon EF lenses have proven to be very popular with a lot of shooters. There are a vast amount of lenses in EF mount to choose from, and you can easily get EF mount cine lenses like the Canon CN-E Primes and Zeiss CP.2 or CP.3 lenses, just to name a few. This is great if you already own EF mount glass, but if you don’t, it may be enough of a reason for you to look at say a Sony FS5 or FS7.
Again this is just my personal opinion, but I think Panasonic have played slightly into Canon’s hands by making the mount EF. Canon has a big advantage when it comes to integrating their own lenses with their cameras. If you are tossing up between a Canon C200 and the EVA1, the Dual Pixel Autofocus and autofocus tracking abilities of the C200 may well be enough to sway you in that direction. Unfortunately, unlike the Varicam 35 and LT, other lens mounts aren’t available.
From Panasonic’s viewpoint, I can see why going with an EF mount was probably Panasonic’s only real option. Sony isn’t exactly going to start licensing out their E-mount to the competition, and using a Micro 4/3 mount on a Super 35mm sensor would have provided other problems. I would have preferred to have seen an interchangeable mount system, so at least you would have given owners the ability to choose what sort of lens they wanted to use.
EVA1 Autofocus
The camera doesn’t have continuous autofocus capabilities like the Canon C200, it only has a one-push autofocus button. If you are looking for a camera that has continuous autofocus and face and object tracking then this most likely isn’t the camera for you. I tried using the autofocus with quite a few different Canon EF lenses and the performance was average at best. It does have a tendency to hunt around and if you are trying to use it when your scene is not particularly bright it really struggles. There is also no way of adjusting where the camera autofocuses – it looks to be center-based only.
Autofocus is not one of Panasonic’s strengths, and it is certainly a major weakness on the EVA1. If you rely on autofocus for documentary, event or wedding shooting, this camera is likely going to disappoint you.
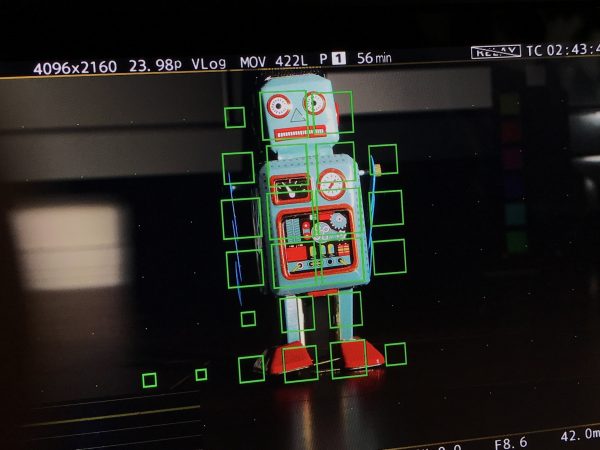
As far as manual focusing goes, there are your normal peaking and focus magnification options available. Panasonic also has a Focus Box Assist mode that when activated, brings up a series of green boxes that change size as your focus is turned. Once the box, or boxes reach their biggest size, that point in your image is in focus. This works pretty well, but you do end up with a lot of green boxes on the screen that obscure your image. Unlike the manual focus assist on some of the Canon cameras, you don’t get an indication of whether you have gone past your focus point or if you are in front of it.
A Cinema Camera with No Viewfinder
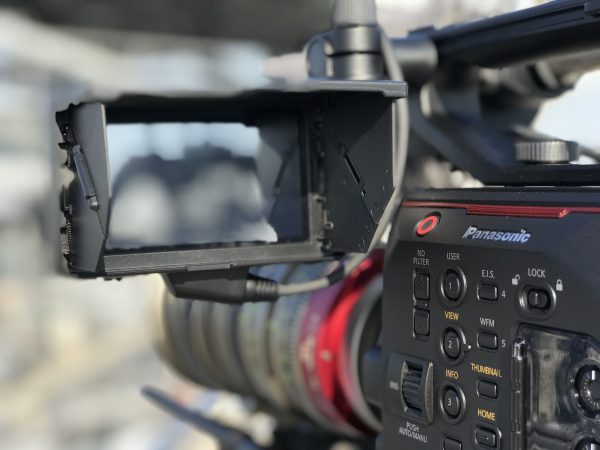
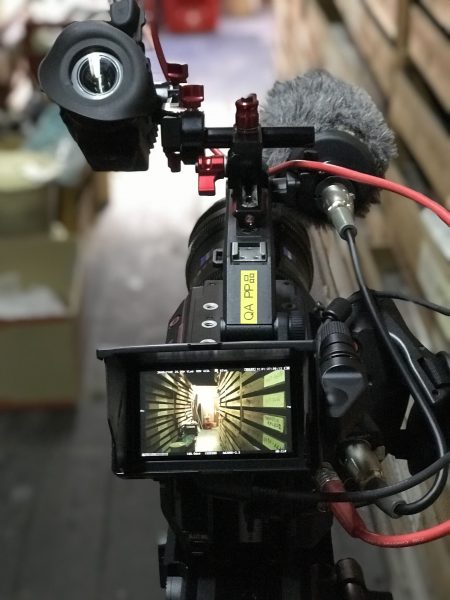
One thing that is missing is an EVF. Panasonic says it’s decision to not have a rear viewfinder is because users don’t generally like or use them. I have to agree to a certain extent. A rear, fixed-mounted viewfinder is normally only suitable if you have the camera pressed up against your eye and you are hand holding it. Apart from that, rear-mounted viewfinders are pretty much useless. By not having one it saves on cost, battery life and weight. To overcome not having a viewfinder the LCD is relocatable to a number of mounting points on the handle and body.

The unfortunate problem is that the LCD screen borders on being unusable outdoors in bright conditions. The first time I used the camera for this review I was on a rooftop out in the sun and I wanted to see if I could get away with just using the LCD and not having to resort to a third party EVF or monitor. It was so reflective it made it almost impossible to see. I ended up putting a sweater over my head to try and cover up not only the LCD screen but the area around it as well. Subsequently, some of the material I shot was either out of focus or not exposed correctly.
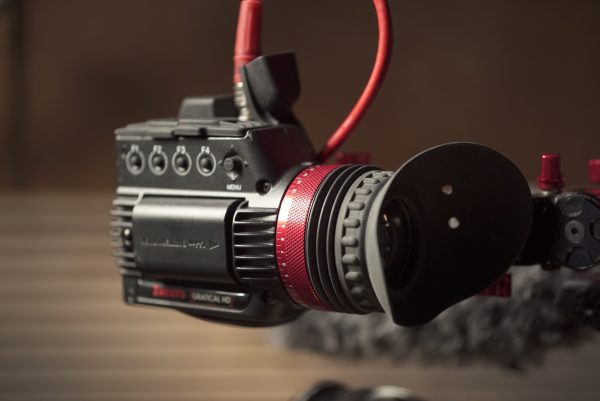
It’s slightly ironic that a lot of the Panasonic release films for the EVA1 showed somebody using a third party EVF, but realistically this is what most shooters are going to end up doing, including me.
I still think you need a dedicated viewfinder on any camera because using an LCD screen outdoors is just not entirely practical. Between glare, direct sunlight and not being able to see the screen correctly because it is either too close or too far away from you, there is a myriad of problems it can create. Yes, you can use Panasonic’s viewfinder that is available for the VariCam LT, but it’s $5,400US. If a company like Zacuto can make a Gratical Eye EVF for just under $2,000US, then you think a big company like Panasonic would be able to make a similar solution for the same sort of money. I’m not just having a dig at Panasonic here because this applies to other manufacturers such as Sony and Canon as well. At least Blackmagic made an affordable EVF for their cameras, and while it’s far from perfect, it’s at least reasonably affordable.
EVA1 LCD screen
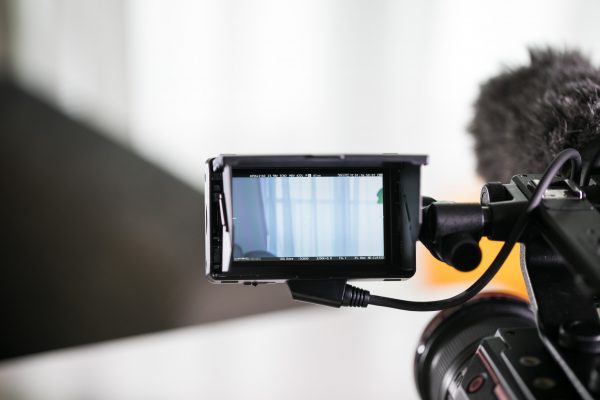
The EVA1 has a 3.5″ LCD monitor (approx. 1,150,000 dots) that is also a touchscreen. From here you can control all of the cameras menu settings and functionality. The touchscreen aspect works well, but it’s reflective and not easy to see. If you are using it in dark conditions it looks fine, but anywhere that is even mildly bright or where a light will reflect onto it and you are going to run into problems. In my opinion, the LCD screen shouldn’t be used for anything more than seeing a reference image and for controlling the menu. Even indoors under regular lighting, I found it attracts far too much glare and the built-in sun hood that opens up just tends to get in the way. As I mentioned earlier, outdoors it borders on being unusable. I could not see myself using this camera without a high-bright monitor or EVF. No matter how great a camera may or may not be, if you can’t see your image clearly and judge accurate exposure and focus, then your results are going to be less than stellar. The LCD screen is definitely the EVA1’s Achilles heel.
Built-in ND filters
The EVA1 uses electrically driven ND filters. You can choose between Clear, 0.6ND, 1.2ND, and 1.8ND. These work well, but only having a maximum ND of 1.8 can be limiting if you want to shoot with a shallow depth of field in bright, sunny conditions. I found that in a lot of cases when shooting in bright conditions I couldn’t dial in enough ND and I was forced to both lower my ISO and stop the camera down to an aperture you don’t want to be shooting at. In comparison, the Canon C200 offers 0.6ND, 1.2ND, 1.8ND, 2.4ND, and 3.0ND.
Batteries
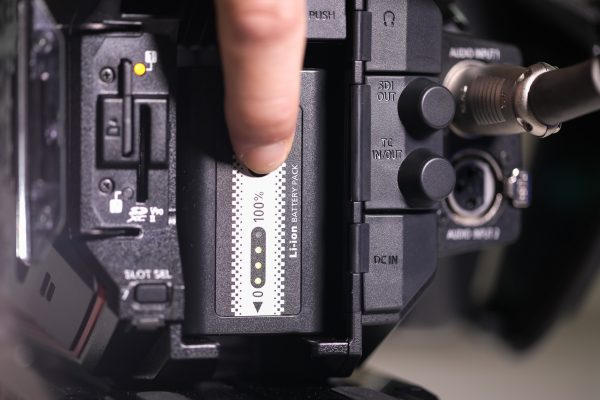
The EVA uses a 7.28v 5800mah/43 Wh battery. The charging time for this battery according to Panasonic is a rather long 3 hours and 20 minutes, but I found the battery charged a lot quicker than this. Panasonic doesn’t state how long these batteries will last, but given the camera only draws 19W (with LCD/HDMI/SDI ON), I found a single battery lasted quite a long time. I think having three batteries would get you through a long shooting day. Other optional Panasonic batteries are also available.

I would have liked to have seen Panasonic make a battery that has a built-in power tap port so you could power an EVF or monitor. Hopefully, a third party manufacturer will come up with a solution.
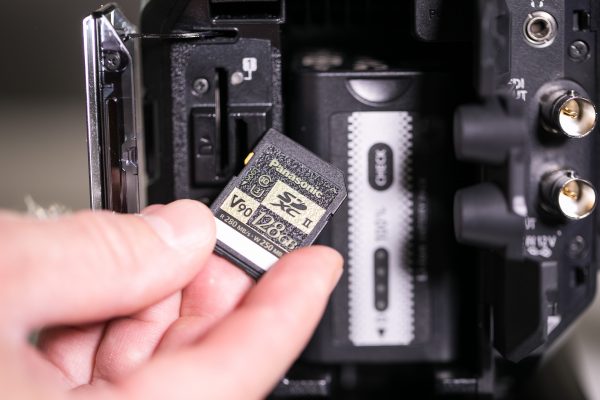
Recording media

Unlike with some cameras from Canon and Blackmagic, Panasonic has chosen to stick with relatively affordable SD cards instead of using more expensive CFast 2.0 cards. The camera has two SD slots with various recording modes. Simultaneous recording, relay recording, loop recording*1, or background recording*. The EVA1 does require different SD cards depending on what codec flavour you decide to record in. Below you can see a chart that tells you what cards are required depending on what codec choice you go with.
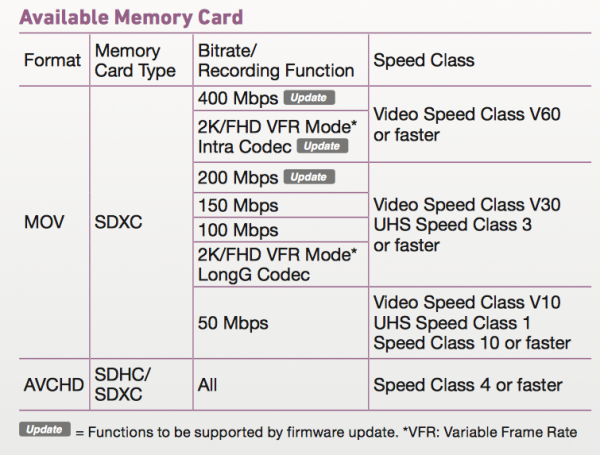
As you can see you will need to use SDXC cards with a Video Class Speed of V60 or greater to record in the 422Intra 400Mbps codec, or in the 2K/FHD VFR Mode. These cards are still relatively expensive and not a lot of them are currently available. Hopefully prices will start to come down by the time the firmware that enables these recording modes is released. Please be aware that according to Panasonic you are limited to using SDXC cards up to 128GB in capacity.
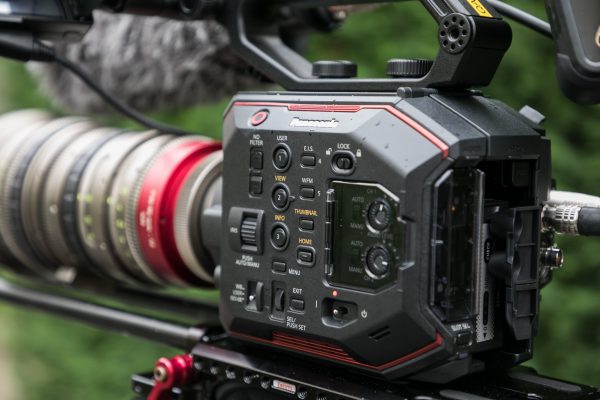
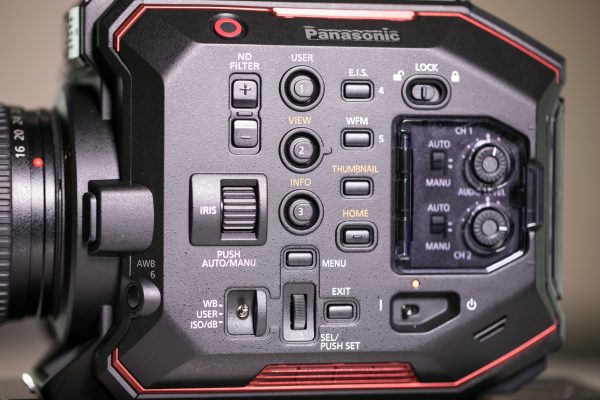
Control layout
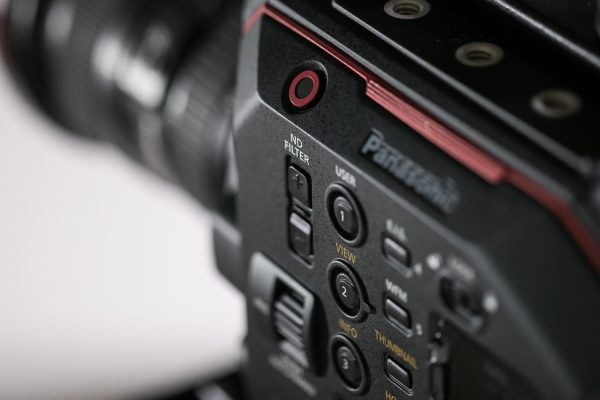
I’m a stickler for wanting to use cameras that are easy to control and operate. There is nothing worse on a camera than confusing menus and badly labeled or placed buttons and switches. So how does the EVA1 fair? The majority of the EVA1’s buttons and controls are located on the operator side of the camera and the key buttons for changing the iris, ND, white balance, and ISO (although this is a combined function switch that you have to go between) are all positioned in an easy to access position.
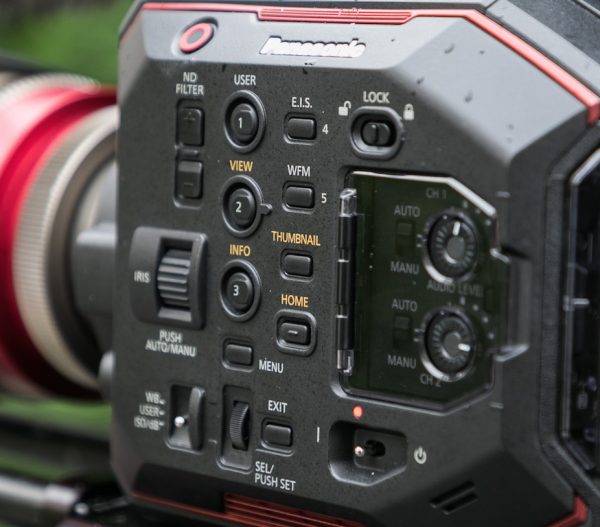
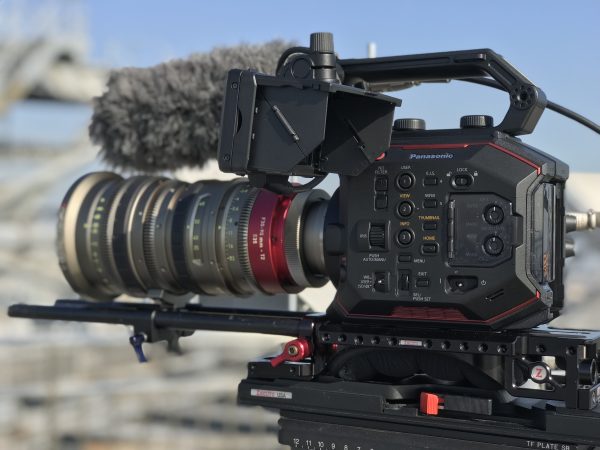
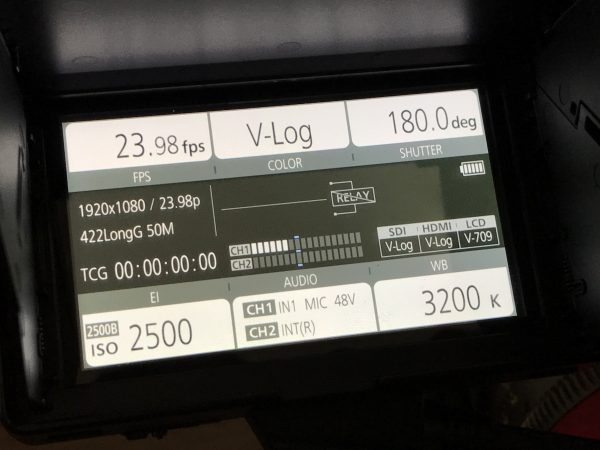
There are nine USER assignable buttons that you can set to a variety of functions. There is also an INFO button as well as a HOME button which when pressed, brings up a nice display screen that shows you all the key operational aspects of your camera. This is a nice screen to use as you can easily see your shutter speed, ISO, frame rate, colour settings, timecode, audio, WB setting, and recording codec and resolution. The HOME screen is not just a status display, it’s also a shorthand menu that allows quick access to some of the cameras controls as well.
The Toggle switch (located under Iris Wheel) has a center position marked USER. In this position you can preselect it to control shutter, variable frame rate or monitor out (headphone level).

Unlike the Varicam LT, the EVA1 has physical audio controls on the side of the camera, but in somewhat of a strange move, they haven’t included physical switches for changing between MIC/LINE or for turning on or off +48V phantom power. All you can physically do with the controls is set CH1 and CH2 to be in auto or manual modes and adjust the levels. To set the channels to MIC/LINE or turn on/off +48 phantom power you need to go into the menu. You have a choice to monitor through the headphone jack of CH1 or CH2, both CH1 and CH2 and also a STEREO setting.
Menu system
The menu system is fairly easy to understand, and the touchscreen functionality of the LCD screen allows you to go through it pretty easily. There is also a menu button on the hand control grip, which once pressed, allows you to use the scroll dial to make changes. Like most cameras these days there is a tendency where you have to go into one menu, select another menu and then into yet another menu to make changes. In saying this I found after a couple of days I was able to get familiar with the system and made changes quickly without having to go searching.
One thing you really need to be vigil about is when you make changes to USER buttons in the menu. If for instance you have USER button 2 set to EIS (Electronic Image Stabilisation) and you have it turned on, if you don’t turn it off, and you then change that USER button function to something else, the EIS will stay on and you won’t be able to turn it off without going through the menu.
EVA1 Picture Profiles
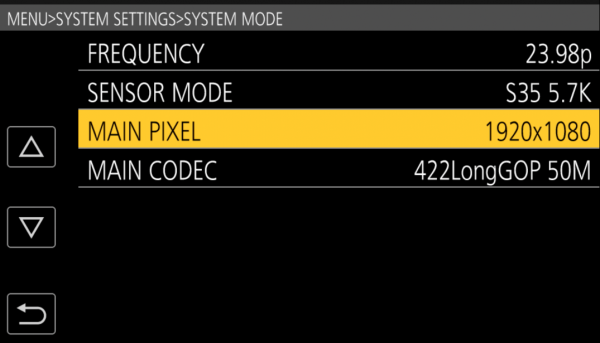
The EVA1 can shoot in V-LOG/V-Gammut and there are also 5 different scene files you can use. These scene files can also be customised if need be by making changes to the Gamma, Detail, Black Point etc. The Scene files are just labeled Scene 1-5, but they can be renamed. Scene files can be saved to and loaded from an SD card. Panasonic also allows you to do a complete reset back to the factory presets.
Scene 5 is for HDR, and it is full HLG (Hybrid Log-Gamma) in the REC2020 colour space.
Internal 4:2:2 10-bit recording
Let’s face it, Panasonic gets it when it comes to codecs. They know people want to record in a good colour space at a decent bitrate, so they put codecs in cameras that people want. Just like the GH5, the EVA1 will be able to record 10-bit 422 at up to 400Mbps, even in 4K, to affordable SDXC cards. In my opinion internal recording is where Canon missed the boat with the C200. In 2017 there is absolutely no reason why camera companies can’t offer 4:2:2 10-bit internal recording in their cameras. Panasonic sell a lot of cameras to television stations and they understand the importance of having codecs in their cameras that meet broadcast specifications. Not having to use an external recorder to record to a broadcast-friendly codec is a big deal, especially when you want to keep your camera light and compact.
The other nice thing about the EVA1 is you can get a lot of footage on a relatively small card. For example, if you want to record in HD 422LongGOP 50M (a broadcast acceptable standard) you can record 5 hours and 20 minutes on a 128GB card. Because the camera has two card slots you could record in this codec for more than 10 hours without having to change cards.
The option to have full 4K and UHD at 10-bit 4:2:2 in 29.97, 24p and 23.976 with a VBR of 400Mbps is impressive. Unfortunately, this codec won’t be available until a later date with a firmware update.
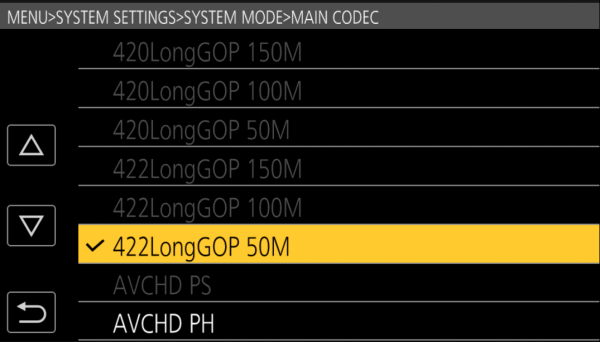
The camera can record in the following codecs and bitrates:
In S35 Mode 4096 x 2160 (4K) .MOV
- 422 Intra 400 Mbps (VBR) 29.97p, 24p, 25p, 23.98p (Firmware Update)
- 422 LongGOP 150Mbps (VBR) 29.97p, 24p, 25p, 23.98p
- 420 LongGOP 150M (VBR) 59.94p, 50p
- 420 LongGOP 100M (VBR) 29.97p, 25p, 23.98p
In S35 Mode 3840 x 2160 (UHD) .MOV
- 422 Intra 400 Mbps (VBR) 29.97p,25p, 23.98p (Firmware Update)
- 422 LongGOP 150Mbps (VBR) 29.97p, 25p, 23.98p
- 420 LongGOP 150M(VBR) 59.94p, 50p
- 420 LongGOP 100M (VBR) 29.97p, 25p, 23.98p
In S35 Mode 2048 x 1080 (2K) .MOV
- 422 Intra 200 Mbps (VBR) 59.94 50p (Firmware Update)
- 422 Intra 100Mbps (VBR) 29.97p, 24p, 25, 23.98p (Firmware Update)
- 422 LongGOP 100Mbps (VBR) 59.94p, 50p
- 422 LongGOP 50M (VBR) 29.97p, 24p, 25p, 23.98p
- 420 LongGOP 100M (VBR) 59.94p, 50p
- 420 LongGOP 50M (VBR) 59.94p, 50p
In S35 Mode 1920 x 1080 (FHD) .MOV
- 422 Intra 200 Mbps (VBR) 59.94 50p (Firmware Update)
- 422 Intra 100Mbps (VBR) 29.97p, 24p, 25, 23.98p (Firmware Update)
- 422 LongGOP 100Mbps (VBR) 59.94p, 50p
- 422 LongGOP 50M (VBR) 29.97p, 25p, 23.98p
- 420 LongGOP 100M (VBR) 59.94p, 50p
- 420 LongGOP 50M (VBR) 29.97p, 25p, 23.98p
The only downside when it comes to the internal recording on the EVA1 is that you are limited to capturing up to 29.97p in 4:2:2 10-bit when recording in UHD or 4K DCI. If you want to record 59.94 or 50p in UHD or 4K DCI you can only do so in 4:2:0 8-bit.
External RAW recording
Unlike the Canon C200, the EVA1 can’t record RAW internally and to do so you need a third part external recorder. Both Convergent Design and Atomos are going to support this once it becomes available. The EVA1 will be able to output a 10-bit 5760 x 3072 signal at frame rates up to 29.97p and a 4096 x 2160 signal at up to 59.94p. From my perspective, I would rather have the RAW recording be external and have good onboard recording codecs, which is exactly what Panasonic has chosen to do. Putting an internal RAW recording option on board would have required a different media solution to be used, and given that the Varicam LT can’t record RAW internally, it wouldn’t have made any sense for Panasonic to have done it. Realistically the majority of shooters using sub $10,000US cameras are not going to be shooting RAW for the majority of the paid work they do.
What does the EVA1 output over HDMI and SDI?
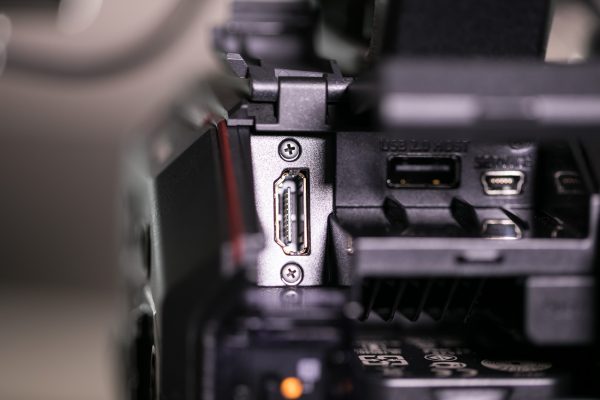
The EVA1 can output 4:2:2 10-bit up to 29.97p in 4K and UHD, and up to 59.94p in HD over SDI. If you use HDMI you can output in 4:2:2 10-bit at up to 59.94p in 4K, UHD, and HD.
Panasonic gives you lots of options for what you can send over HDMI and SDI. In a nice touch, you can actually have the EVA1 send the signal directly from the cameras LCD screen over SDI. This is very handy if you are using a monitor or EVF as you can completely replicate exactly what information is on the LCD screen. This is quite different from just choosing to send the overlay information over SDI or HDMI as it lets you see a lot of extra information such as the focus assist boxes and peaking etc.
A major function of the EVA1 when it comes to outputs is is the ability to individually address the different video outputs and use them all even while recording. Resolution can be separately set on SDI & HDMI, as can choosing to show the heads up info displays. When shooting V-Log/V-Gamut, the LCD, SDI & HDMI can individually be set to Log or Rec709 (easy to do in HOME menu). Think of it this way: SDI in 4K/Log/clean to a recorder, HDMI in HD/709/info (info to show timecode) to a producer-client (maybe via a transmitter), and LCD toggling between V-Log & Rec709 (set a User Button to toggle the LCD image). Plus the waveform in the LCD will always show what internal recording is set to, so the LCD could remain in 709 with the waveform indicating the recorded exposure. Unlike some other cameras, all of these outputs are always available simultaneously, even while recording.
As far as the external RAW recording is concerned the camera can output 10-bit 5760 x 3072 at frame rates up to 29.97p and in 4096 x 2160 up to 59.94p. The RAW recording output will eventually be made available through a firmware update.
SDI
4K (6G), HD (3G/1.5G) Output format (4:2:2 10-bit):
• 4096 x 2160: 29.97p, 25p, 24p, 23.98p
• 3840 x 2160: 29.97p, 25p, 24p, 23.98p
• 1920 x 1080: 29.97p, 25p, 24p, 23.98p, 59.94p, 50p, 59.94i, 50i, 29.97p, 29.97PsF, 25p, 25PsF, 24p, 24PsF, 23.98p, 23.98PsF
• 1280 x 720p: 59.94p, 50p
RAW* output format (10-bit):
• 5760 x 3072: 29.97p, 25p, 24p, 23.98p
• 4096 x 2160: 59.94p, 50p, 29.97p, 25p, 24p, 23.98p
HDMI
Output format (4:2:2 10-bit):
• 4096 x 2160: 59.94p, 50p, 29.97p, 25p, 24p, 23.98p
• 3840 x 2160: 59.94p, 50p, 29.97p, 25p, 24p, 23.98p
• 1920 x 1080: 59.94p, 50p, 59.94i, 50i, 29.97p, 25p, 24p, 23.98p
• 1280 x 720: 59.94p, 50p
• 720 x 480: 59.94p
• 720 x 576: 50p
Output format (4:2:0 8-bit):
• 4096 x 2160: 59.94p, 50p
• 3840 x 2160: 59.94p, 50p
EVA1 High Frame Rates
For high-speed capture, the EVA1 offers up to 59.94fps/50fps for 4K/UHD, up to 120fps/100fps for 2K/Full HD, or 240fps/200fps (cropped area). All internally recorded.
- 2K/VFR Mode with Intra Codec will come later in a firmware update.
- S35: 4K/UHD 60 fps/50 fps 2K/HD 120 fps/100 fps
- Cropped Mode (4/3″) 2K/HD 240 fps/200 fps
A lot of people are going to be disappointed that the camera can’t capture 50/60P UHD internally in 10-bit 4:2:2. I’m personally not that surprised by this as Panasonic needs to differentiate the camera from the VariCam LT. Having a cropped (4/3″) 2K/HD mode for 240 fps/200 fps shooting is also something people are bound to frown at. It is not uncommon for manufacturers to do this as it often results in improved quality. Most of the cameras I have used that don’t do a sensor crop for 200/240fps recording tend to do so with a compromise in image quality.
Changing the camera to shoot in the VFR (variable frame rate) mode requires you to go into the menu, again this is another function you can’t assign to a USER button.
You don’t have to just use the cropped (4/3″) 2K/HD mode for 240 fps/200 fps recording, you can also use it at normal frame rates. Unfortunately, you can’t use it as a pseudo doubler in the same way you can do a 2K center crop on say a Sony F5. The EVA1 also has a Digital Zoom (1.4x magnification) that can be set to a User Button. This extra reach is handy when you need a little bit more magnification.
It takes about five seconds for the camera to change from using the 5.7K sensor mode to the (4/3″) 2K/HD mode and vice versa. You need to be aware that when you are shooting in the 2.2K 4/3″ crop mode that due to reciprocity failure at high frame rates the native ISO of the EVA1 drops to 400/1250. The dynamic range also drops from a claimed 14 stops to 13.
The cropped (4/3″) 2K/HD mode is definitely noisier and you have to be careful when using it. I found that at up to 800 & 1250 ISO it is still reasonably clean, but if you try using it at 2500 ISO for example, there is significant noise and image artifacts.
Overall I found the 240fps recording in this crop mode to be ok. As I said earlier, you just have to be careful not to push the ISO too hard. I also tried out the 4K 60p mode, and despite it only recording in 4:2:0 8-bit, I found the quality to be good. I didn’t get a chance to test out the 120fps/100fps 2K/Full HD non-sensor crop.
EVA1 Colours
This is where I think the EVA1 excels. It replicates colours beautifully, and if there is one thing Panasonic do tend to get right, it’s accurate colour rendition. Skin tones look really nice and the camera handles mixed lighting conditions a lot better than some of its competition.
In my personal view (feel free to disagree with me in the comments!) the EVA1 has the most accurate colour rendition of any of the sub $10K cameras that are out there. The colours are very reminiscent of the Varicam LT and you would struggle to tell the two apart.
For news, documentary and event shooters who need to turn material around quickly and can’t shoot in a Log profile or grade the image at all, the EVA1 is very good choice. I found that I didn’t have to do anything to the images for them to look pleasing to the eye.
Resolution
There has been much debate about increased resolutions and whether we actually need them. The EVA1 uses a native 5.7K sensor as opposed to a native 4K sensor. Due to loss of resolution to Bayer pattern math, 5.7K is needed to deliver proper 4K RGB. It’s the same reason ARRI uses 2.8K to deliver 2K. The EVA1, in theory, should out-resolve any 4K Native camera, as it can clearly delineate 2000 line pairs while most others max out at about 1600.
The camera allows you to change the sensor mode between 5.7K, 2.8K, and 4/3″ Crop. I did a small test to compare what all these resolutions looked like when you put them on a HD timeline. I was interested to see if shooting in 4K or HD, especially when using the 5.7K sensor mode made much of a difference if you plan on delivering in HD.
Given the cameras large sensor, I was interested to see if there was a massive difference in perceived resolution between shooting in 4K as opposed to HD if everything is going on a 1080 timeline. Yes, there are obvious benefits with shooting in 4K or UHD when it comes to reframing etc. but resolution wise I couldn’t see much of a difference. Even a 300% crop of the images didn’t reveal vast differences.
The differences were however apparent if you used the 2.8K sensor mode or the 4/3″ Crop mode. Both of these had noticeably less perceived resolution and once you blew up the images 300% you could really tell the difference.
Electronic Image Stabilization (EIS)
Panasonic has incorporated Electronic Image Stabilization (EIS) into the camera body itself. This can be turned on or off and when it is engaged, it compensates for camera shake and blurring of the image. This is the first time to my knowledge that a proper professional digital cinema camera has featured EIS. There have been plenty of consumer-grade camcorders that have had anti-shake technology built in, but not professional digital cinema cameras. For run and gun and documentary shooters using a camera with built-in image stabilisation makes a lot of sense.
I tried out the EIS and also compared it directly against using the IS system on Canon lenses. Just a word of warning, you can’t use EIS when you have the IS turned on with a Canon lens. The EIS works reasonably well, and although it doesn’t perform as well as using IS on a Canon lens, it certainly makes a big enough difference that you should consider using it when shooting handheld.
While the Canon IS is noticeably better, the benefit of Panasonic’s EIS is that it works with any lens you put on the camera. This makes the system very versatile and allows users of Canon lenses without IS to get reasonable results.

One of the things you need to be mindful of when using the EIS is that it does crop in quite a lot on your image (the crop in is about 13%). This crop allows a smaller box to float around in a 5% larger area of the sensor that is normally seen (the sensor is actually 6K). This gives EIS greater range to smooth out motion, almost 20% of the recorded frame size.
The EIS mode works regardless of whether you are in shooting in HD, 2K, UHD or 4K.
Boot-up time
If you are a documentary, news or event shooter the time it takes for a camera to boot-up is a big deal. There is nothing worse than missing a shot because you are waiting for your camera to fire up. Unlike it’s older sibling the Varicam LT, the EVA1 boots up very quickly. I timed it as being around four seconds from the time you turn it on till you get an image and can press record.
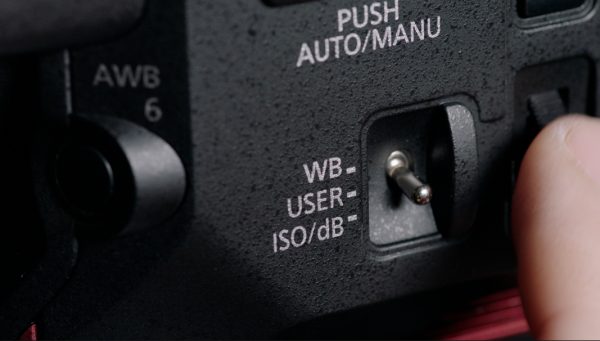
White balance
The camera lets you store up to 12 white balance presets that you can recall, which is a handy feature. However, the actual white balance process is a little confusing on the EVA1 and if you are using a white balance preset setting that you have saved, say for example 5600k 0.0CC, and you press the white balance button, all you get is a message saying INVALID. The only way I initially found to white balance the camera is if you go into the menu and set the white balance to AWB Memory, only then will it allow you to do a white balance. Not only do you have to choose AWB memory, but you then have to press set and get back out of the menu.
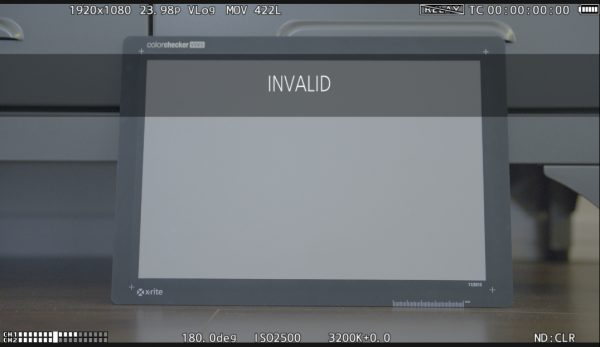
This system is totally unintuitive and you should be able to white balance regardless of what you have selected. If you need to white balance in a hurry then it’s not that easy to do.
NOTE: I didn’t have any access to a manual at the time of testing and I subsequently have found out that there is another way to do white balancing. According to Panasonic, you can flip the toggle switch to WB. Now the menu wheel will scroll through any preset WB settings. To change the AWB, scroll to the Auto setting (in the LCD an “A” appears before the WB number). Now you can push the AWB button.
The problem for me is that you still need to put the camera in the AWB position to be able to use the AWB button. I would have preferred to just be able to do a white balance anytime I like without having to worry what position it is set in.
As well as saving white balance preset values in the menu you can also dial in your own white balance. The CC (correlated colour) adjustment is a nice feature to have and it lets you dial in more magenta or green if you need to. In a rather nice touch, Panasonic brings up a small vectorscope when you are in the white balance selection menu so you can see what effect your adjustments have.
Panasonic EVA1 Audio
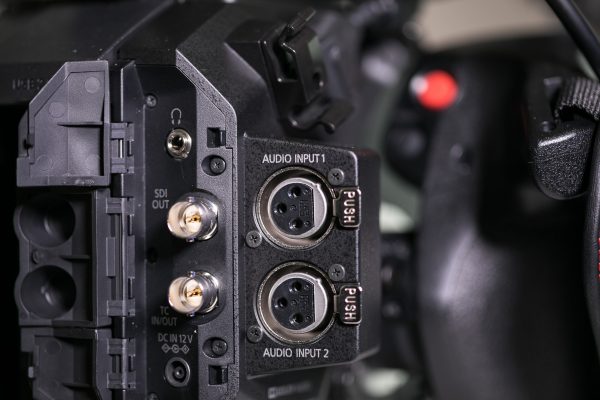
The camera has two balanced XLR inputs (LINE/MIC/MIC +48V menu switchable) that are located on the back of the camera. The physical audio controls are on the side of the camera in a similar position to where they are located on the DVX200. If you want to use the camera on a gimbal without a top mic the EVA1 has a built-in stereo microphone. There is also a 3.5 mm stereo mini-jack headphone output as well as a small 20mm diameter speaker.
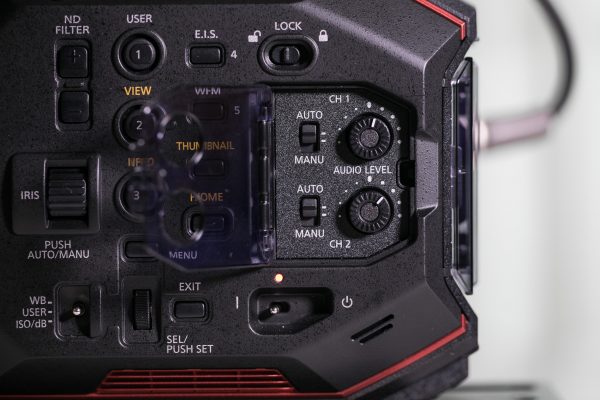
As I mentioned earlier, physical audio controls on the side of the EVA 1 are limited to just letting you adjust the input levels and for changing the inputs from Auto to Manual. In a strange move, if you want to turn +48 phantom power on, or switch the input from line to mic, you have to do it in the menu, or from the HOME screen. The HOME screen allows you to switch between inputs and Mic or Line levels. The Toggle switch (located under Iris Wheel) has a center position marked USER. In this position, you can preselect it to control the monitor out (headphone level). So you do have fairly quick access to most controls without menu diving. Despite these abilities, for a solo operator it’s not ideal. I would have preferred to have physical controls on the camera body itself for making more audio related adjustments.
The preamps on the camera seem to do a good job and the audio I recorded was nice and clean. The onboard stereo microphone actually does a pretty reasonable job if you don’t want to use an external on-camera microphone. Just be aware that if you are using the built-in stereo microphone it sits just above the lens and certain lenses are going to make noise when you are adjusting the iris or using the One Touch Auto Focus.
EVA1 Dynamic Range
The Varicam LT has a claimed 14.5 stops (8 under to 6.5+ over). Panasonic claims that the EVA1 has 14 stops of dynamic range (8 under and 6 over). From my experience using other cameras, that claim may not be far off. In comparison at 800 ISO the Arri Alexa has 7 stops under and 7.5+ stops over. Dynamic range numbers are very often misunderstood. The important factor is not how many stops of DR a camera has, but where those stops are allocated. Most cameras such as the Sony FS7, Canon C200, Canon C300 Mark II and Blackmagic Ursa Mini Pro allocate more stops under middle grey and not above.
I found the camera responded really well to tough, challenging lighting conditions. I’m not overly concerned by claimed dynamic range numbers, I’m more interested in how the camera handles highlights. To me, the best way to test dynamic range is to see what the camera does in real-world conditions. I shot material in very challenging lighting conditions where a lot of dynamic range was required. I was very happy with how the camera performed in these conditions. It certainly has significantly more dynamic range than the GH5, and looks to be very close, if not the same, as the Varicam LT.
Highlight Roll-off
Having a lot of dynamic range is all well and good. Personally, the most import thing is how it handles highlight roll off. In my opinion the EVA1 rolls highlights off in a similar way to the Varicam LT. It deals with bright conditions quite well and the roll-off isn’t too harsh.
Dual native ISO
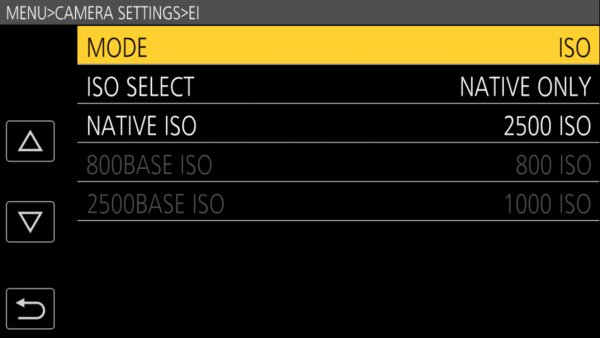
The EVA1 has a dual native ISO of 800 and 2500. The way dual native ISO works is that there are two analog circuits right after each pixel before the gain amp, one for each ISO value. This allows for two “native,” very clean settings. For example, on the Varicam 35 and LT, in one mode there is a native ISO of 800 and when you switch to another setting the camera clicks over to its other native ISO of 5000. This keeps the signal-to-noise ratio the same and allows you to shoot remarkably clean images in low light conditions. The noise present at 5000 ISO is nearly identical to that at 800. It’s coming directly from the sensor, so it’s not simply a case of boosting the gain and erasing the noise. One of the reasons Panasonic has done this is to allow for high framerate capture in lower ambient lighting.
Is the EVA 1’s 2500 ISO as clean as the 800? I’m not convinced. While it does a pretty good job and it’s impressive technology, I don’t think it’s the same at 2500 as it is at 800. Again this is my personal opinion from the testing I did.
ISO range
When the EVA1 is set to its 800 native ISO, the ISO setting can be set anywhere from 200 to 2000ISO. When you are using the camera at its 2500 base you can select anywhere between 1000 to 25600ISO. For those of you who prefer to have your ISO displayed as gain instead, this is also possible.
While there are no dedicated buttons on the camera to change the ISO, all you need to do is flick the switch that is labeled WB/USER/ISO/GAIN on the side of the camera down to the ISO/GAIN position. Once it is in this position you can use the scroll dial to change your ISO. Unfortunately, you can’t do this via the handgrip. You do need to remember to move the switch back to the WB position to be able to do a white balance.
Another way to change the ISO is to hit the HOME button on the side of the camera which brings up a lot of the key information about the cameras current operational settings. From there you can press on the ISO value and make changes. If you aren’t using the touch LCD screen then you need to either use the scroll wheel on the camera or handgrip to navigate the HOME screen, or go into MENU- CAMERA SETTINGS, then press EI (Panasonic labels ISO as EI in the menu) and then make an adjustment. Unfortunately you can’t assign a USER button to adjust the EI (ISO).
EVA1 Low Light performance
Perhaps I should have had this category up higher in the article as a lot of people were disappointed with the low light performance they saw from the EVA1 launch videos. I did quite a few low light tests recording in both V-LOG and a normal scene profile to see just how much noise there was.
For me, the camera’s low light performance was more than acceptable for the levels of ISO I would normally shoot with, but in my personal opinion, I wouldn’t claim that the EVA1 is a low light beast. I didn’t have any other cameras to compare it to that I would consider its direct competition, but from previous experience, I don’t think it is as good as some of the offerings from Canon and Sony. Despite having the dual native ISO of 800 and 2500, I found that the images were only really usable up to around 5000 ISO, but in saying that, other people may feel differently. It really depends on what you deem is an acceptable amount of noise.
The camera is only capable of going up to 25,600 ISO, which is quite low when compared to some of the other competition. To be fair though (depending on the type of work you do), if you are shooting at ISO levels of over 5000 then noise is probably the least of your problems! In saying that there are occasions in news and documentary shooting where you just have to get the shot and it doesn’t matter how much noise there is. Being able to go up to 100,000 ISO is all well and good, but I’m more concerned with how it performs at 3200 ISO and below.
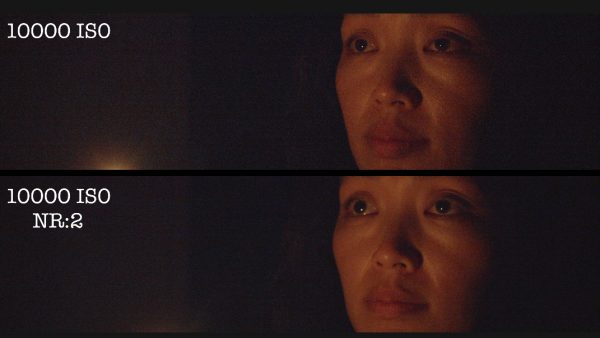
The EVA1 does have Noise Reduction settings, and it does make a bit of a difference to the images, so you should maybe think about using it at higher ISOs. Using third-party noise reduction software also works quite well if you do have to record at those larger ISO numbers.
Auto Iris
The EVA1 has an Auto Iris function that you can set in the menu to be activated when you press the Iris Dial button on the camera body. This allows a compatible EF lens to function in an automatic iris mode.

You can make adjustments to the Auto Iris function including whether it works on a center measurement system or a broader picture area. Adjustments to the level can be made if you want to over expose or under expose your image slightly. Similar to how exposure compensation works in stills cameras.
The system works fairly well, but you do have to be careful if you are using it in the center setting and your subject moves to the left or right. If they do do that, the auto iris will start adjusting for whatever the background happens to be.
For run and gun shooting, as long as the light is fairly even, the Auto Iris mode can be very handy to use.
Iris FA (Full Aperture)
Another feature the camera has is an Iris FA (Full Aperture) mode. You can set this in the menu to an assignable button, or to the push function on the iris dial, and by pressing that button the iris on your lens will open all the way up to its maximum setting. So say for example you were using a Canon 24-70 F2.8 lens and you had the aperture at F8, as soon as you press Iris FA your lens will open up to F2.8.
This is a handy option to have for run and gun shooters. The ability to go from say outside to inside and just press a button that will very quickly open up your iris all the way is a nice feature. This function opens up your iris a lot quicker than trying to use the dial on the camera body or the control grip.
Panasonic EVA1 vs C200, FS7, and Other Cameras
The sub $10,000 US digital cinema camera market is already crowded and the EVA1 faces some very stiff competition from cameras that have already been on the market for quite some time as well as some newcomers. The competition ranges from cameras costing as little as $4,750 US all the way up to $9,999 US. Unfortunately, I didn’t have the time or the access to the cameras from the competition to do any direct head-to-head comparisons.
Because of what the EVA1 can do, in my view these are its competitors:
Now all of these cameras have their own set of strengths and weaknesses and depending on what your requirements and tastes are, one of them is sure to meet your needs. If I start to list all the pros and cons of all these cameras we will be here all day. I can’t compare everything, but here are the basics on a handy PDF.
Notes:
^ Only in Cinema RAW Light
– Up to 10 stops
+ Electronic Variable ND
~ Up to six stops
*UHD and 4K are only 4:2:0 8-bit at 50 and 59.94p
{ 120p with no sensor crop
} 240p with sensor crop
4KDCI –Refers to internal recording
UHD – Refers to internal recording
At least 4:2:2 10-Bit internal – Refers to the camera’s ability to record at a minimum 4:2:2 10-bit internally
HFR in HD – Highest frame rate possible for internal recording in full HD.
RAW – Whether the camera can record RAW internally or externally.
MEDIA – What media slots are available on the camera
ND – Does the camera have internal ND
DP Autofocus – Does the camera feature Dual Pixel Autofocus
Price – Current prices listed on B&H as of 11 August 2017.
Panasonic EVA1 Review: Final Thoughts
In a real-world shooting scenario, I found the EVA1 a real pleasure to use. The image and colours the camera produces are beautiful. For the most part operational-wise, I found it to be a pretty efficient camera to use. In saying that it’s not without its problems. Performing a white balance can be confusing, the onboard LCD screen is horrible to use as a monitor, and the autofocus is disappointing.
I shot everything using a Zacuto Gratical EVF as I found it was the only way to accurately judge exposure, colour and focus. In my honest opinion, you really do need a third party EVF or at the bare minimum, a high-bright screen, if you are going to buy this camera.
The size and weight of the camera are great, but if you need to shoulder mount you are going to have to spend a fair bit of extra cash on third-party accessories. The battery life is great and you can get long recording times on SD cards. If I had of had more time with the camera I think I would have felt even more comfortable operating it and using the controls.
If you are looking for a camera with good autofocus performance this isn’t it. The one push autofocus is average at best, and if you really want to use a camera with good autofocus you are going to have to look at a Canon.
In real-world shooting scenarios, I found the low light performance to be good. No, it’s not a low light beast, but then again, how often do you shoot anything above 3200 ISO? For me personally, this is almost never. Again if you really need a camera that can shoot at 20,000 ISO and still look “ok” then this isn’t the camera for you.
For documentary, news, event, or indie filmmakers the EVA1 is a very good camera. Having shot with most of the Sony, Canon, and Blackmagic cameras I would have to honestly say that I prefer the EVA1. For me the camera’s “look” (whatever you want to classify that as) is appealing. It is very easy to shoot high-quality images and turn them around quickly without having to make any adjustments. This is key for news, documentary and event shooters who often have to hand off their material straight away and can’t shoot in a Log profile.
The camera performs really well in mixed lighting conditions, which is something I found that the sub $10k Sony, Canon and Blackmagic cameras struggle with. Again this is just my personal opinion and I know some people like the Sony look, some the Canon, and so on and so on. Having shot a lot of major projects on the Varicam LT, I found the EVA1 has a very similar looking image. While I don’t think its identical, it’s pretty close.
All of the EVA1’s competition are good cameras in their own right, and you can’t really go wrong with any of them. If the onboard RAW recording is what you want then the Canon C200 or Blackmagic URSA Mini Pro are probably the way to go. If you want great autofocus performance then the C200 or C300 Mark II is what you should be looking at. If you want to be able to record in high frame rates without a sensor crop and need a versatile lens mount then you should look at a Sony FS7. My point is, there is no such thing as the perfect camera, it’s just a case of finding one that works best for you.
It has taken Panasonic seven years to get back into the affordable digital cinema camera market, and I think they have done a good job with the EVA1. It’s not without its flaws, and it’s far from the perfect camera. I do however think Panasonic have struck a good balance with what the EVA1 offers. If you are in the market for a sub $10k digital cinema camera then the EVA1 is definitely a camera you should be seriously considering.
Thanks to Angenieux and NAC Rental for providing lenses for this review.
I would have liked to have more time with the camera to test everything, but there was only so much I could do in three days. If there is anything I haven’t covered in the article please feel free to ask a question and I’ll do my best to get you an answer. Please be aware that I didn’t have access to a manual at the time of testing and there may be small workarounds that allow certain functions of the camera to be used in different ways.
What are your thoughts about the EVA1 based on what you now know and have seen? Let us know in the comments section below.


