The Varicam LT is an interesting camera and one that I have been looking forward to getting my hands on. Before its launch there were a lot of rumours flying around as to where the camera would sit in the Panasonic line up and how much it would cost. It’s fair to say that that most pundits were hoping that the camera would be an AF100 replacement and priced to directly challenge cameras such as the Sony FS5 and Blackmagic URSA. As it turns out Panasonic went after a different sector of the market and the Varicam LT is competing directly on price against cameras like the Sony F5 and Canon C300 Mark II. Despite this, Panasonic told me that they believe the feature set, price and build quality competes against the F55/Red Epic/ARRI Amira as well. We’ll see…
On paper there is a lot to like: a 4K-capable Super 35mm camera in a lightweight magnesium body with interchangeable lens mounts as well as many of the same features as its bigger brother the Varicam 35. The LT shares the same sensor as the Varicam 35 and utilises the same dual native ISO ratings of 800 and 5000. Panasonic claim the camera has 14 stops of dynamic range when recording in V-Log. The camera records 4K at up to 60p and 2K at up to 240fps.
As Panasonic is targeting documentary and run-and-gun solo operators as potential users of the LT, I wanted to see just how suitable the camera was when using it for that exact purpose. I have been lucky enough to have access to the Varicam LT for a few weeks and have had a good chance to evaluate its strengths and weaknesses as a documentary, solo operator camera. Having owned the Sony F55 and now a Arri Amira, as well as having used the Canon C300 Mark II, Blackmagic Ursa, Sony F5, FS5, and FS7, I wanted to see how the Varicam LT stacked up.
If you don’t want to read the whole review, I’ll sum up the Varicam LT in a few sentences. To cut a long story short, in its current form, Panasonic almost made a great camera- it’s 85% of the way there. The ergonomics are for the most part great, the images are really nice, the camera has good dynamic range and as long as you’re not making a lot of changes to the settings it is very easy to use. For documentary and run-and-gun solo operators though the deal breakers might be the slow boot up times, audio interface and cropped sensor high frame rate shooting. It is early days in the evolution of the LT and after speaking to Panasonic I understand a lot of the issues I will mention have already been or will be rectified via firmware.
If your not interested in reading about all the specifics and just want my thoughts on actually shooting with the camera, feel free to skip down to the bottom of the article.
Initial impressions
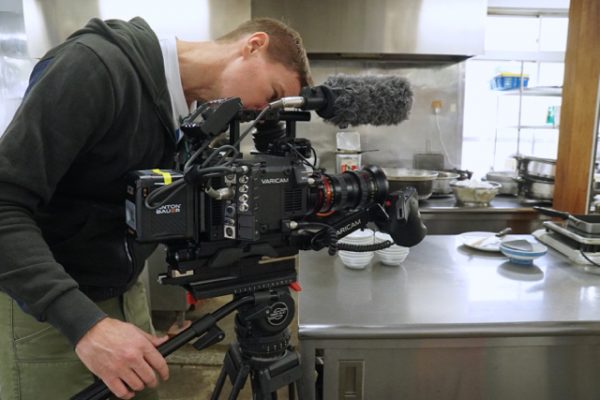
When the camera turned up the first thing I wanted to do is see just how easy and fast it was to set up. Panasonic have done a pretty good job with the physical design of the camera and getting it ready to shoot is very straightforward. The camera came with the Panasonic EVF, shoulder base plate, control panel, grip module, EF mount, PL mount, 256GB Panasonic expressP2 card and a card reader. All I had to do was slide the shoulder base plate on, attach the EVF and control panel and insert a card. This whole process can be done in just a few minutes. The camera I was reviewing was a very early model of the LT.
The build quality is good, but I did find the tightening latches for the EVF mount and the shoulder baseplate adjustment to be a little small and fiddly to use. The shoulder baseplate use a dovetail sliding action and gives you a fair range of adjustment when balancing the camera for handheld use.
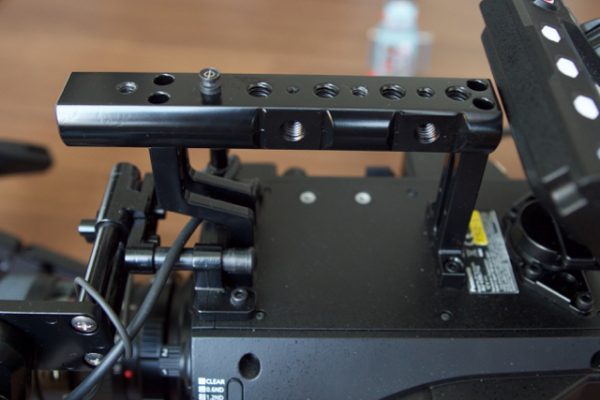
Unlike the adjustable shoulder base plate, the top handle is completely fixed and can’t be moved. This also greatly affects where you can position the EVF. To be fair though I didn’t find this a problem in use. One thing that is lacking is mounting points on the top of the camera for any type of accessories. Most of the mounting points are on the top handle itself. Again I don’t think this is a major problem as there are accessories available from manufactures like Wooden Camera and others that provide moveable handles and cheese plates.
Weight wise the camera isn’t too bad, but once you start adding a V-lock or Anton Bauer battery and a PL lens it can start to get heavy. I was however pleasantly surprised just how nicely it balances on the shoulder regardless of what lens and battery combination you use. While it may not be as light as an FS7 or a C300 Mark II, it is a lot nicer to use on the shoulder than the majority of cameras I have tried.
Menu and setup
When you first turn the camera on you discover one of the major disadvantages to using the Varicam LT as a documentary or run-and-gun camera. The boot up time is painfully slow and it takes close to 20 seconds before the camera is ready to use. As a documentary shooter and solo operator I found this very frustrating and it can definitely mean the difference between getting or missing a shot. I’m not sure if this is something that can be fixed via firmware, but if Panasonic want to attract more documentary shooters then it is something they need to change. After my experiences using the camera I spoke to Panasonic about the boot up times, and was told the reboot time changes depending on how many clips are on the card because the system interrogates the card. For example it will always take approx. 3sec for a picture to appear and then if it is a new card you will be able to start recording in approx. 16sec. If you have approximately a 100 clips on the card the boot up time is 25 sec.
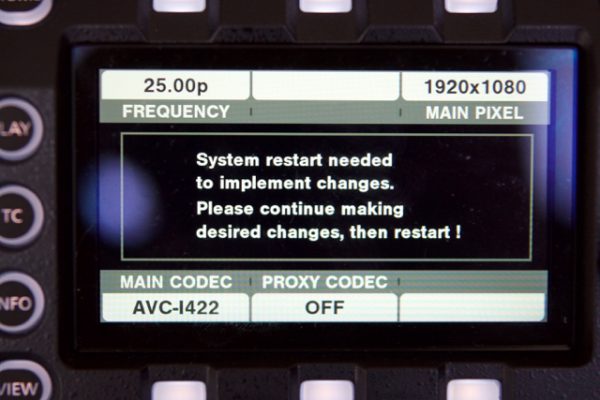
The key thing to be aware of when making changes to the frame rate, codec or resolution is that you need to reboot the camera for them to take effect. This is far from ideal given how long the camera takes to power back up. What is even more frustrating is that if you don’t make all the changes you want to make before rebooting the camera, you will be forced to do it multiple times. For example if I wanted to change the camera to shoot at a different frame rate and codec, if I just change the frame rate and then reboot the camera, I can’t then go and then change the codec without doing another reboot. I learnt this the hard way and was often standing around waiting to do multiple reboots just to shoot some slow motion footage. If you need to make several changes in the settings then make sure you select them all before rebooting the camera. I spoke to Panasonic about this and they said: Customer feedback has told us that the boot up message is confusing. The display “re-boot” message displays with each change but you are able to make all changes then reboot once so only 16sec to 20 sec. They also went on to say, The factory is studying the best way to improve the menu navigation and reduce reboots. We don’t have a specific timeline now but it is something that we are aware of and are working to improve. It is not a physical limitation of the hardware. The firmware needs to be amended.
Apart from the rebooting issues the menu settings are reasonably straightforward to use but do take a little getting used to. Like any new camera, getting everything configured to how you like it set up will take a bit of time. You can make camera adjustments through both the EVF and the control panel which I’ll talk about below.
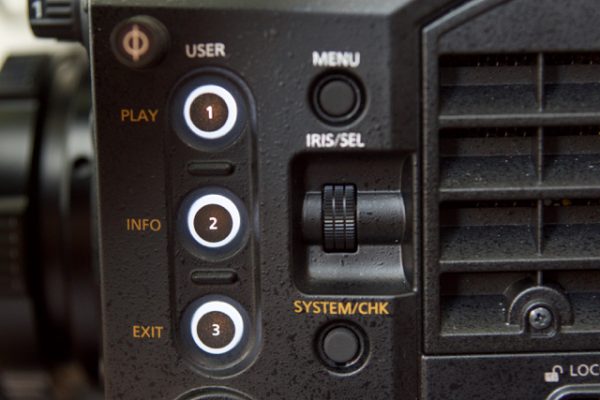
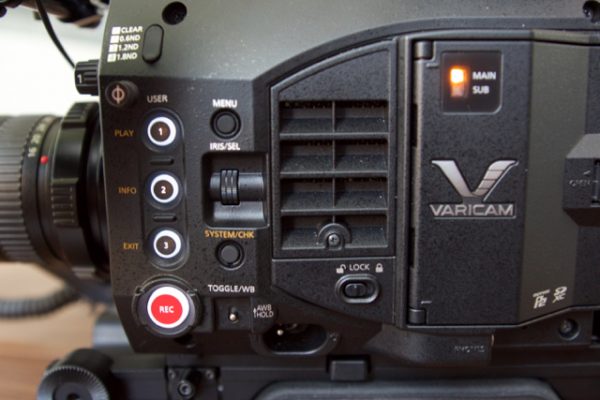
Control Panel
The camera has very few physical buttons on the body itself and Panasonic have designed the LT so that you really have to use the control panel regardless of whether you want to or not. The camera setting menu access is also available via the menu dial on the side of the camera and if you use the Panasonic EVF via the EVF camera menu dial. Although these options are available, using the control panel is the easiest way to access camera settings. The control panel sits on the back of the camera and can be rotated about 180° side to side and about 45° up and down. It attaches to the camera via a cable, which is long enough that you could mount the controller in a different spot on the camera or have somebody just hold it if needs be. The control panel can as its name suggests can be used to make any operational changes as well as be a monitor.
At first it was a little strange using the control panel to make adjustments, but after a while it became second nature and I didn’t really have any problem when using it. It was nice to be able to monitor your image on the panel and this was particularly useful when shooting a long interview, where I could just keep an eye on the image without having to lean over and look into the EVF for extended periods of time. The screen is quite small though and I wouldn’t recommend trying to use it for judging any type of critical focus. It is also not super bright, so you can’t see it outside in direct sunlight.
EVF
The EVF is quite large but it feels very solidly made. Unlike some other competitors’ EVFs Panasonic’s doesn’t use proprietary connections. Instead the EVF has two inputs- an SDI and a Lemo DC in. This allows you to use the EVF with other cameras if you choose to do so. Other manufacturers should take a good long hard look at what Panasonic have done here, as today’s buyers expect products that are versatile and can be used across multiple camera platforms.
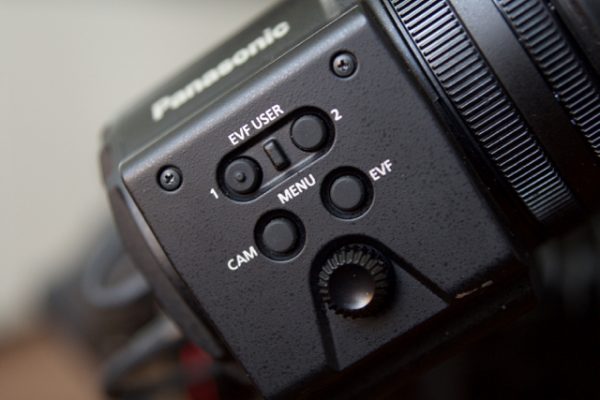
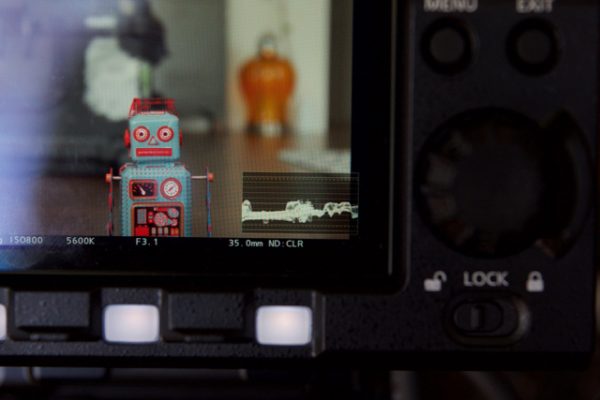
The OLED EVF is very good and I found getting critical focus to be very easy. It is sharp and looks to be very colour accurate. Like most EVFs it has a proximity sensor to help conserve power when it is not in use. The EVF has two user assignable buttons and camera and EVF menu buttons. The user assignable buttons could be configured to a variety of items such as having the LUT turned on and off, false colour as well as focus magnification. The camera menu button allows you to make changes directly in the EVF itself to the fps, shutter speed, ISO and toggle through white balance set ups. The EVF menu lets you change the colour, contrast, brightness and peaking settings.
The other thing I liked about the EVF was that all the camera information is above and below the image so you don’t have any distracting items across your screen. The most bewildering aspect when it comes to the on screen displays is there is no option to display audio meters whatsoever. I just cannot for the life of me understand why Panasonic didn’t give you any option to see audio levels in the EVF. Again I have since spoken to Panasonic about his and have been told The audio level meter will display in the EVF when the function is implemented (next firmware update).
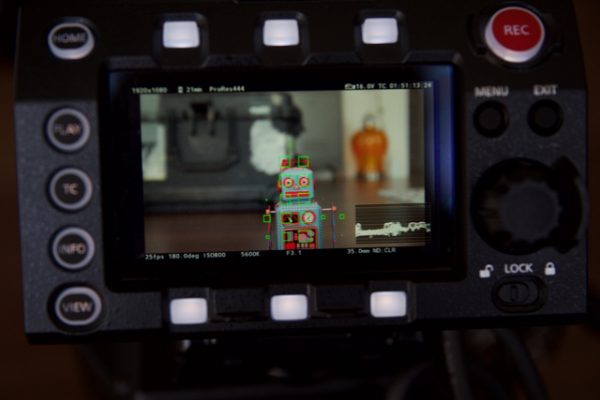
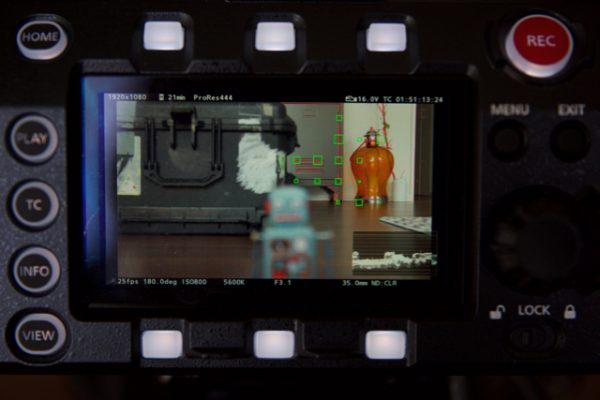
On the positive side there is quite a nice focus assist enhancement that shows up green boxes to indicate what is in focus. The bigger the box on the object the more it is in focus. This works well if there aren’t a lot of things in the shot, but it can be a little confusing looking at lots of green boxes.
From having shot out in the real world with the EVF I have to say it is one of the better EVFs I have used. I would put it right up there with the Arri Amira/Alexa Mini and Sony F5/55 OLED EVFs in terms of performance. People tend to forget that you are basing everything you shoot with a camera on what you are seeing through an EVF. Even though these higher-end EVFs can be expensive, to me their benefit far outweighs the cost.
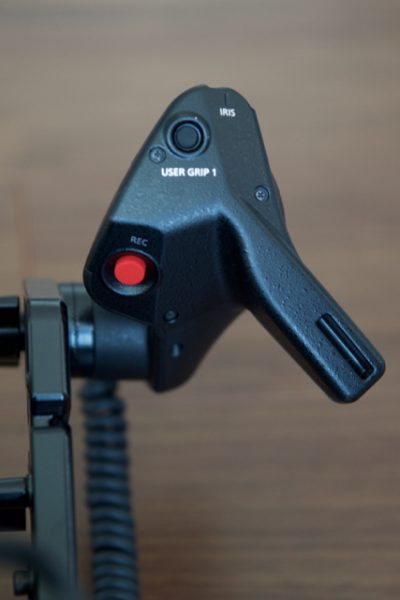
Grip Module
Just like similar Sony offerings the Panasonic grip module is nicely designed and makes handheld operation of the camera very easy. It attaches to the Arri rosette on the shoulder plate and can be extended out if you need to make it longer. The control handle has a record start/stop button, two user assignable buttons and an iris wheel for controlling EF lenses. It is made of hard plastic and is reasonably ergonomic, although depending on the size of your hands some users may find it not to their liking. The button lay out is nice apart from the user grip 1 which I found to be in a bit of an awkward spot to reach. Again though this will depend on the user’s hand size.
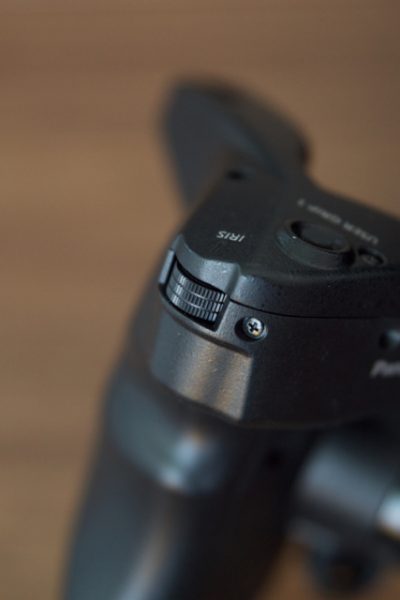
The two user grip buttons can be assigned to any one of 25 different functions, which allows you to really set up the LT to whatever best suits your shooting needs. When using Canon EF lenses it offers a lot of control over exposure and you can also set one of the user buttons to one push auto iris which works really well if you want to get ballpark exposure very quickly.
Lens Mounts
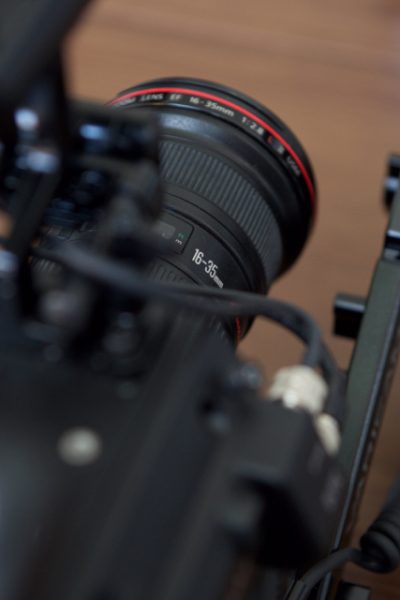
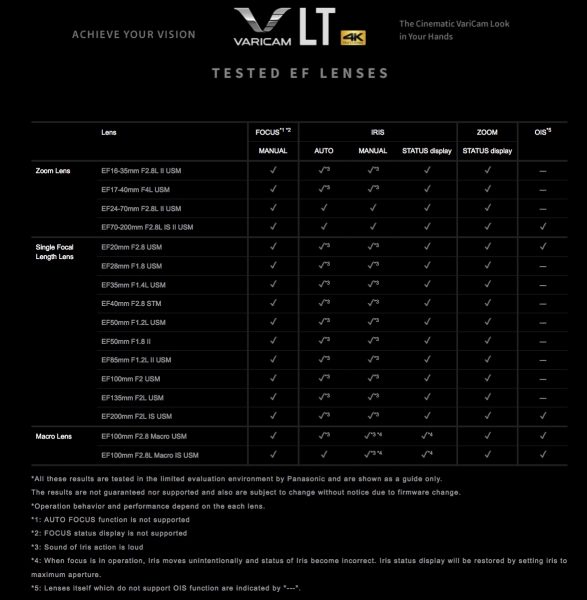
The camera comes as standard with a Canon EF mount, but you can also buy an optional PL mount. Panasonic have done a really good job with the lens mounts and they are extremely sturdy and easy to change. The added benefit when using Canon EF glass is that the mount uses a positive lock to keep the lens from moving around. The EF mount talks electronically to the lens and you can control the aperture as well as get an f/stop reading and focal length displayed in the Panasonic EVF. The EF mount does support IS on certain Canon lenses. If you’re using PL lenses such as the Fujinon Cabrio series or the Canon 17-120mm all the relevant information from those lenses can be displayed in the EVF.
I asked Panasonic if they would be making a B4 adapter so you could use 2/3” broadcast ENG lenses, but at this stage they have no plans to do so. If you do want to go down that path there are a lot of third party options available. Below you can see a table of currently supported Canon EF lenses.
Audio
Audio is currently this camera’s achilles heel if you’re planning on using it as a solo operator. I mentioned earlier that you can’t currently monitor audio levels in the EVF at all and as there are no physical audio controls on the camera body itself, you need to make all the audio adjustments using the control panel. This is far from ideal and the audio is quite complicated to set up initially. I went through all the camera menus and couldn’t for the life of me work out how to actually manually adjust the audio levels. I eventually had to go to the manual to find out how to do it.
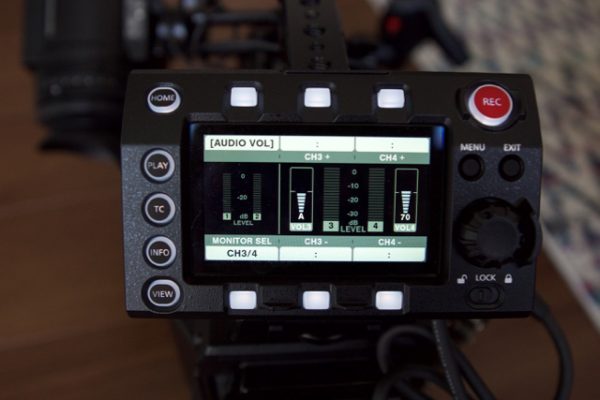
On the control panel you have to select the home button and then press the system button and then select audio. You then have to push another button to select audio volume and then you have to use either the + or – button to increase or decrease the audio levels. No right minded solo operator is going to think that the audio adjustment has been well thought out by Panasonic. The camera really needs to have audio adjustment dials or buttons directly on the camera itself. Panasonic’s reliance on having all the audio level controls only be accessible through the control panel leaves you flying blind (or in this case deaf) when using the camera on the shoulder.
Since testing the camera I have spoken directly to Panasonic and this is what they said in regards to the audio: There are improvements to the audio control in planning now. The plan is to be able to assign audio level control to either the menu control dial on the camera body or to the iris level control dial on the grip in a later firmware update. UPDATE: Since originally shooting with the camera I have been able to download the new firmware that allows you to control the audio levels within the menu system itself without having to use the control panel. This is certainly a lot better solution, but I would still like to have actual audio controls on the camera body itself.
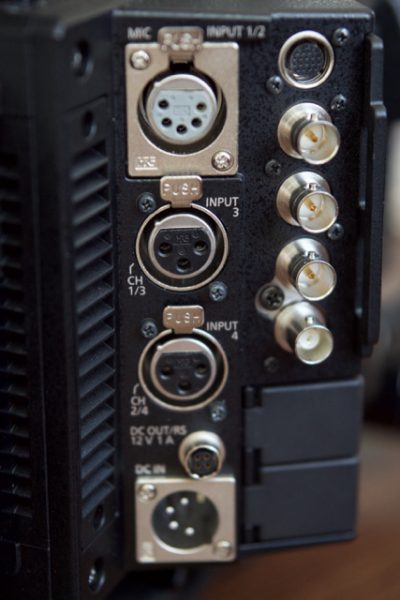
On the positive side the camera has nice quiet preamps and 48V phantom power available on both input 3 and 4. Inputs 1 and 2 are coupled together via a 5 pin XLR for those wanting to input audio via a mixer or use a dual radio mic reliever. The headphone output can be changed to deliver stereo audio from two separate microphones or set to listen to just one source.
ND Filters
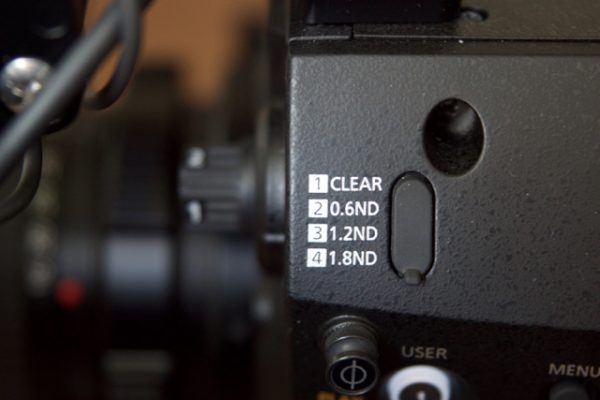
In my opinion you can’t really call any camera a documentary style camera unless it has built in ND filters. I really like the placement of the ND filters on the Varicam LT. Panasonic has put them in a familiar spot for those former and current users of broadcast ENG cameras. A lot of shooters are starting to transition from ENG cameras to Super 35mm digital and the familiarity of the ND placement is one less thing for people to have to worry about. There are four settings for the ND: Clear, 0.6ND, 0.9ND and 1.8ND.
Codecs and recording options
The Varicam LT can record full 4K (4096×2160) or UHD (3840×2160) in AVC-Intra4K 422 at up to 30fps. It will do up to 60fps in 4K if you use the AVC-Intra4K-LT codec. In 2K you can record up to 60fps in either AVC-Intra2K444 or AVC-Intra2K422. If you want to go up to 120fps in 2K you need to go into a crop sensor mode and record in AVC-Intra2k422. If you decide to record anywhere between 120-240fps you need to choose AVC-Intra2K-LT. For recording in HD (1920×1080) you have the same codec choices as when recording in 2K as well as the option of recording ProRes 4444 at up to 30p or ProRes 422HQ at up to 60p. The thing to remember is anytime you change one of these codec options you need to re boot the camera. It is a real pain that if your shooting for example in a 25p base at 100fps and you want to suddenly record at 120fps, you need to change the codec and re boot up the camera. You can however mix and match codecs and frame rates all on the one card without having to re format it.
Both the 4K and the HD images out of the camera are really nice. From using the LT in real world shooting enviroments I found the rolling shutter, moire and aliasing to all be very minimal and not in anyway a concern.
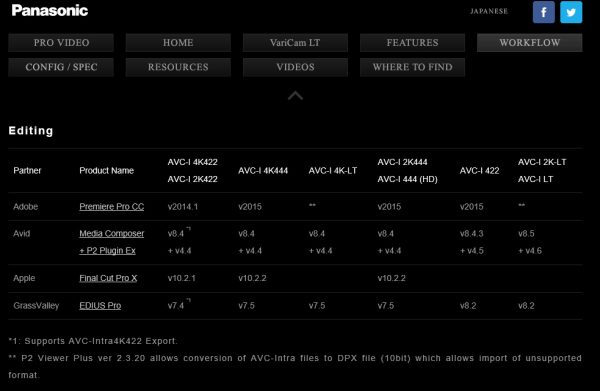
The current headache with using the new AVC-Intra codecs is that certain NLEs like FCPX cannot read or display the files. AVC-Intra 4K/2K LT are the newest codecs in the Varicams and Panasonic are still working with the various NLE systems to get full support. I was shooting with the camera primarily in ProRes 4444, but when I wanted to shoot some high frame rate material I had no choice but to record in AVC-Intra422. As I use FCPX, the only work around I had access to was to play the files back out of the camera and record them as ProRes files on a Convergent Design Odyssey 7Q+.
Media and Proxy Recording
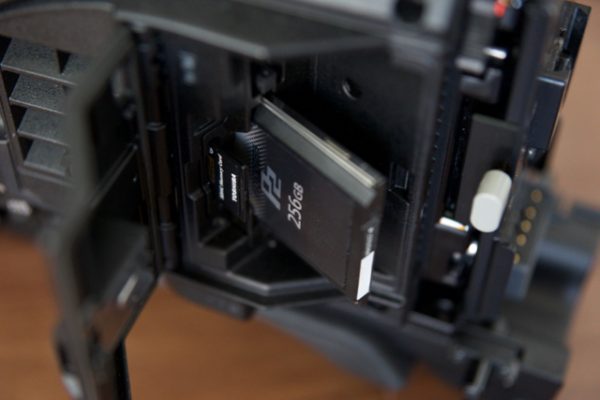
The camera has two in built recording slots. The first is for the main recording using expressP2 cards and the second is for sub recording to a SD card. The LT records to expressP2 cards which are a proprietary media. express P2 cards just like Sony’s SxS are very reliable and robust, but they do come at a cost. A single 256GB expressP2 card will set you back US$1,150.00, which on the surface sounds expensive, but to put it in perspective a 256GB Sony SxS Pro+ card is US$1,679.95. I would of liked to have seen Panasonic move to CFAST 2.0 media just like Arri and Canon have with certain camera models.
The sub recording has two types of operation modes- Normal+Audio and VFR. In Normal+Audio you can record in the same frame rate as your main recording along with recording the audio. In VFR you can record images up to 60p without any audio. The Proxy codec is AVC-Proxy G6, which is a full HD codec that records at 6Mbps. I was actually surprised to see just how good the quality of the proxy recording actually was. In a fast turn around news situation you could easily use the proxy footage as long as everything is correctly exposed and white balanced.
There are several limitations as to what proxy data you can record, but the main limitation is that you need to be careful what type of SD card you use to sub record if your main recording is being done in ProRes 422HQ or ProRes 4444. You cannot use a SDHC card, you have to use a SDXC card. The proxy recording function is handy if you want to burn in a LUT so a editor or colourist can see what your intended creative decisions were or they can use it for offline editing and then re link the media back to the original files. You can also use the proxy function to record audio when your main recording is being done in higher frame where audio is not being recorded.
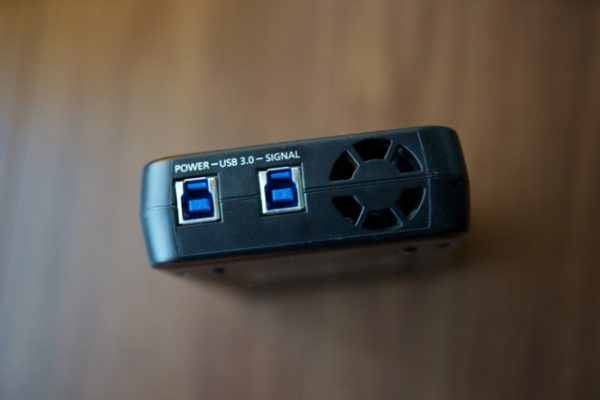
The other thing I wasn’t a fan of when it comes to the media was the size of the expressP2 card reader. Not only is it quite large, but it also requires two USB connections, one for power and one for the data transfer.

V-Log and colour settings
The Varicam LT offers a lot of options to control how your footage looks. You can choose to shoot in V-Log, V-709, or create your own looks in or out of camera to store in scene files. For shooters whose clients don’t want to deal with a Log image, Panasonic has designed the Varicam-Look which is a gamma curve that is still cinematic but includes more colour and contrast. Below is a list of the options:
f [V-Log]:
This is a gamma curve for gradation and wide latitude (exposure range). A grading process after recording is required.
f [V-709]:
This is a gamma curve equivalent to Varicam standard CINE-LIKE. A tone optimum for preview on the monitor can be achieved.
f [V-406060]:
This is the VARICAM-LOOK gamma curve for cinema.
It means rise = ×4.0, gamma coefficient = 0.60, changing point = 60%.
This is a setting focused on contrast. The color does not get washed out as easily throughout the latitude. It is recommended to record the face tone at 50% or less.
f [V-452080]:
This is the VARICAM-LOOK gamma curve for cinema.
It means rise = ×4.5, gamma coefficient = 0.20, changing point = 80%.
This is a setting focused on soft texture. The color does not get washed out as easily throughout the latitude.
f [VIDEO45]:
This is the broadcast gamma curve for video. The dynamic range is set to 600%.
I’m not going to go into too much detail about creating looks, but the Varicam offers very powerful internal grading or external grading using an iOS app. This allows you to do live grading on set and dial in any look you want in real time. Most documentary and solo shooters are not really going to use this functionality, but it is good to know it is there. One of the nice features is that you can choose to burn in a LUT or look, which is very handy for turning around material quickly or providing clients with footage they can start to edit straight away.
High frame rate recording
As I mentioned earlier the camera can record 4K at up to 60p and 2K at up to 240fps. To shoot at any frame rate over 60p you need to use the crop sensor function. This effectively gives you a 2x crop of your image which isn’t ideal for high frame rate shooting as it severely limits your ability to get wide shots. I talked to Panasonic about this and I was told, In 2K/HD it is technically possible run at higher frame rates than 60p using the full sensor if a scanning method like line skipping or interpolation is used. These methods would allow higher frame rates but increases the potential of moiré. To reduce moiré and keep the image quality high the OLPF would need to be changed which is possible but not something that can be done in the field easily.
Center Crop
The center crop doesn’t just have to be used for recording in higher frame rates, it can also be used to effectively double the focal length of any lens you happen to be using. This center crop function is the same as what other manufacturers such as Sony and Arri are already doing. While this type of function was originally intended by many manufacturers so that you can use B4 or Super 16mm glass, a lot of shooters are just using it as a pseudo focal extender. This is a very handy function for documentary style shooters who may be only carrying a few lenses.
Dual native ISO
Just like the Varicam 35, the LT has dual native ISO ratings of both 800 and 5000. This can be set in two ways. There is a option to just select native only that gives you the choices of selecting either 800 or 5000ISO, or you can select the individual base as either 800 or 5000. When you choose the individual base option you can set the following ISO values:
800 Base
200ISO, 250ISO, 320ISO, 400ISO, 500ISO, 640ISO, 800ISO, 1000ISO, 1250ISO, 1600ISO, 2000ISO, 2500ISO, 3200ISO and 4000ISO.
5000 Base
1250ISO, 1600ISO, 2000ISO, 2500ISO, 3200ISO, 4000ISO, 5000ISO, 6400ISO, 8000ISO,10000ISO and 12800ISO.
You can also turn on NR (noise reduction) in both the 800 and 5000 base settings. The NR will work on the 800 base anywhere from 200-4000ISO and on the 5000 base between 1250 to 12800ISO.
The dual native ISO is a interesting concept from Panasonic. Although Panasonic claim the native 5000 ISO allows for clean shooting in very low light situations, I found it still produced noise even when I had the NR turned on. In my opinion it didn’t really look any cleaner than other good low light cameras at the same ISO settings. The noise is however quite organic and it does clean up very well with noise reduction software. This is definitely where it has an advantage over many other cameras. I found the LT performed well and produced good results at a variety of ISO settings. While the 5000 base ISO setting works well, users shouldn’t expect that it is some sort of magic that will make all your pictures noise free.

Shot Marking, Text Memo Recording and Pre-Recording
These three items might be of interest to documentary and solo operators. The Shot Marking function allows you to ad a mark to a thumbnail that allows it to be distinguished from all other clips. You can do this by setting one of the user assignable buttons to this function. This is handy if you’re shooting lots of footage and want to be able to find your best shots quickly once you start editing. The Text Memo Recording lets you add a text memo to any clip during playback. You can save up to a hundred text memos per clip. I’m not entirely sure how this function actually works as the instruction manual was very vague. When I tried it it came up and said text memo but didn’t give me the option to do anything else. There is also a pre-recording function that you can set, but unfortunately it is limited to approximately three seconds which doesn’t make it that useful.
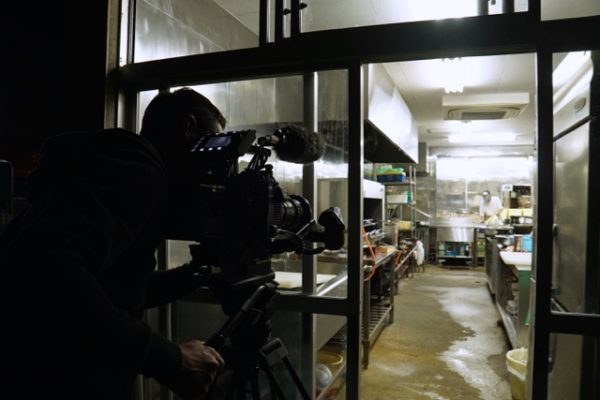
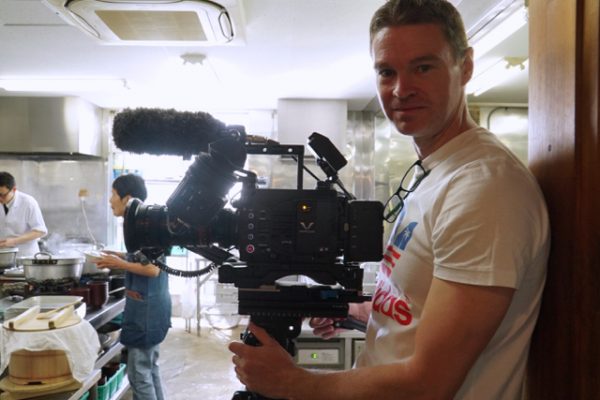
Real world shooting with the camera
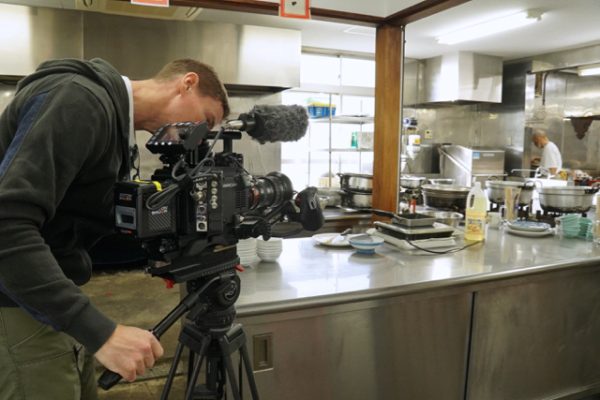
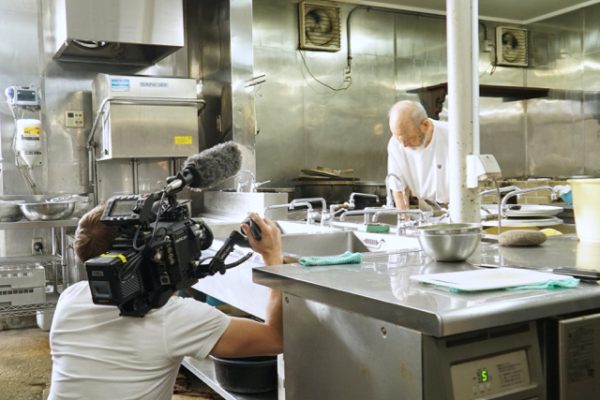
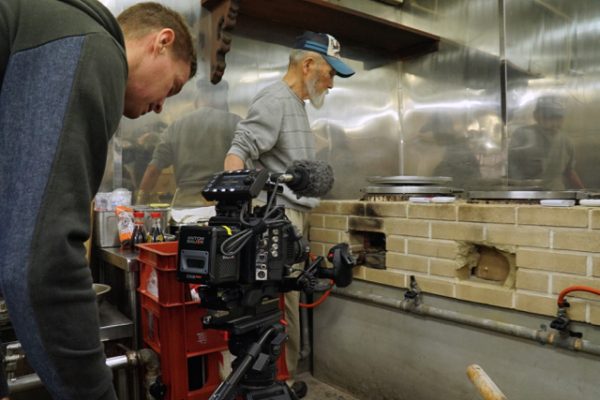
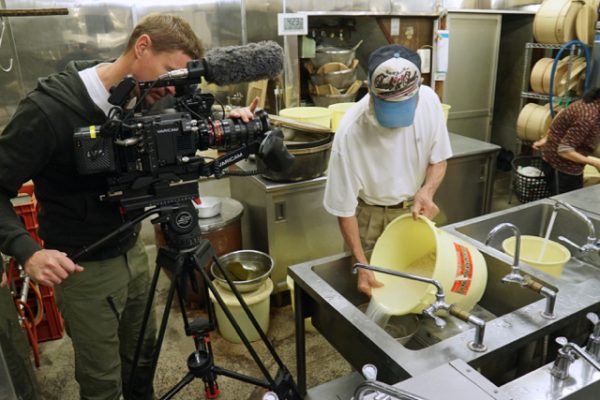
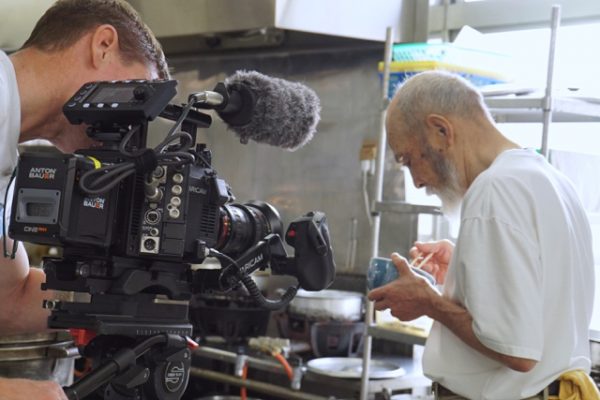
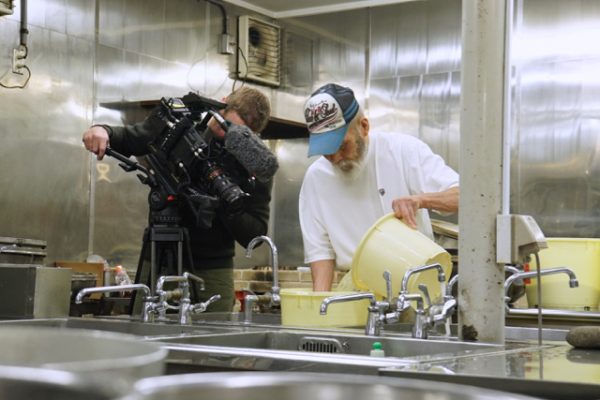
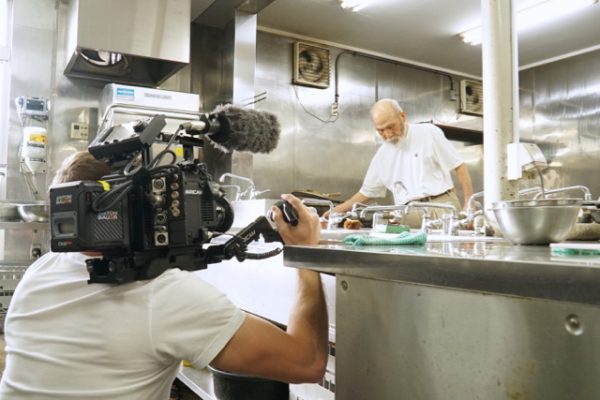
There is no better way to actually test a camera than to use it on a real world assignment. After spending a day getting familiar with the camera and making sure I knew how to operate it correctly I took it to Osaka for a shoot with a Japanese rice master who has been making rice for more than 50 years. This shoot started at 4am when he starts preparing the rice. Any of today’s cameras can look great in controlled lighting conditions, but the real test of a camera to me is using it in available mixed lighting conditions.
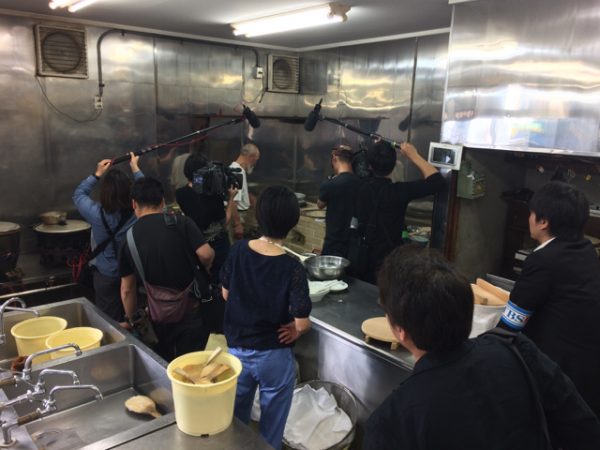
The whole shoot was done using available light and I couldn’t get him to start or stop or re-do something for me. Everything had to be shot as it was happening and I just had to anticipate where to position the camera and what to compose in my frame. This was the last day he would be cooking rice in his shop before moving to China for the next few years. Other Japanese media would also be there, which was going to make the shoot even more difficult. The interview was lit with a single Westcott Flex 1×1.
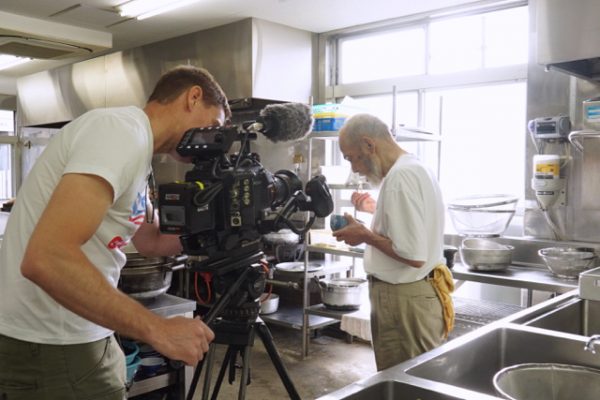
I shot with the Varicam in ProRes 4444 in HD and used ISO ranges between 400-5000. I shot in HD, because that is what 90% of my clients want. The story was shot almost entirely with the Angenieux 16-40 and 30-76mm Optima Style PL zooms. The macro shots were done with the Tokina AT-X Pro 100mm T2.9 PL macro.
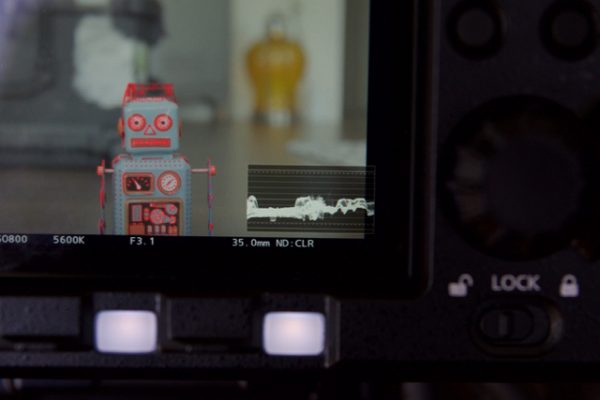
I found the Varicam LT a joy to use no matter whether I was handheld or using a tripod. The camera is really nicely balanced and feels very comfortable on the shoulder when combined with the control grip. The EVF is very good and getting critical focus and adjusting exposure was easy. I also liked that the waveform shows the V-Log recording exposure regardless of whether you are monitoring with a LUT. This really helps you know if you are close to clipping any highlights.
The dynamic range of the camera when shooting in V-Log was very impressive and I found its highlight handling to be pretty good. The pictures out of the camera looked really nice and I think the Panasonic colour science is some of the best around. As an Arri Amira owner I still find that Arri has the best colour science and highlight handling of any camera manufacturer on the market, but companies such as Panasonic are starting to close the gap.
Operationally as I mentioned earlier in the article, having to reboot the camera every time you make a setting change is a real pain and detracts from the overall experience. Having to wait several minutes to change to a different frame rate or codec often meant that I missed shots.
I did shoot several shots at higher frame rates and I found the vision to look very pleasing. I didn’t shoot any of this material at higher ISO values so I still need to see how much more noise is generated in the image if any. The unfortunate part about shooting at higher frame rates is that it is done in a crop mode, which severely limits its usefulness. Consumers may find it a hard pill to swallow why in 2016 a $19,000 camera can’t shoot high frame rates without having to do a sensor crop. In fairness though to Panasonic, Canon are doing the exact same thing with the C300 Mark II.
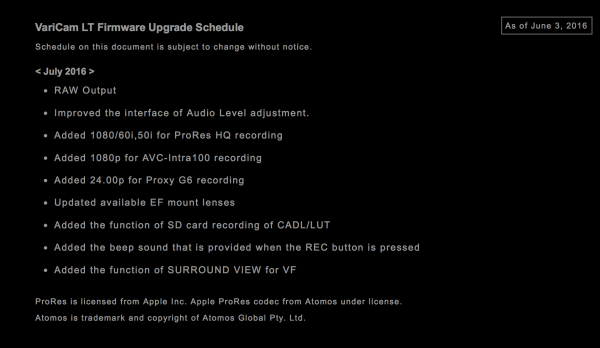
UPDATE: Below is what is coming in the next major firmware release.
Conclusion
This review was done solely from the perspective of a solo documentary shooter and my thoughts and conclusions are based on using it in this type of environment. Panasonic have made a really nice camera, but it isn’t without its problems if you are using it as a one man band. It’s almost as if Panasonic originally designed some of the control interfaces for a production camera and then integrated them into the LT. I still find it hard to get my head around some of the design components. On one hand it has been really well designed as a documentary shoulder-mounted camera, but on the other, the control panel and lack of physical audio controls on the camera body itself makes it feel more like a production camera.
Despite some of these problems I really enjoyed using the LT once I had spent a few days with it. The pictures are great, and the camera is wonderful to use on either a tripod or on the shoulder.
I think the LT is one of the best cameras around for handheld work as it balances really easily and feels very comfortable on the shoulder. For me it is a far better balanced camera on the shoulder than either the Sony F5 or Canon C300 Mark II. Where it does fall over for the solo shooter is the ridiculously slow boot up times and adjusting the audio. The total reliance on making audio recording adjustments through the use of the control panel (or soon the camera menu system) and not putting physical audio buttons on the camera itself is in my opinion a big design flaw. To Panasonic’s credit they are addressing the majority of these problems via upcoming firmware updates.

The LT is extremely versatile when it comes to recording codecs, frame rates, dual native ISO, proxy recording and internal colour grading. Although Panasonic are not releasing a firmware roadmap publicly I have been told that there are lots of firmware updates still to come that will greatly improve the camera. To their credit Panasonic have been listening to a lot of the feedback from testers and early adopters and have already made quite a few changes to the camera. It always impresses me when a company is willing to listen and provide open and honest answers to concerns that get raised by their customers.
I really do like the LT and despite the few niggling issues I have with it, it’s important to remember that this camera is still very much in its infancy. In fairness to Panasonic we have seen a lot of cameras such as the Sony F series and even the Arri Amira take a long time to get extra features and problems sorted out. Panasonic have done a really good job with the Varicam LT and once the audio problem is addressed the camera is definitely worth looking at as an alternative to a Sony F5 or Canon C300 Mark II.


