By technical editor Matt Allard:
Rockpools Sony F55 from Matthew Allard on Vimeo.
Last year I was on vacation in my native Australia with my F55 when Sony Australia gave me the chance to test out the R5 RAW recorder. I had previously seen and used it briefly but only with the FS700. The R5 and F55 was a combination I really wanted to investigate more to what benefits were to be had by recording the 16bit linear RAW format.
Let me preface this by saying that for the majority of work I do RAW really isn’t an option. I normally work in environments where fast turn around time is paramount. RAW recording and shooting in any sort of log profile just takes too long to handle in post.
Like many other shooters I had limited experience of RAW shooting before this. I had worked extensively with S-Log footage but not RAW. This then was a chance for me not just to review the F55 and R5 in combination, it was also a learning exercise and a chance to draw some conclusions about whether I actually need to shoot RAW at all?
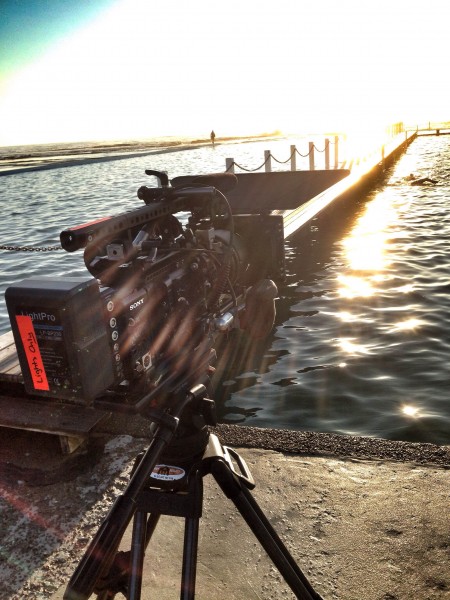
For the test I decided to revisit the rock pools on the northern beaches of Sydney. I have traveled all over the world but the sheer beauty of the rock pools at dawn is a sight I’ll never grow tired of seeing. It also provided very challenging lighting in which to test the F55 both in 4K raw and also in the 2K RAW high frame rate. As the sun rises you are faced with scenes that have an extremely high dynamic range. The brightness of the sun, the dark shadows in the rock pools and variations in colour are a great test for any camera. The warm orange sky and the cool blue tones of the ocean are always hard to represent well in video.
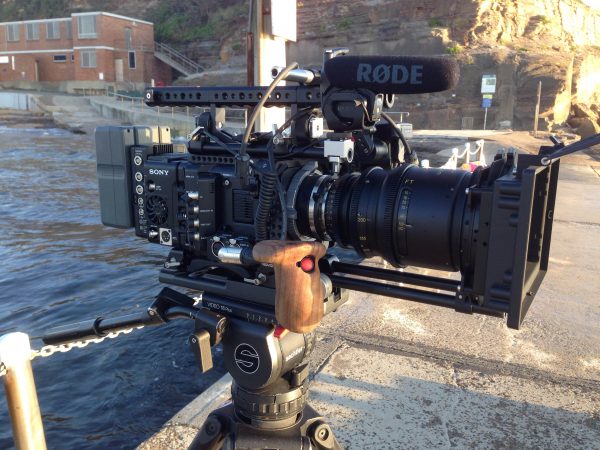
As I was on vacation I only had one lens with me, a PL 80-200mm T3. I also had my trusty Sachtler tripod and some loaner batteries – that was the extent of my kit. Sony loaned me the R5, a USB3.0 card reader and a 512GB card.
In use:
The first thing I found out is that the R5 is incredibly easy to use. You just attach it to the back of the camera, snap on a battery and turn on the camera. No cables, no complex set up and no fiddly menus. Whenever the R5 is connected to your camera it is recording either 2K or 4K 16 bit linear RAW. When mounted the R5 really does feel like part of the camera and not a bolt-on accessory.
Another great thing about the F55 R5 combination is how easy it is to switch from 4K to 2K. When changing the frame rate Sony have been smart enough to design to have the camera change down the resolution accordingly. There is no need to re-format or change memory cards when changing resolution in the R5 either. It can record 2K or 4K in regular or variable frame rates without any hassle.
Before dawn, when I first started shooting at the rock pools, it was very dark. The main difference I found to regular shooting is that in RAW your exposure index (EI) is locked at the camera’s base ISO of 1250. You can change the EI setting but this does is alter the reference image you are seeing in you viewfinder or monitor to give an indication of what the final image would look like if you pushed the ISO in post. The R5 is always recording the at the camera’s base ISO no matter what you do. I’m not going to attempt to go further into the image science of this as there are plenty of technical articles online that can explain it far better than me. Your white balance is also limited to presets.
I shot over two mornings. On the first morning I noticed that I was tending to under expose my images out of habit – after years of trying to protect the highlights. With the F55 and R5 you can comfortably over expose by two or three F-stops and recover that information later in post. I am so used to shooting my material to look as close to the finished product as possible that I had trouble re-wiring my brain to shoot RAW. Thankfully by the second morning I had managed to re-program myself to break with my old habits and expose closer to the way the camera likes it. You really have to let go and trust the camera and RAW format to do their thing.
I downloaded Sony’s RAW viewer software which is very easy and straight forward to use. When back in the edit I was amazed at the material I recorded. The image was vey filmic and had completely different look to footage recorded in XAVC. With the RAW images it wasn’t necessarily the dynamic range that amazed me most – I was expecting it to be great. It was the depth of colour information that blew me away.
This is where the 16bit colour space and the F55’s S-gammut really make a huge difference. I can see now why a lot of colourists and DP’s like using and shooting raw. The level of flexibility in post truly is spectacular. It’s at the high end of what the F55 can do that sets it apart from cheaper cameras. This makes me feel a lot better about all the money spent. To be honest if I shoot on my F55 in a regular REC709 colour space, at 50Mb/s on. this it doesn’t look that much different to any other large sensor camera. Where I really do notice thevdifference is if I shoot raw or in the SR codec in 444. For me it is the colour space that makes all the difference to your images. Like the Sony F3 I also own it becomes a completely different beast when you shoot RGB 444 in S-log2.
Shooting RAW on the F55 really was a pleasure and I was blown away by the results. The downsides are of course the ginormous file sizes and the extra work involved in post. I can do basic grades myself, but dealing with RAW and DaVinci Resolve is something that definitely takes me out of my comfort zone.
Luckily I enlisted the help of my good friend and DP Ben Allan ACS to edit and colour grade the material. I could have attempted to do this myself, but wouldn’t have gotten to see just how well the vision I shot should turn out.
Ben really knows what he’s doing when it comes to post work flow. Below are his (ed – very technical) thoughts about the quality of the footage and its gradability, using the Sony Raw viewer software and the edit process:
The format:
It’s easy to overlook the significance of Sony’s 16-bit versus the other RAW formats that are out there. Because we’re talking binary bits, each extra one creates twice as many tonal steps on each of the colour channels. So a 10-bit Cineon scan has 4 times as much tonal subtlety as an 8-bit HDCAM image and 12 bit Arri Raw has 4 times as much again. 16 bit has 16 times as many shades per channel as 12 bit Raw and 256 times as much tonal information as 8 bit video – and this is before taking into account compression or colour sampling. What this means is that less than 0.5% of the format’s tonal range has as much tonal subtlety as 8-bit video.
The RAW part means that each of the Red, Green & Blue pixels are mapped directly into those 16-bits with virtually no processing. All of that information can be accessed in post, just as if you were making the same adjustments in camera.
Grading:
I find grading nicely exposed F55 S-Log2 very much like working with scanned, 10 bit log 35mm. In fact, because S-Log doesn’t need the head & toe room that a film scan needs it actually has more digital shades to work with than traditionally scanned film in 10-bit.
In terms of workflow, dealing with the RAW files is more like working directly from the negative, but in terms of image control it’s like being able to also change the characteristics of the film emulsion in post.
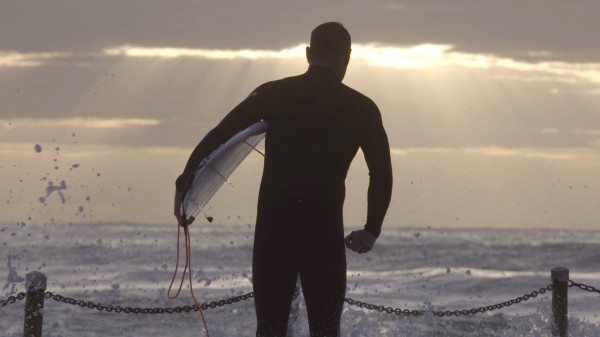
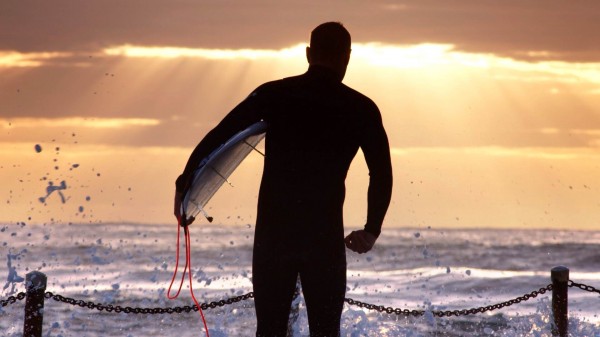
You can change the ISO, White Balance, Colorspace and Gamma as well as a whole lot of other image characteristics. Because there is so much detail in the 16-bit images it really is the same as doing it in camera. We were able to bring back a sky that was blown out against a correctly exposed foreground. Not only were we able to correct, we were then able to add dramatic amounts of shading without even a hint of banding or blocking. I found it to be as subtle and malleable as most film stock I’ve worked with – in fact more so than many.
Workflow:
Because our workflow is currently built around ProRes I decided to stick with that to get this edit done quickly. All of the RAW footage was converted in Sony’s RAW Viewer to ProRes Proxy at full 2K in REC-709, with some rough ISO adjustments for the offline edit. We then converted all of the shots used in the edit to ProRes HQ with S-Log2 & S-Gamut and with some overall ISO corrections. This was then taken into DaVinci Resolve and graded using Sony’s new S-Log2 LC-A lookup table (LUIT). This is a bit gentler and more natural than the original Sony LUT and provided a great starting point for grading.
Sony RAW Viewer:
The RAW Viewer sounds very basic but it’s actually quite powerful. If you needed to you could easily use it to do more powerful grading than you could in a photochemical film lab.
Exposure:
Because there is so much information right throughout the tonal range of the RAW files exposure becomes something much more like film than traditional digital. Where possible I would always prefer to use an incident light meter when working with a camera like the F55, there many situations like this project where it would become a real barrier to quickly capturing the footage. In these sort of situations I would be inclined to set the viewfinder to display Rec709 and just make it look as good and consistent as I could, knowing that there is plenty of latitude in the RAW files to correct in post if needed.
Based on my settings in the RAW viewer I would say that Matt rated the camera by eye at 640 ISO or one stop over Sony’s rating of 1250 ISO. As with negative film, the F55 RAW has plenty of room to rate the camera at different ISO’s to get a slightly different flavour in the image. It is nothing like traditional digital video where the last thing you want to do is overexpose at all. At 640 ISO there was still bucket loads of highlight detail and very smooth mid tones and no noise. To grade it feels very much like Kodak’s 200T.
Ben has posted several versions of this project so that you have a good reference as to what is achievable in post. You can see them all at the theFilmbakery.com.
Final Thoughts:
For a colorist and cinematographer 16-bit RAW is lovely, but so is properly shot S-Log 2. With my other hat on as a producer, I love it. It’s peace of mind that just about anything that could go wrong with camera settings can be completely fixed in post with a mouse click.
When Ben sent me the link to the finished product I was blown away. It just goes to show that in the right hands the results can be very impressive to say the least. If you are going to shoot something like 16-bit linear RAW there is a good chance the budget is going to allow for a professional colorist to work on it. This kind of work is where shooting RAW is a really great option. For smaller budgets and projects where one has to do it all yourself it’s less of an advantage. You really need to be very proficient as a colorist and have great skills in post workflow if you plan on shooting RAW. Just because I got some fantastic images doesn’t mean I’m going to run out and start shooting everything in RAW. The project, time you have, budget and proficiency of the people you work with really should dictate whether you even consider raw in the first place.
The F55 and R5 are a very impressive combination and they truly are spectacular when working in harmony. Ease of use, coupled with impressive results makes for a winning combination for RAW work.