Lupo may not be a name you’re familiar with, but major broadcasters around the world including FOX, CNBC, SKY and MTV have been using their lights. The Italian company has been around since 1932, and back in the 1990’s Lupo started production of new fluorescent lights for use in the photography and television market. They expanded into LED technology and today they have a range of LED lighting solutions available.
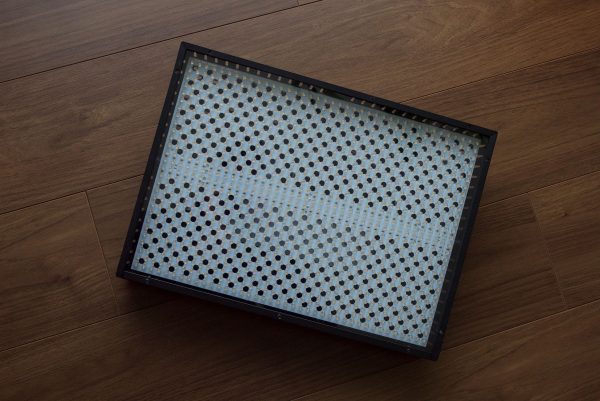
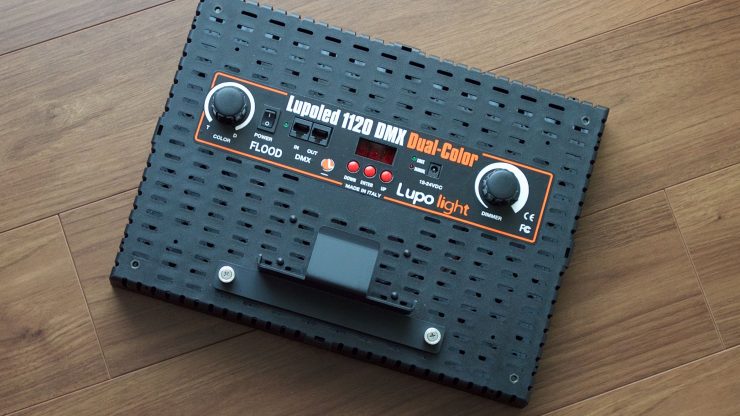
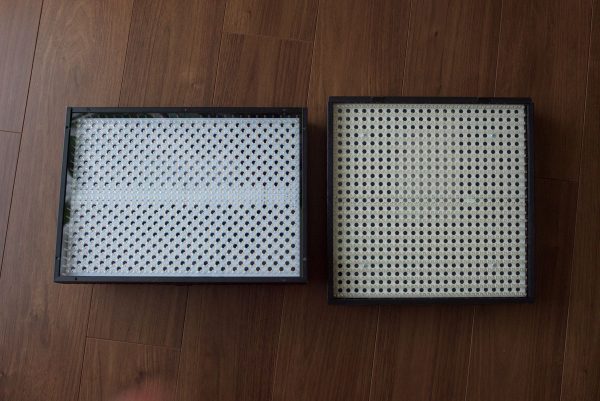
One of these lights is the LUPOLED 1120 DMC Dual Colour, which at first glance looks very similar to the vast array of 1×1 style LED panels available on the market. The Lupoled 1120 hasn’t been designed in the traditional 1×1 square shape though – it is wider than it is tall. This has been done on purpose and the idea is that if you’re shooting in a 16:9 aspect ratio the light source is more spread out across your frame.
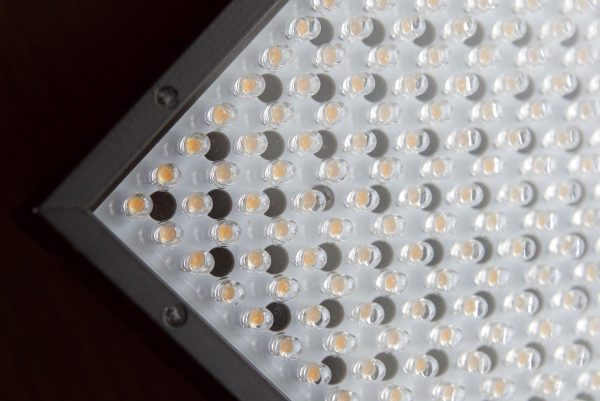
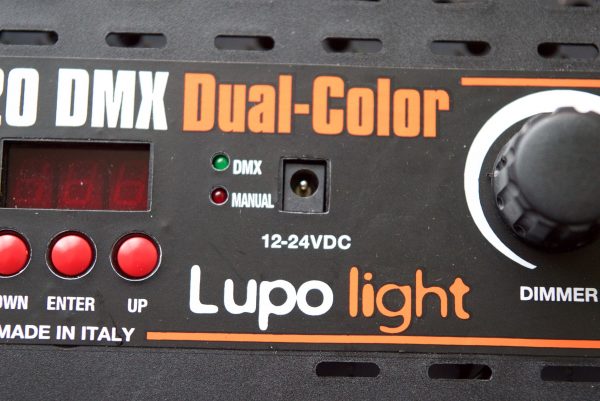
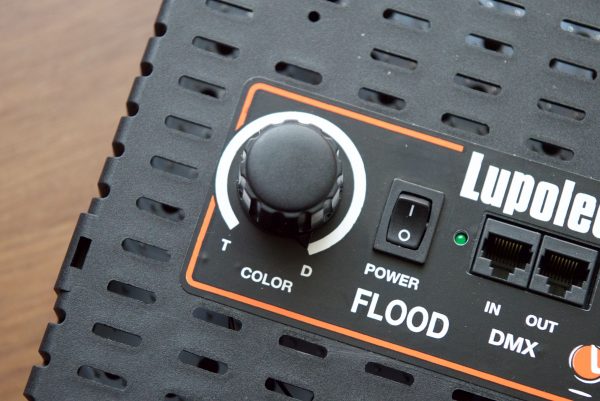
As its name suggests the 1120 consists of 1120 LEDs and is colour temperature controllable from 3200K to 5600K. ½ of them are 5600K daylight balanced and the other ½ are 3200K tungsten equivalent balanced. So as you fade from one set to the other the power output stays constant and so does the light output level. All that changes is the colour of the light. Making changes can be done using an onboard dial, buttons, or via DMX. You also get a visual readout on the back of the panel showing you what the colour temperature is set at.
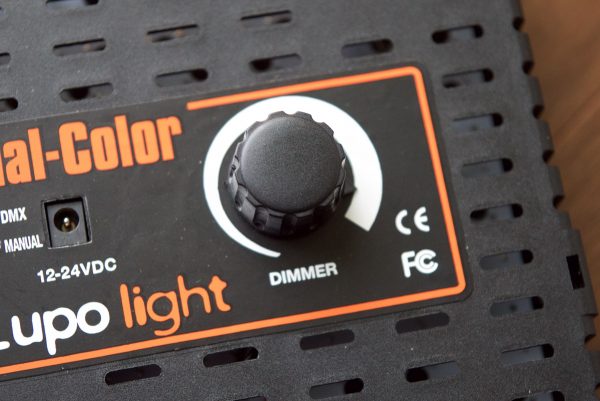
The brightness of the light can also be adjusted from 0-100%, but I did find that the light doesn’t seem to come on until you have moved the dial to around 10% of its rotation. The thing I didn’t like is you can’t see a visual percentage of the brightness of the light when you adjust the dial. I would have liked to have the unit display this as soon as I touch the brightness dial instead of it just displaying the colour temperature. There is a workaround for this if you go into the menu settings where you can adjust the light using an up and down button, only when you do this can you see a brightness reading.
Build quality wise the light is very similar to most other 1×1 panel style LED lights. For shooters who travel a lot and need something light, the 1120 weighs in at 1.4 Kg (3.08lb). This is one of the best features of the light, and this low weight makes it easy to use with smaller and more compact light stands. As a comparison the Litepanels Astra bi-Colour weighs substantially more at 3.2 kg (7.0lb). Despite its low weight the 1120 still feels well made and durable although how it would stand up over a long period of daily use remains to be seen.
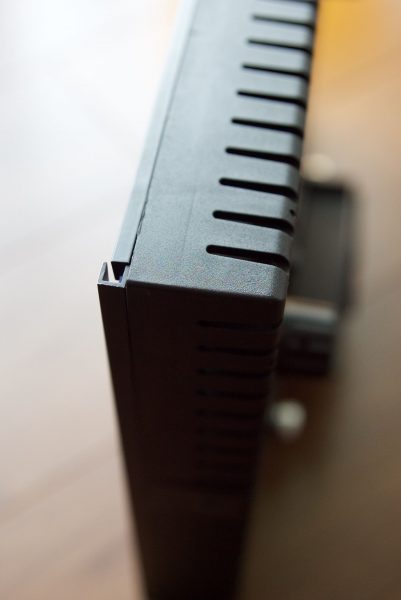
Size wise it is very convenient to transport and the light’s 16×9 profile makes it very easy to fit inside smaller pelican cases such as the 1510, but you would have to remove the yoke support to do so. You could also manage to squeeze it inside a backpack if you needed to be even more portable.
Photometrics
Lupo claim a CRI> 94 and a output of 3340lx at a distance of one meter. I used a Sekonic C-700 to put these claims to the test and to also look at how colour accurate the light was across its kelvin range and how well it was able to replicate skin tones.
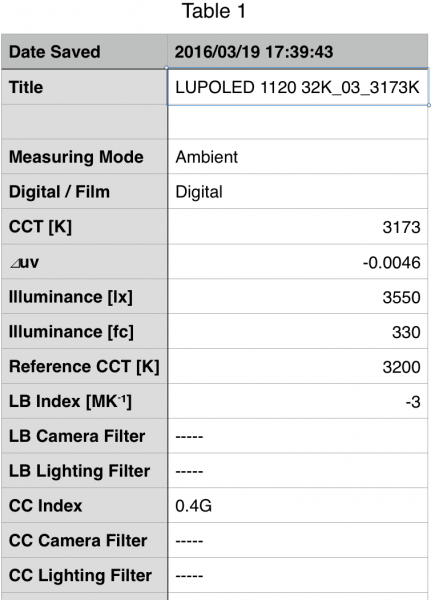
The table above shows the measurements for output and colour temperature accuracy when the light was set at 3200K at full output. The readings were taken in a controlled environment at a distance of one meter. As you can see the light performed pretty well in this category, and even with a slight 0.4G CC Index reading, this wasn’t enough to have to worry about using any type of colour correction gel. In terms of illumination the light read 3550lx which was higher than Lupo’s quoted specification.
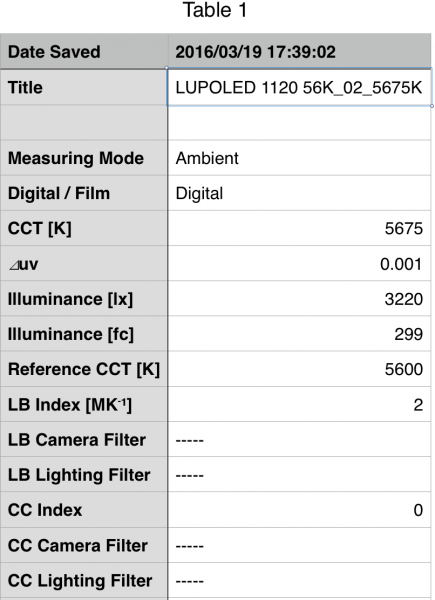
The readings above are measurements for output and colour temperature accuracy when the light was set at 5600K at full output. The readings show an improvement when using the light at 5600K compared to 3200K. The light was extremely colour accurate, reading 5674K, and it had a CC Index reading of 0. Output-wise the light measured 3220lx, which was lower than what it registered at 3200K, which was a little surprising.
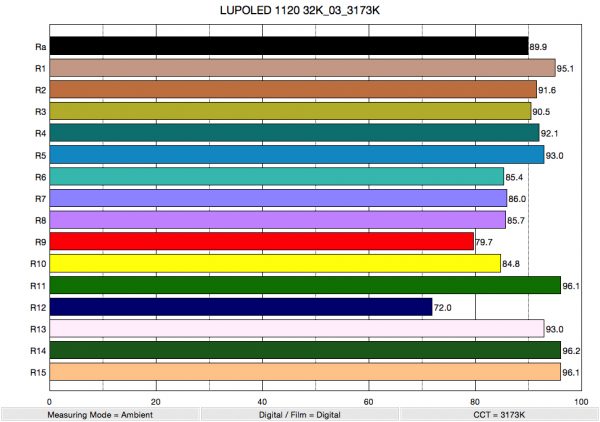
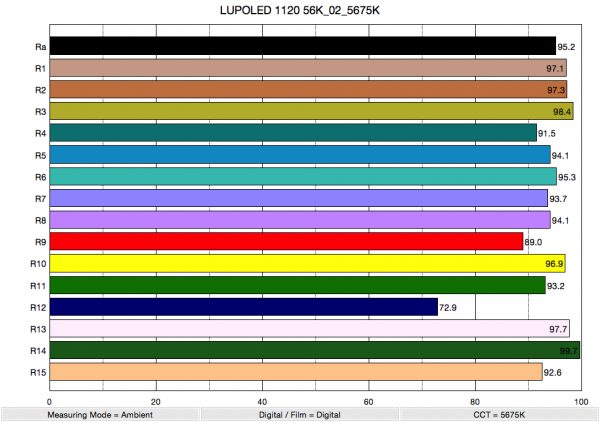
As I have mentioned in previous articles, a light’s CRI rating can be a little deceiving and doesn’t give you a true indication of how well it can replicate skin colours. CRI only samples the colours R1-R8, which don’t include the colours that best represent skin tones. On the tables above the key results to look at are R9 (red), R13 (best representation of caucasian skin tones), and R15 (best representation of Asian skin tones). From the results the light looks to perform slightly better at 5600K than 3200K. At 5600K it had a average CRI (R1-R8) of 95.2, but most importantly it scored very well in R9, R13 and R15. As far as tests go, the Lupoled 1120 performed very well and meets and in some cases exceeds the manufacturer’s specifications.
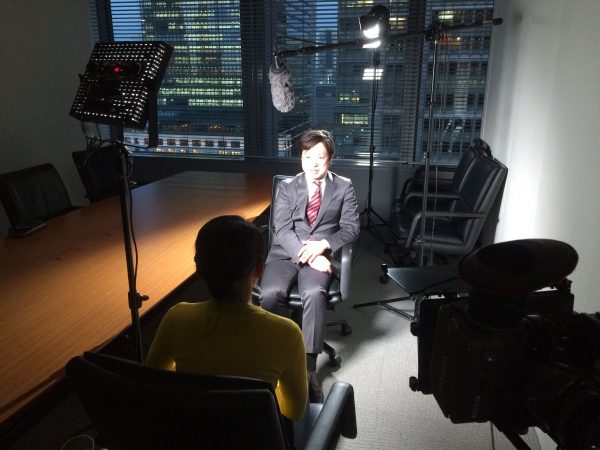
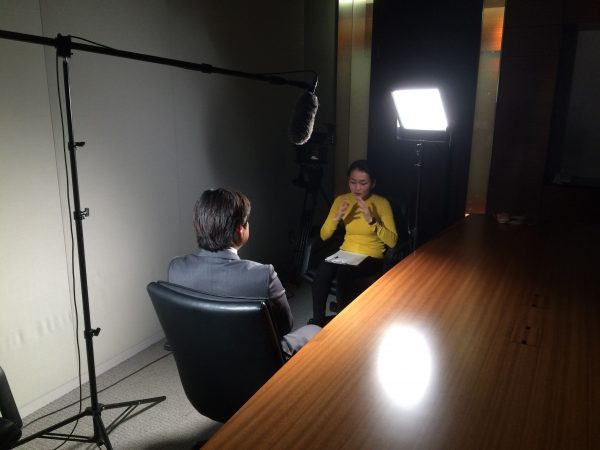
Specifications and test results can tell you a lot about a light, but they can’t tell you how the light actually looks in the real world. The only way to do this was to take it out and use it on an actual job. This way I could see how it performed in a uncontrolled environment. I often work solo and have very little time to set up interviews. I am also often faced with less than ideal environments to shoot interviews in. In Japan you often have to film your subject in a tiny room where you have little space to position lights. For the first interview I used the light for, this was exactly the scenario I encountered. The room was was about three meters (9.84ft) by two meters (6.56ft) and was filled with furniture. This left me with very few options in terms of where I could place the talent and the lights. I also only had five minutes to set it up. The room was so small that I had to place the tripod and camera outside in the corridor and shoot back into the room. If I didn’t do this I would have been within a meter of the talent. Below you can see a short clip from the interview. This was a very basic lighting setup. One key light (the 1120) and one back light (a Lupoled DAYLED 1000). I took advantage of the office window and kept the talent’s desk light on to help add a bit of depth.
The whole interview was a compromise, so it was a good chance to see how the light performed as a key light in a real world situation. Unfortunately the loaner light from Lupo didn’t include any optional extras such as softbox or barn doors, so I had to use the light as-is. While the light source still managed to look OK, it could have used a soft box and egg crate to help control and diffuse the light source. Lupo do make a diffuser panel for this light and it would have been interesting to see what type of results I could have achieved with that. To my eye without diffusion the light looked very flat and didn’t wrap around the subject. You can also see some of the harsh lines the light is creating on his forehead from not using any type of diffusion. On the positive side the light was able to replicate the subject’s skin tones pretty well.
I usually use a remote phosphor light with a soft box and egg crate as my key light and I wouldn’t recommend using any type of LED panel without diffusion. I just don’t like the way all those tiny little LEDs produce multiple point sources. This doesn’t just go for the 1120, my recommendation would be the same regardless of what brand you are using.
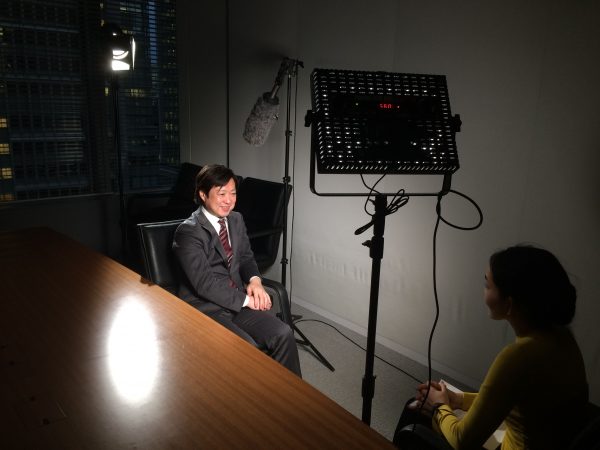
In this second example you can see a similar result. The light really needed to be diffused to create a much softer source. Without diffusion you get a very flat looking subject. You will notice just how different this subject’s skin tone is compared to the previous one.
This room was at least a lot more spacious and you can see this basic two light set up above. Again this interview was for a news program and had to be set up and filmed in a very small amount of time.

The light’s operation is fairly straightforward until you try to use the menu system. Whoever designed it needs to go back to the drawing board as it is the most complicated and hard to figure out lighting menu system I have ever come across. When I first turned on the the light I pressed the enter button and then the up key and suddenly lost all control of the lights dimming and colour temperature controls. The worst part was I couldn’t work out how to return it to normal operation. When I consulted the instruction menu it was equally as confusing. Here is what the instruction menu says word for word. Control Of Colour Temperature And Of Luminous Intensity Via The 2 Knobs– “Using the buttons UP, DOWN and ENTER, set F1, F2, F4, F5 on L and set F3 on H.” Equally as confusing is the Control Of Luminous Intensity Via Up And Down Buttons-“Using the buttons UP, DOWN and ENTER, set F2, F3, F4, F5 on L and set F1 on H.”
This is all impossible to remember and you need to carry around the instruction manual with the light at all times. I am not sure why it needs to be so confusing and it really makes changing some basic settings overly complicated.
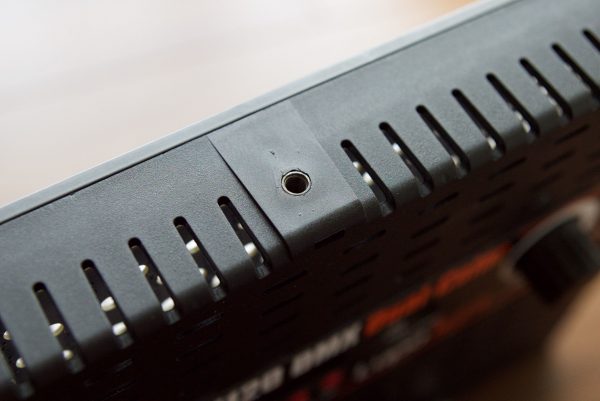
The light has a consumption of just 38W and power wise you can run the light off mains power (100-240V 50-60Hz) or via a optional V-mount battery plate. Lupo also make their own proprietary V-lock battery (95Wh) that they claim can run the light at maximum brightness for three hours. They don’t seem to make any Anton Bauer battery plates for you to use as an alternative. There is however a D-tap power cable that is available so you could run the light off a power source that features that connection.
The light runs without any noise and doesn’t generate any heat, which makes it very suitable for interview situations or filming in quiet locations. Lupo also claim that the 1120 is flicker free, but they don’t specify up to how many frames per second.
The Lupoled 1120 is a bit of a mixed bag. On one hand the light is colour accurate and very bright for its size, but on the other the menu operating system is overly complicated and just downright confusing. I would have liked to have tested the light with a softbox and some diffusion to see how much better it could have performed. There is no question that the light is very versatile and reasonably priced at around $1150 US, but it faces very tough competition in an already crowded LED panel marketplace.